Tools Inside Blue Pill
Various tools and how to access them inside the Blue Pill
- API Endpoints
- Check Device Core for Unused Parameters
- Engineering Menu
- Experiments
- Hardware Calibrator
- History View
- HW Event Log
- Internal Processes Stats
- mDNS Services
- Ping Tool
- Tools Page
- Using a USB Network Adapters or LTE modems
API Endpoints
The Blue Pill system manager provides multiple API endpoints, that can be triggered by simple http requests. This can be useful in advanced scenarios, where external systems should trigger changes on a panel.
This is an advanced topic and basic knowledge of HTTP commands and control API's is expected.
Monitoring Package Status
The status of a package can be enquired by the following call.
This requires a POST request to the endpoint: /api/controlpackage/[package_name]
Curl example:
curl 'http://192.168.0.20/api/controlpackage/core-bmd-atem' \
-H 'Content-Type: application/json' \
--data-raw '{"Action": "status"}' \
--insecure
(if authentication is enabled it needs HTTP BasicAuth as well with username and password)
This will return a json response, like this:
{"Status":"ok","Data":{"runState":true,"startOnBoot":false,"packageHasControl":true,"ingressPath":"","inMenu":false}}
Switching Reactor Projects
Reactor allows to switch the current project via an external HTTP POST request.
The endpoint used is: /reactorapi/selectproject
This request allows to use the skaarOS authentication via HTTP Basic Authentication (Use the latest version of system-manager to allow this (v1.0.1-pre1 and higher))
Curl example:
curl --location --request POST '192.168.0.20/reactorapi/selectproject' \
--header 'Authorization: Basic YWRtaW46c2thYXJob2o=' \
--header 'Content-Type: application/json' \
--data-raw '{"Filename":"MyProject"}'
Toggle Raw Panel Mode
Raw Panel Mode can be enabled/disabled on a Blue Pill inside panel.
This requires a POST request to the endpoint: /api/setrwpconfig
Curl example:
curl 'http://192.168.0.20/api/setrwpconfig' \
-H 'Content-Type: application/json' \
--data-raw '{"Activate":true}' \
--insecure
Toggle Package Status
A package running on a Blue Pill device, can be started or stopped by a API call.
This requires a POST request to the endpoint: /api/controlpackage/[package_name]
Curl example:
curl 'http://192.168.0.20/api/controlpackage/reactor' \
-H 'Content-Type: application/json' \
--data-raw '{"Action": "start"}' \
--insecure
(if authentication is enabled it needs HTTP BasicAuth as well with username and password)
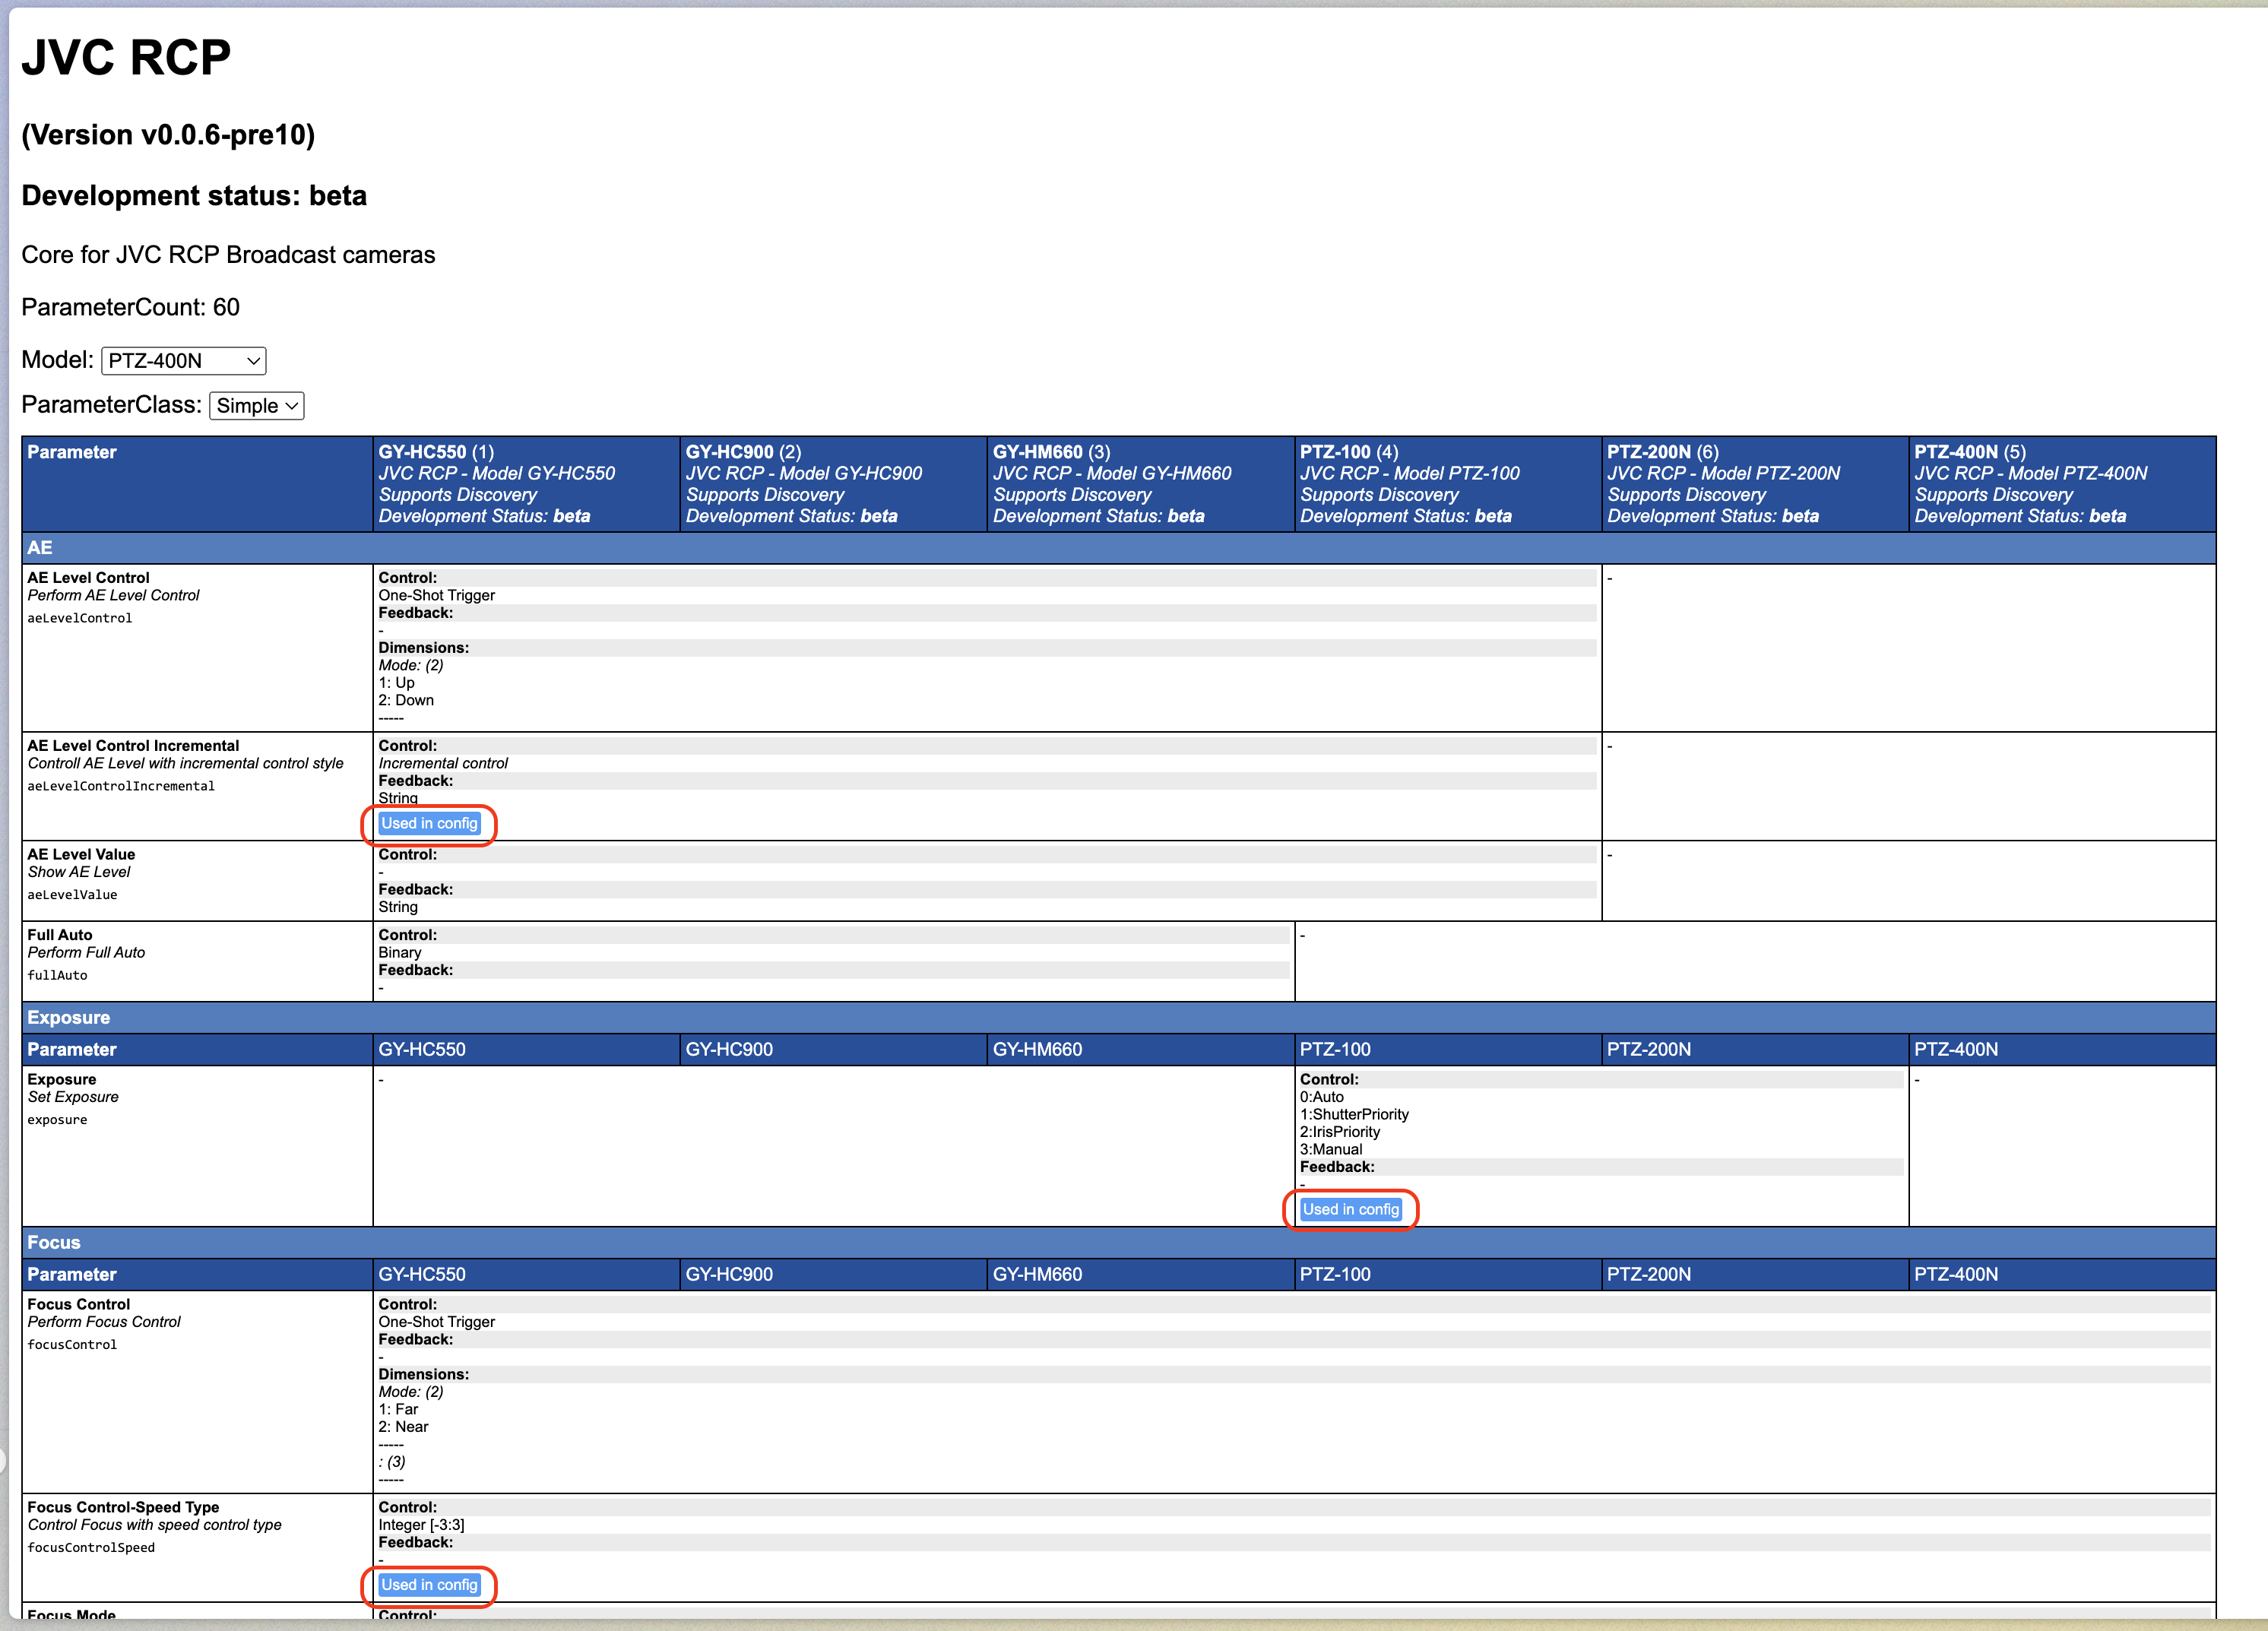
Check Device Core for Unused Parameters
If you have a Config, and would like to know what parameters aren't mapped to a config, is that easy to check in Reactor after version 2.0.2.
Open Home Screen of Reactor
Click the Device Core settings: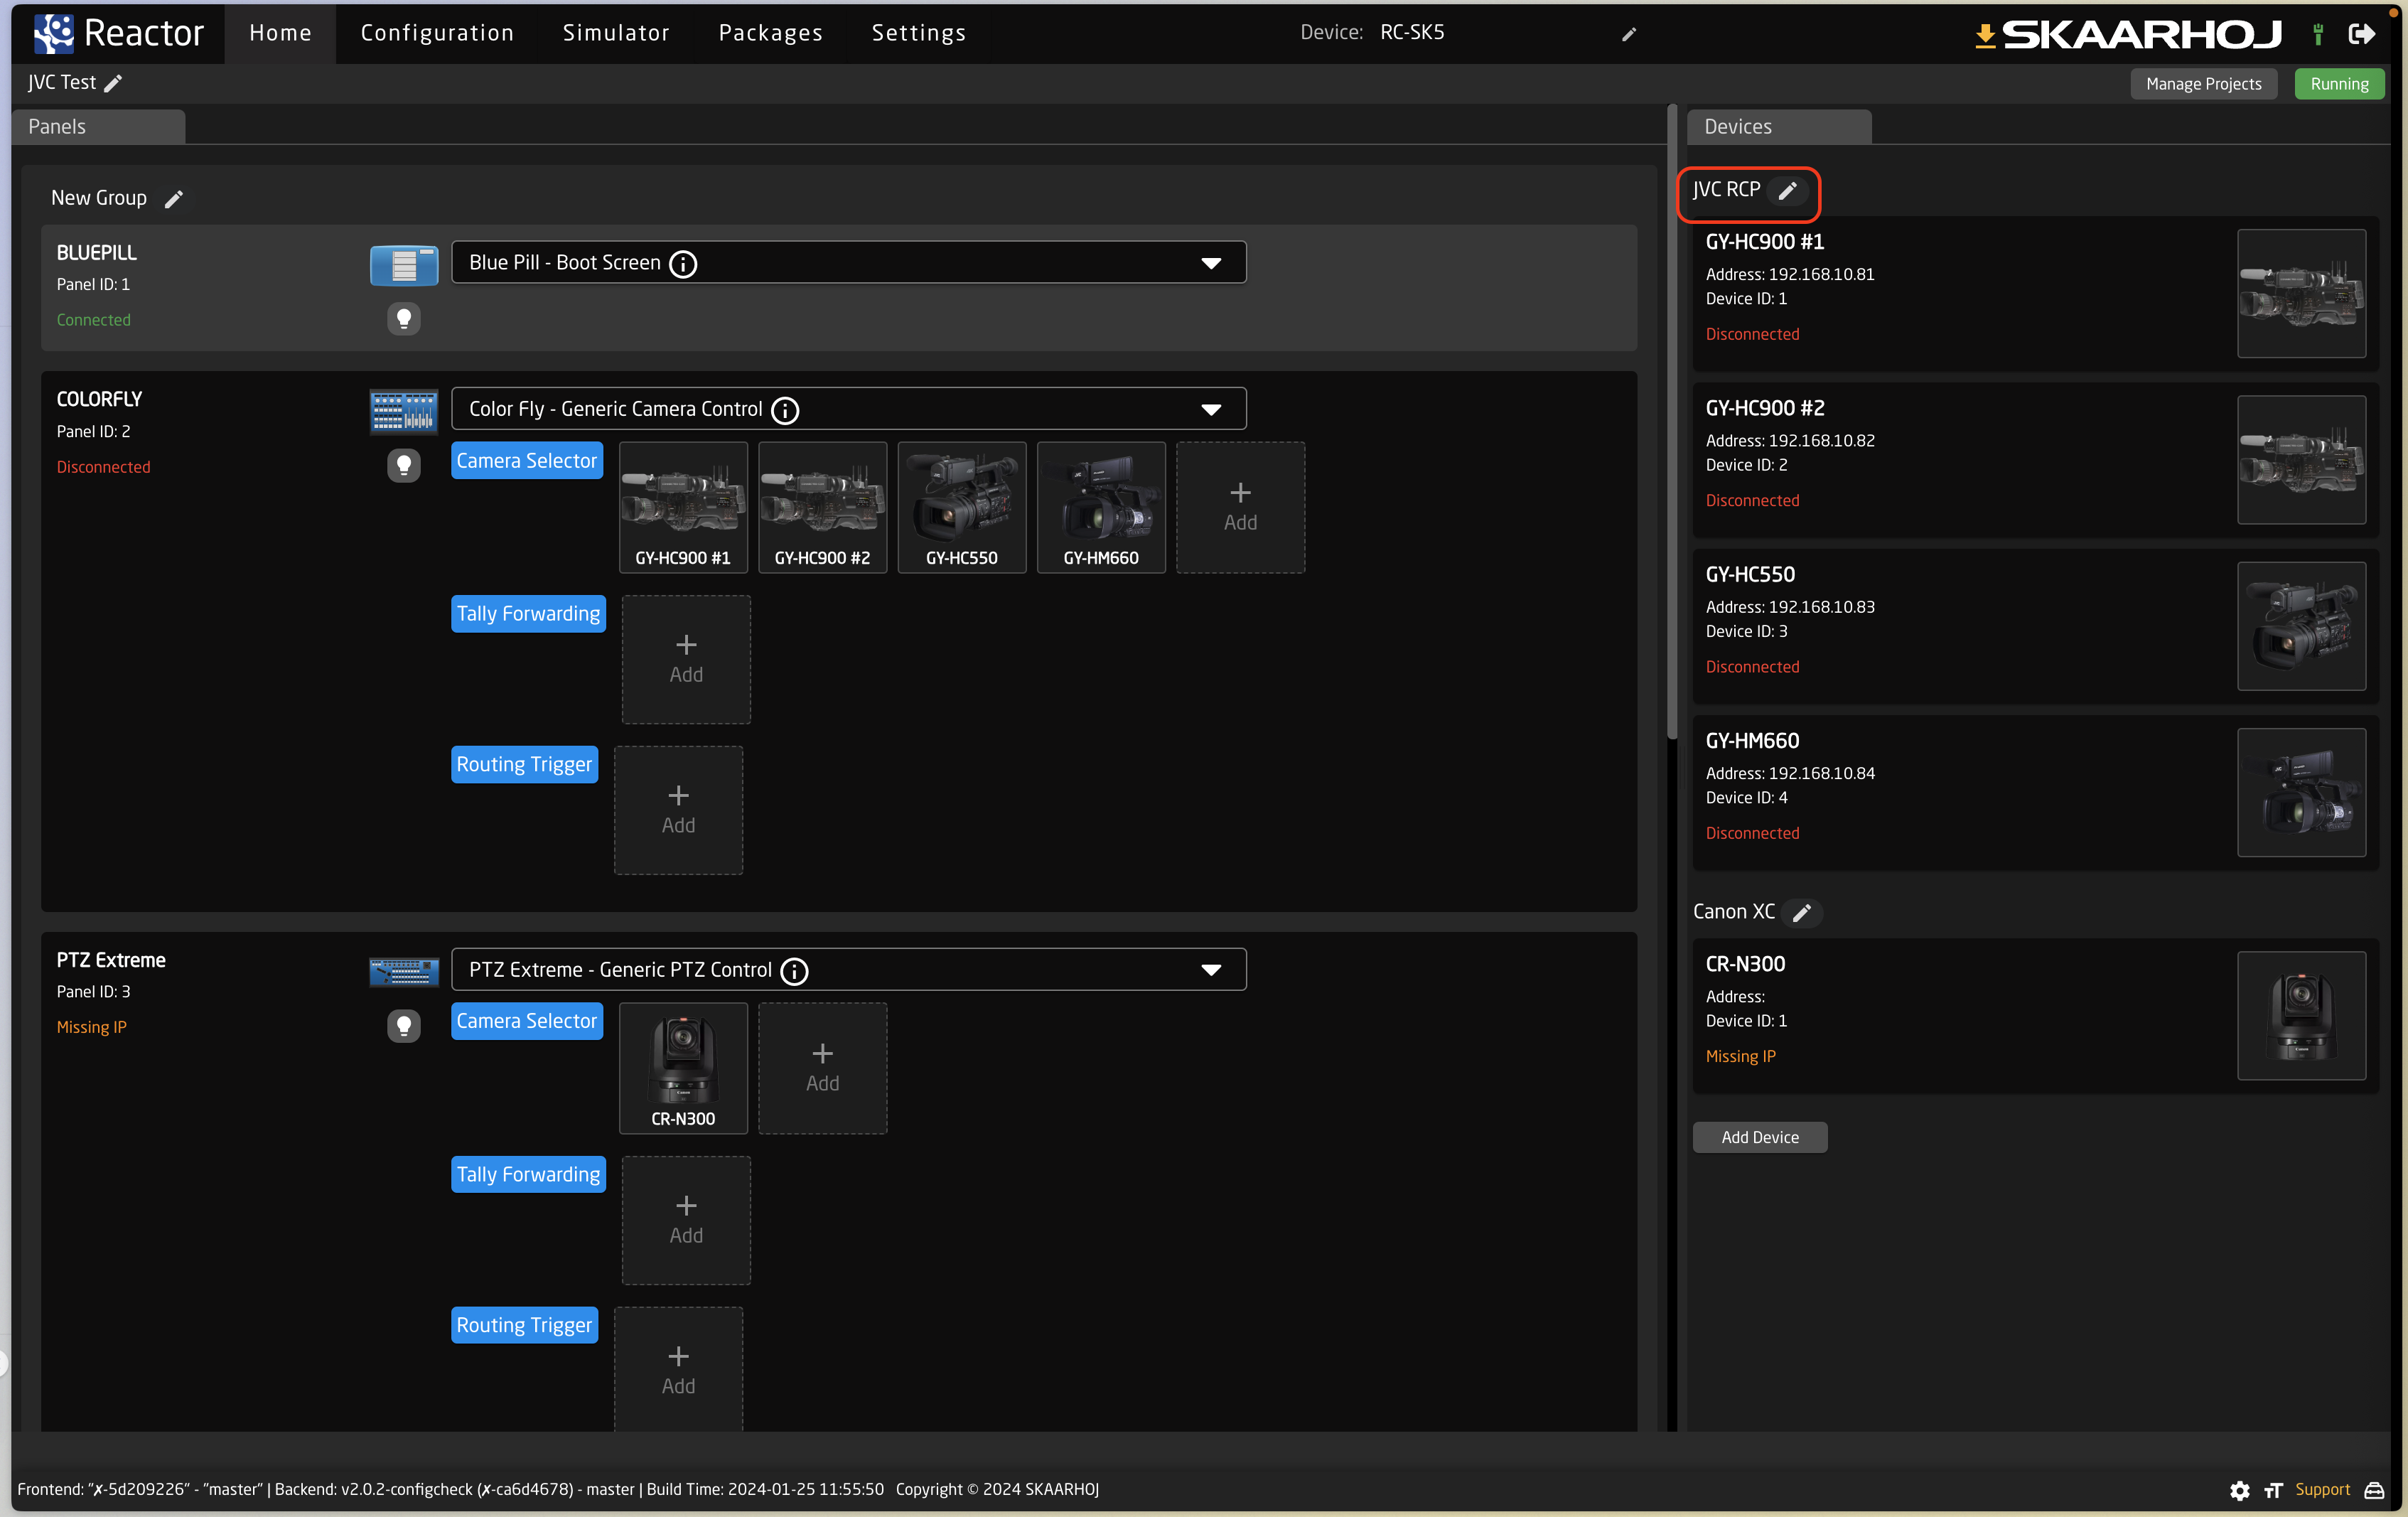
Open Parameter List: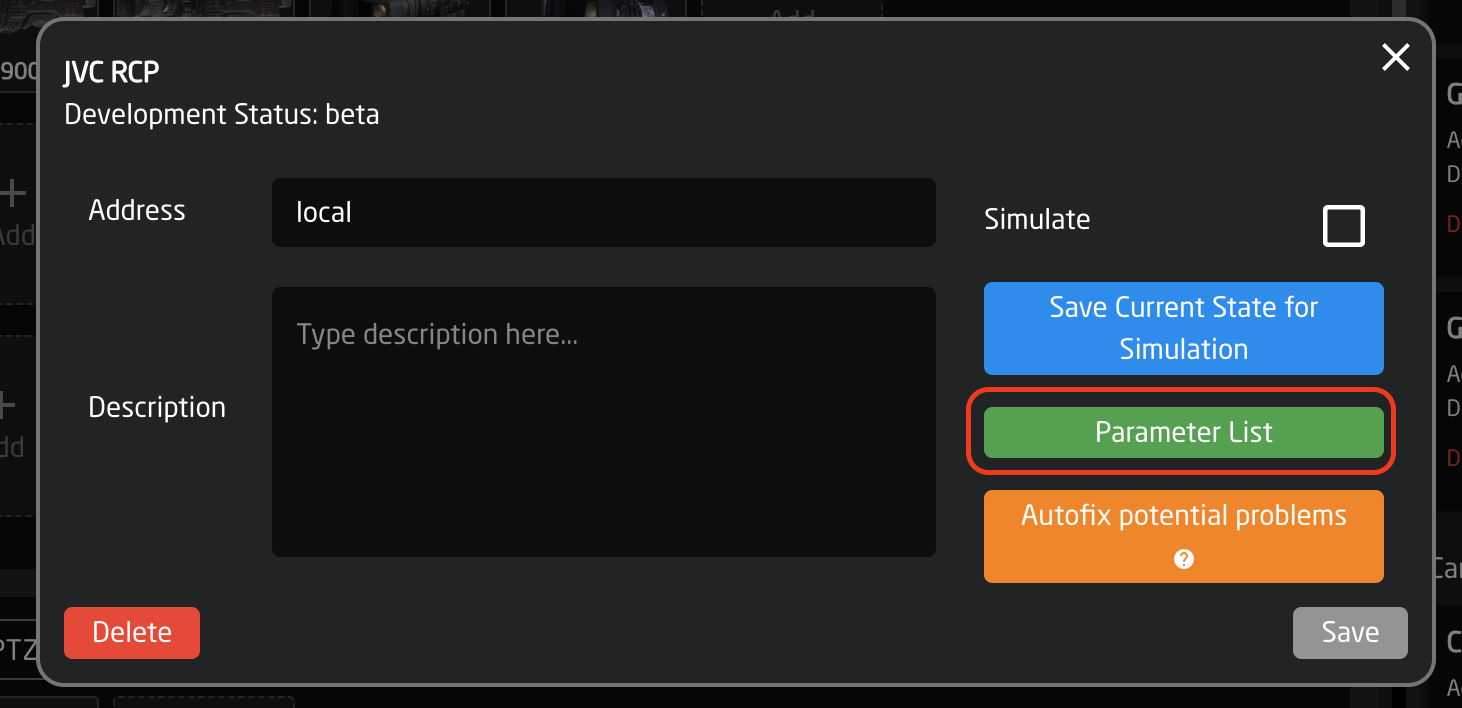
Add "?configcheck=true" after the address: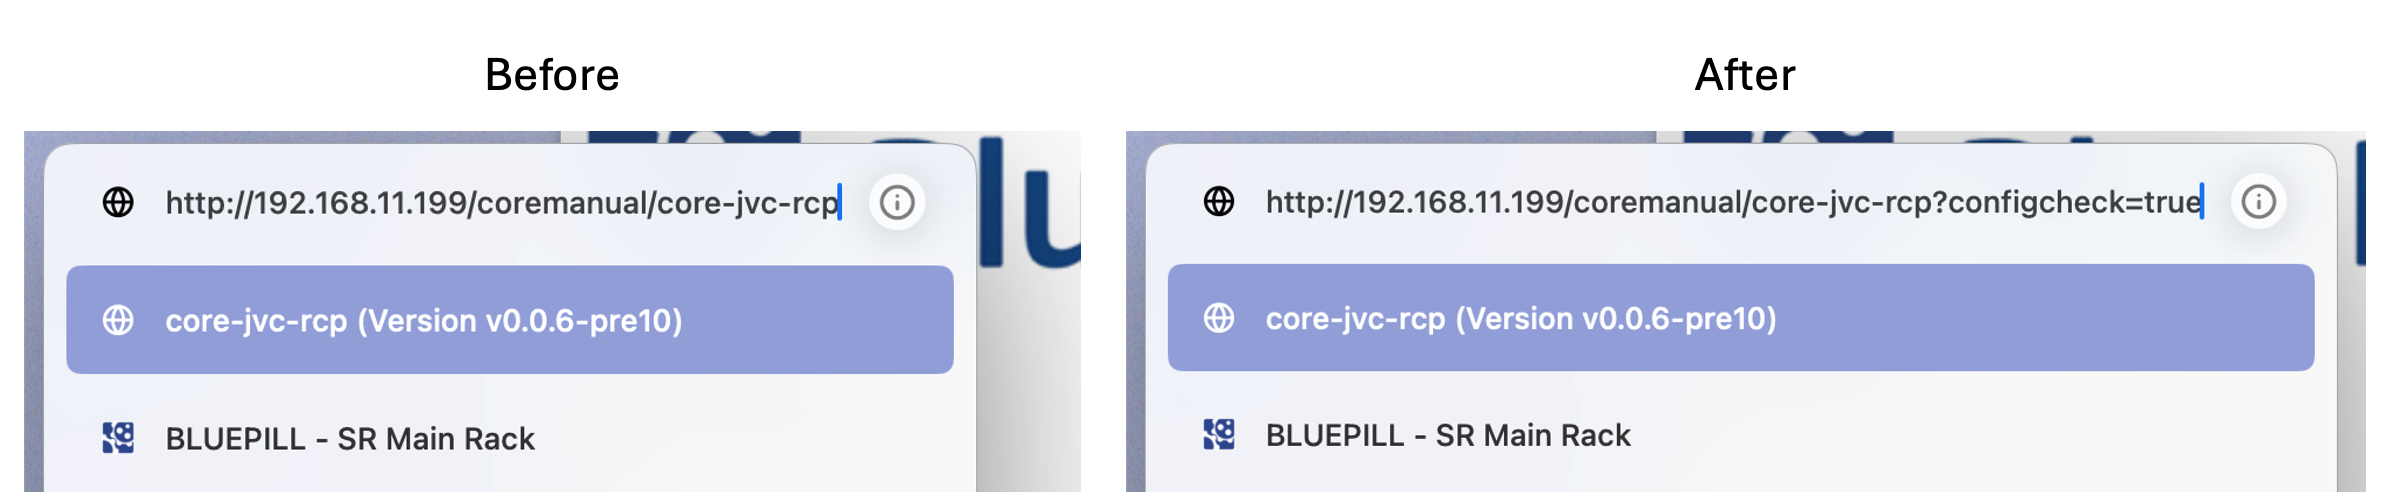
Now the parameter list shows what Parameters are added to the config, and who isn't:
Engineering Menu
This documentation might be outdated. Please consult the Reactor manual at https://docs.skaarhoj.com/3_configuration/default-configurations.html#engineering-menu
It can be accessed in different ways based on the panel, and chosen configuration.
How do I know which method my configuration is using?
Here we have listed the different 'panel configurations' that have the engineering menu.
Remember this is a list of configurations. So the specific panels named here, only have access to the engineering menu, when the loaded configuration contains such menu. This also means that you will find panels not named here, that can also access an engineering menu. To find the exact method used in your panel config, you can navigate the list here, and try methods that is in correspondence with your panel type.
Method 1 - Camera selector
This technique is used for panel configurations that has a camera page button or a combo menu button, that both cycle camera pages and the menus.
How to activate
Press and hold the top edge of the 'Page' button A for a few seconds
Examples of models using this method:
Listed here is 4 panels that have support for a configuration, that have an engineering menu accessible the same way. Remember this is just examples, and that this method is not exclusive to these 4 panels.
PTZ Wiz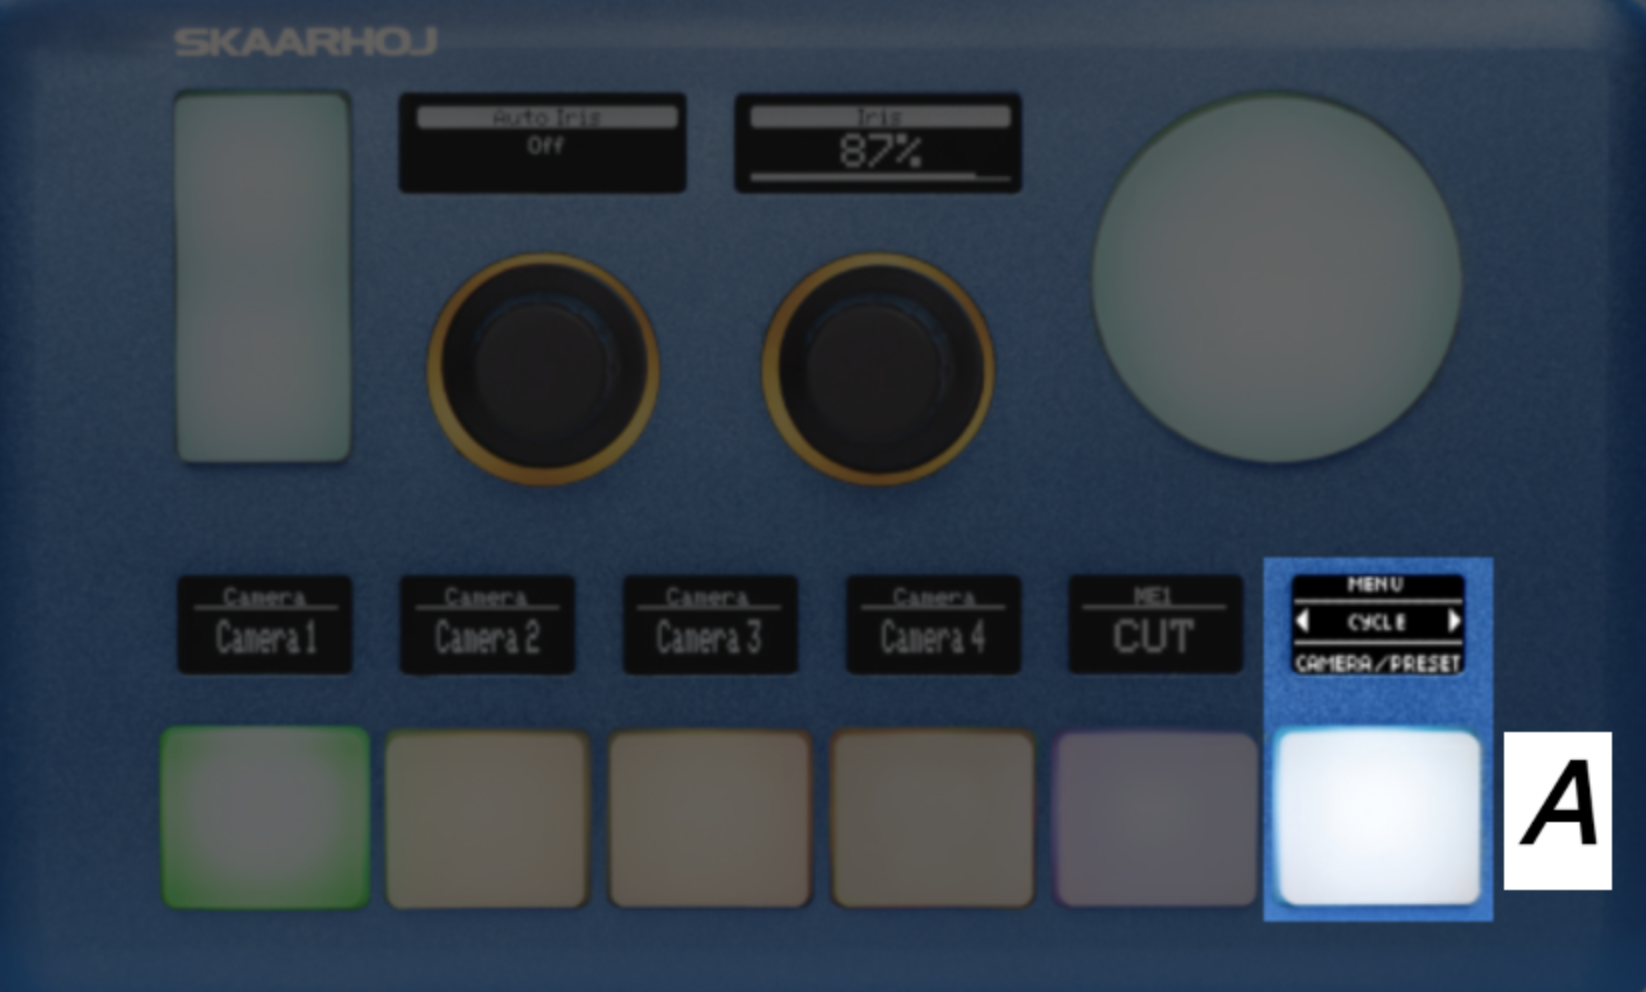
PTZ Fly
Rack Control Uno
Inline 22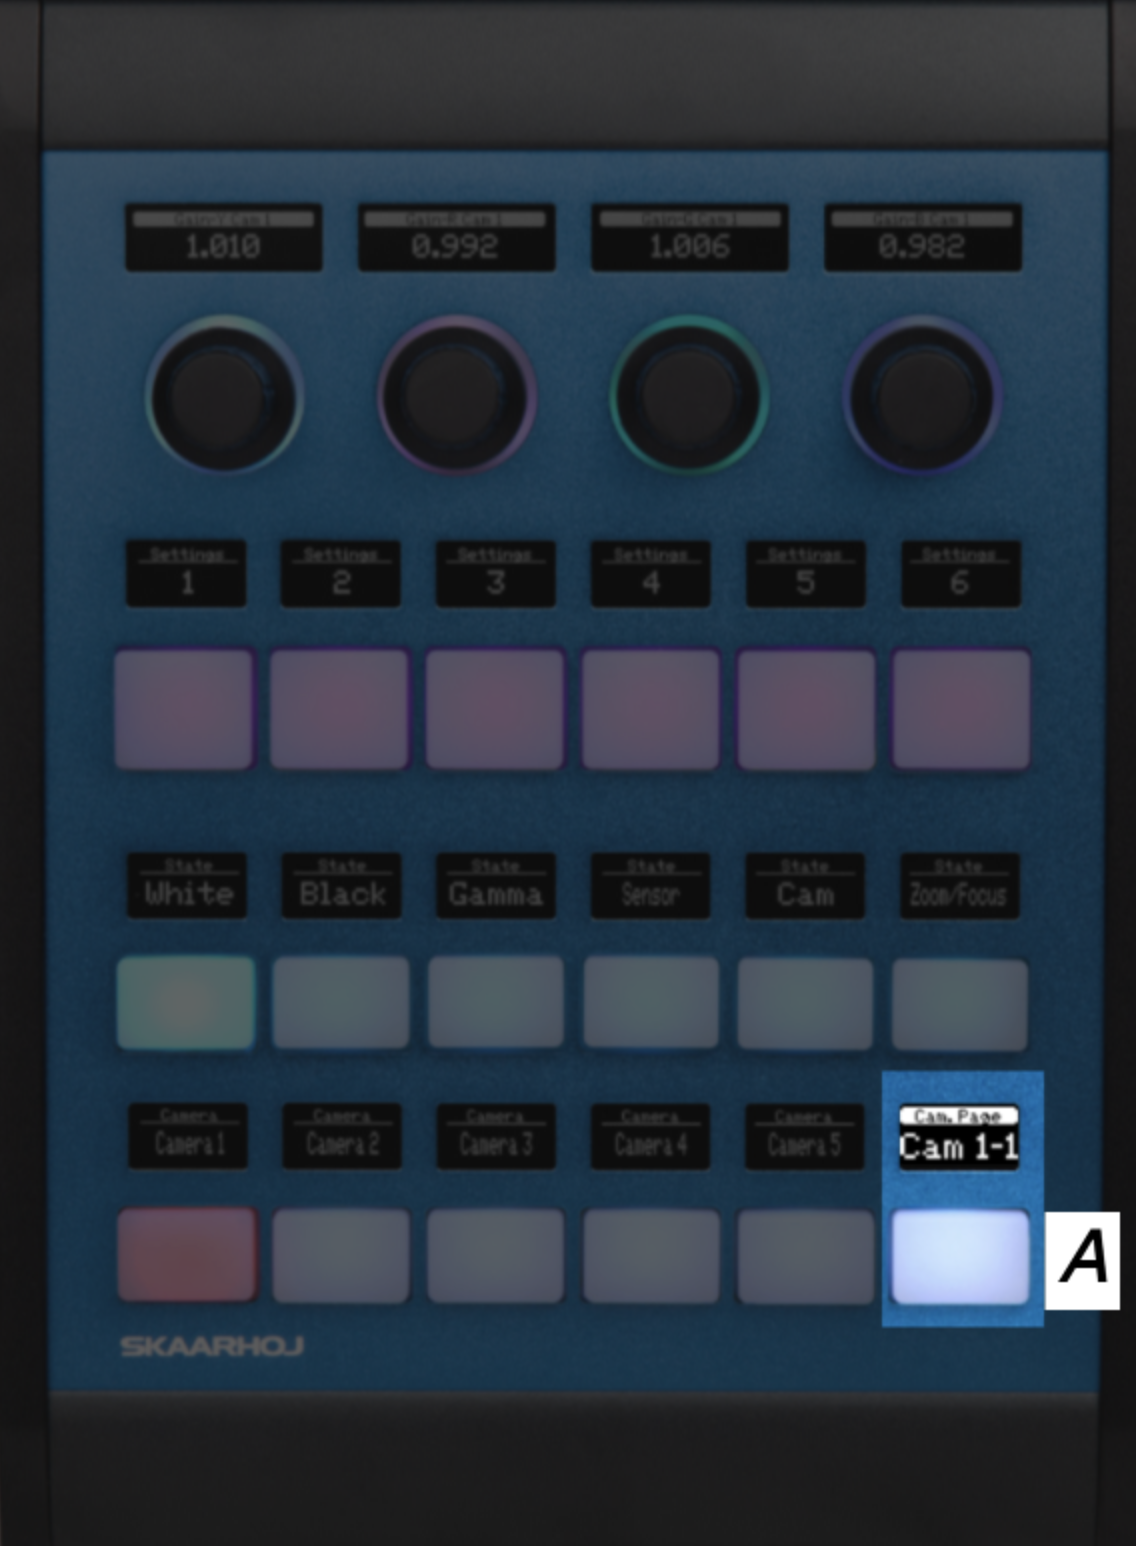
Method 2 - PTZ Pro
This technique is used for PTZ Pro only.
How to activate
Press and hold U4 A for a few seconds
Examples of models using this method:
This method is exclusive to the panel showed below
PTZ Pro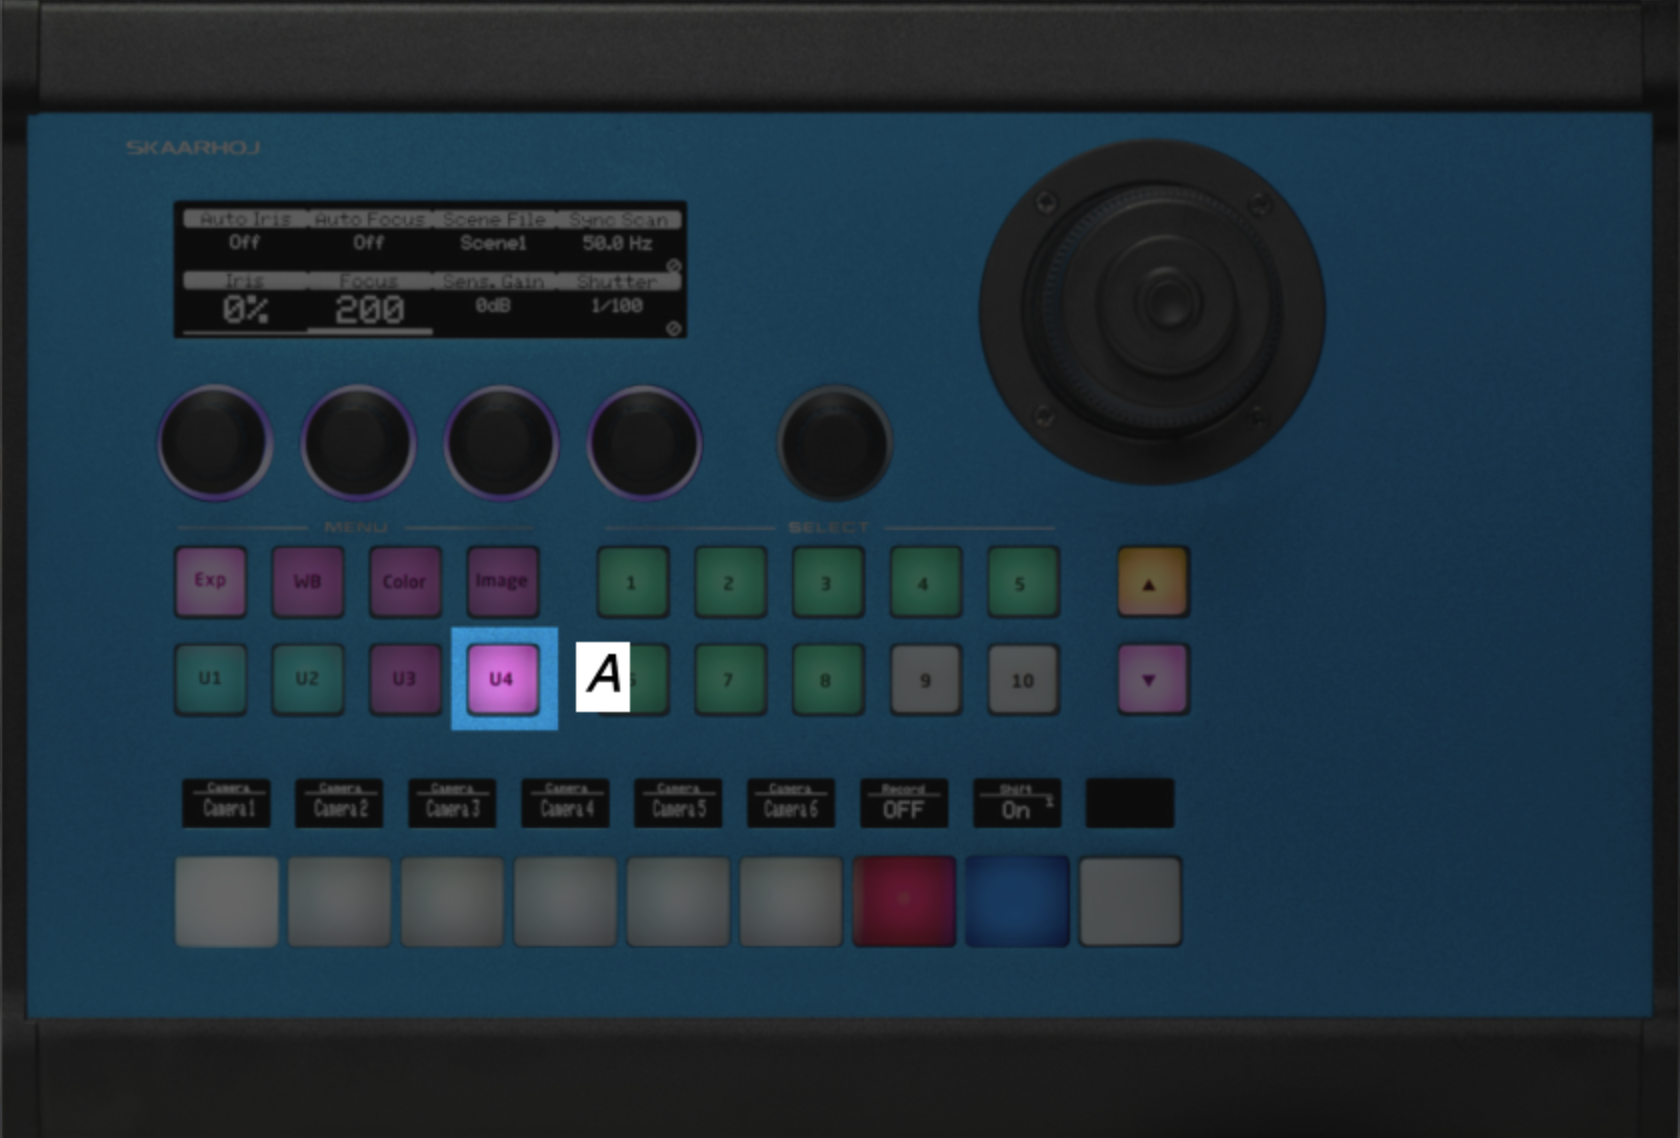
Method 3 - PTZ Extreme
This technique is used for PTZ Extreme only.
How to activate
Press and hold U4 A for a few seconds
Examples of models using this method:
This method is exclusive to the panel showed below
PTZ Extreme
Method 4 - RCP
This technique is used for every RCP panel (with config: "RCP - Generic PTZ Control").
How to activate
Step 1) Press and hold the 'Shift' button A
Step 2) Now press the 'Panel lock' button B to enter the engineering menu
Examples of models using this method:
Remember this is just examples, and that this method is not exclusive to this RCP panel only, but all RCP models, with the config "RCP - Generic PTZ Control".
RCPv2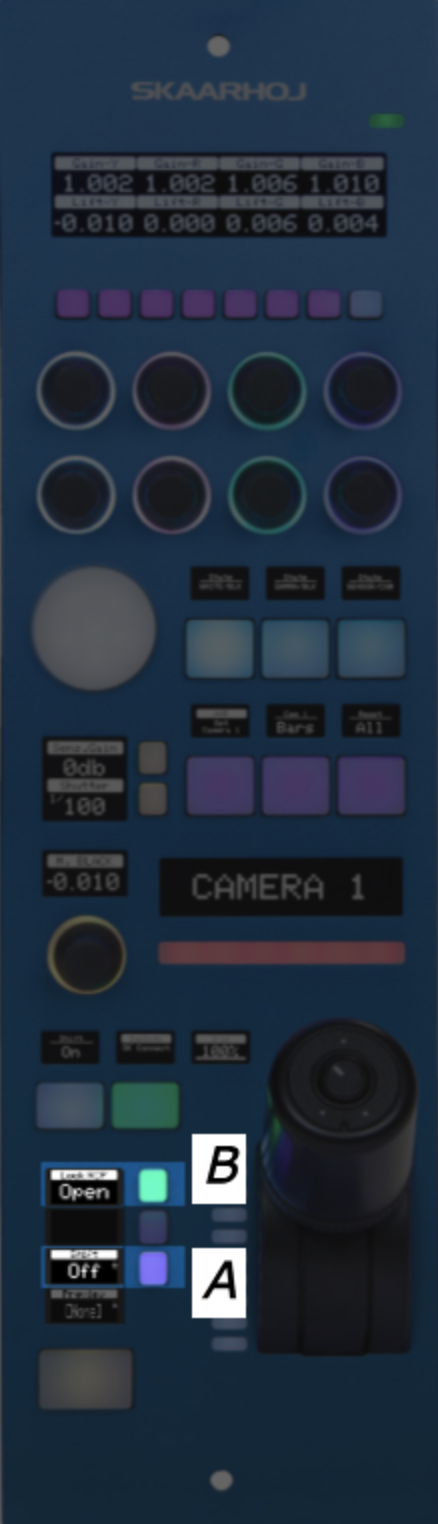
Method 5 - MEGA Panel
This technique is used on panel MKT1B and MKT1A
How to activate
Step 1) Press 'Menu' A to make the settings button appear
Step 2) Press 'settings' B to enter the engineering menu
Examples of models using this method:
This method is not exclusive to the panel showed below, but also MKT1A.
MKT1B
Method 6 - Switcher Selector
This technique is used for panel configurations in the switcher class.
How to activate
Step 1) Press 'Shift' A to make the FTB button light green
Step 2) Press 'FTB' B to enter the engineering menu
Examples of models using this method:
Listed here is 3 panels that have support for a configuration, that have an engineering menu accessible the same way. Remember this is just examples, and that this method is not exclusive to these 3 panels.
Airfly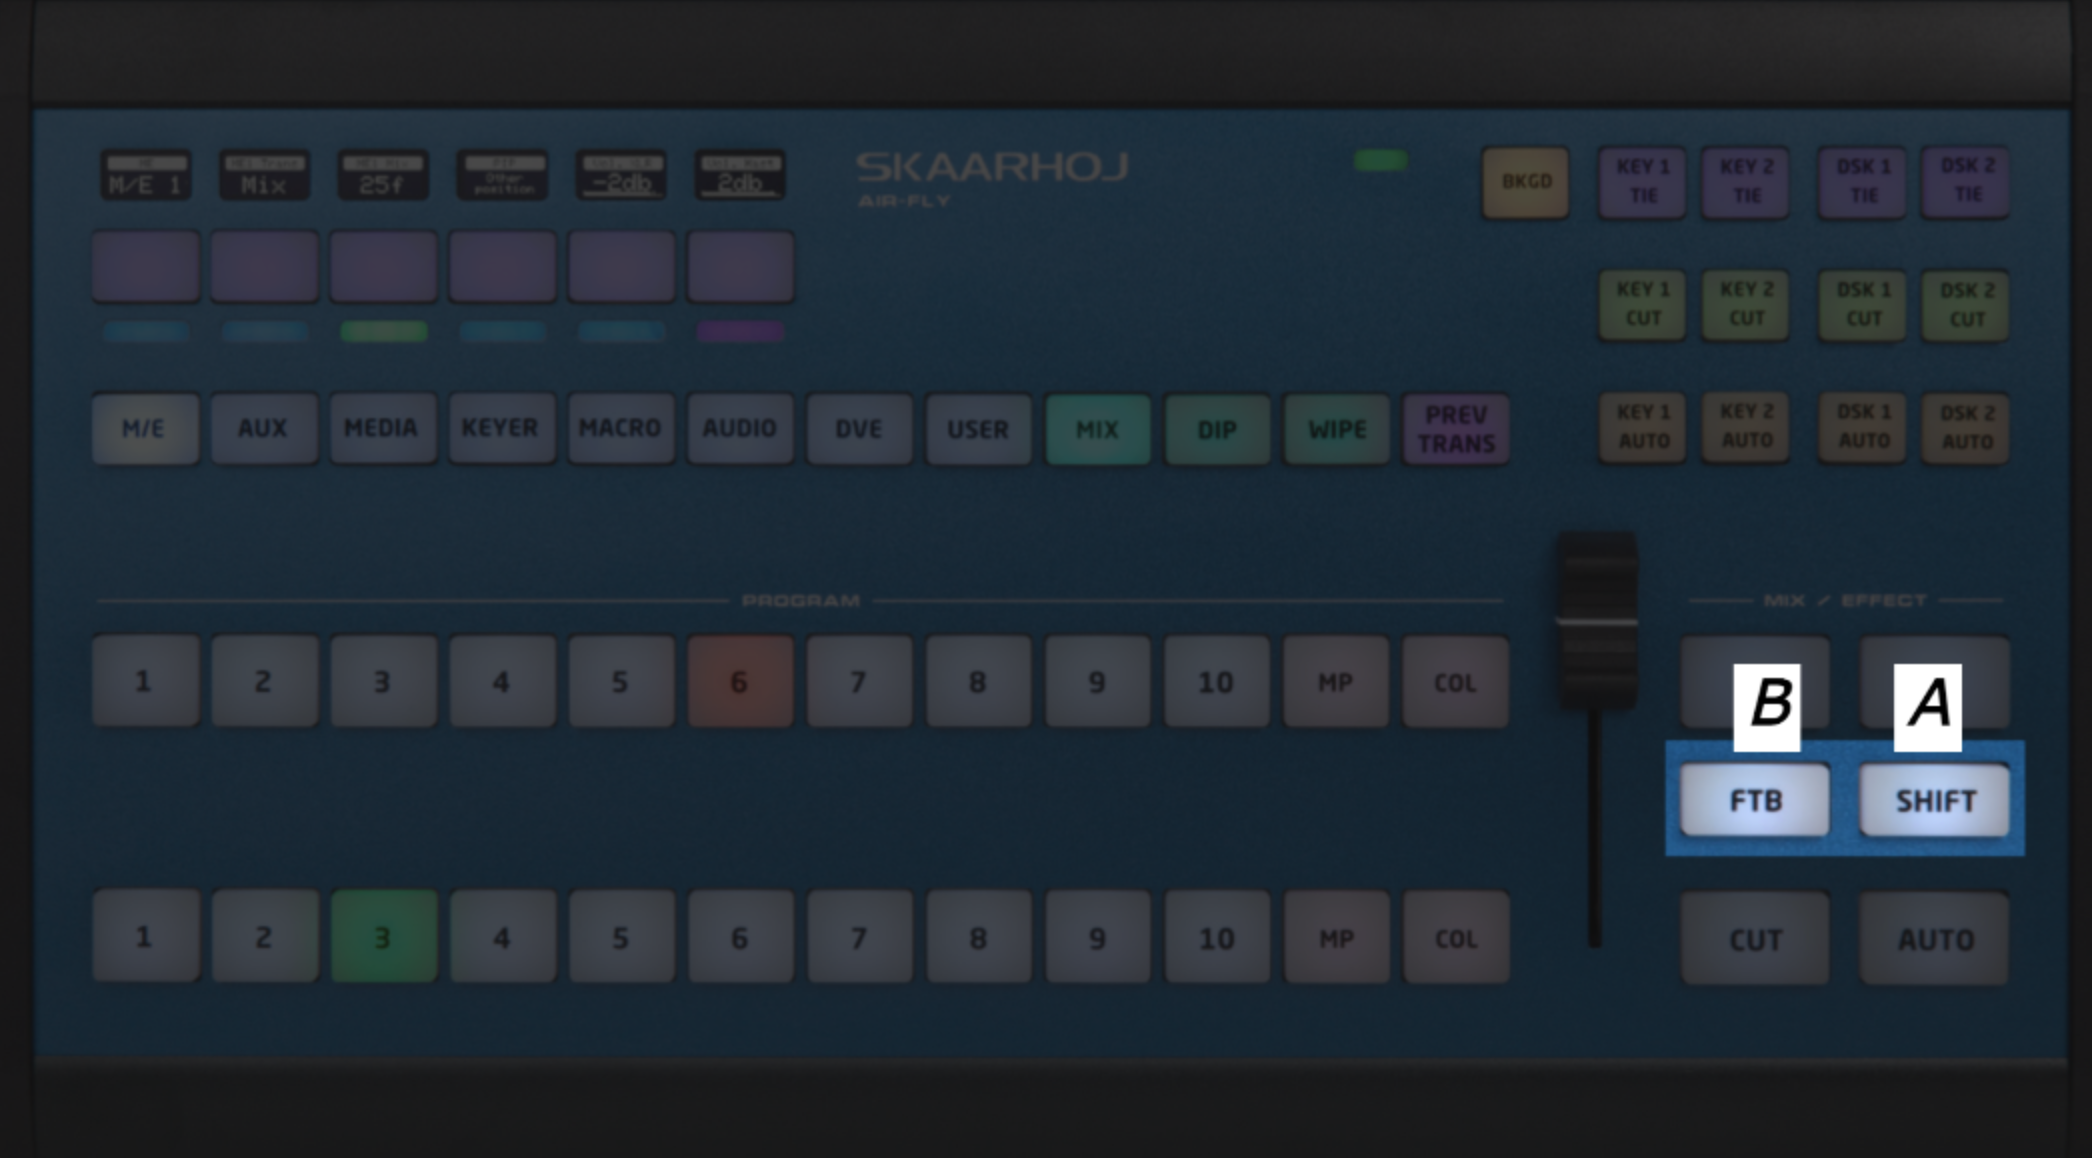
Airfly Pro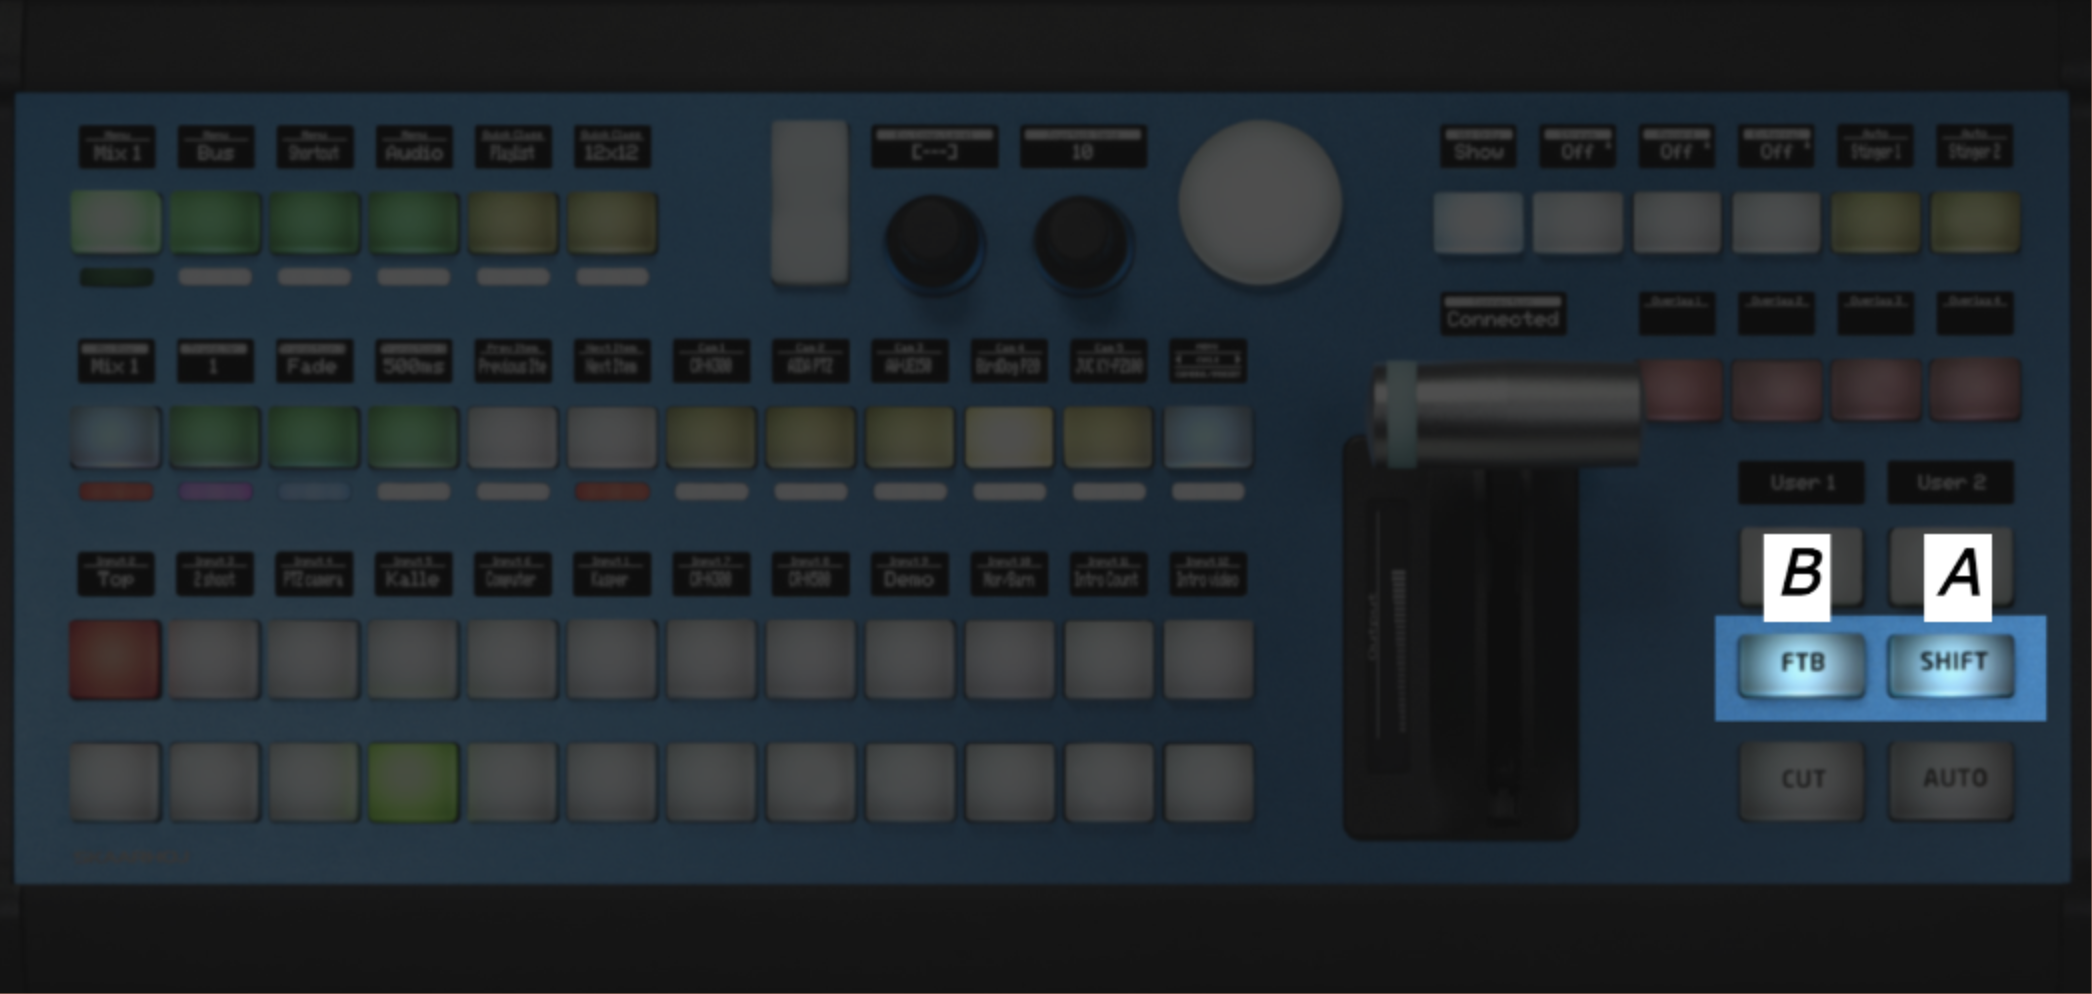
Master Key One
Method 7 - Kairos
This technique is specific for our Kairos configuration for the Master Key One V2 (Blue pill inside)
How to activate
Step 1) Press and hold the button marked A
Step 2) Now press the button marked B to enter the engineering menu
Examples of models using this method:
This method is exclusive to the Kairos configuration on the panel showed below
Master Key One V2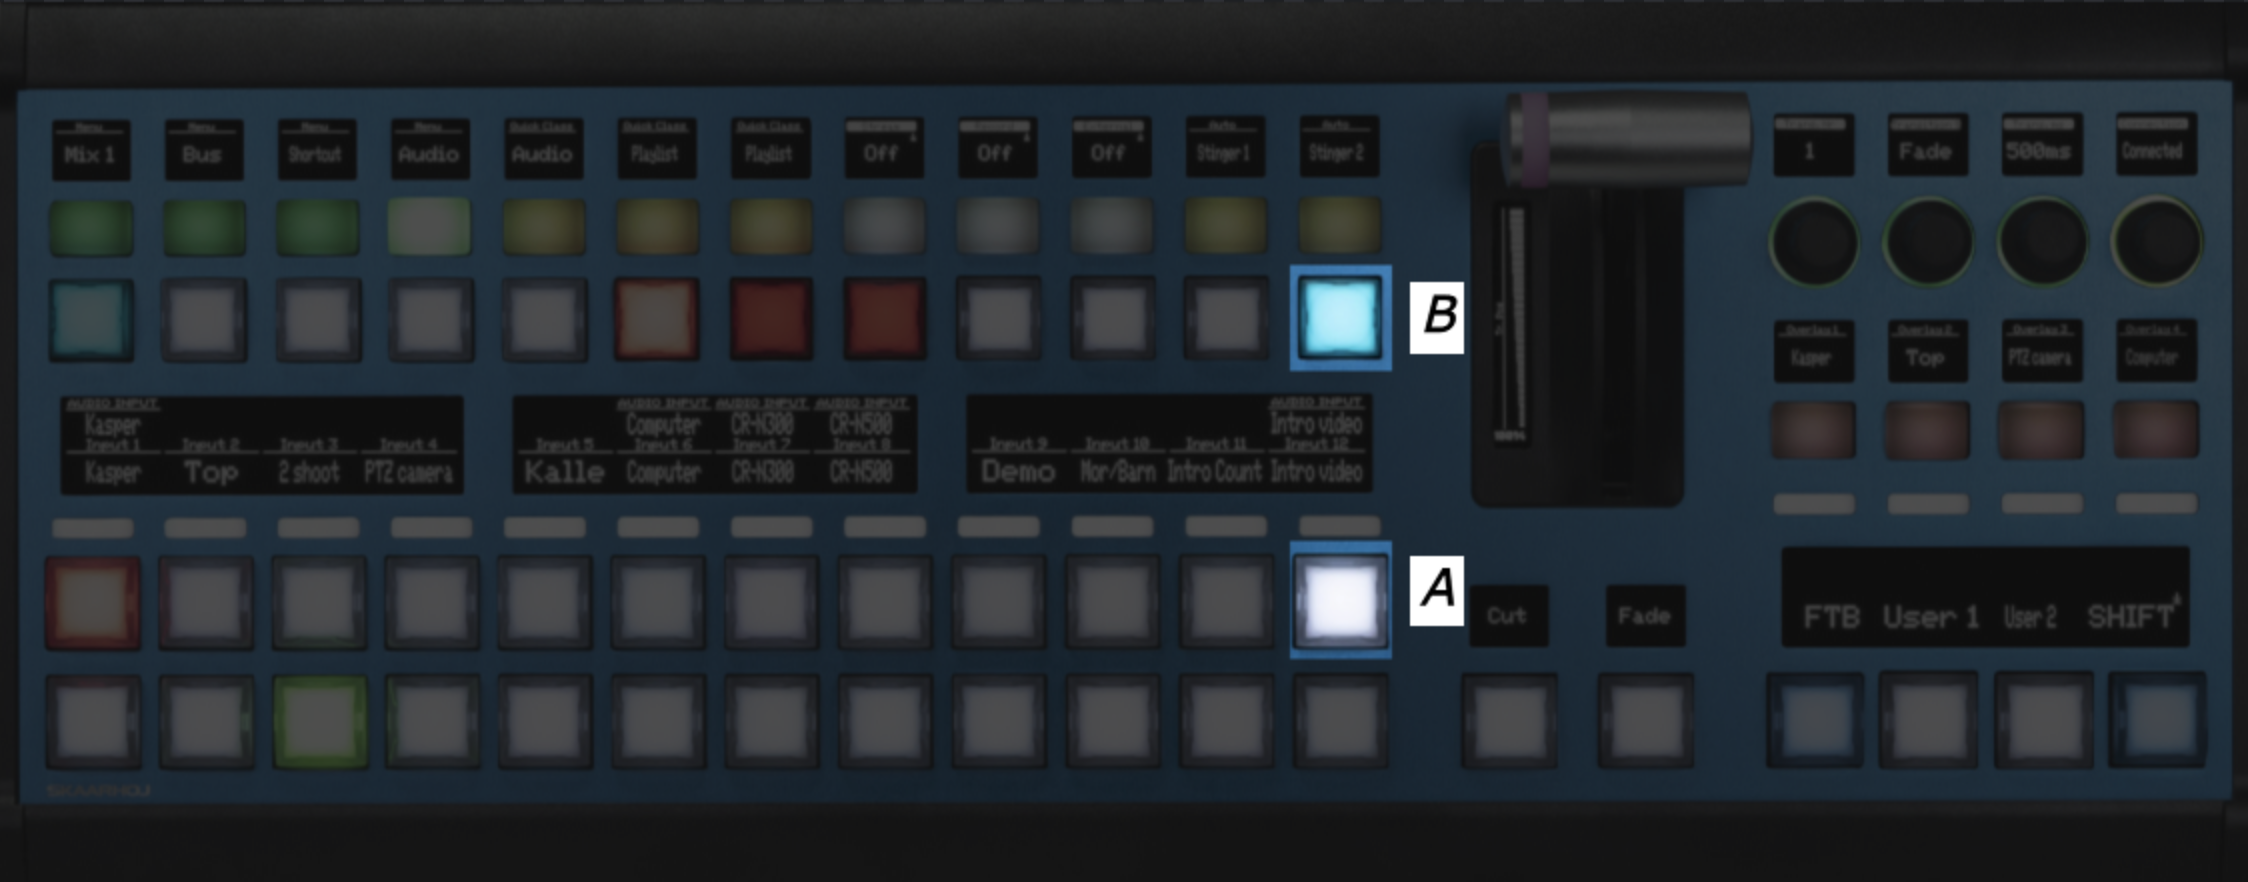
Method 8 - Audio & Light Control
This technique can be used for most panels with an 'Audio & Light Control' config.
How to activate
Step 1) Press and hold the first pager button.
Example of model using this method:
Waveboard V2
Experiments
Here you are able to disable the auto-deactivation of device cores on the Blue Pill. This is sometimes necessary when working with device cores across multiple Blue Pills.
There is also the possibility to use a different algorithm for Reactor that may improve performance in some instances. As it is not fully tested, we do not recommend using it in a production capacity.
Guide:
- Use any browser to access the Blue Pill via its IP address
- To access the Experimental page write /experiments after the IP
Example: XX.XX.XX.XX/experiments

Hardware Calibrator
Located on the Tools Page (https://wiki.skaarhoj.com/books/blue-pill-reactor/page/tools-page), the Hardware Calibrator allows for the calibration of analog hardware components on the local Blue Pill panel.
For analog calibration of Blue Pill panels on the same network see the Calibration App: https://wiki.skaarhoj.com/books/blue-pill-reactor/page/analog-component-calibration-bp-inside-
Scroll down to the bottom of the Tools Page to enable hardware calibration on panels that have an analog hardware component.
Examples of analog hardware components are: T-Bar, PTZ Joystick, Fader

Once it is enabled, the individual components will be exposed based on hardware component number. The below example is a PTZ Joystick on a PTZ Pro. Note that different hardware components may have different calibration options.

Range
Start Point: control the ends of the component, think all the way up/down of a fader or T-bar, but all so the max movement range on a joystick or zoom rocker. If you find that you are not able to move a T-bar from 0-1000 in its raw value but instead you might only get something like 100-950 then you would move these values closer to the middle in order for the component to hit "Max/Min" before hitting the physical limit of its movement range. In the same manner, if you find that you have a lot of dead space at the ends, you can move these sliders further out to gain more resolution.
End Point: control the ends of the component, think all the way up/down of a fader or T-bar, but all so the max movement range on a joystick or zoom rocker. If you find that you are not able to move a T-bar from 0-1000 in its raw value but instead you might only get something like 100-950 then you would move these values closer to the middle in order for the component to hit "Max/Min" before hitting the physical limit of its movement range. In the same manner, if you find that you have a lot of dead space at the ends, you can move these sliders further out to gain more resolution.
Center Point: Allows you to move the centre of your value range, mainly found on components like the rotating component on the PTZ joysticks on a PTZ extreme. This can compensate for a slight drift in one or the other direction when you let go of the rotation. This also defines where the centre of the halfway point is on motorized faders.
Deadzone: adjusts the "padding" around the centre value and how far you need to move it before it starts "moving." You would adjust this on a PTZ joystick or zoom rocker to change how sensitive it is in the middle.
Filtering
Tolerance: Is used to define how big or small a change is needed before the component sends a "change." In 99% of cases, this is not worth messing with, but if you have a stutter or maybe more than normal EMC (electromagnetic noise) in your environment, it might be worth raising this to prevent unintended movement. But again, this is only in very extreme cases.
Hysteresis: The reduced change threshold used while the component is actively being moved. During movement, a change only needs to exceed this value (instead of the full Tolerance) to register, giving smoother tracking. Once movement stops (after Kinetic Timeout expires), the system reverts to requiring the full Tolerance threshold for noise rejection. A lower value means more responsive tracking during movement; a higher value filters out more jitter.
Kinetic Timeout: Time in milliseconds after the last detected movement before the component switches from the lower hysteresis threshold back to the full tolerance threshold. While the component is being actively moved, smaller changes (governed by Hysteresis) are enough to register. Once movement stops for longer than this timeout, the system requires the full Tolerance value again to register a change, providing better noise rejection when the component is stationary.
To disable the Hardware Calibrator again, in the Hardware Manager package toggle off Calibration Enable and press Save and Restart.

History View
How long back can I go?
Every change from the last 24 hours is saved. After that it will be combined to 1 file per day, and saved for 10 days.
It is also possible to add tags to individual versions. When a tag is added to the version, it will no longer be deleted based on the default time scale and will persist.
What is being saved?
It's important to remember that these autosaved versions are only saving information from the Configuration tab. Although if you change things related to configurations, from the Home tab, it may also be saved, and therefore revertible from the History View.
Example: Adding a Panel on the Home tab will not be part of an autosave, but choosing a configuration for it will.
How to find the History View
Here is the ways to navigate through the UI:
First way
Being in the Configuration tab, the icon can be found right beside the Undo/Redo buttons
Second way
Step 1: Being on the Home tab. Press the button "Change Project"
Step 2.1: Here you can press the icon for configuration on a specific project
Step 2.2: Or choosing a project, and from the dropdown menu, click the icon on a specific config