Please note that by signing in you are accepting the terms of the [user agreement](https://wiki.skaarhoj.com/books/blue-pill-reactor/page/end-user-license-agreement).
 **Link from SKAARHOJ Discovery App** If the SKAARHOJ Discovery open on a computer running on the same subnet as the Blue Pill, the Blue Pill should appear below the main controller access buttons of the updater. Clicking on Configure next to the panel’s information will open the web interface directly. The Blue Pill does not need to be connected to the computer via USB. 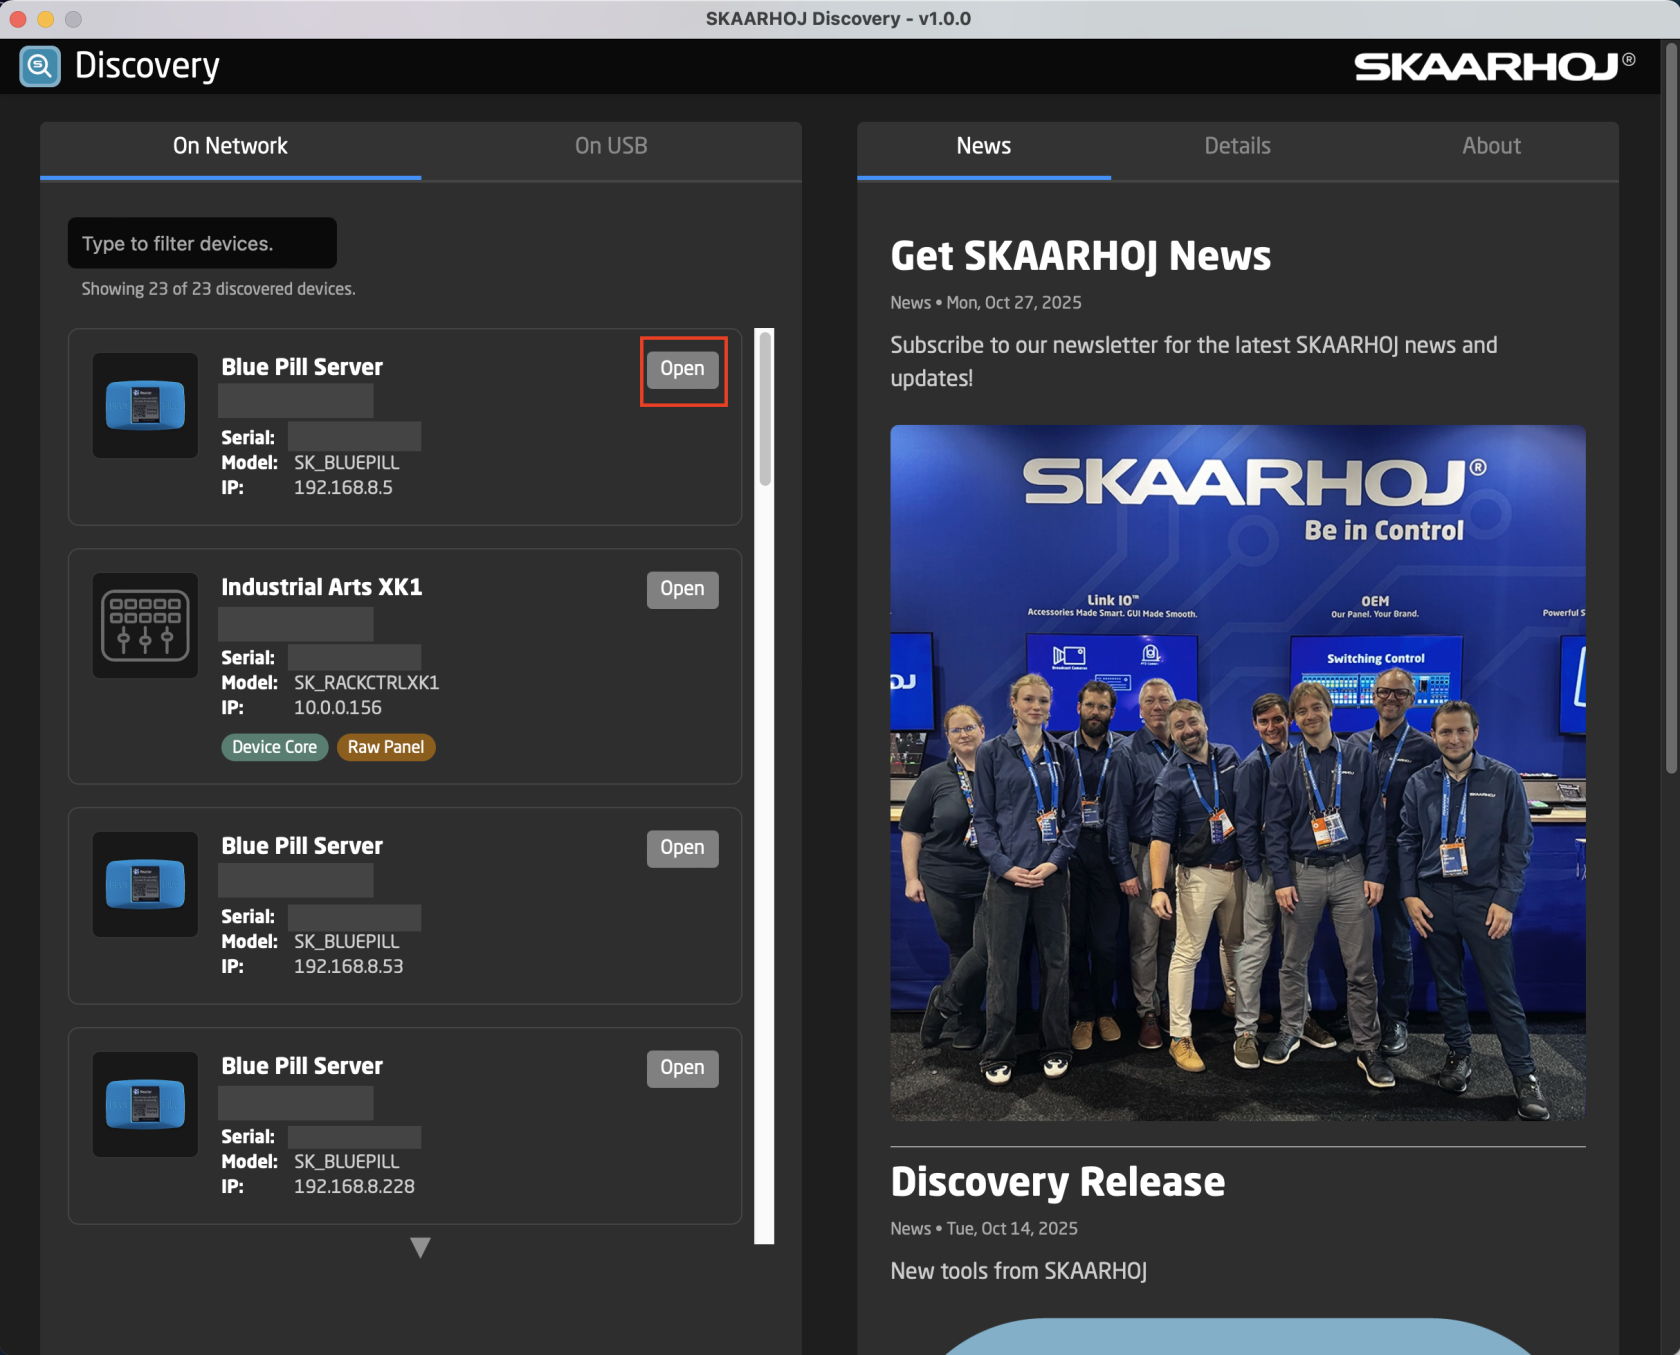 **SKAARHOJ Discovery and Micro USB** If a network connection to the Blue Pill in not available, the IP address can be set using a Micro USB cable. In this case the Blue Pill will appear in the “On USB” tab in the Discovery App can be used to set the IP address: 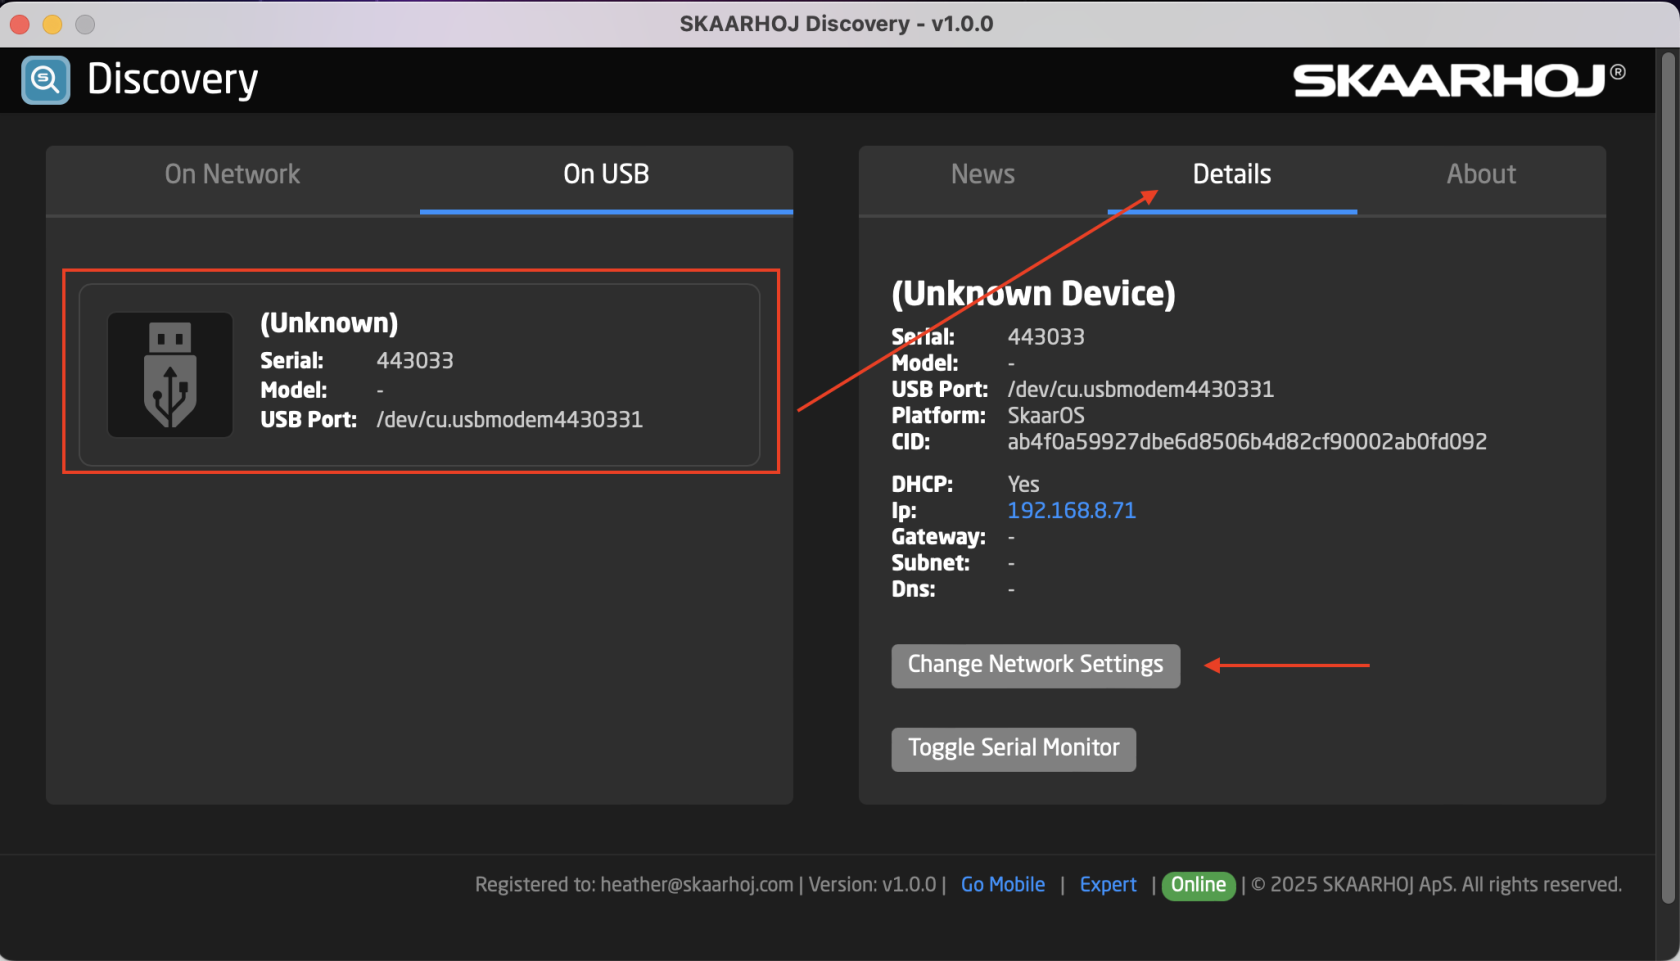 It is possible to toggle between DHCP and Static IP. After setting the IP address, Subnet Mask, and Gateway, press Update to apply.  **Wi-Fi Access Point** If the Blue Pill is not displaying an IP address, the web interface is accessible by enabling the internal Wi-Fi access point. To enable the Wi-Fi access point, gently press and hold the config button on the Blue Pill device for about 3 seconds (see image below). Use a flat screw driver, a paper clip or similar - you should feel the springy button-click when pushing it. [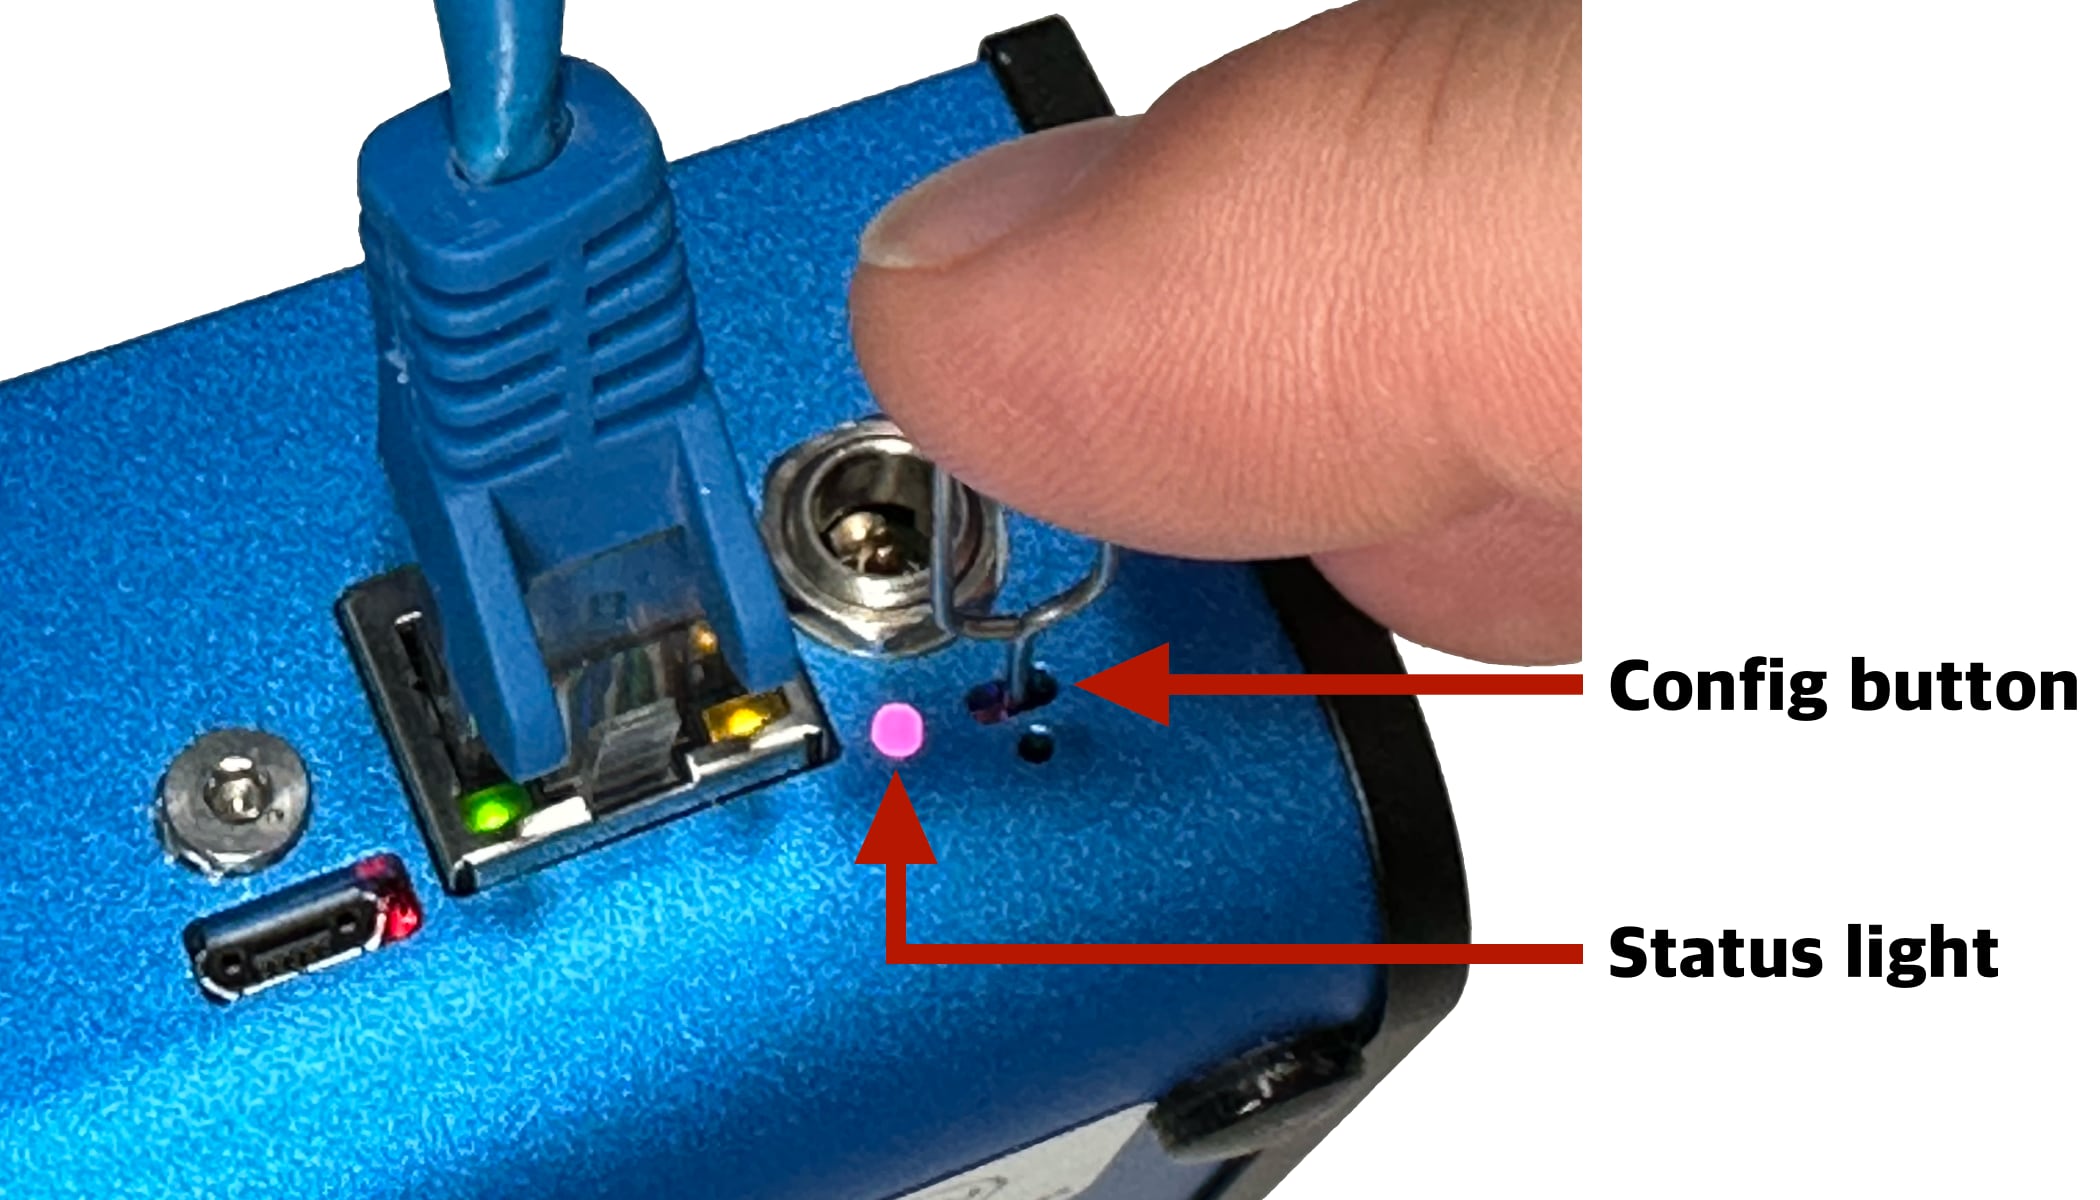](https://wiki.skaarhoj.com/uploads/images/gallery/2025-06/0cHconfig-button.jpg) After holding Config button for 3 seconds the internal Wi-Fi Access Point is enabled and the Status LED will light up purple. It will show up in the Wi-Fi networks list as SKAARHOJ-XXXXXX (Blue Pill’s serial number). The default password is: **skaarhoj** The web interface is then accessed at the IP address: **192.168.4.1** [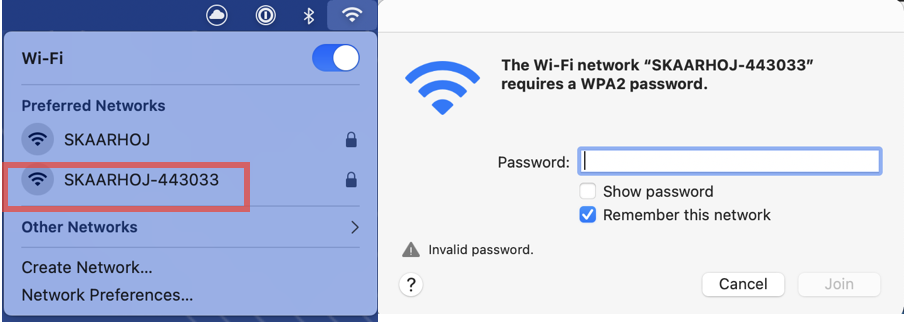](https://wiki.skaarhoj.com/uploads/images/gallery/2022-03/image-1648117650328.png) After accessing the Blue Pill it is best to navigate to the System/Settings page to set a static IP address. Once saved, the new IP address will appear on the Blue Pill’s display, it may be necessary to reboot or power cycle the device afterwards. 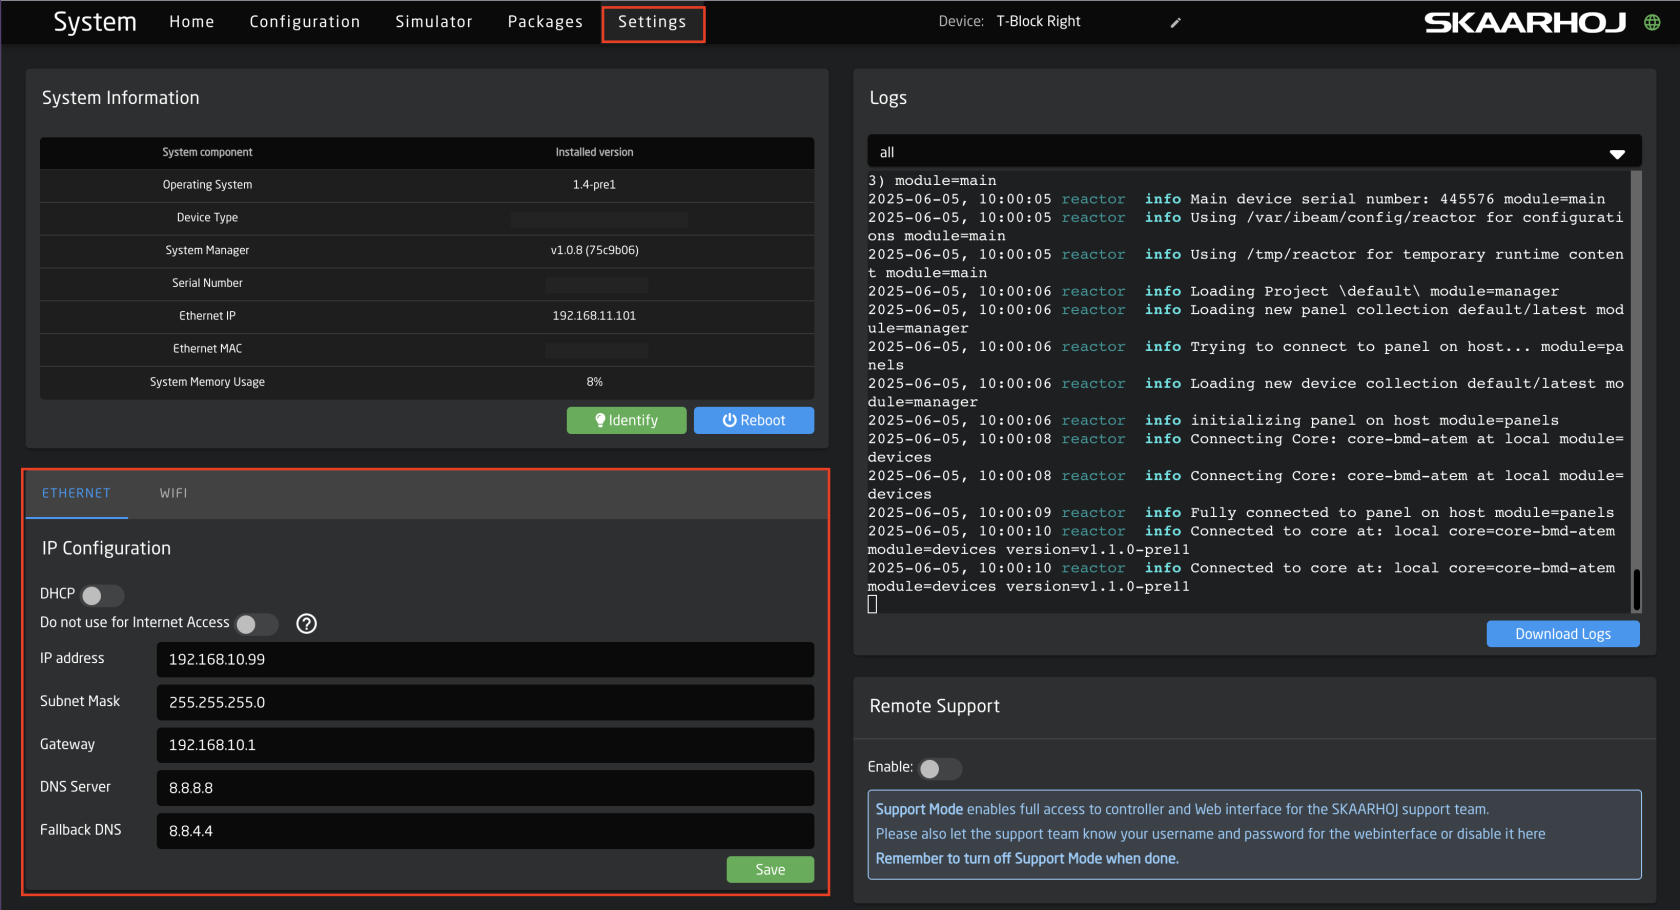A controller’s status needs to be active for use.
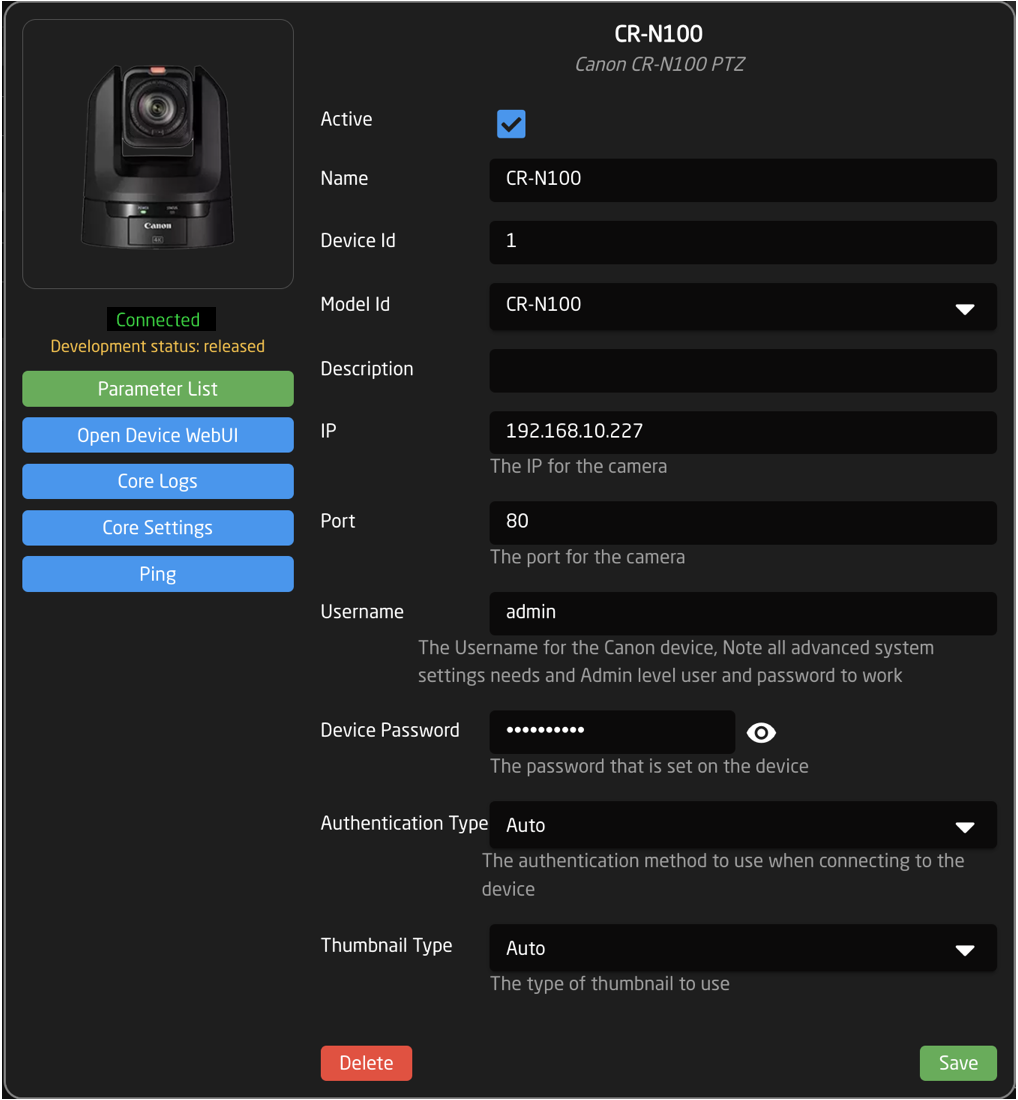
 By default our controllers connect using port 9923. It is important to include the port number, separated from the IP address by a colon (:), for example 192.168.50.236:9923 A panel with Blue Pill inside that is operating as the main panel will not show its IP address or port in the panel details, but will instead say **host**. This has indicates internal connection instead of an external connection. 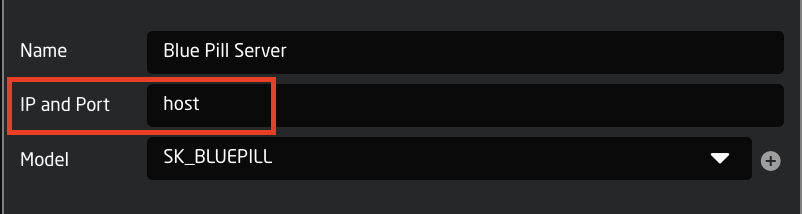 **Confirm Connection** A panel that has established a connection with a blue pill will no longer display “Waiting for Blue Pill” or “Waiting for Raw Panel”. [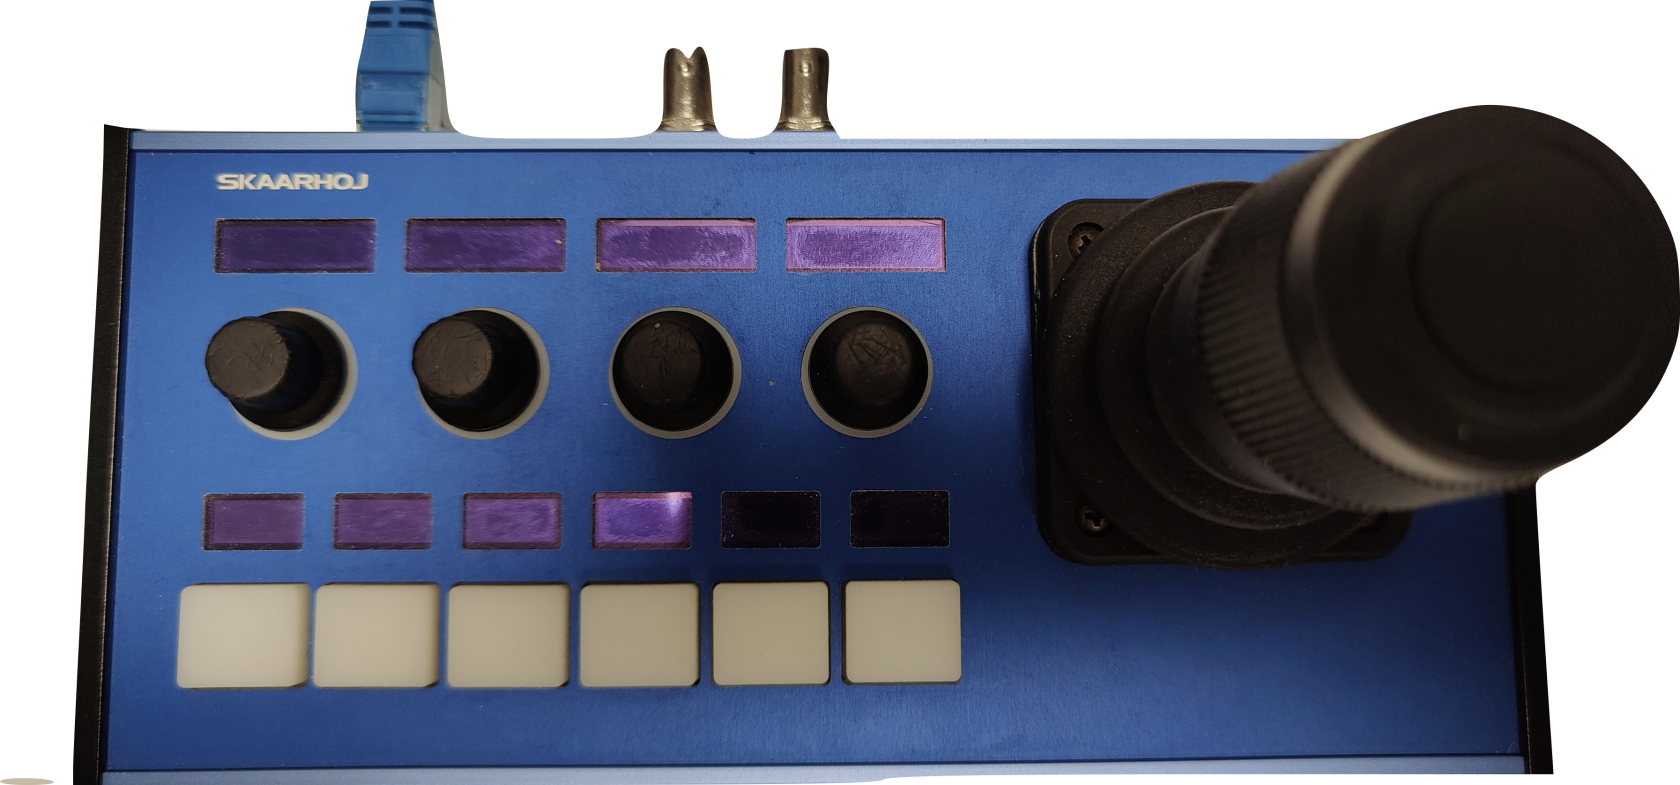](https://wiki.skaarhoj.com/uploads/images/gallery/2022-03/image-1648118037898.png) # Select Configuration The controller’s layout is determined by the configuration. In most cases, the Generic configuration is all that is needed, though for some combinations of panel and device, there are specific configurations. The configuration is chosen in the drop down next to the panel. 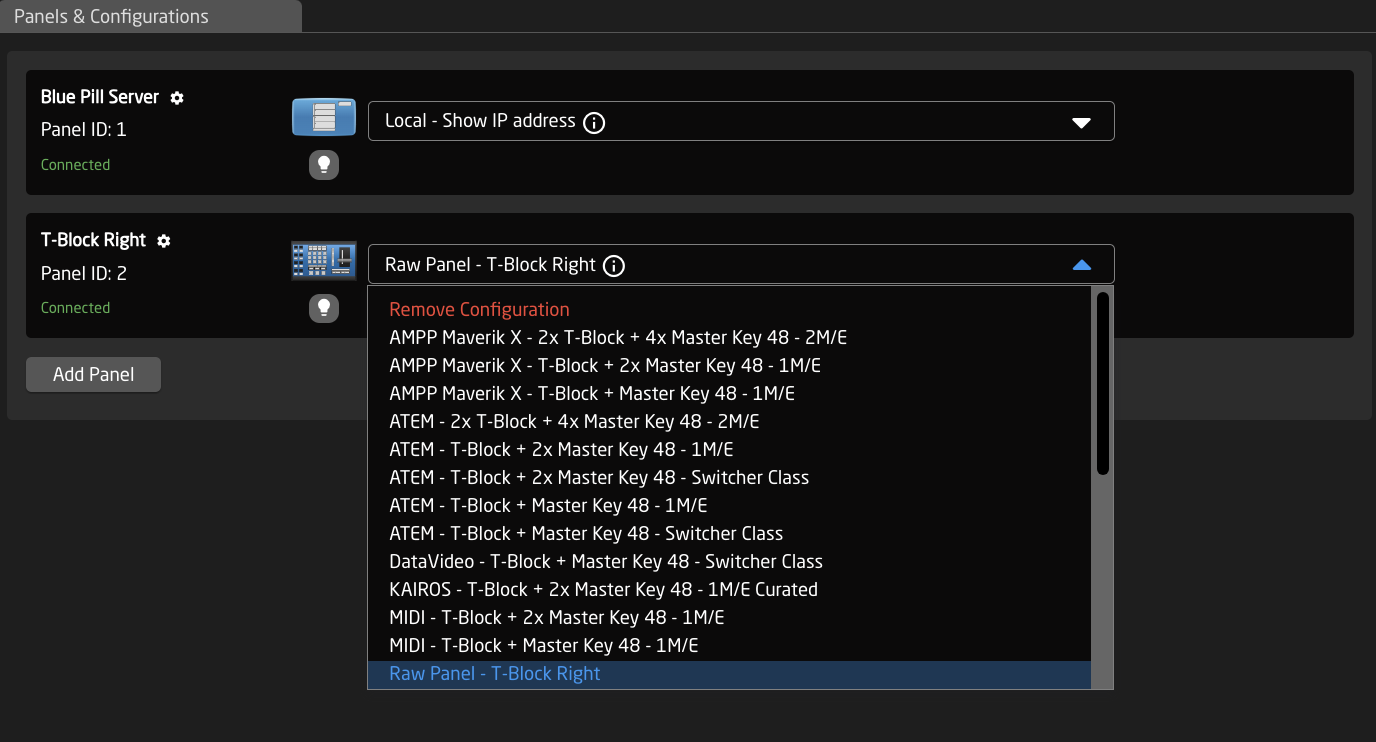 # Adding Devices There are two main ways a device can be added to a new Blue Pill, Auto Discover and Manually. 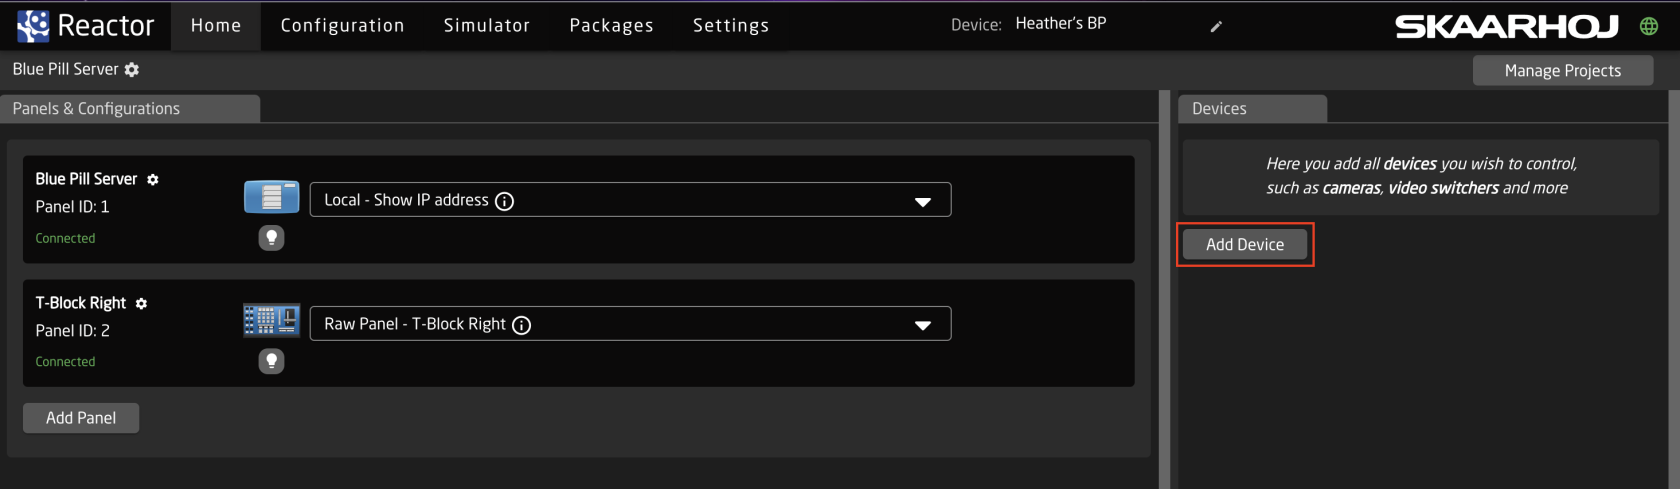 **Auto Discover** Searching on the network for devices will find many types by a combination of mDNS look-ups and other methods. However, not all devices can be discovered easily, but with those that can, it’s a simple click of a button to add it to the Blue Pill device collection. Following an Auto Discover some device details may still be needed to establish connectivity. See Device Details section for set up. 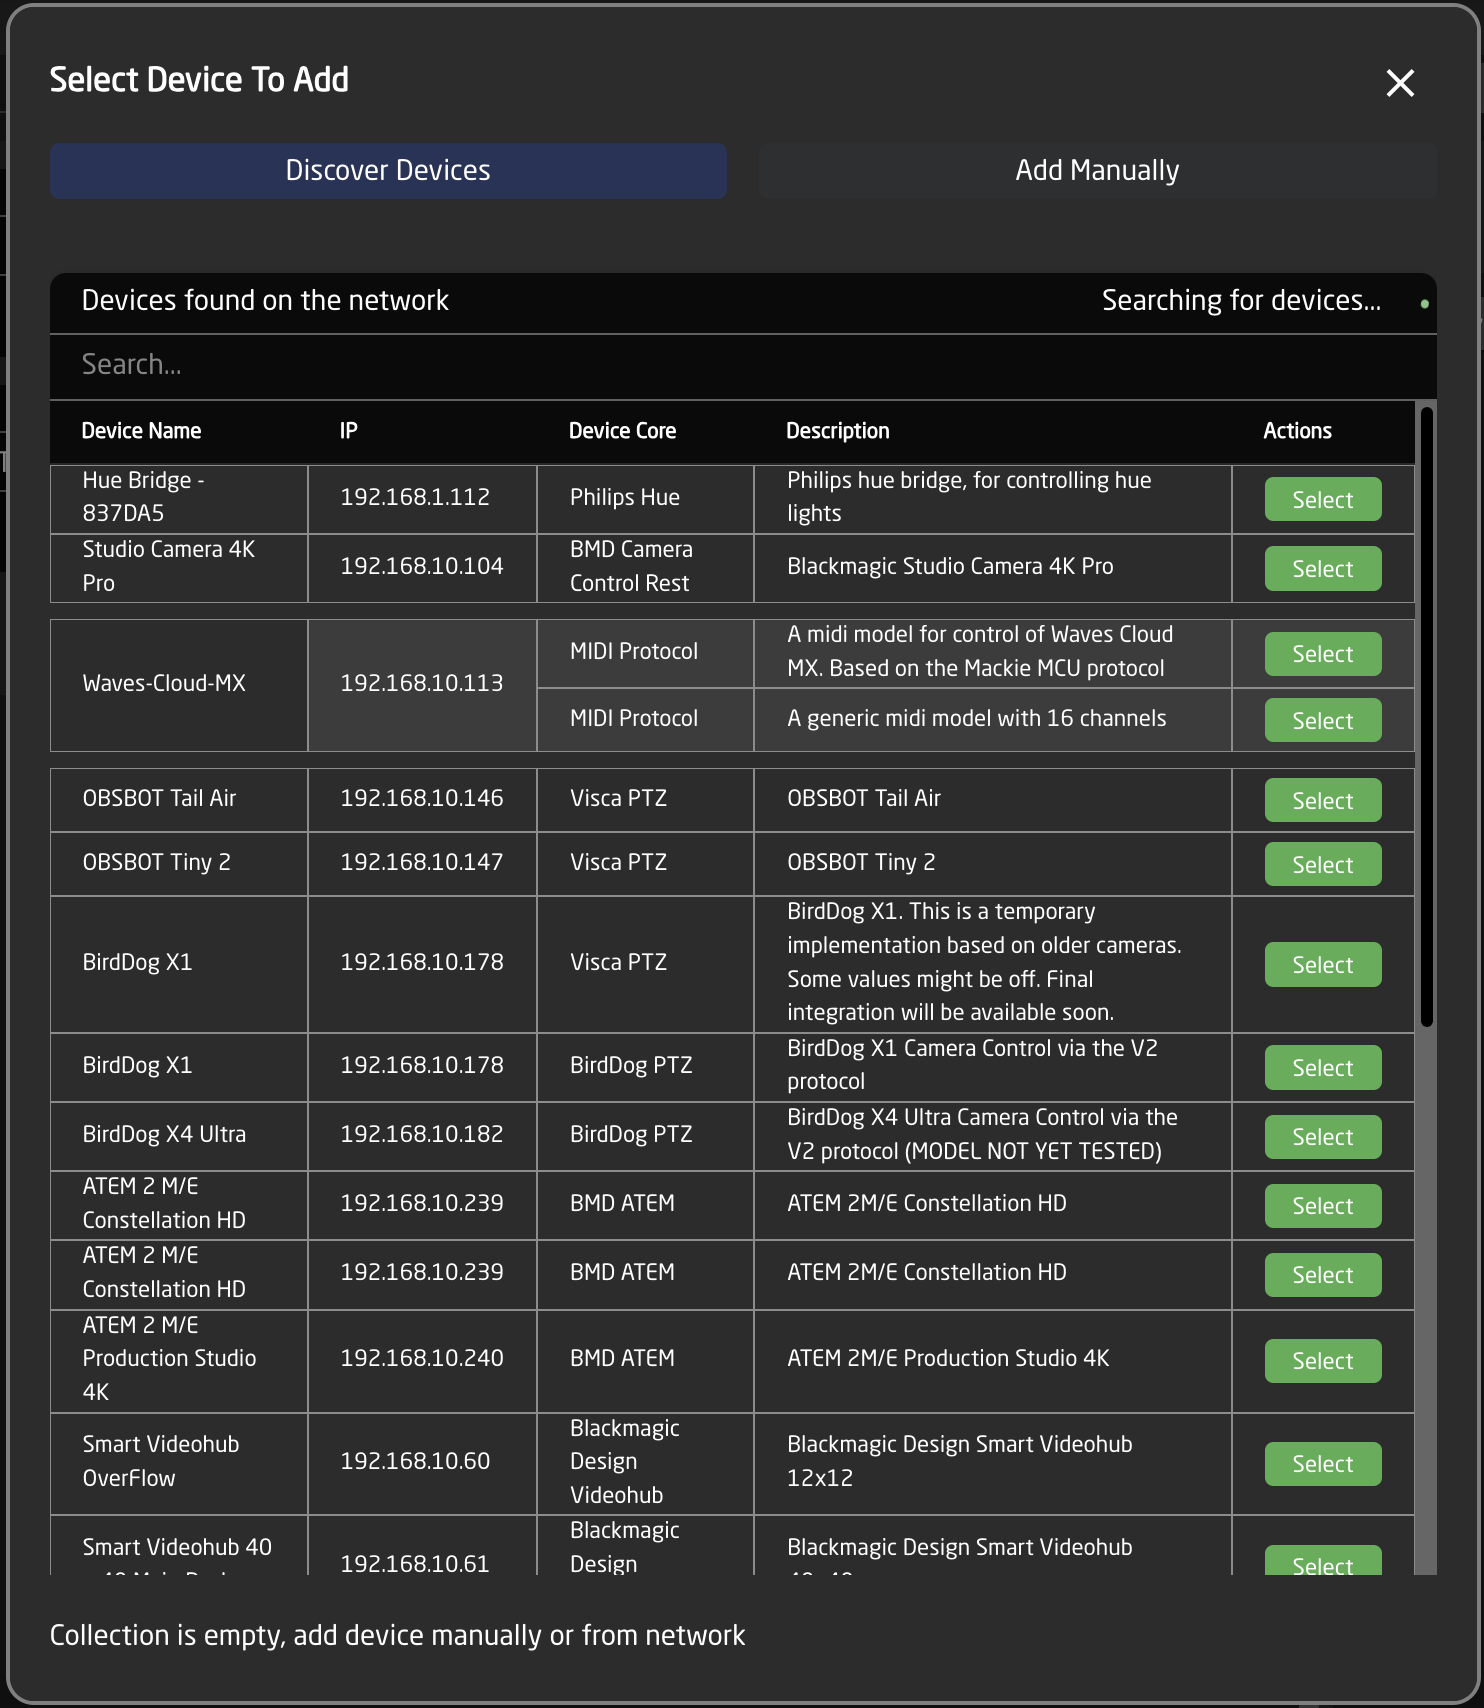 Pressing SHIFT + the green Select button will allow for multiple device selection. **Manually Added** If a device must be added manually, it’s easy to look it up in the list of supported models. Following a manual choice of device, the user will have to enter the IP address and other possible device detail information. See the Device Details section for set up. 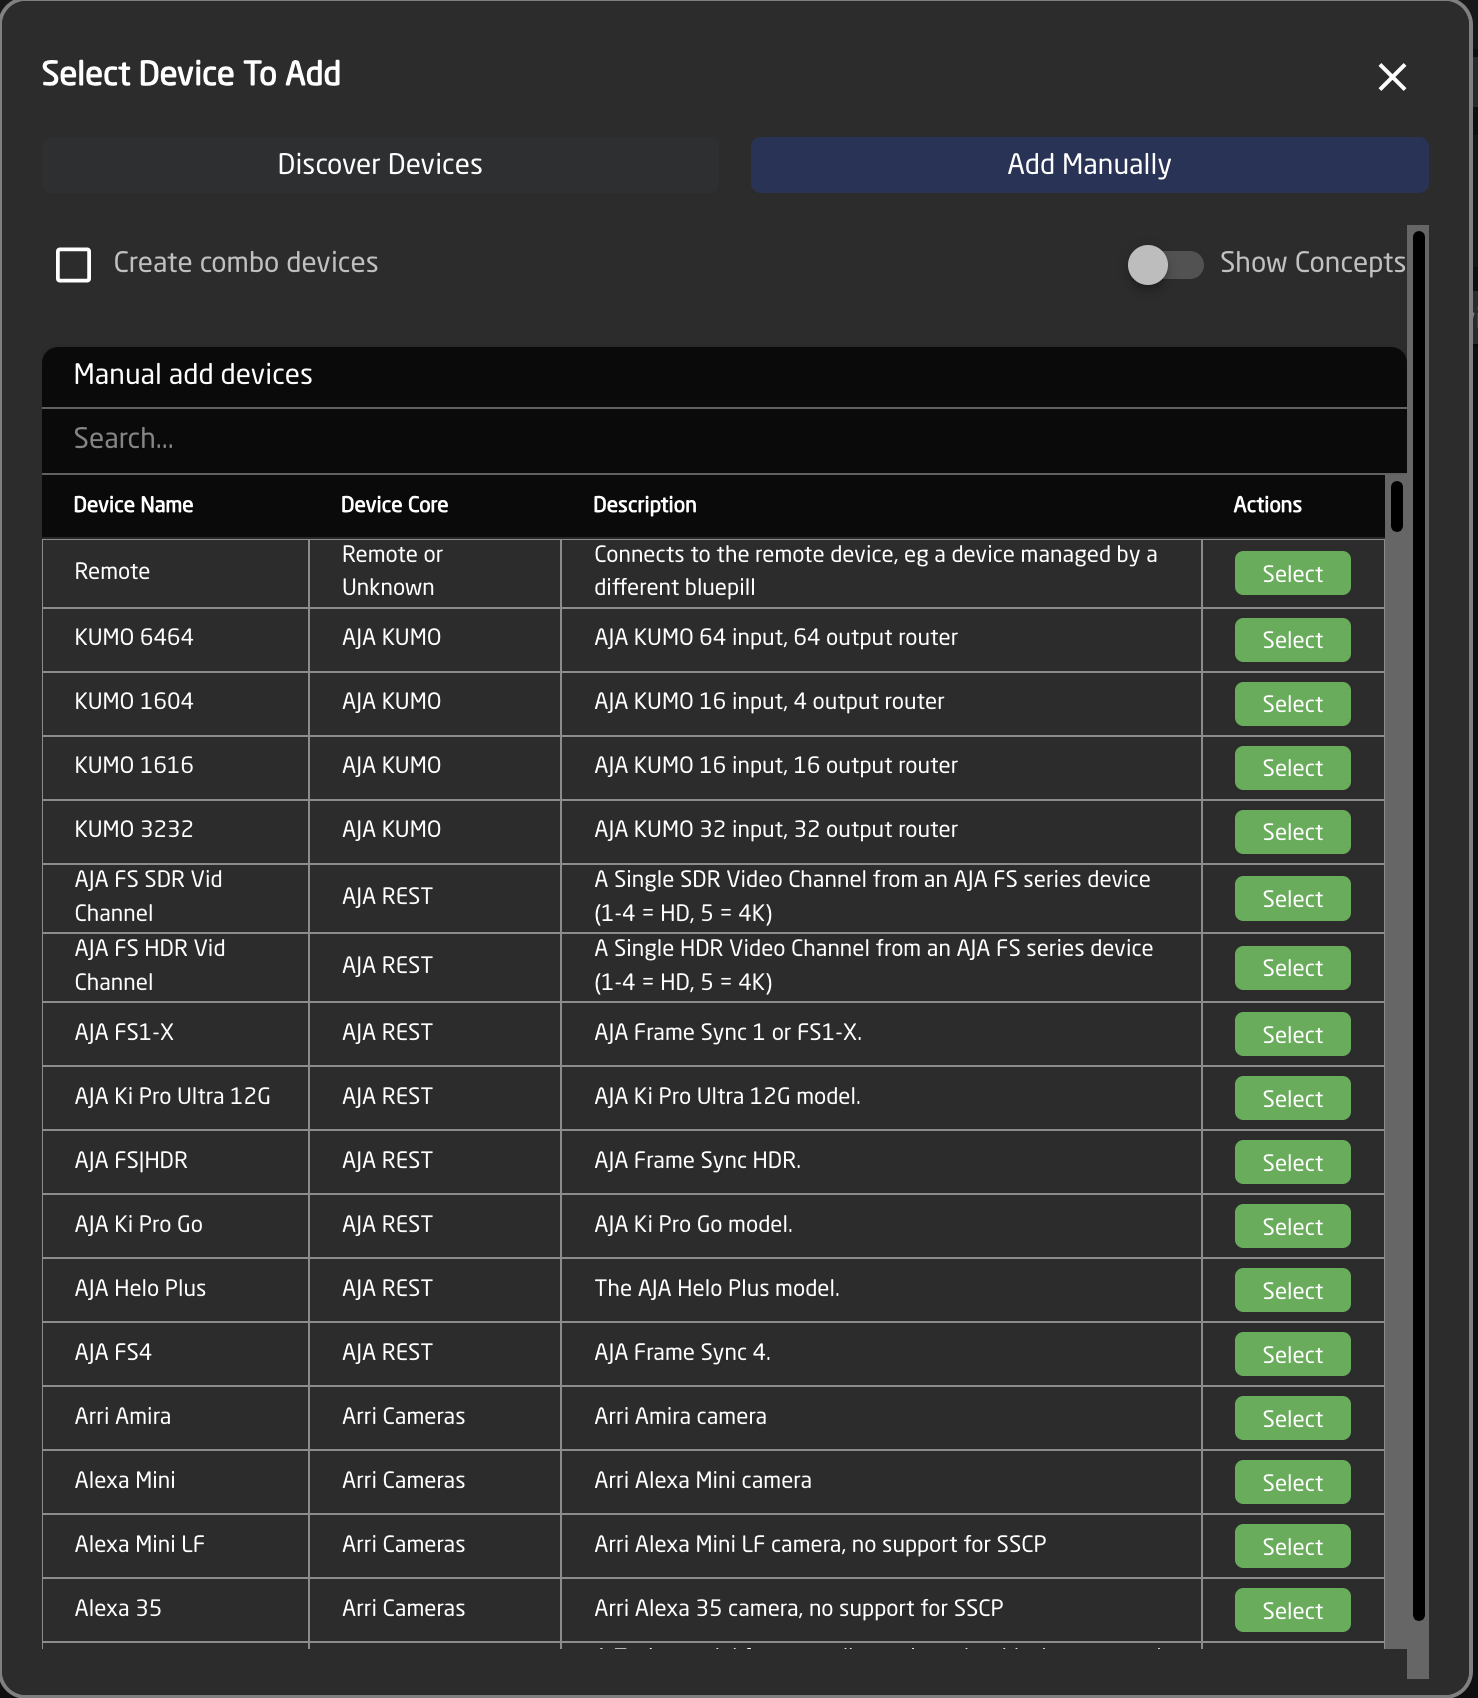 Pressing SHIFT + the green Add Device button will allow for multiple device selection. **Device Details** Devices have their status displayed clearly in the overviews on the Home screen. [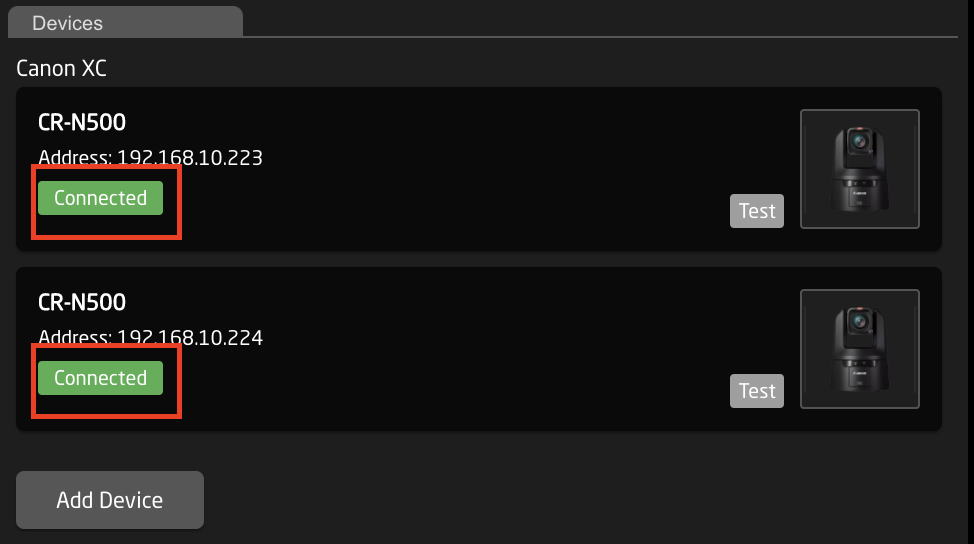](https://wiki.skaarhoj.com/uploads/images/gallery/2022-03/image-1648118451986.png) Clicking on a device name in the Devices section will open up the details. Here the name, ID number, and Active status of the devices can be changed. By default the device name will be the same as the model name, the ID will be auto generated in order, and the status will be active. When applicable to the device, the option for connecting is a specific username and password will also be available along with other device specific options. Without setting a specific username and password, in most cases the core will try to connect to the device’s default username and password.A device needs to be set to Active for use.
 # Populating Settings Tables The final step is to fill in any settings table. The settings tables are available based on the chosen configuration and should contain entries such as specific cameras for a PTZ controller, or the inputs for a video switcher etc. They can be found in a large number of our configurations. The settings tables will auto save and quickly appear on displays and enable the function. [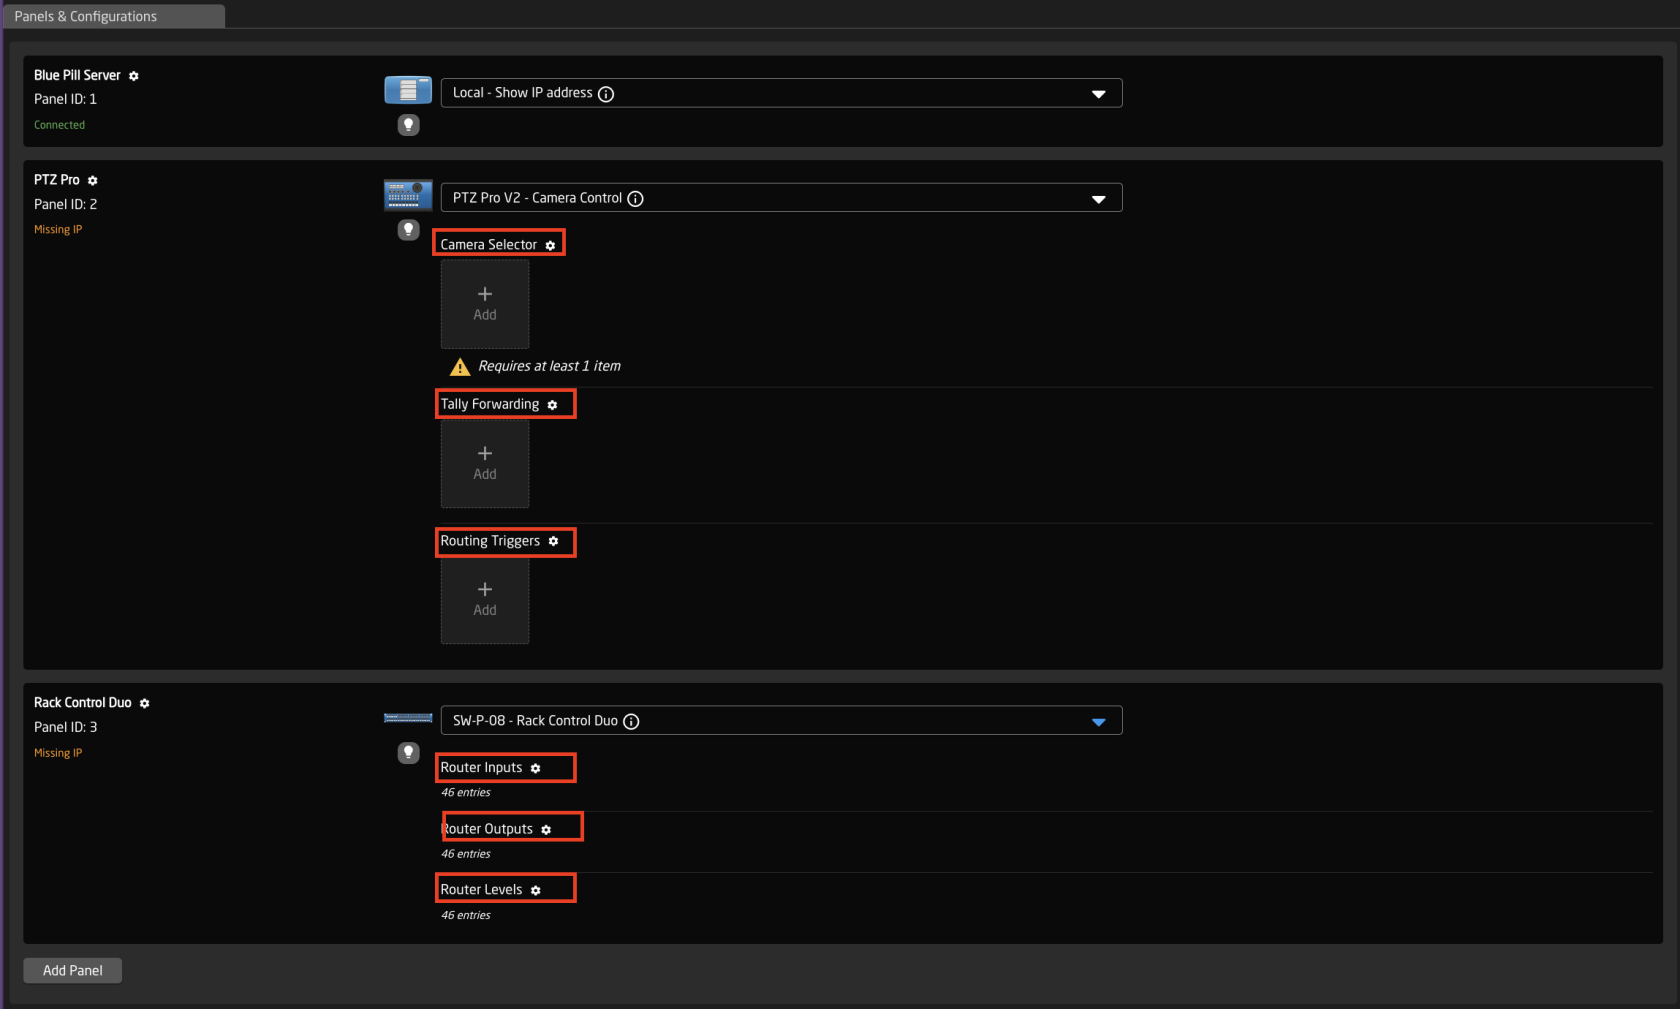](https://wiki.skaarhoj.com/uploads/images/gallery/2025-06/screenshot-2025-06-05-at-1-22-54-pm.png) An example of a settings table would be a camera selector and can be seen below. These can be different depending on the selected configuration. From here the order on the camera selector row of the panel will be set as well as the desired name on the displays. [](https://wiki.skaarhoj.com/uploads/images/gallery/2025-06/screenshot-2025-06-05-at-1-25-56-pm.png)| **Column** | **Description** |
| Order | Allows for quick rearranging of camera order. Right clicking on drag will allow for deleting the row. |
| Mute | Allows for removing access to a specific camera or to leave a blank spot on the panel |
| Bound Device | Allows for the selecting of a specific connected camera |
| Device ID | Ties the camera selector to the specific device. This is found in the Devices section. Each device will have a unique device number per device core. This box should auto-populate when a camera is selected in binding |
| Camera Name | Customizable name to appear on the displays. Character limit is determined by size of display and can vary. |
| Camera Config | Selects the protocol based configuration associated with camera. Needed protocol can be seen in the Devices section, each device is grouped into their native protocols. **Double check the correct configuration is selected. Improper selection will effect camera control.** |
| Tally Index | Sets the Tally Index number to connect with associated tally source device. See Blue Pill/Reactor Manual for more information. **This column does not need to be filled out for standard operation.** |
| Route Index | Sets the Route Index number to connect with associated routing device. See Blue Pill/Reactor Manual for more information. **This column does not need to be filled out for standard operation.** |
| Color | Sets the button color for the associated camera select button. **This column does not need to be filled out for standard operation.** |
| Presets | Allows for the setting of preset names for applicable configurations. **This column does not need to be filled out for standard operation.** |
| [](https://wiki.skaarhoj.com/uploads/images/gallery/2025-06/screenshot-2025-06-05-at-1-58-50-pm.png) | Deletes the row. |
Please note that by signing in you are accepting the terms of the [user agreement](https://wiki.skaarhoj.com/books/blue-pill-reactor/page/end-user-license-agreement).
 **Link from SKAARHOJ Discovery App** If the SKAARHOJ Discovery open on a computer running on the same subnet as the Blue Pill, the Blue Pill should appear below the main controller access buttons of the updater. Clicking on Configure next to the panel’s information will open the web interface directly. The Blue Pill does not need to be connected to the computer via USB.  **SKAARHOJ Discovery and Micro USB** If a network connection to the Blue Pill in not available, the IP address can be set using a Micro USB cable. In this case the Blue Pill will appear in the “On USB” tab in the Discovery App can be used to set the IP address:  It is possible to toggle between DHCP and Static IP. After setting the IP address, Subnet Mask, and Gateway, press Update to apply.  **Wi-Fi Access Point** If the Blue Pill is not displaying an IP address, the web interface is accessible by enabling the internal Wi-Fi access point. To enable the Wi-Fi access point, gently press and hold the config button on the Blue Pill device for about 3 seconds (see image below). Use a flat screw driver, a paper clip or similar - you should feel the springy button-click when pushing it. [](https://wiki.skaarhoj.com/uploads/images/gallery/2025-06/0cHconfig-button.jpg) After holding Config button for 3 seconds the internal Wi-Fi Access Point is enabled and the Status LED will light up purple. It will show up in the Wi-Fi networks list as SKAARHOJ-XXXXXX (Blue Pill’s serial number). The default password is: **skaarhoj** The web interface is then accessed at the IP address: **192.168.4.1** [](https://wiki.skaarhoj.com/uploads/images/gallery/2022-03/image-1648117650328.png) After accessing the Blue Pill it is best to navigate to the System/Settings page to set a static IP address. Once saved, the new IP address will appear on the Blue Pill’s display, it may be necessary to reboot or power cycle the device afterwards. A device needs to be set to Active for use.
 # Populating Settings Tables The final step is to fill in any settings table. The settings tables are available based on the chosen configuration and should contain entries such as specific cameras for a PTZ controller, or the inputs for a video switcher etc. They can be found in a large number of our configurations. The settings tables will auto save and quickly appear on displays and enable the function. [](https://wiki.skaarhoj.com/uploads/images/gallery/2025-06/screenshot-2025-06-05-at-1-22-54-pm.png) An example of a settings table would be a camera selector and can be seen below. These can be different depending on the selected configuration. From here the order on the camera selector row of the panel will be set as well as the desired name on the displays. [](https://wiki.skaarhoj.com/uploads/images/gallery/2025-06/screenshot-2025-06-05-at-1-25-56-pm.png)| **Column** | **Description** |
| Order | Allows for quick rearranging of camera order. Right clicking on drag will allow for deleting the row. |
| Mute | Allows for removing access to a specific camera or to leave a blank spot on the panel |
| Bound Device | Allows for the selecting of a specific connected camera |
| Device ID | Ties the camera selector to the specific device. This is found in the Devices section. Each device will have a unique device number per device core. This box should auto-populate when a camera is selected in binding |
| Camera Name | Customizable name to appear on the displays. Character limit is determined by size of display and can vary. |
| Camera Config | Selects the protocol based configuration associated with camera. Needed protocol can be seen in the Devices section, each device is grouped into their native protocols. **Double check the correct configuration is selected. Improper selection will effect camera control.** |
| Tally Index | Sets the Tally Index number to connect with associated tally source device. See Blue Pill/Reactor Manual for more information. **This column does not need to be filled out for standard operation.** |
| Route Index | Sets the Route Index number to connect with associated routing device. See Blue Pill/Reactor Manual for more information. **This column does not need to be filled out for standard operation.** |
| Color | Sets the button color for the associated camera select button. **This column does not need to be filled out for standard operation.** |
| Presets | Allows for the setting of preset names for applicable configurations. **This column does not need to be filled out for standard operation.** |
| [](https://wiki.skaarhoj.com/uploads/images/gallery/2025-06/screenshot-2025-06-05-at-1-58-50-pm.png) | Deletes the row. |
It is recommended to use the same number as is used for the input on the triggering device. Example if using a BMD VideoHub and the camera is Input 5, set the Ext. Cam Number to 5 as well.
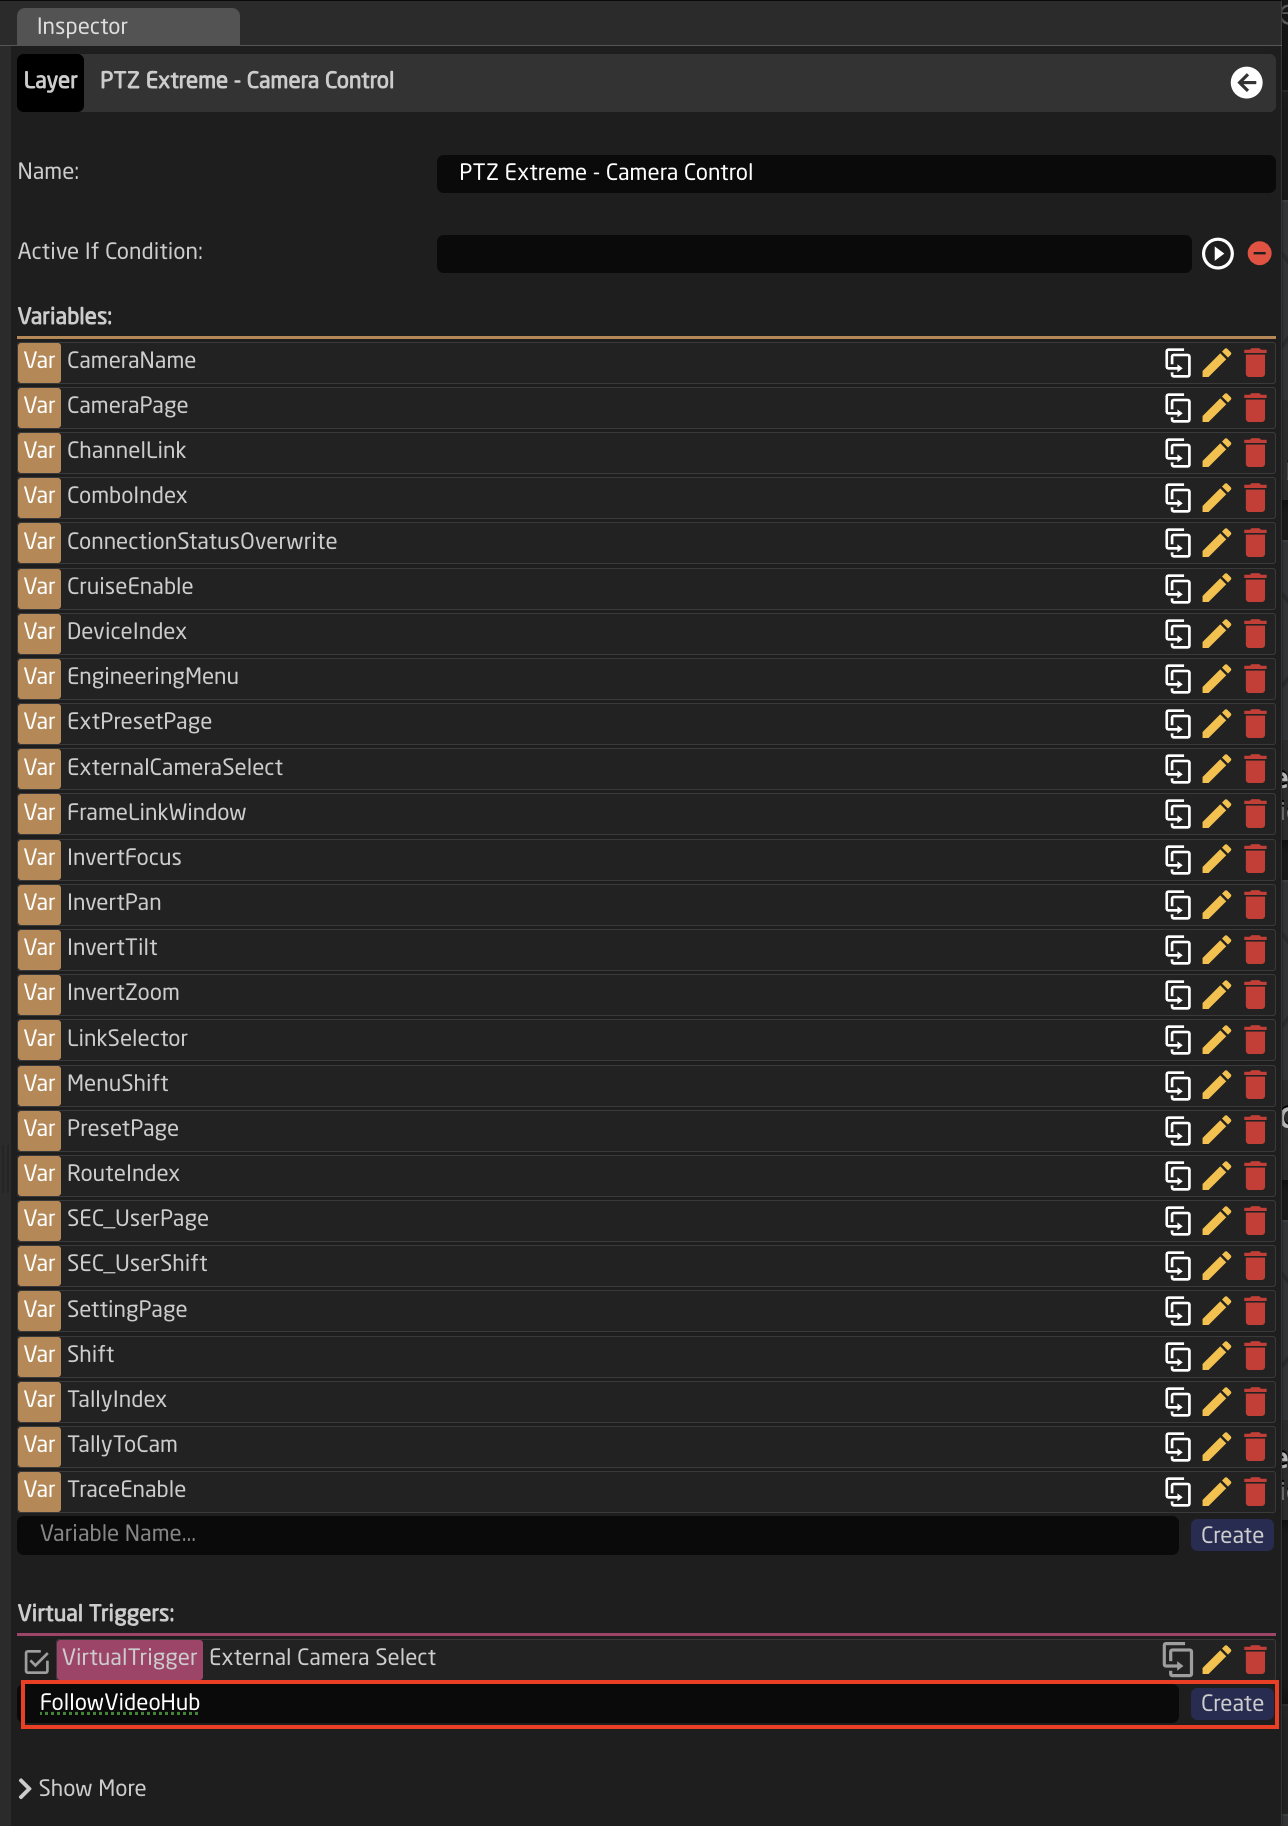
 5. Navigate to the Configuration Page. 6. If setting up for a single panel only, click anywhere on the panel background (blue part) to open the Inspector on the configuration base layer. 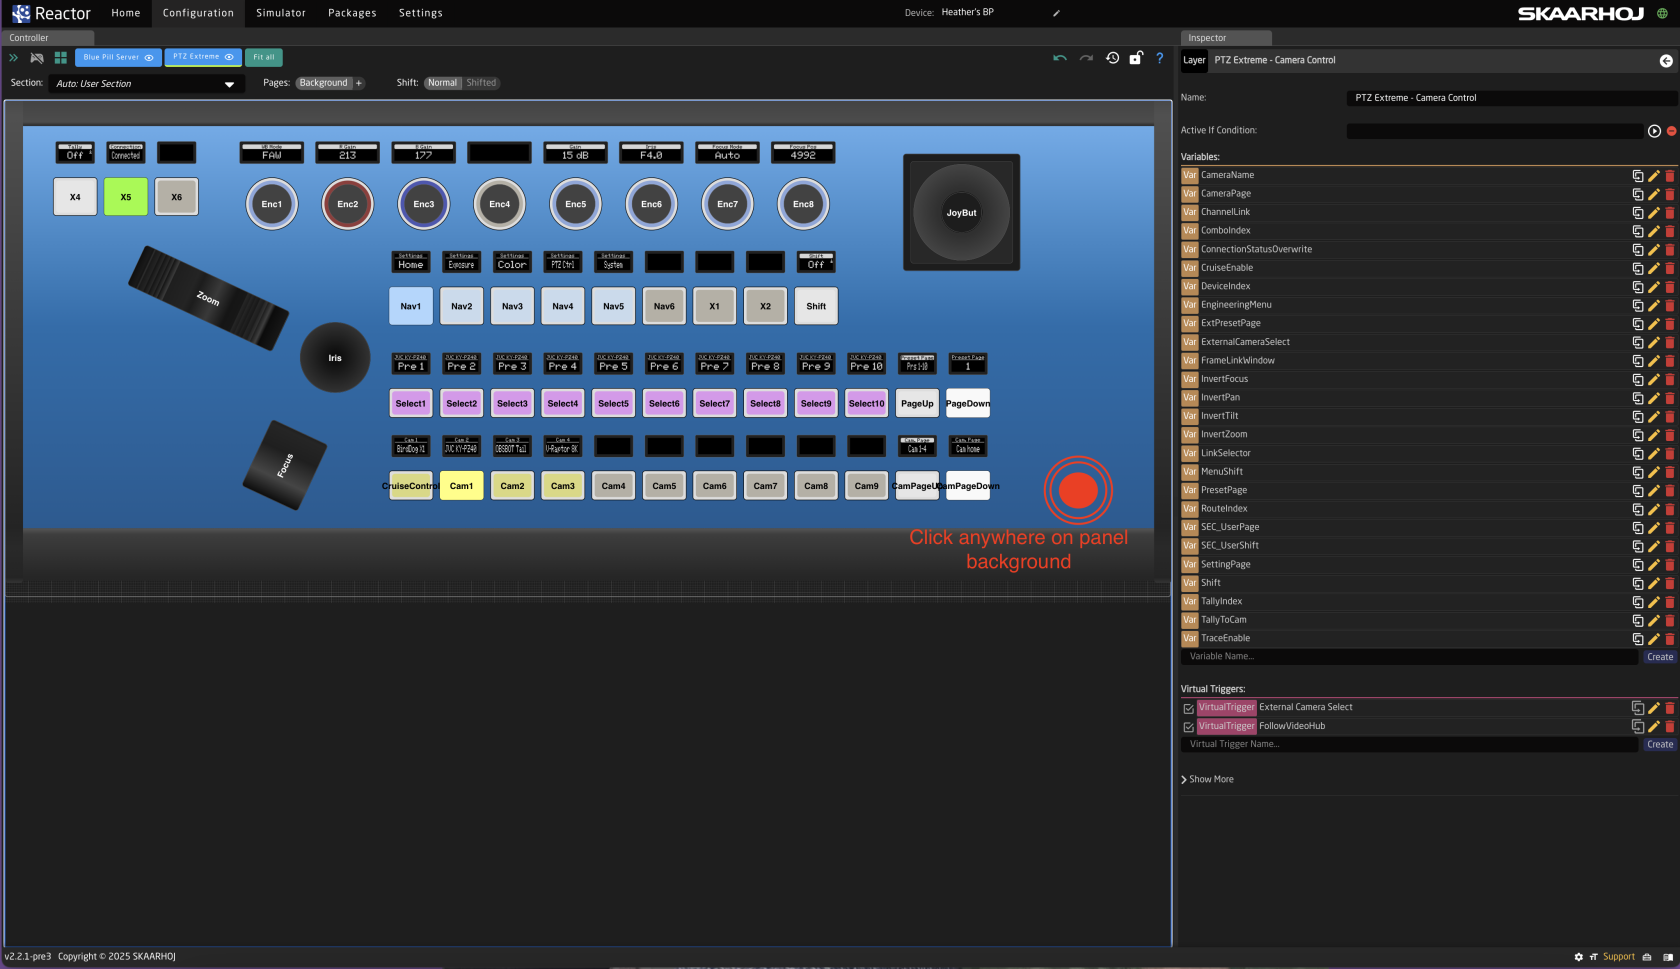 7. If setting up for multiple panels within the same project, open the Configuration Tree and click on the Root Layer at the bottom. 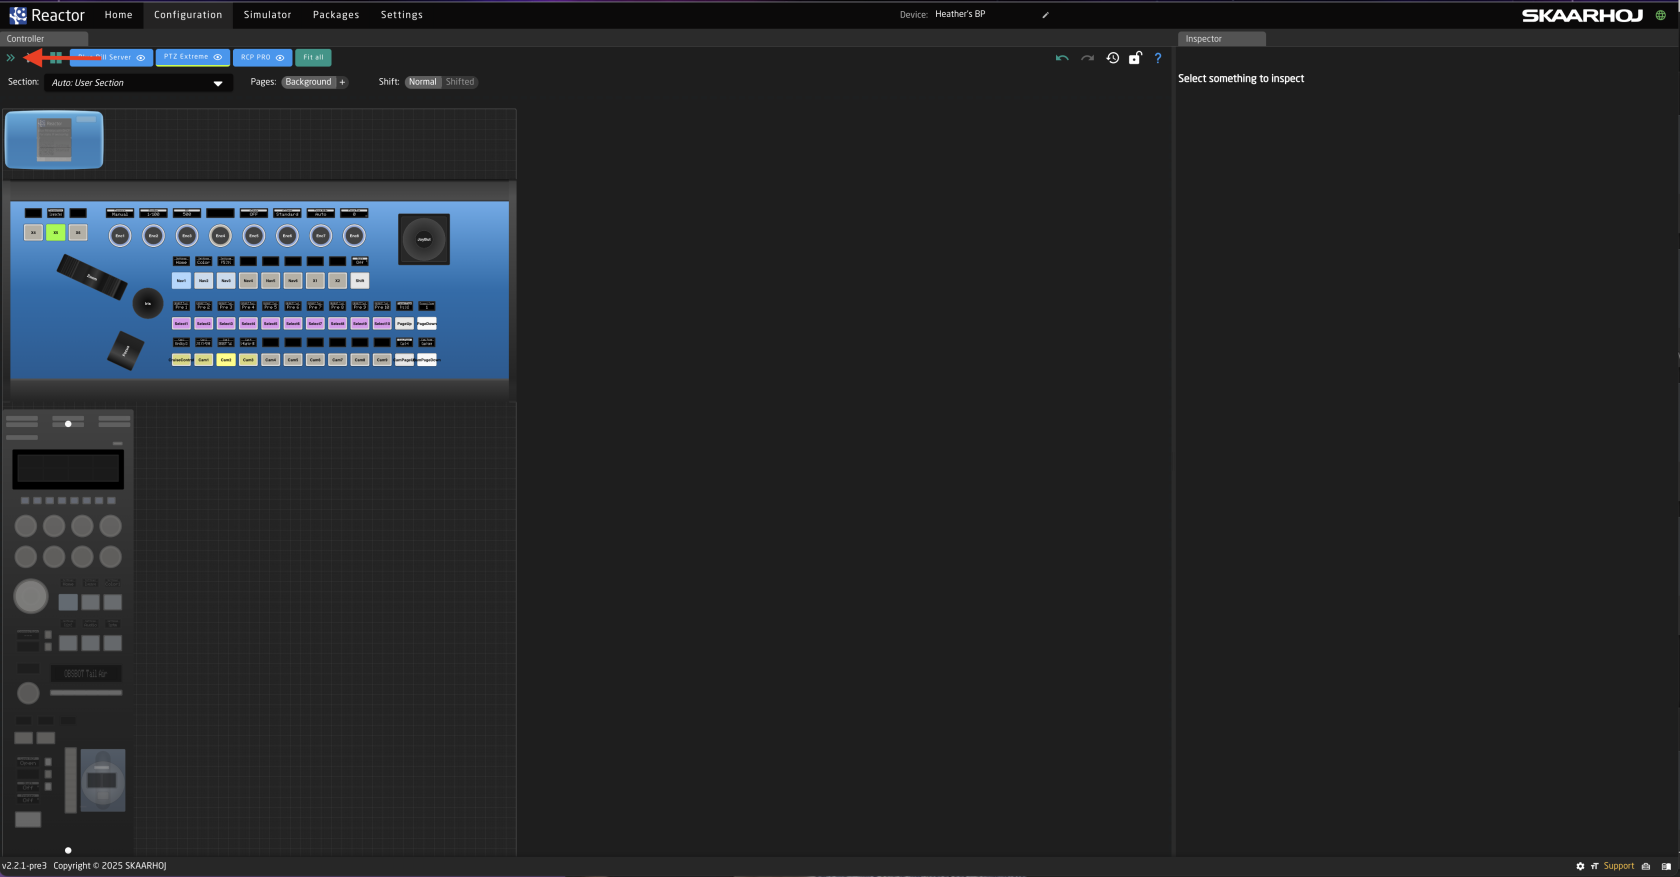 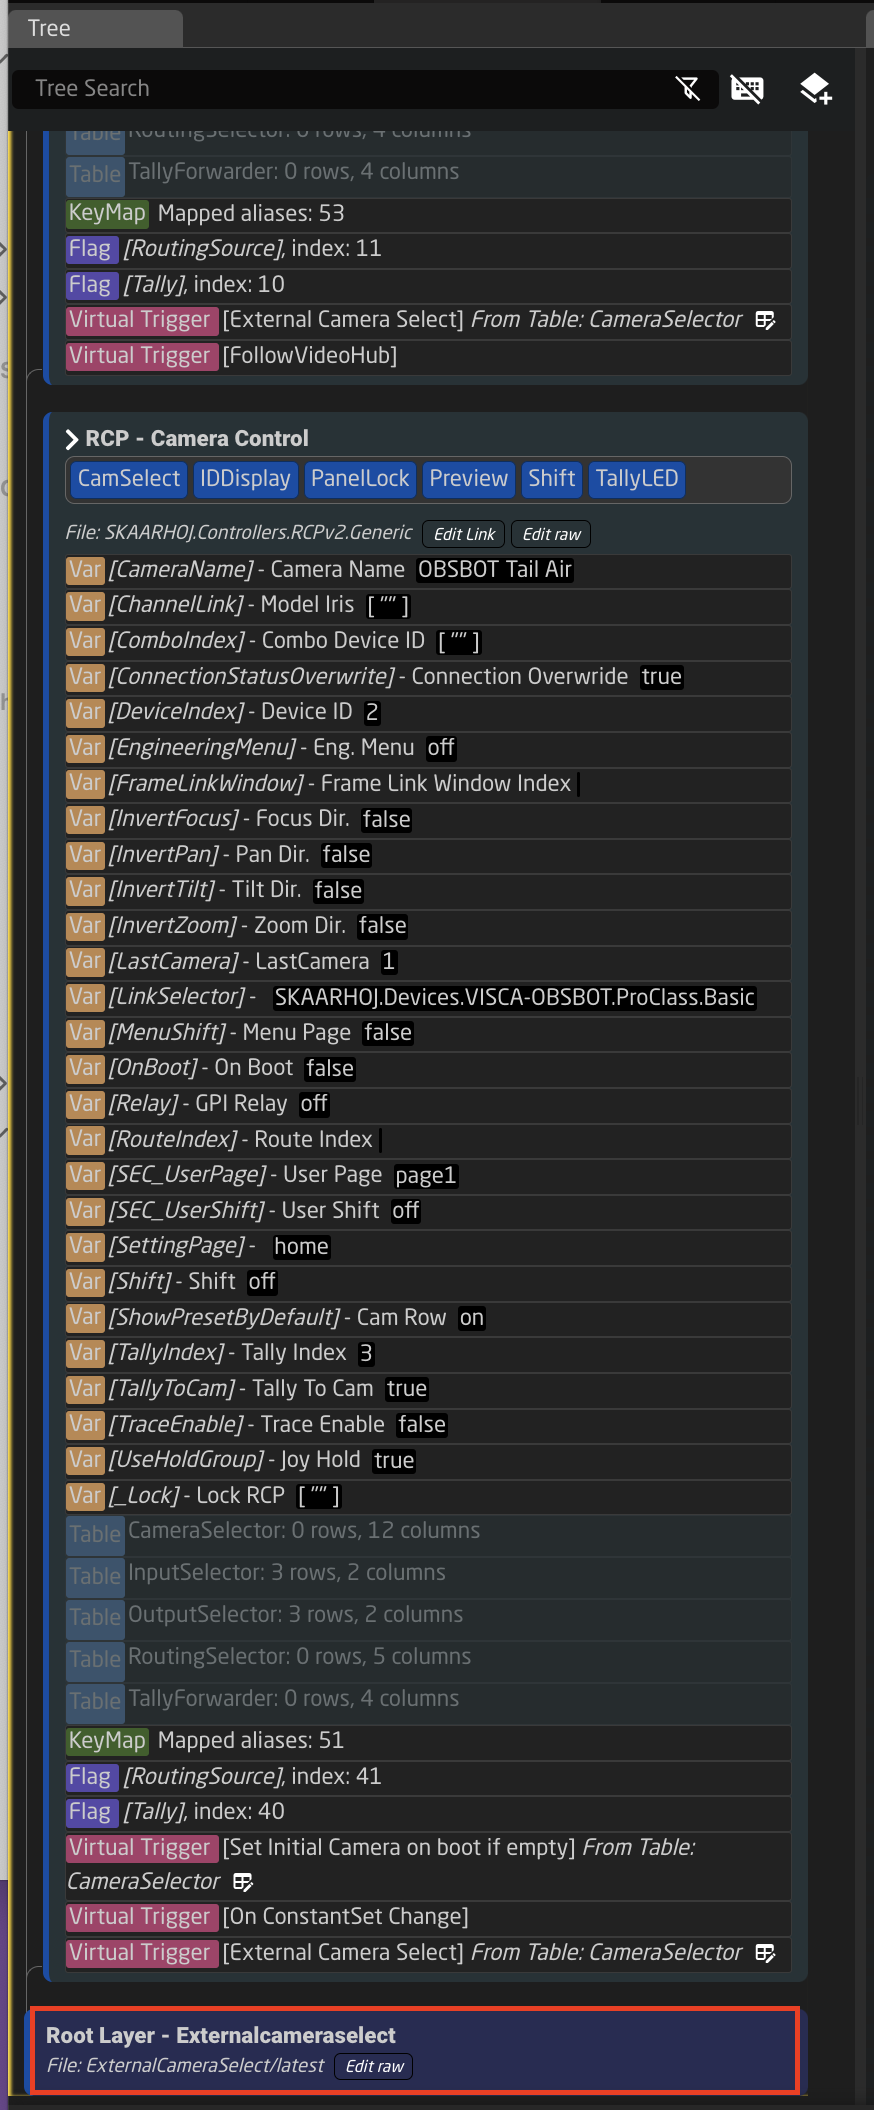 8. Create Variable called **ExternalCameraSelect** Exact name is needed as it is prebuilt into a Virtual Trigger. 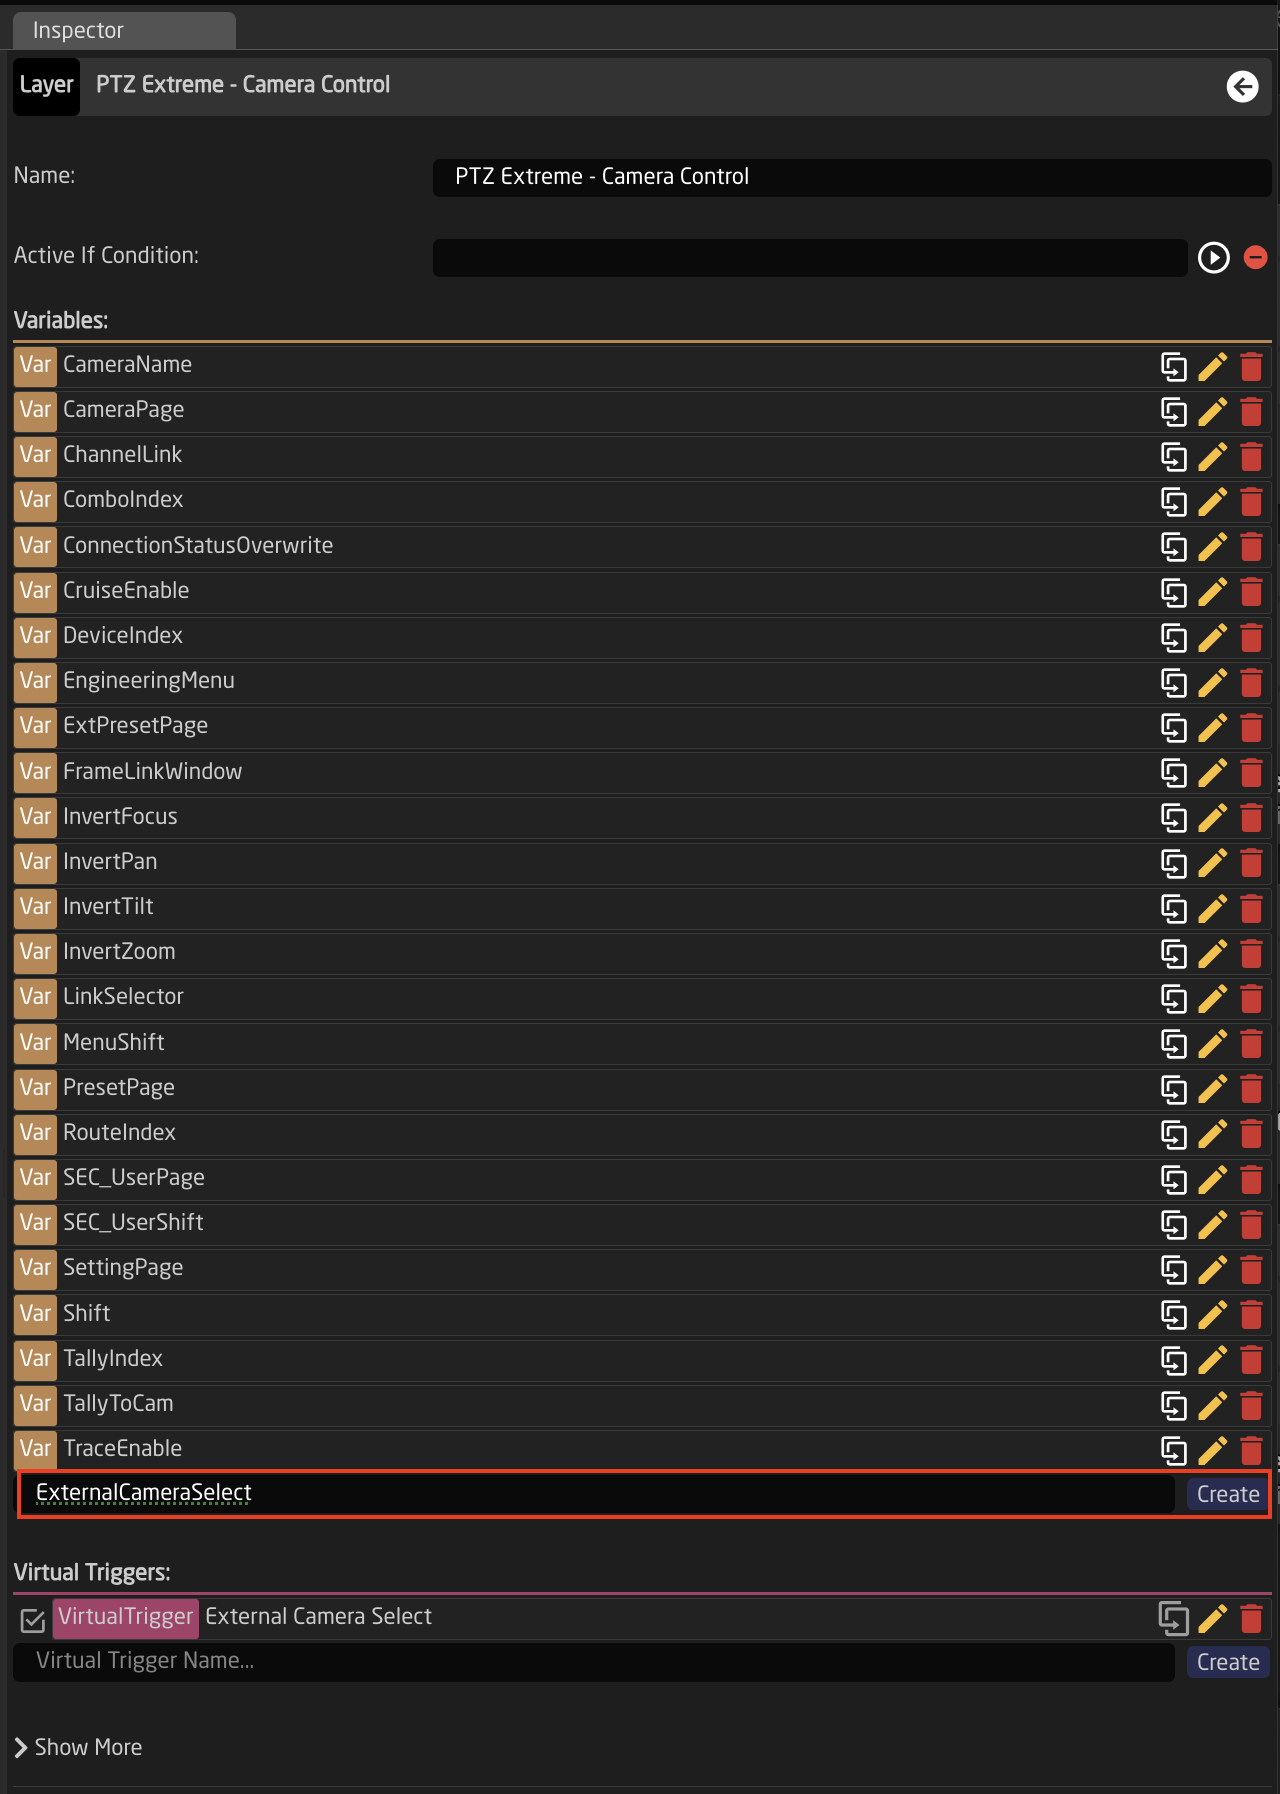 9. Adjust the needed range of the Variable based on numbers used in the Camera Selector on the Home Page for the Ext. Cam Number. The range used should encompass all numbers you have defined. By default the range is 1-10, if that is all that is needed, then no adjustment is required. 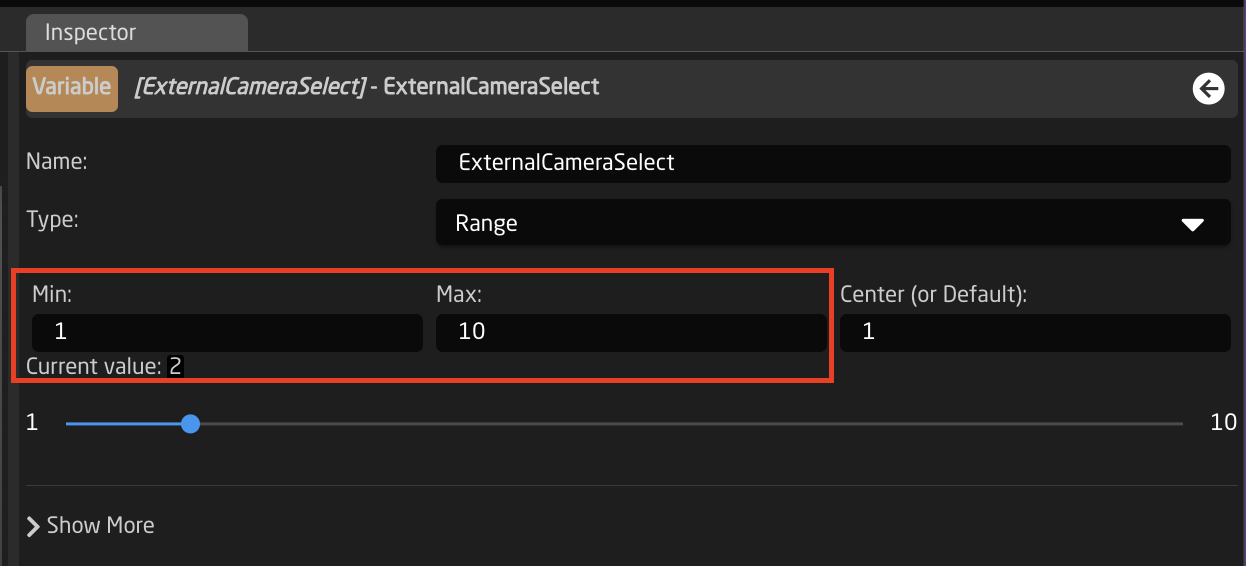 10. Create a Virtual Trigger to set the ExternalCameraSelect Variable based on desired parameter. Name the Virtual Trigger something that will allow you to easily identify what it is doing.Shown is an example using a Blackmagic VideoHub, but it can be any other device.
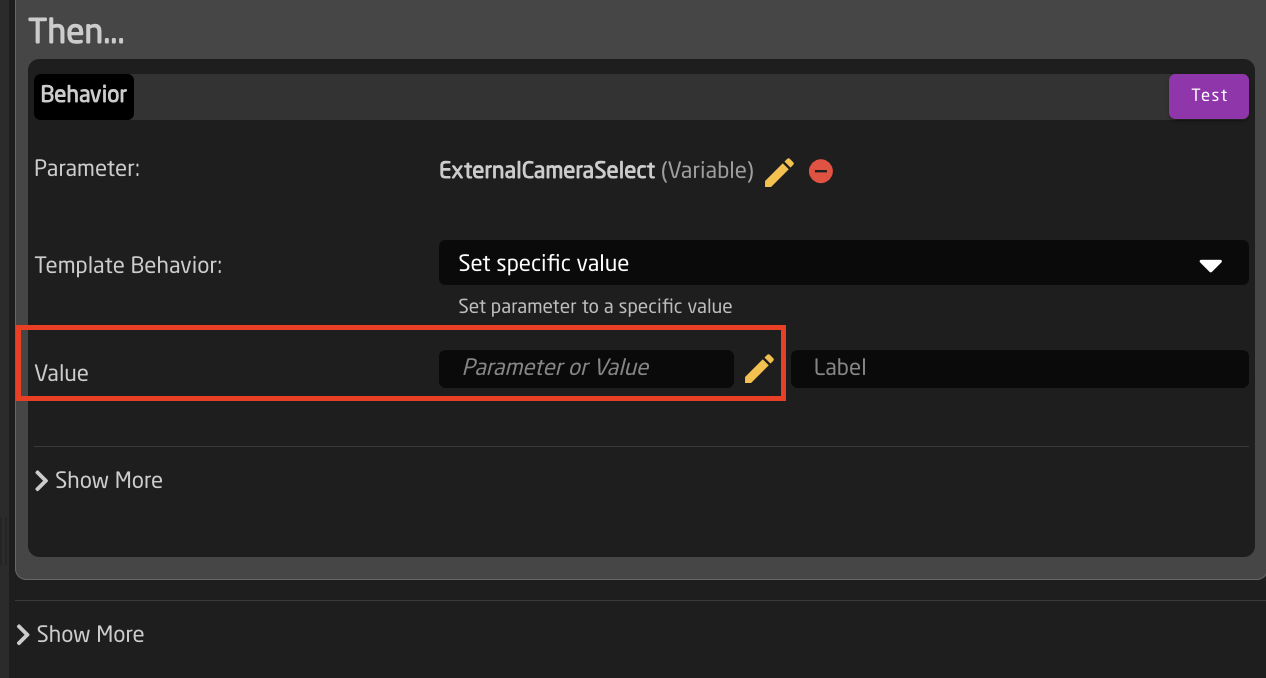
 11. Open the newly created Virtual Trigger. 12. Set the Mode to Change. 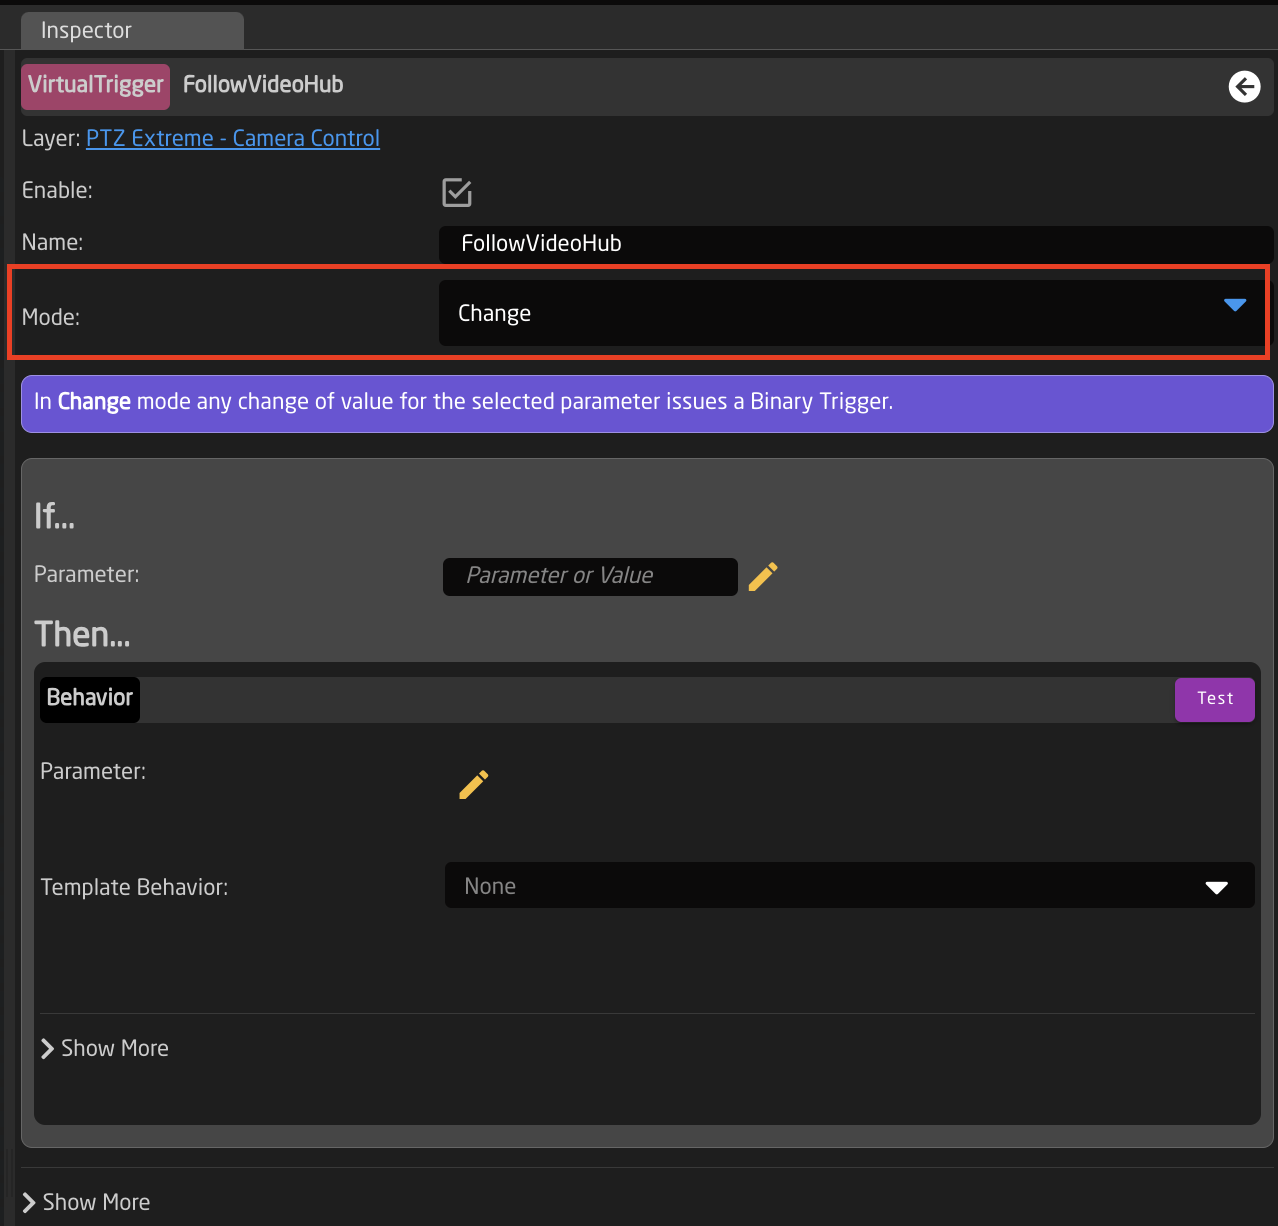 13. For the IF parameter, set the source of the trigger. In this instance a route of the VideoHub on a specific output will be used to change the ExternalCameraSelect variable. 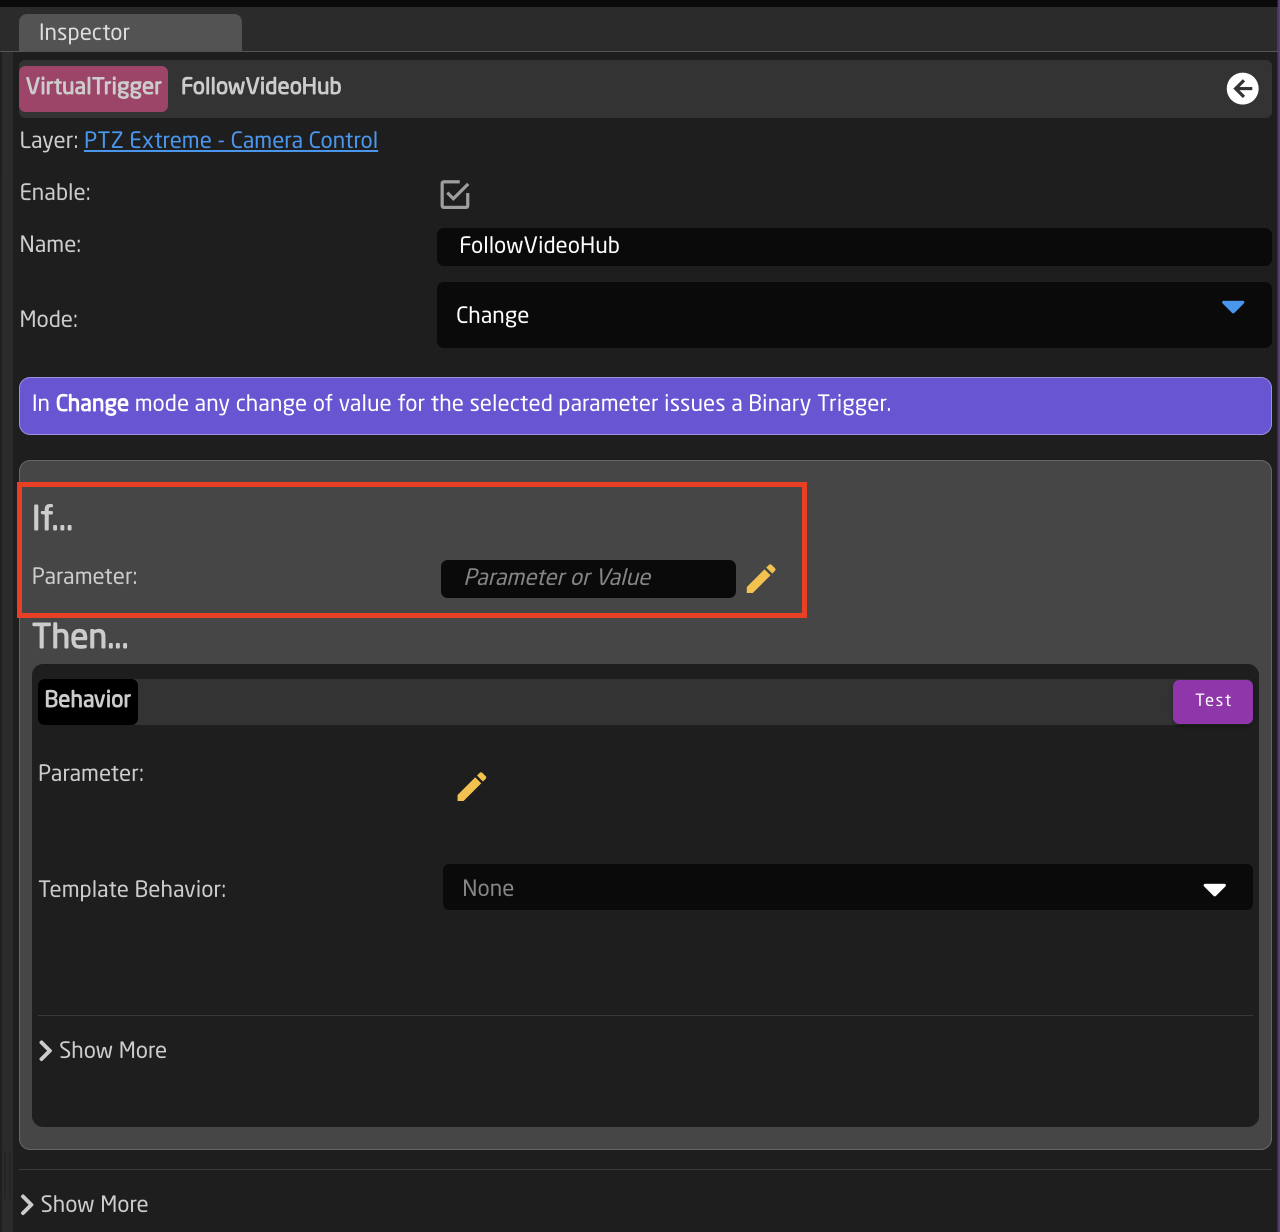  14. For the THEN parameter, select the ExternalCameraSelect Variable 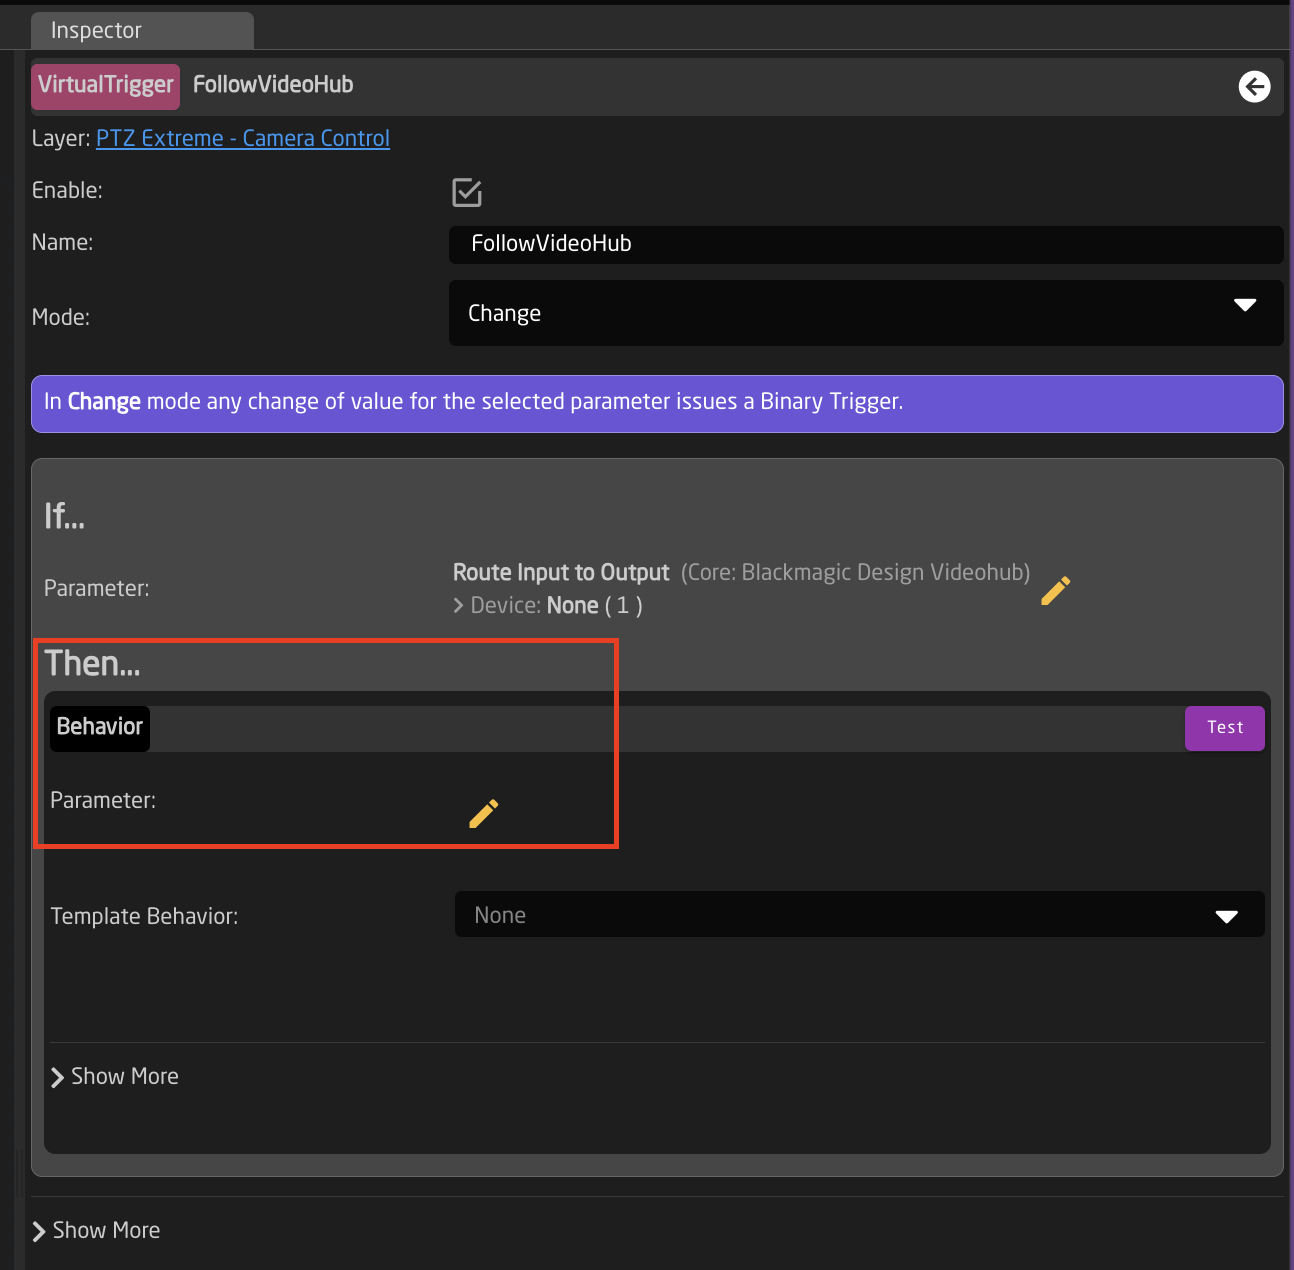 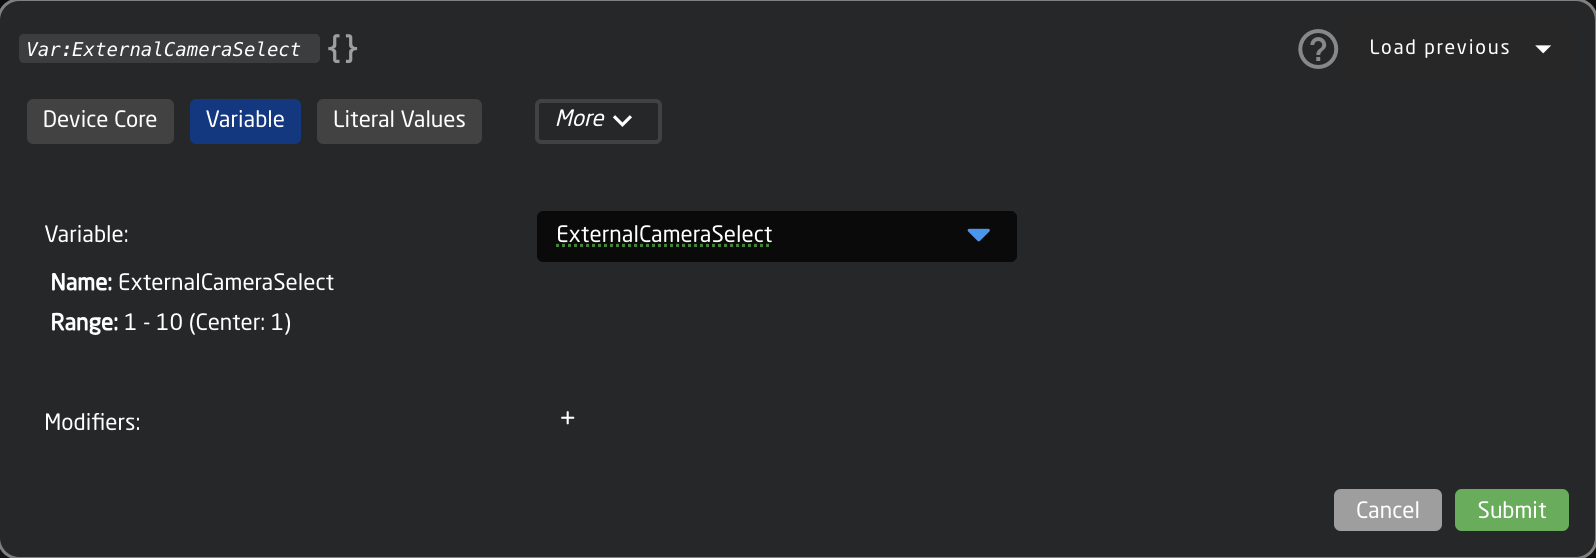 15. The needed Template Behavior for the THEN should be auto suggested. If it is not, you will want to select SET SPECIFIC VALUE. 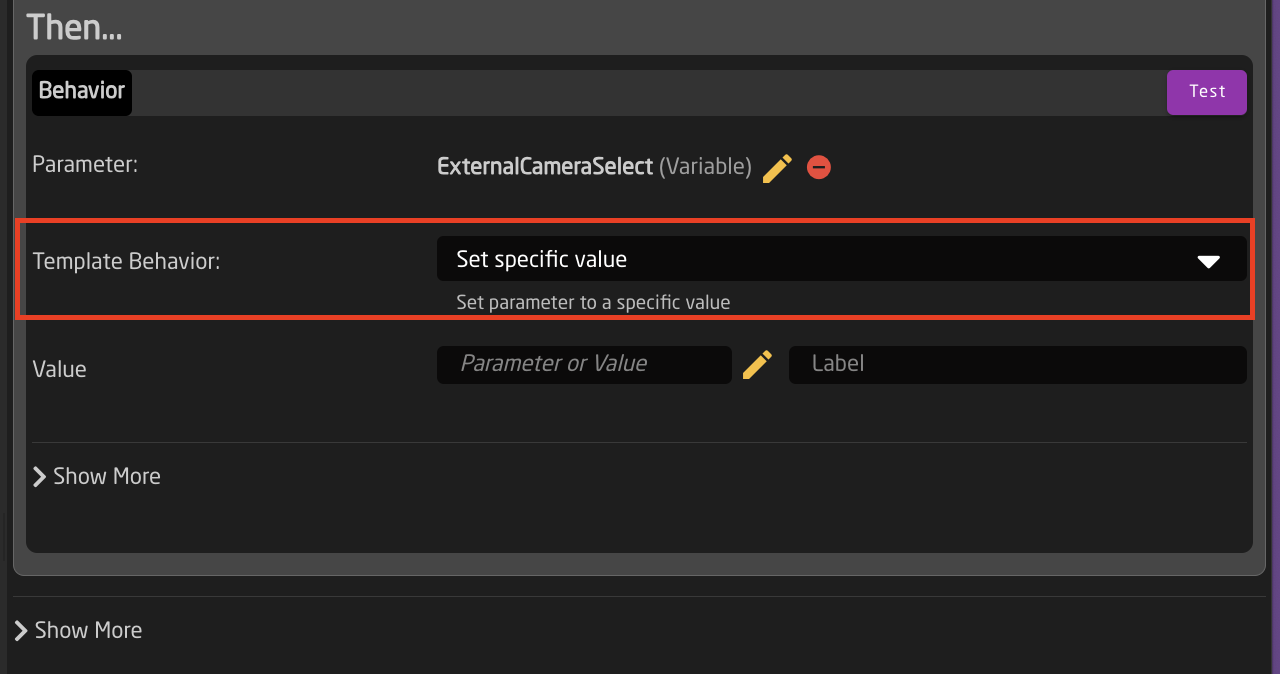 16. For the Value, set again the same parameter you used for the IF parameter. In this example it was Output 1 of a Blackmagic VideoHub.This is why it is recommended to set the Ex. Cam Number in the Camera Selector Settings Table to match the Input number from the trigger source. It can then easily be synced.
  17. The trigger is now set up and can be used. Note that any change in the source trigger's status will trigger the route (within the variable range set) but you are able to freely choose a different camera to control from the camera select row without it retriggering.The camera select doesn't need to be in the same order, but the same number needs to be associated with each camera.
6. Navigate to the Configuration Page. 7. Open the Configuration Tree and click on the Root Layer at the bottom.   8. Create Variable called **ExternalCameraSelect** Exact name is needed as it is prebuilt into a Virtual Trigger.  9. Adjust the needed range of the Variable based on numbers used in the Camera Selector on the Home Page for the Ext. Cam Number. The range used should encompass all numbers you have defined. By default the range is 1-10, if that is all that is needed, then no adjustment is required.  10. Close the Configuration Tree but remain on the configuration page. 11. Click on any of the camera select buttons for the panel you want to trigger the external camera select from. This will open the details in the Inspector. 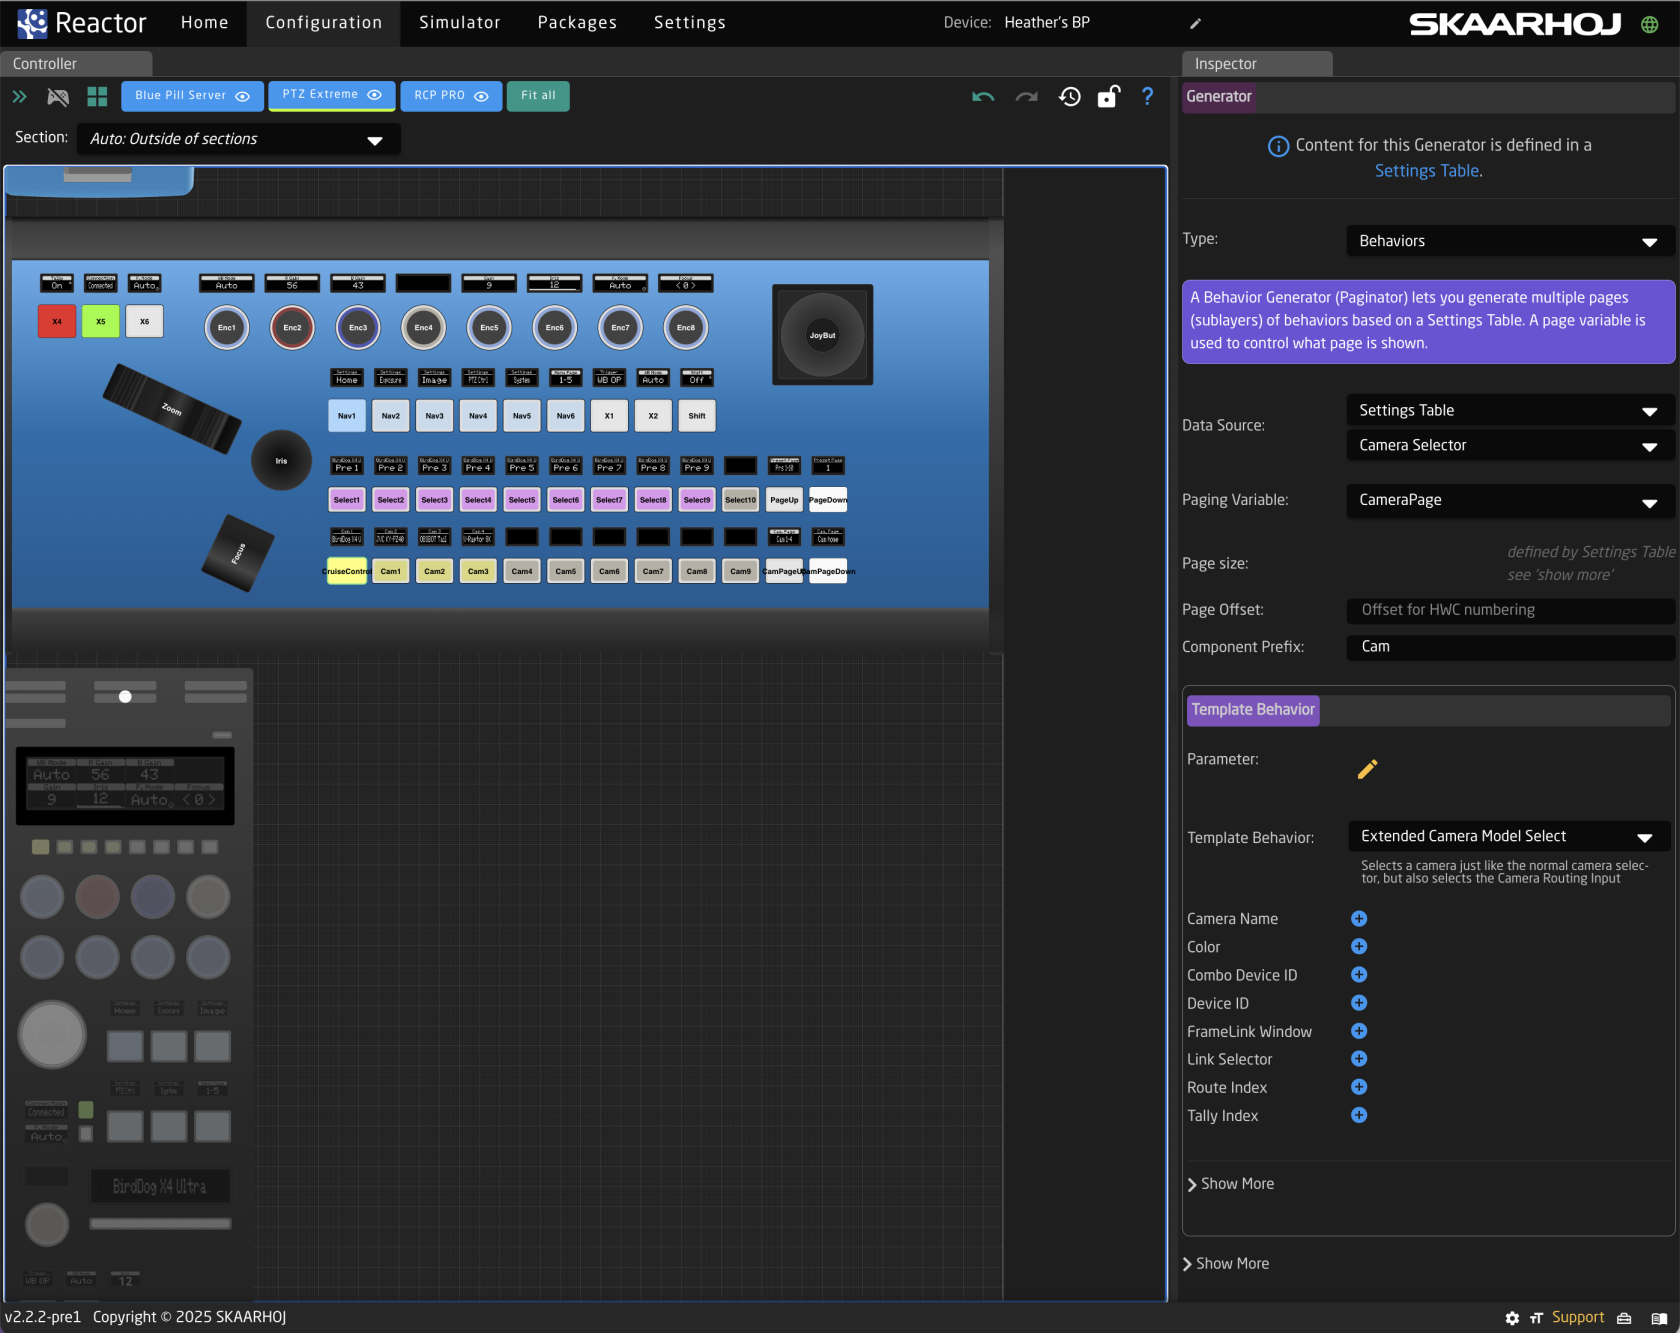 12. In the Inspector, click on the first Show More to expand it. 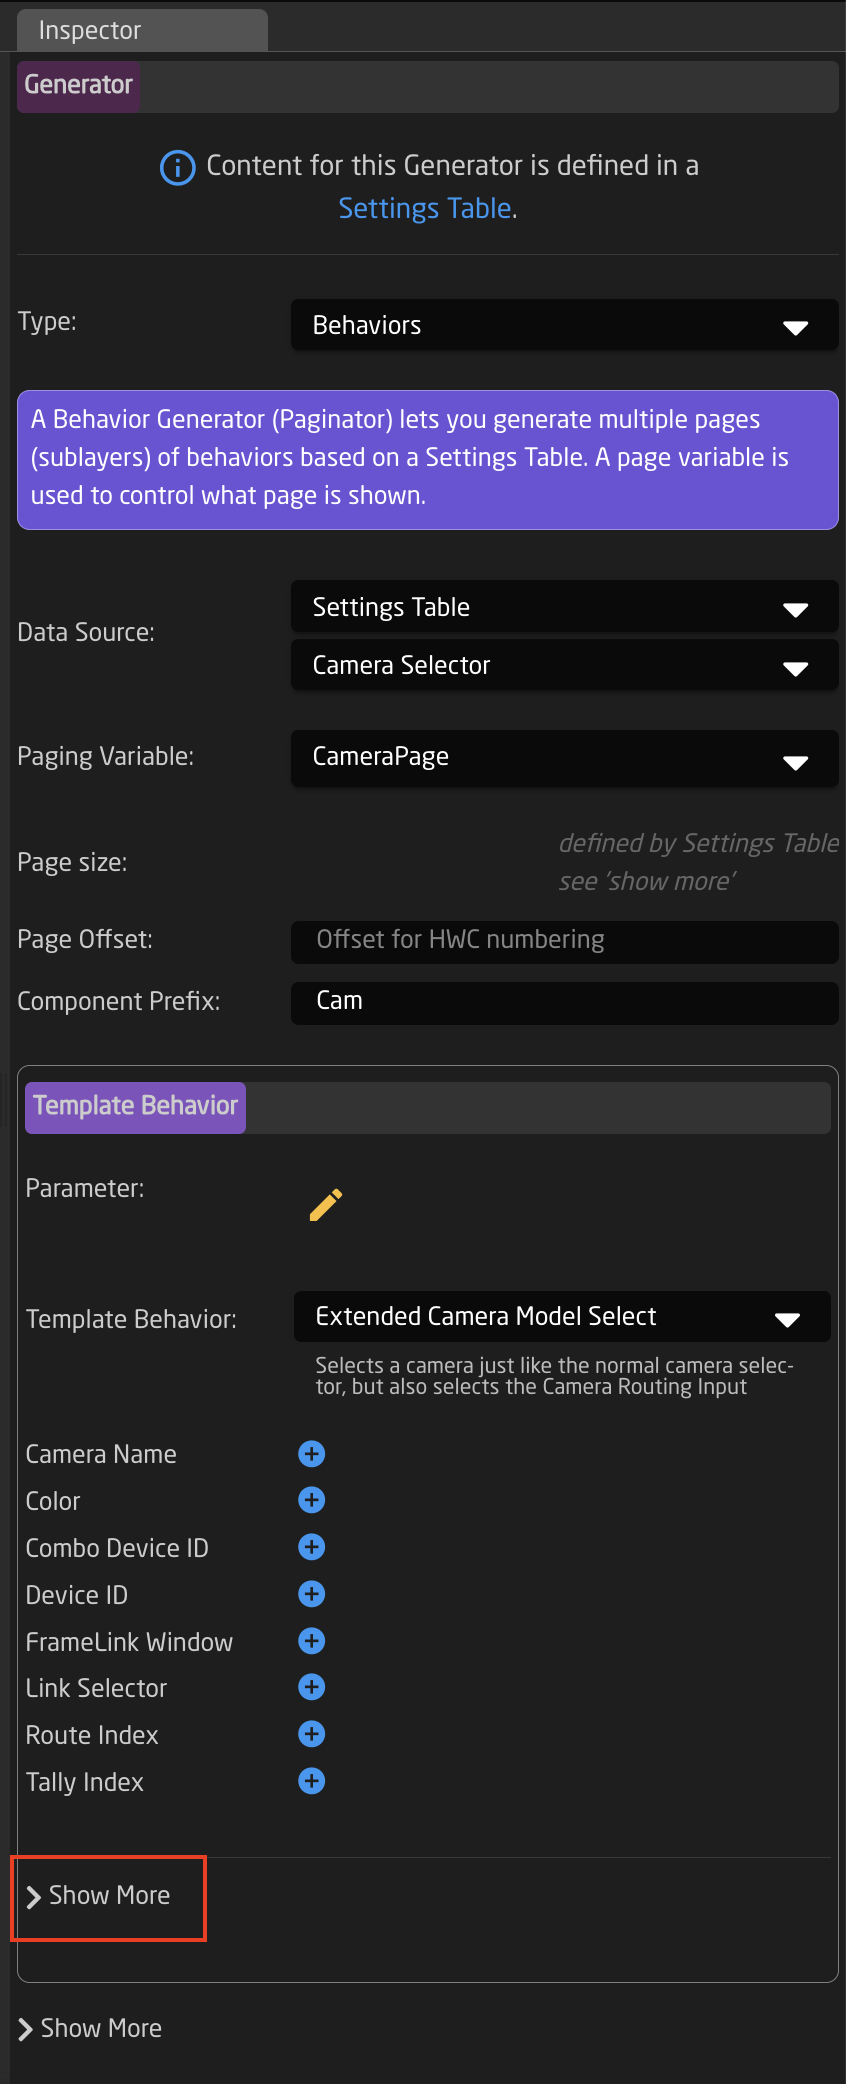 13. Create another Action called **externalselect**  14. Set up the action as follows: 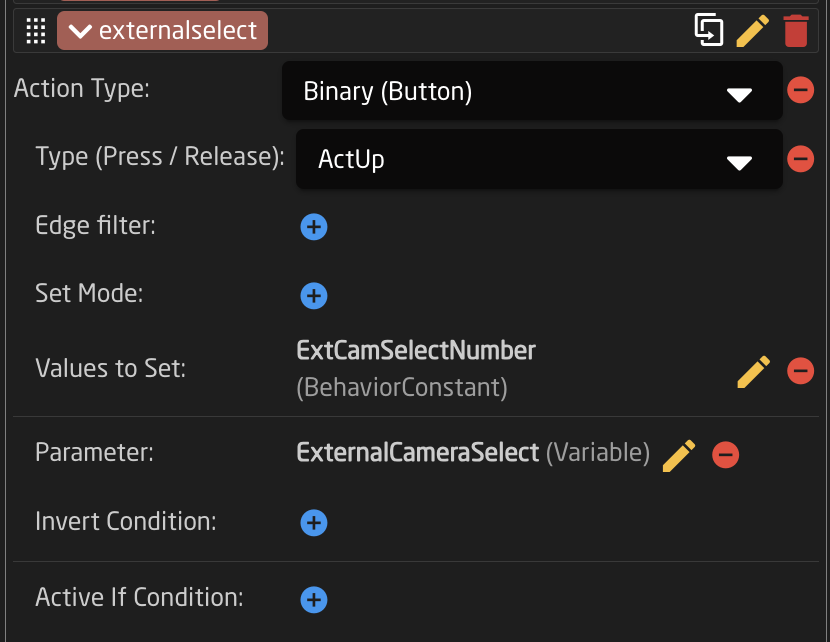Action Type: Binary (Button) Type (Press/Release): ActUp Values to Set: Behavior:Const:ExtCamSelect 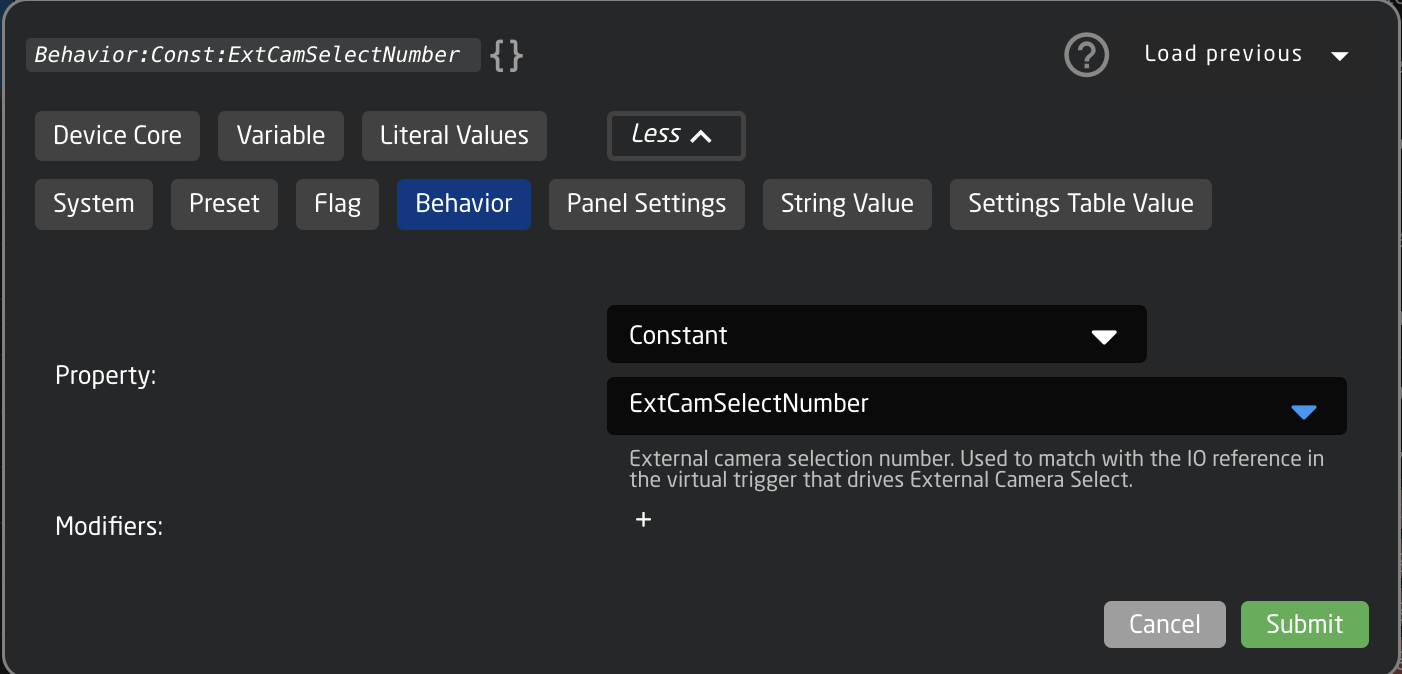Parameter: Var:ExternalCameraSelect 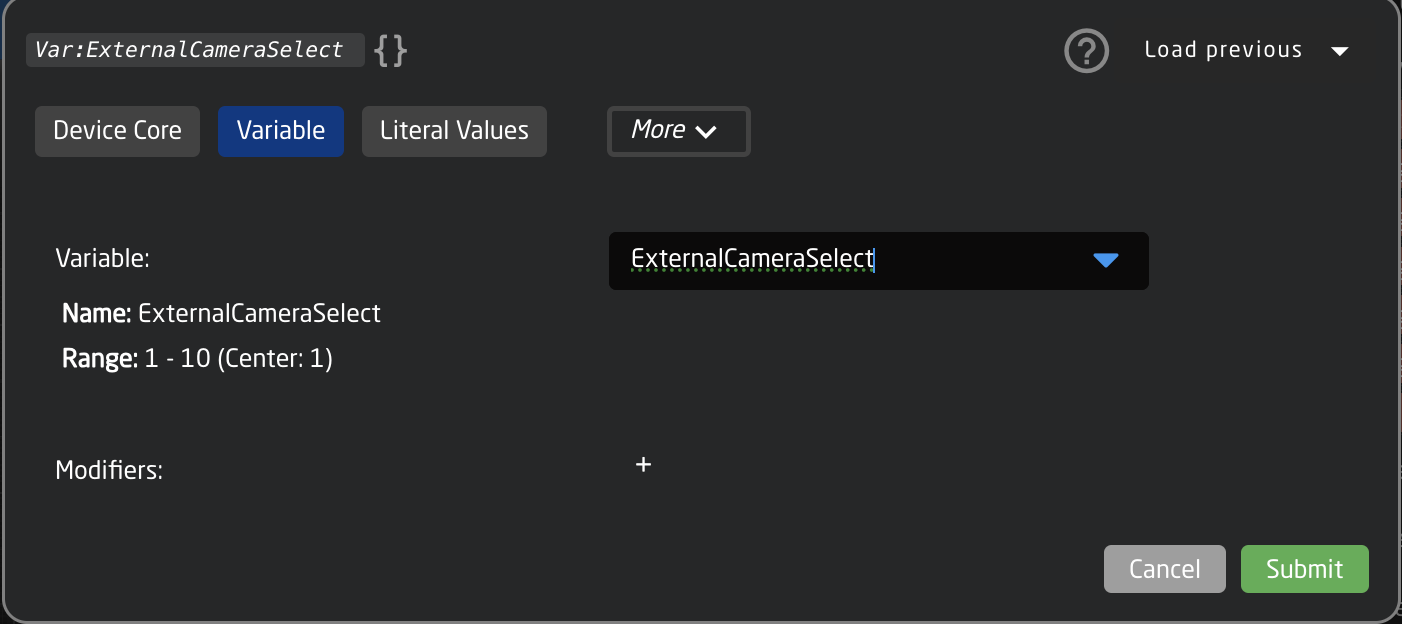 15. If you would like to trigger the external camera select to go both ways, repeat steps 11-14 for additional panels.| [](https://wiki.skaarhoj.com/uploads/images/gallery/2025-07/e2ylinear.png) Linear (default) | [](https://wiki.skaarhoj.com/uploads/images/gallery/2025-07/a5Hflat-top.png) Details in top | [](https://wiki.skaarhoj.com/uploads/images/gallery/2025-07/LHNflat-middle.png) Details in middle | [](https://wiki.skaarhoj.com/uploads/images/gallery/2025-07/OQsno-top-bottom.png) No top/bottom | [](https://wiki.skaarhoj.com/uploads/images/gallery/2025-07/more-points.png) More points = smooth |
| Guide to open the curve editor: 1. click a fader to select it in Inspector 2. select a parameter that uses a behavior for 'Change value on fader' (fx. Audio volume / Camera Iris / Hyperdeck PlaySpeed) 3. click 'Show more' 4. click the Action 'Change' to open it 5. click 'Show Advanced Action Options 6. in 'Static Value Mapping' select 'Coords' 7. next to 'Static Value Mapping Coords' click '+' to create curve, and click the small white 'curve' icon to open the curve editor | [](https://wiki.skaarhoj.com/uploads/images/gallery/2025-07/cgBaccess-curve-editor.png) |
| In the curve editor you add points, and drag them in the 0-1000 grid (0,0 being bottom and 1000,1000 being top). Here's a guide to the features: 1. click '+' or '-' to add or delete points. 2. adjust the grid size. For many uses 100x100 is fine. 3. drag points to adjust the curve. It always start in bottom left and ends in top right. Steeper vertical means less detail in this area - more horisontal means more detail in this area. 4. click the 'circle-arrow' icon to create an 'inverted feedback'. This can be vital to match return-values from the device you control, and avoid fader jumps. 5. hover mouse over 'brackets' icon to see all coordinates. 6. click 'Submit' to save the curve. Changes are applied immediately. | [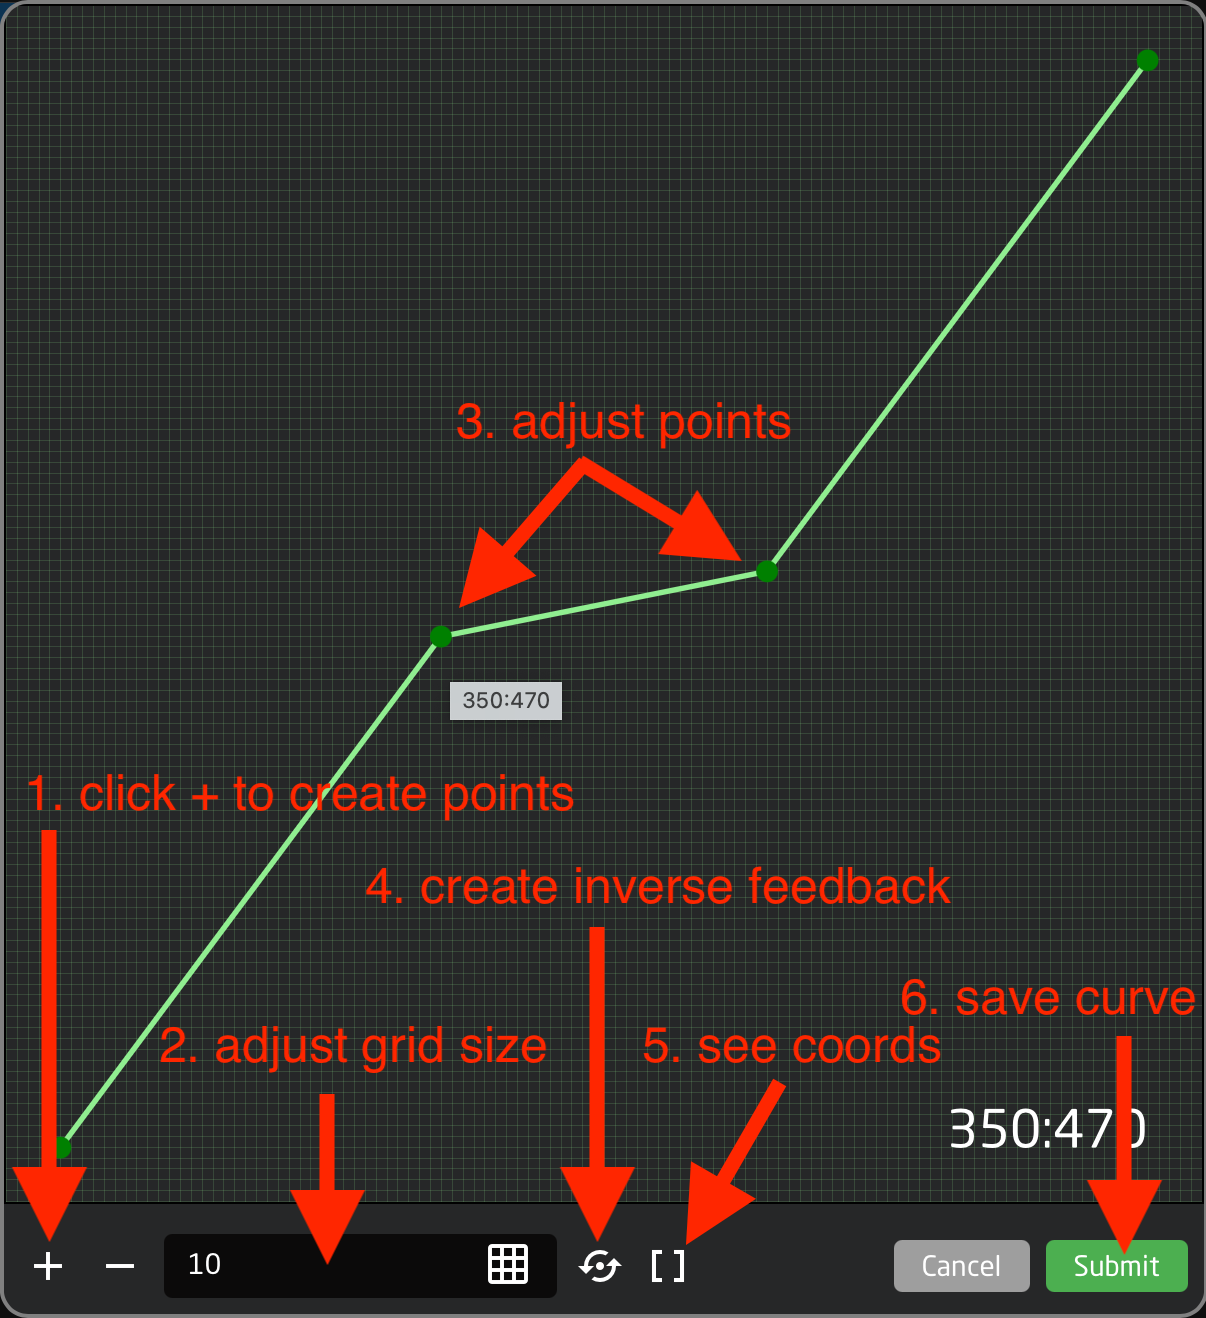](https://wiki.skaarhoj.com/uploads/images/gallery/2025-07/nGocurve-editor.png) |
This documentation has moved, see here: [https://docs.skaarhoj.com/3\_configuration/ioreference.html](https://docs.skaarhoj.com/3_configuration/ioreference.html "Reactor Manual - IOReference")
# Joystick Override / Hold Group guide This is a guide on how to handle 'Joystick override' and 'Hold groups' for CCU operators - allowing automatic routing of cameras to a confidence monitor. Imagine these operator steps: 1. CCU 1 presses the joystick :: Route cam 1 to monitor 2. CCU 4 presses the joystick :: Route cam 4 to monitor 3. CCU 2 presses the joystick :: Route cam 2 to monitor ... 4. CCU 4 lets go of the joystick :: (nothing happens) 5. CCU 2 lets go of the joystick :: Return to route cam 1 to monitor 6. CCU 1 lets go of the joystick :: Return to original input for monitor You can of course have more CCU's - and the order of who does what when is remembered by the system. #### Prerequisite This setup requires a 4 things: - Blue Pill device --> Is the brain, running the config and controlling both ETH-GPI Link and video switcher/router For example 'Blue Pill Server' : [https://www.skaarhoj.com/product/blue-pill-server](https://www.skaarhoj.com/product/blue-pill-server) - ETH-GPI Link --> Handles the GP inputs from the CCU's [https://www.skaarhoj.com/product/eth-gpi-link](https://www.skaarhoj.com/product/eth-gpi-link) - A number of CCU's with GP output for joystick press - A video switcher/router (for example; Aja Kumo, ATEM, Tricaster, vMix etc.) NOTE: The Blue Pill device must have Reactor 2.2.3-pre10 or later installed. This is handled on the 'Packages' page. NOTE: The ETH-GPI Link must be in 'Blue Pill Mode', which means it's controlled by a Blue Pill device. #### Configuration 1. Goto IP address of Blue Pill device to see Reactor, the configuration manager. 2. Click '**Add panel'** and select your ETH-GPI Link 3. Click '**Add device**' and select your routing device 4. In the ETH-GPI Link configuration drop-down menu, **select default configuration** 'Tally & Routing' 5. Click '**Camera Selector**' to open settings -> Add empty rows (by holding Shift) -> Set route index \[1, 2, 3..\] (these are the camera inputs on the switcher/router) 6. Click '**Routing Trigger**' to open settings -> Select the output to route to 7. Click '**GPIO Input mapping**' to open settings -> Change type from ‘Tally Program’ to ‘Route Index’ 8. Click '**Config Variables**' to open settings -> Select 'Press' or ‘Hold down’ Advanced step to share stack between multiple \[Blue Pill Inside\] RCP panels in the same configuration: 1. Goto Configuration page -> click '>>' in window left/top top show Layer Tree 2. Find variable: HoldGroupState -> right-click it and copy it 3. Scroll down to lowest Root layer -> right-click it and paste variable here (variables here are shared by all panels) #### Screenshots Same as config steps above 2: [](https://wiki.skaarhoj.com/uploads/images/gallery/2026-03/2-add-panel.png) 5:  6:  7: 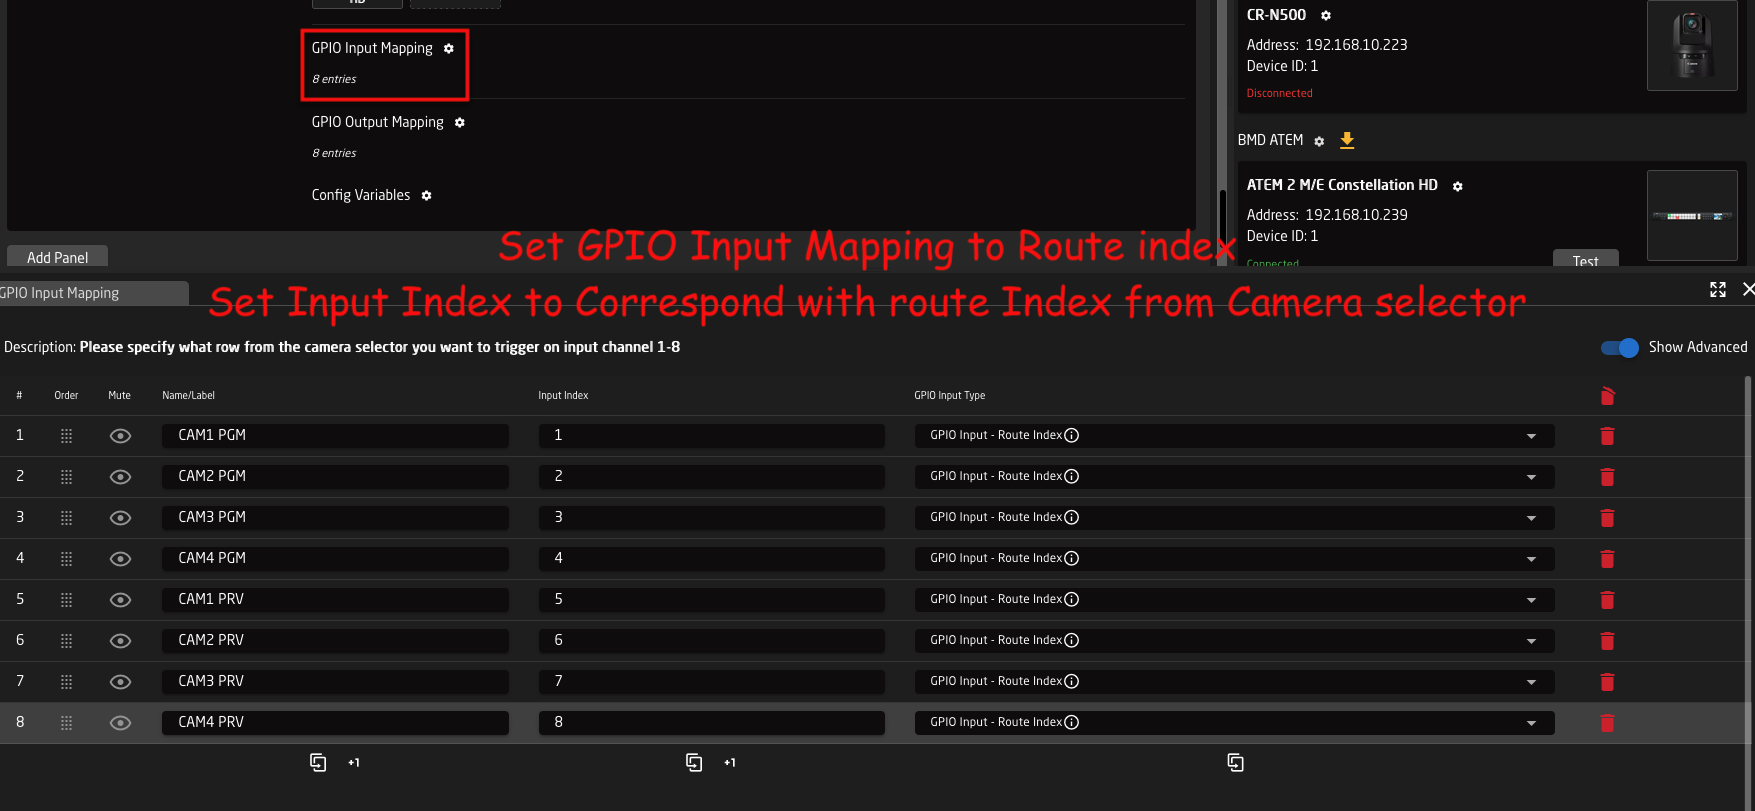 8: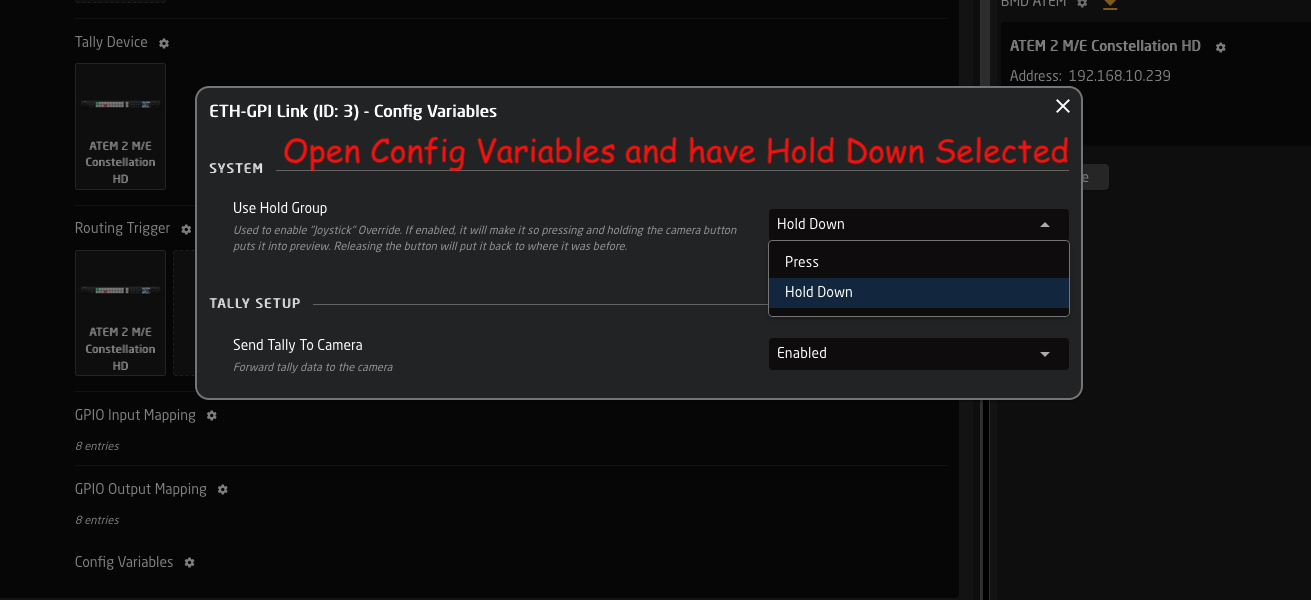 # Page LayersPlease note: This video is made for Reactor 1.x We have since released Reactor 2.x - and the video is no longer up-to-date.
This guide show you how to make Page Layers. Say you wish control 8 parameters on a camera, but only have 4 encoders on your controller. In this case you make two 'Pages' - or layers - and assign different commands in each 'Page'. You then assign a button to toggle between the pages.This page has been made obsolete in newer versions of Reactor.
By default Pan, Tilt, and Zoom are all controlled by the setting Joystick Sensitivity. This is not ideal for some users who would like Zoom to be controllable at its own sensitivity. To separate this out it is necessary to dive into the configuration and the json editor, but don't worry, it isn't too difficult. This example will be done on the PTZ Extreme but can be applied to all configurations. Joystick sensitivity is not set for the whole controller, but per camera configuration based on device core. The configuration in this instance is different from the panel mapping. There will be a different configuration added for each device core used.Different brands might use the same device core, example: BirdDog, NewTek, Marshall all use the Visca device core.
This example was made on a Blue Pill running the following version: SkaarOS v1.0 Reactor v1.0.5-pre11 System Manager v1.0.1-pre1 Hardware Manager v1.0.2-pre3 Using earlier versions can affect the look of the interface causing it to appear different. We recommend using at least the indicated versions or newer.
1\. Determine the number of PTZ configuration in your set up. In the set up example there are 3 different device cores used as indicated in the Devices section. All devices will be grouped by the used core in this section. 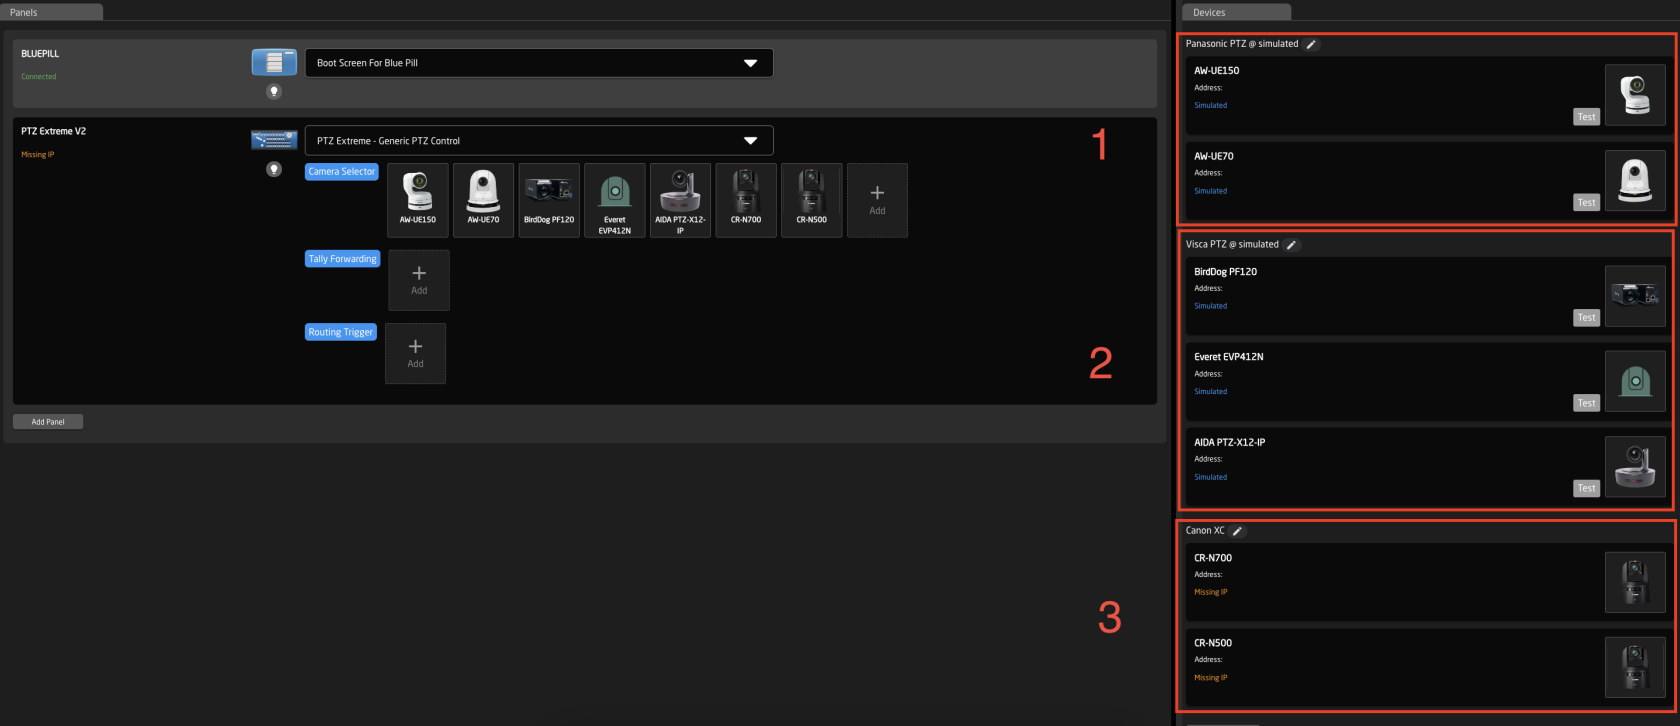 2\. Navigate to the Configuration Tab.  3\. Open the Tree to navigate to the Device Core Configurations. The tree expands from the bottom up, like a tree starting at the roots. (This is shown in a collapsed view) 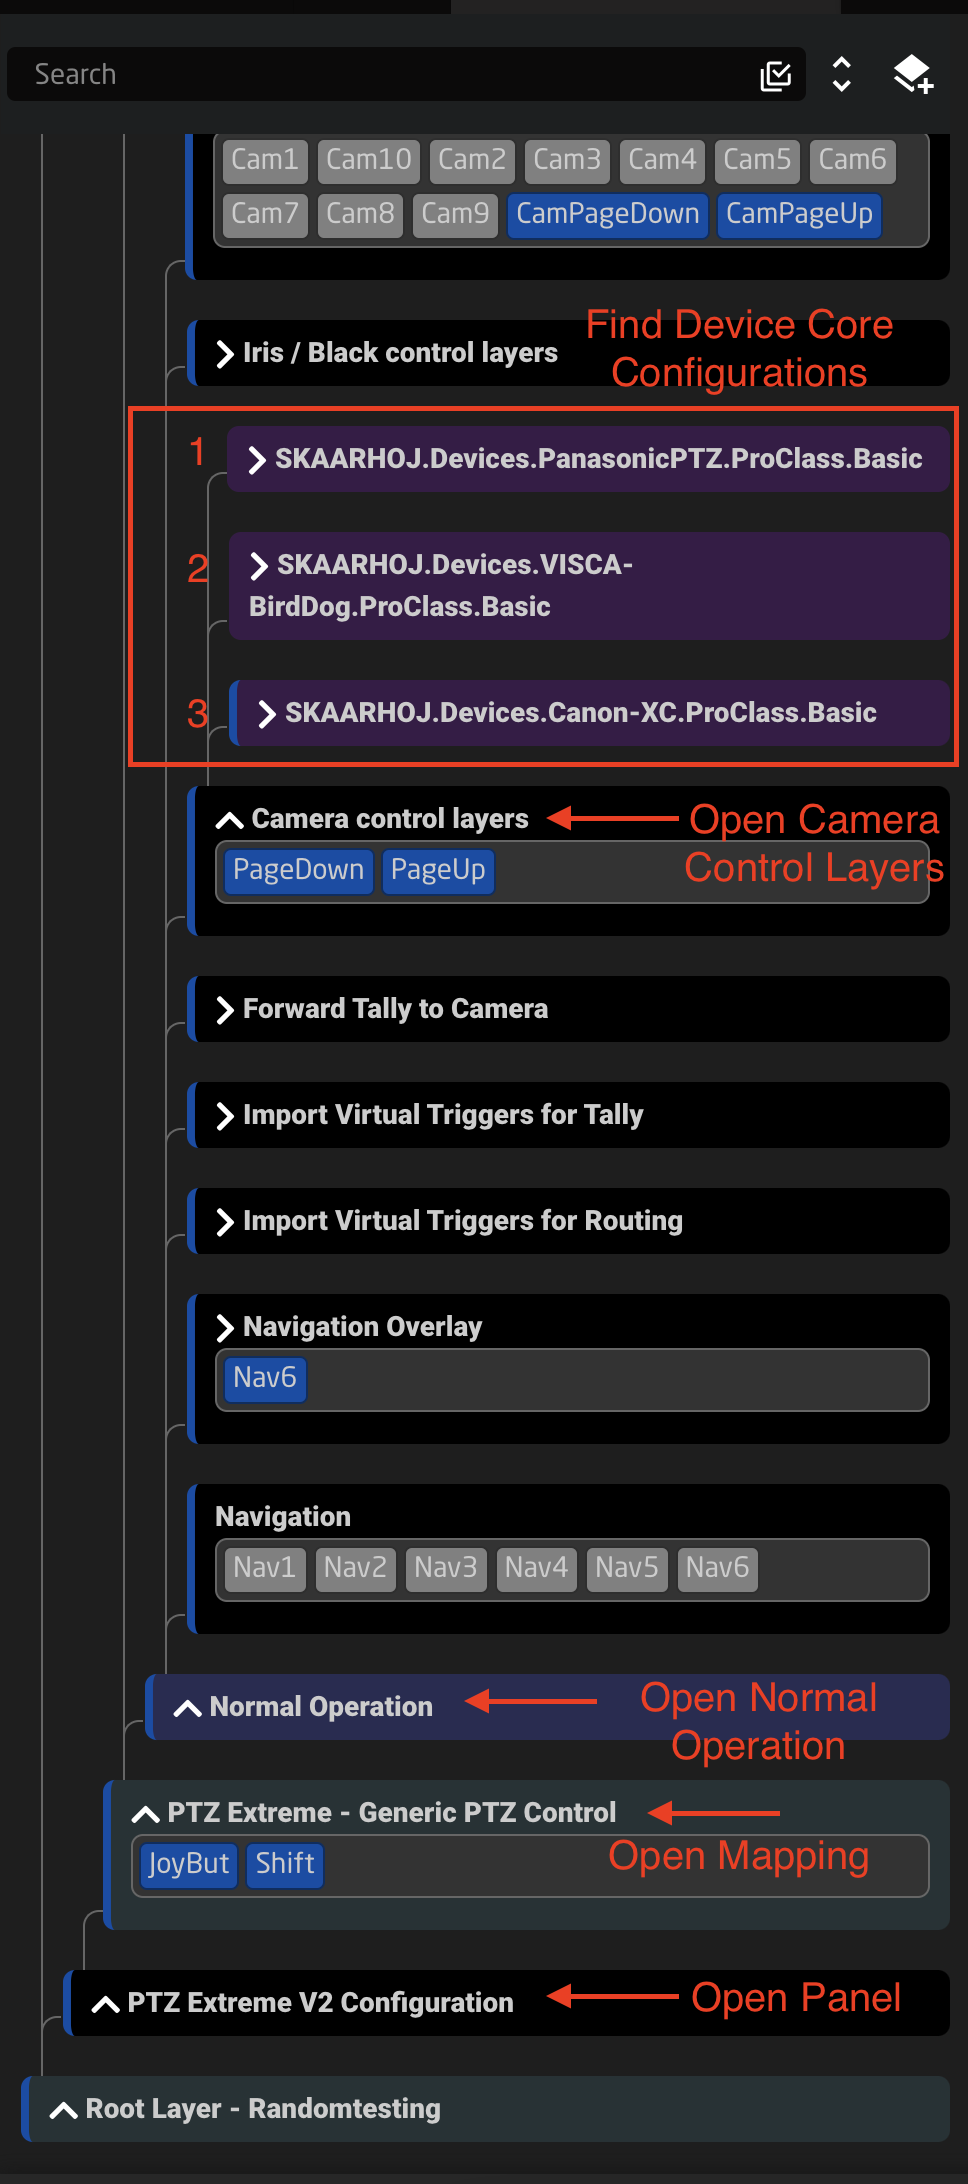 4\. Navigate to the Joystick Sensitivity variable for a Device Core Configuration. 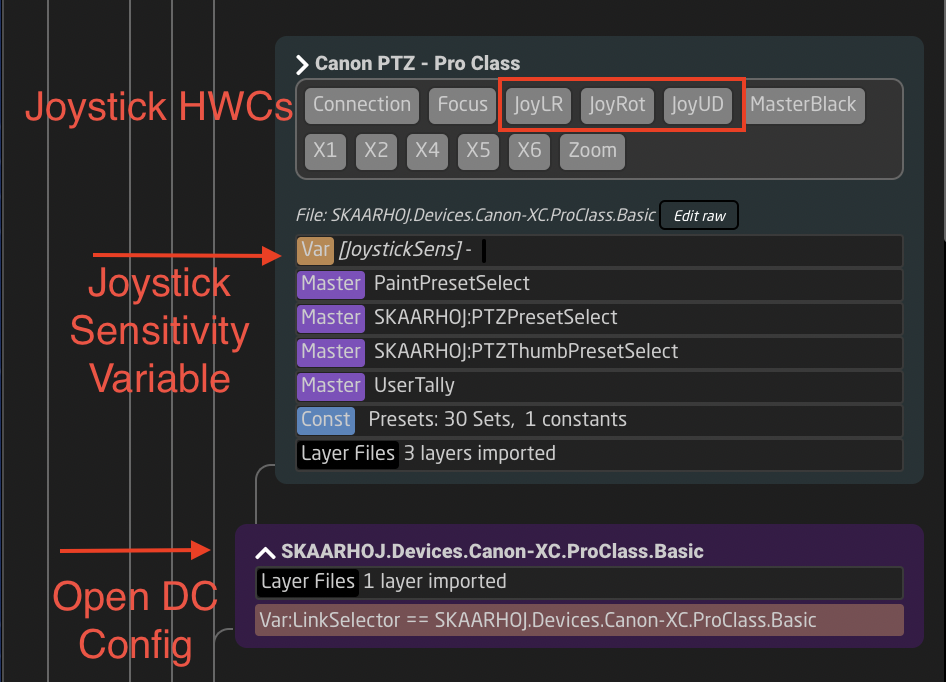 5\. Open the Tree Layer with the Joystick Sensitivity Variable. When selected the layer will change color and you will see it open in the Inspector on the right side of the screen. 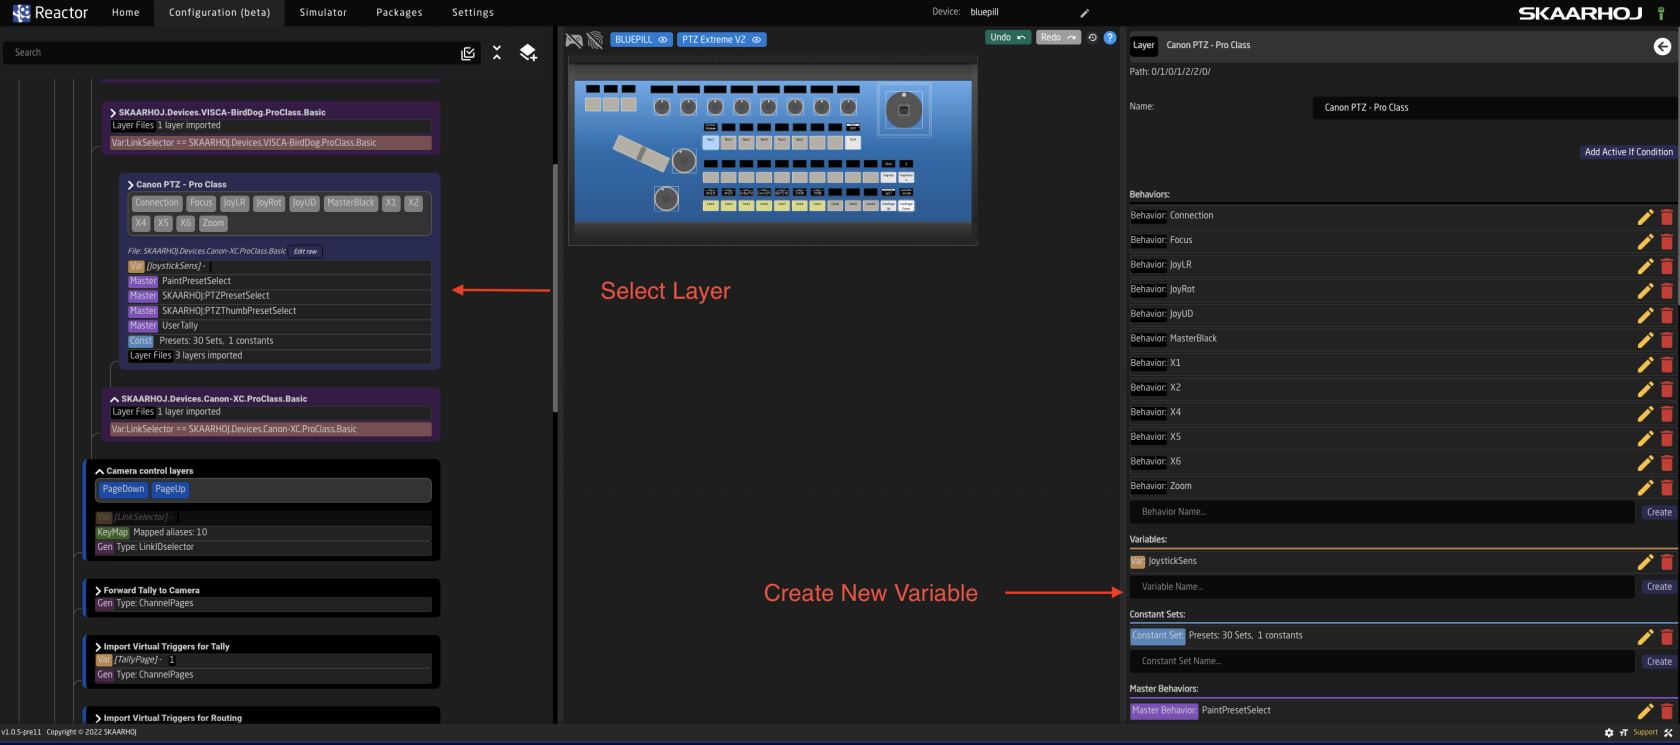 6\. Create a new variable called **ZoomSens**. This could be named anything, but it is best to use something that will be easy to remember and type later.  7\. Open the ZoomSens variable to edit the details. Use the same details as the JoystickSens variable. The name is however you would like it to display on the controller. The type is Range The Min is 1 The Max is 10 (The scale should not exceed 10) Default value is 10 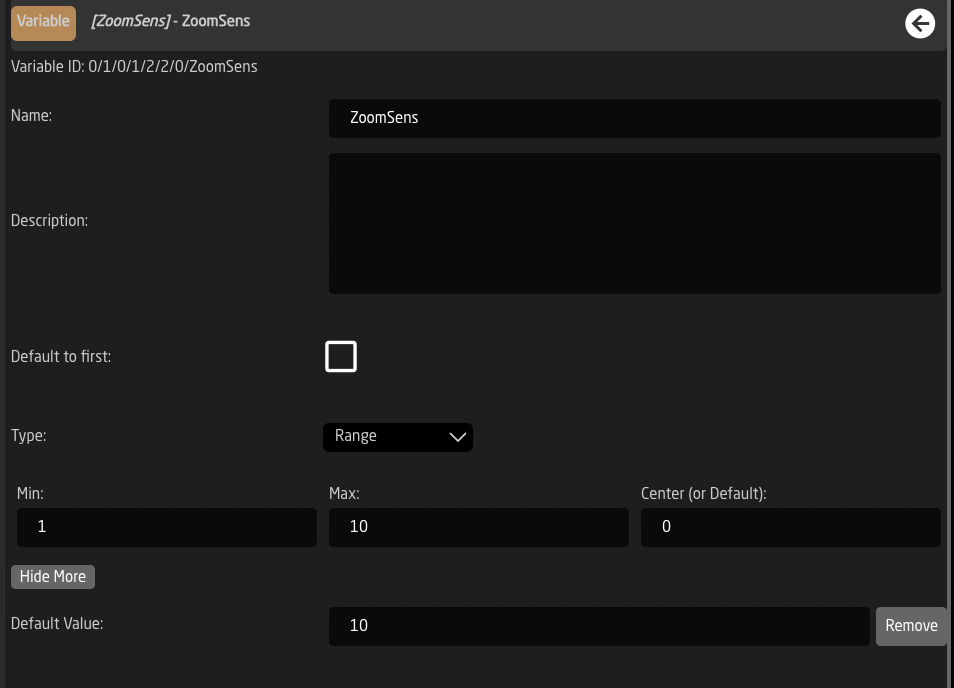 8\. Go back to the Tree and select the JoyRot box in the same layer you are working in. This will open the joystick rotation (zoom) in the inspector. 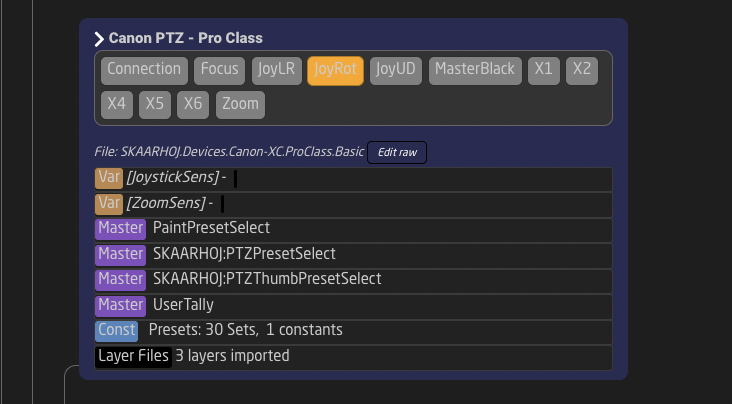 9\. DON'T PANIC 10\. Open Show JSON for the JoyROT component. 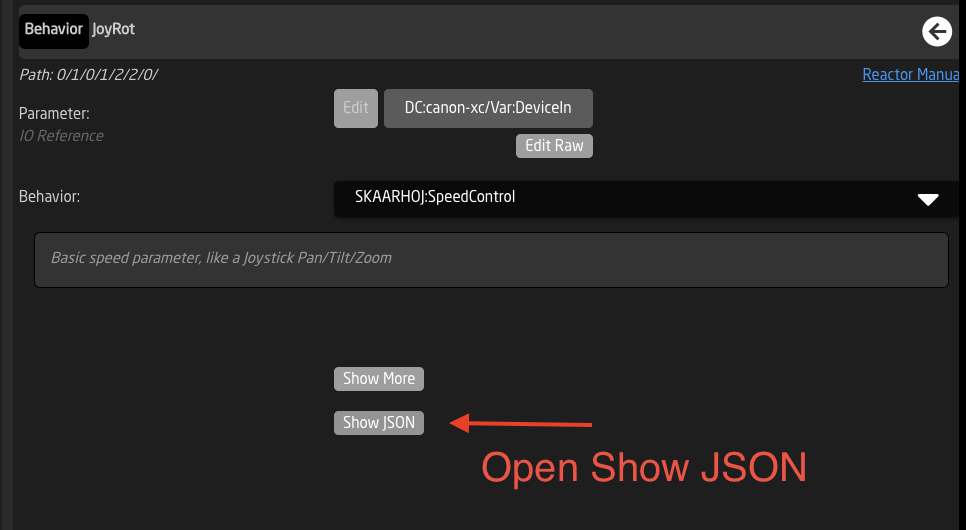 11\. Select Format 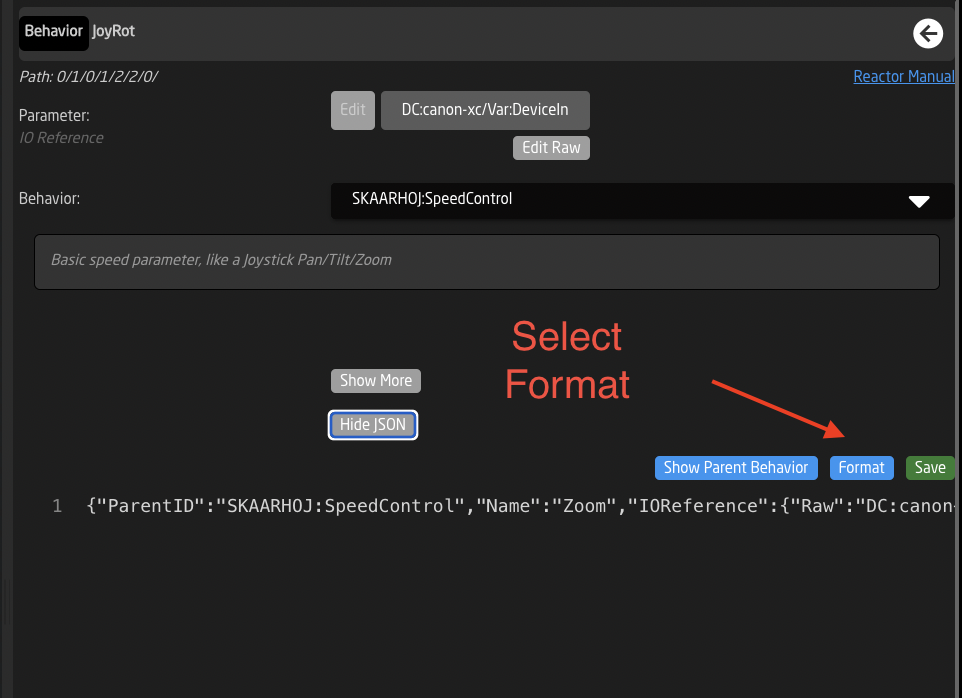 12\. Select Show Parent Behavior 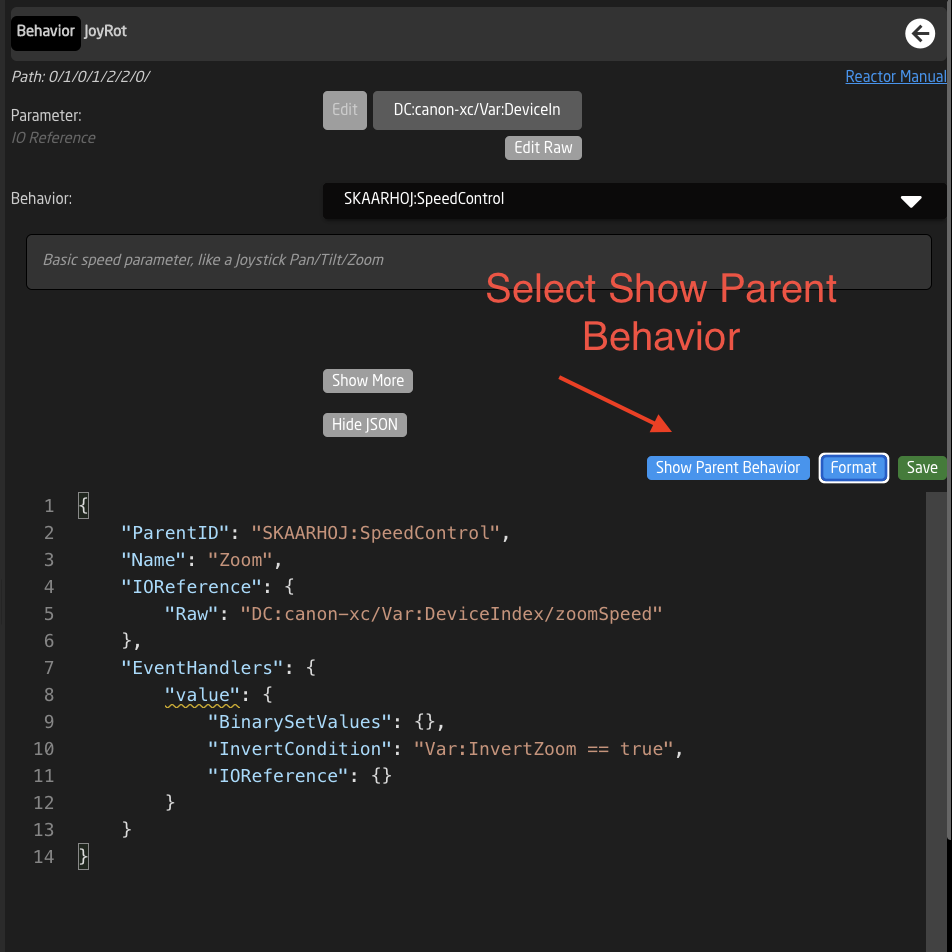 13\. In the Window the pops up, select Format again. This will expand the data to see the whole JSON text. 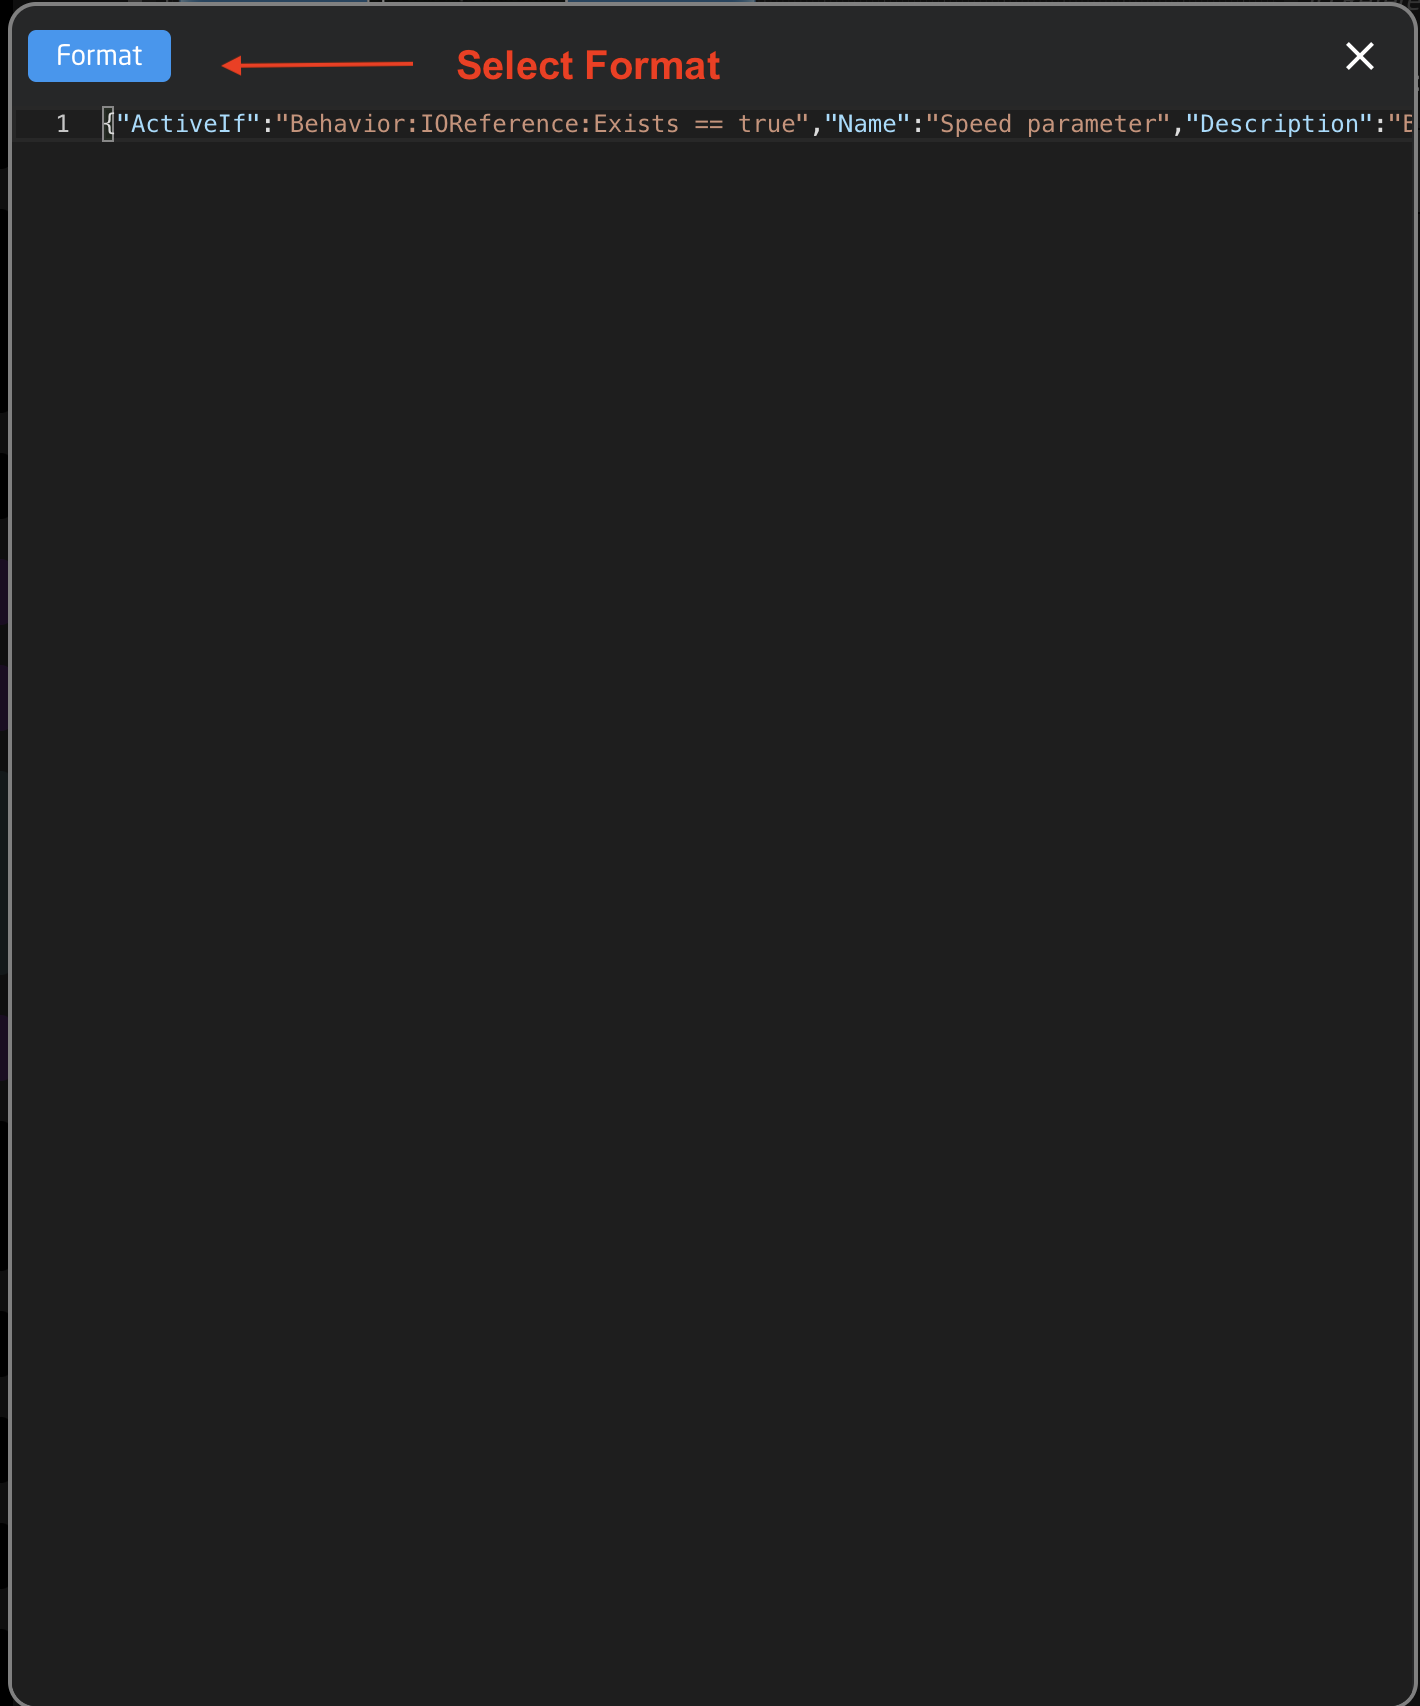 14\. Scroll down to the Joystick Sensitivity commands and copy the whole command set as seen below, every part is essential:Please Note, changing the current project will disconnect controllers if they are not configured in the project that is being switched to.
Make sure to configure the projects to be switched between in each project.
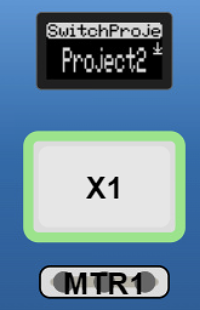
In the Project Manager, open the project details for the project you want to switch to. Copy the project's Filename exactly. It is necessary to toggle on Show Advanced to see the file name. [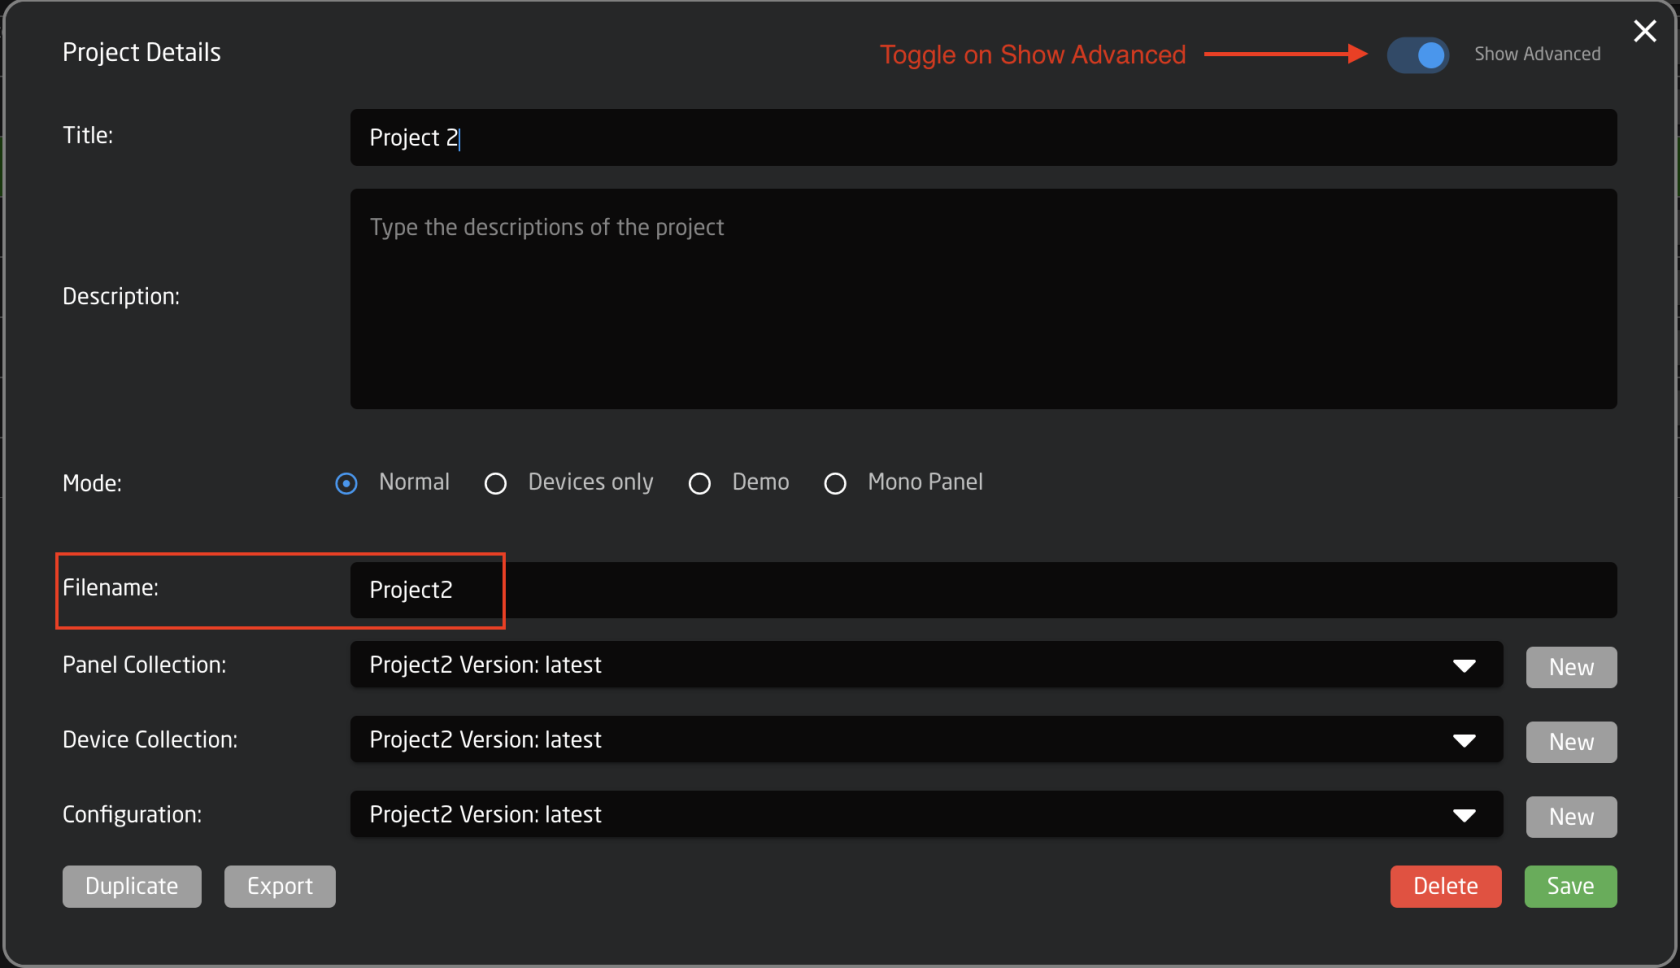 ](https://wiki.skaarhoj.com/uploads/images/gallery/2023-11/screenshot-2023-11-08-at-1-54-39-pm.png) On the Configuration Page, select the button to configure. In the Inspector, select Switch Project under the System options. [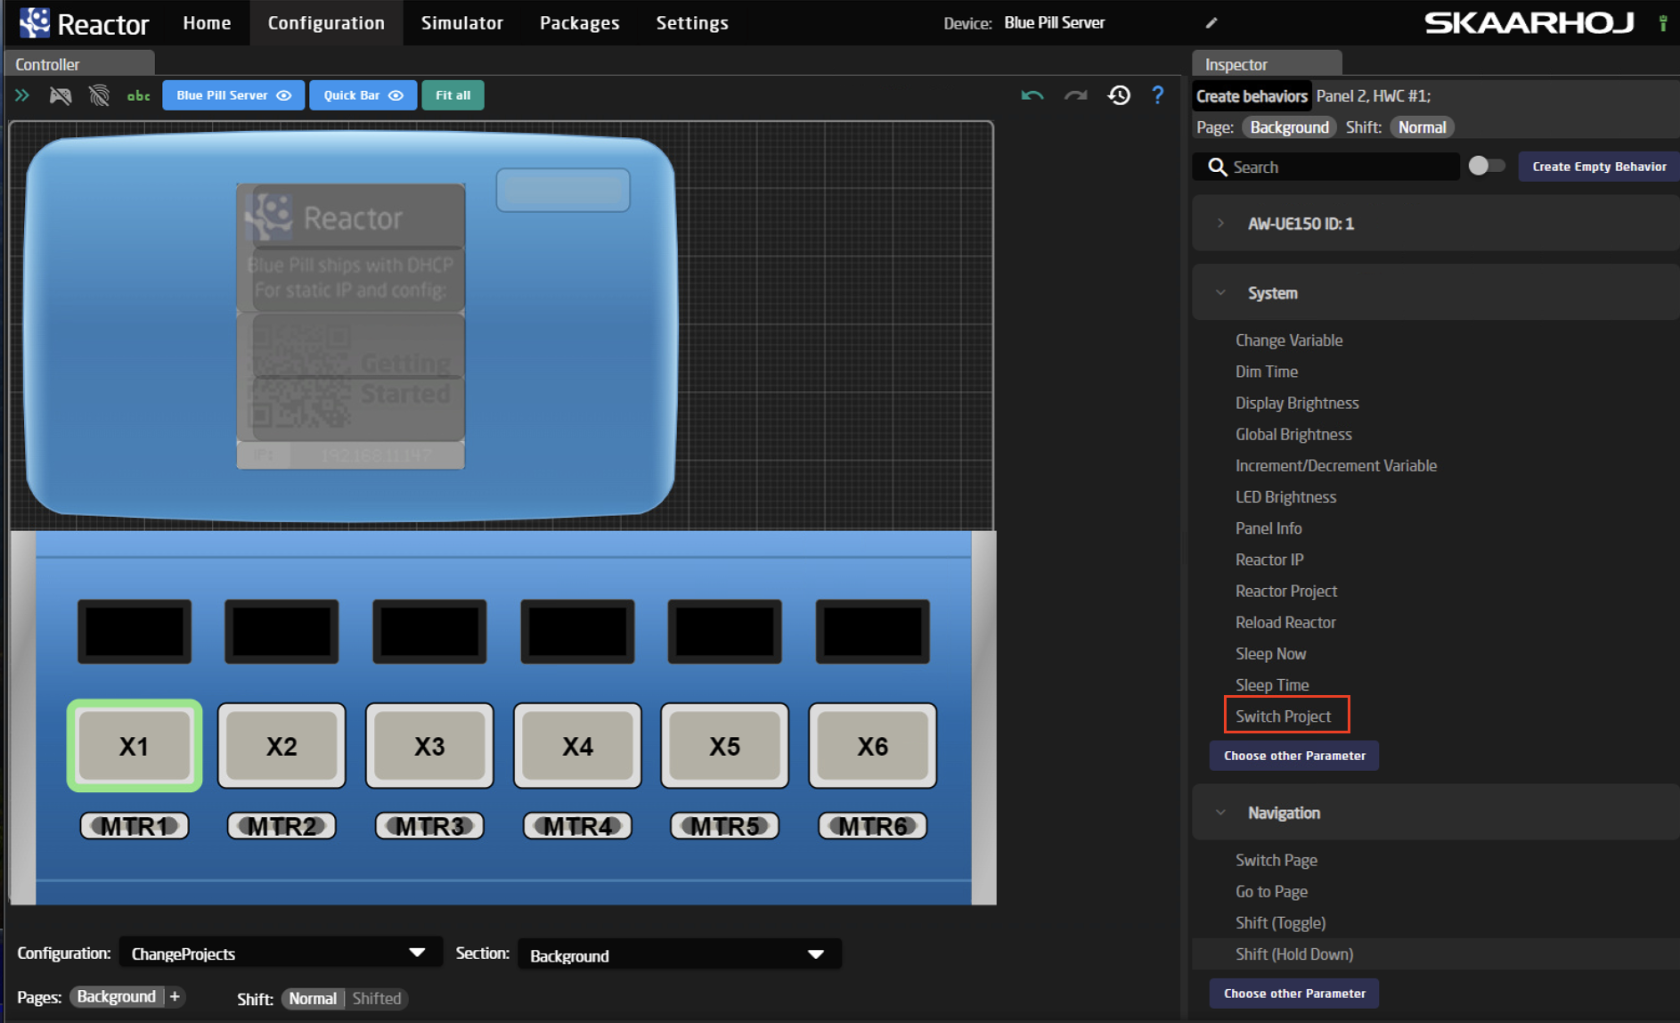](https://wiki.skaarhoj.com/uploads/images/gallery/2023-11/screenshot-2023-11-09-at-11-37-15.png) In the Inspector box, the parameter should open with a preselected selected Settings Template. 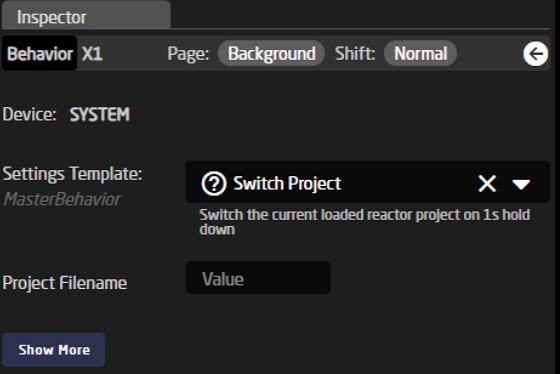 Fill in the Project Filename that was copied from the Project Manager into the Value field next to Project Filename. It is important that the file name is copied exactly as found in the Project Manager. [](https://wiki.skaarhoj.com/uploads/images/gallery/2023-11/screenshot-2023-11-09-at-12-19-47.png) The project name should now appear on the display above the button (if the button does have an associated display).Please Note, the switch is activated by a 1 second hold down of the button.
[](https://wiki.skaarhoj.com/uploads/images/gallery/2023-11/screenshot-2023-11-09-at-12-20-05.png) Another way to do it without the 1 second hold down. On the Configuration Page, select the button to configure. In the Inspector, select Choose Other Parameter under the System option. [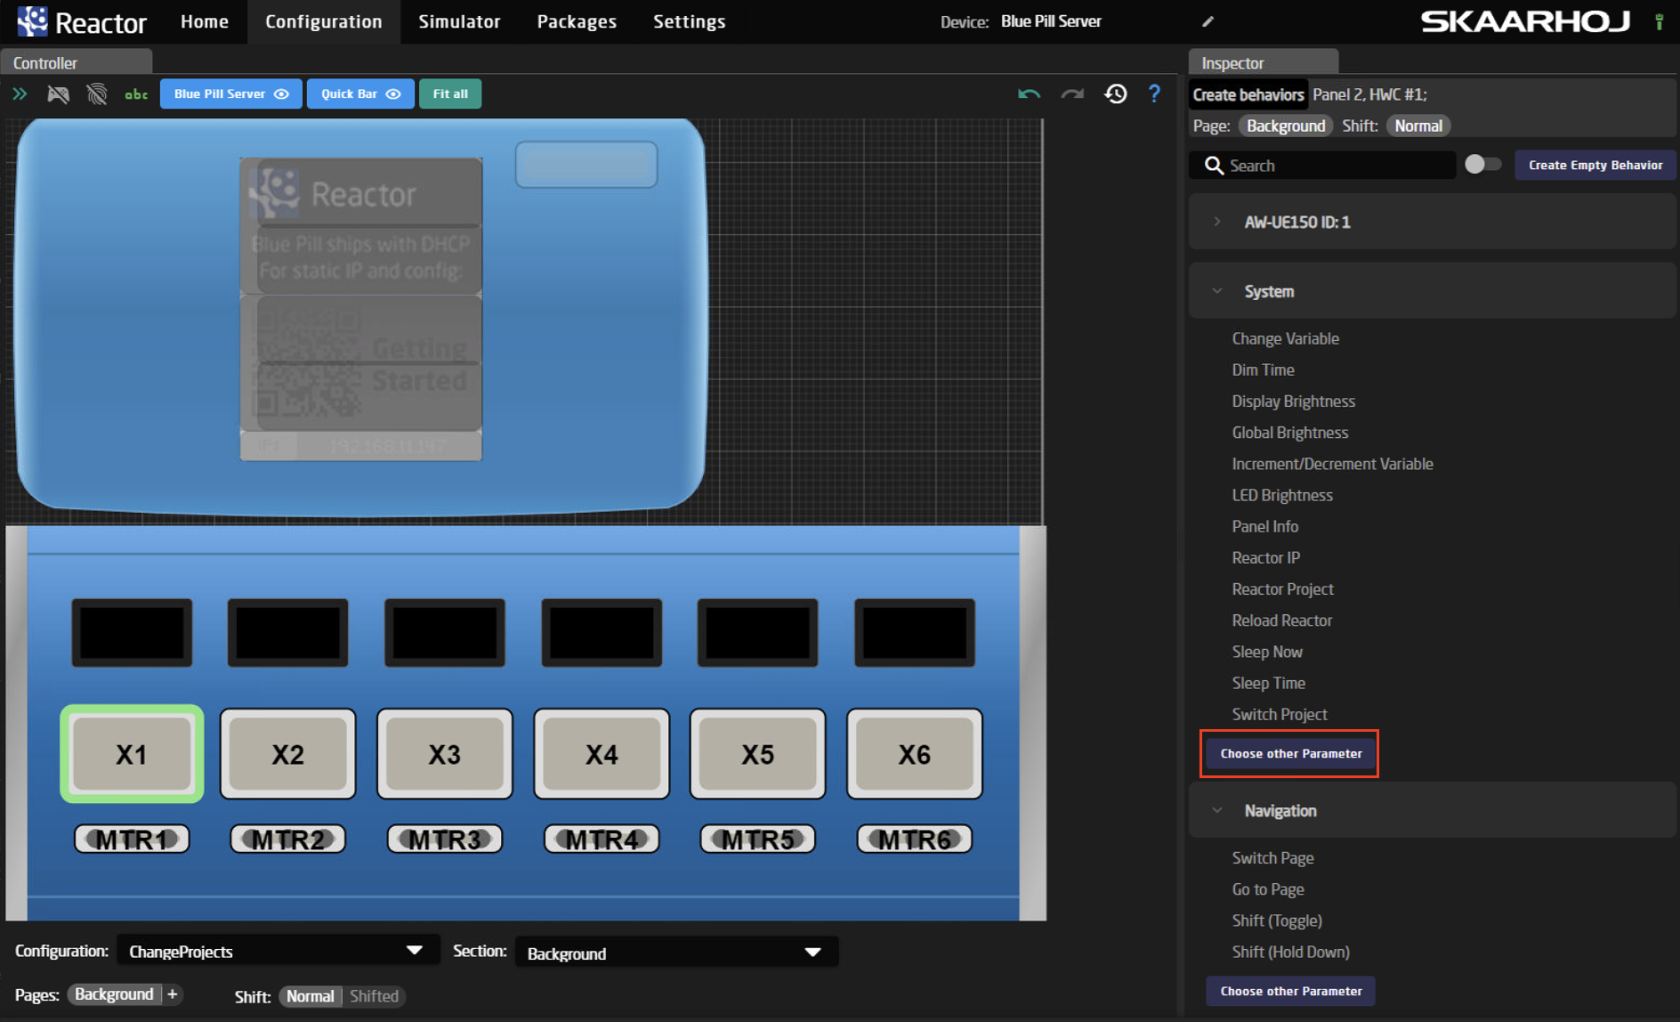](https://wiki.skaarhoj.com/uploads/images/gallery/2023-11/screenshot-2023-11-09-at-12-35-30.png) In the dialog box that pops up select: Reactor/CurrentProject then Submit [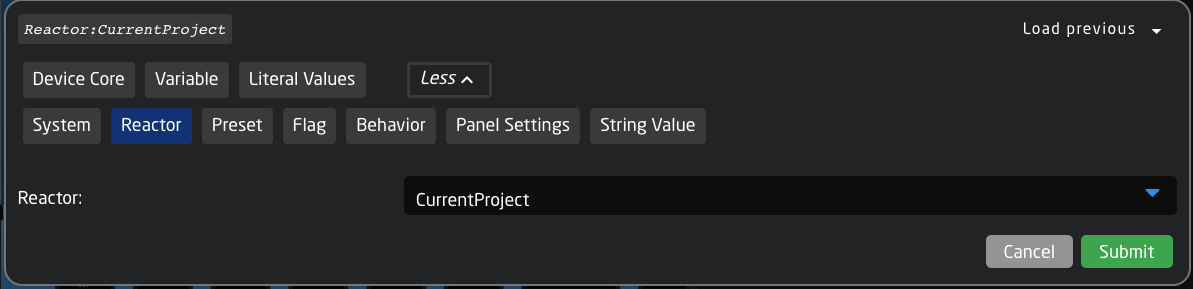](https://wiki.skaarhoj.com/uploads/images/gallery/2023-06/projectswitch-ioref.png) Returning to the Inspector, select Show More if you do not see Settings Template available. 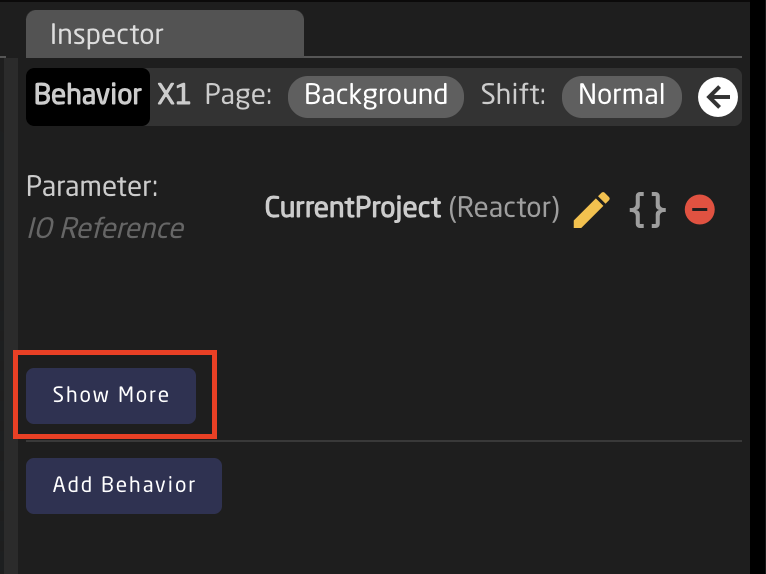 In the Settings Template, select Set Value Directly: [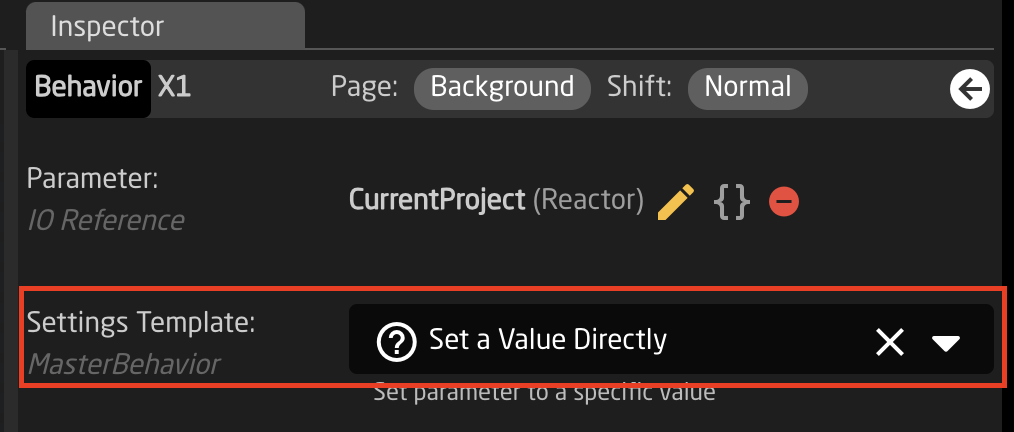](https://wiki.skaarhoj.com/uploads/images/gallery/2023-11/screenshot-2023-11-08-at-2-07-21-pm.png) This should then give you the option to define the value needed. The first box will contain the Project File Name as directly copied from the Project Details. The second box can contain any name you would like to be displayed on the hardware panel. [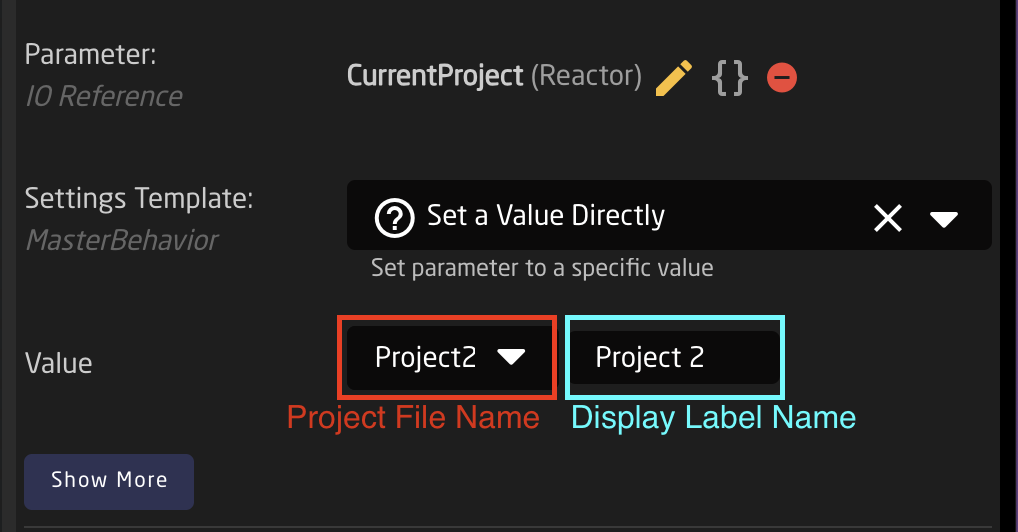](https://wiki.skaarhoj.com/uploads/images/gallery/2023-11/screenshot-2023-11-08-at-2-08-03-pm.png) You should end up with a button like this: [](https://wiki.skaarhoj.com/uploads/images/gallery/2023-11/screenshot-2023-11-08-at-2-25-37-pm.png) # Switching Projects via external HTTP Request Reactor allows to switch the current project via an external HTTP POST request. The endpoint used is: /reactorapi/selectproject This request allows to use the skaarOS authentication via HTTP Basic Authentication (Use the latest version of system-manager to allow this (v1.0.1-pre1 and higher)) Curl example: curl --location --request POST '192.168.0.20/reactorapi/selectproject' \\ \--header 'Authorization: Basic YWRtaW46c2thYXJob2o=' \\ \--header 'Content-Type: application/json' \\ \--data-raw '{"Filename":"MyProject"}' # Understanding FlagsThis documentation might be outdated. Please consult the Reactor manual at [https://docs.skaarhoj.com/11\_advanced\_topics/flag-groups.html](https://docs.skaarhoj.com/11_advanced_topics/flag-groups.html)
Inside reactor we have support for setting flags true or false. These flags are based around how TSL works to some extent and provides a list of true/false states with 4 "bits" per index. Flags in reactor consists of 4 bits per index, that can be set true or false individually, each of these flag bits can be used for different things but you will mainly see them used for providing tally and routing support in configs as they are a great way to store the intermediate state that comes in from a GPI pin or from a device like an ATEM switcher. Then use the stored state to send the Tally to the cameras The 4 "colors/bits" main use cases in the default configs for each color are:| Red | Mainly used for Program Tally |
| Green | Mainly used for Preview Tally |
| Blue | Not widely used in default configs yet |
| White | Mainly used for storing what camera to Route on a mixer/videohub |
This documentation might be outdated. Please consult the Reactor manual at [https://docs.skaarhoj.com/3\_configuration/variables-conditions.html](https://docs.skaarhoj.com/3_configuration/variables-conditions.html)
For increased flexibility in a configuration Variables are often applied. A variable works as an adjustable value which can be numerical or text based that can be used in place of a set value. Variables live on the layers of the tree but are used in lots of different places and in different ways. It is on the layers that you can see what Variables are available, their names, and their current value. In the example below you can see how: Please note, Variables in the tree are only accessible to the same layer they are created on or higher in the tree, unless defined otherwise in the variable set up. Additionally, layers limited by Active If conditions also set limits on the variable.
There are two types of variables; range or options.| Name | Variable's name |
| Description | Easy to understand description to help identify the variable's purpose |
| Type | Range or Options |
| Min | Minimum value for the variable (must be lower than the max). Can be set to 0 |
| Max | Maximum value for the variable (must be higher than the max) |
| Center (or Default) | Default value for the variable if not saved on panel reboot. |
| Default to first | Sets default value to the first. |
| Default Value | Define the default value if not first. |
| Always define | Separates this instance of the variable from ones of the same name lower in the tree (overridden by Expand Scope). |
| Accept Any Value | Allows any value to be accepted during conformity check. |
| Expand Scope | Allows the variable to be used lower in the tree towards the root. |
| Capture | Allows a variable to capture any expanded-scope variable from a branch. |
| Persistent | Saves value between panel reboots. |
| Zero set Allow | Allows for the variable to be blank |
| Force value (test) | Force set a value for the variable, use for testing |
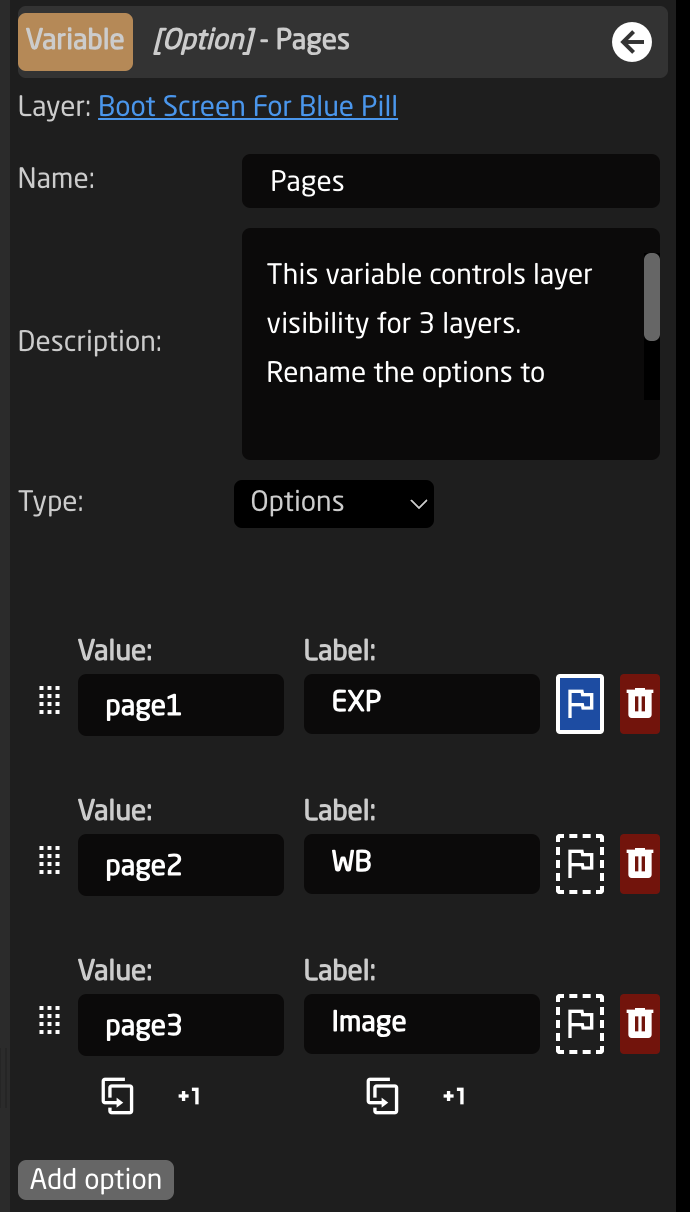
This is only a single example of the use of Options Variables.
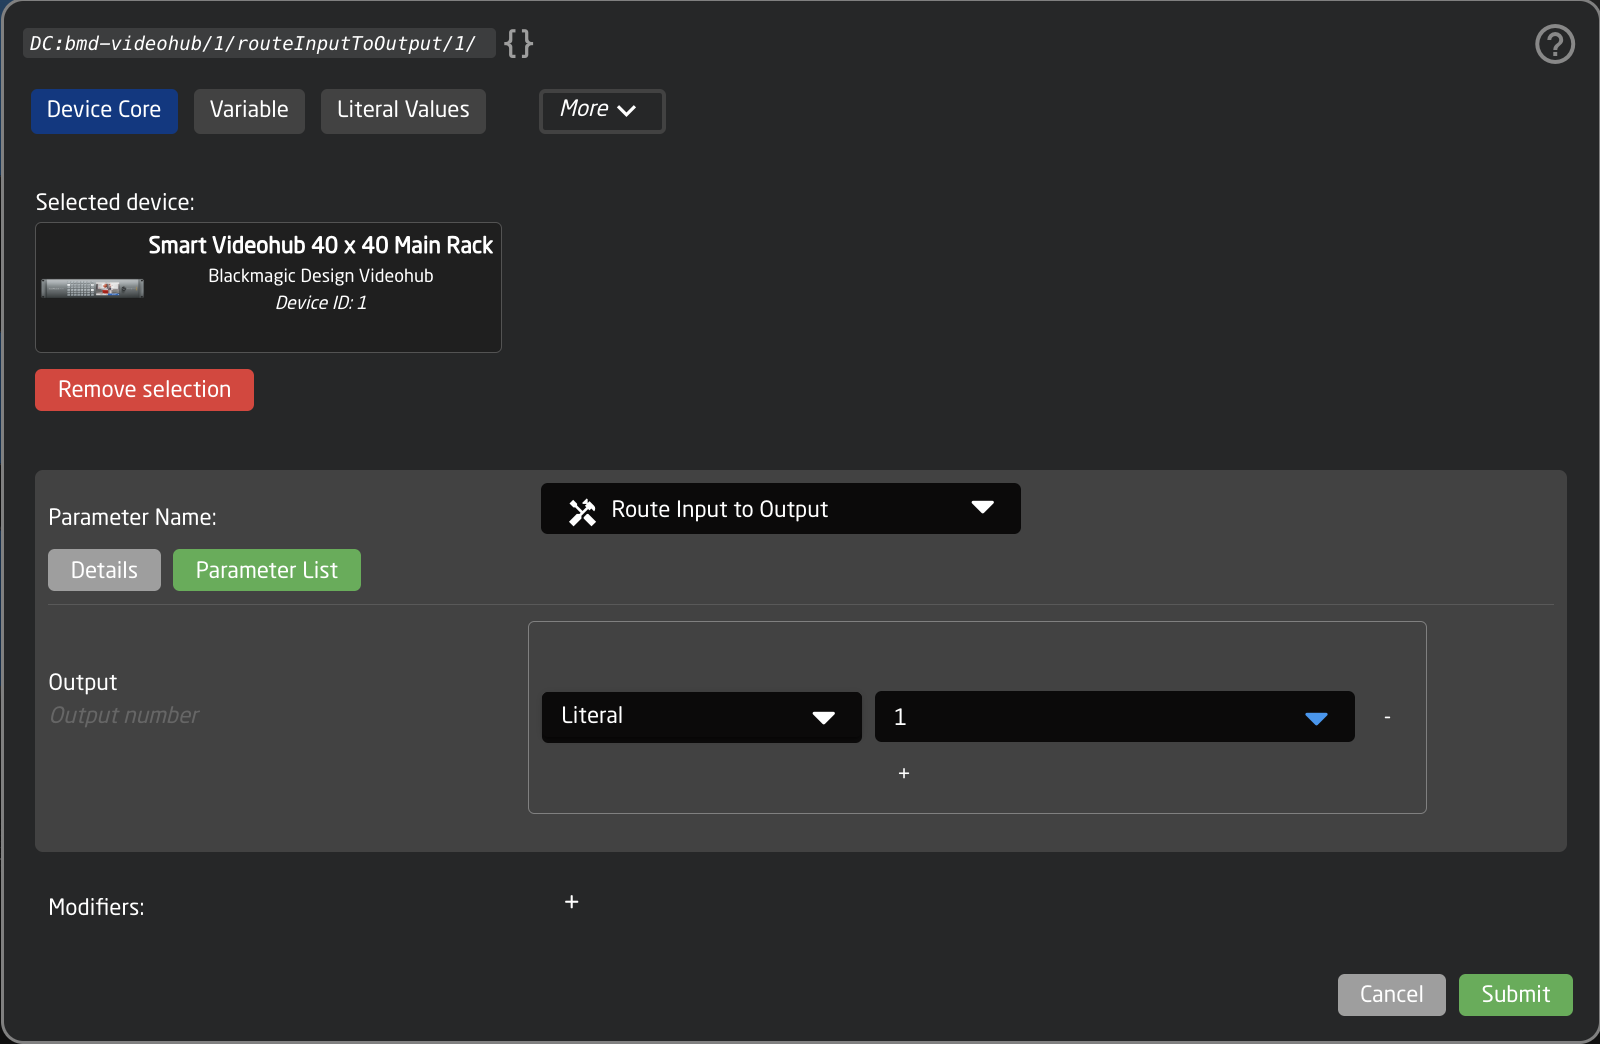
First looking at a breakdown of the parameter the variable is going to be added into: Atem Program Input Video Source DC:bmd-atem/1/ProgramInputVideoSource/1/1 **DC** (DEVICE CORE) **:bmd-atem** (BMD-ATEM) **/1** (DEVICE ID 1) **/ProgramInputVideoSource** (Specified parameter) **/1** (M/E number) **/1** (Input Number) A range variable would most naturally be put in place of numerical values, making Device ID, M/E Number, or Input Number great places use a variable. Using the variable in place of the Device ID will allow for switching instances of the Atem. It is possible to find the specific Device ID number of the Atems in the Device Details on the Home Page of Reactor. 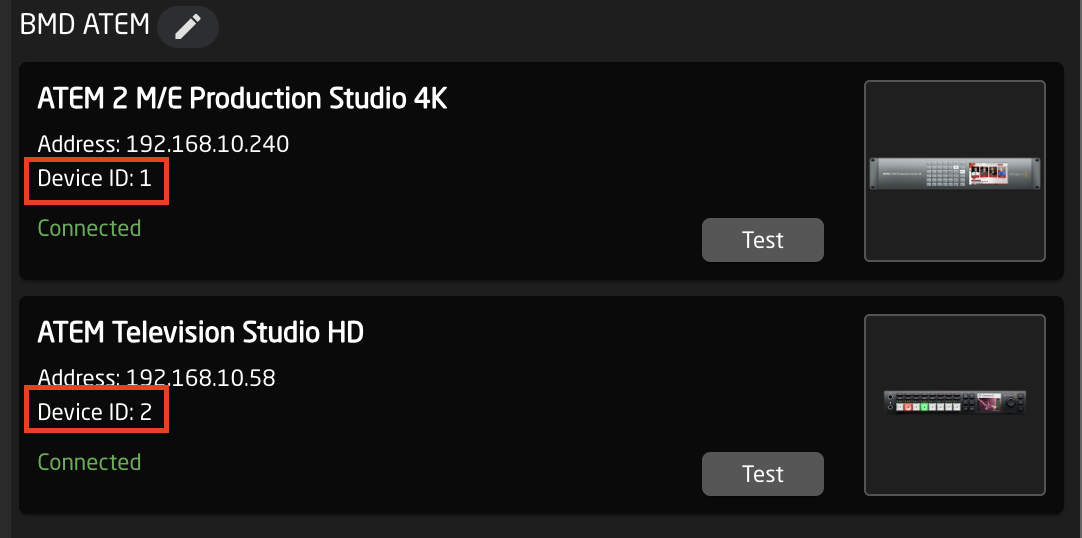 When creating the variable it is best to name is something easy to identify the place it should be used. 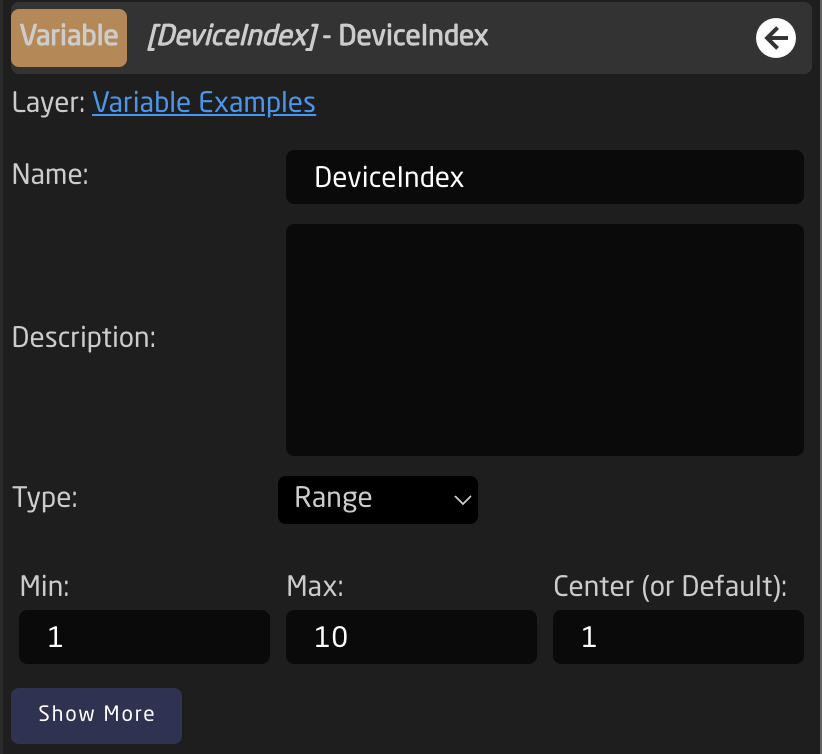 Insetting that variable in the command would look like this: DC:bmd-atem/**Var:DeviceIndex**/ProgramInputVideoSource/1/1Please note: Formatting is important for the variable name.
After setting the variable into a parameter it is important to set up a way to control the variable. 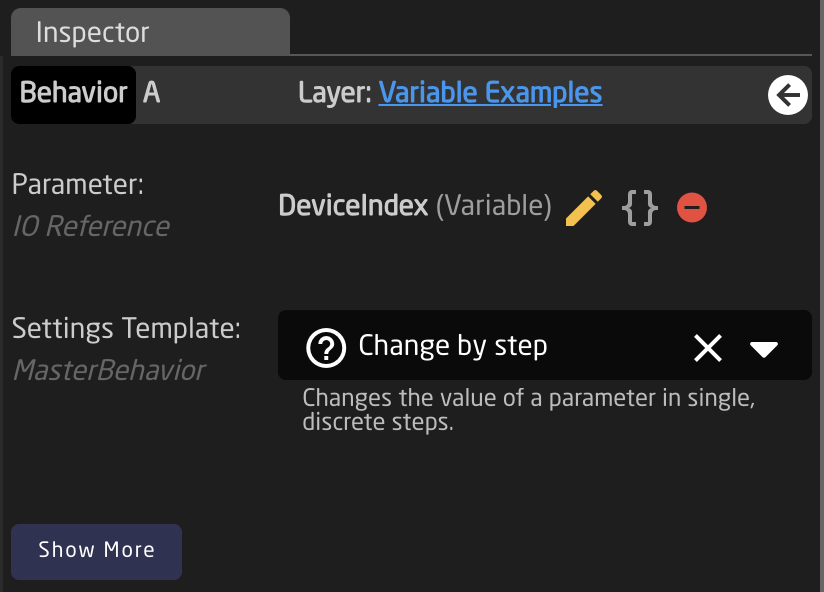 The feedback will look like: 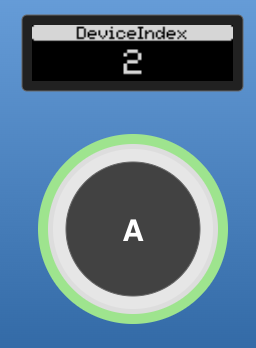 Confirm the variable is changing properly in the tree: 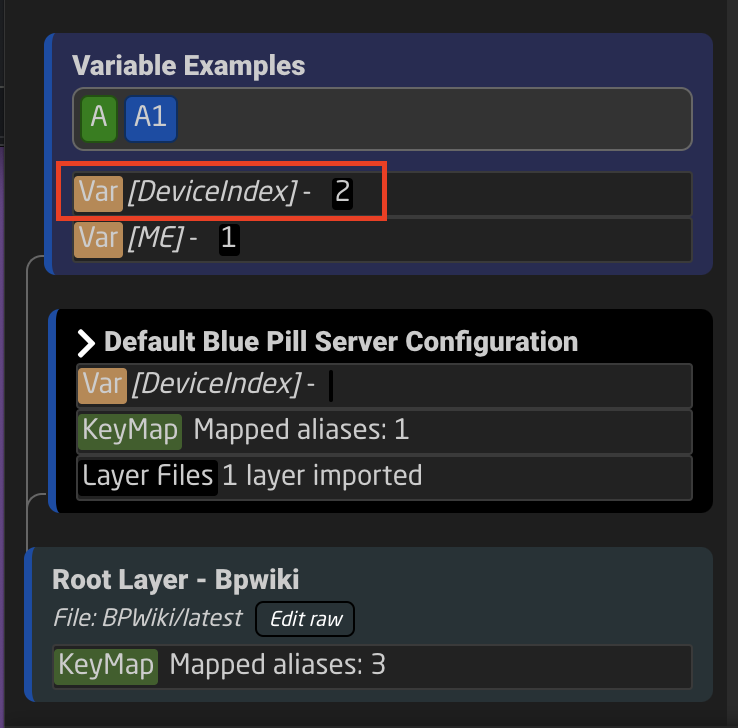| Name | Variable's name |
| Description | Easy to understand description to help identify the variable's purpose |
| Type | Range or Options |
| Value | Value string for the variable |
| Label | Easy to understand label used for feedback |
| Flag | Sets the option as the default value |
| Trash | Deletes the Option |
| Duplicate | Duplicates the line |
| +1 | Increments the line by +1 |
| Add option | Default value for the variable if not saved on panel reboot. |
| Default to first | Sets default value to the first. |
| Default Value | Define the default value if not first. |
| Always define | Separates this instance of the variable from ones of the same name lower in the tree (overridden by Expand Scope). |
| Accept Any Value | Allows any value to be accepted during conformity check. |
| Expand Scope | Allows the variable to be used lower in the tree towards the root. |
| Capture | Allows a variable to capture any expanded-scope variable from a branch. |
| Persistent | Saves value between panel reboots. |
| Zero set Allow | Allows for the variable to be blank |
| Force value (test) | Force set a value for the variable, use for testing |
This is only a single example of the use of Options Variables.
 In the tree it would look like this. The blue line next to a layer indicates it is the active layer. In the layer where the variable lives, the variable also shows what its current value is. 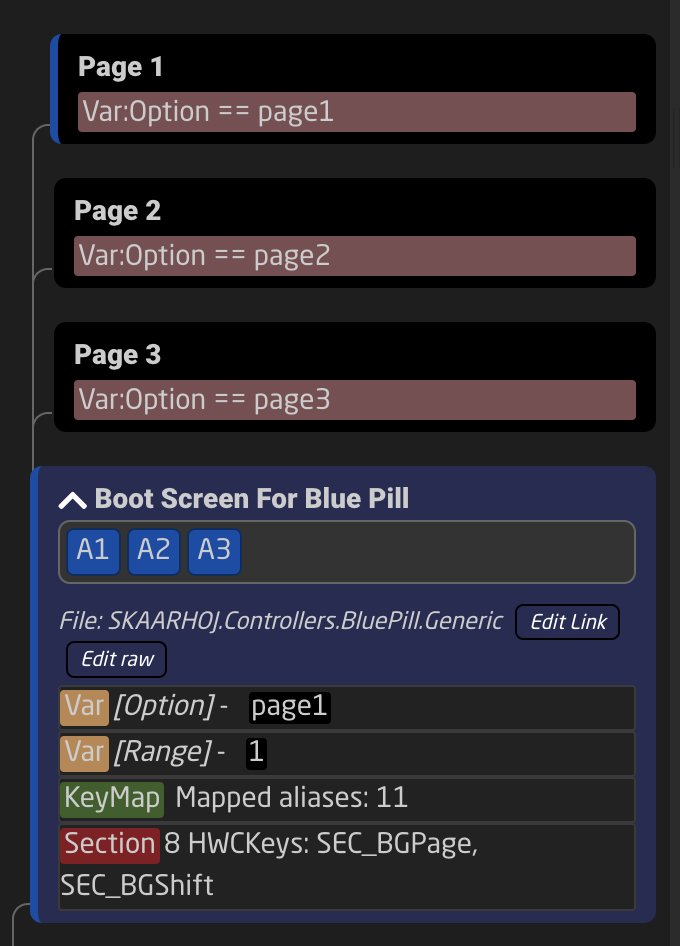 On the page layer, the variable is set as the Active If conditions, meaning that need to be true for the layer to be the active layer. 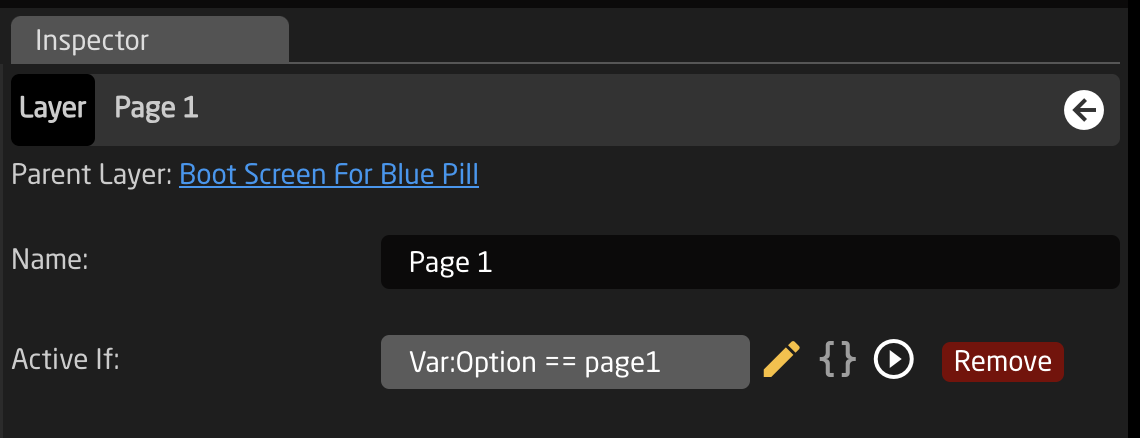 There are two main way to select the value of the parameter. To set a specific value, mainly on key press or by trigger, select the variable as a parameter with the Settings Template as Set a Value Directly. 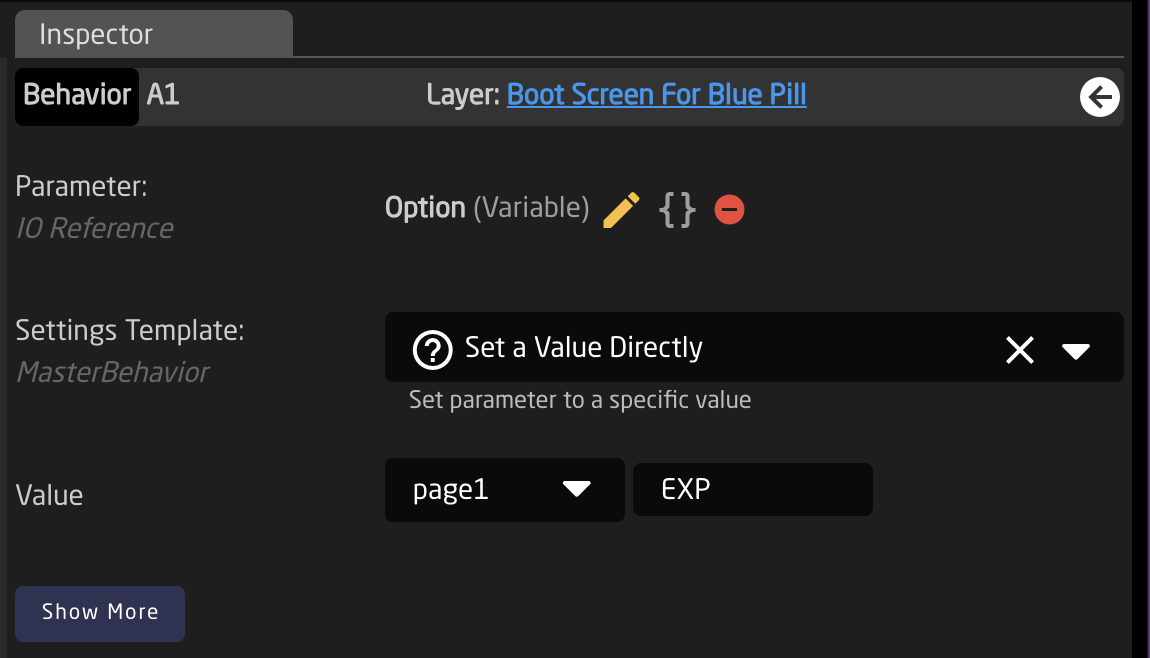 The feedback will look like this: 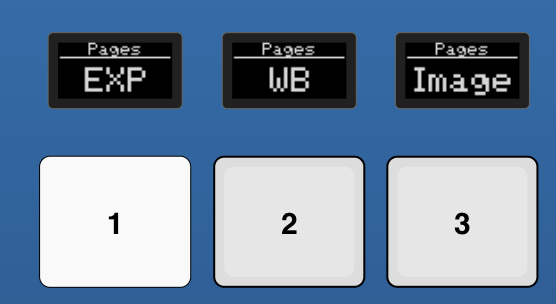 To cycle through the values, mainly on the pulse of an encoder, select the variable as a parameter with the Settings Template as Change Variable.  The feedback will look like this: This documentation might be outdated. Please consult the Reactor manual at [https://docs.skaarhoj.com/3\_configuration/virtual-triggers.html](https://docs.skaarhoj.com/3_configuration/virtual-triggers.html)
Sometimes you want to create interaction between devices using Reactor, or use the state of a device to change Variables in the system (eg changing the visible layer depending on the currently active camera) This is what Virtual Triggers are for, providing the ability to use Conditions and Values of Devicecores to change other values in the system or even on other devices **Virtual Triggers** in Reactor can be created on Layers in the Configurator and have 3 modes:| **Binary** | **Analog** | **Schedule** |
| In Binary mode a condition will be interpreted like a Binary trigger (basically imitating a button). While the condition is true the VirtualTrigger is "pressed" and while its false it is "released" | In Analog mode the selected parameter becomes an Analog Trigger (basically imitating a fader). Everytime the value is changed a new Analog Value is sent to the defined Behavior | In Schedule mode you can configure a schedule of when your trigger will be executed using **cron** like syntax. Everytime the specified time is reached the Virtual trigger will send a Binary trigger (basically a buttonpress) to the defined behavior |
| **\*** | **\*** | **\*** | **\*** | **\*** | **\*** | |
| **Field name** | Seconds | Minutes | Hours | Day of month | Month | Day of week |
| **Allowed values** | 0-59 | 0-59 | 0-23 | 1-31 | 1-12 or JAN-DEC | 0-6 or SUN-SAT |
| **Allowed special characters** | \* / , - | \* / , - | \* / , - | \* / , - ? | \* / , - | \* / , - ? |
| **Entry** | **Description** | **Equivalent To** |
| @yearly (or @annually) | Run once a year, midnight, Jan. 1st | 0 0 0 1 1 \* |
| @monthly | Run once a month, midnight, first of month | 0 0 0 1 \* \* |
| @weekly | Run once a week, midnight between Sat/Sun | 0 0 0 \* \* 0 |
| @daily (or @midnight) | Run once a day, midnight | 0 0 0 \* \* \* |
| @hourly | Run once an hour, beginning of hour | 0 0 \* \* \* \* |
Please note, The Calibration Tool is only for Blue Pill Inside panels running hardware-manager version 1.0.3-pre15 or higher. This is not for use with UniSketch OS panels.
1\. One has to access the controllers web interface, navigate to packages tab and click on hardware-manager package. [](https://wiki.skaarhoj.com/uploads/images/gallery/2023-10/pasted-graphic-22.png) 2\. Next you will see hardware-manager settings page. [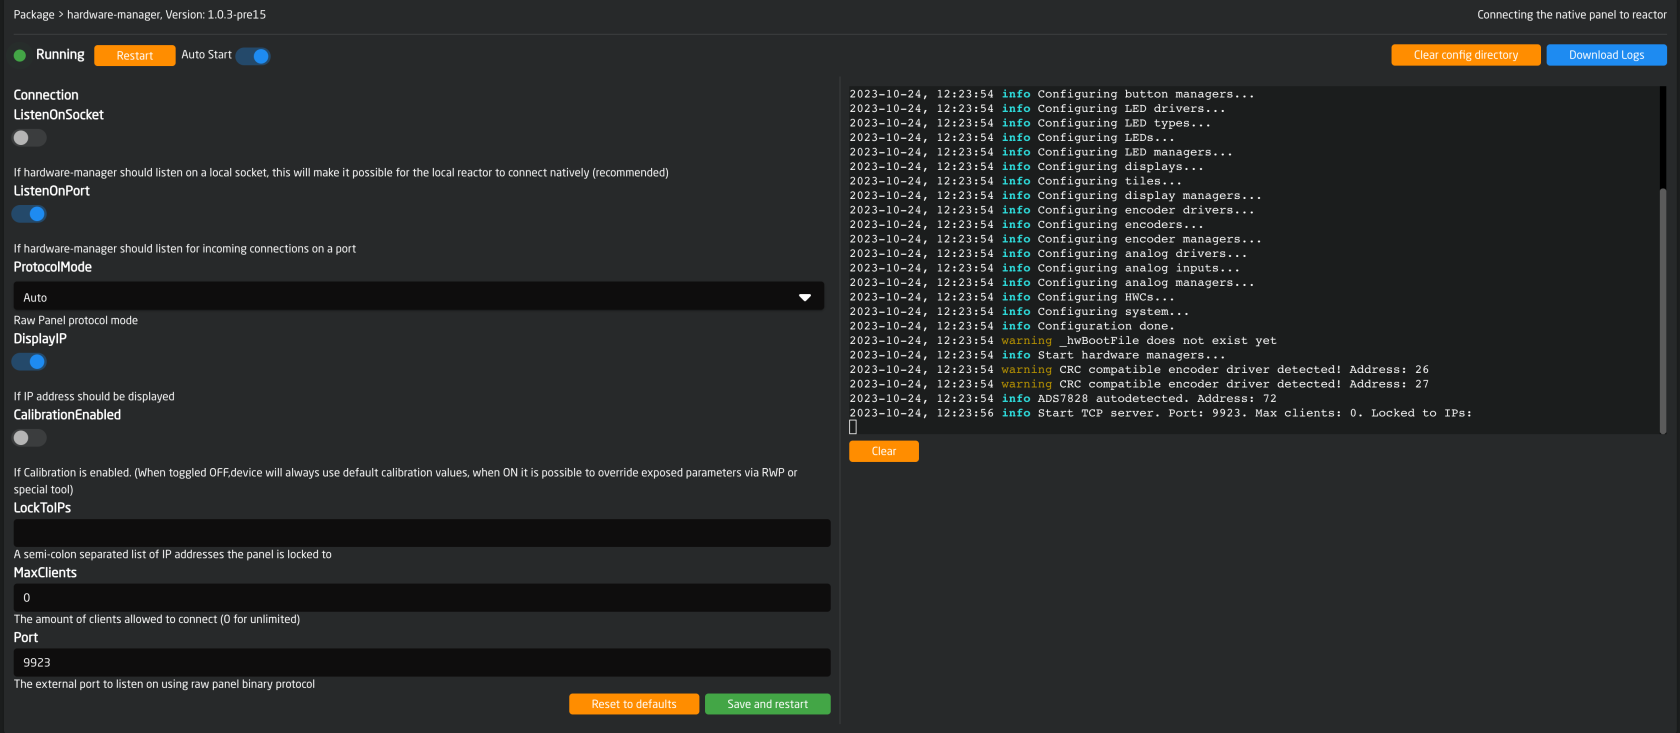](https://wiki.skaarhoj.com/uploads/images/gallery/2023-10/pasted-graphic-21.png) 3\. In order to establish a TCP connection to the controller, make sure to enable the ListenOnPort option. Enable the “CalibrationEnabled” toggle button, click save, and restart. [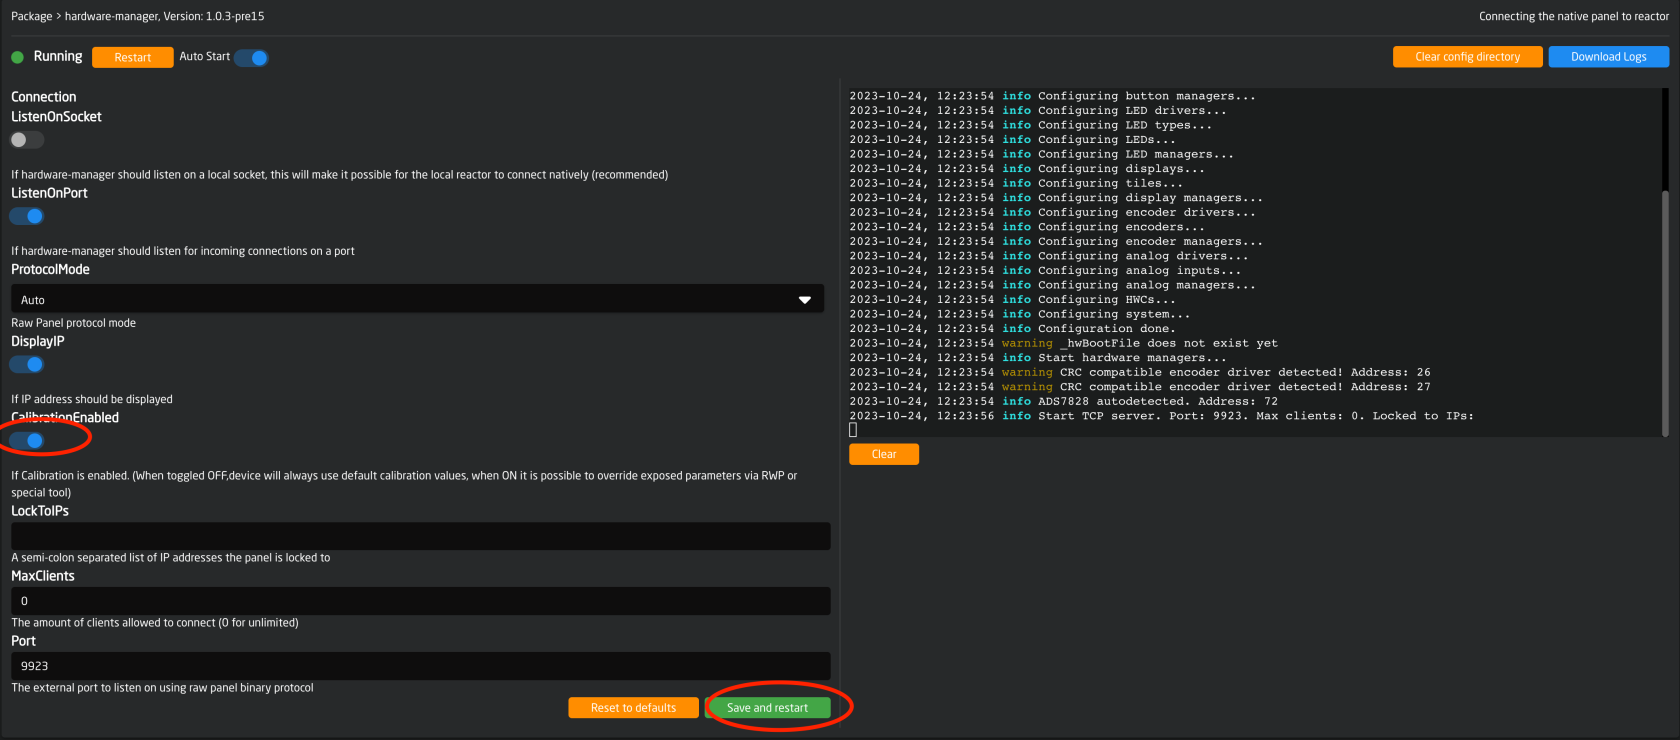](https://wiki.skaarhoj.com/uploads/images/gallery/2023-10/pasted-graphic-23.png) 4\. Use either the Hardware Calibrator App to connect and calibrate or manually connect over TCP to the BluePill device and calibrate it that way. To do this, follow one of the two guides below: ### **Calibrate With The Hardware Calibrator App**Please make sure you have system-manager version 1.0.5-pre2 or higher installed on the controller on which you want to run the Hardware Calibrator app
Ensure that you have the Hardware Calibrator App installed on at least one BP device in your network. You only need one of your devices to have this as it can connect to any BPI (BluePill Inside) device over the network. Fell free to install it on more than one but it's not required. ##### 1.A Online install *(if you have internet access from the BPI device)* [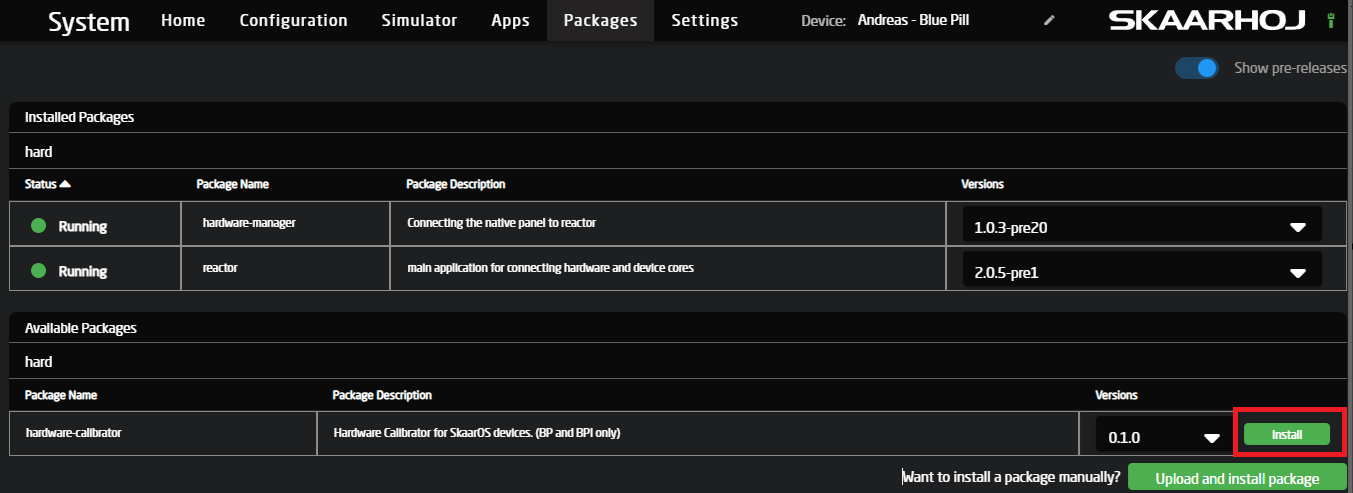](https://wiki.skaarhoj.com/uploads/images/gallery/2024-06/2kXimage.png) When it's done installing, enable "**Autostart**" and "**Start now**" as seen here: [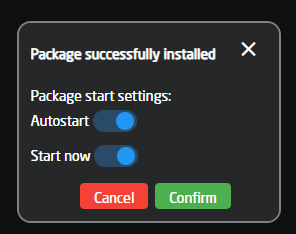](https://wiki.skaarhoj.com/uploads/images/gallery/2024-06/wDkimage.png) ##### 1.B Offline Install *(if you are working with no public internet access on your BPI device)* Download the "**hardware-calibrator**" package from [https://devices.skaarhoj.com/otherpackages](https://devices.skaarhoj.com/otherpackages "Devices Skaarhoj.com other packages") Go to the packages tab seen here and upload the downloaded package to your device via the button at the lower right corner of the packages tab on your device: [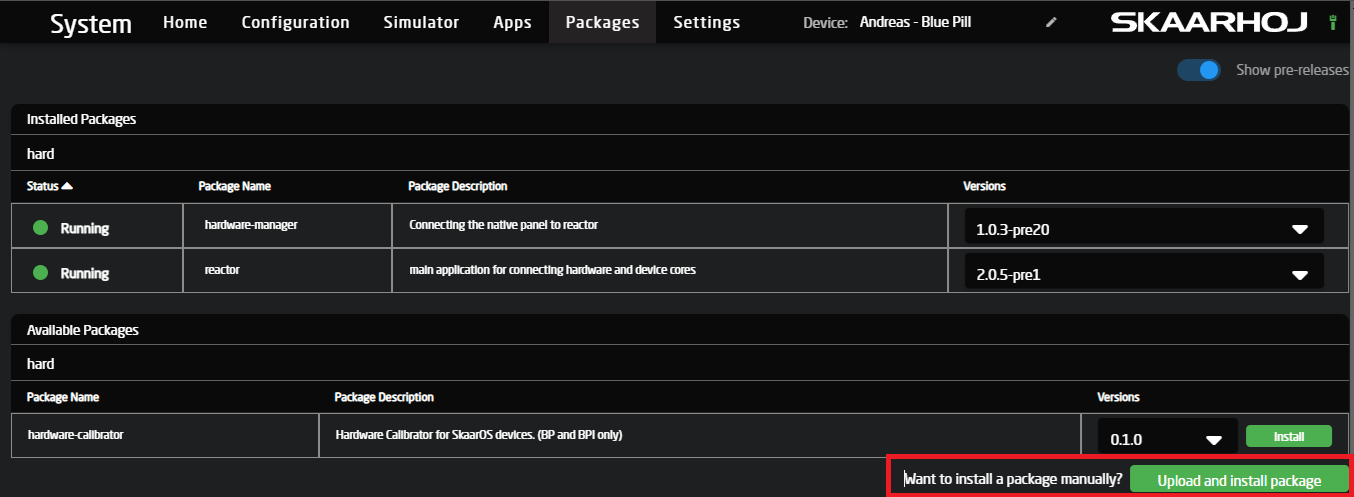](https://wiki.skaarhoj.com/uploads/images/gallery/2024-06/8jeimage.png) Select your downloaded file and click install When it's done installing, enable "A**utostart**" and "**start now**", as seen here: [](https://wiki.skaarhoj.com/uploads/images/gallery/2024-06/wDkimage.png) ##### 2. Open the App After installing, you should now see a new tab at the top of your screen called "**Apps**", go to it and select the Hardware calibrator app. [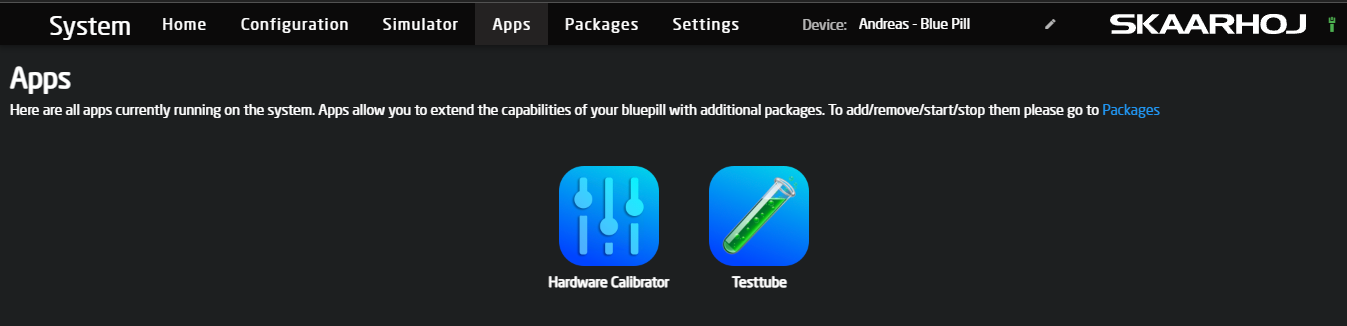](https://wiki.skaarhoj.com/uploads/images/gallery/2024-06/du6image.png) If you do not see it here, or there is no "Apps" tab, go back to packages and ensure that the package for Hardware calibrator is running and that "**system-manager"** is updated. ##### 3. Connect to the device from Hardware Calibrator If you wanna adjust the calibration on the same device as the one you are running hardware calibrator from, then you don't need to touch anything. Just click the "Connect" button marked in red. If you want to connect to a different device, please fill in the IP of that device and the port if you have changed it; if you don't know, then leave the port as it is. :) Press the "Connect" button marked in red to connect. [](https://wiki.skaarhoj.com/uploads/images/gallery/2024-06/U5Iimage.png) If you get a message like this, then please check the Hardware-Manager version, as well as the **IP** and **port**. If you are unsure about the port, you can find it inside Hardware-Manager: You will also get this warning when connecting to a panel or Bluepill server that does not support calibration or where you might have skipped the steps at the top of this page about enabling the calibration profiles. [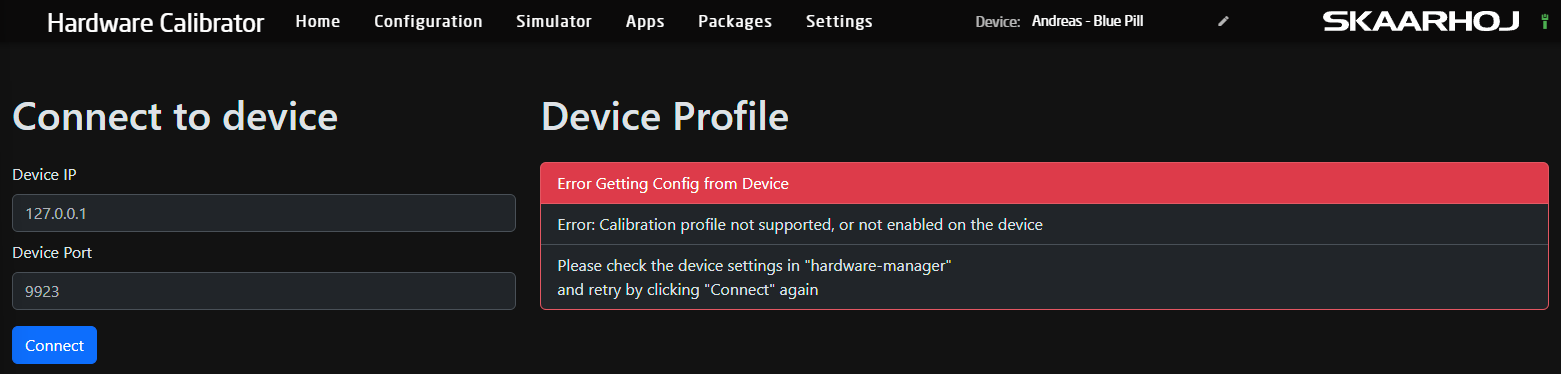](https://wiki.skaarhoj.com/uploads/images/gallery/2024-06/DiRimage.png) ##### 4. Understanding the "Calibration Profile" shown when connected When connected, it will present you with a list of all the components on your device that you can manipulate, as well as two buttons, a reset and a save. The reset button will poll the original calibration that your device came with and save that to the device. This functions as a Factory Reset button. After pressing it to update the UI, you must click "**Connect**" again. This will be fixed in a later version so it auto-updates. "**Save**", does as it says on the button it saves all the settings currently shown on your screen with any changes you might have made. Any changes will only take effect when saved.Note: Any changes, both saves and factory resets, only take effect after restarting the device or hardware-manager itself!
[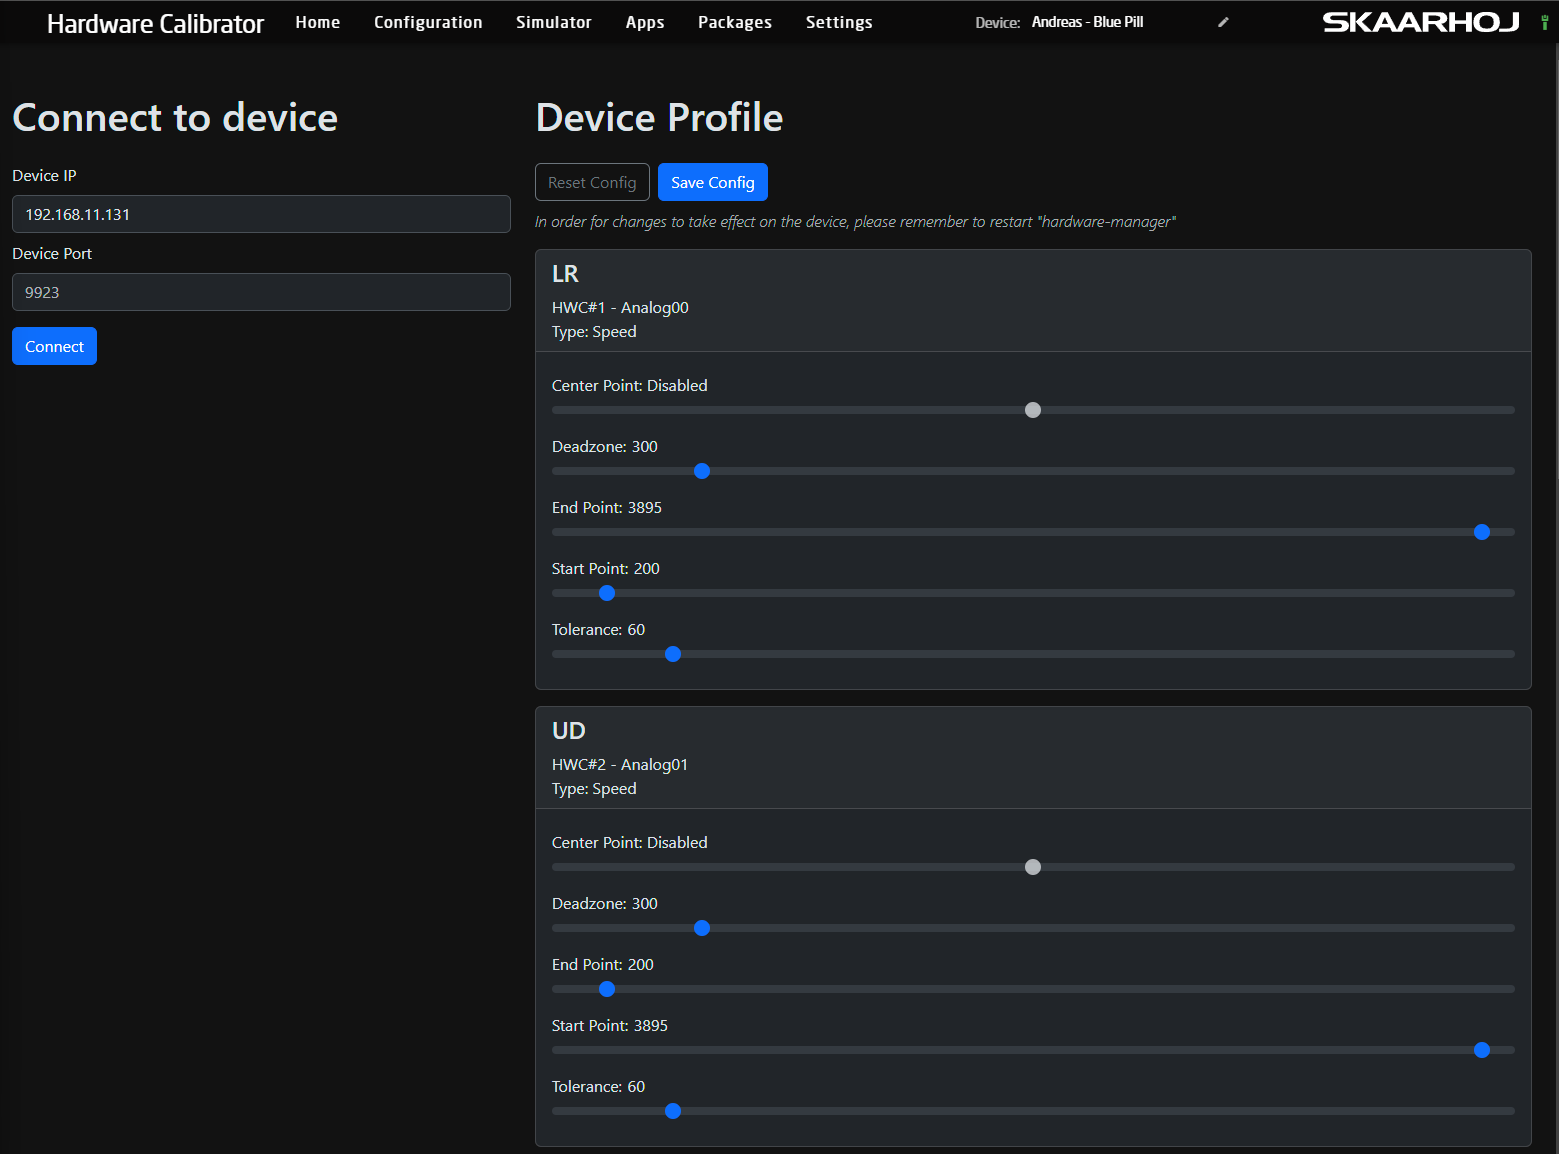](https://wiki.skaarhoj.com/uploads/images/gallery/2024-06/VT4image.png) Depending on the type of hardware components the connected device has available, different options will be available or locked out. What do these settings then mean and control: - **Centre point** allows you to move the centre of your value range, mainly found on components like the rotating component on the PTZ joysticks on a PTZ extreme. This can compensate for a slight drift in one or the other direction when you let go of the rotation. This also defines where the centre of the halfway point is on motorized faders. - **Deadzone** adjusts the "padding" around the centre value and how far you need to move it before it starts "moving." You would adjust this on a PTZ joystick or zoom rocker to change how sensitive it is in the middle. - **End Point** and **Start Point** control the 2 ends of the component, think all the way up/down of a fader or T-bar, but all so the max movement range on a joystick or zoom rocker. If you find that you are not able to move a T-bar from 0-1000 in its raw value but instead you might only get something like 100-950 then you would move these values closer to the middle in order for the component to hit "Max/Min" before hitting the physical limit of its movement range. In the same manner, if you find that you have a lot of dead space at the ends, you can move these sliders further out to gain more resolution. - **Tolerance** is used to define how big or small a change is needed before the component sends a "change." In 99% of cases, this is not worth messing with, but if you have a stutter or maybe more than normal EMC (electromagnetic noise) in your environment, it might be worth raising this to prevent unintended movement. But again, this is only in very extreme cases. Most people will only need to play with the "**Deadzone**" for any speed components like if you like a more sensitive Joystick. Or the "**Start/End point**" if you have a T-Bar, Fader, RCP-Joystick or a Potentiometer that is not going the full range. ##### 5. Test out your new Calibration The simplest way to test out your new calibration is either by just playing with it on your setup or by using our build in hardware component testing tool, that's included in reactor. To use this tool, make sure your panel is connected to Reactor and showing up, then go to the "**Tools**" page via this small button at the bottom right of Reactor's home page: [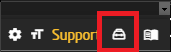](https://wiki.skaarhoj.com/uploads/images/gallery/2024-06/Vmoimage.png) Or go to: http://<your reactor ip>/tools Look at the window called "HW Event Log" This should show you all the values sent by hardware-manager to the reactor when you move or press any hardware components. if it's not showing up like below, reload the page: [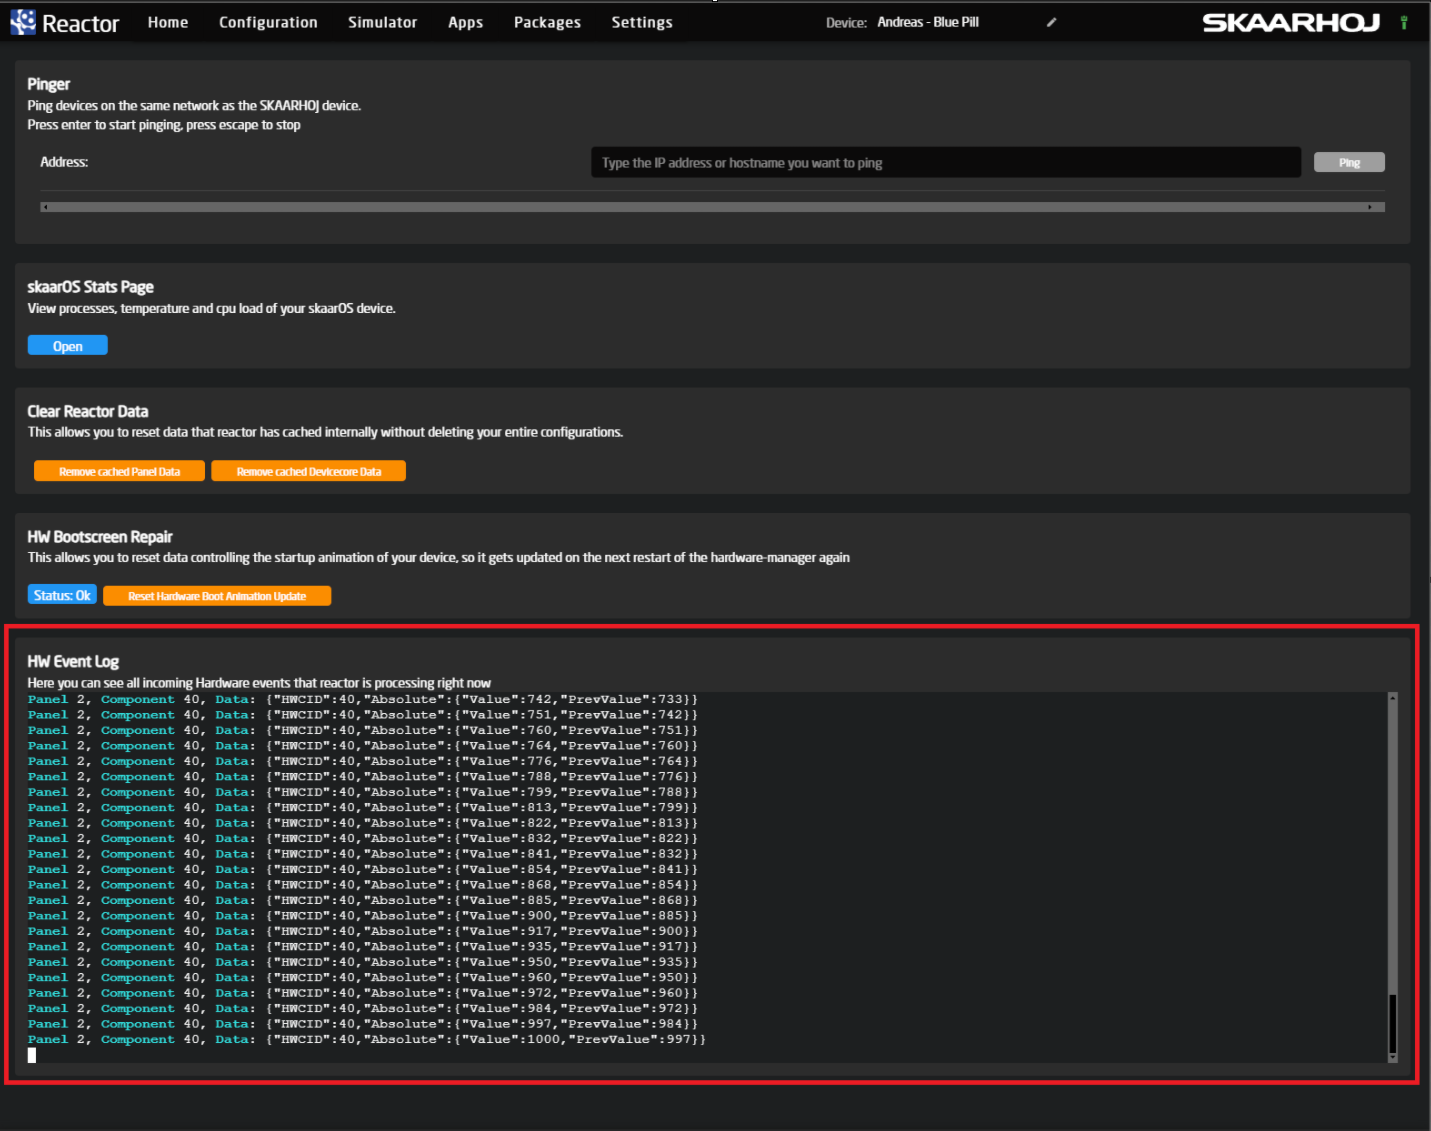](https://wiki.skaarhoj.com/uploads/images/gallery/2024-06/7fTimage.png) ### **Manual Calibration Over TCP**Please make sure the computer you will use has some sort of tool to maintain a TCP connection to the controller Netcat utility can provide this functionality. For Microsoft Windows the easiest way is to [install Nmap package](https://nmap.org/download.html) For macOS, you can [install it using Brew.](https://formulae.brew.sh/formula/netcat) Please make sure your computer and controller are on the same network.
#### Step-by-step guide: As the next step, we can now establish the TCP connection to the controller and verify that calibration is enabled. Open your terminal app and run the following command: nc 192.168.5.151 9923 Of course the ip you use must be the ip of your controller and 9923 is the default port value, unless you have changed it in hardware-manager settings page. Next, send the following command: list Verify that this is the controller you have intended to adjust by comparing the model and serial number. Also, please verify that you see “Calibration” among other supported features. [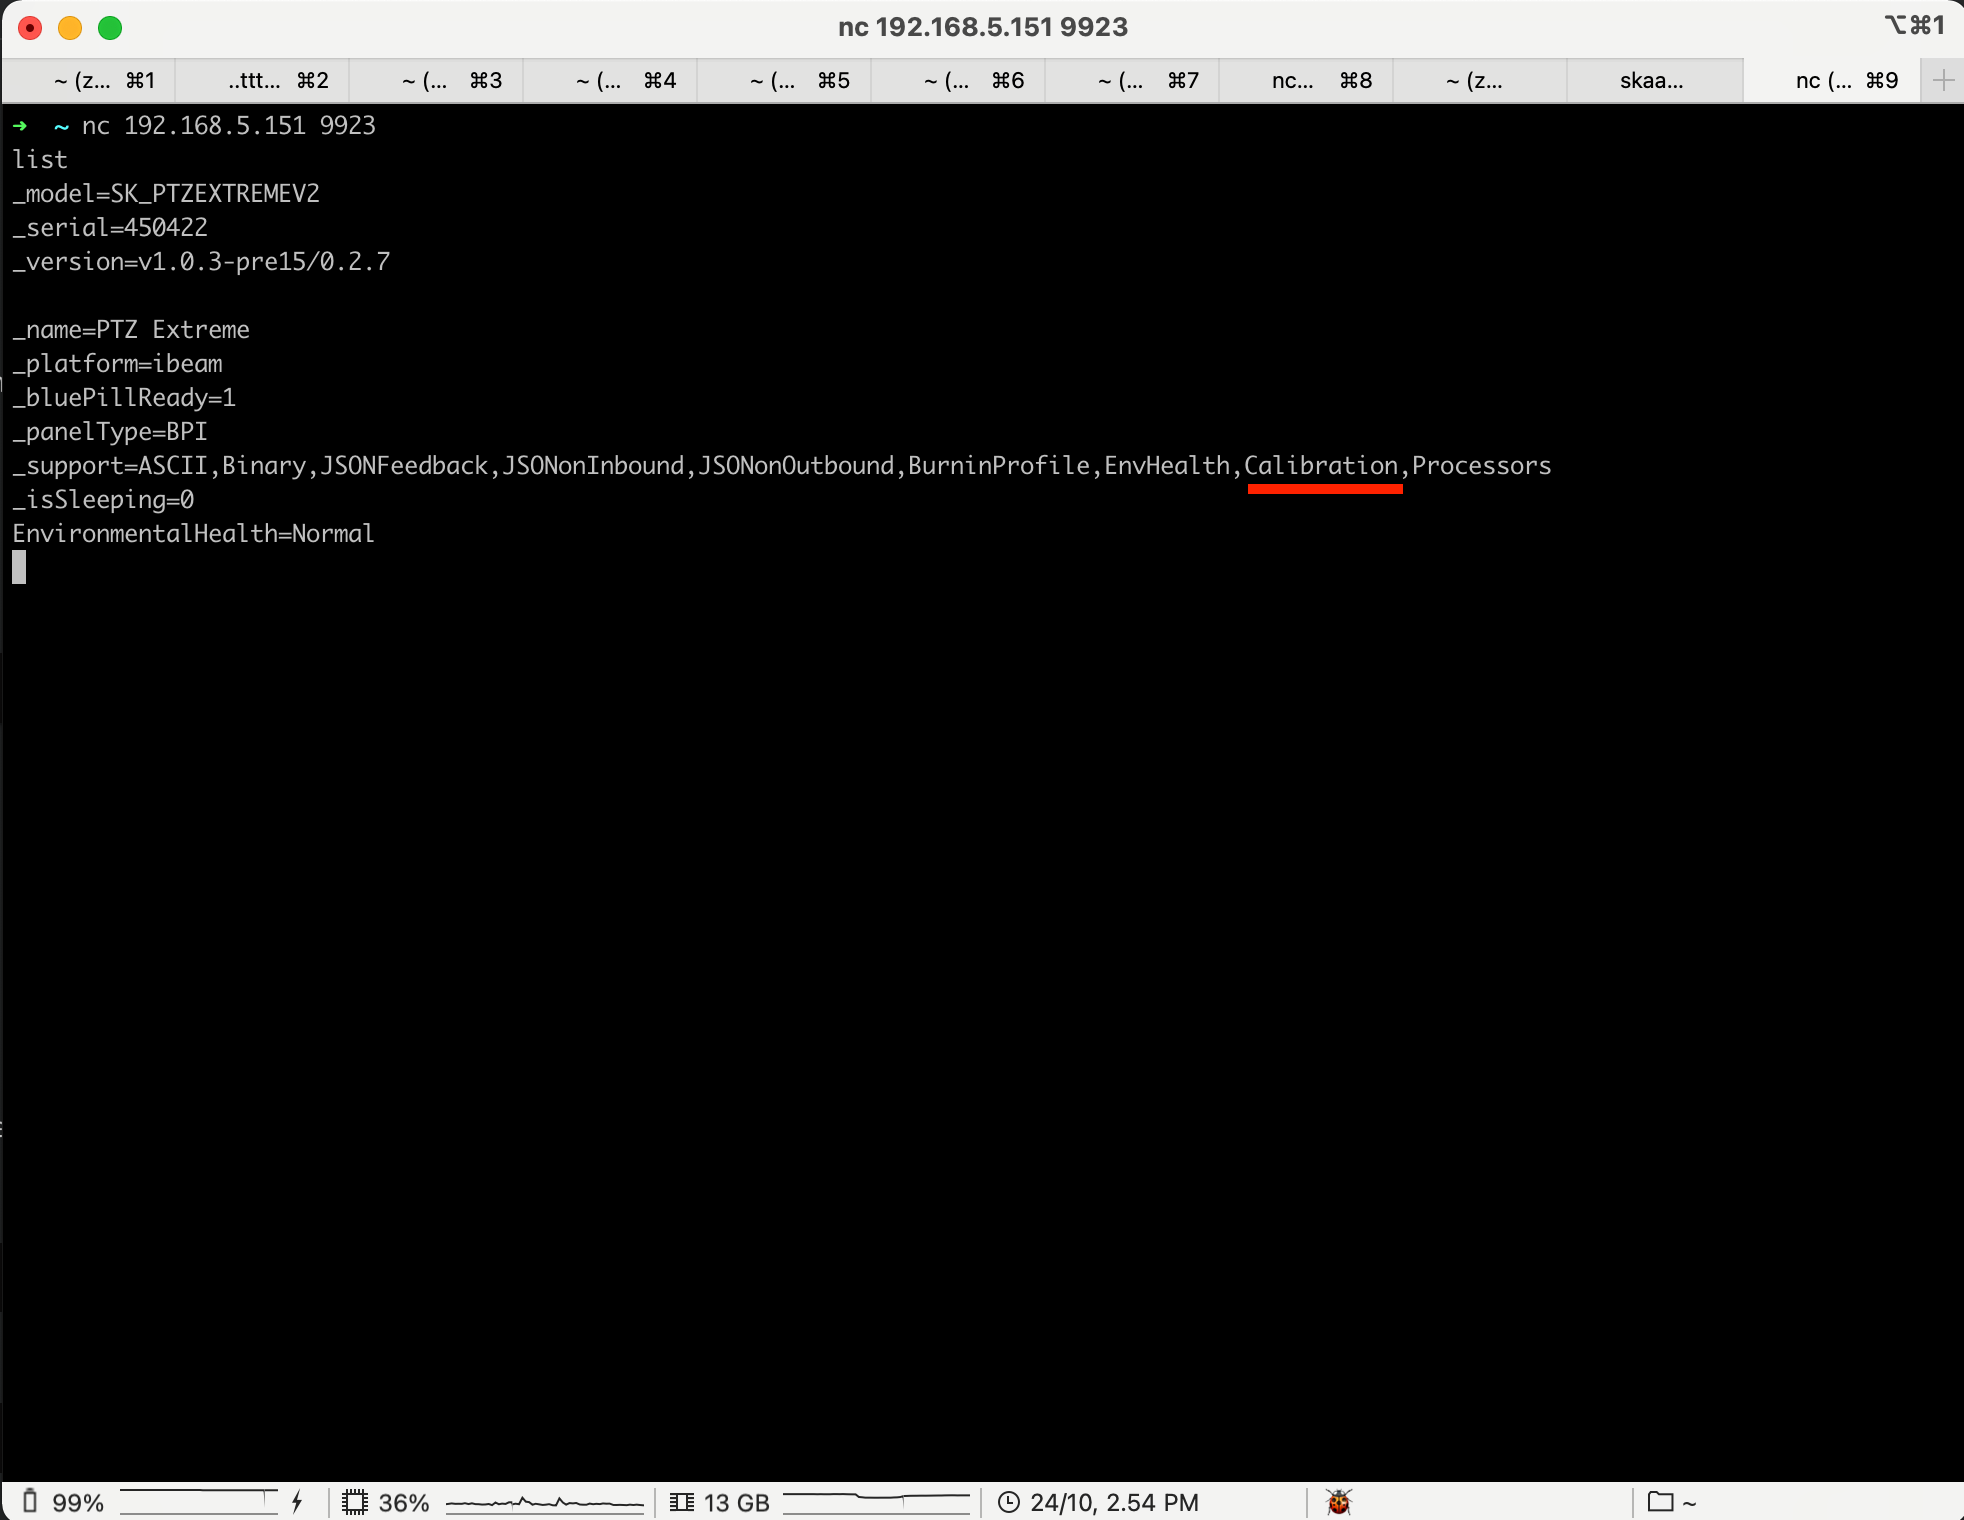](https://wiki.skaarhoj.com/uploads/images/gallery/2023-10/pasted-graphic-26.png) Next, type the following command: CalibrationProfile? In response, one should see a JSON-formatted array of analog component parameters allowed to be modified by the user. [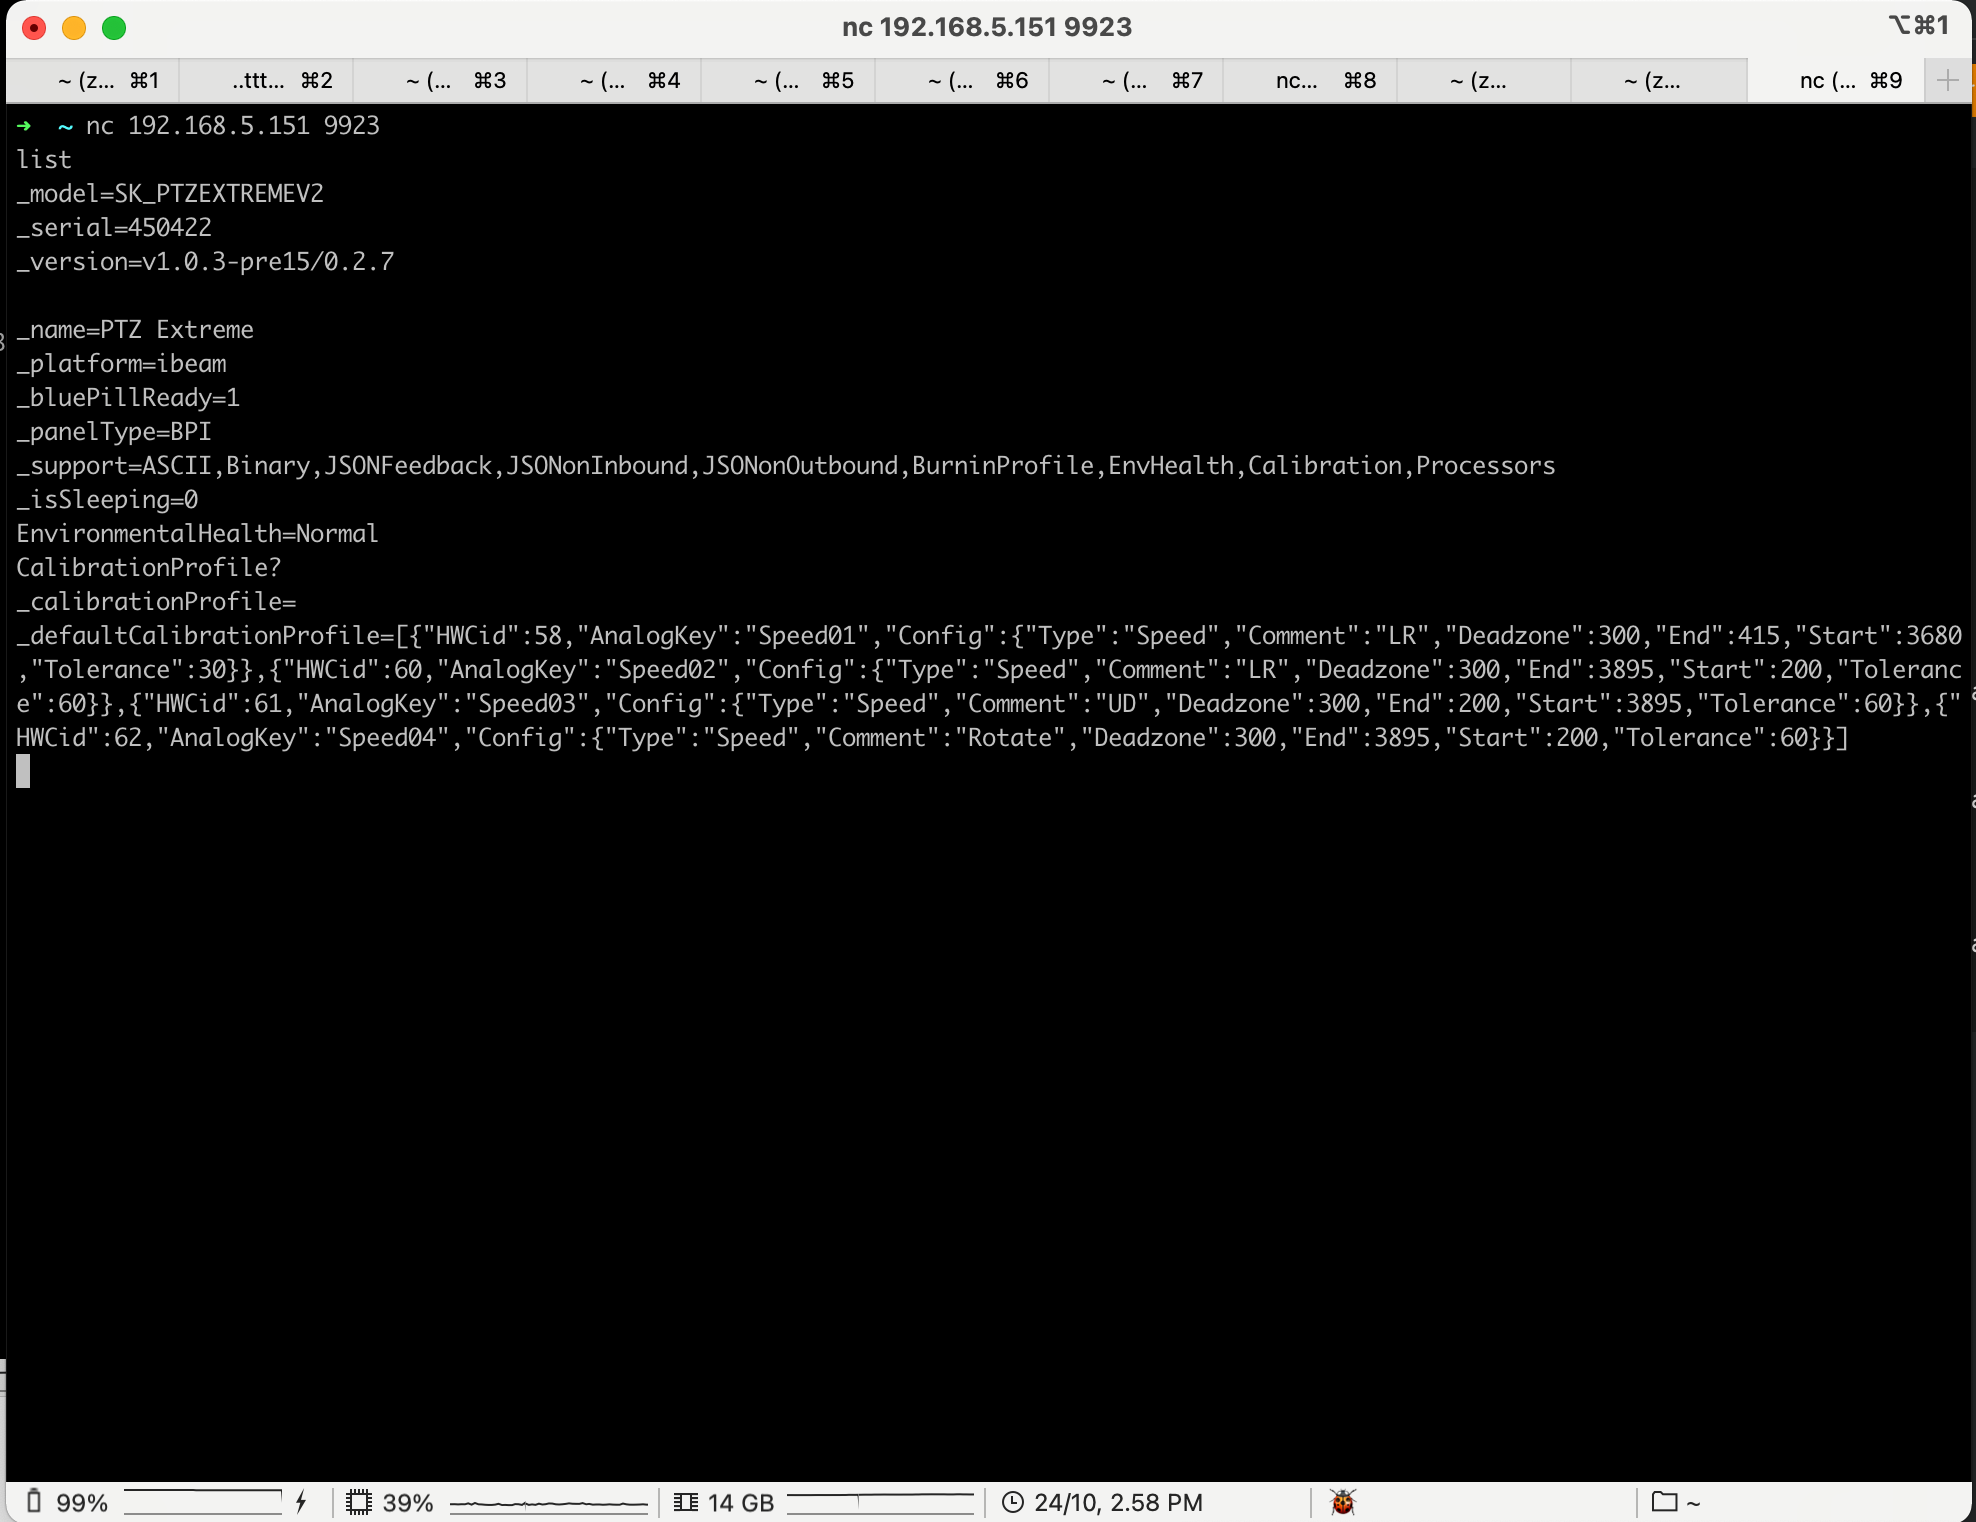](https://wiki.skaarhoj.com/uploads/images/gallery/2023-10/pasted-graphic-27.png) For example, we will modify the deadzone of the joystick on PTZ Extreme Controller. One can look up the HWC assignments specific per controller on [https://devices.skaarhoj.com/panels](https://devices.skaarhoj.com/panels) In case of PTZ Extreme, HWC ids for joystick : 60- horizontal(LR-left/right), 61-vertical axis(UD-up/down). Please note down the values. As the next step, we need to copy the array after the \_defaultCalibrationProfile= or the whole thing together. \_defaultCalibrationProfile=\[{"HWCid":58,"AnalogKey":"Speed01","Config":{"Type":"Speed","Comment":"LR","Deadzone":300,"End":415,"Start":3680,"Tolerance":30}},{"HWCid":60,"AnalogKey":"Speed02","Config":{"Type":"Speed","Comment":"LR","Deadzone":300,"End":3895,"Start":200,"Tolerance":60}},{"HWCid":61,"AnalogKey":"Speed03","Config":{"Type":"Speed","Comment":"UD","Deadzone":300,"End":200,"Start":3895,"Tolerance":60}},{"HWCid":62,"AnalogKey":"Speed04","Config":{"Type":"Speed","Comment":"Rotate","Deadzone":300,"End":3895,"Start":200,"Tolerance":60}}\] Next, we substitute \_defaultCalibrationProfile with SetCalibrationProfile and modify the deadzone of HWCid 60 and 61 to a value of 200, for example. As a result, the final command we need to send back should look like below. SetCalibrationProfile=\[{"HWCid":58,"AnalogKey":"Speed01","Config":{"Type":"Speed","Comment":"LR","Deadzone":300,"End":415,"Start":3680,"Tolerance":30}},{"HWCid":60,"AnalogKey":"Speed02","Config":{"Type":"Speed","Comment":"LR","Deadzone":200,"End":3895,"Start":200,"Tolerance":60}},{"HWCid":61,"AnalogKey":"Speed03","Config":{"Type":"Speed","Comment":"UD","Deadzone":200,"End":200,"Start":3895,"Tolerance":60}},{"HWCid":62,"AnalogKey":"Speed04","Config":{"Type":"Speed","Comment":"Rotate","Deadzone":300,"End":3895,"Start":200,"Tolerance":60}}\] If all is fine you should not get any response back. After sending CalibrationProfile? again you should see a similar message as first time, although \_calibrationProfile= will have the new parameters you have just set manually. [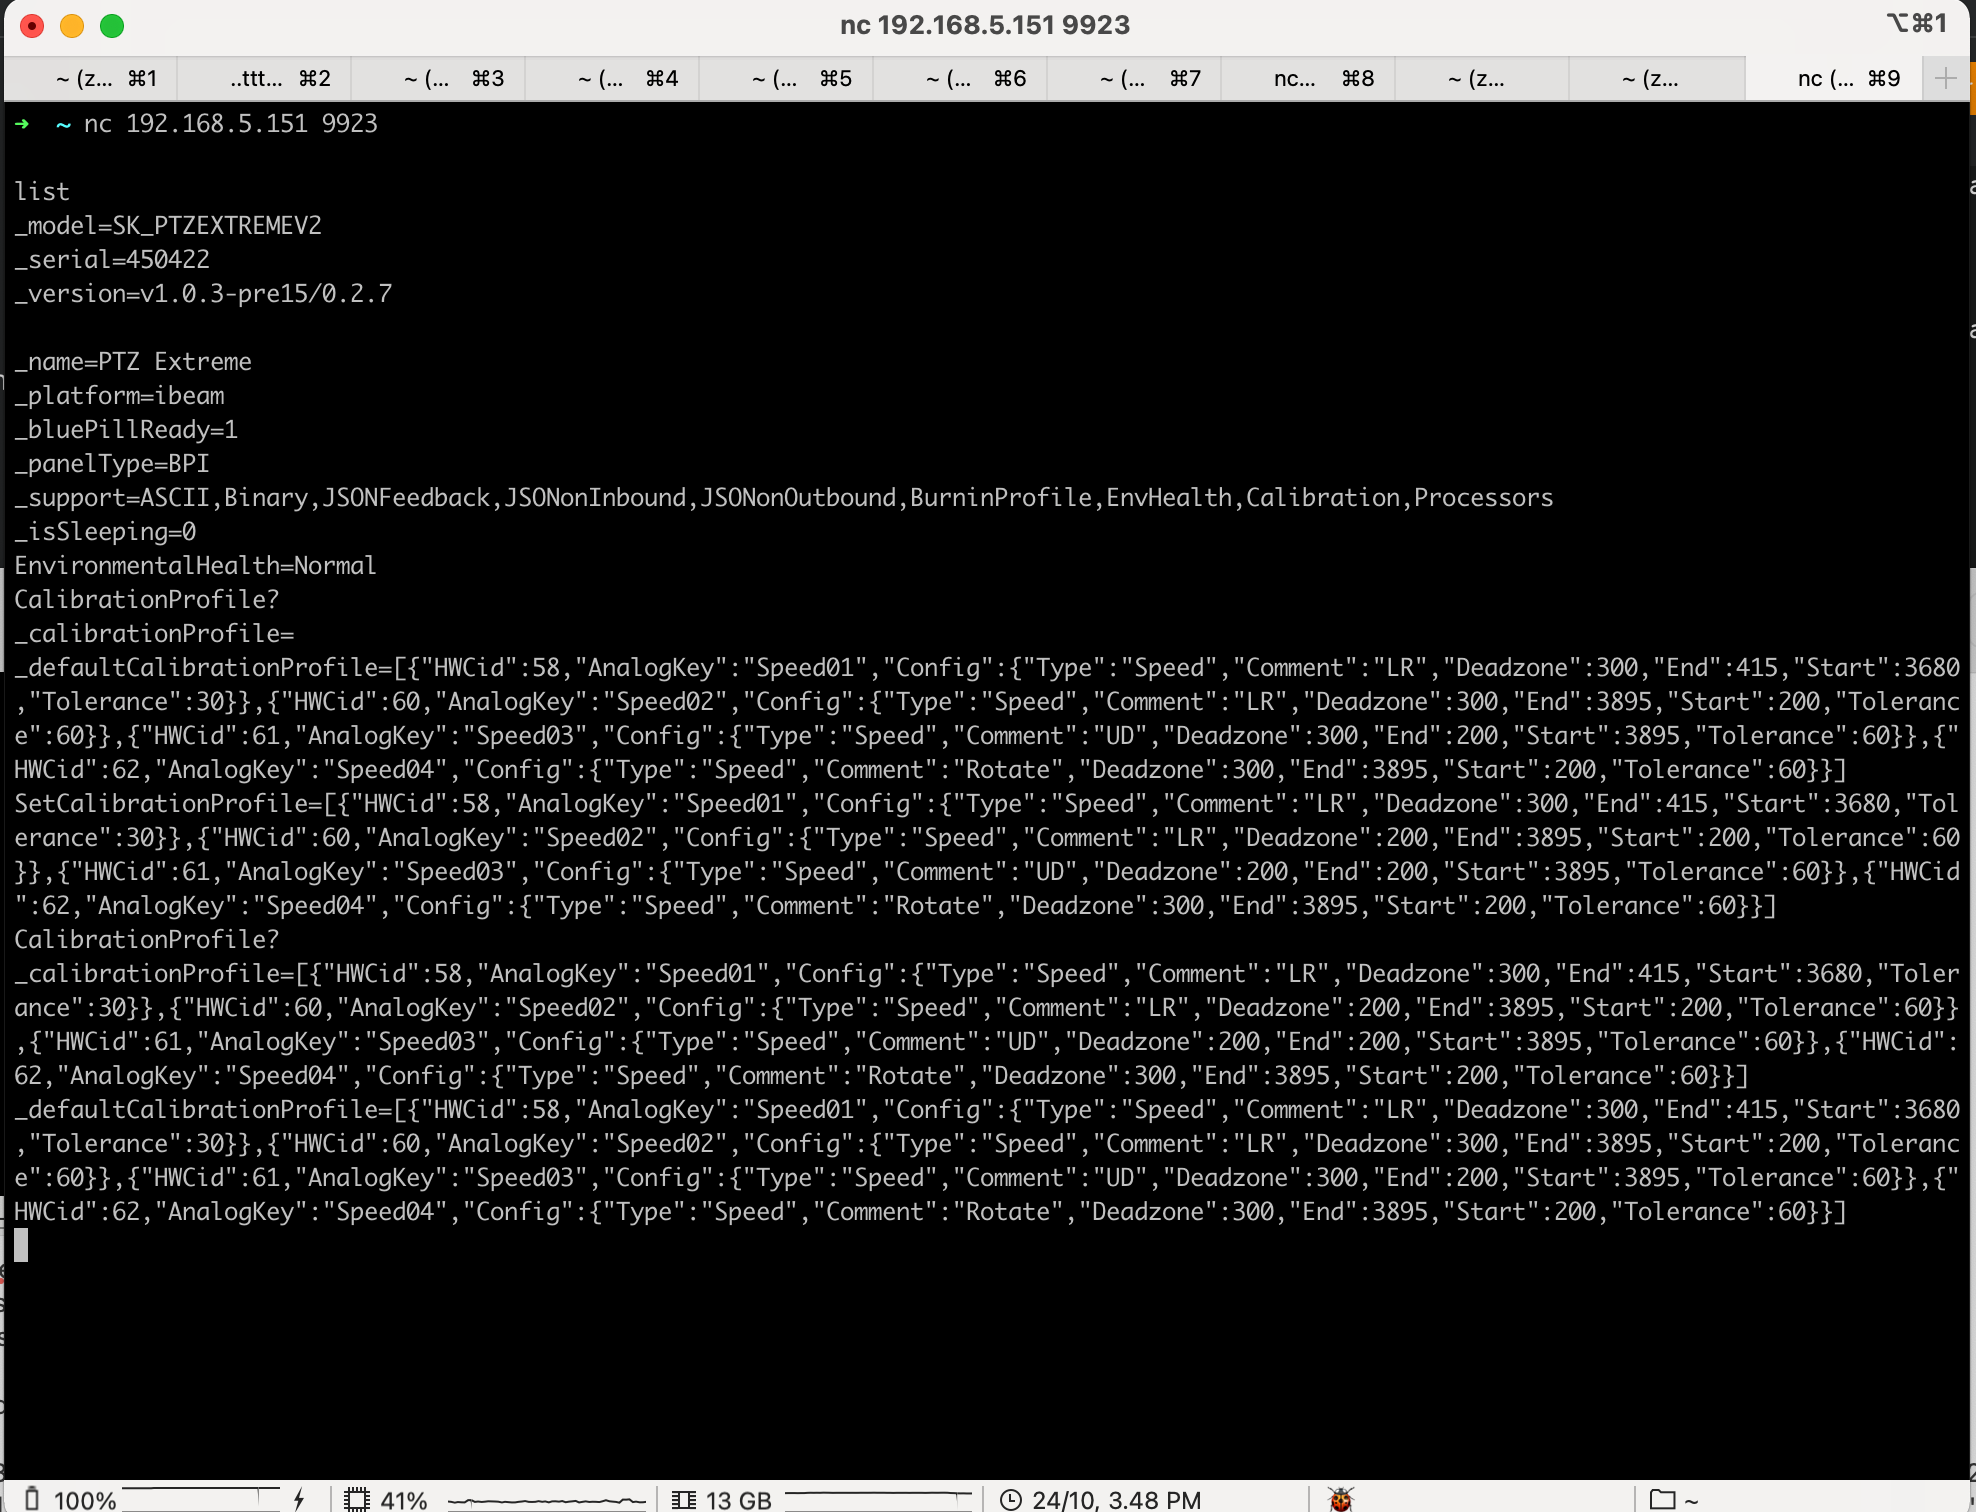](https://wiki.skaarhoj.com/uploads/images/gallery/2023-10/pasted-graphic-31.png) Additional verification can be found in the logs of hardware manager. If correct calibration profile was sent, you will find confirmation in the log, as seen below. [](https://wiki.skaarhoj.com/uploads/images/gallery/2023-10/pasted-graphic-28.png) \*If you get “nack” in response, the content received by JSON is not valid. **At this moment the new “parameters” are saved and will take effect next time hardware-manager starts.** **So either power cycle the unit or restart the hardware-manager to test new settings.** You can always "roll-back" to original settings either by simply disabling the "CalibrationEnabled" in the settings and restarting, or copy-pasting values from \_defaultCalibrationProfile to SetCalibrationProfile command and restarting. # Demo Mode The Raw Panel Demo application connects to one or more Raw Panel units, retrieves their topology data, and provides dynamic feedback to their hardware components. This includes updating button colors, display contents, and other visual elements in a cyclic manner, showcasing the panel's capabilities. Additionally, the application responds to triggers from the connected panels, such as button presses, knob rotations, fader movements, and joystick interactions. These interactions are reflected both on the panels themselves and in the application logs, creating a comprehensive demonstration of the panels' functionality. Install the raw-panel-demo package on the packages page. 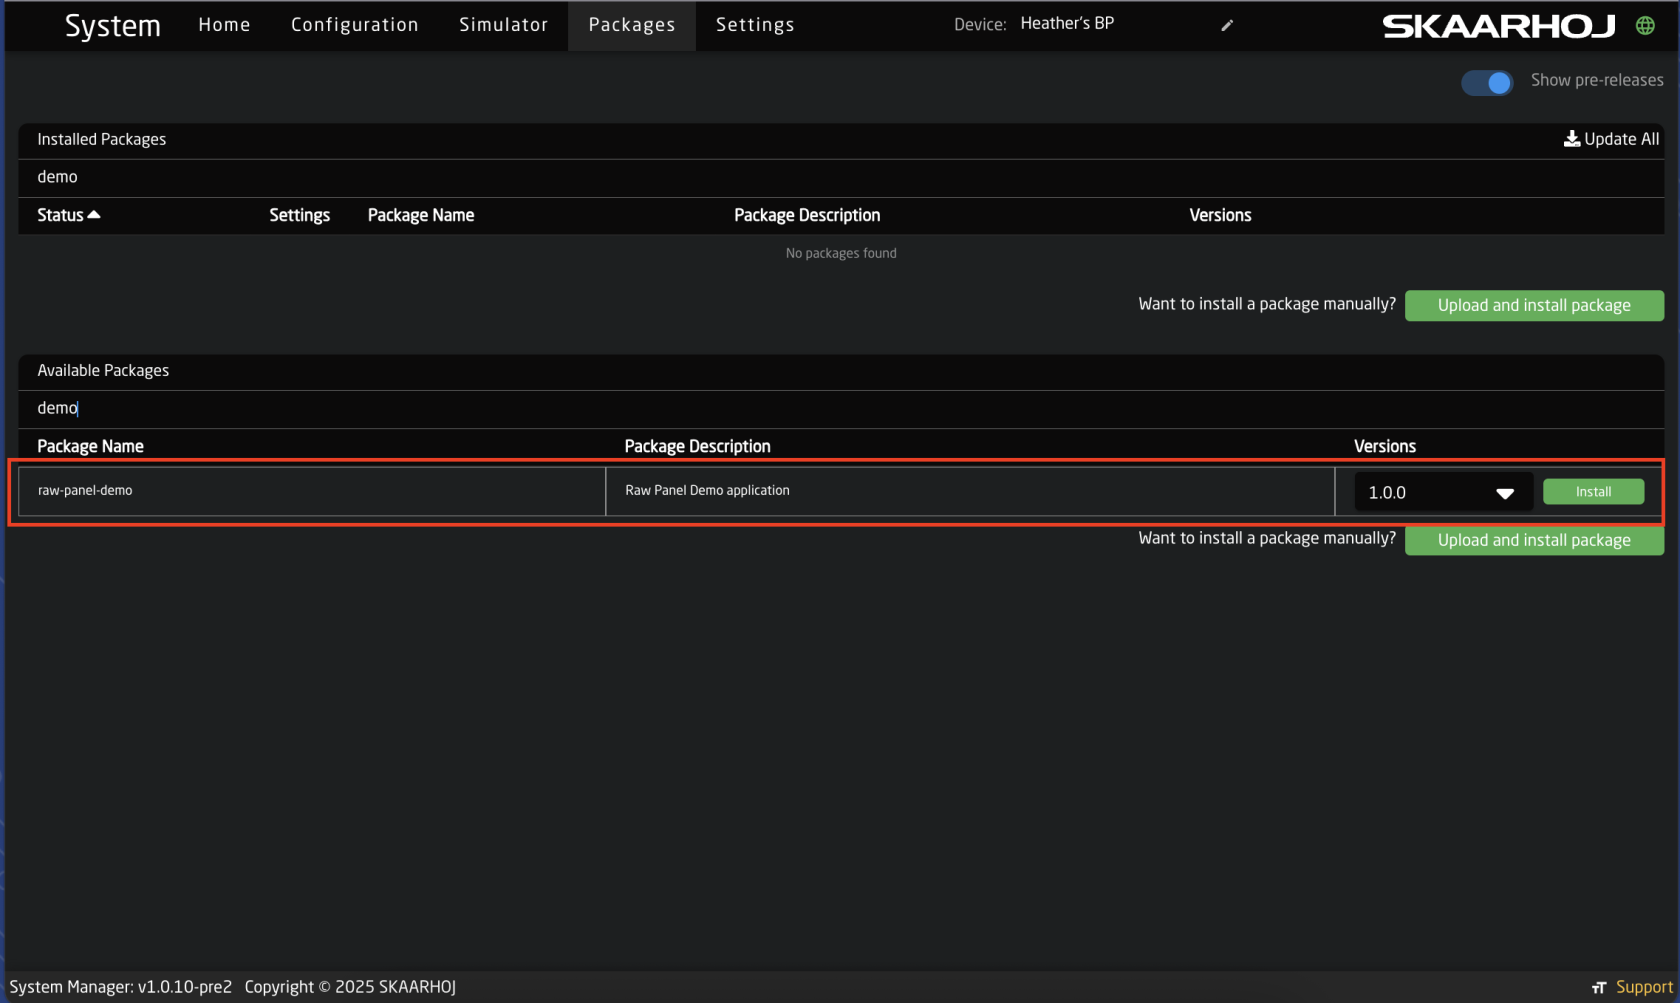 Click in the package to set the parameters, connect to other panels, to run in, and access its own web interface.**Panels MUST be in 'Raw Panel Mode' in order for the Demo app to connect to them.** You can enable and disable Raw Panel Mode on the Settings page. This also means that Reactor cannot run at the same time.
[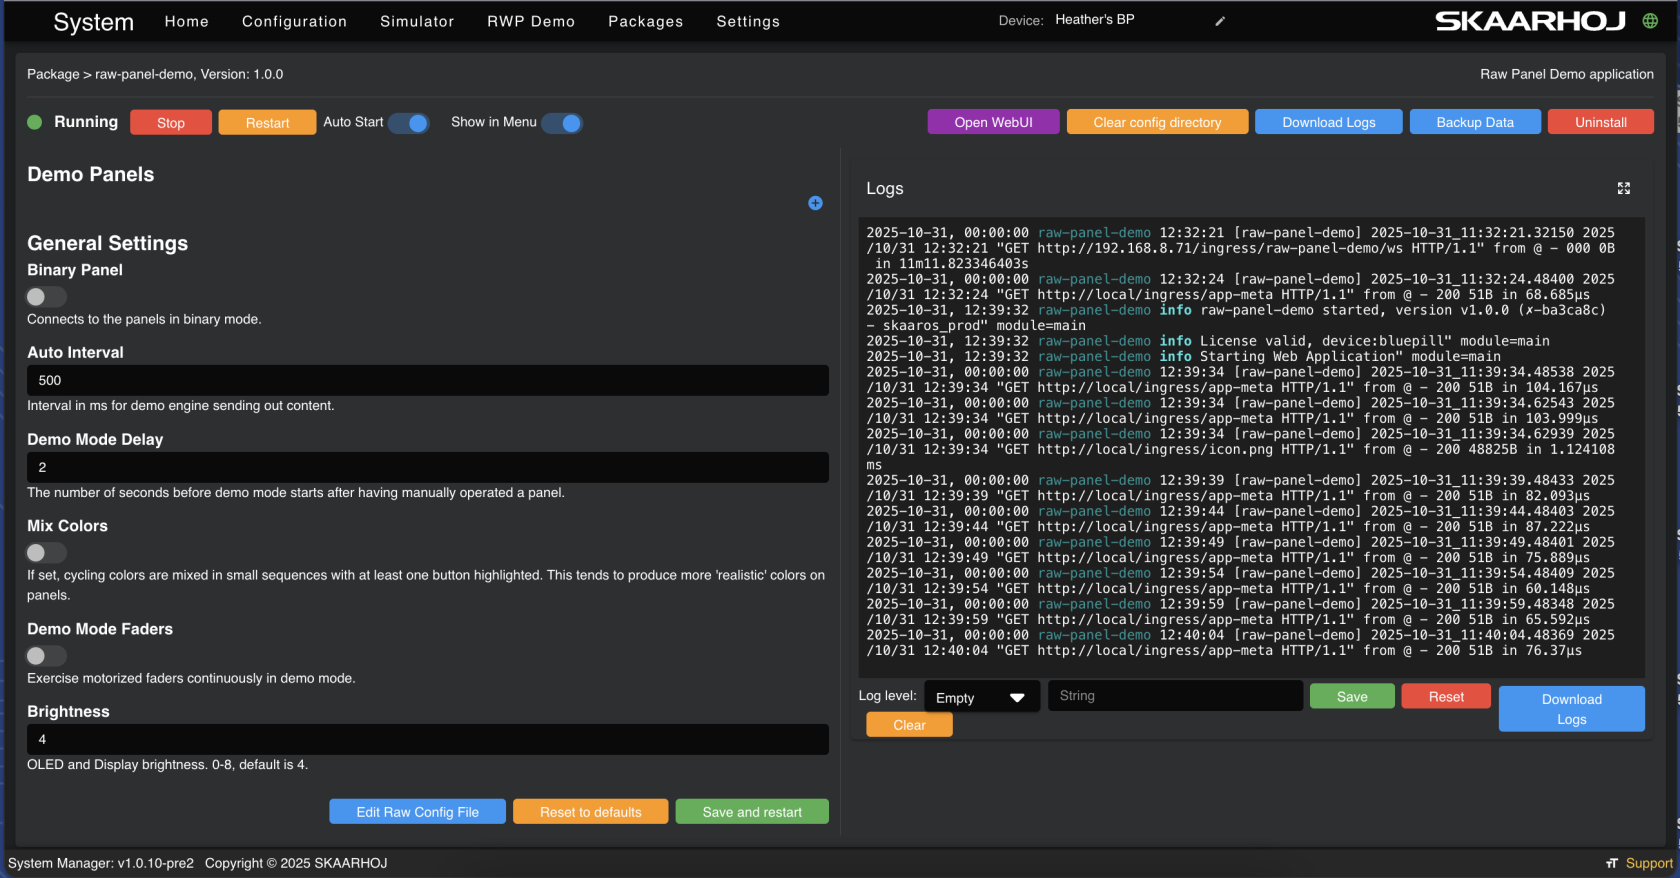](https://wiki.skaarhoj.com/uploads/images/gallery/2025-10/screenshot-2025-10-31-at-12-40-09.png) It is possible to set up the demo mode straight from the package details. 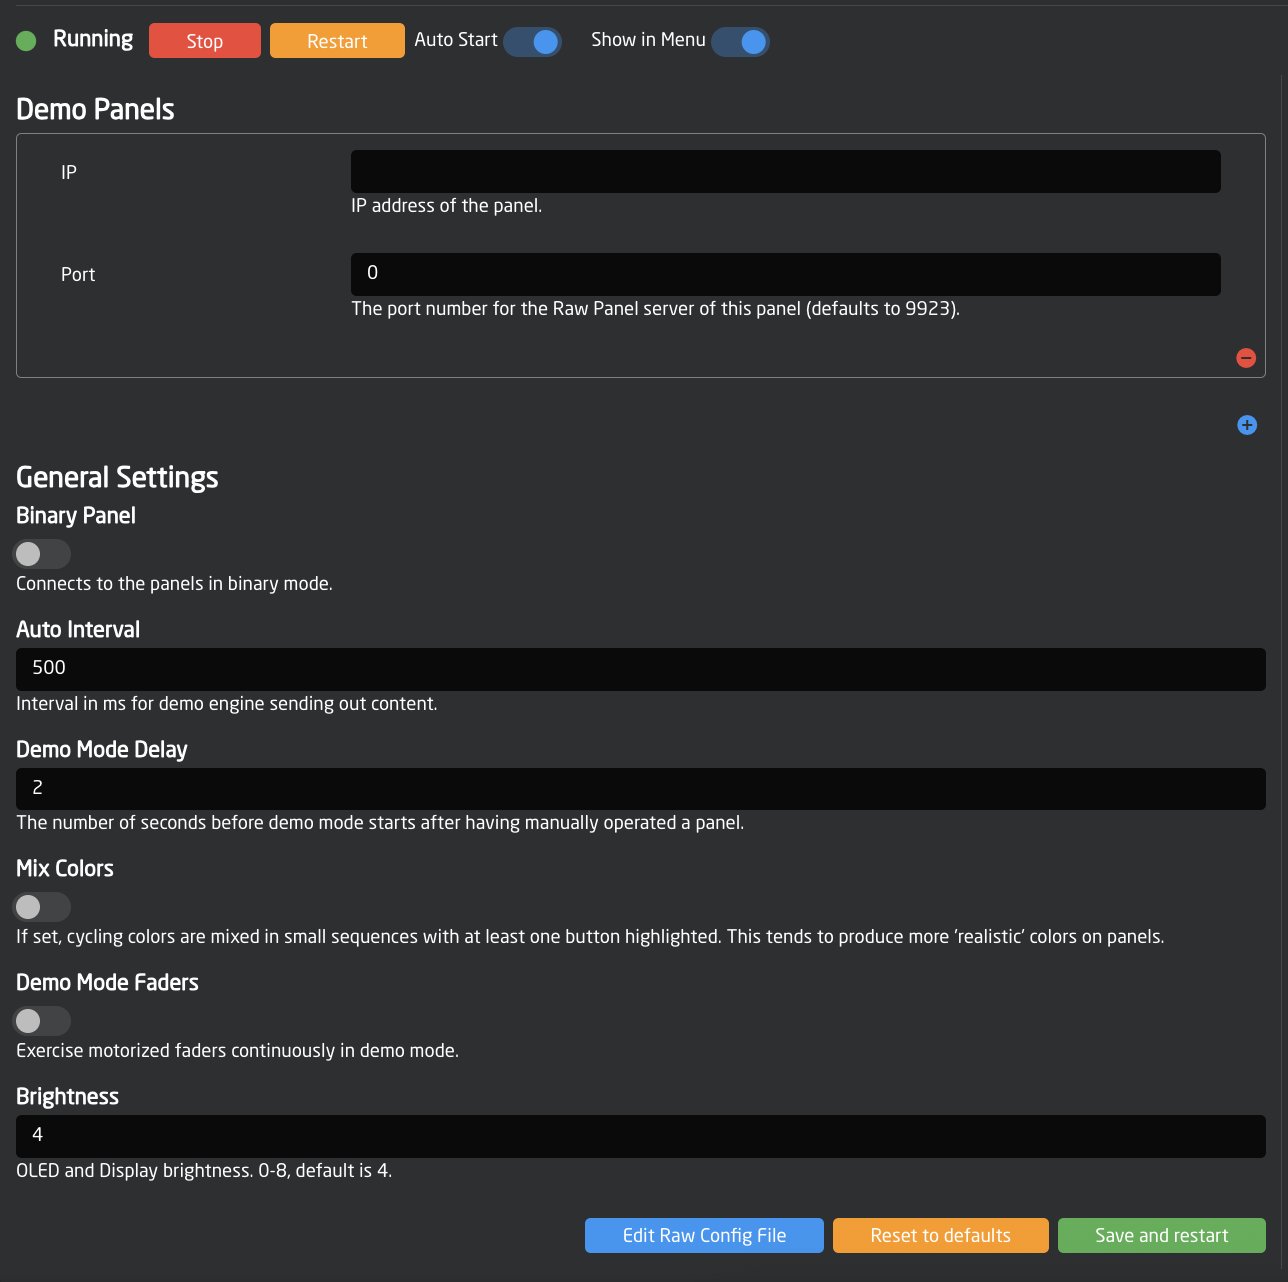 Accessing it via it's own interface gives the same options in a cleaner application interface.If the Open WebUI button is not visible, make sure the package is running and try refreshing the page.
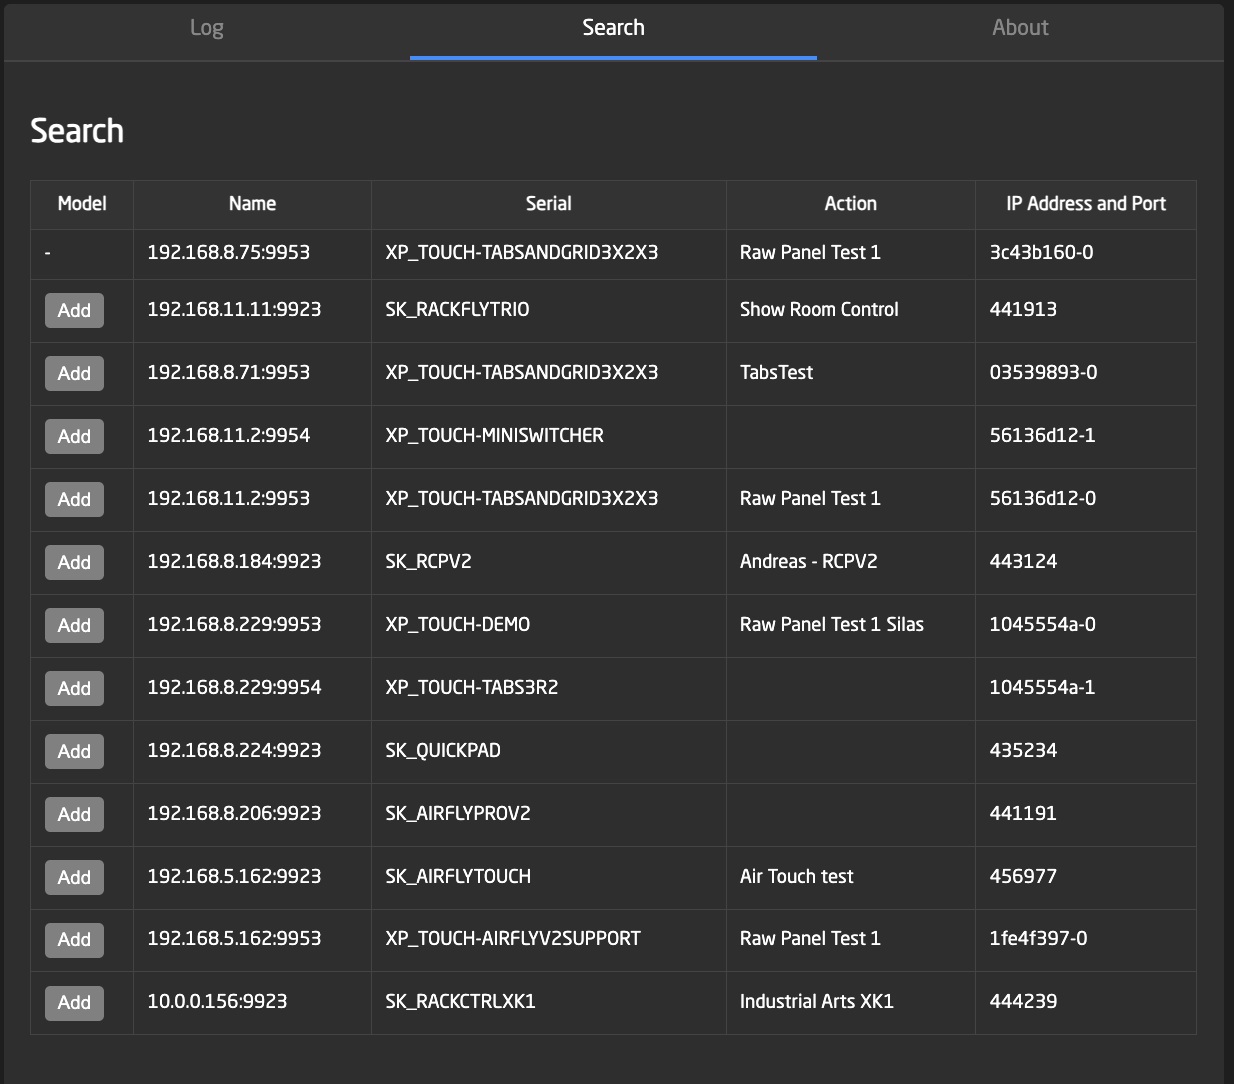
 Within the application's interface: The settings tab exposes the parameters that can be set for the demo mode. 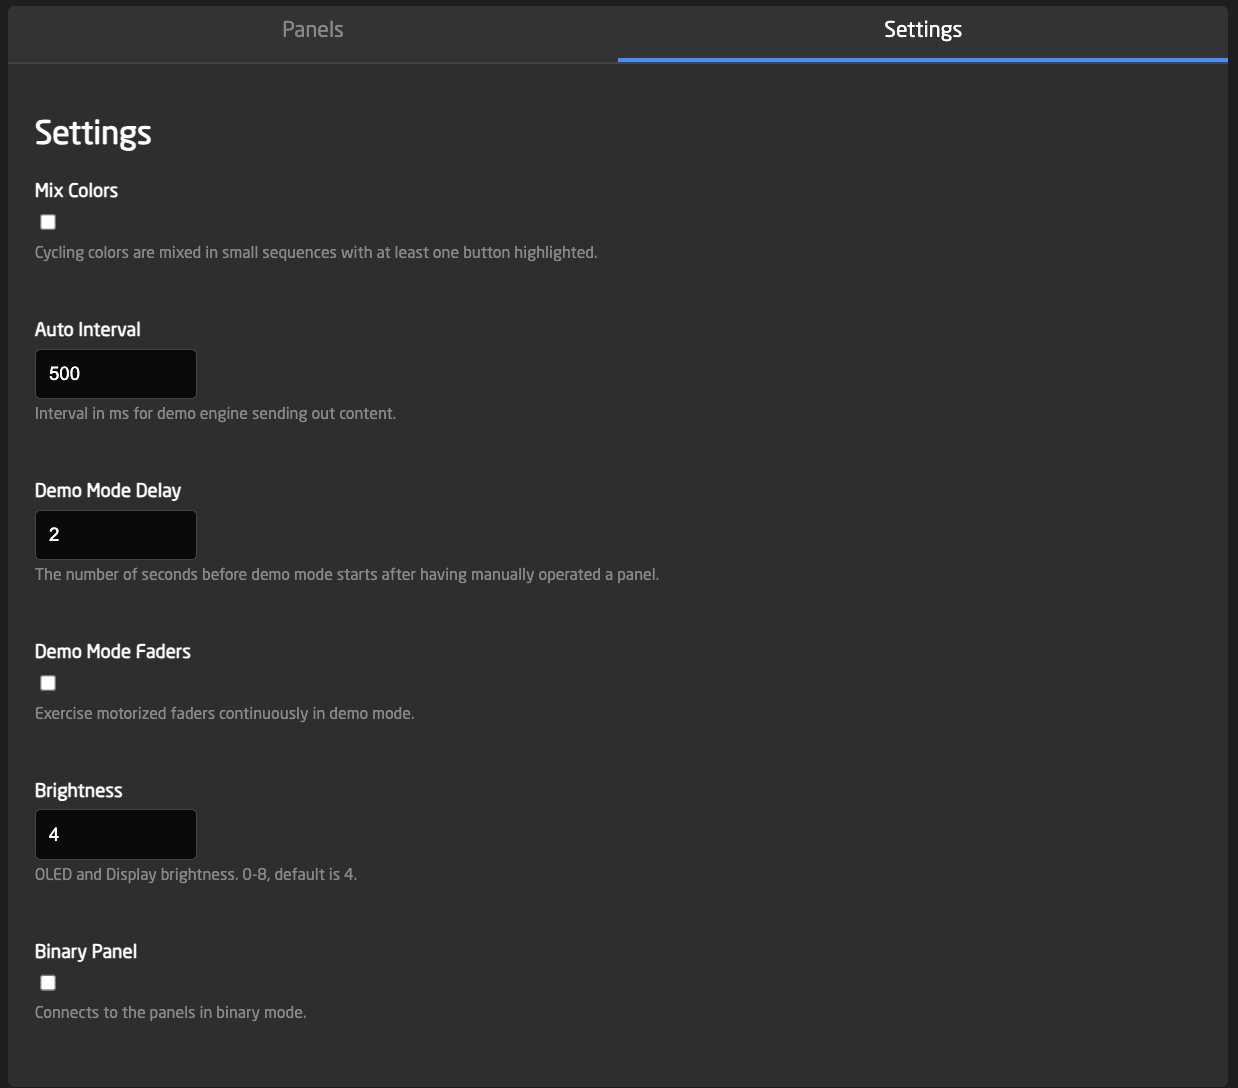 Panels tab allows for adding panels manually, running demo mode on them or removing them.  The Search tab allows for adding panels in Raw Panel Mode that are discovered on the network.Corrected image coming soon.
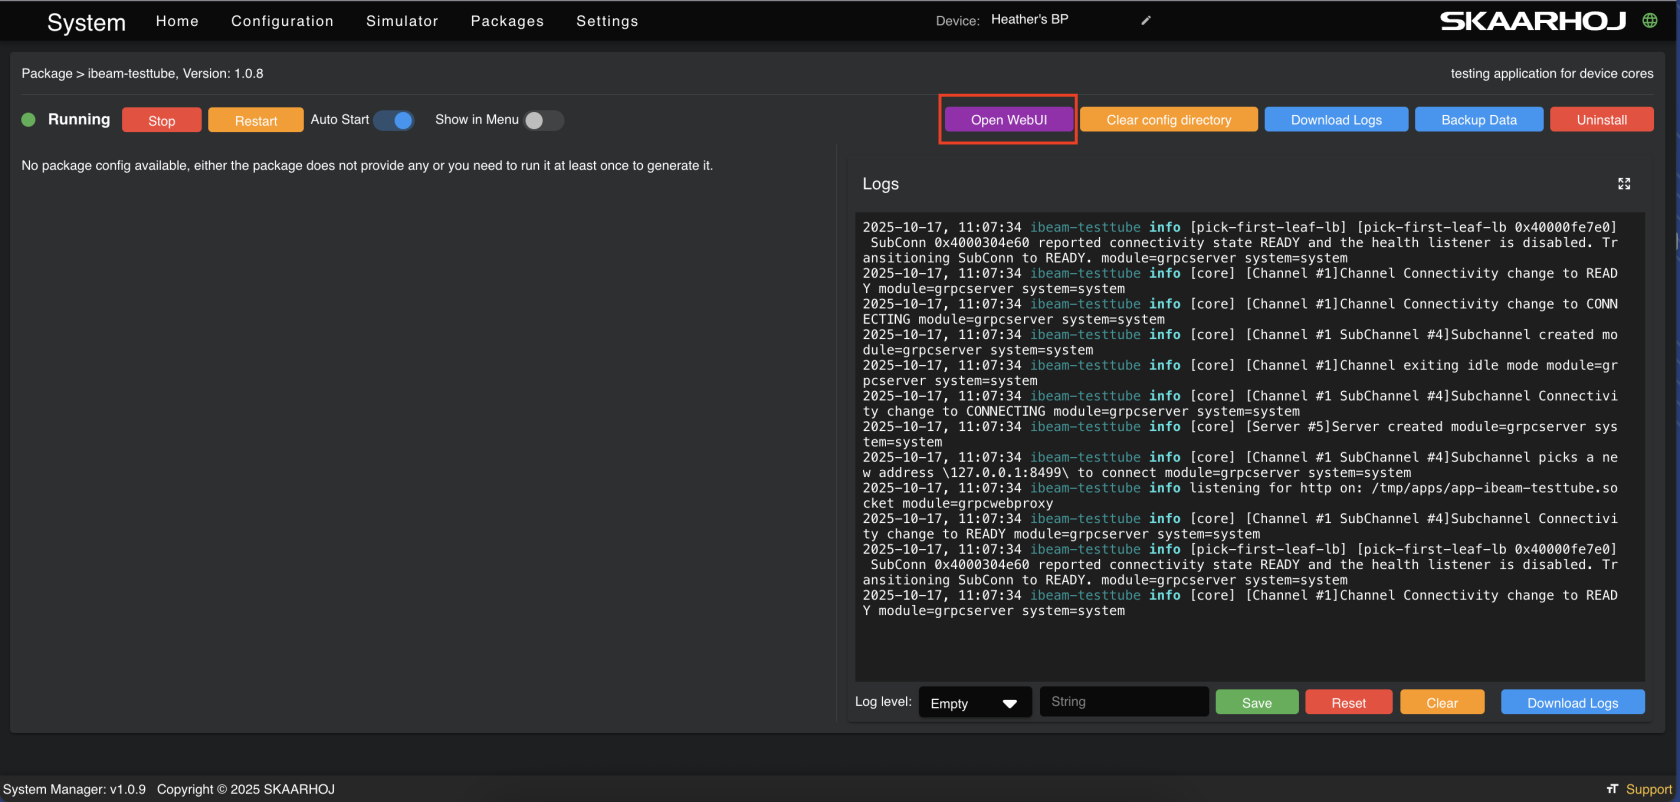
 The last section is for a readout of the logs. 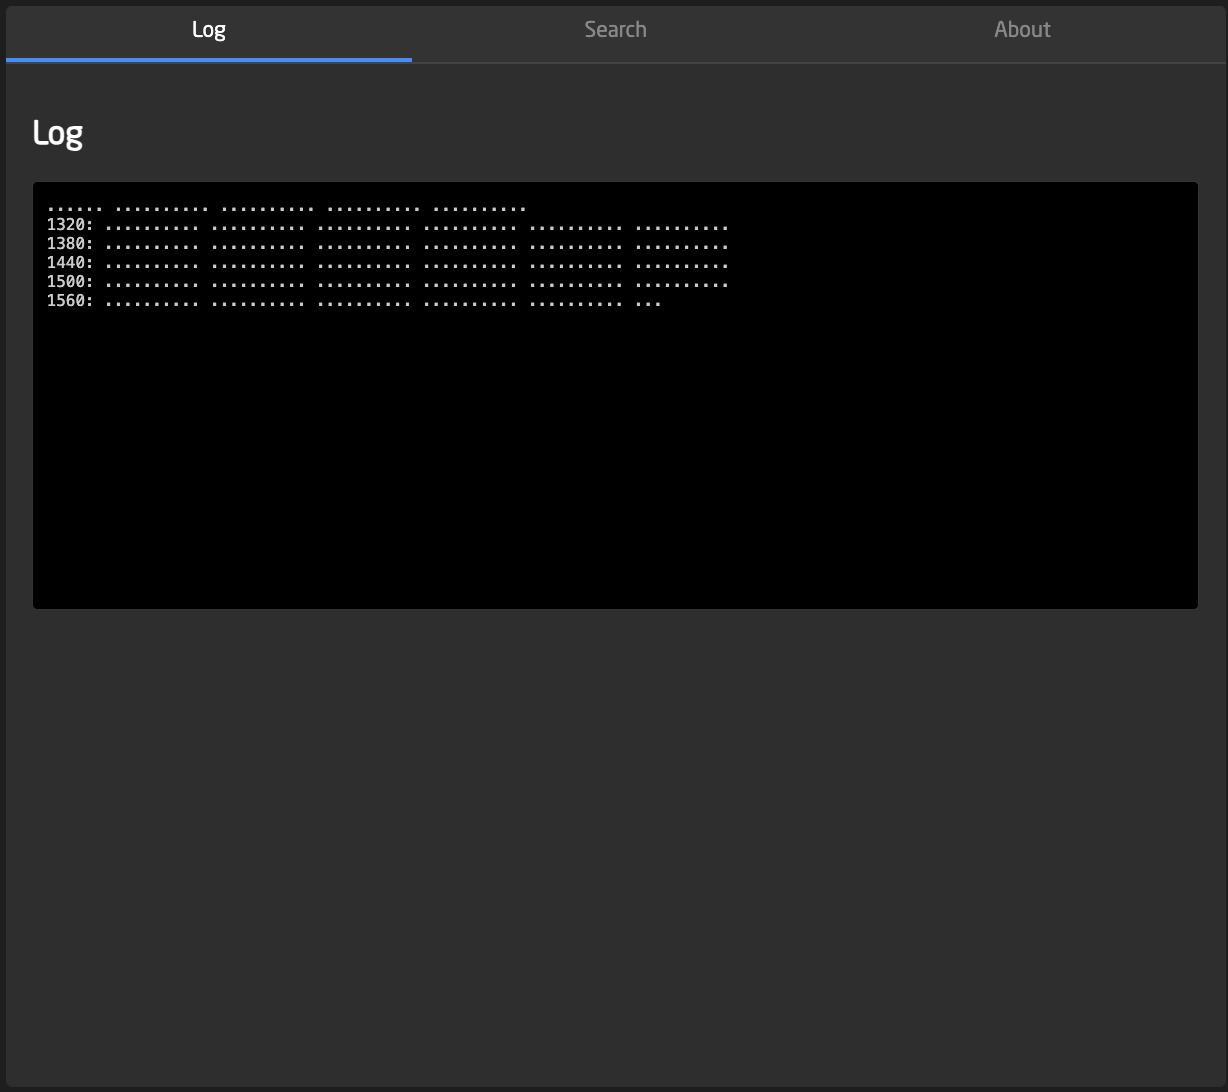 # Test Tube Our Test Tube application is a great resource for troubleshooting issues that may come up while configuring a panel. This allows you to explore control and feedback of individual parameters of devices that have been added in Reactor. Start by installing it on the packages page. [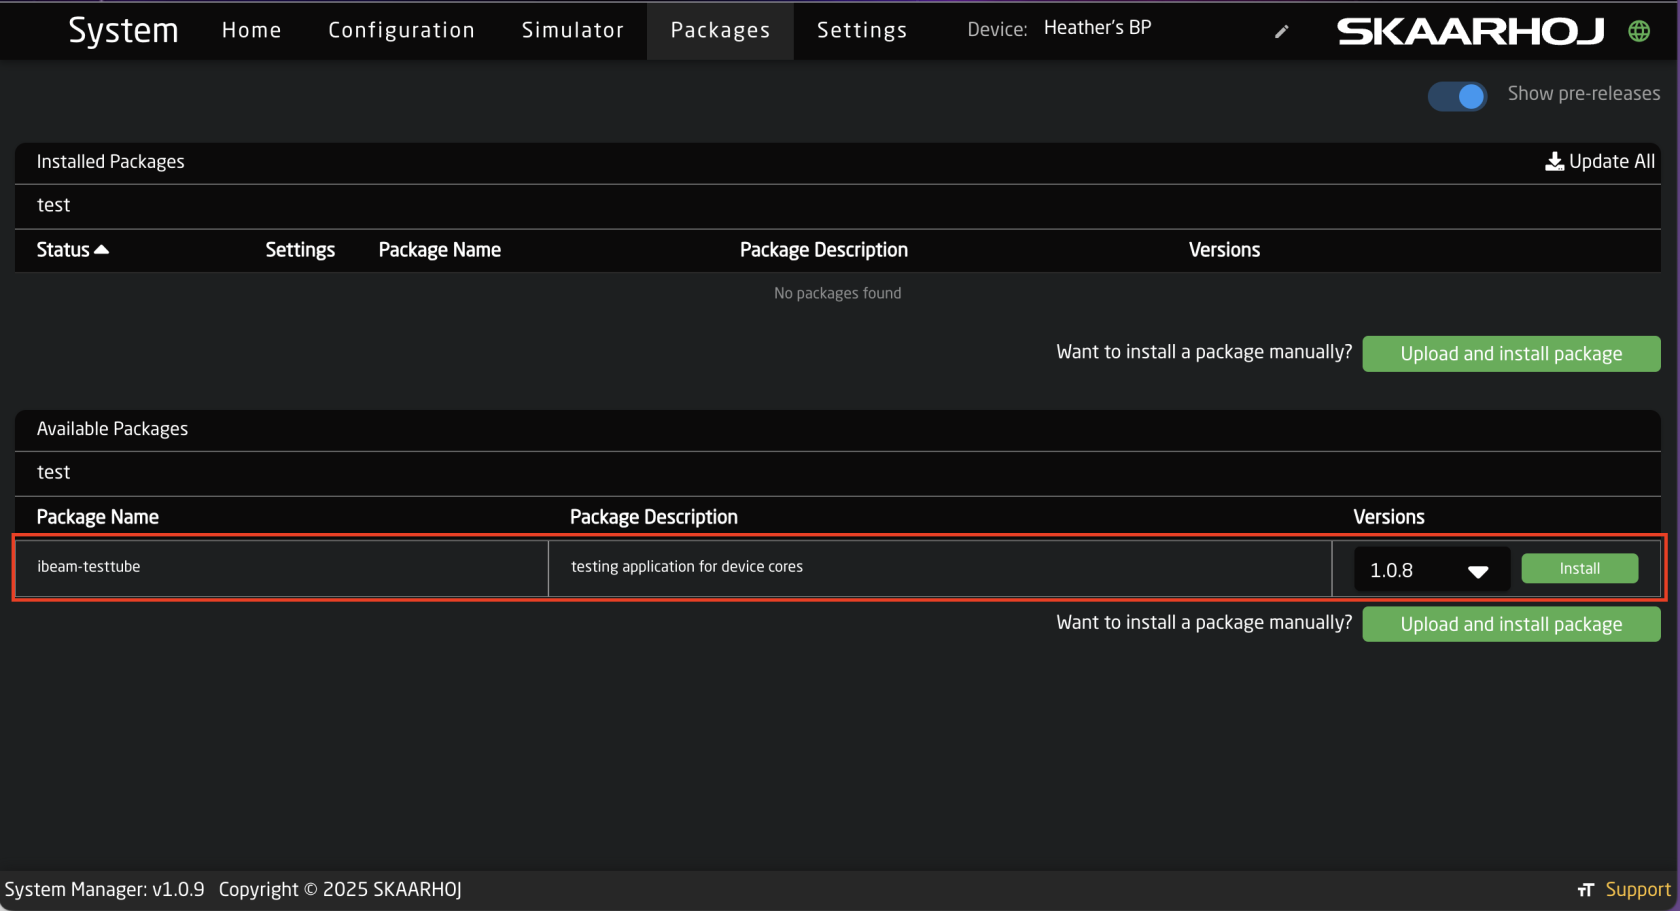](https://wiki.skaarhoj.com/uploads/images/gallery/2025-10/screenshot-2025-10-02-at-2-47-30-pm.png) Click into the package to start it before refreshing the page. [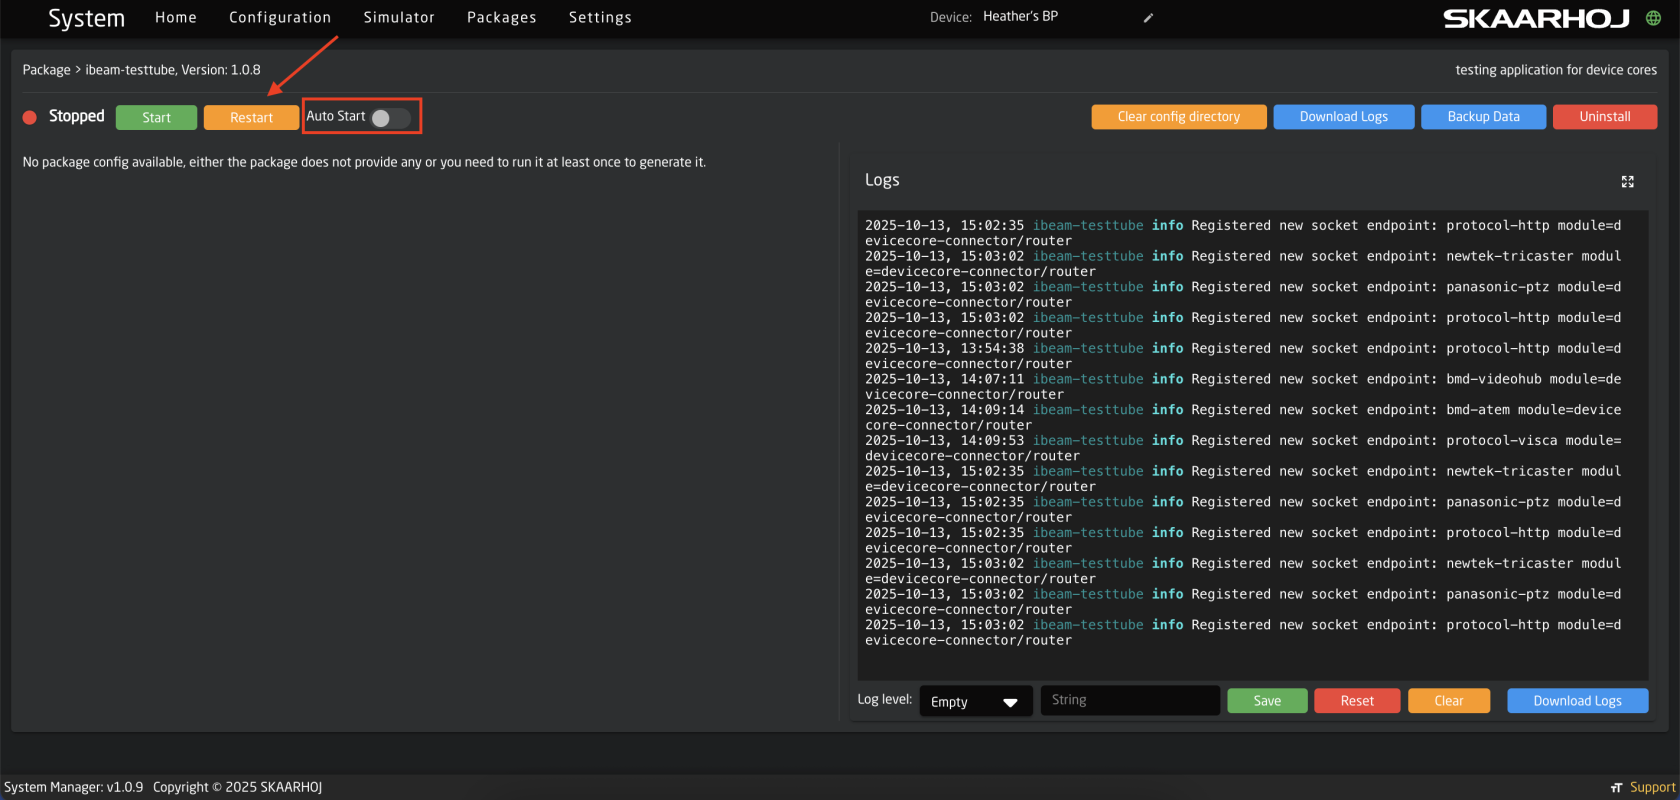](https://wiki.skaarhoj.com/uploads/images/gallery/2025-10/screenshot-2025-10-17-at-11-06-33.png) After refreshing the page the Open WebUI button will be available. Clicking this will open the interface for the internal application.Using the Show in Menu toggle will create a tab to access the application from the upper menu bar.
[](https://wiki.skaarhoj.com/uploads/images/gallery/2025-10/screenshot-2025-10-17-at-11-08-04.png) In the WebUI for the Test Tube application click on the Selected Core text to expand the view and see currently running device cores. [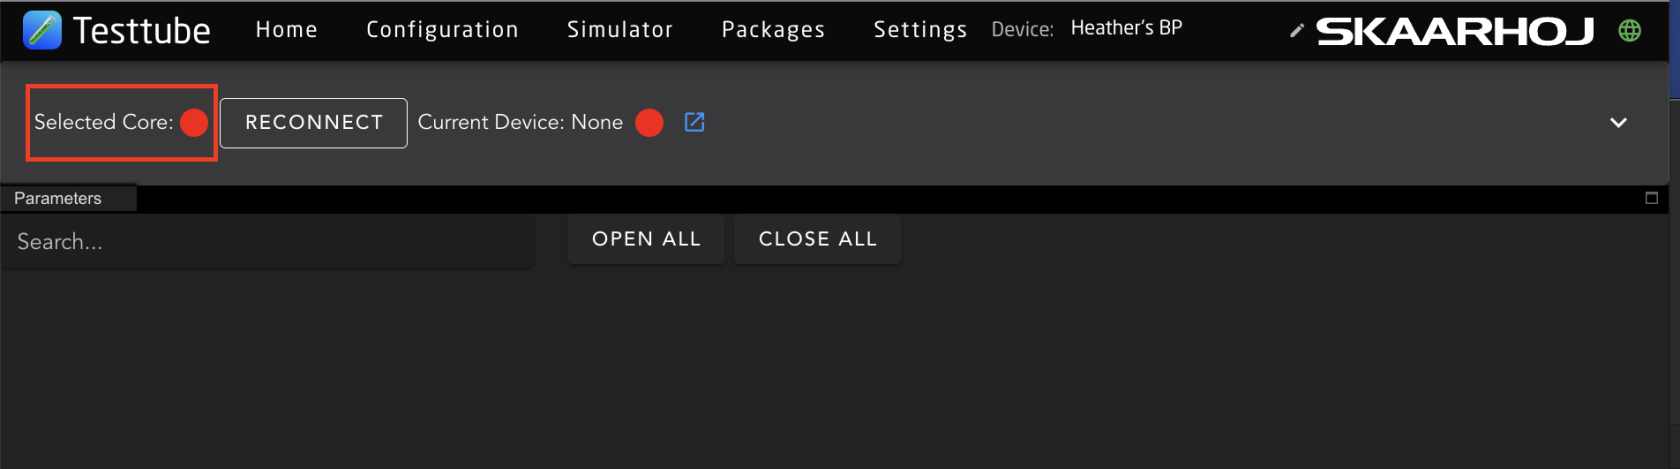](https://wiki.skaarhoj.com/uploads/images/gallery/2025-10/kR3screenshot-2025-10-17-at-12-37-15.png) Using the drop down for the select core will allow you to select any of the currently running core. [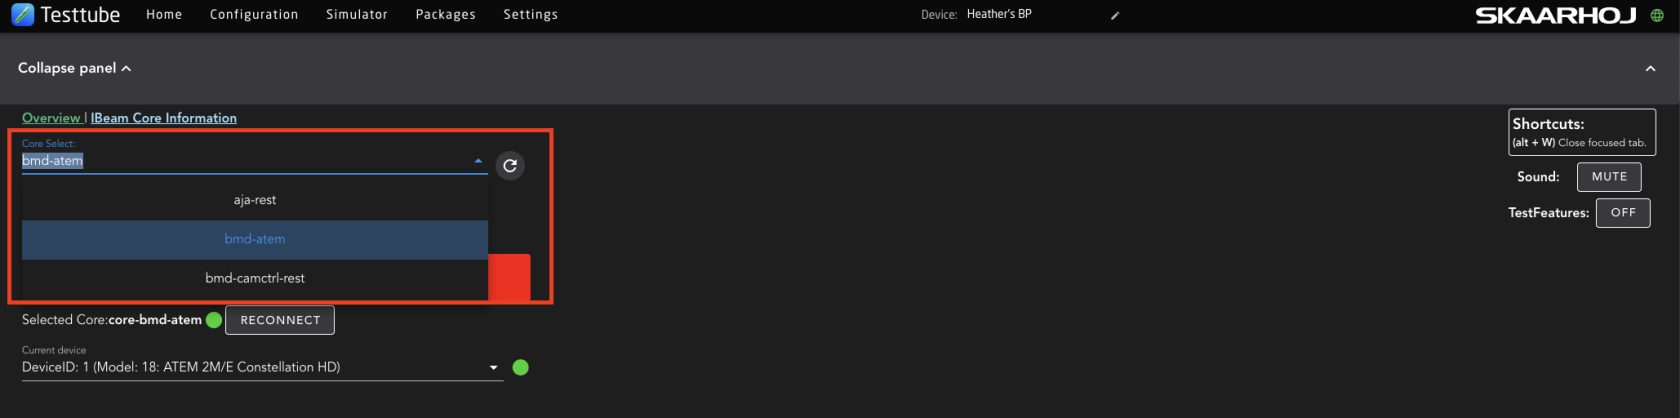](https://wiki.skaarhoj.com/uploads/images/gallery/2025-10/screenshot-2025-10-17-at-13-23-44.png) Using the drop down for the Current Device allows for the select of the specific device using the core. [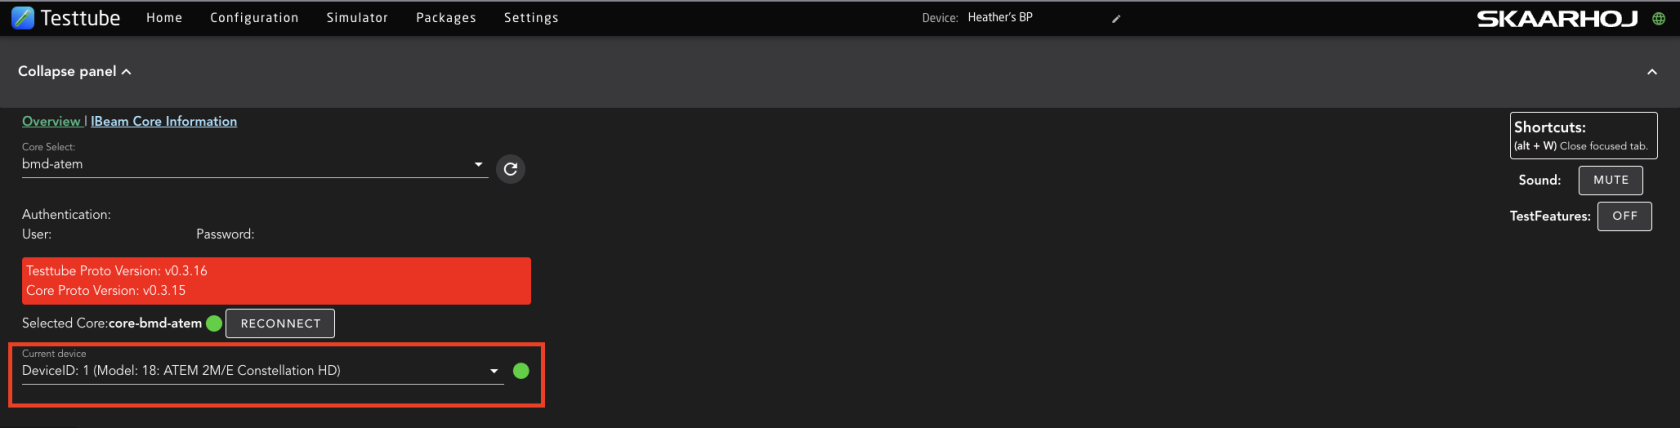](https://wiki.skaarhoj.com/uploads/images/gallery/2025-10/screenshot-2025-10-17-at-13-24-34.png) After selecting the specific device instance, the parameter list will generate allowing for the selection of the parameter to test. [](https://wiki.skaarhoj.com/uploads/images/gallery/2025-10/screenshot-2025-10-17-at-13-49-46.png) Selecting a parameter will open it see all the available dimensions of the parameter and the expected feedback. [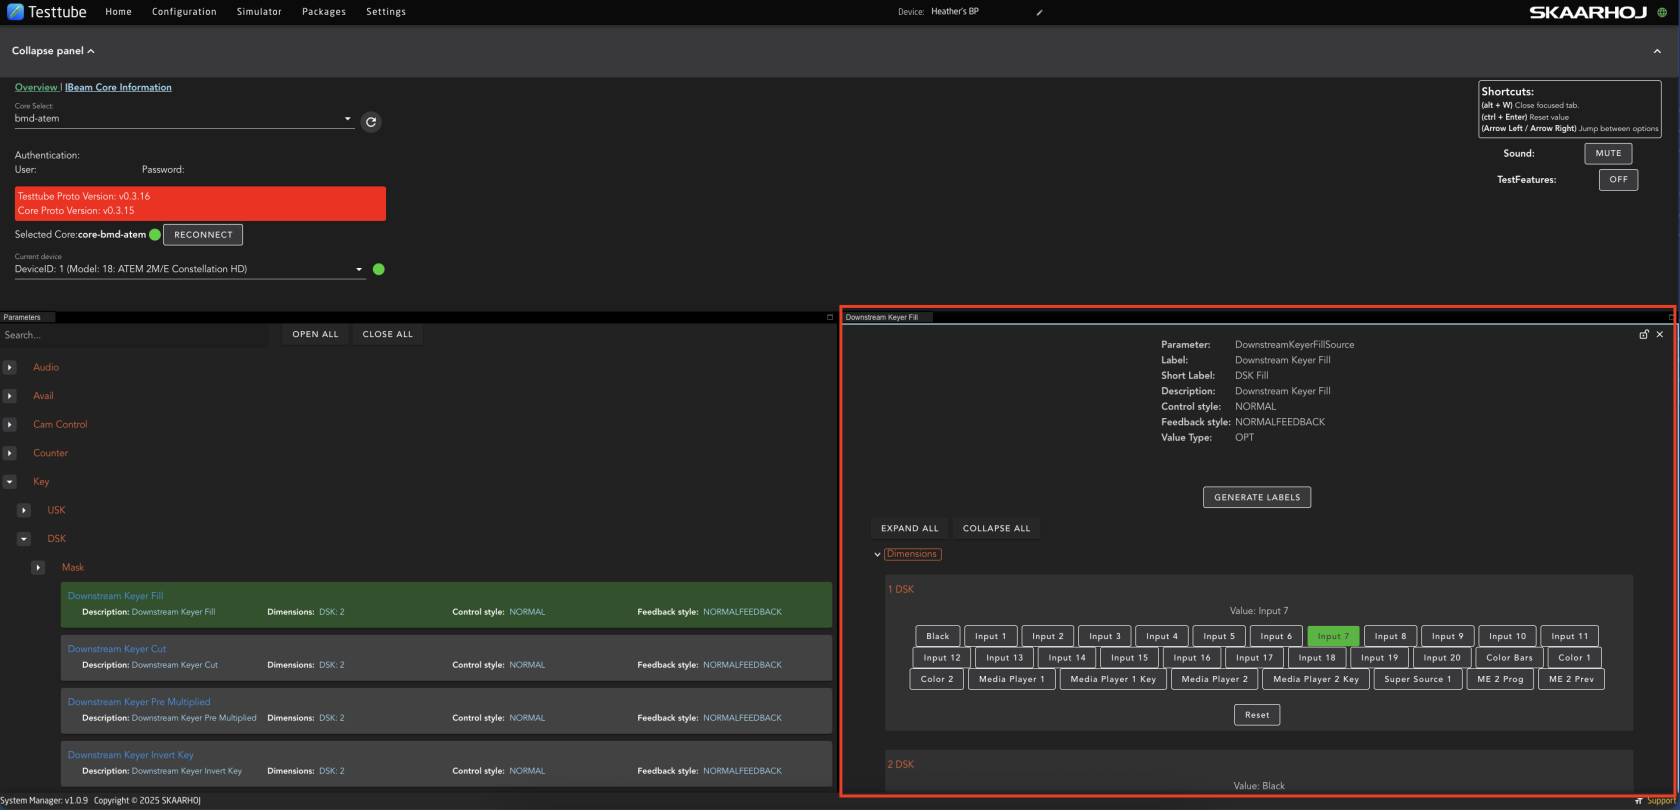](https://wiki.skaarhoj.com/uploads/images/gallery/2025-10/screenshot-2025-10-17-at-13-52-59.png) From the dimension inspector it is possible to set parameters directly from the core. This helps to test if that parameter used by the core is correct and working. If it is, then any issue could be in the configuration. [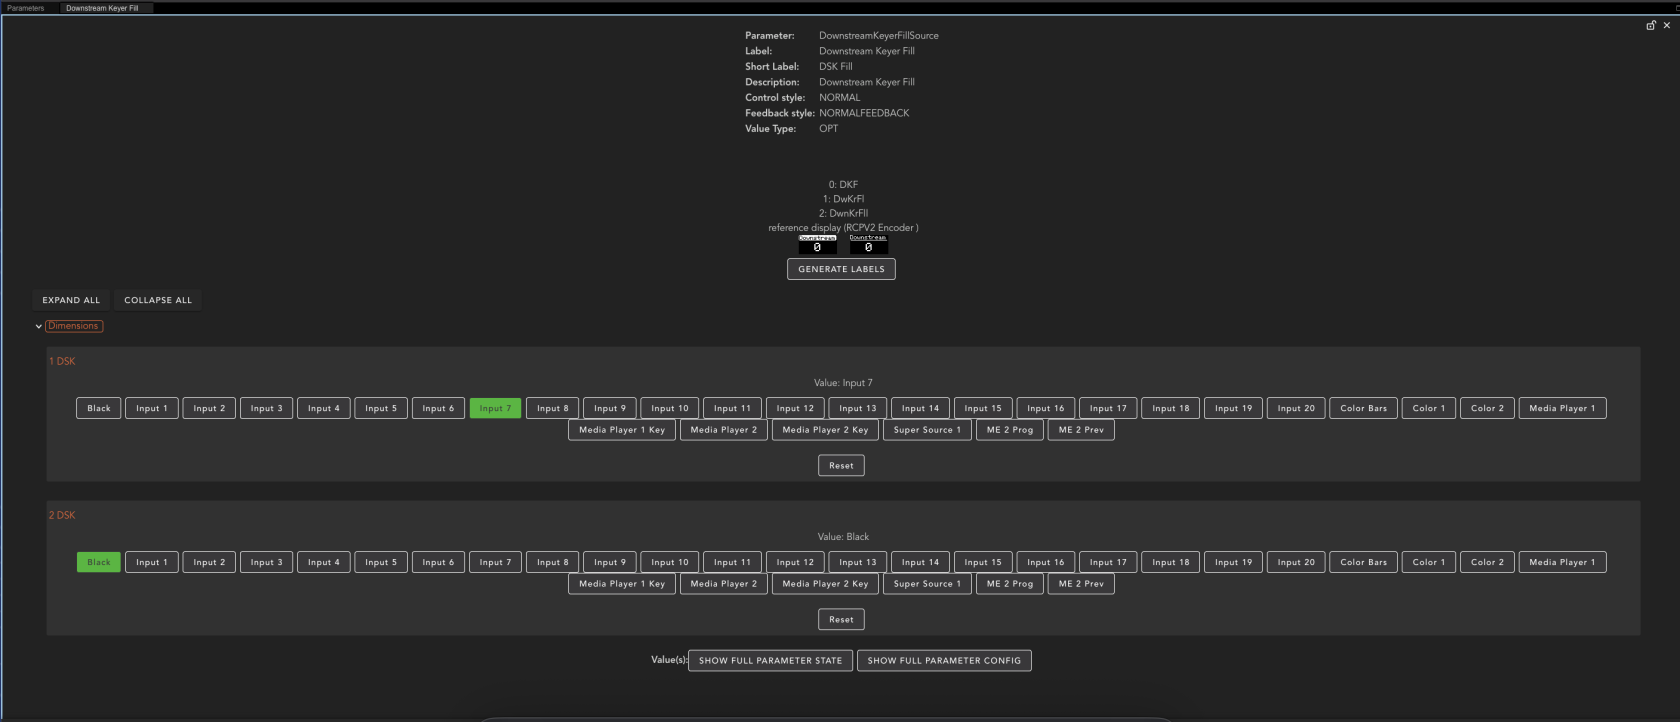](https://wiki.skaarhoj.com/uploads/images/gallery/2025-10/screenshot-2025-10-29-at-14-04-51.png) # Config Classes Explanation of default configurations for devicecores # What are Configuration Classes ? When getting started in Reactor you most likely want to get your configuration done fast, so you can focus on your valuable production. But to do so you need to setup you devices, likely multiple of them, from different manufacturers or of different models. To make this process easier and to make combining cameras a breeze we have created the concept of **configuration classes**. The different configuration classes basically suggest a group of panels, and define a standardized way of setting up default configurations. With all device cores in reactor supporting this "format" you can now easily combine different devices on a panel, without having to worry about assigning individual actions for these different devices to your controller. Reactor will cleverly combine the default configuration classes to give you **the best experience out of the box**! --- ##### See what Configuration Class your Panel belongs to here: [Pro Class Configurations](https://wiki.skaarhoj.com/books/reactor/page/proclass-configurations "ProClass Configurations") [Standard Class Configurations](https://wiki.skaarhoj.com/books/reactor/page/standardclass-configurations "StandardClass Configurations") [Light Class Configurations](https://wiki.skaarhoj.com/books/reactor/page/liteclass-configurations "LiteClass Configurations") [Quick Class Configurations](https://wiki.skaarhoj.com/books/blue-pill-reactor/page/quick-class-configurations) [Switcher Class Congratulations ](https://wiki.skaarhoj.com/books/blue-pill-reactor/page/switcher-class-configurations) [Audio Class Congratulations](https://wiki.skaarhoj.com/books/blue-pill-reactor/page/audio-class-configuration "Audio Class Configuration") # Audio Class Configuration **Audio Class** configurations are default configurations provided by SKAARHOJ that work with controllers that have at least **4 Faders** as their main components. To use them in Reactor, select a "Generic Audio" configuration for your panel, then fill the channel config with devices. See [Audio Class Config](https://wiki.skaarhoj.com/books/blue-pill-reactor/page/audio-channel-config "Audio Class Config") to learn how to configure it. All **Audio Class** compatible controllers are: #### Wave Board (V2) [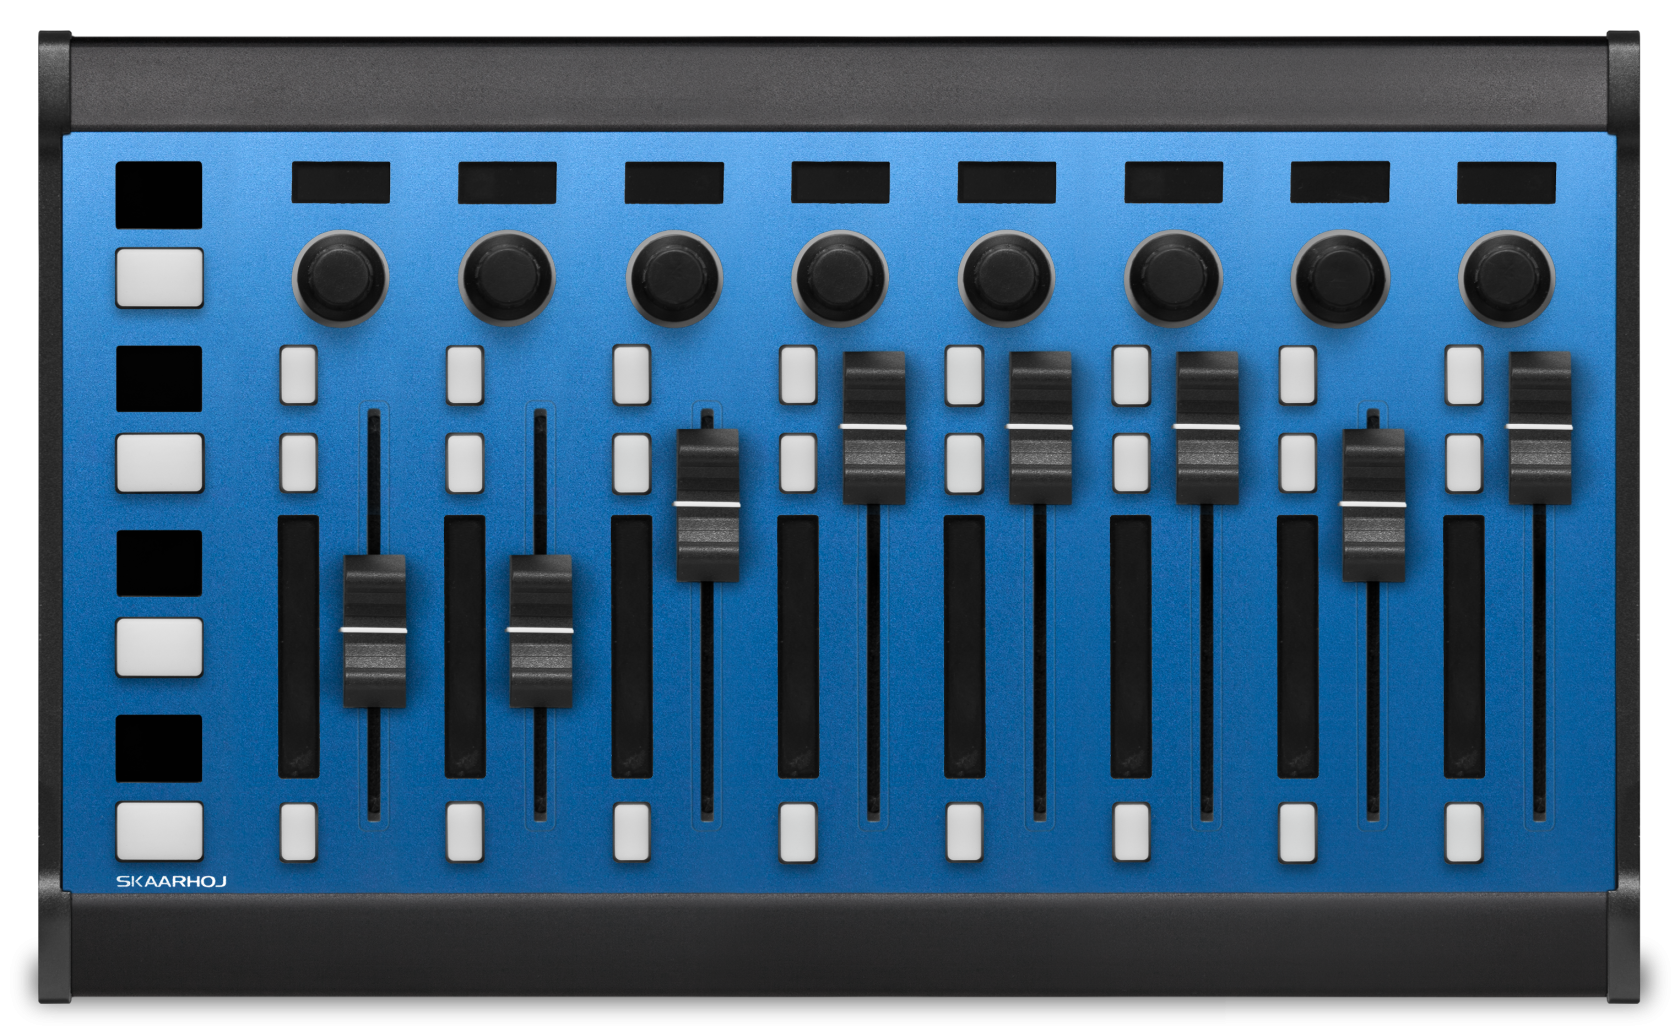](https://wiki.skaarhoj.com/uploads/images/gallery/2023-11/waveboardv2-top-s254.png) #### Wave Board Mini [](https://wiki.skaarhoj.com/uploads/images/gallery/2023-11/waveboardmini-top-s254.png) #### Color Fly (V2, V3) [](https://wiki.skaarhoj.com/uploads/images/gallery/2023-11/colorflyv3-top-s254.png) #### Wave Board (V1) Wave Board V1 has an alternative setup utilizing the extra two buttons instead of the encoder. [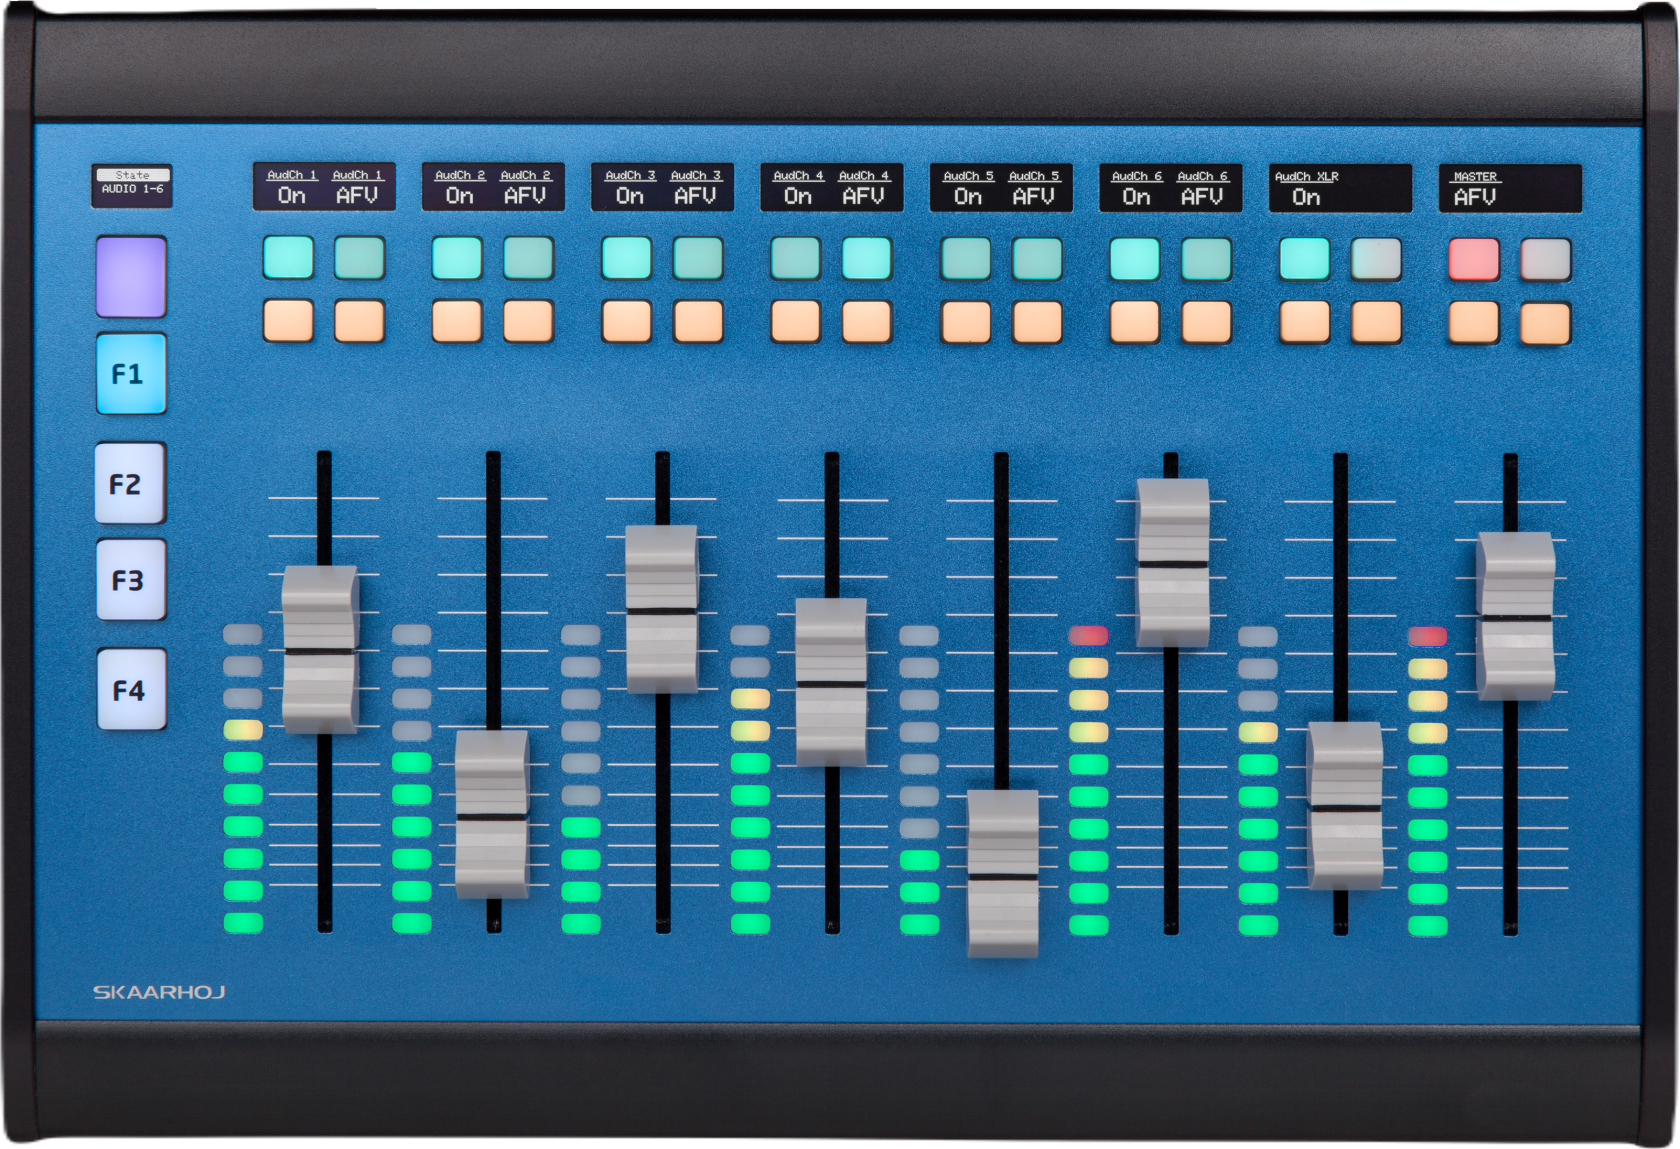](https://wiki.skaarhoj.com/uploads/images/gallery/2023-11/DpWwaveboard-bb-topview-id.png) # Light Class Configurations **Light Class** configurations are default configurations provided by SKAARHOJ that work with Controllers that have 2 **Encoders** as the main components. To use them in Reactor, select a "Generic" configuration for your panel, then fill the camera Selector with devices that support **Light Class** controllers. All **Light Class** compatible controllers are: #### PTZ Wiz [](https://wiki.skaarhoj.com/uploads/images/gallery/2022-05/image-1653035991093.png) #### PTZ Wiz + Frame Shot [](https://wiki.skaarhoj.com/uploads/images/gallery/2022-05/image-1653036004749.png) [](https://wiki.skaarhoj.com/uploads/images/gallery/2022-03/image-1646906858300.png) #### Air Fly Pro (V2 and V3) Some Controllers like the Air Fly Pro, includes an embedded PTZ Wiz, and this part of the controller can be used to map a PTZ LIght Class Configuration. When paired with a config that supports it. [](https://wiki.skaarhoj.com/uploads/images/gallery/2022-05/image-1653036171459.png) # Pro Class Configurations **Pro Class** configurations are default configurations provided by SKAARHOJ that work with controllers that have **8 Encoders** as their main components. To use them in Reactor, select a "Generic" configuration for your panel, then fill the camera selector with devices that support **Pro Class** controllers. All **Pro Class** compatible controllers are: #### RCPv2, RCP Pro [](https://wiki.skaarhoj.com/uploads/images/gallery/2022-03/image-1646840149407.png) #### PTZ Extreme (V1 and V2) [](https://wiki.skaarhoj.com/uploads/images/gallery/2022-03/image-1646840183556.png) # Standard Class Configurations **Standard Class** configurations are default configurations provided by SKAARHOJ that work with controllers that have 4 **Encoders** as their main components. To use them in Reactor, select a "Generic" configuration for your panel, then fill the camera selector with devices that support **Standard Class** controllers. All **Standard Class** compatible controllers are: ### PTZ Fly [](https://wiki.skaarhoj.com/uploads/images/gallery/2022-03/image-1646839840382.png) ### PTZ Pro [](https://wiki.skaarhoj.com/uploads/images/gallery/2022-03/image-1646839896364.png) ### MKA 2 [](https://wiki.skaarhoj.com/uploads/images/gallery/2022-03/image-1646839905516.png) ### INLINE 22 + XC 7 [](https://wiki.skaarhoj.com/uploads/images/gallery/2022-03/image-1646839914138.png) ### Color Fly [](https://wiki.skaarhoj.com/uploads/images/gallery/2022-03/image-1646839925058.png) # Switcher Class Configurations **Switcher Class** configurations are out of the box ready configurations! They will provide you with all the most common functions that most people will need to control a switcher system. But we have also provided many layers of advanced features and options, that allow you to fully control most aspects of your device. All **Switcher Class** compatible controllers are: ### Air Fly [](https://wiki.skaarhoj.com/uploads/images/gallery/2022-07/image-1657288230177.png)Air fly - for reference ### Air Fly Pro (V1, V2, V3) [](https://wiki.skaarhoj.com/uploads/images/gallery/2022-07/image-1657288143792.png)Air Fly Pro V2 - for reference ### ### Master Key One (V1, V2) [](https://wiki.skaarhoj.com/uploads/images/gallery/2022-07/image-1657288307134.png)Master Key One - for reference # Quick Class Configurations **Quick Class** configurations are parts of a configurations provided by SKAARHOJ that work with a Quick Bar and Selected controllers that have a section of 6 4-way buttons. To use them in Reactor, select a configuration supporting **Quick Class** for your panel, then fill the **Quick Class** selector with devices you want to control. This controllers have already configurations supporting **Quick Class**: ### Air Fly [](https://wiki.skaarhoj.com/uploads/images/gallery/2022-05/image-1651653305069.png) ### Air Fly Pro (v1, v2 and v3) [](https://wiki.skaarhoj.com/uploads/images/gallery/2022-05/image-1651653380403.png) ### Master Key One (v1 and V2) [](https://wiki.skaarhoj.com/uploads/images/gallery/2022-05/image-1651653457217.png) ### Mega Panel (MK48) [](https://wiki.skaarhoj.com/uploads/images/gallery/2023-06/3EXimage.png) ### PTZ Extreme [](https://wiki.skaarhoj.com/uploads/images/gallery/2023-06/T70image.png) ### Quick Shot [](https://wiki.skaarhoj.com/uploads/images/gallery/2023-06/0Esimage.png) ### Quick Pad [](https://wiki.skaarhoj.com/uploads/images/gallery/2022-05/image-1653035902525.png) ### Quick Bar [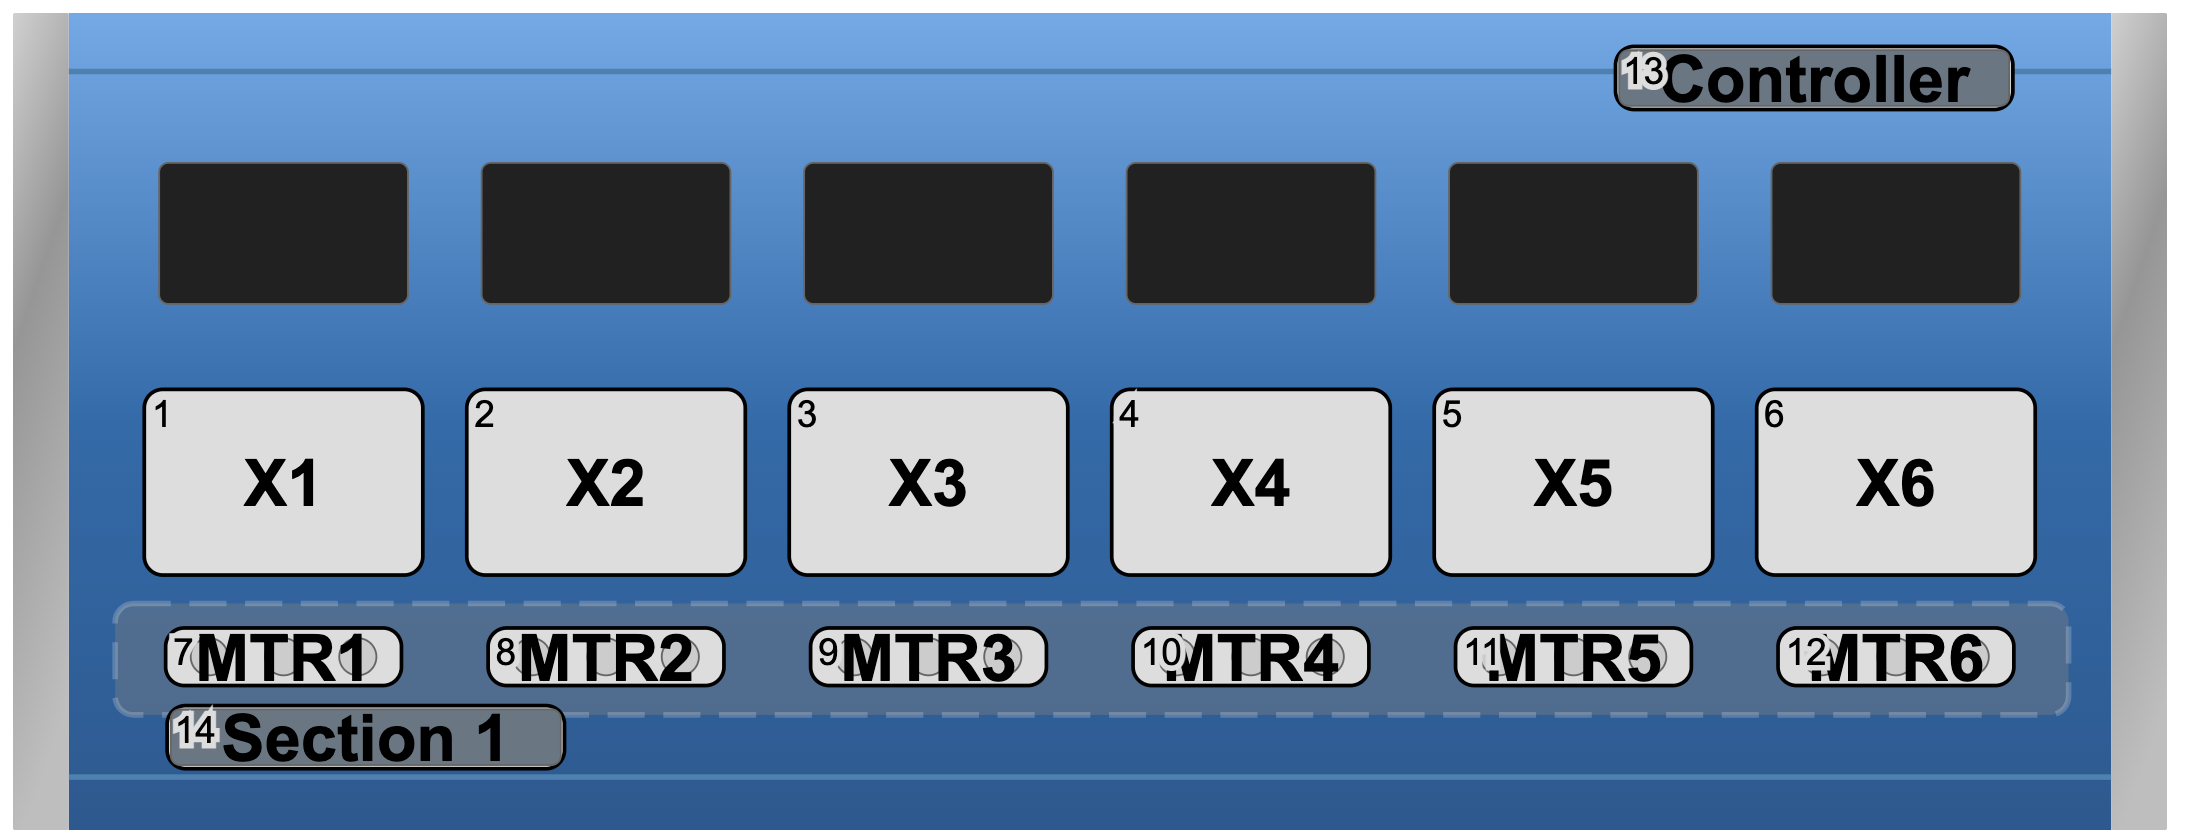](https://wiki.skaarhoj.com/uploads/images/gallery/2022-05/image-1651653518891.png) # Connecting Multiple Blue Pill Panels Tutorials on different workflows for connecting multiple Blue Pill panels # Raw Panel Mode or Using One Blue Pill Panel as the Main UnitPlease Note, turning off Reactor will limit the page selections to Package and Settings. All other pages are part of the Reactor firmware package.
# Sharing Device Cores Across Different Blue PillsInstructions are compatible with System Manager v1.0.11 and above. For older System Manager methods, please see Old Method instructions at the end of the article.
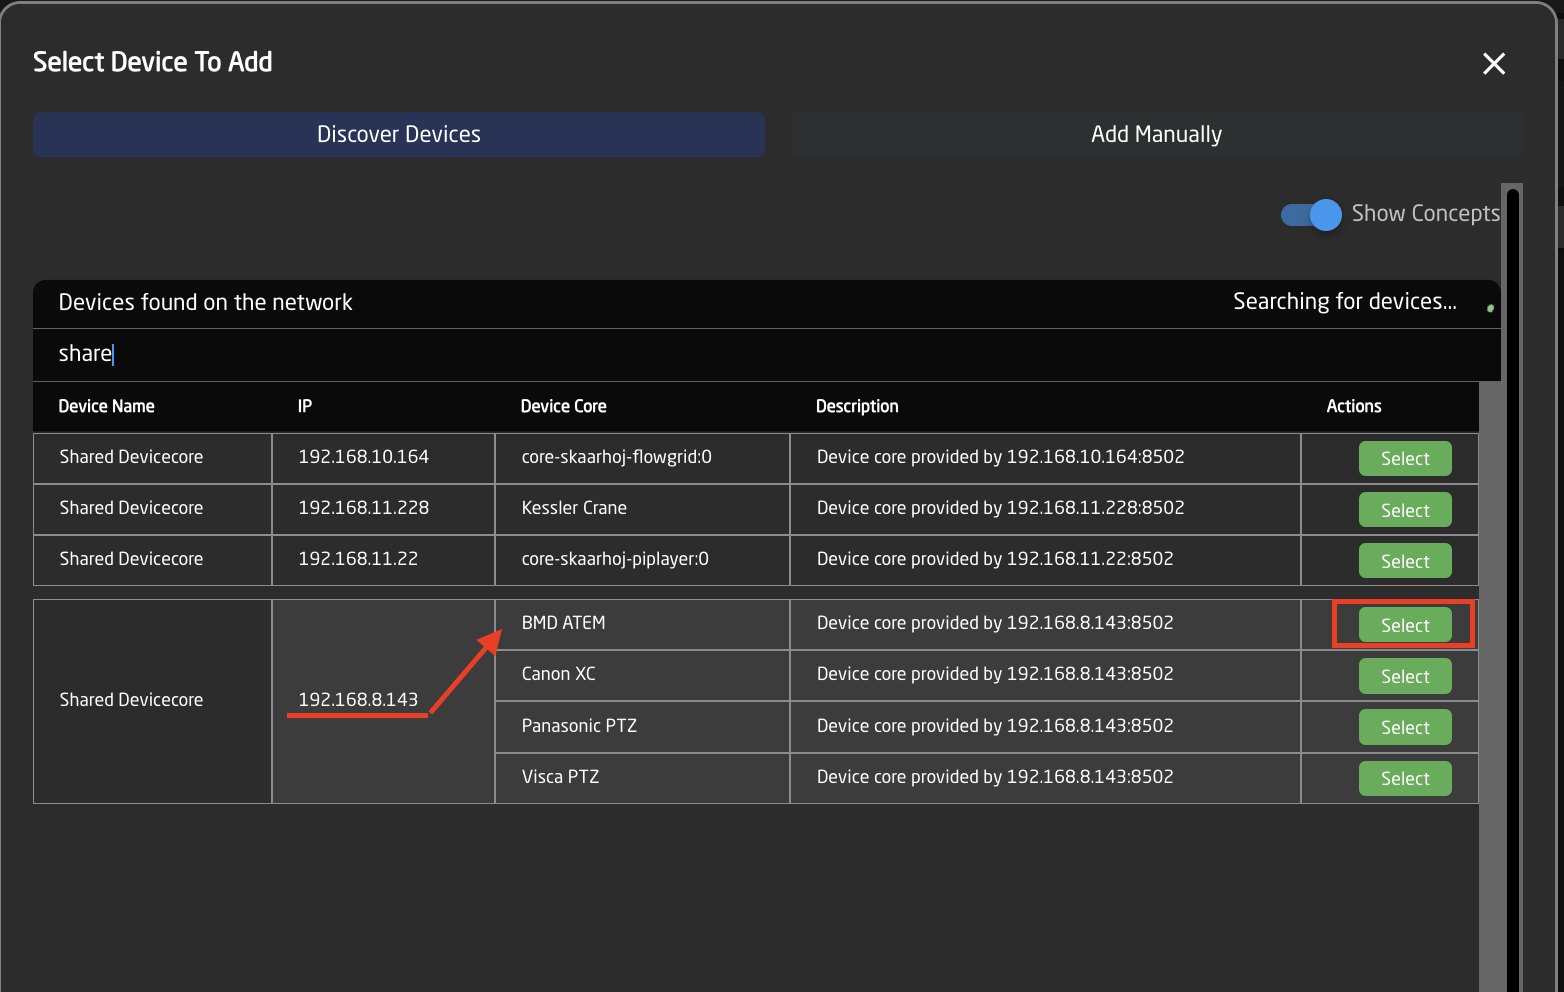
1. Navigate to the Settings Page on the BP running the needed package locally. 2. Enable Device Core sharing 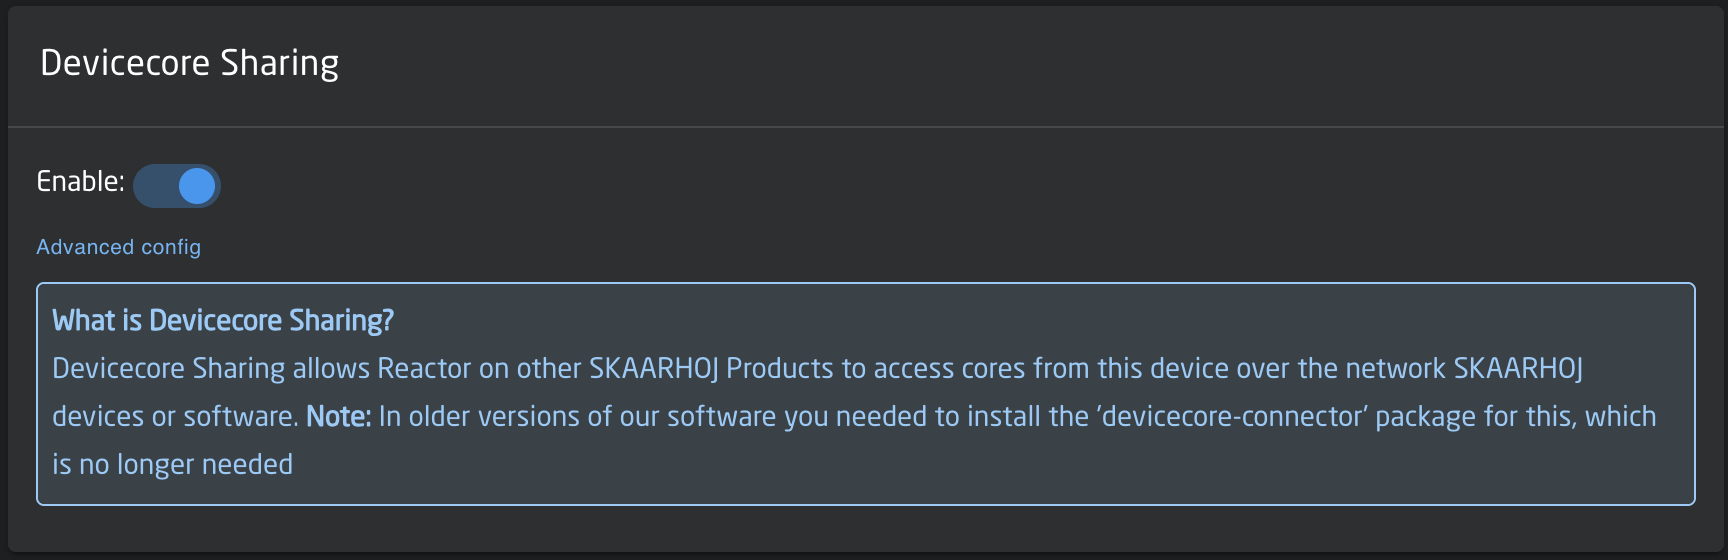 3. On the BP not running the package locally, select Add Device on the Home Page  4. Search for shared core, selecting the specific core on the panel that you are looking to connect to.Please note, the shared core will not come up if searching by the Device Core name, only by the Device Name which is Shared Core. Selecting the specific shared core will bring in all individual devices connected to by that core on the remote Blue Pill device.
 5. After adding the desired remote core it should show in the Device Core name the IP address it is connecting to the core from. 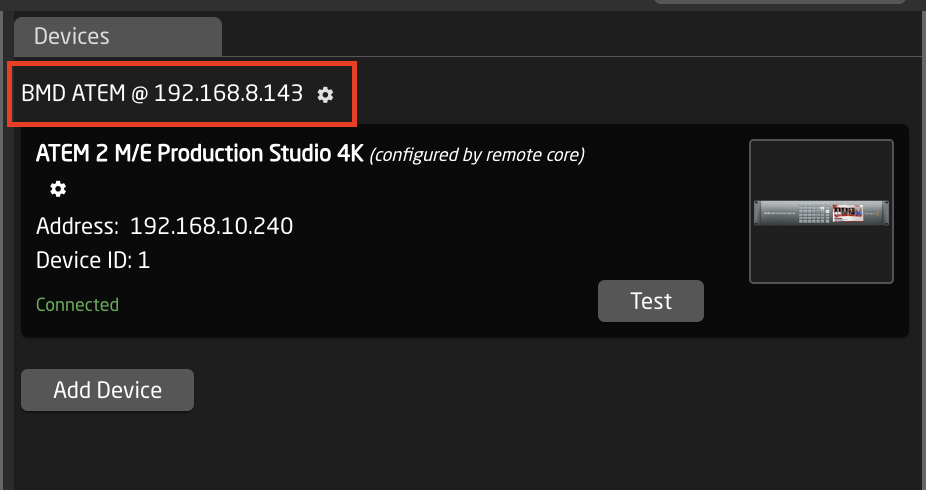 6. If it is not possible to autodiscover the shared core, it can be added manually by adding the device to be controlled. 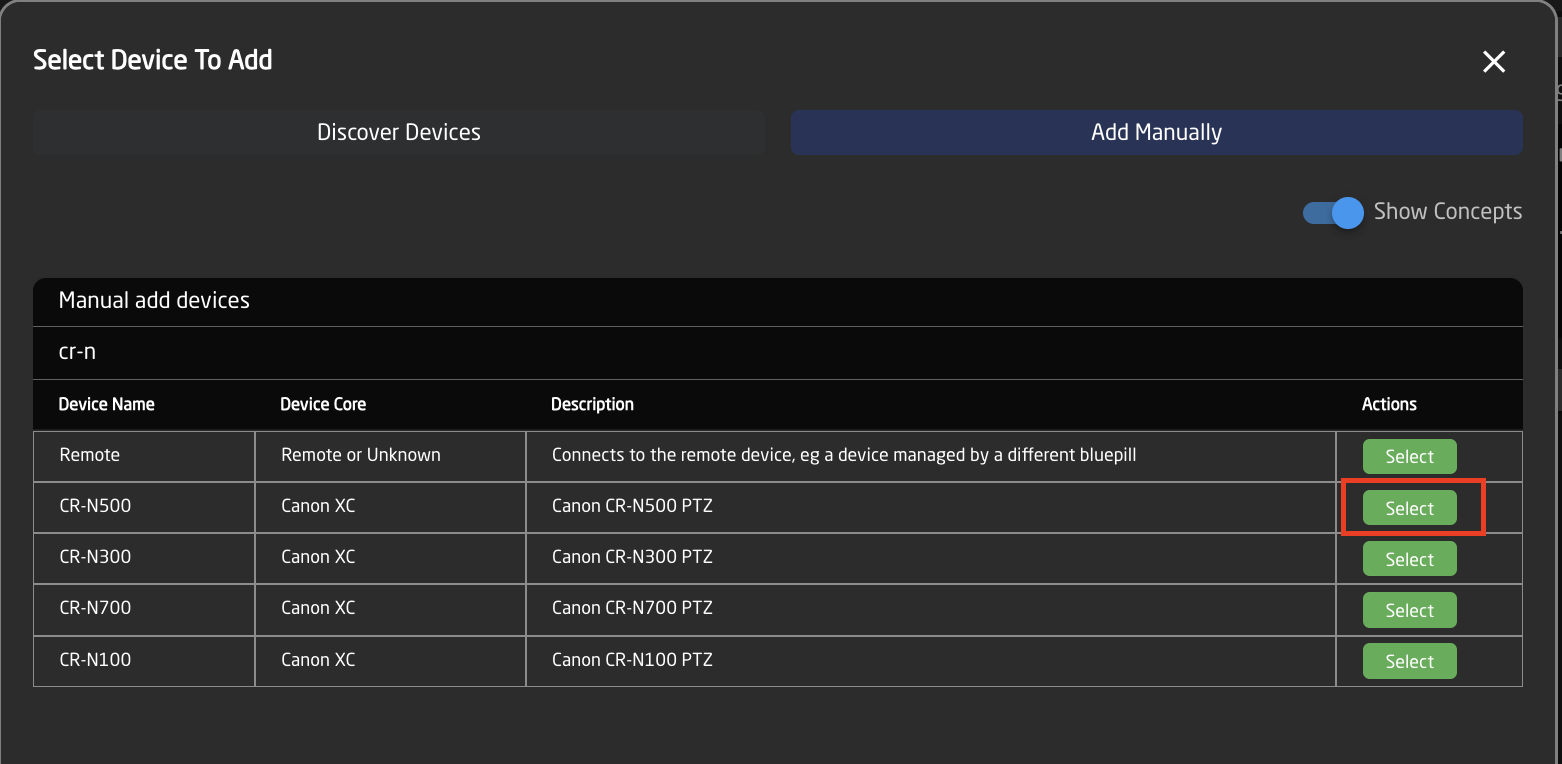 7. Setting the proper device details for the device. 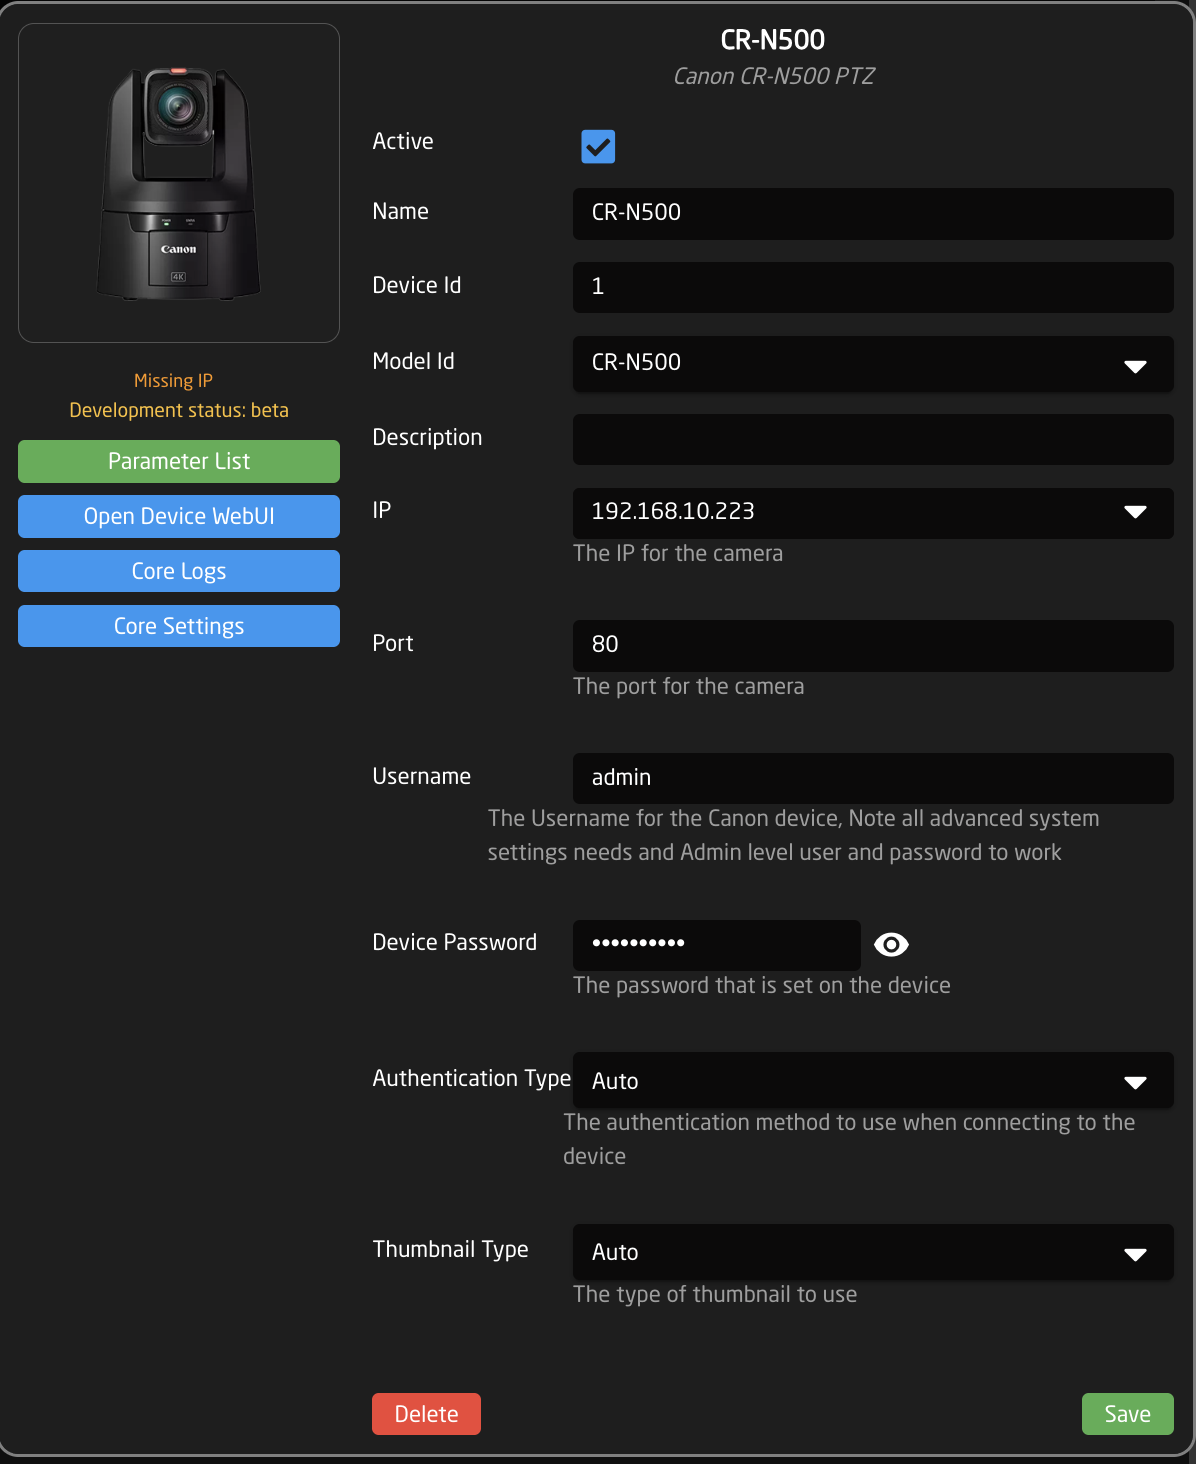 8. Click into the Device Core Details for the device. 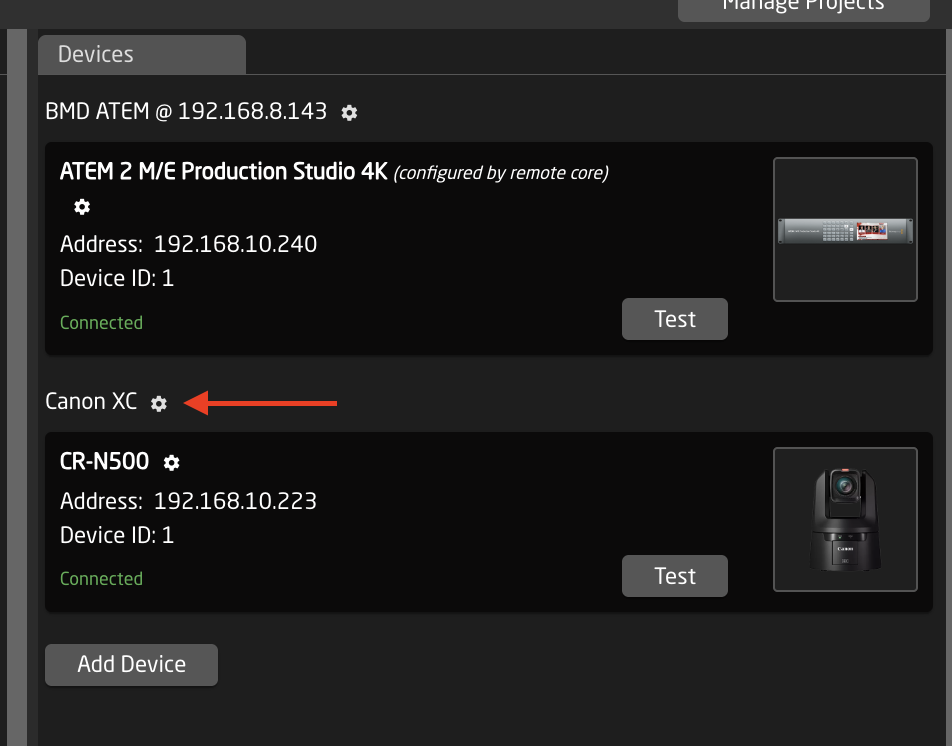 9. Enter the IP address of the remote Blue Pill that will be hosting the device core locally. Or select it from the drop down if it appears.  **Old Method (Pre System Manager v1.0.11)** 1. Install DeviceCore-Connector package on the BP running the needed package locally. 2. AccessMode= default-allow[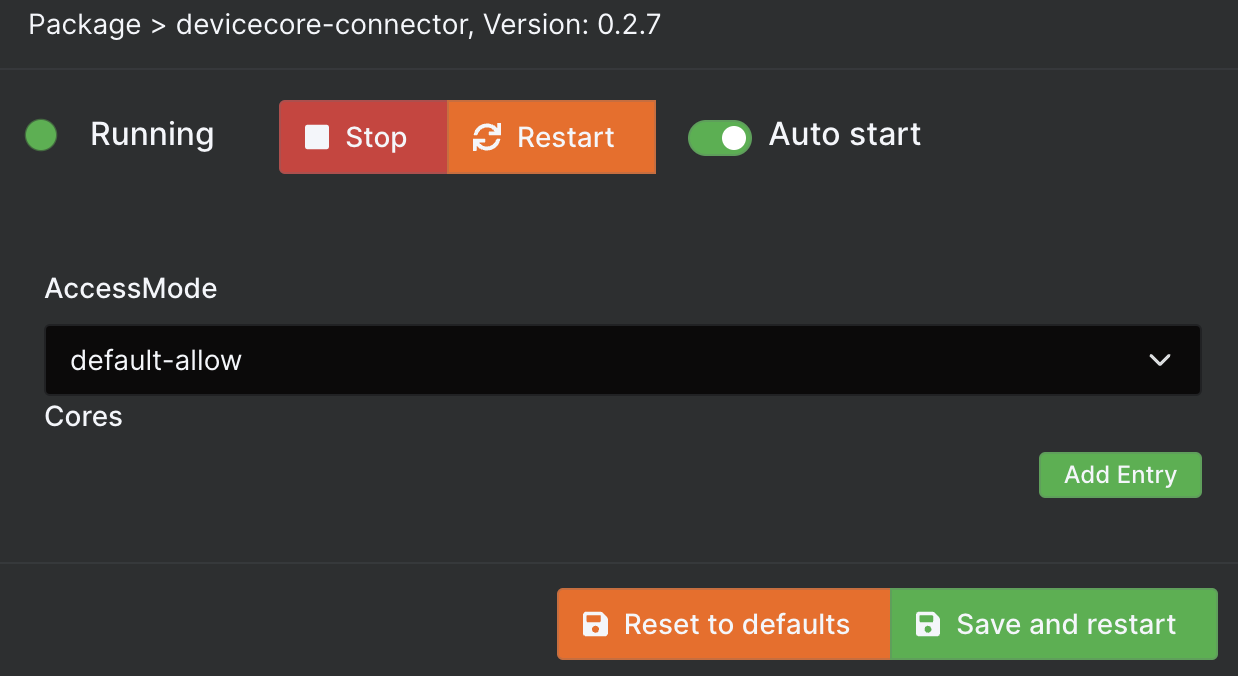](https://wiki.skaarhoj.com/uploads/images/gallery/2022-03/connector.png) All other steps are the same as the current method. # Device Core Parameter Lists # Finding Device Core Parameter Lists There are four ways to access the parameter list for your devices.Find out how to access the parameter list per device core or per device here: https://wiki.skaarhoj.com/books/blue-pill-reactor/page/finding-device-core-parameter-lists
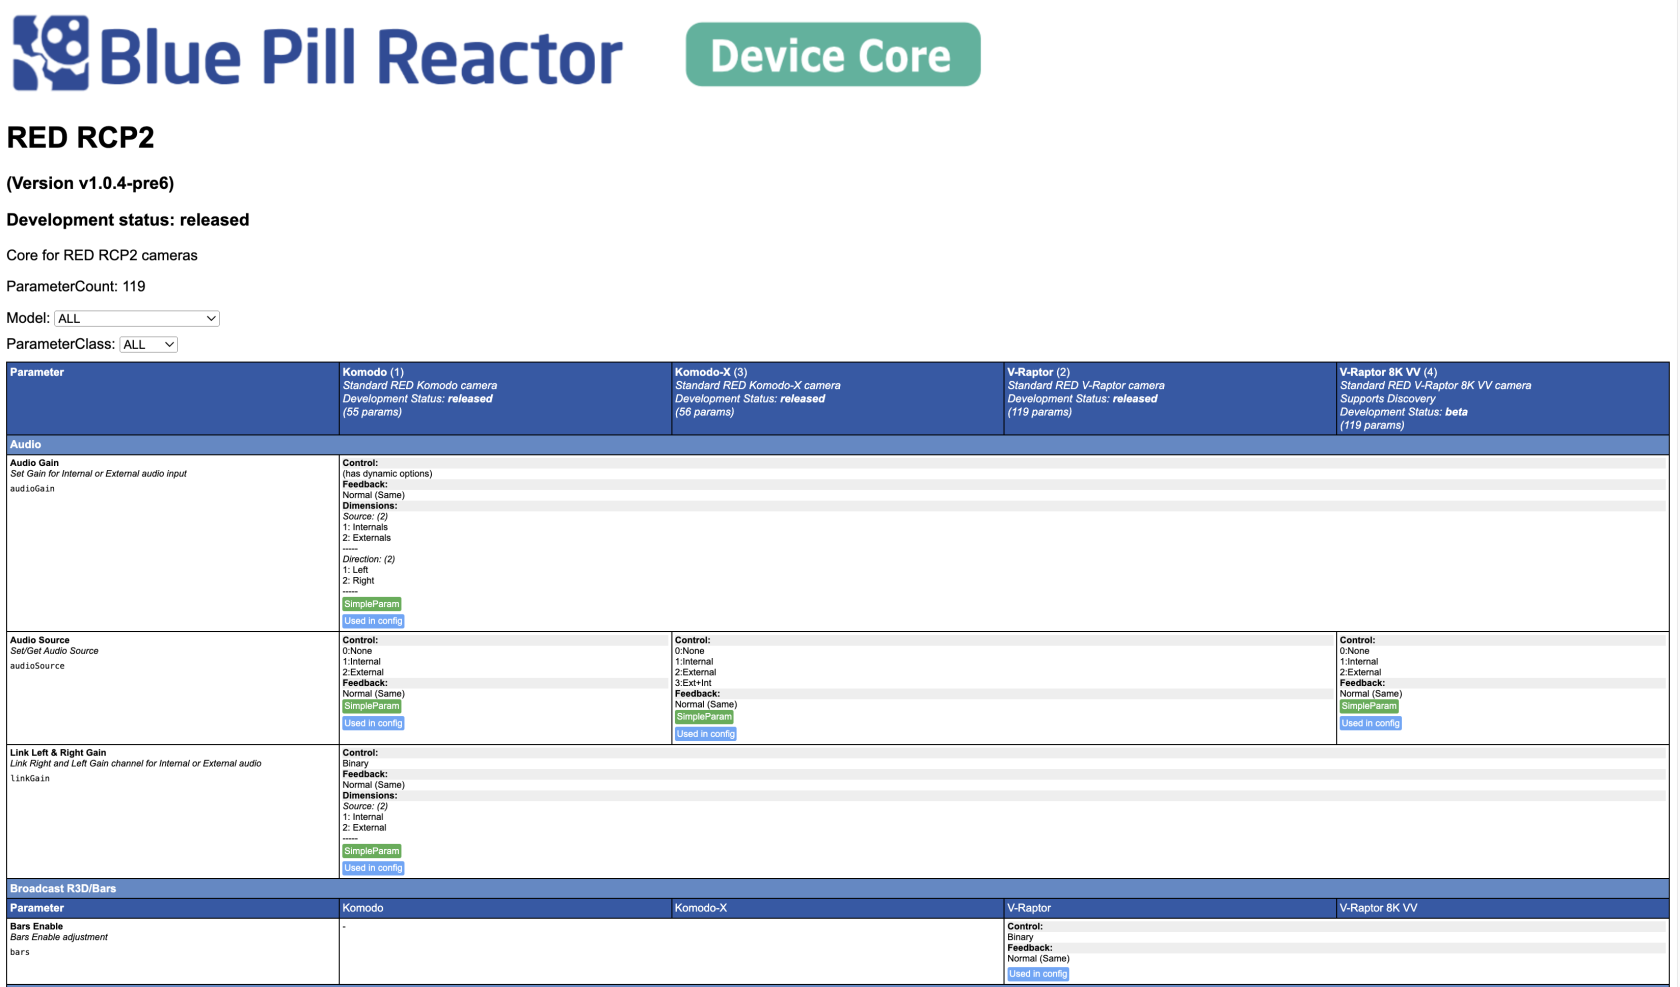 At the top of the Parameter List page is listed details about the core overall. Here you find the Core Name, Firmware Version used for the list (will be the most recent), development status of the core, a general description of the core, the number of parameters available (each contained model can have different amounts), which model the list is showing (or all ), and what type of parameters you are seeing (or all).  [ ](https://wiki.skaarhoj.com/uploads/images/gallery/2023-08/topdetails.png) Looking at the individually controlled devices there is more information on each one. Here you find the model name of the device, the internally used model number, a brief description of the unit, the development status for that specific model, and the number of available parameters for that model.The development status for a specific model may differ from the device core's overall development status. See further in this article for a breakdown of development status descriptions.
 Looking at the individually supported parameters there is the easy to read parameter name, general description of the parameter, and the internal parameter command name. 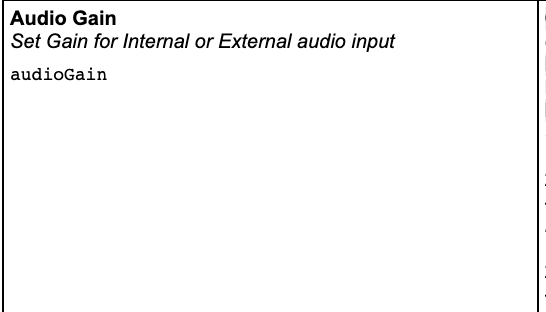 Looking at the individually supported parameter details can give a lot of information about how we have control. **Control**: The value range available **Feedback**: What information we receive back from the camera **Dimensions**: Sub parameters available, each with their own feedback and control **---** : Additional information such as the type of parameter it is (Simple or Helper) and if it is used in the configuration (only see when accessed via parameters from the configuration page of Reactor). 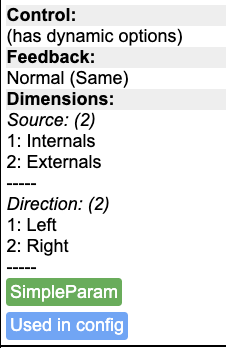 The main part of the Parameter List is broken up in a grid fashion, with the parameters creating the the rows and the devices forming the columns. For ease of reading, the rows are broken up into categories. 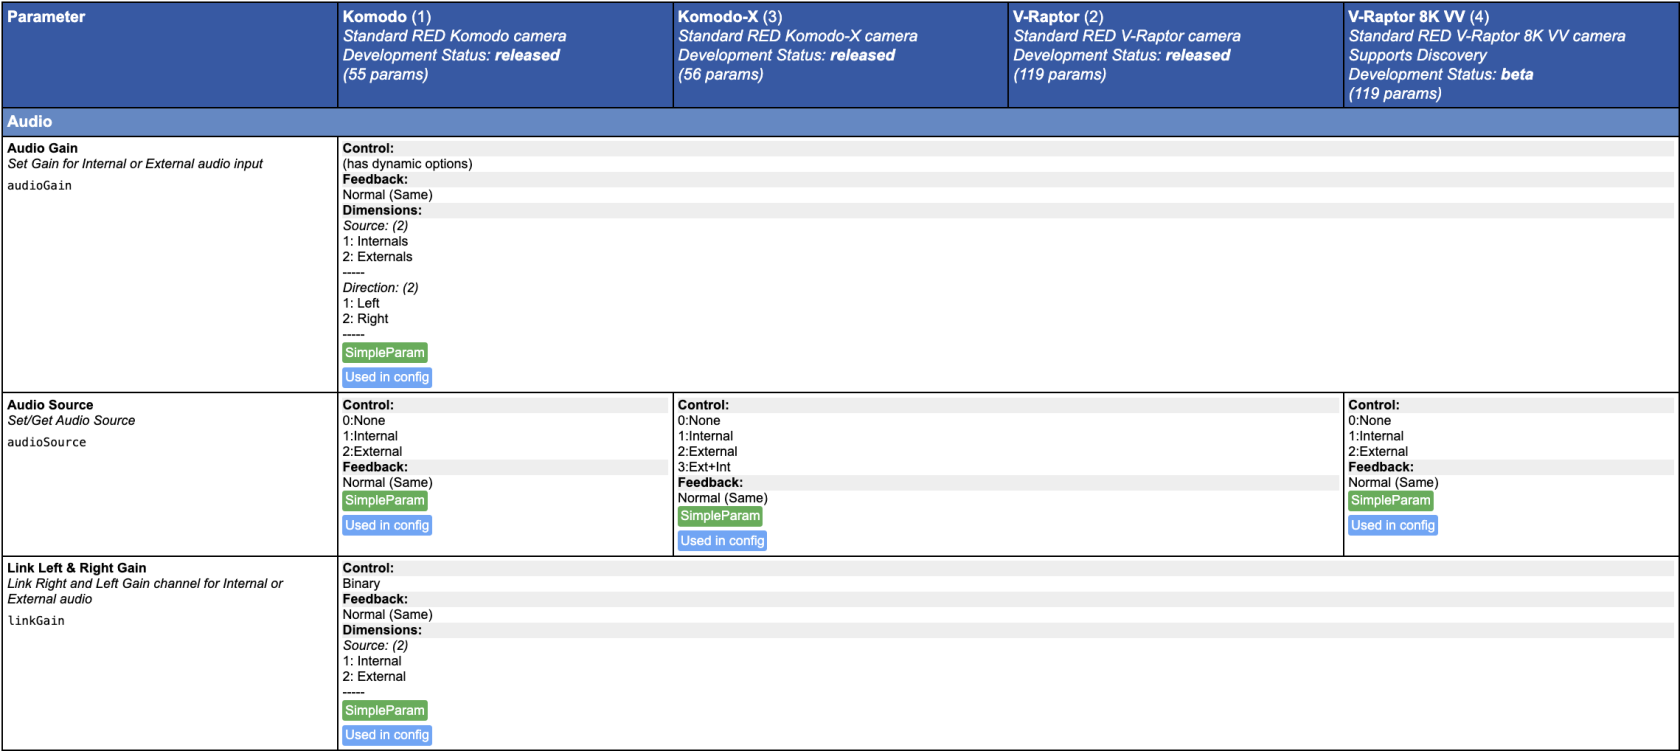 Looking at the parameters, in the below example Audio Gain is supported by all four models of cameras and with the same value ranges and feedback. However, Audio Source, while still supported by all three models has a different value range for Komodo then for Komodo-X and V-Raptor. 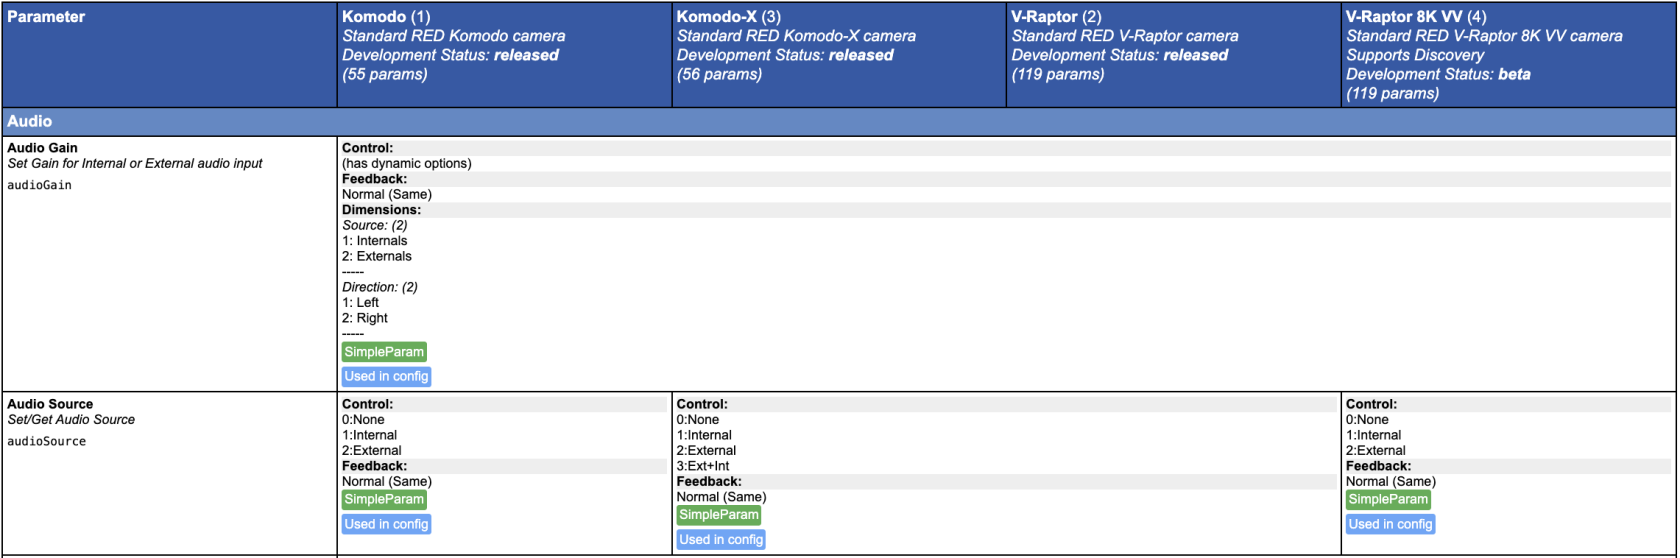 When you see the below symbol, that parameter is not supported by the model of device. [](https://wiki.skaarhoj.com/uploads/images/gallery/2023-08/oLGnot-supported.png)| **1** | USB-A Port. See Settings page for more details |
| **2** | SKAARHOJ Expansion Slot |
| **3** | HDMI Port serial diagnostics and debugging |
| **4** | Config Button to enable WiFi Access Point. See Accessing Blue Pill section in Getting Started Guide |
| **5** | Status LED for monitoring and debugging. See below for more information. |
| **6** | IP Network RJ45 Port for IP control and 5W-30W PoE (+)/PoE Standard: IEEE 802.3af/t |
| **7** | Micro USB Port for serial communication and 5V power |
| **1** | Micro USB Port for serial communication with SKAARHOJ Firmware Updater |
| **2** | IP Network RJ45 Port for IP control and 5W-30W PoE (+)/PoE Standard: IEEE 802.3af/t |
| **3** | Status LED for monitoring and debugging (see below) |
| **4** | Not used |
| **5** | Config Button (see below) |
| **6** | 12V DC Power Supply for connection to the supplied DC power adaptor |
| **7** | USB-A Port. See Settings page for more details, not available on all models |
GPI is an add on option for the Color Fly v3B, it does not come standard.
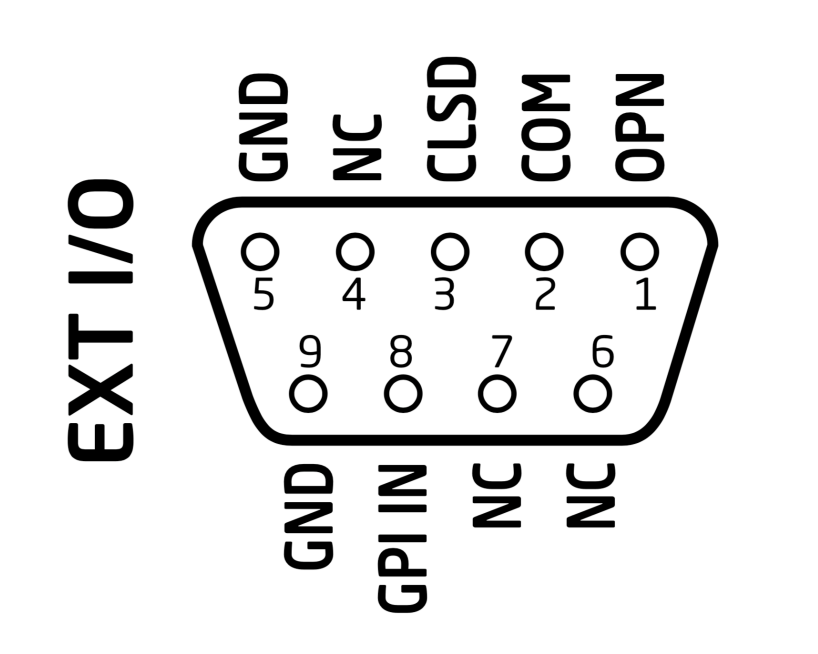
**[](https://wiki.skaarhoj.com/uploads/images/gallery/2022-10/eth-gpi.png)** **RCP Pro DB-9 Connector**The RCP Pro only has 3x GPI Input and 3x GPI Outputs that are programmable, this is different than the RCPv2.
**[](https://wiki.skaarhoj.com/uploads/images/gallery/2022-10/db15-connector.png)** **3G SDI Arduino Shield**SDI is an add on option for the Color Fly v3B, it does not come standard.
**[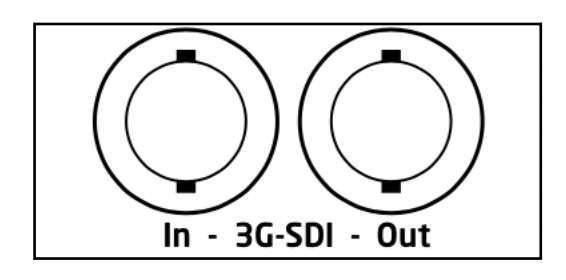](https://wiki.skaarhoj.com/uploads/images/gallery/2022-10/sdi.png)**The Blackmagic 3G-SDI Arduino Shield supports the following formats using SDI Level B: 720p50, 720p59.94, 720p60, 1080i50, 1080i59.94, 1080i60, 1080p23.98, 1080p24, 1080p25, 1080p29.97, 1080p30, 1080p50 (output only), 1080p59.94 (output only) and 1080p60 (output only), but the camera doesn't have to be running the same video format as the program input, so you can use cameras in Ultra HD while the camera protocol is sent over HD signal to the camera. # Graphical Displays **Graphical Display** The Blue Pill has a graphical LED Display. By default this is set to go into a sleep mode to prevent image burn-in. The unit is still operational during sleep mode, it is only the display that effected. Burn-In caused after disabling sleep mode is not covered by our standard warranty. To wake the Blue Pill up from sleep mode, it should only be necessary to tap the unit. It is not necessary to shake it like a polaroid picture. # Operating Temperatures **Operating Temperature:** 0° C to +40° C / +32° F to +104° F **Max Internal Temperature:** 80°C / 176°F **Storage Temperature:** -20° C to +45° C / -4° F to +113° F **Humidity:** 90\\% RH, non-condensing, from -20° C to +45° C The Blue Pill device’s internal processes statics is accessible by following the instructions on our wiki page: [https://wiki.skaarhoj.com/books/blue-pill-reactor/page/internal-processes-stats](https://wiki.skaarhoj.com/books/blue-pill-reactor/page/internal-processes-stats) # Power over Ethernet (PoE) Specifications **Power over Ethernet (PoE) Specifications** We use the PoE industry standard 5W-30W PoE (+) IEEE802.3af/t. To power our controllers using PoE it is important the switch supports this standard. Please notice some manufactures such as Ubiquity have their own non-standard 24V type of PoE which is incompatible with our controllers. Especially pay attention to the standard when using a PoE injector. # UniSketch Panel ConnectionsFor full UniSketch panel guide see the UniSketch Installation and Operations Manual here: [https://github.com/SKAARHOJ/Support/blob/master/Manuals/SKAARHOJ/SKAARHOJ\_Manual.pdf](https://github.com/SKAARHOJ/Support/blob/master/Manuals/SKAARHOJ/SKAARHOJ_Manual.pdf)
#### **Back Panel Connection** 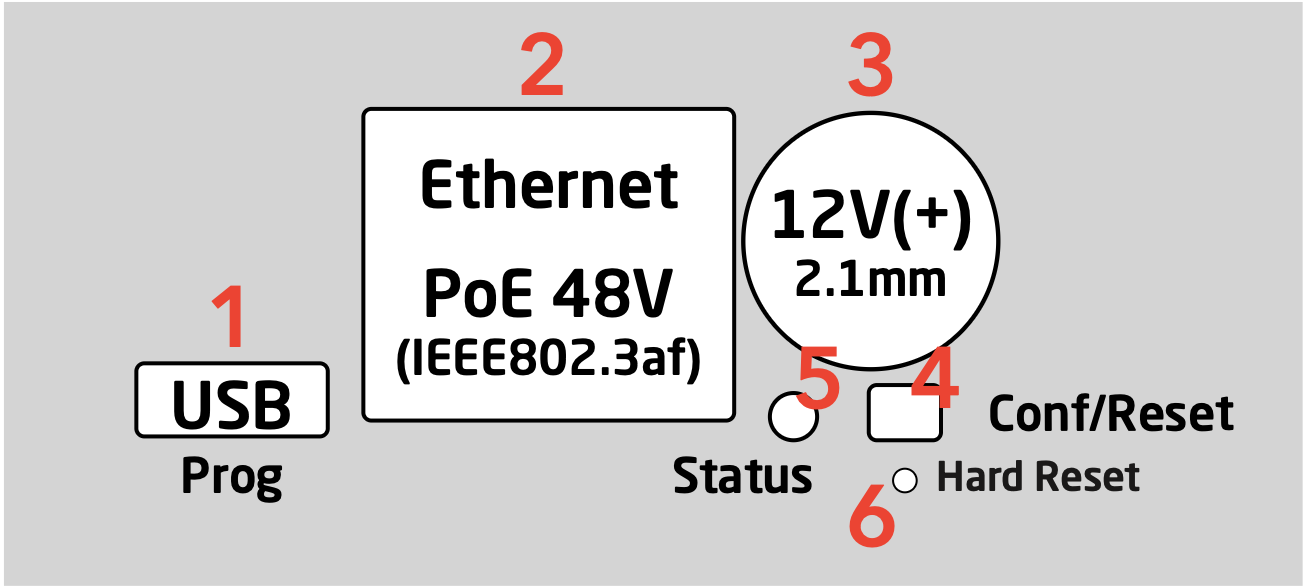 **1. Micro USB plug.** Used for service monitoring and programming new software into the unit (firmware upgrades). **2. Ethernet Jack.** Connect this to your ethernet switch. This jack may also support PoE (Power over Ethernet) if your SKAARHOJ controller was delivered with that option. When connected to a network switch, the yellow LED (lower left) will be on. When data is sent to/from the controller, the green LED (lower right) will blink. If the device in the other end supports TX/RX auto detection you may be able to connect the SKAARHOJ controller directly to your device, otherwise use a crossed cable or a network switch (the supported setup). **3. DC input.** Use a standard 2.1mm center pin plug (center = ”+”). Allowed voltage range is 7-18V. We test controllers will work at 12V. The device uses max 1A at 12V. Units with Blackmagic 3G-SDI Arduino Shields needs 12V. **4. Configuration/Reset button.** Use a pencil or tooth pick to press the button. When you press the button shortly, the controller will reset (same as pulling the power plug). If you press and hold the button, you can reset the controller into configuration mode (as as pressing “Local Configuration” in Firmware Application): A. Press and hold the button until the status LED becomes blue after a few seconds. Release the button and the controller is in *config* mode. You can access the controller web interface with a web browser on ”http://\[CONTROLLER IP\]/” where CONTROLLER IP is the IP address used for the currently loaded preset. The controller will run a diagnostics mode after 2 minutes where displays and buttons will light up. B. Press and hold the button longer until the status LED becomes white (which is 2 seconds after becoming blue). Release the button and the controller is in config default mode. You can access the controller web interface with a web browser on ”http://192.168.10.99/”. The controller will immediately run a diagnostics mode where displays and buttons will light up. C. Press and hold the button even longer until the status LED becomes red (which is 10 seconds after becoming blue and 8 seconds after becoming white). This will clear all presets in memory thereby resetting all configuration made in the controllers own web interface (this corresponds to the serial monitor command “clearpresets” and should only be necessary in case a firmware update requires it or if there is another tricky error state present). In rare cases you cannot rely on the reset button but have to turn off the power to the controller instead (“cold start”). **5. Status LED:** When the controller is just powered up, you will see the status LED blink purple during the boot process. In this process, the hardware is initialized. Eventually the LED should end up blinking slowly (2 sec period) steady green (or blue or white if in config modes). If the LED blinks yellow quickly it indicates that connection to one or more devices is not established. This is perfectly normal for a few seconds between the boot up process (purple blinks) and the operational state (green blinks) when the controller connects to all devices. The status LED should never be permanently on or off, this indicates a potential freeze in the system. In fact, in normal healthy operation the LED should blink with a steady 2 sec period, otherwise it could indicate trouble with connections or hardware. The LED will also light up red for a split second whenever an analog hardware component (such as a T-bar) is operated (this feature is helpful to determine if calibration is needed). **6. Programming Mode Reset:** Will make a hard reset of the controller leaving it with *no* firmware. Is used if the controller does not appear in the Port list in the Firmware Application. Only to be used prior to have consulted SKAARHOJ Support. Please see section: Controller does not show up under Port in Firmware Application. #### **Status Light Overview** **Purple blinks, uneven durations** The controller is booting up (and for each blink a given step has been completed). **Yellow blinks, quickly** The controller hasn't established necessary connection to one or more devices. At the end of the boot process this is natural for a few seconds as the controller connects to devices for the first time. If you unplug the network cable or turn off an external device the controller is connected to, you will also see this state. Just turn on the external device again or re-insert the cable and the error state should restore itself to normal operation (green, steady blinking) after some time. If this happens during normal operation and without obvious explanations (like removal of a network cable or shutting down an external device), it's an error state you need to pay attention to and bug-fix further. If the controller boots up and never stops blinking yellow, you may want to check if you have configured devices for the controller which are not currently present in the network set up. Go to config mode, enter the web interface and check which devices are enabled and their IP addresses. **Green blinks, steady, period of 2 seconds** Normal mode, everything is connected and working properly. Just bliss **Blue or white blinks, steady, period of 2 seconds** Config mode (white: “config default”) where you can access the controller web interface. **Red blinks (interrupting green or yellow blinks)** This happens if you move an analog hardware interface component like a T-bar or knob and is totally normal in that case. However if such blinks happen without you touching any analog components it indicates the need for calibration. **Quick red blinks and no response from controller** A problem with the preset memory checksum indicates that the preset memory may be corrupt. However, in most cases a “cold start” by removing the power supply, waiting 10 seconds and connecting the power supply will solve the problem. If after 2-3 attemps with this solution it still remains a problem, you must clear the preset memory. This is done by holding the config button pressed, then apply power to the controller and wait for around 15 seconds until the status LED becoems solid red (before that state, the LED should be first purple, then blue, then white for 8 seconds and finally solid red). When the LED is red, release the button and the status LED should start blinking again and the controller should boot up. Notice that your controller will be reset to factory settings in this case and you may need to reload or recreate your configuration. #### **3G SDI Arduino Shield**The 3G SDI Arduino Shield imbedded in UniSketch panels is not compatible when using the UniSketch panel with a Blue Pill device. It will only function when working only via the UniSketch platform.
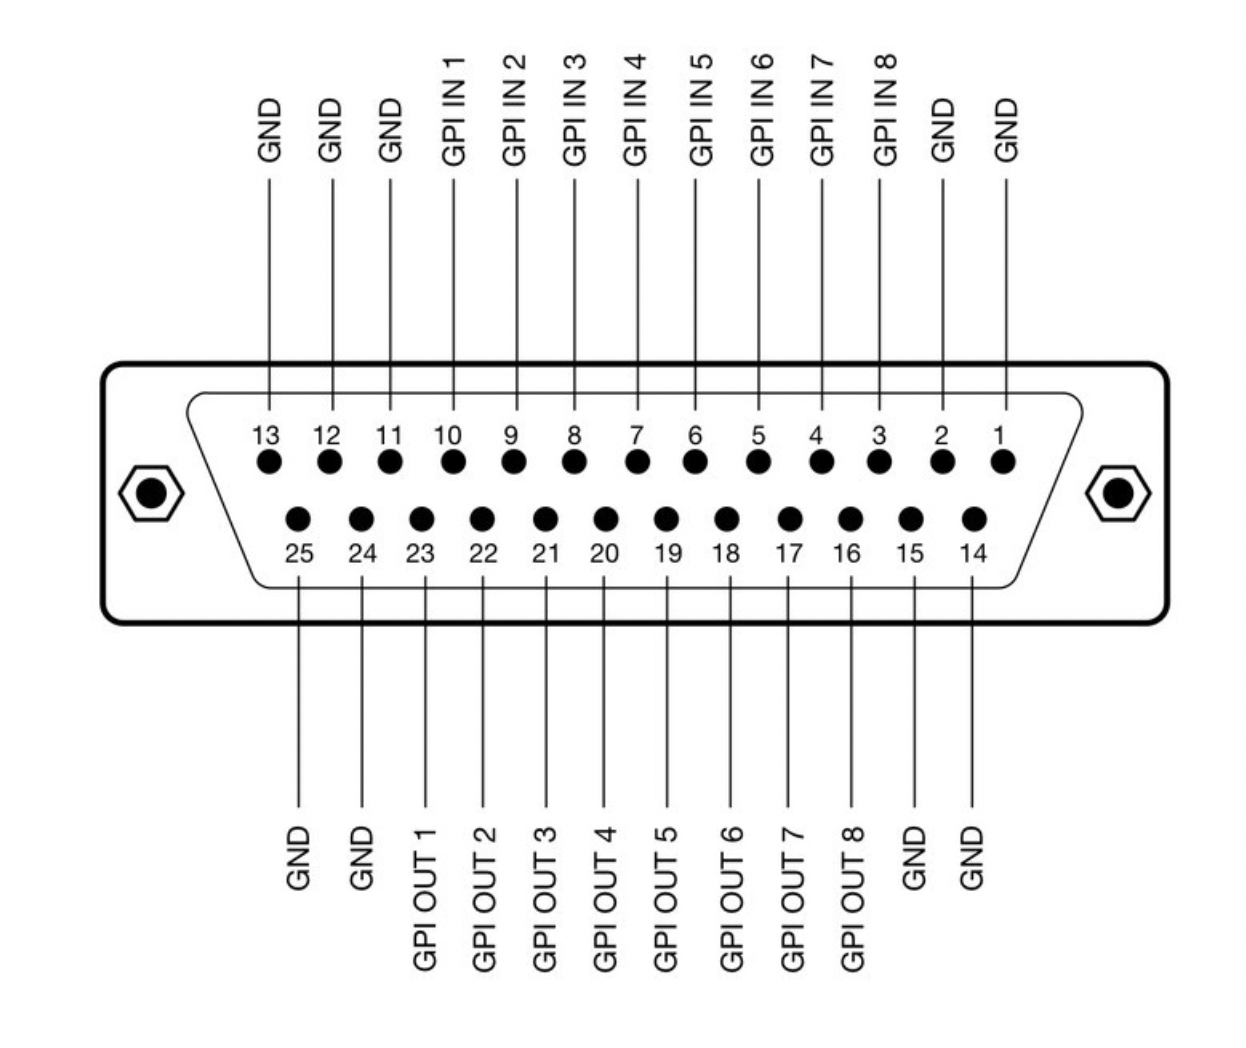
**[](https://wiki.skaarhoj.com/uploads/images/gallery/2022-10/sdi.png)**The Blackmagic 3G-SDI Arduino Shield supports the following formats using SDI Level B: 720p50, 720p59.94, 720p60, 1080i50, 1080i59.94, 1080i60, 1080p23.98, 1080p24, 1080p25, 1080p29.97, 1080p30, 1080p50 (output only), 1080p59.94 (output only) and 1080p60 (output only), but the camera does not have to be running the same video format as the program input, so you can use cameras in Ultra HD while the camera protocol is sent over HD signal to the camera. #### **Eth-GPI Link and Color Fly DB-25 Connector**The Eth-GPI Link and Color Fly have 8x GPI Inputs and 8x GPI Outputs, this is different than the SDI-GPI Link.
**[](https://wiki.skaarhoj.com/uploads/images/gallery/2022-10/eth-gpi.png)** #### #### **RCP v2 DB-9 Connector**The RCPv2 only has 1x GPI Input that is programmable, this is different than the RCP Pro.
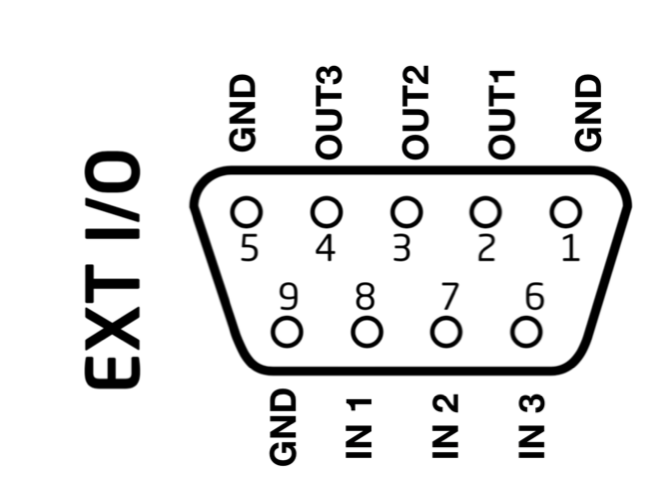
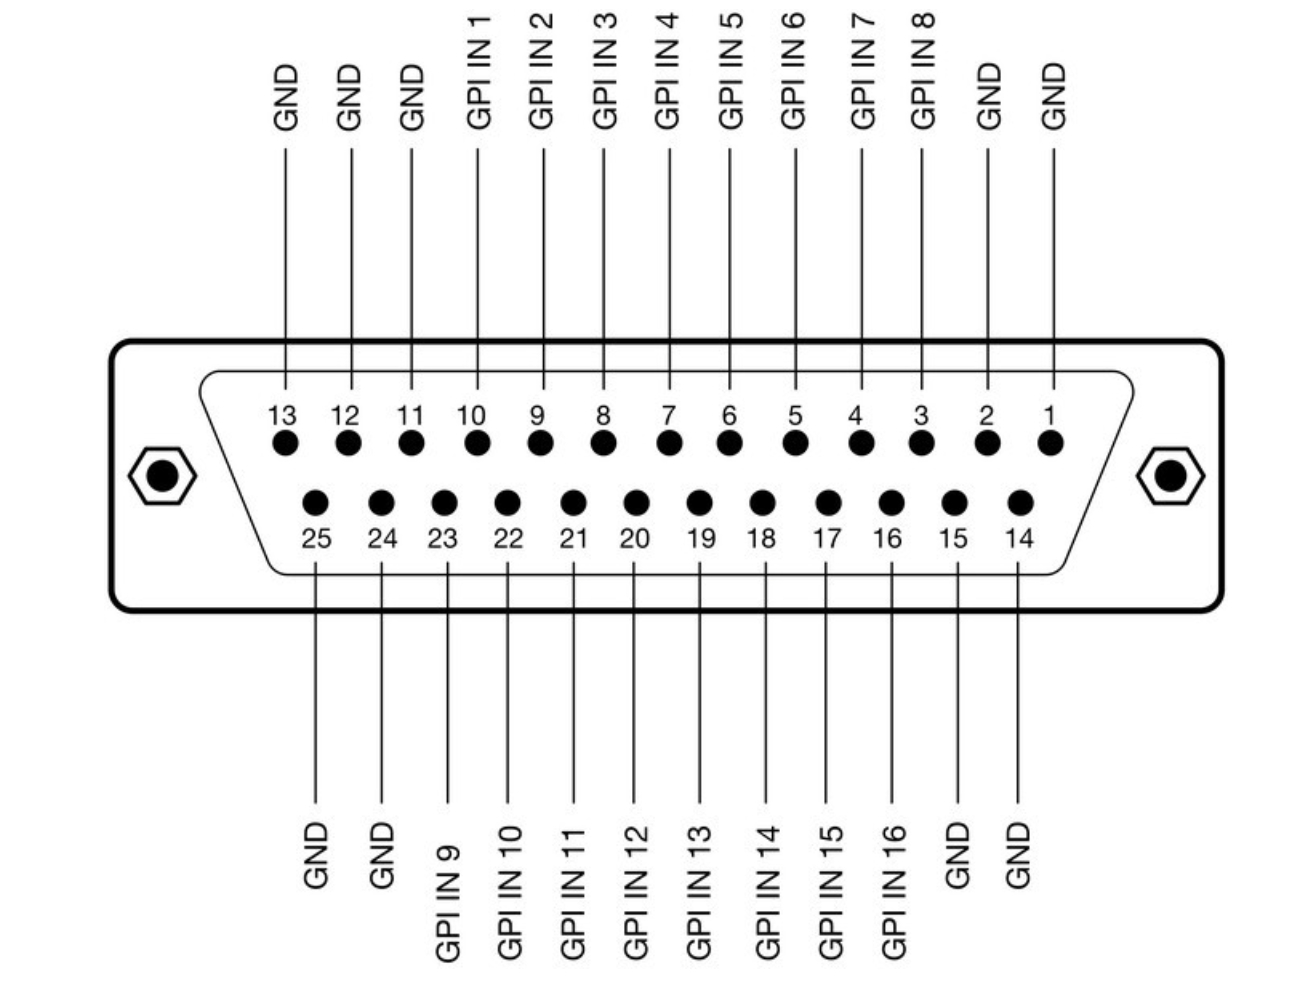
**[](https://wiki.skaarhoj.com/uploads/images/gallery/2022-10/db-9-rcpv2.png)** #### #### **SDI-GPI Link DB-25 Connector**The SDI-GPI Link has 16x GPI Inputs and 0x GPI Outputs, this is different than the Eth-GPI Link.
**[](https://wiki.skaarhoj.com/uploads/images/gallery/2022-10/sdi-gpi.png)** #### #### **Tally Box and Lights** The pinout of the RJ-45 connector is as follows: 1\. GND 2\. 12V 3\. 5V control signal for red tally 1 4\. 5V control signal for green tally 1 The next four are for daisy-chaining tally lamps: 5\. 5V control signal for red tally 2 6\. 5V control signal for green tally 2 7\. 5V control signal for red tally 3 8\. 5V control signal for green tally 3 Our tally lamps need 12V power in order to light up the LEDs. The control signals are 5V so whenever you apply 5V on one of the pins the corresponding LEDs will illuminate. **[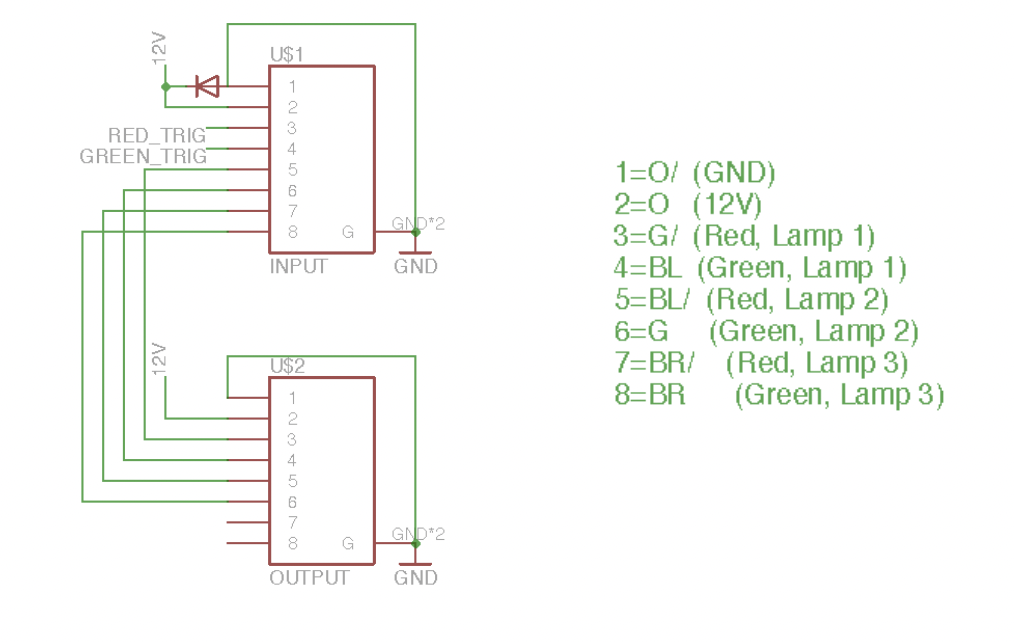](https://wiki.skaarhoj.com/uploads/images/gallery/2022-10/tally-box.png)** # UniSketch Panel Hardware Calibration This guide is for doing hardware calibration on analog hardware components of UniSketch panels that are integrated into a Blue Pill workflow. For information on hardware calibration on analog hardware components of Blue Pill inside panels please see: [https://wiki.skaarhoj.com/books/blue-pill-reactor/page/hardware-calibrator](https://wiki.skaarhoj.com/books/blue-pill-reactor/page/hardware-calibrator) For the analog calibration the Skaarhoj Firmware Updater application is needed. It can be downloaded here: [https://www.skaarhoj.com/legacy-downloads](https://www.skaarhoj.com/legacy-downloads)UniSketch Analog Hardware Component calibrations are stored in the panels EEPROM and are used when controlled by a Blue Pill panel.
1\. Connect the UniSketch panel to the computer via the Micro USB port on the port side of the panel. 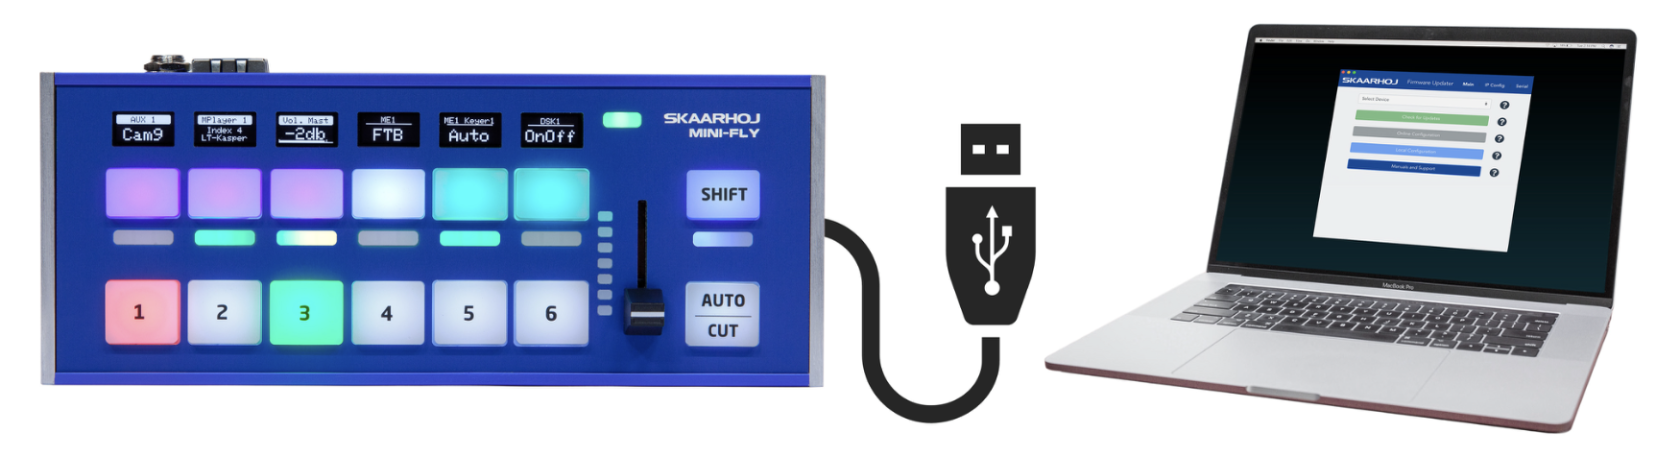 2\. Open the Firmware Updater Application. 3\. Select the device in the port section of the updater. 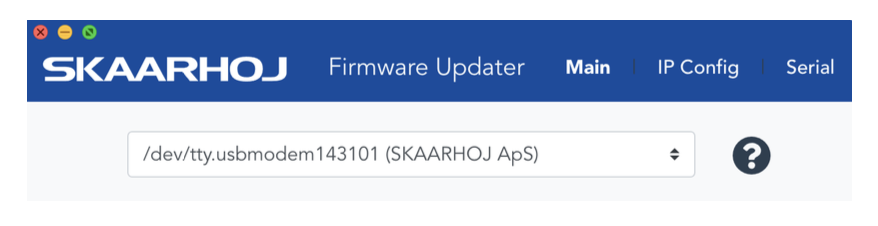4. Click over to the Serial Monitor tab. #### **PTZ Joystick** To see the values of the PTZ joystick deadzone use the command: **“show joystickDeadzone”** Shows joystick deadzone values *if* they have been set via “joystickDeadzone=X,Y,Z” To set the values of the PTZ joystick deadzone use the command: **“joystickDeadzone=X,Y,Z”** Set deadzone values for a joystick component X = Pan deadzone in percentage Y = Tilt deadzone in percentage Z = Zoom deadzone in percentage Default values are 20%. Applicable values are between 1% and 100% Example: “joystickDeadzone=5,10,20” equals 5% pan, 10% tilt and 20% zoom deadzone #### **RCP Joystick**Serial monitor commands can be use with non motorized faders and t-bars but were designed for the RCP Joystick.
To see the available analog components available: **”list analog”** Lists analog hardware components on the controller with number, description and three calibration values (start/end/tolerance) To show the current analog calibration values: **“show analog X”** Shows readings from analog component X where X is the number given by “list analog”. The readings indicate the value and noise level for the read out. This is useful for debugging. If you move the analog component you should see values change. To hide the analog values: **“hide analog”** Stops the display of “show analog” To calibrate the analog component: **“calibrate analog X”** Starts calibration of analog component X. Instructions will be posted in the serial monitor. The steps involve moving the analog component to various positions. When instructed to move the joystick to the end point (all the way up or all the way down, it does not matter which) then in the serial monitor type ok. Continue to follow the instructions as prompted. To reset the calibration to defaults: **“clear analog X”** Resets calibration data for analog component X to default. If X is not given it resets calibration data for all components. To force calibration values: **“set analog X=start,end,tolerance”** Forces calibration data “start”, “end”, and “tolerance” for component X. This is best used when needing to up the tolerance.For full list of available serial monitor commands for UniSketch panels, see page 23 of the UniSketch Installation and Operations manual here: [https://github.com/SKAARHOJ/Support/blob/master/Manuals/SKAARHOJ/SKAARHOJ\_Manual.pdf](https://github.com/SKAARHOJ/Support/blob/master/Manuals/SKAARHOJ/SKAARHOJ_Manual.pdf)
# Panel Diagrams Diagrams of the panels. Unfortunately we do not have CAD files available at this time, only the diagrams. Check out our Product Information Documents (PID) for additional information. # Air Fly [](https://wiki.skaarhoj.com/uploads/images/gallery/2022-10/air-fly.png) # Air Fly Pro v2 [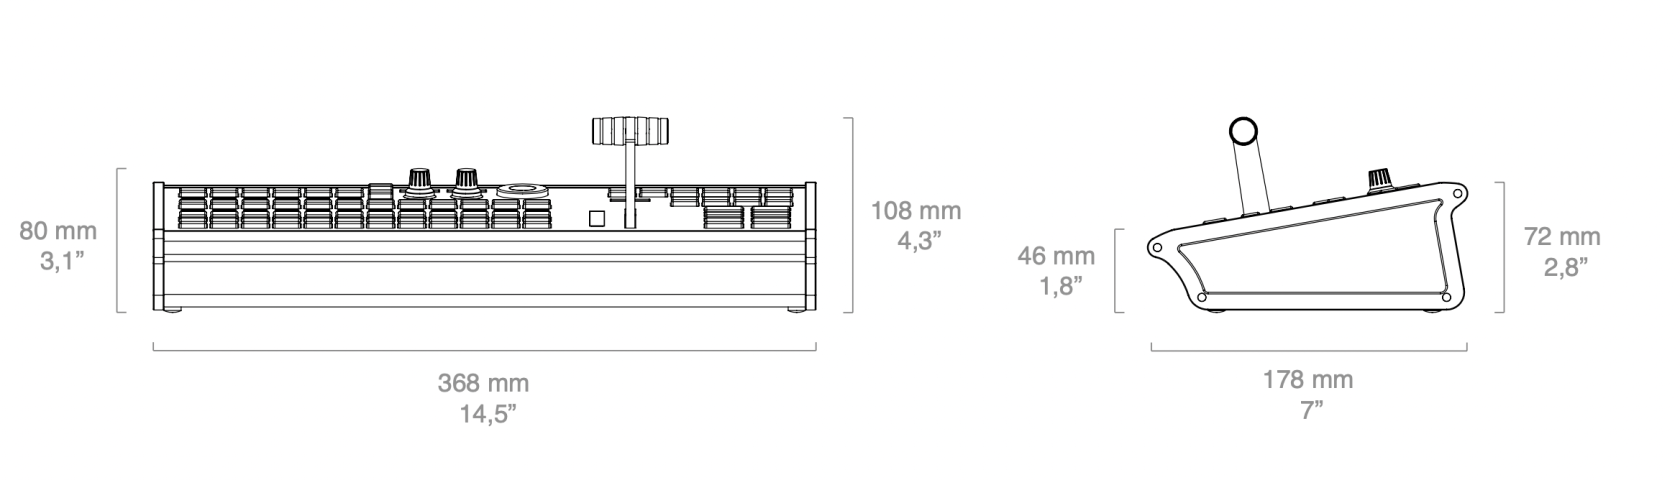](https://wiki.skaarhoj.com/uploads/images/gallery/2022-10/air-fly-pro-v2.png) # Air Fly Pro v3 [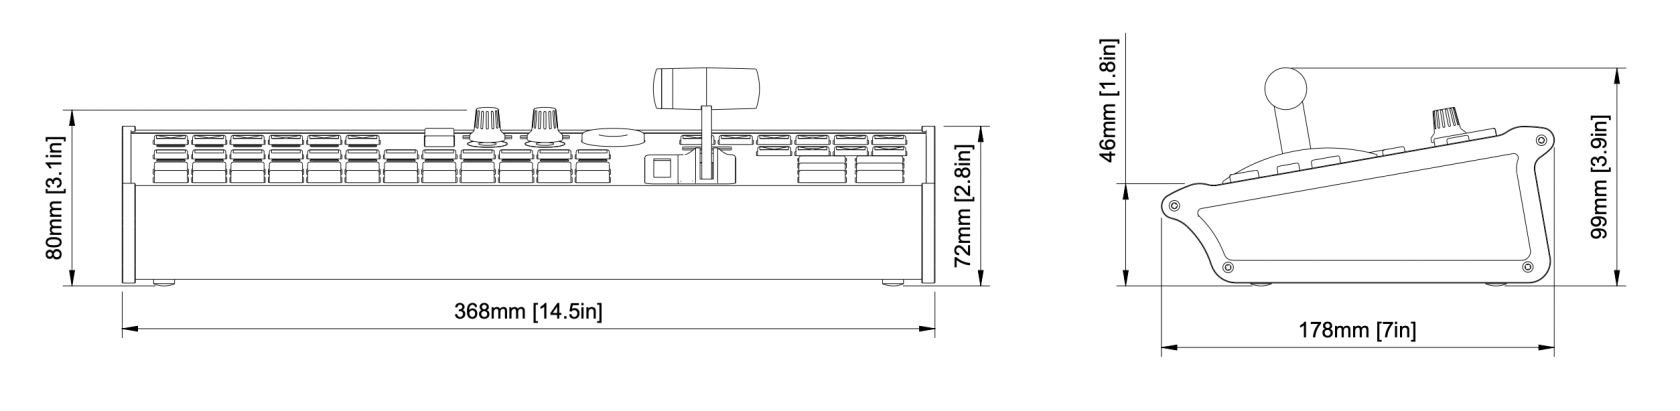](https://wiki.skaarhoj.com/uploads/images/gallery/2022-10/air-fly-pro-v3.png) # Blue Pill Server [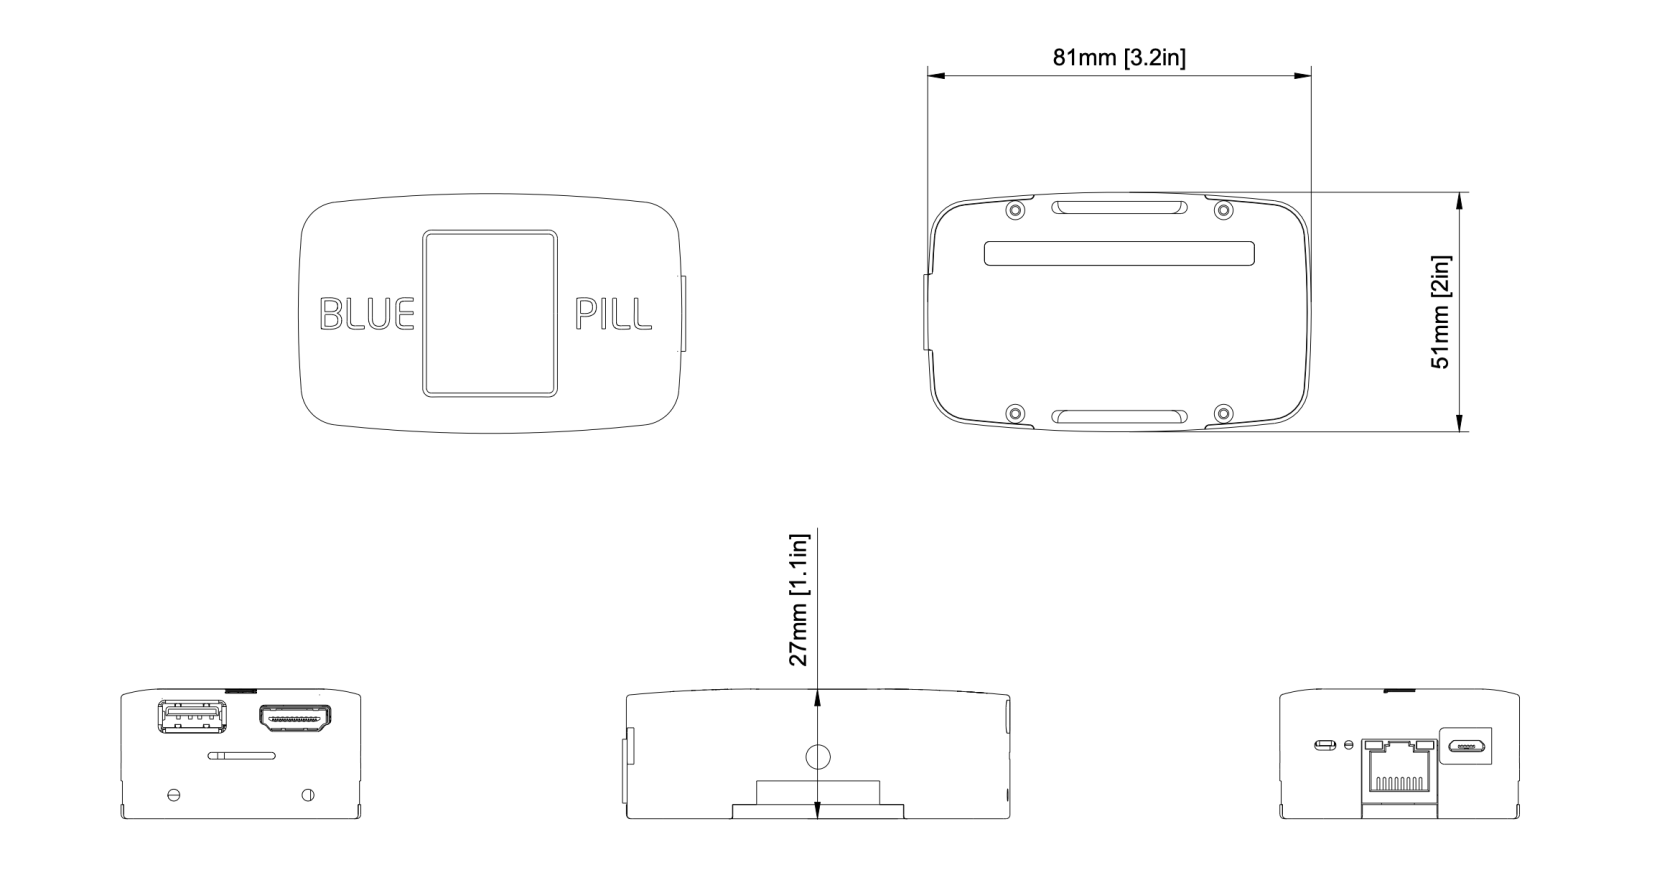](https://wiki.skaarhoj.com/uploads/images/gallery/2022-10/blue-pill.png) # Color Fly v2 **Standard** [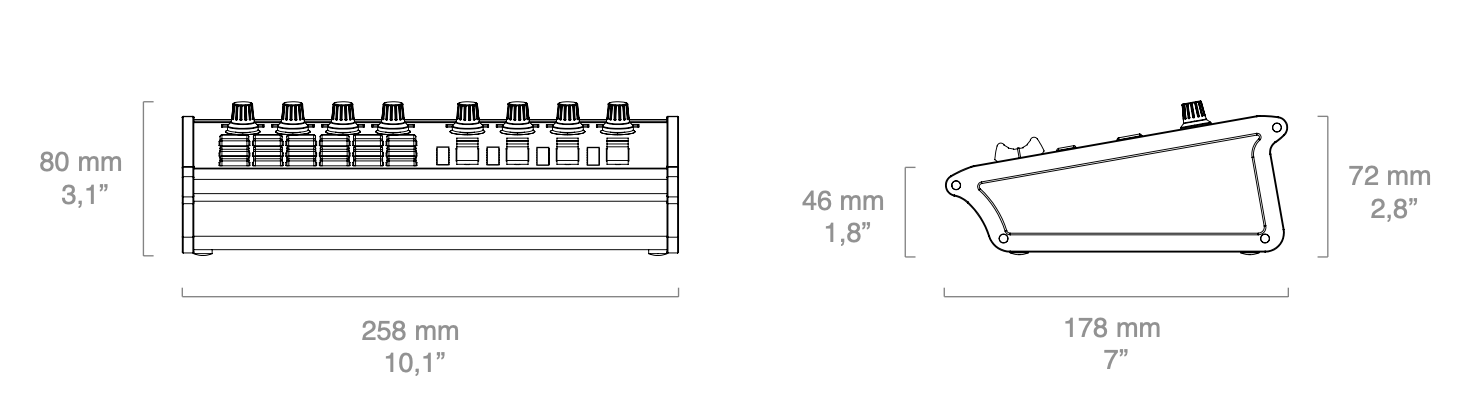](https://wiki.skaarhoj.com/uploads/images/gallery/2022-10/color-fly-v2.png) **With SDI Option** **[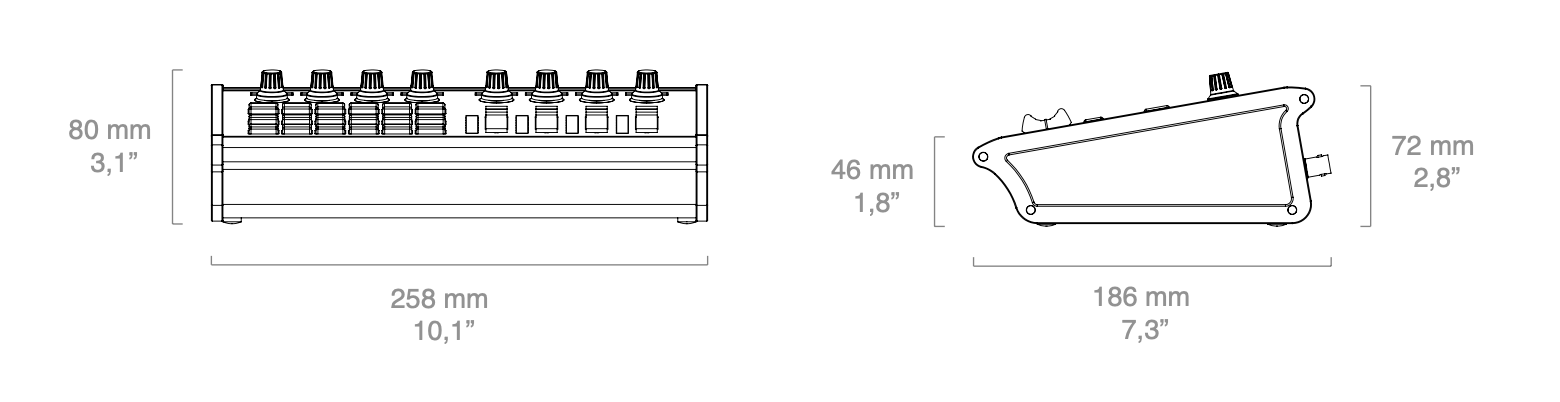](https://wiki.skaarhoj.com/uploads/images/gallery/2022-10/color-fly-v2-sdi.png)** # Color Fly v3 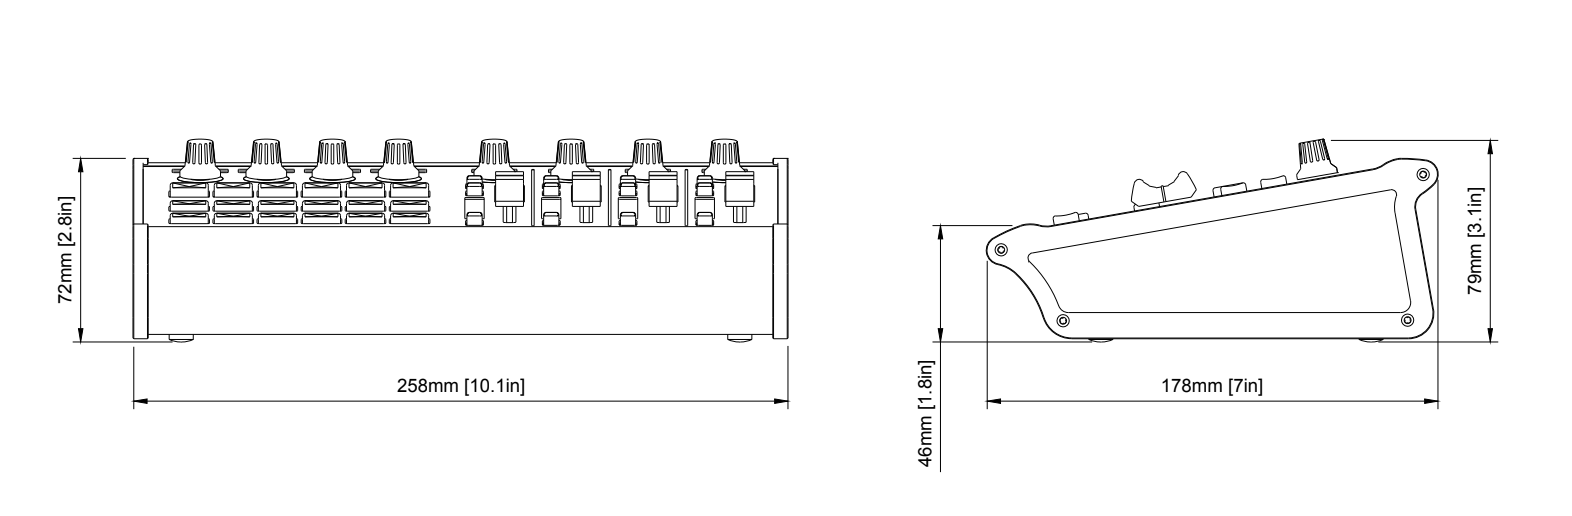 # Eth-B4 Link [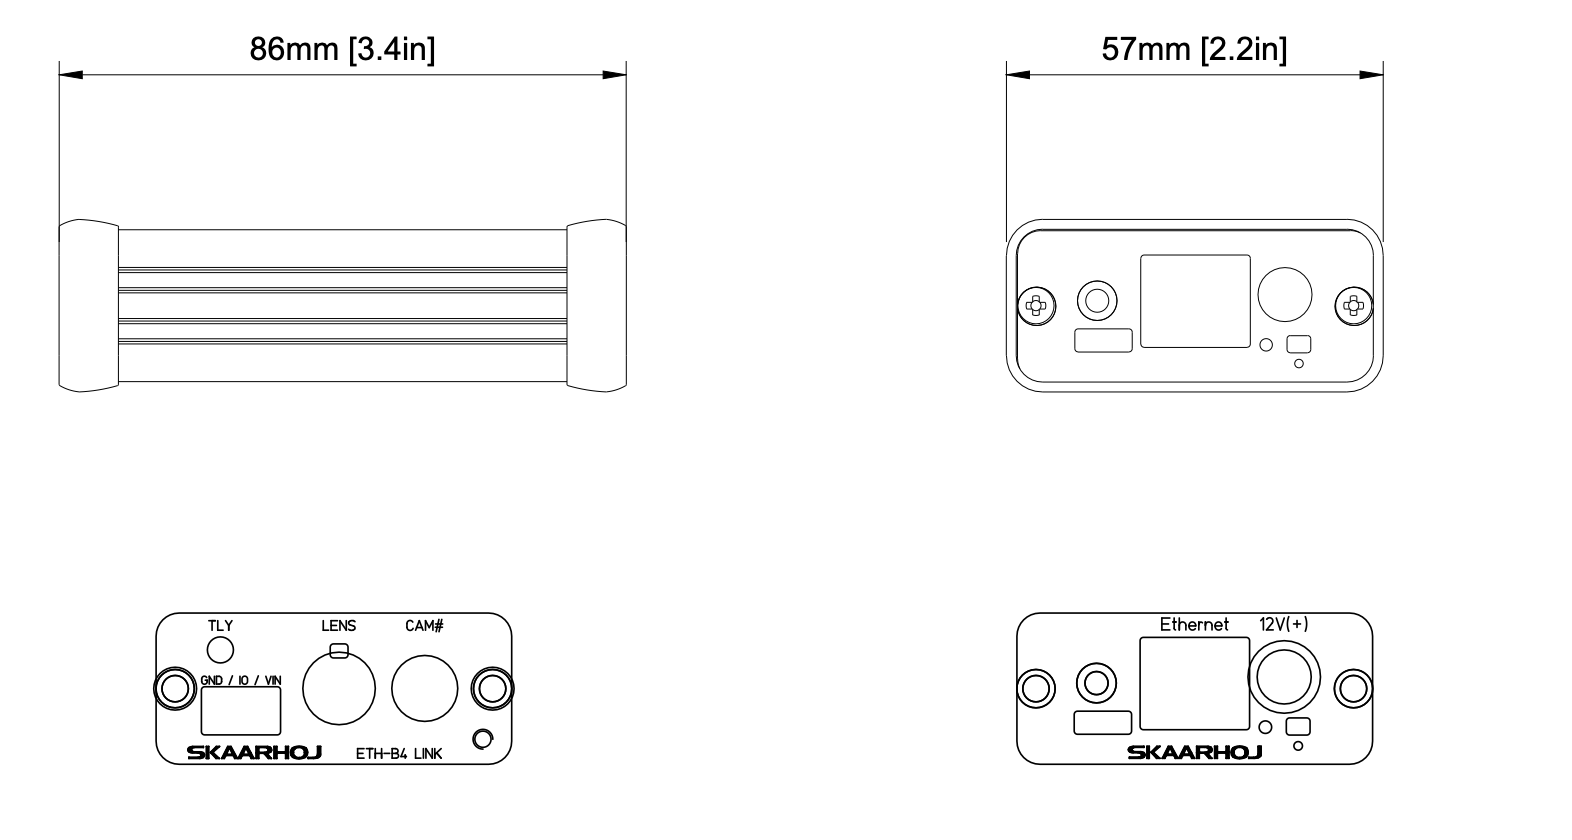](https://wiki.skaarhoj.com/uploads/images/gallery/2022-10/eth-b4-link.png) # Eth-GPI Link **Standard** [](https://wiki.skaarhoj.com/uploads/images/gallery/2022-10/eth-gpi-link.png) **Dual** [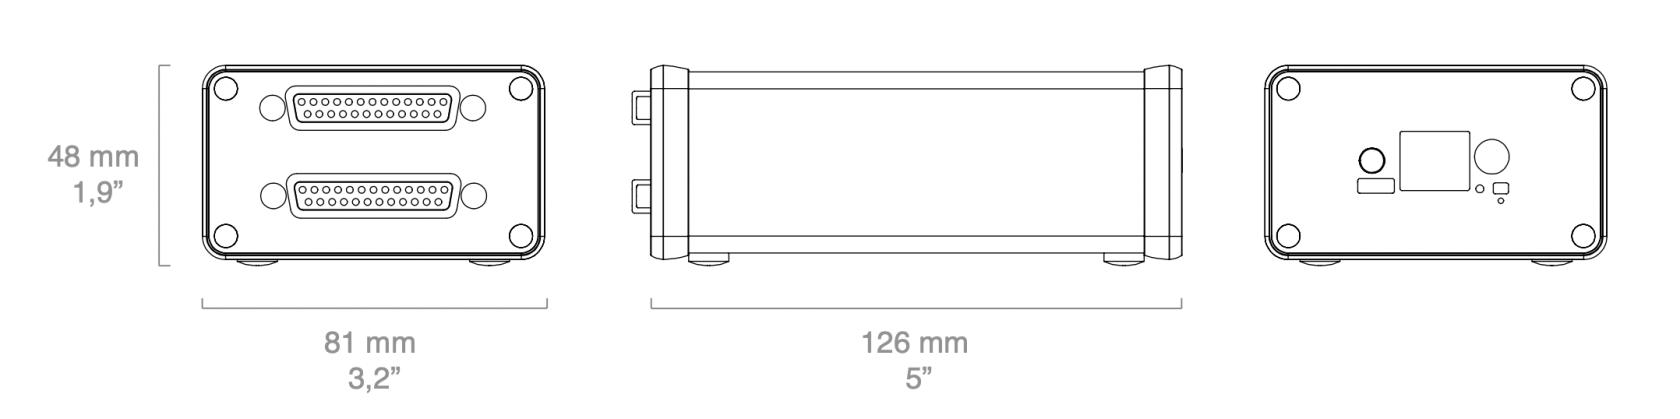](https://wiki.skaarhoj.com/uploads/images/gallery/2022-10/eth-gpi-link-dual.png) # Eth-Lanc Link [](https://wiki.skaarhoj.com/uploads/images/gallery/2022-10/eth-lanc.png) # Eth-SDI Link [](https://wiki.skaarhoj.com/uploads/images/gallery/2022-10/eth-sdi.png) # Frame Shot Plus Formerly MKA1 Standard [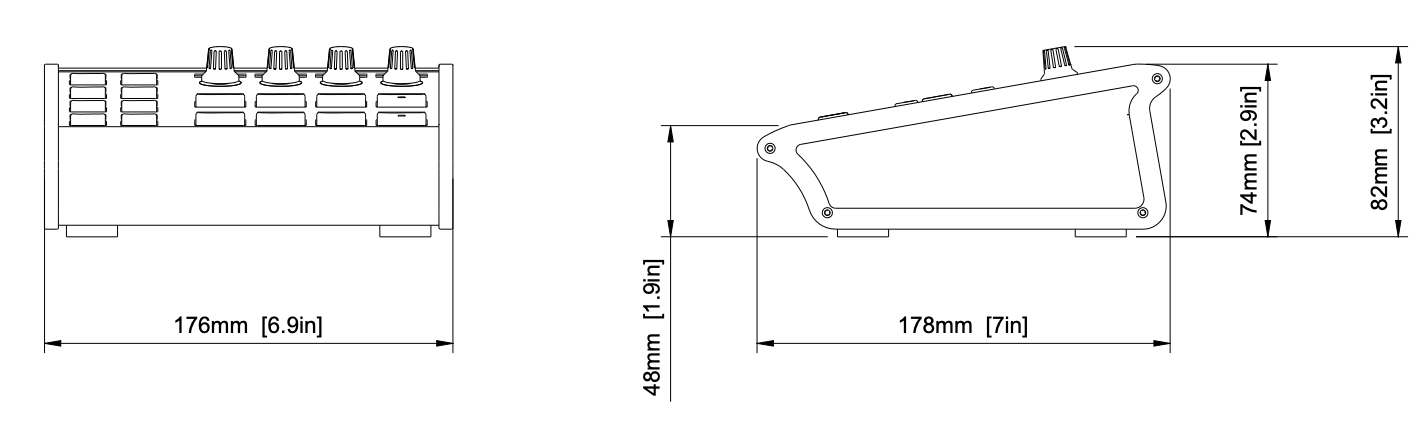](https://wiki.skaarhoj.com/uploads/images/gallery/2022-10/mka1.png) Slim 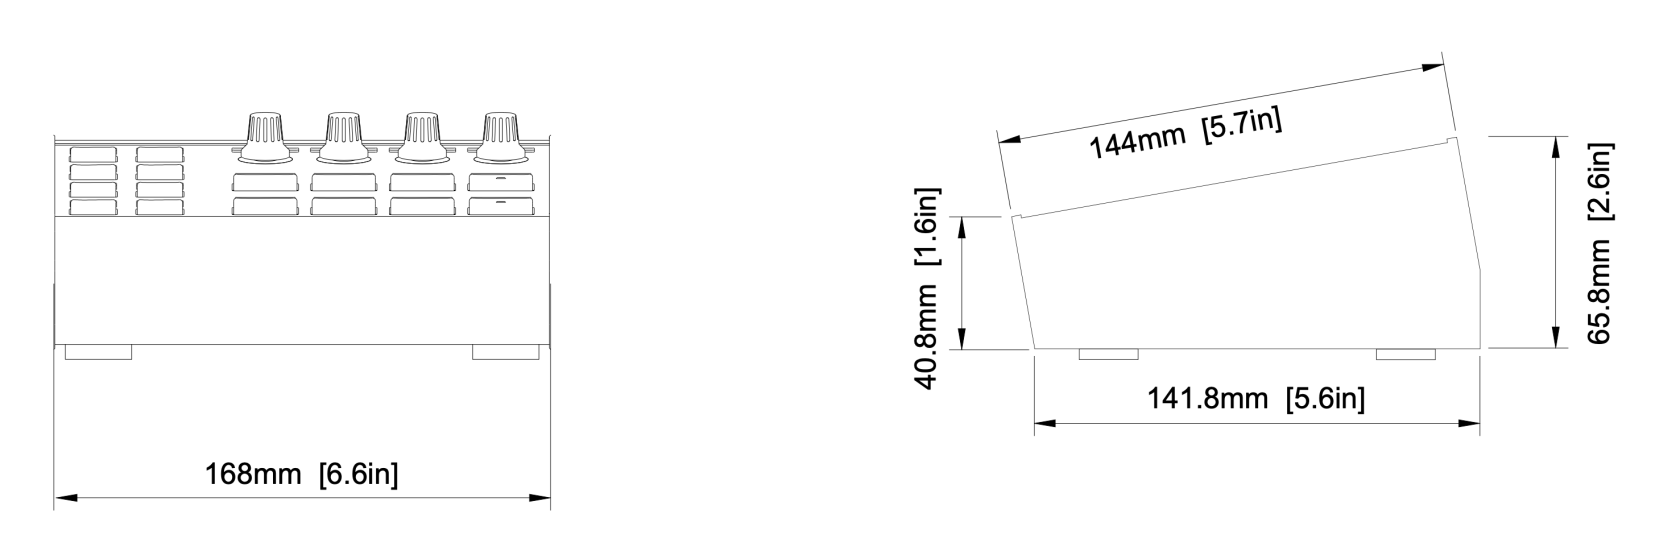 # Frame Shot Pro 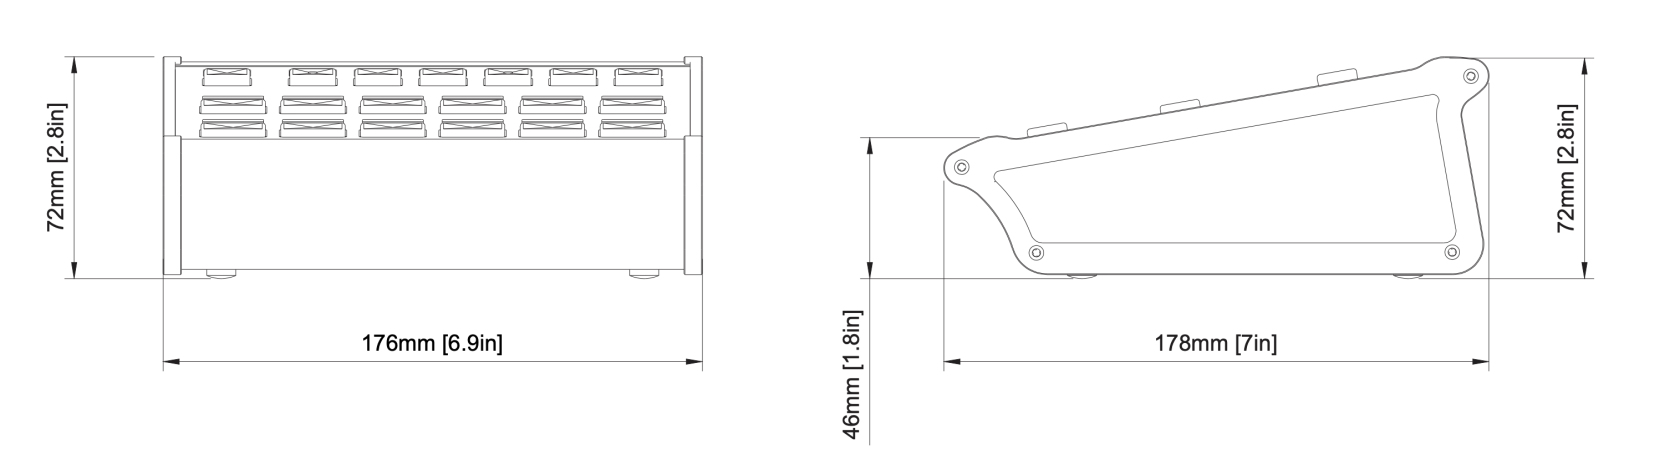 # Frame Shot Uno 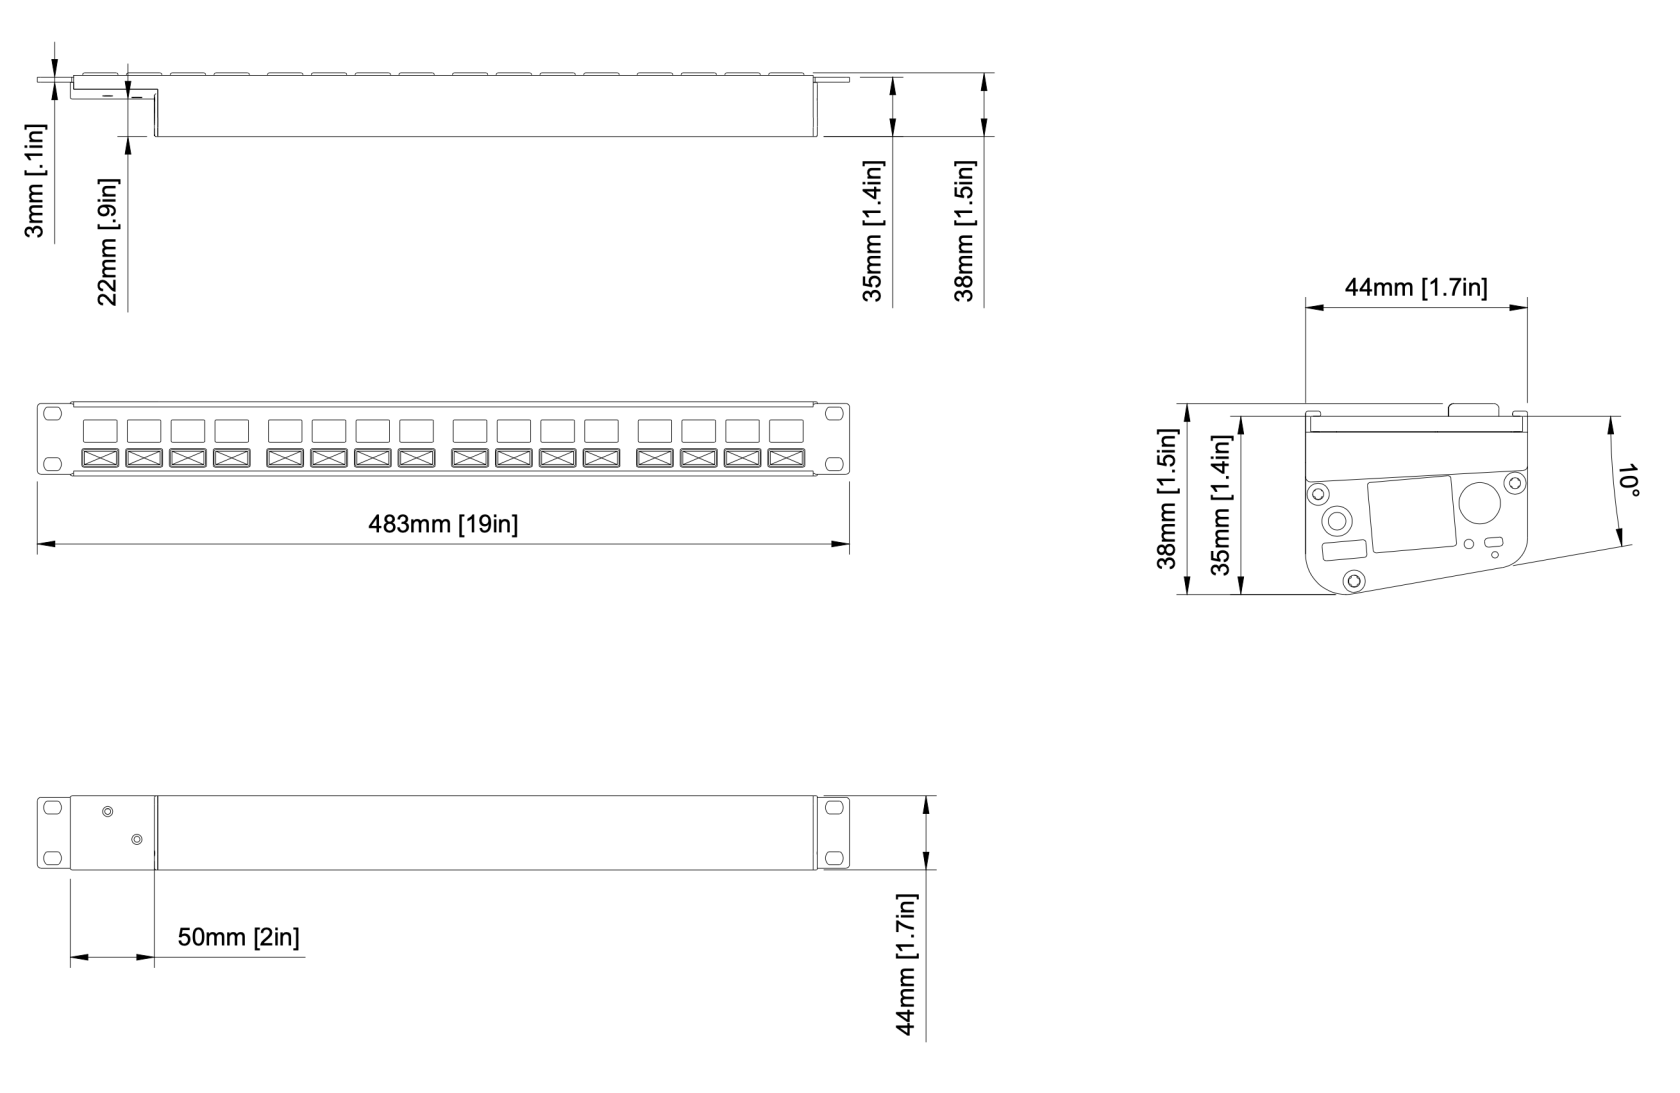 # Inline 10 **Standard** [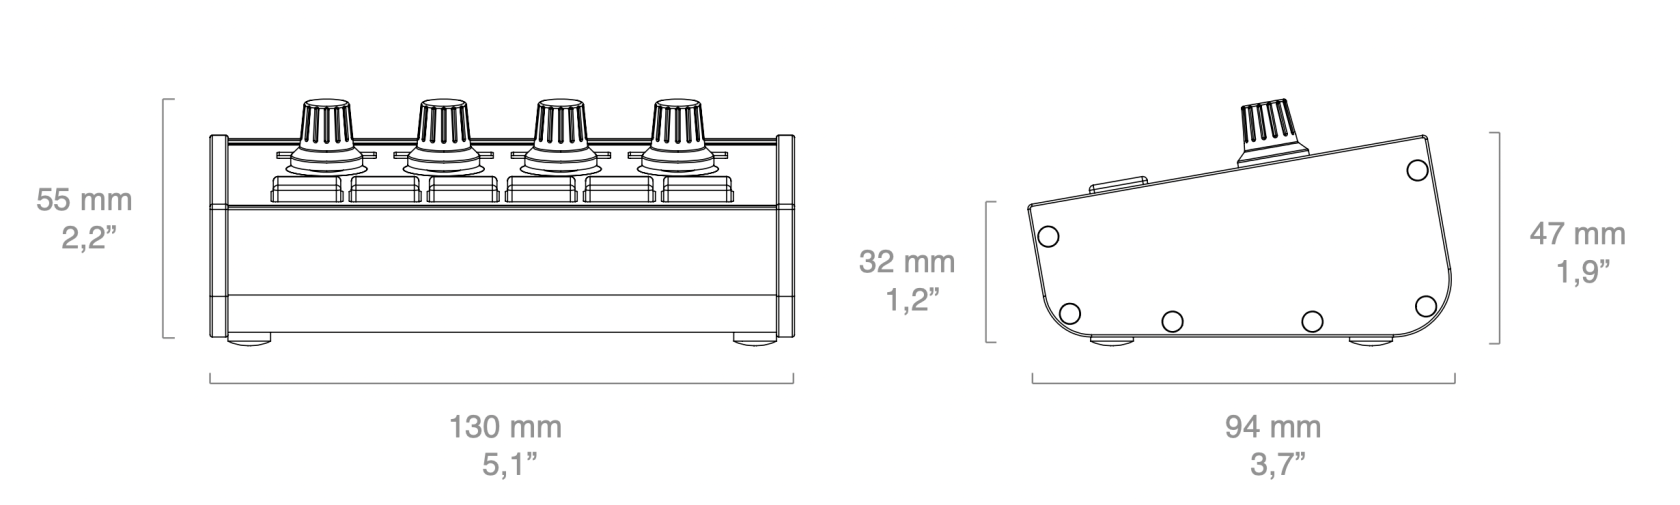](https://wiki.skaarhoj.com/uploads/images/gallery/2022-10/inline-10.png) **SDI Option** **[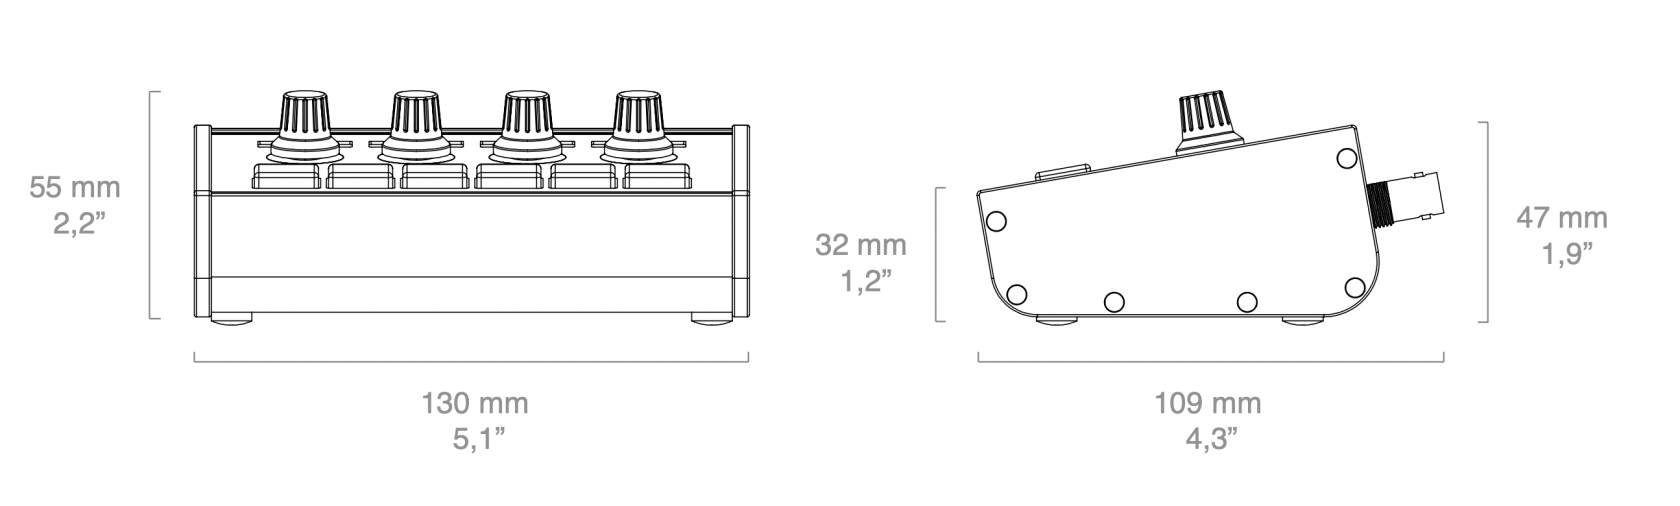](https://wiki.skaarhoj.com/uploads/images/gallery/2022-10/inline-10-sdi.png)** # Inline 22 [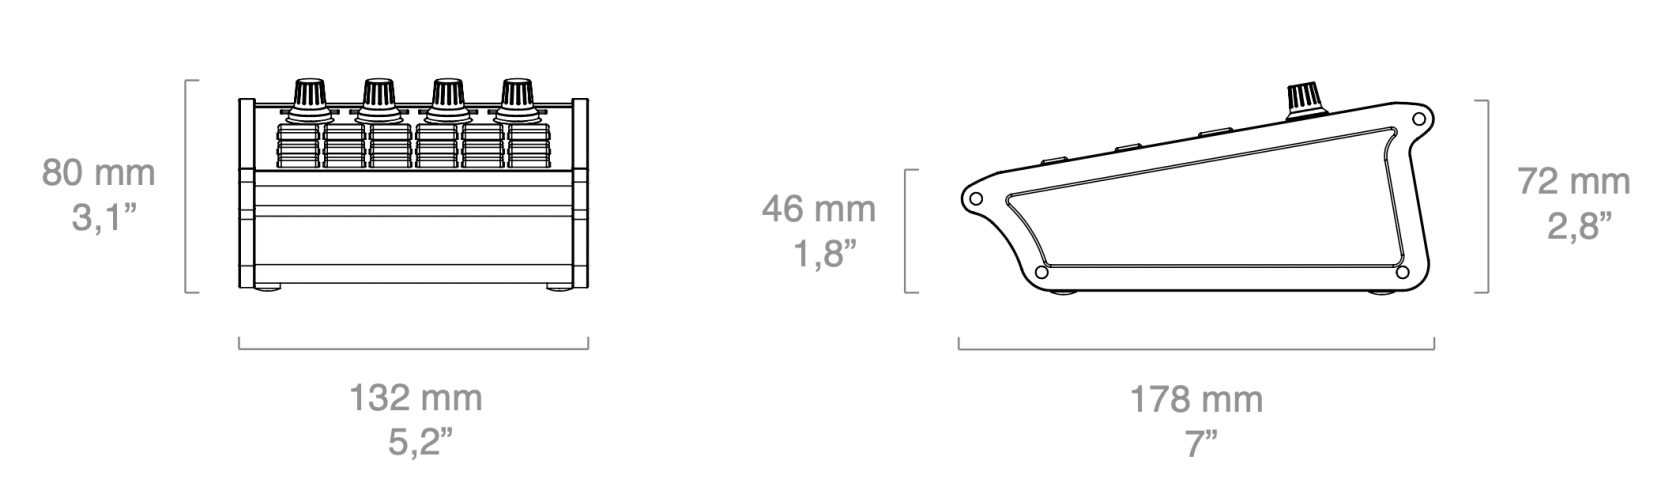](https://wiki.skaarhoj.com/uploads/images/gallery/2022-10/inline-22.png) # Live Fly [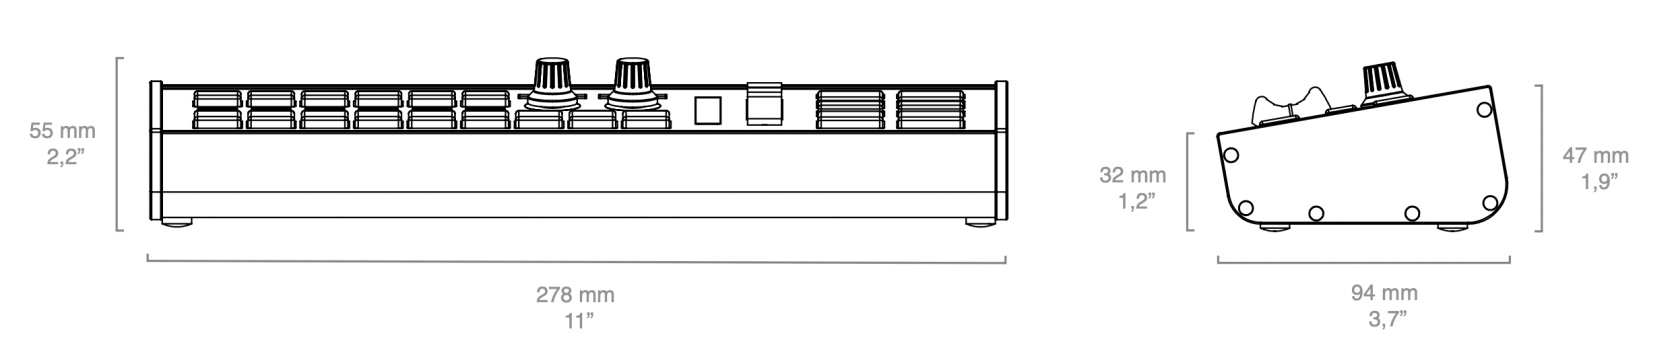](https://wiki.skaarhoj.com/uploads/images/gallery/2022-10/live-fly.png) # Master Key 36 [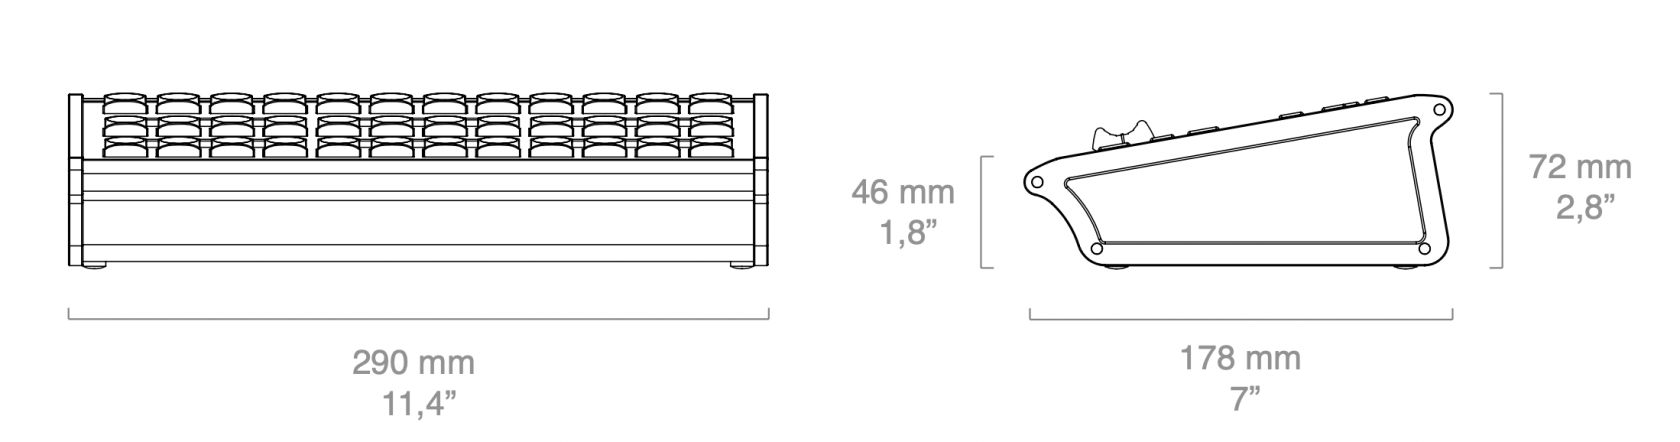](https://wiki.skaarhoj.com/uploads/images/gallery/2022-10/master-key-36.png) # Master Key One v1 [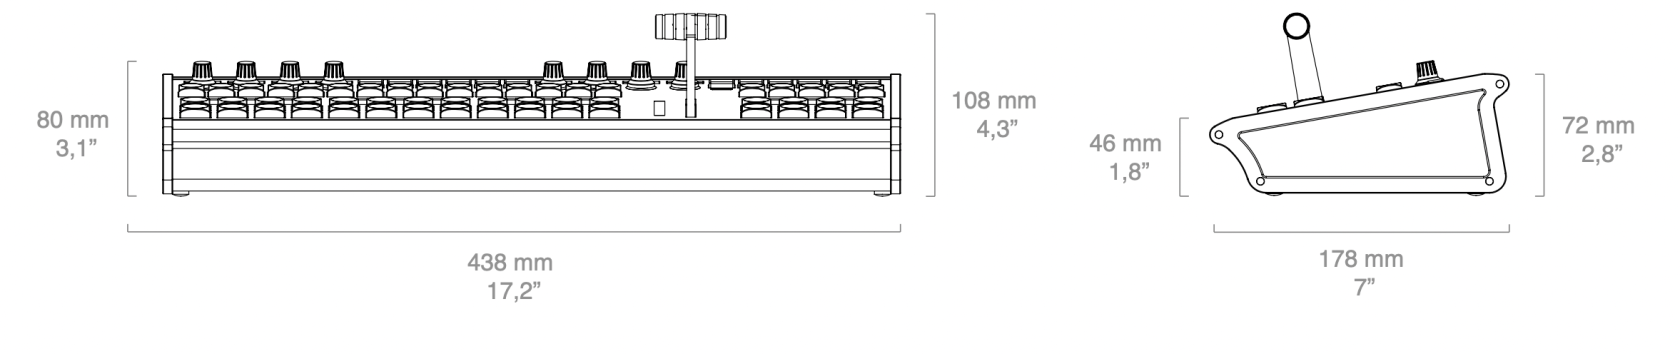](https://wiki.skaarhoj.com/uploads/images/gallery/2022-10/master-key-one-v1.png) # Master Key One v2 [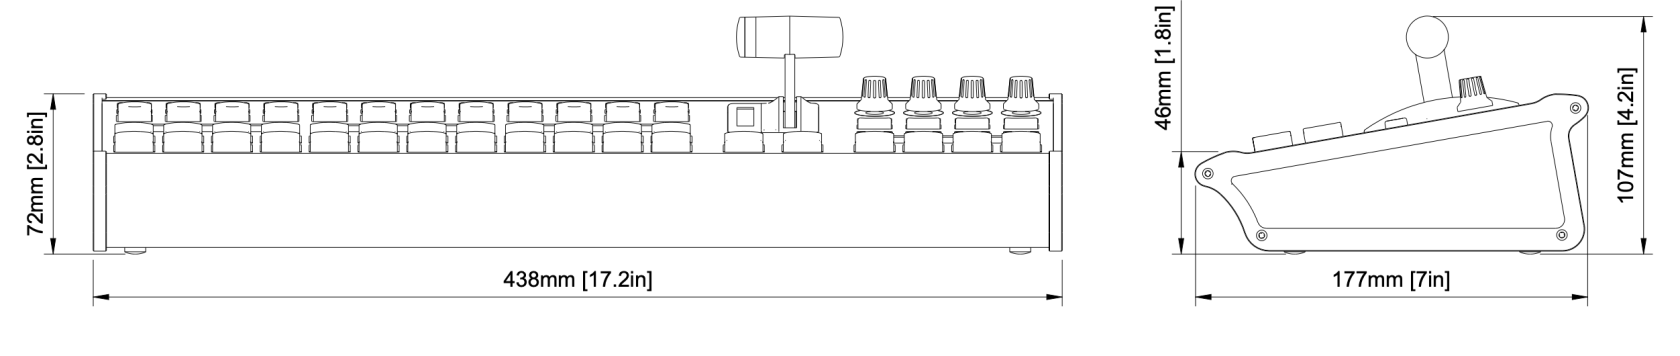](https://wiki.skaarhoj.com/uploads/images/gallery/2022-10/master-key-one-v2.png) # Mega Panel 2M/E Frame [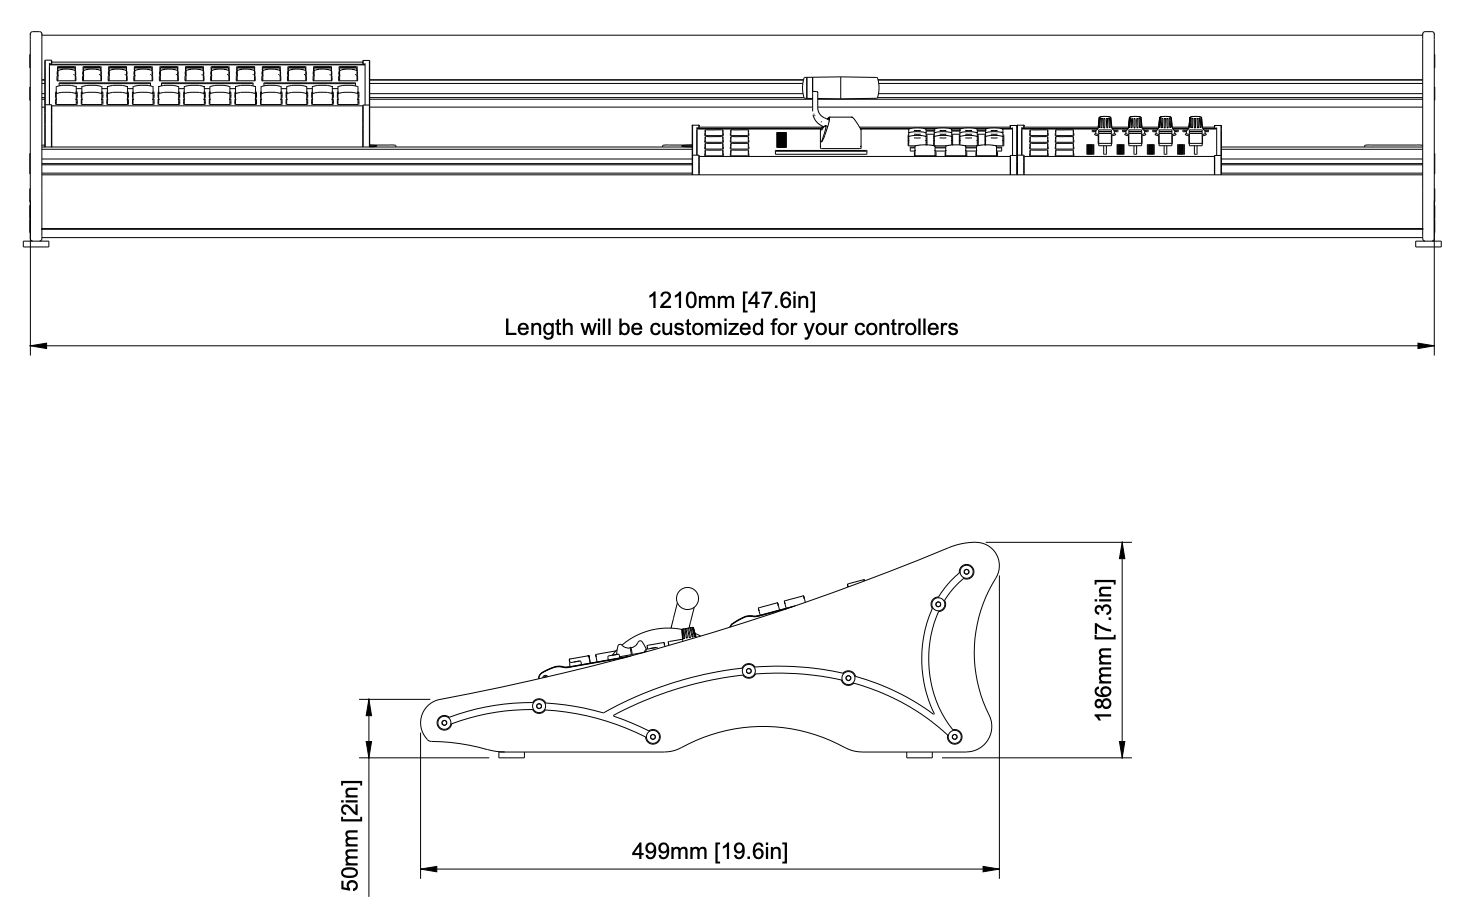](https://wiki.skaarhoj.com/uploads/images/gallery/2022-10/mega-panel-frame-2-me.png) # Micro Fly [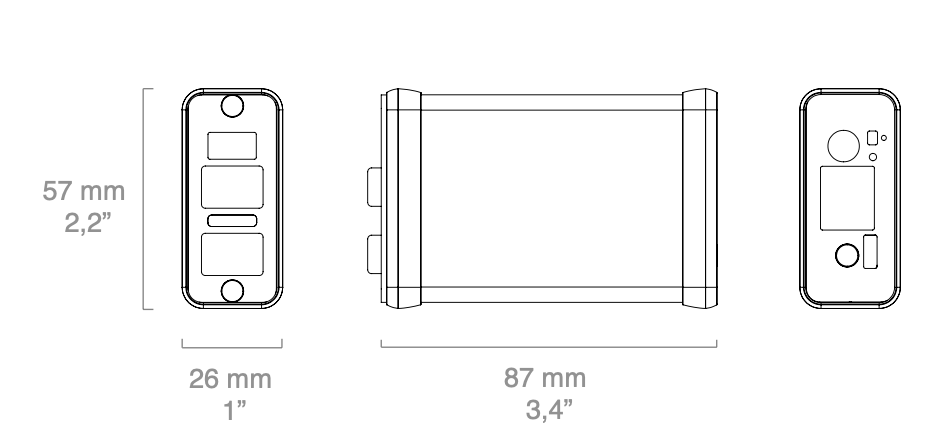](https://wiki.skaarhoj.com/uploads/images/gallery/2022-10/micro-fly.png) # Mini Fly [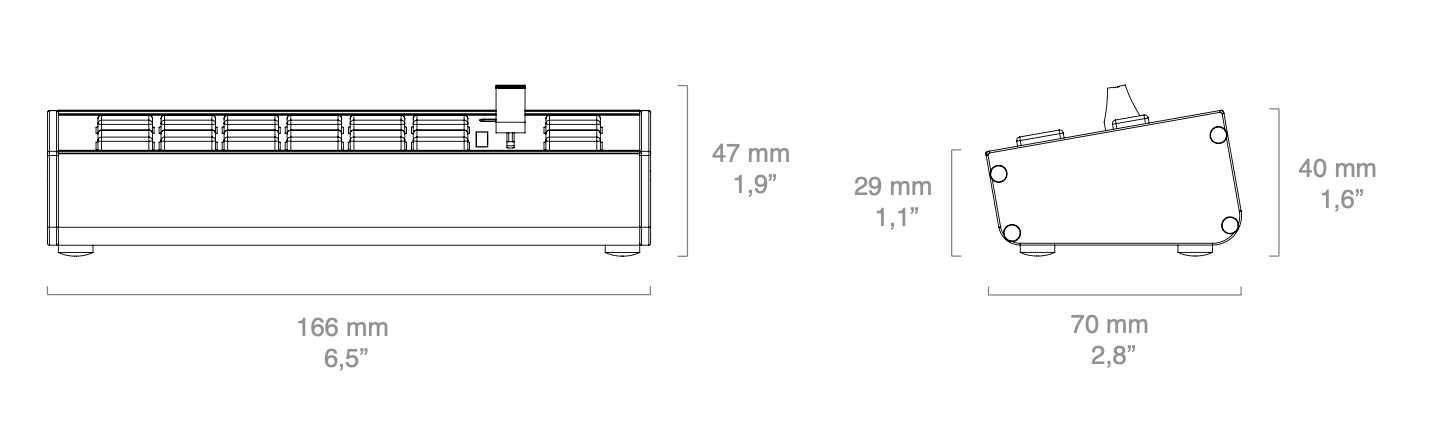](https://wiki.skaarhoj.com/uploads/images/gallery/2022-10/mini-fly.png) # MK48 Standard [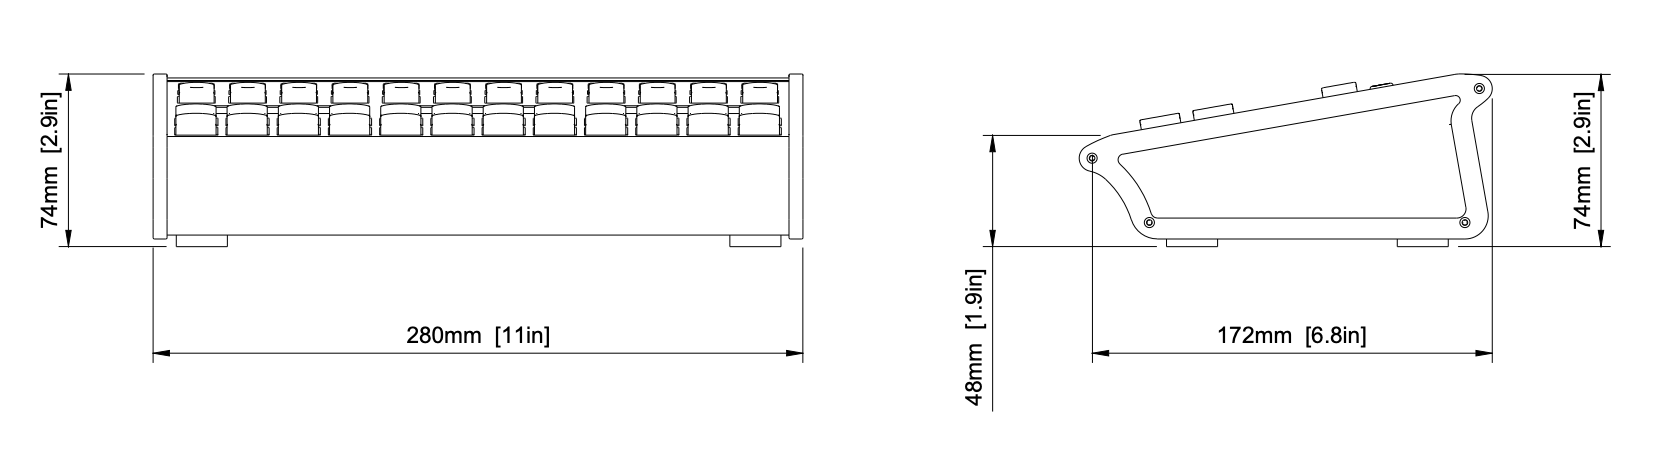](https://wiki.skaarhoj.com/uploads/images/gallery/2022-10/mk48.png) Slim  # MKA3 [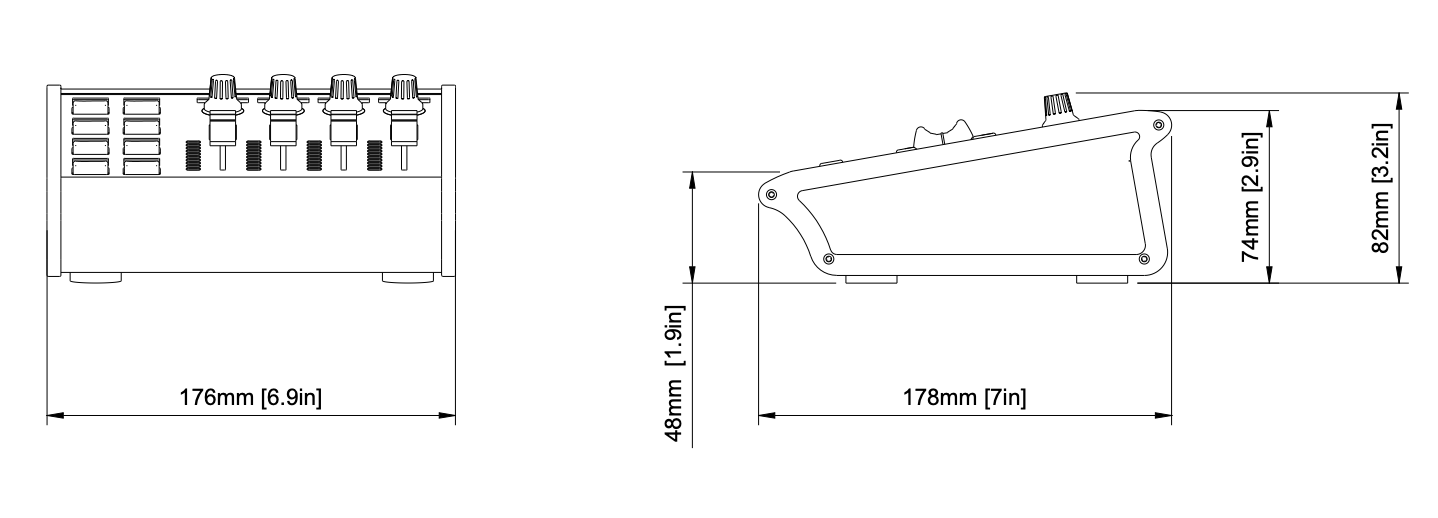](https://wiki.skaarhoj.com/uploads/images/gallery/2022-10/mka3.png) # MKAB [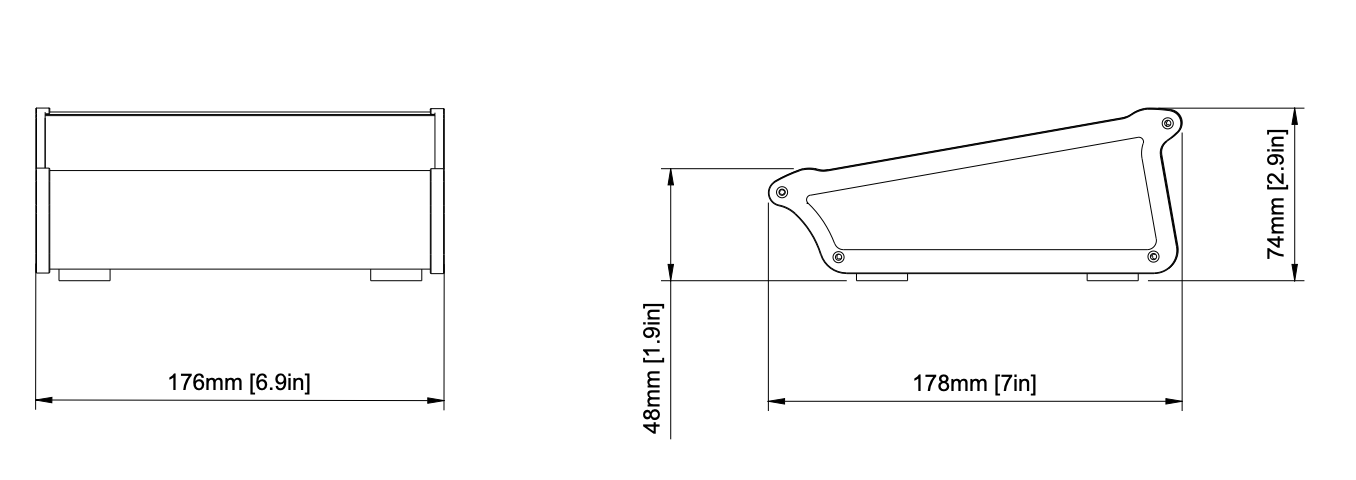](https://wiki.skaarhoj.com/uploads/images/gallery/2022-10/mkab.png) # PTZ Extreme v2 [](https://wiki.skaarhoj.com/uploads/images/gallery/2022-10/ptz-extreme-v2.png) # PTZ Fly **Standard** [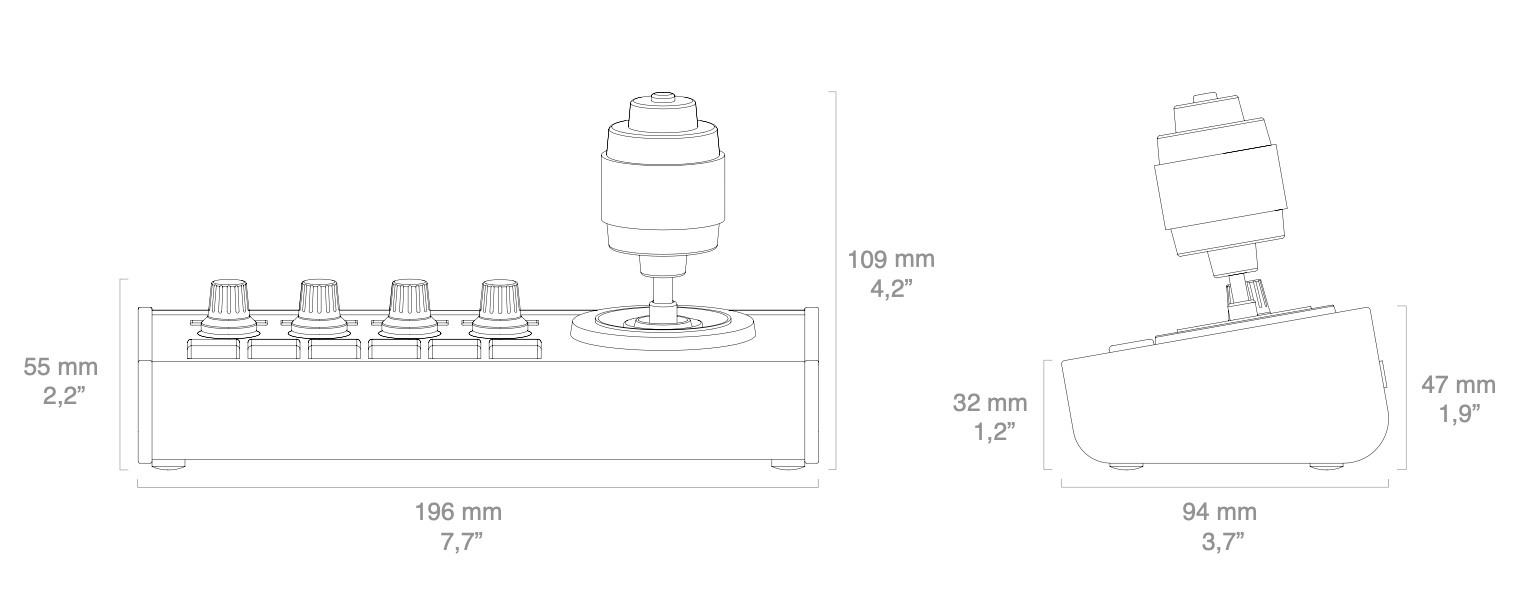](https://wiki.skaarhoj.com/uploads/images/gallery/2022-10/ptz-fly.png) **Hall Effect Joystick Option SDI Option** [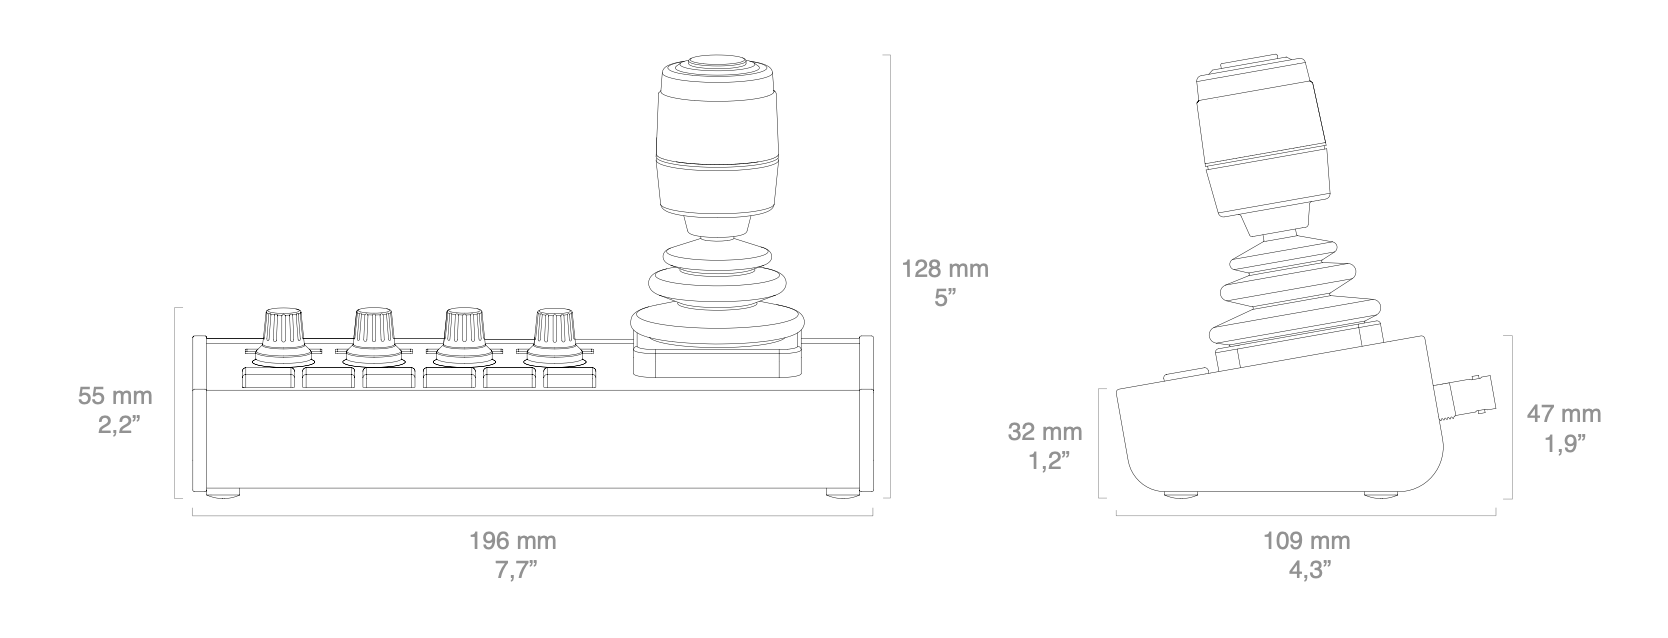](https://wiki.skaarhoj.com/uploads/images/gallery/2022-10/ptz-fly-he.png) # PTZ Pro v1 **Standard** [](https://wiki.skaarhoj.com/uploads/images/gallery/2022-10/ptz-pro-v1.png) **Hall Effect Joystick Option** **[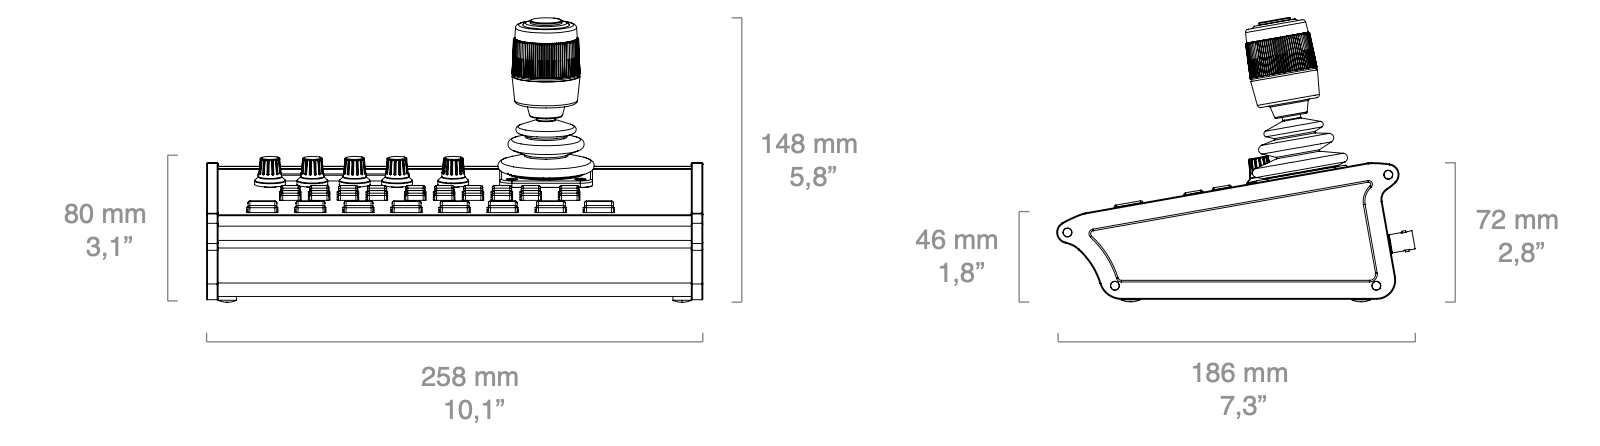](https://wiki.skaarhoj.com/uploads/images/gallery/2022-10/ptz-pro-v1-he.png)** # PTZ Pro v2 **Standard** **[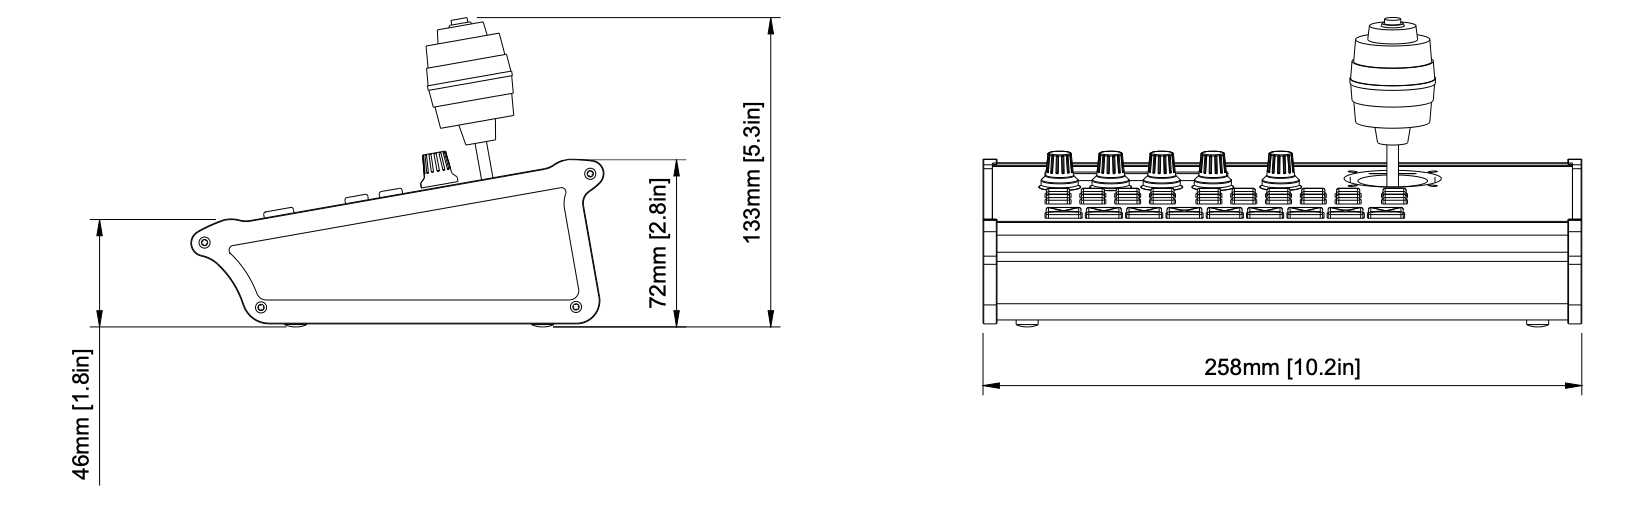](https://wiki.skaarhoj.com/uploads/images/gallery/2022-10/ptz-pro-v2.png)** **Hall Effect Joystick Option** **[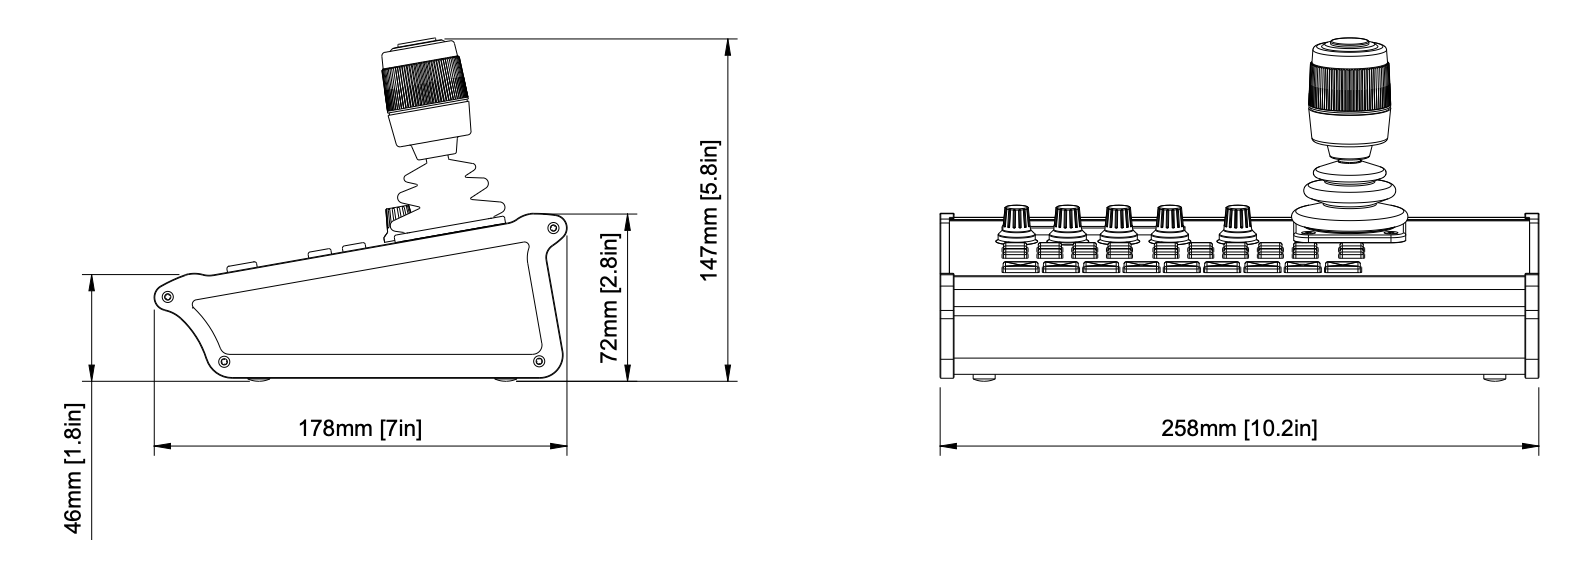](https://wiki.skaarhoj.com/uploads/images/gallery/2022-10/ptz-pro-v2-he.png)** # PTZ View Formerly MKA2 Standard [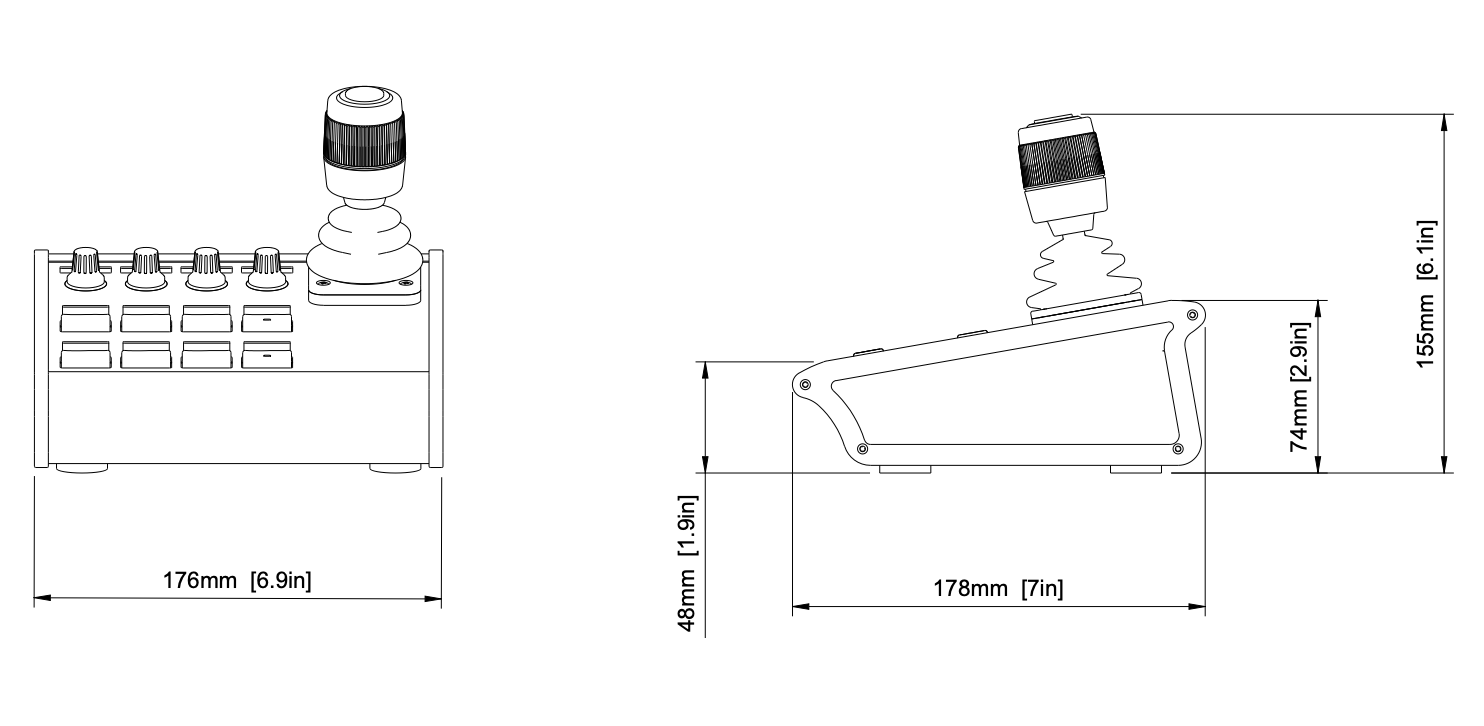](https://wiki.skaarhoj.com/uploads/images/gallery/2022-10/mka2.png) Slim 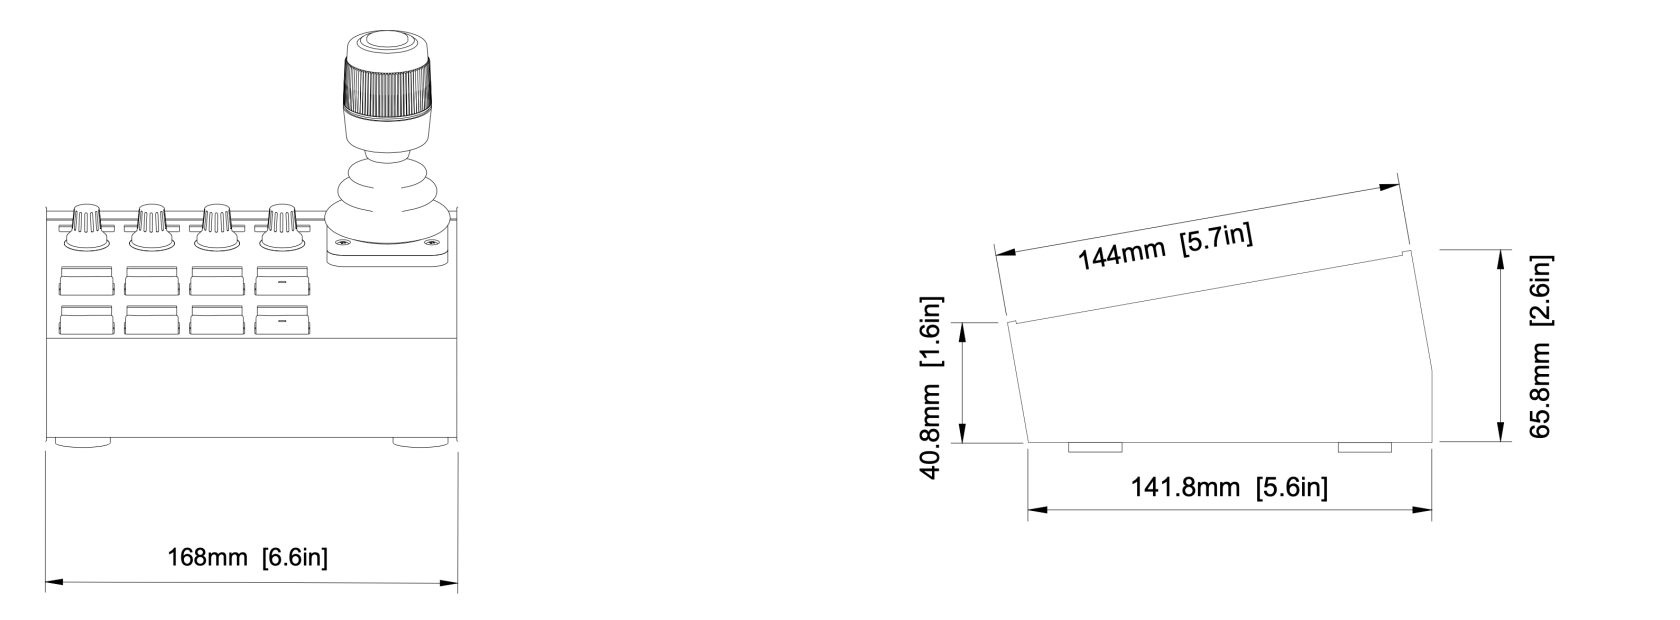 # PTZ Wiz v1 [](https://wiki.skaarhoj.com/uploads/images/gallery/2022-10/ptz-wiz-v1.png) # PTZ Wiz v2 [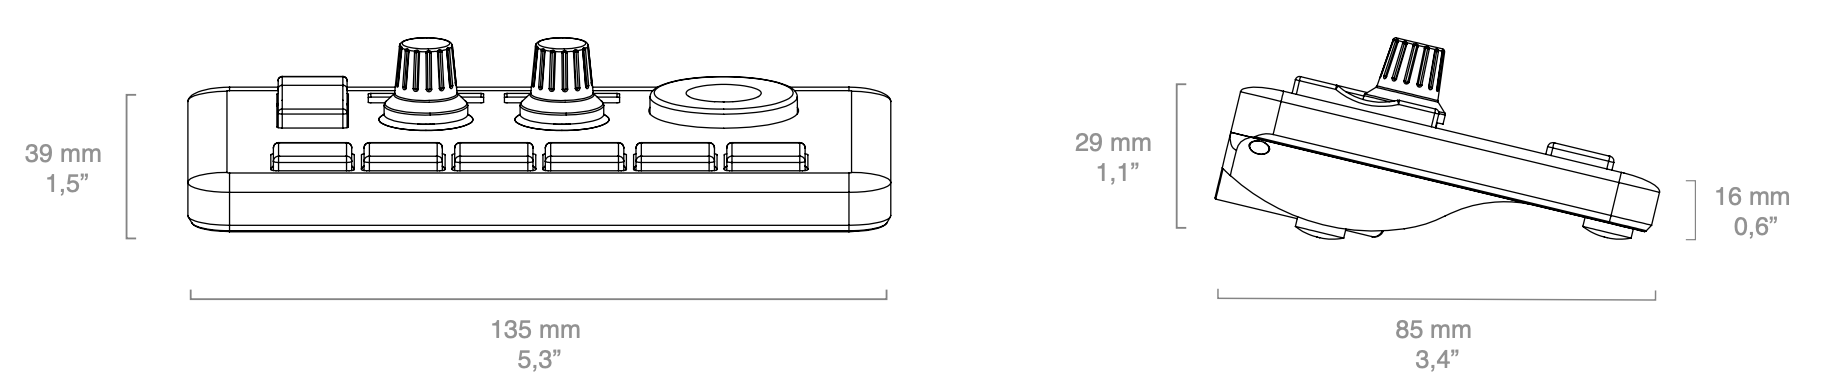](https://wiki.skaarhoj.com/uploads/images/gallery/2022-10/ptz-wiz-v2.png) # Quick Bar [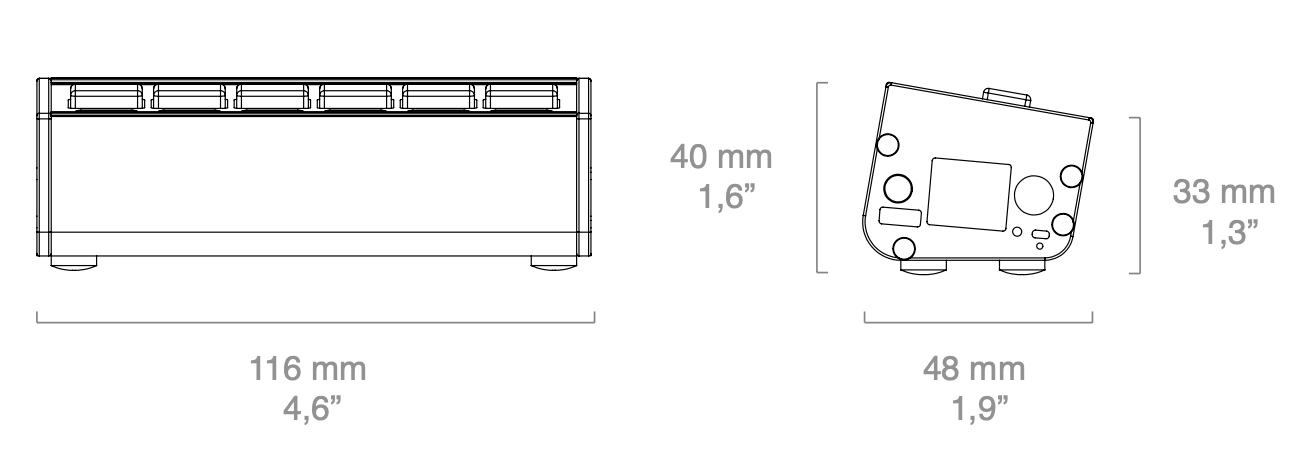](https://wiki.skaarhoj.com/uploads/images/gallery/2022-10/quick-bar.png) # Quick Pad [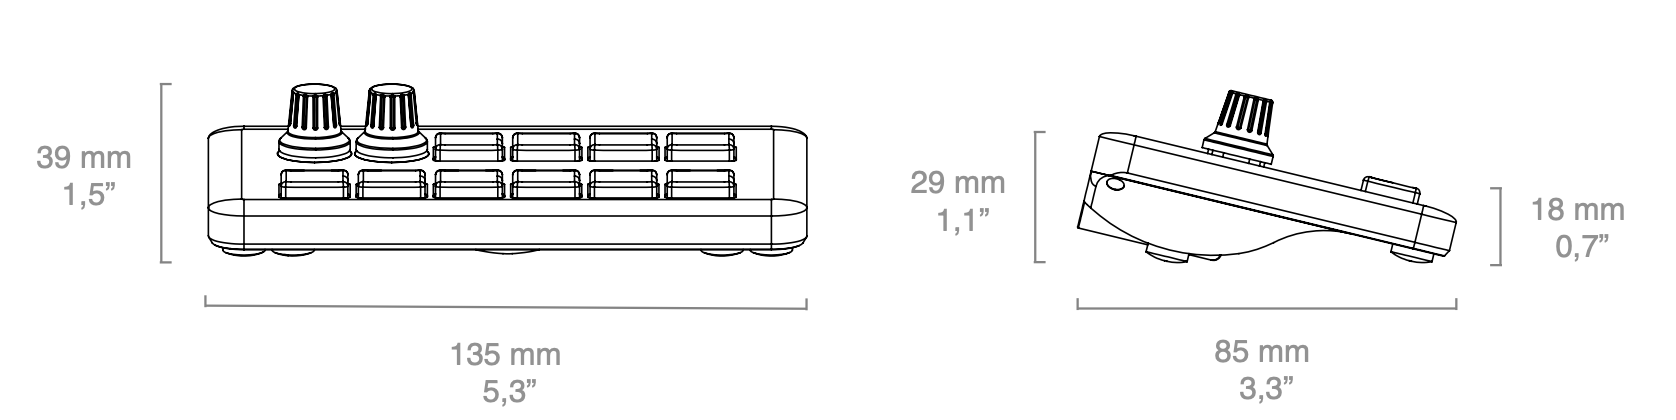](https://wiki.skaarhoj.com/uploads/images/gallery/2022-10/quick-pad.png) # Quick Shot Formerly MKA4 [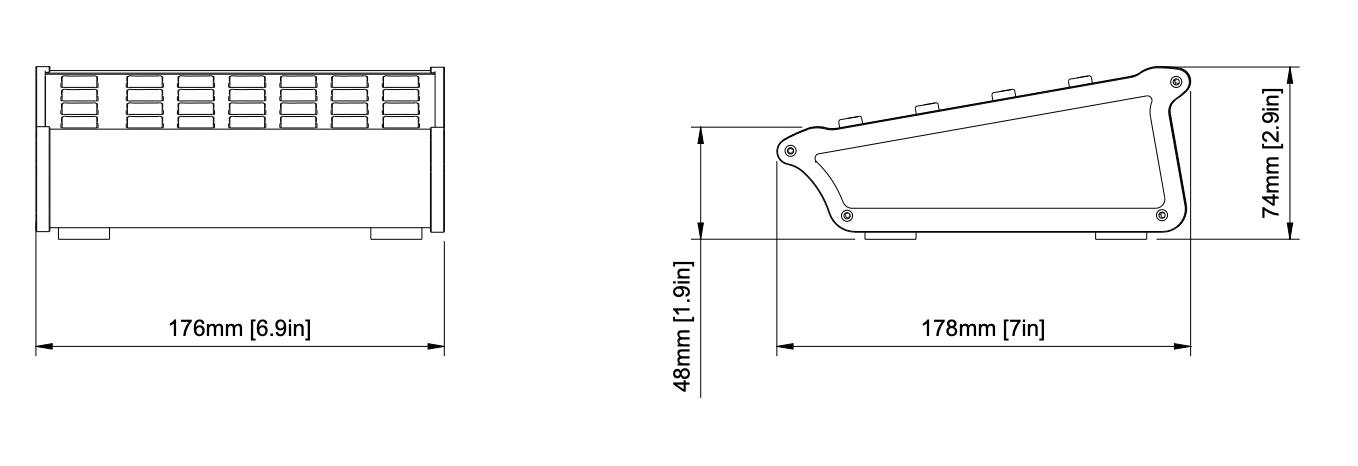](https://wiki.skaarhoj.com/uploads/images/gallery/2022-10/mka4.png) # Quick Shot Pro Standard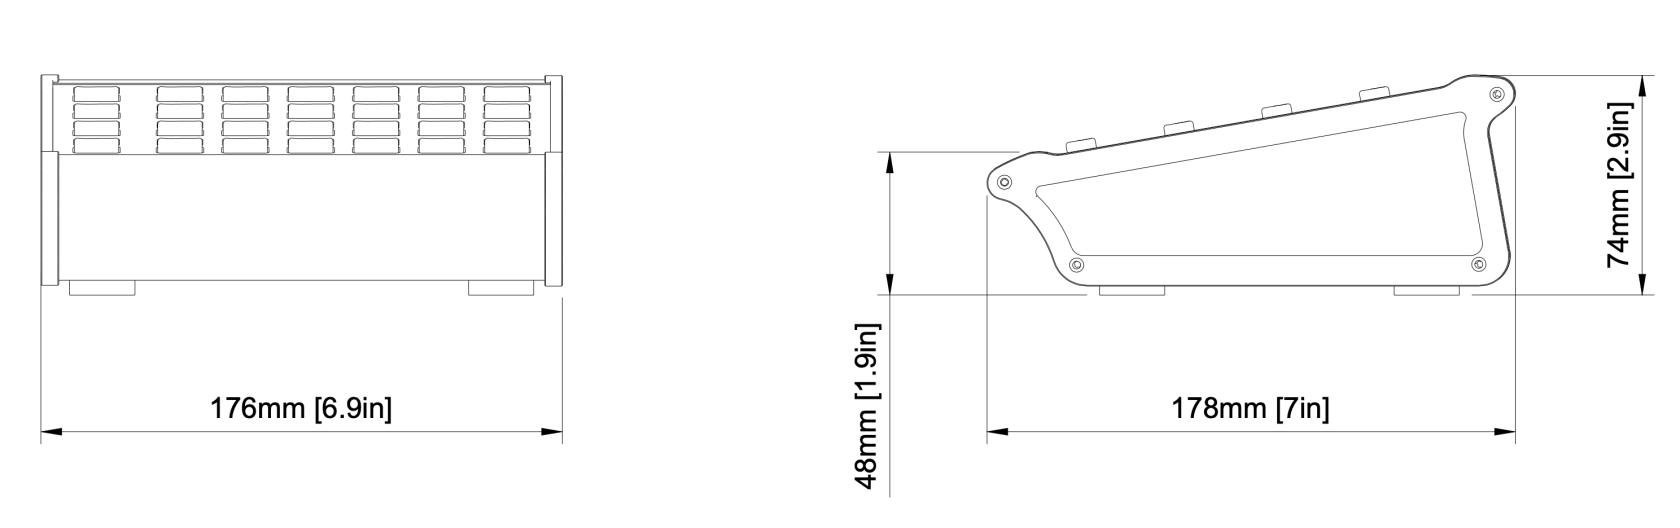 Slim 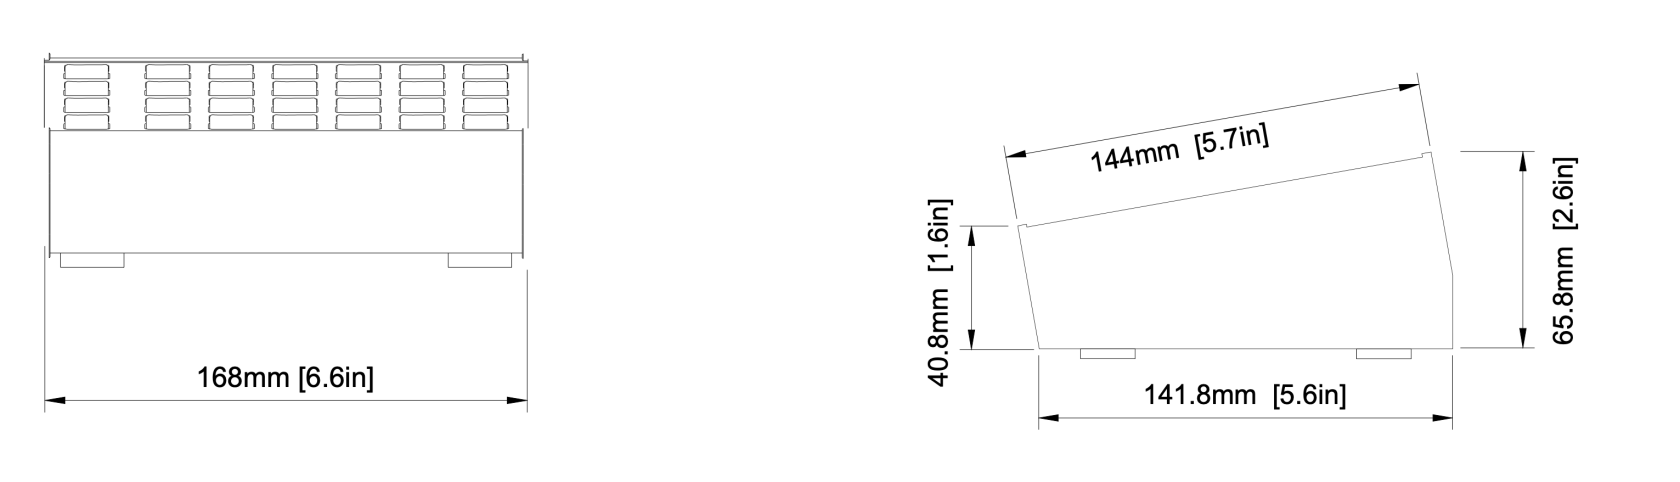 # Rack Control Duo [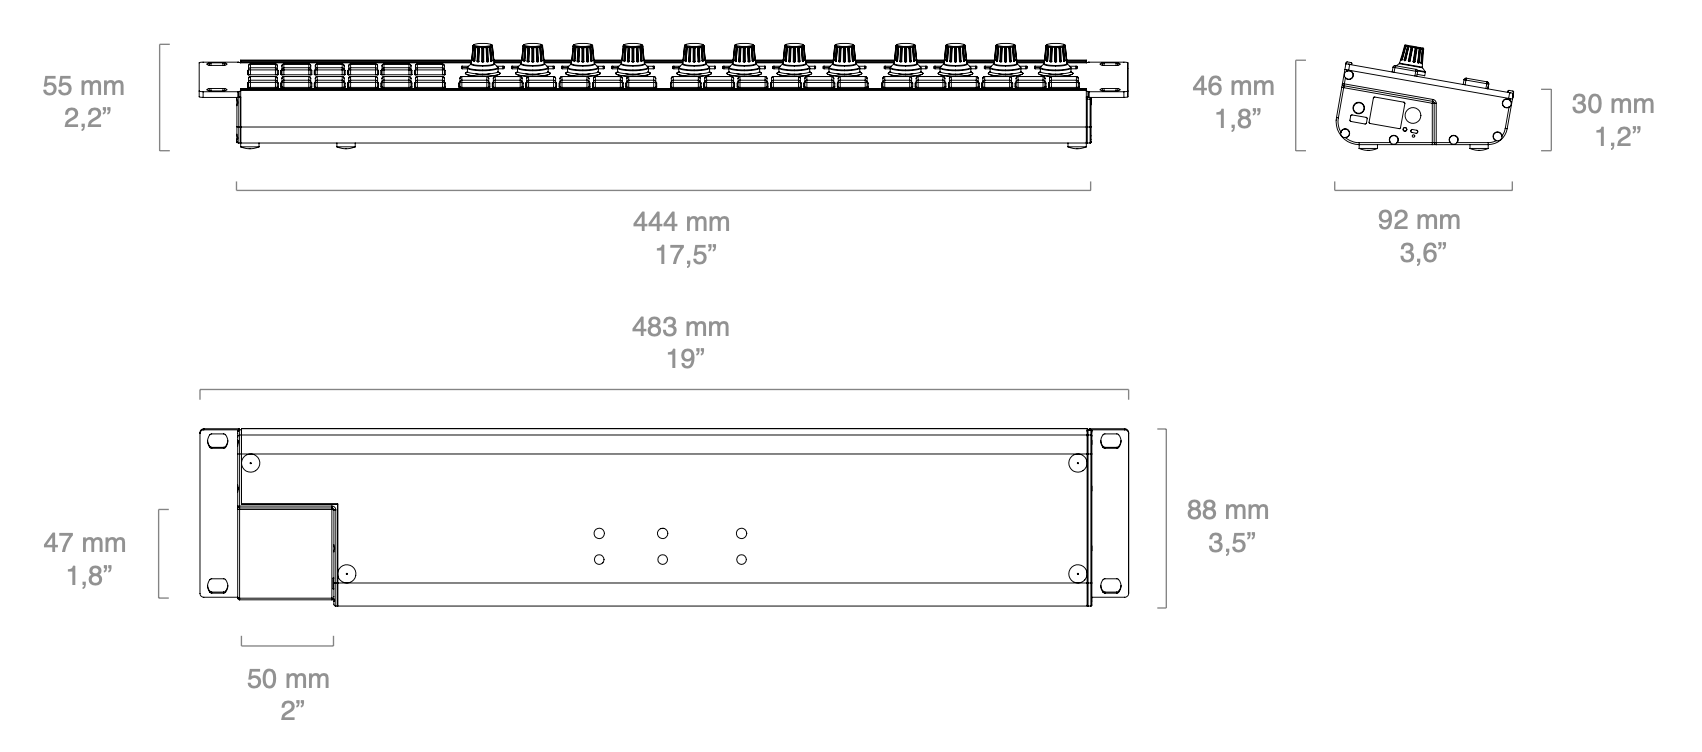](https://wiki.skaarhoj.com/uploads/images/gallery/2022-10/rack-control-duo.png) # Rack Control Uno Formerly Rack Fusion II [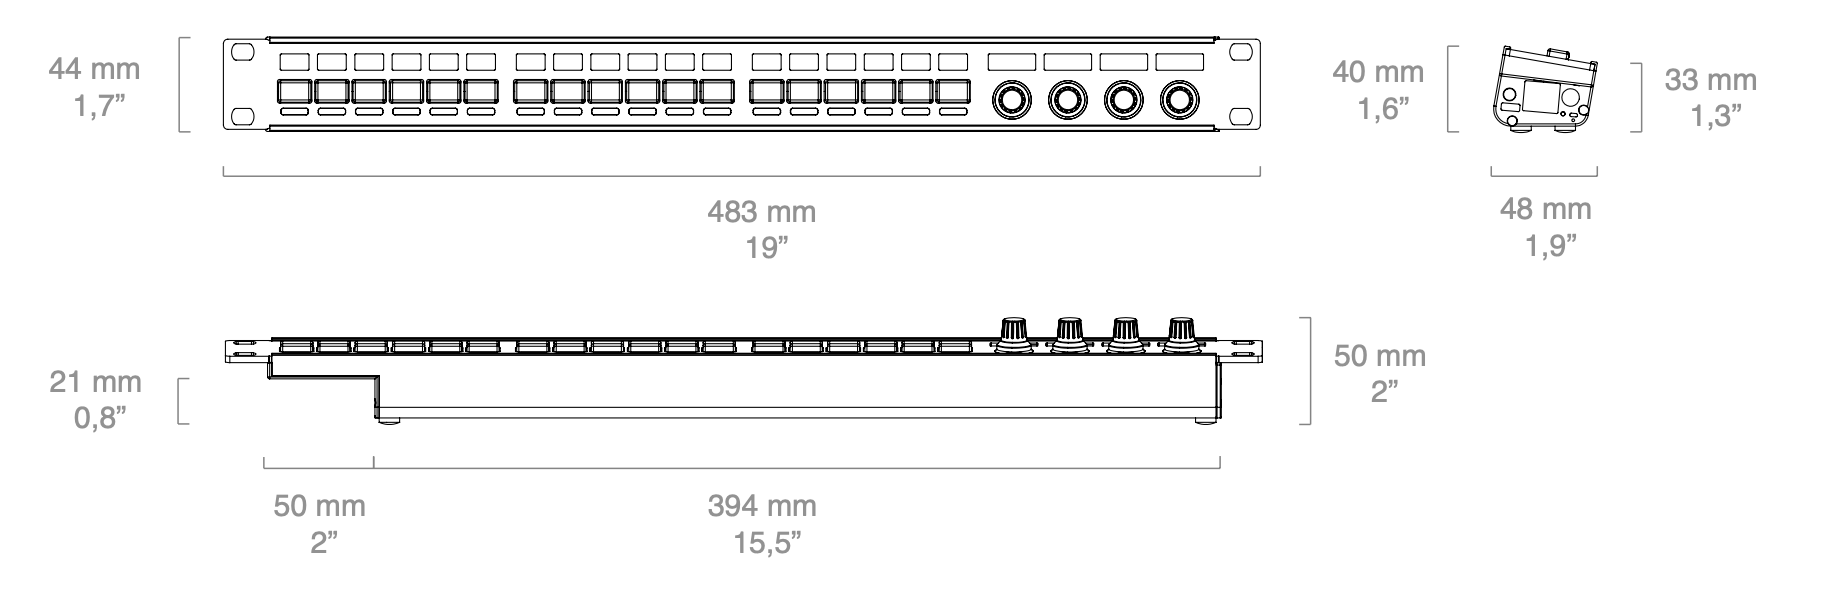](https://wiki.skaarhoj.com/uploads/images/gallery/2022-10/rack-control-uno.png) # Rack Fly Duo [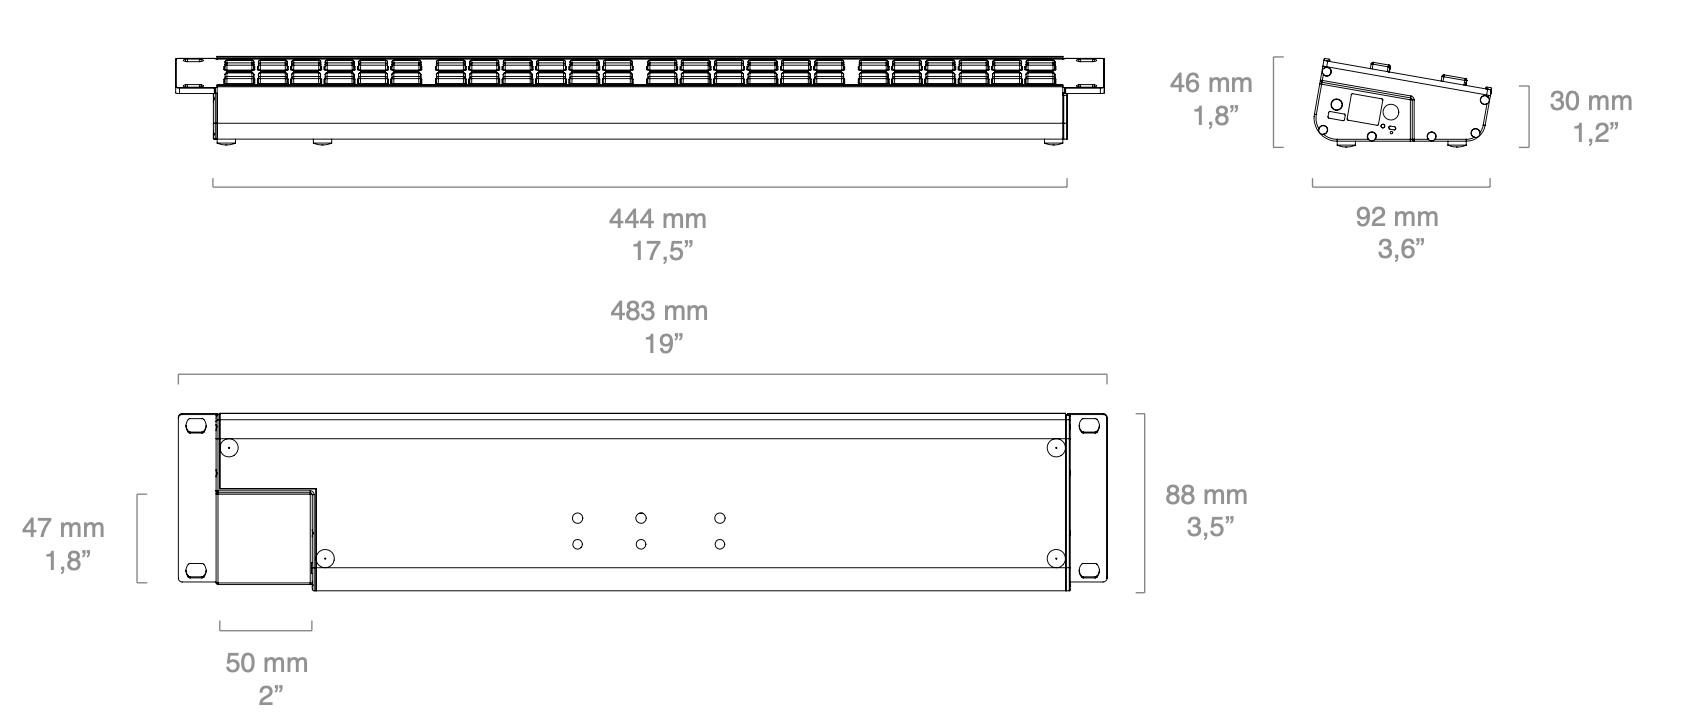](https://wiki.skaarhoj.com/uploads/images/gallery/2022-10/rack-fly-duo.png) # Rack Fly Trio [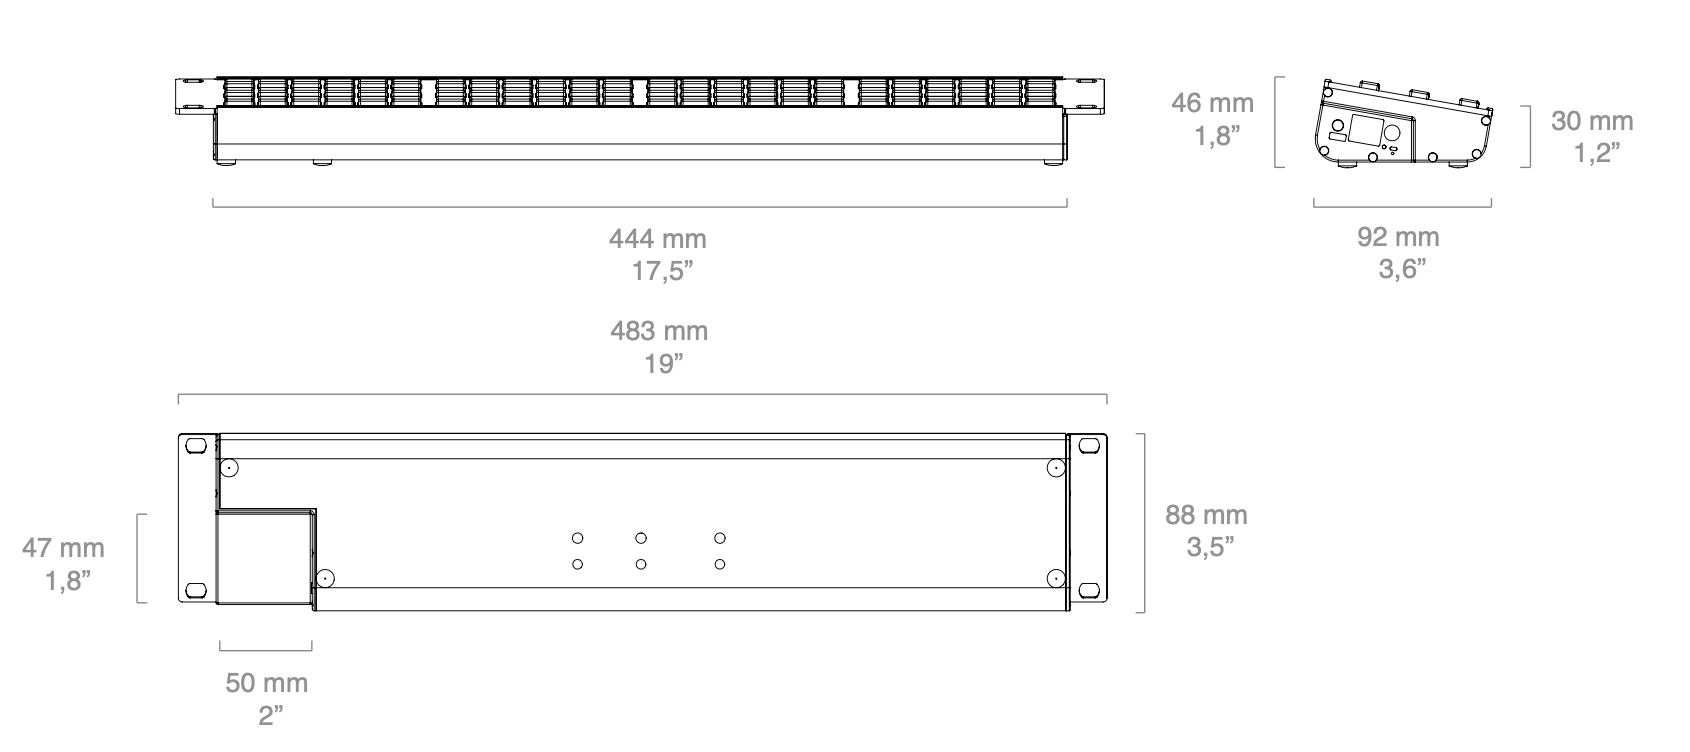](https://wiki.skaarhoj.com/uploads/images/gallery/2022-10/rack-fly-trio.png) # Rack Fly Uno [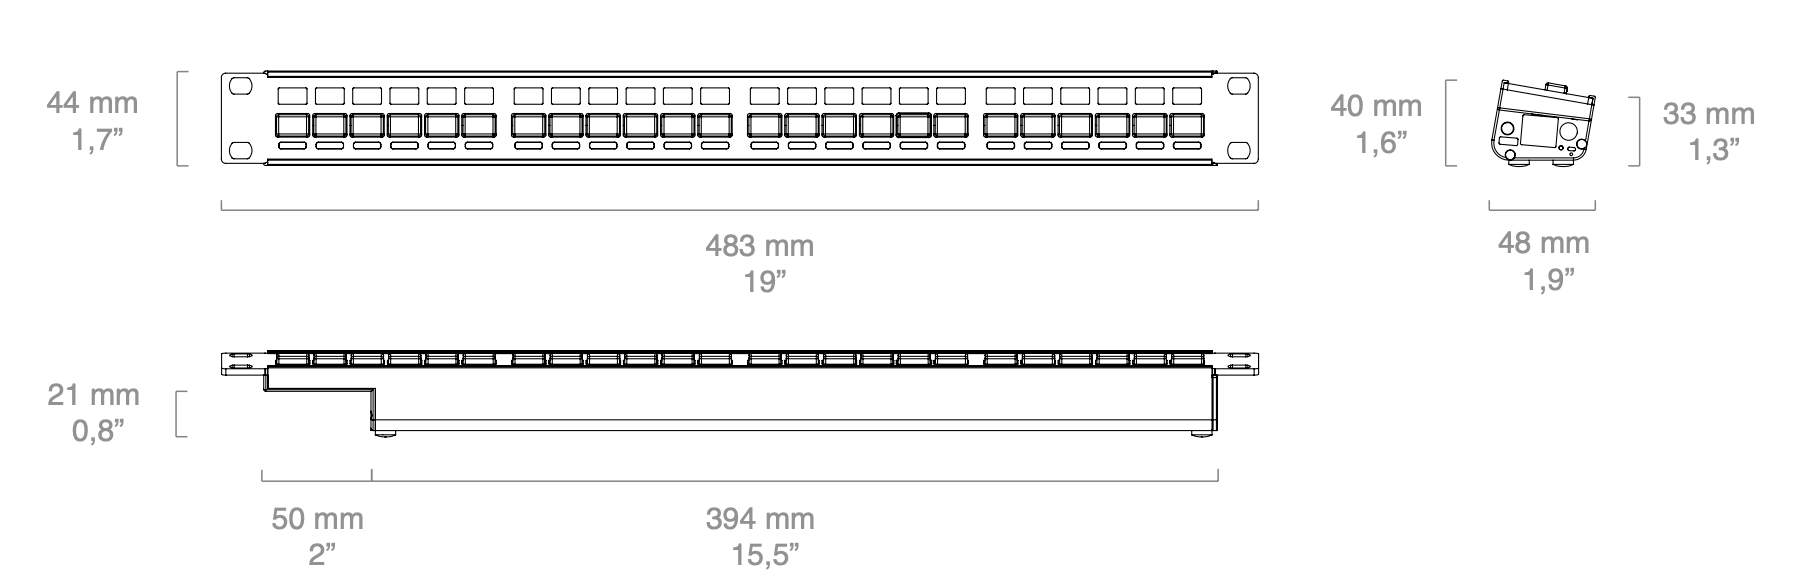](https://wiki.skaarhoj.com/uploads/images/gallery/2022-10/rack-fly-uno.png) # Rack Fusion Live **Standard** [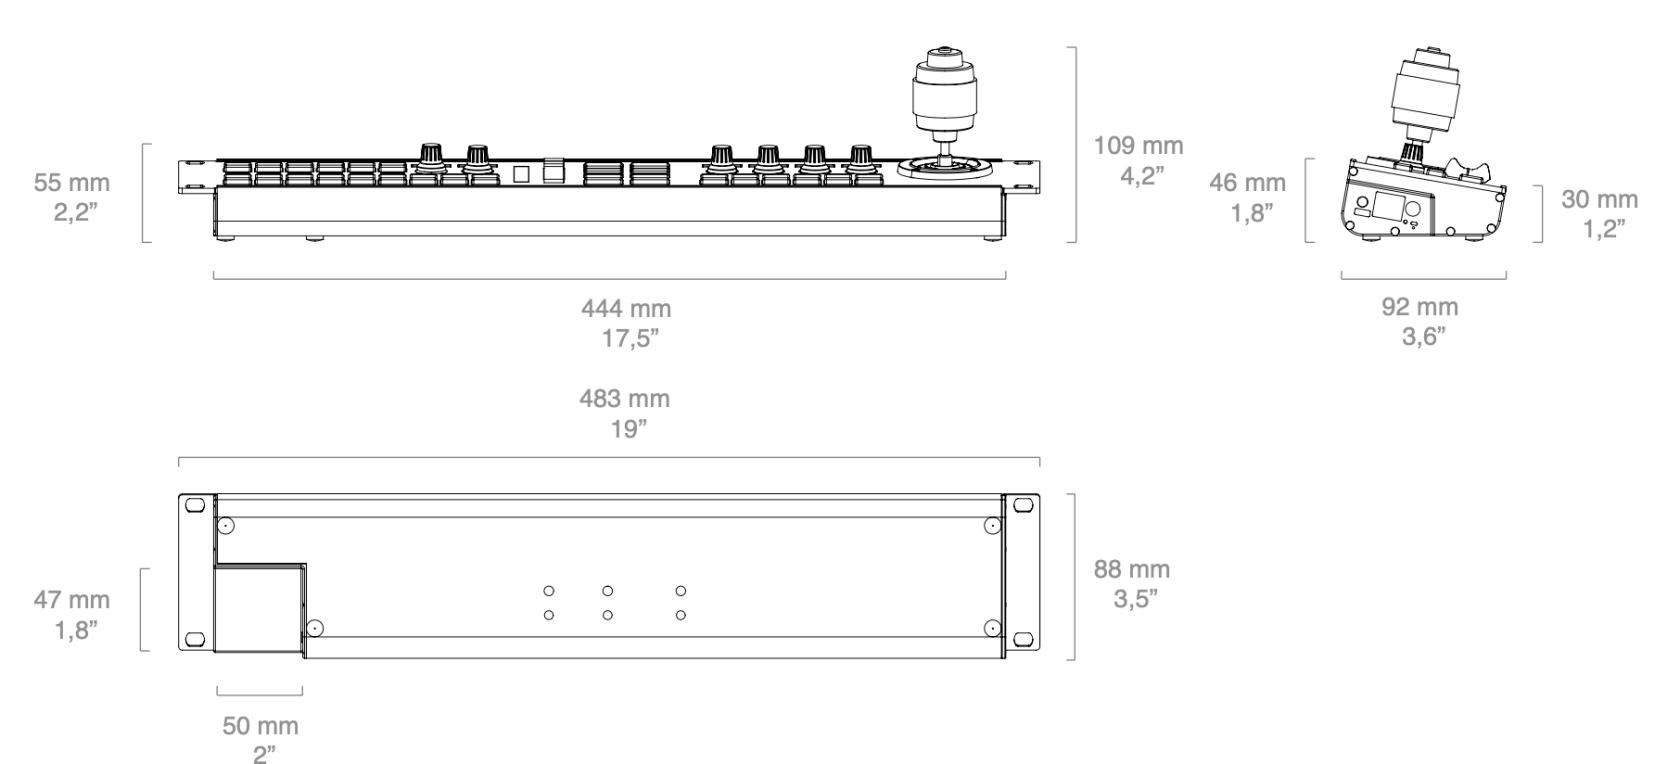](https://wiki.skaarhoj.com/uploads/images/gallery/2022-10/rack-fusion-live.png) **Hall Effect Joystick Option** **[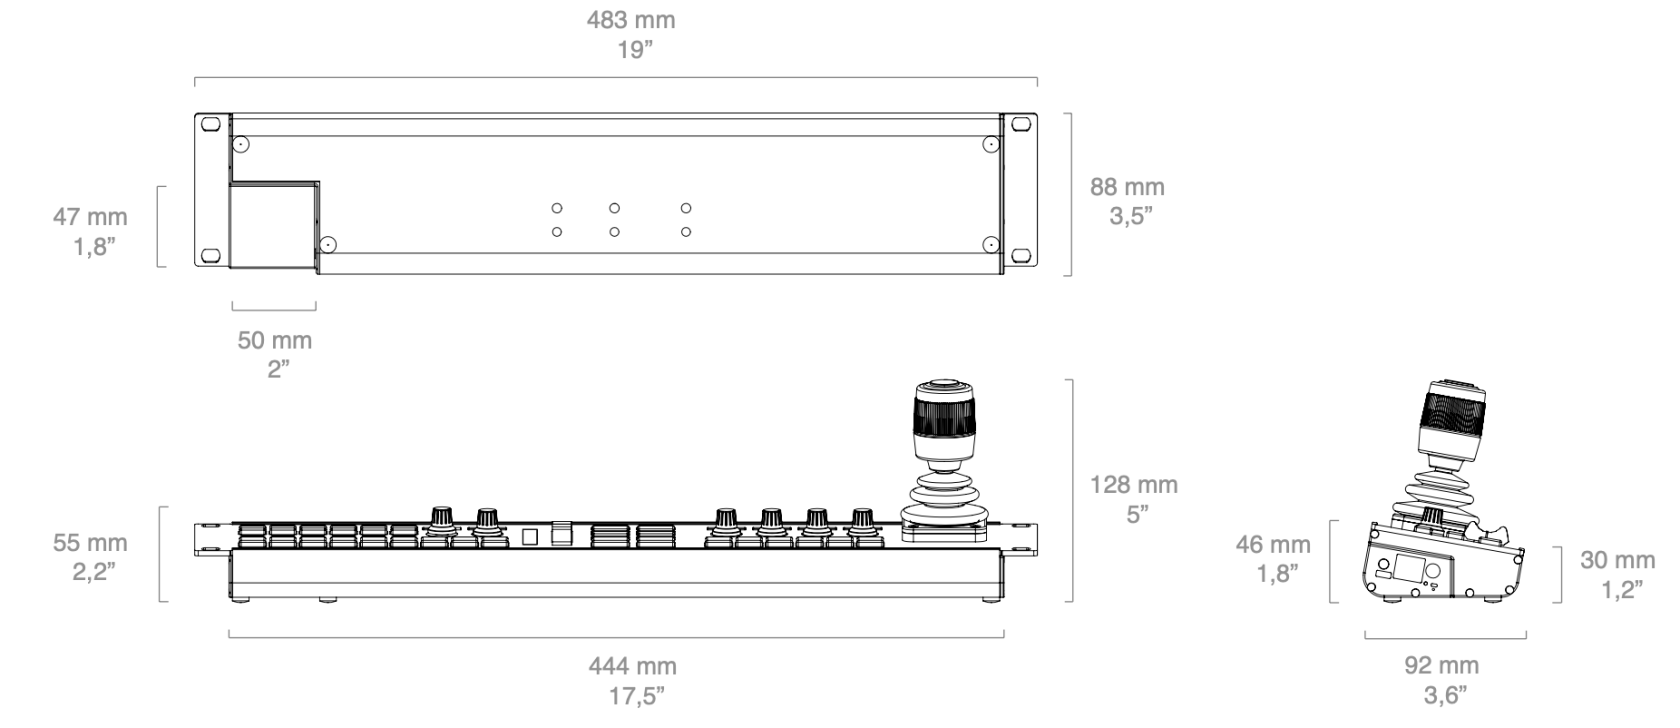](https://wiki.skaarhoj.com/uploads/images/gallery/2022-10/rack-fusion-live-he.png)** # Rack Pro 1 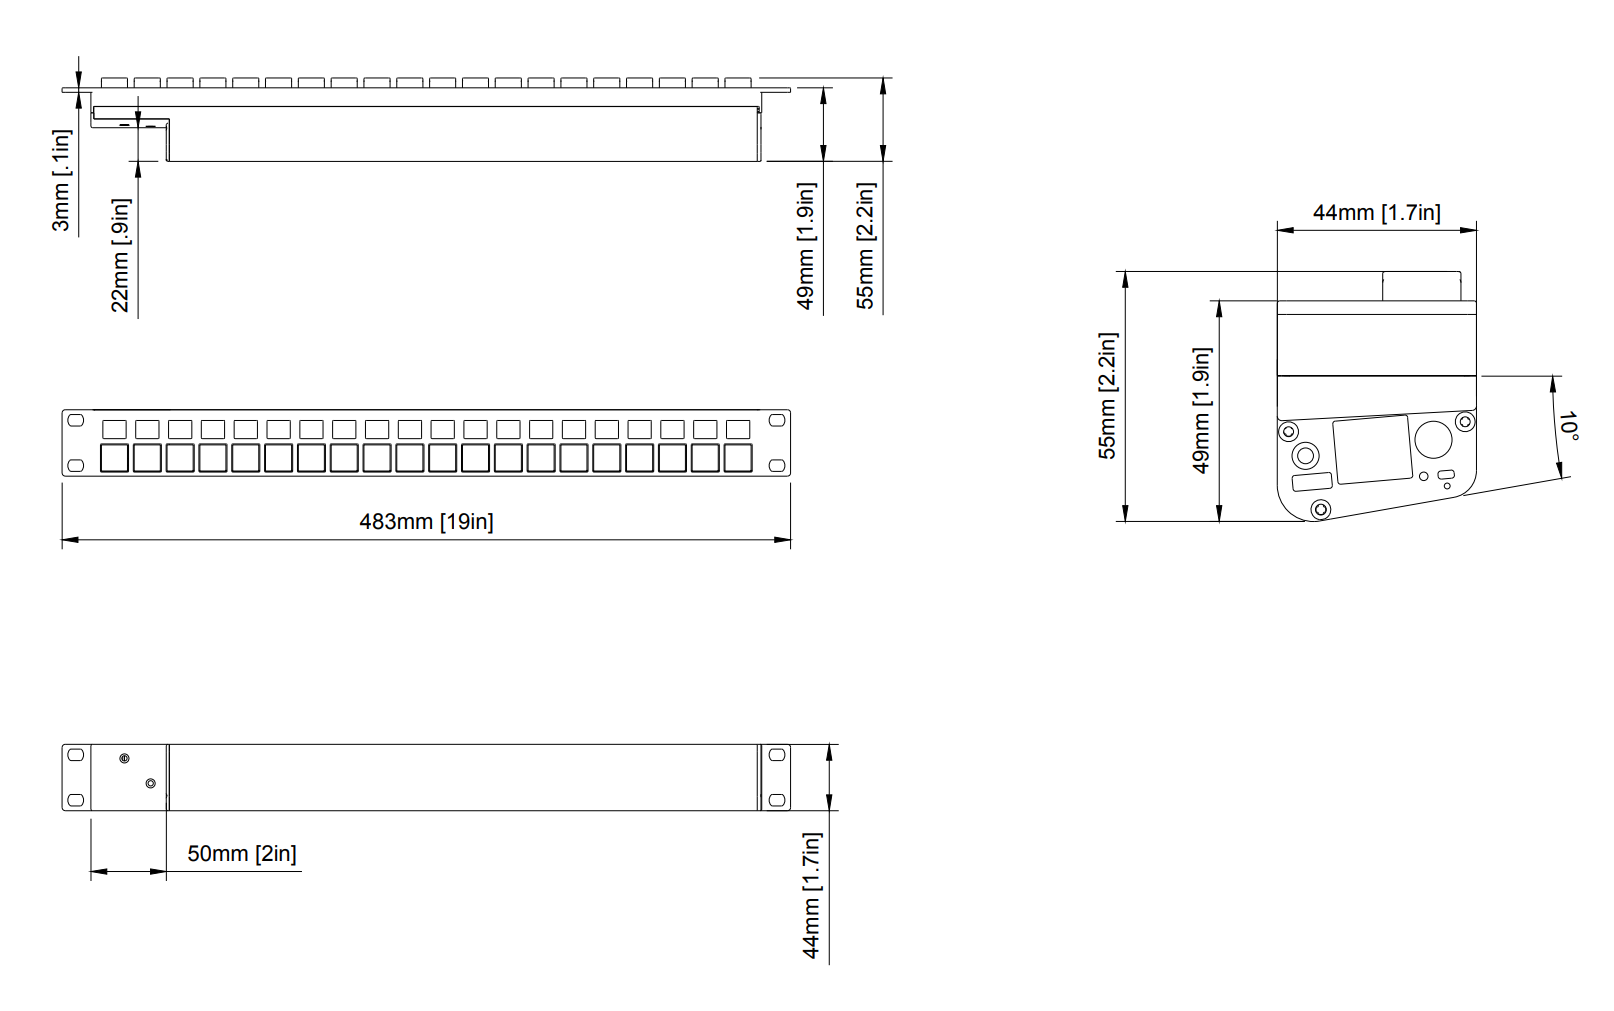 # Rack Pro 2 [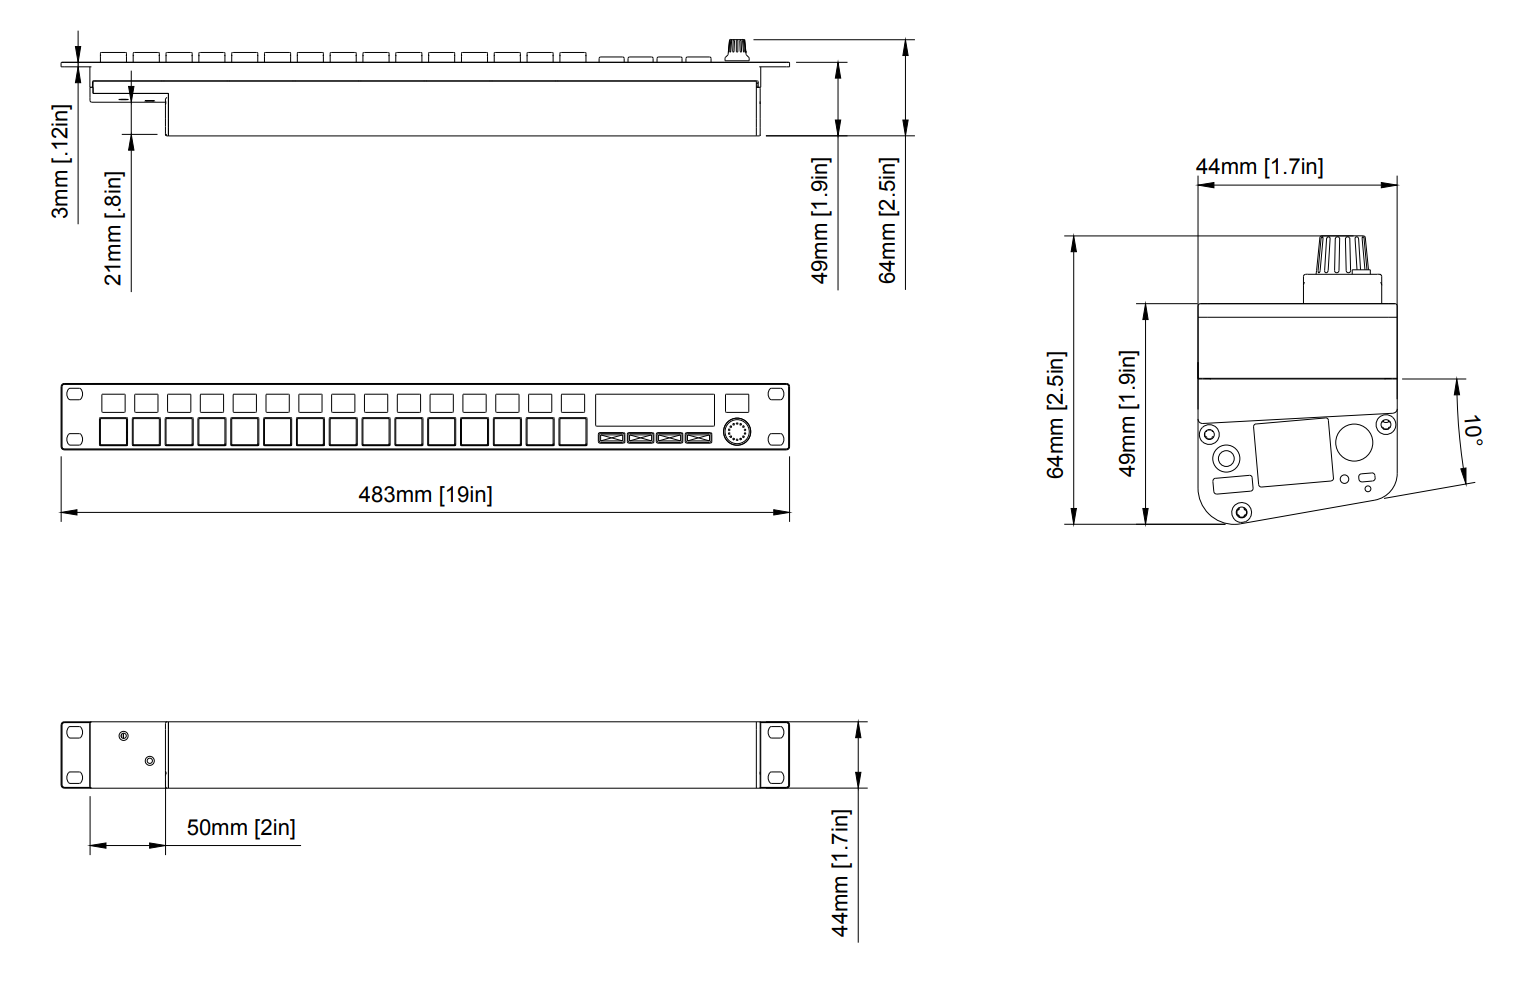](https://wiki.skaarhoj.com/uploads/images/gallery/2023-02/THeimage.png) # Rack Pro 3 [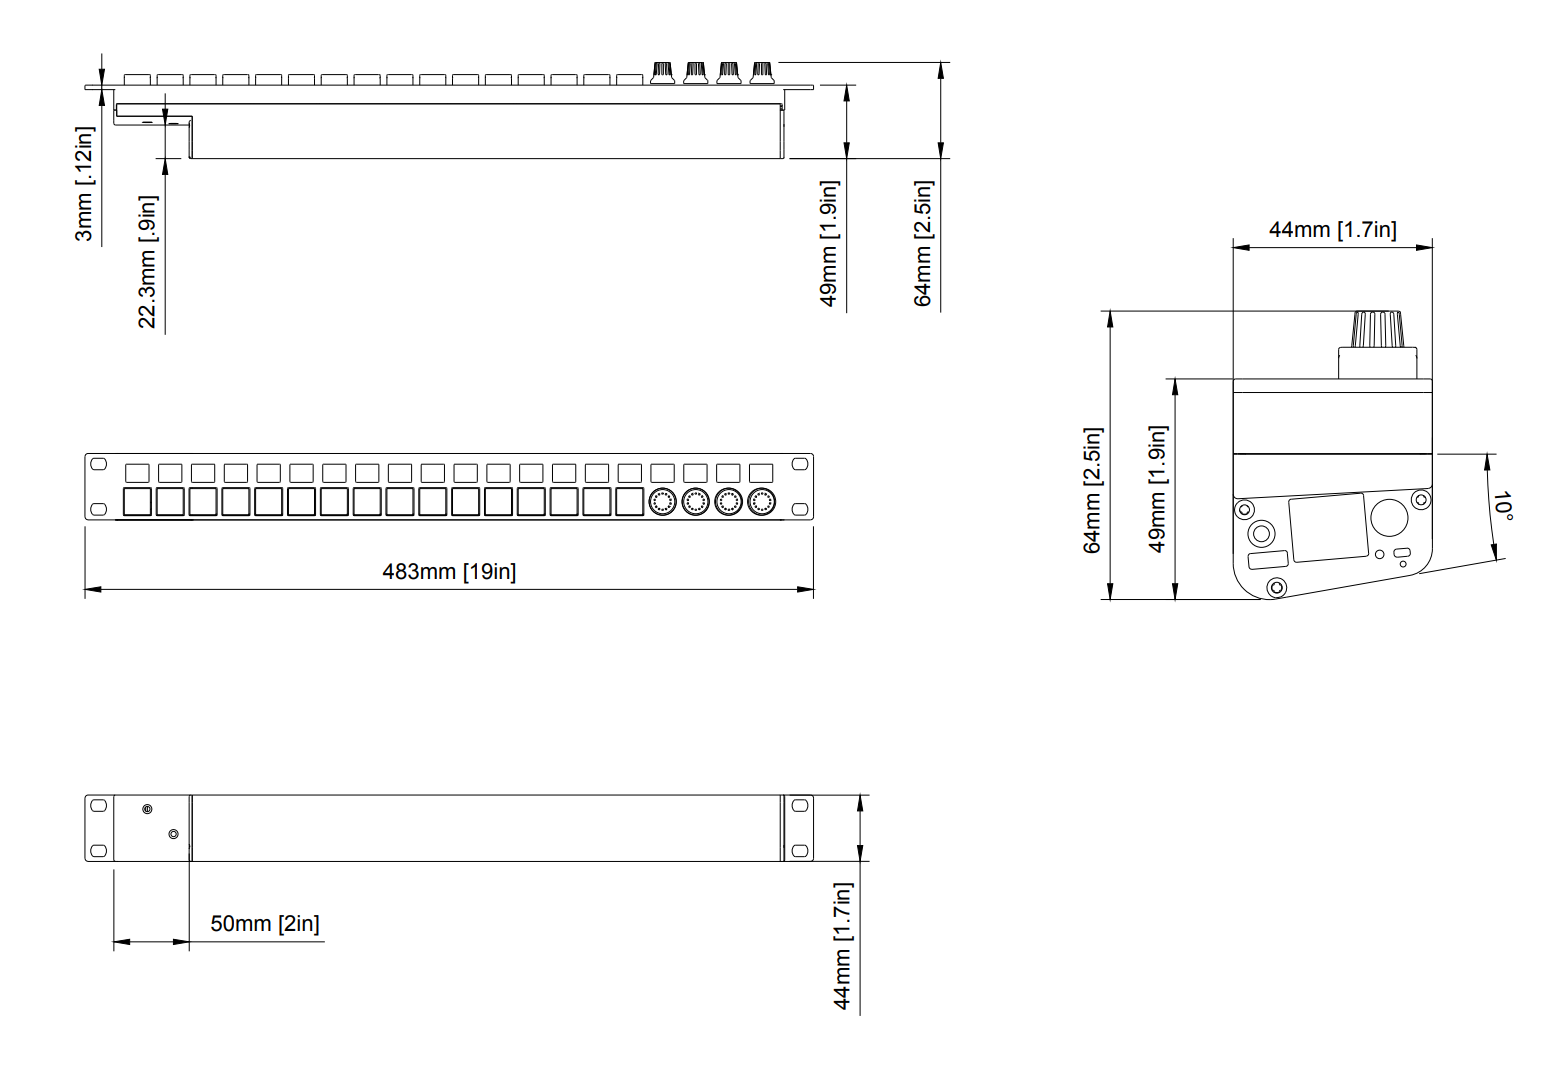](https://wiki.skaarhoj.com/uploads/images/gallery/2023-02/Rz5image.png) # RCP Pro 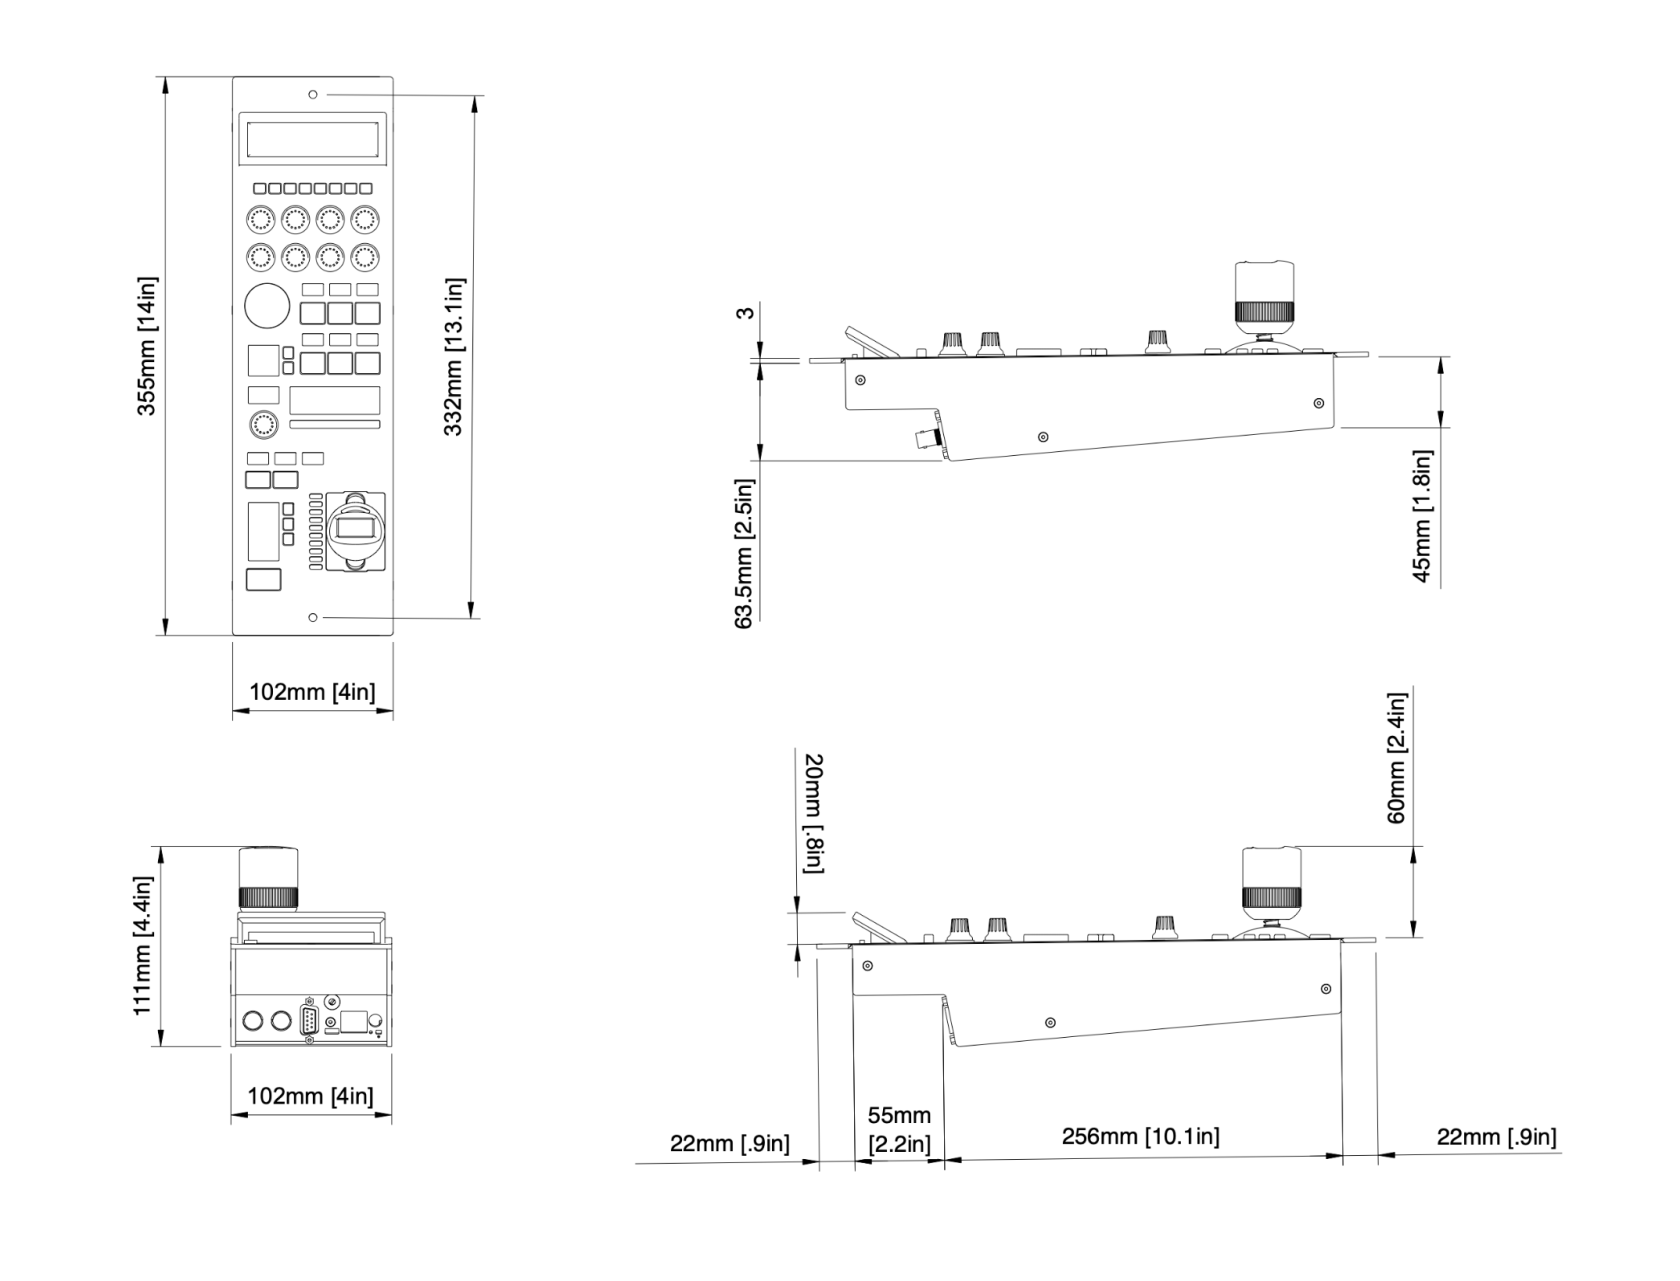 # RCP v2 **Standard Joystick** [](https://wiki.skaarhoj.com/uploads/images/gallery/2022-10/rcpv2-joystick.png) **Motorized Fader** [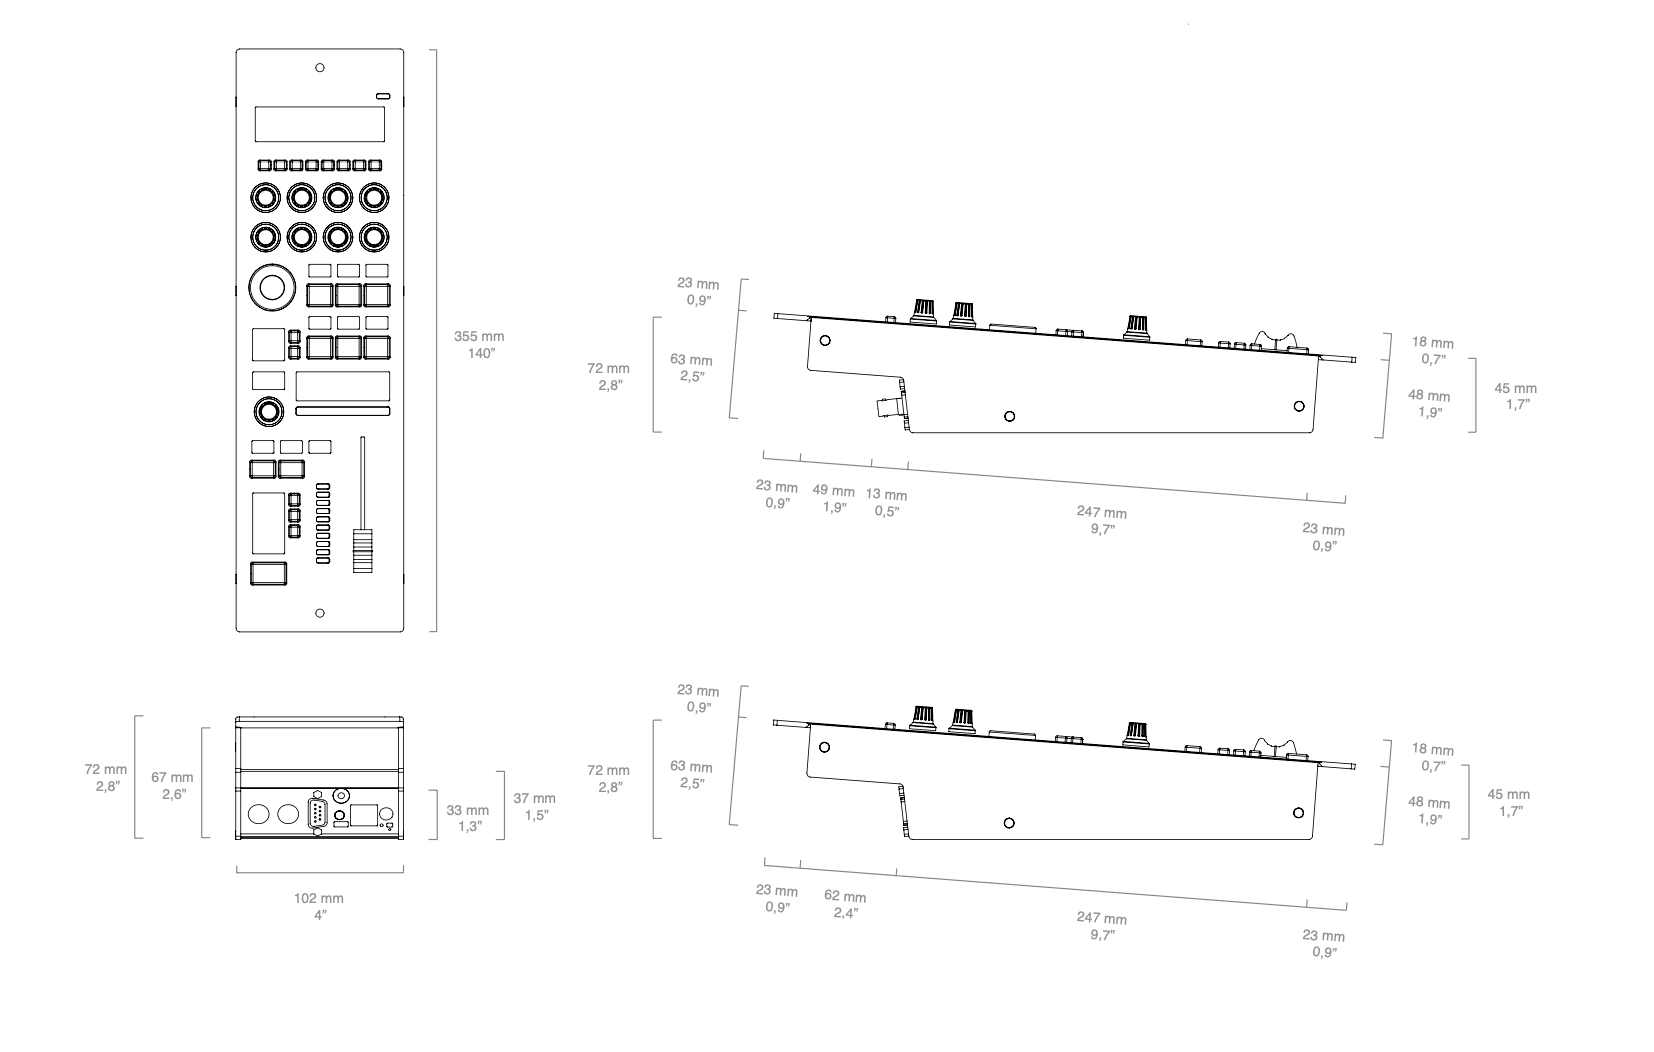](https://wiki.skaarhoj.com/uploads/images/gallery/2022-10/rcpv2-fader.png) # SDI-B4 Link [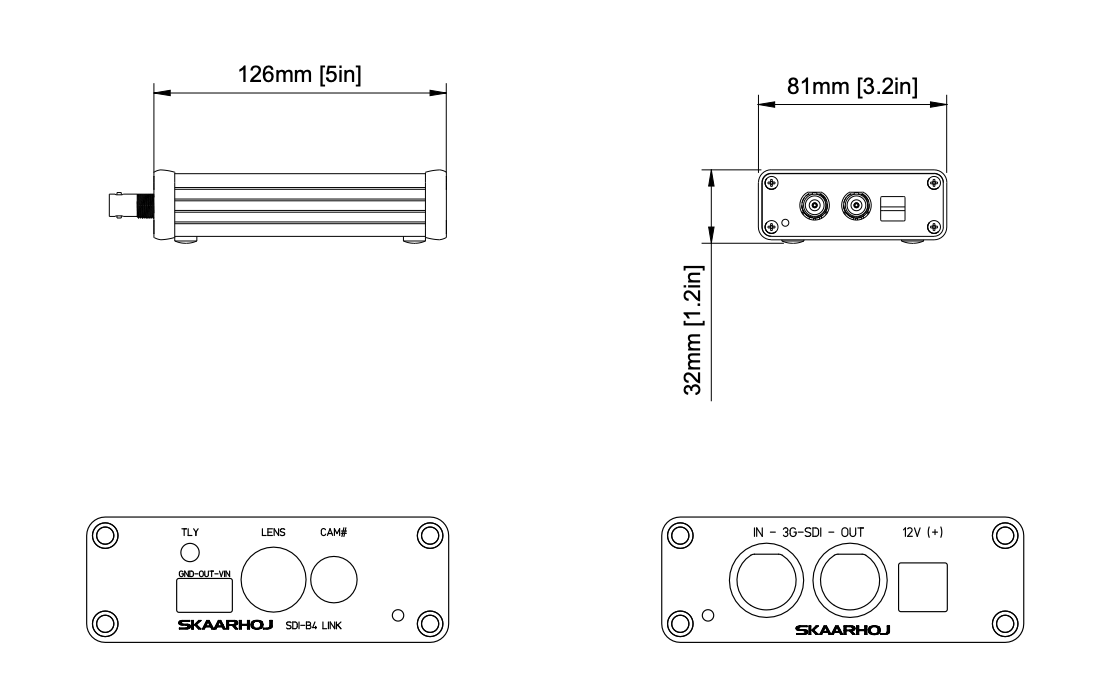](https://wiki.skaarhoj.com/uploads/images/gallery/2022-10/eth-sdi-link.png) # SDI-GPI Link [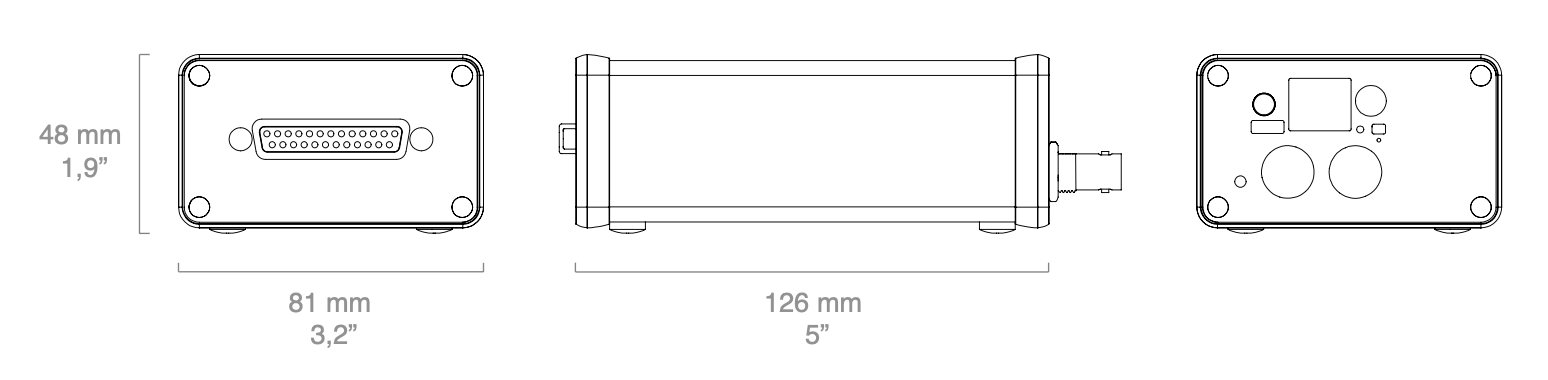](https://wiki.skaarhoj.com/uploads/images/gallery/2022-10/sdi-gpi-link.png) # T-Block L Formerly MKT1A [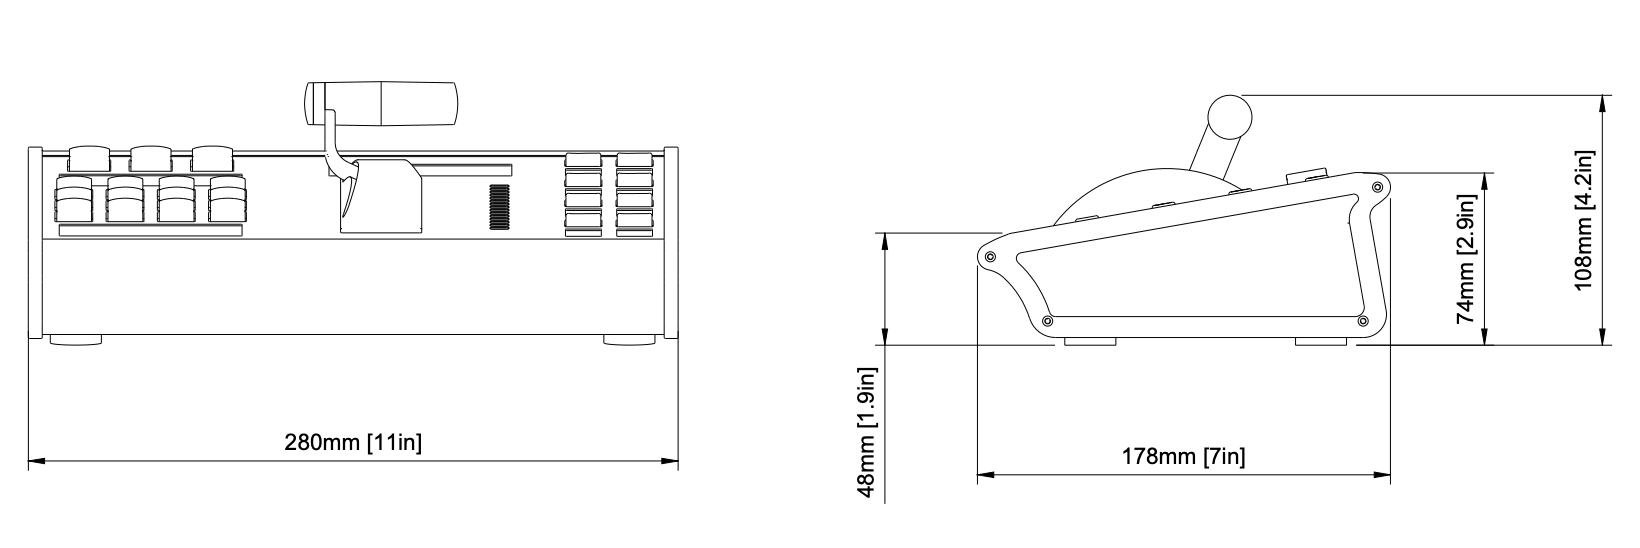](https://wiki.skaarhoj.com/uploads/images/gallery/2022-10/mkt1a.png) # T-Block R Formerly MKT1B [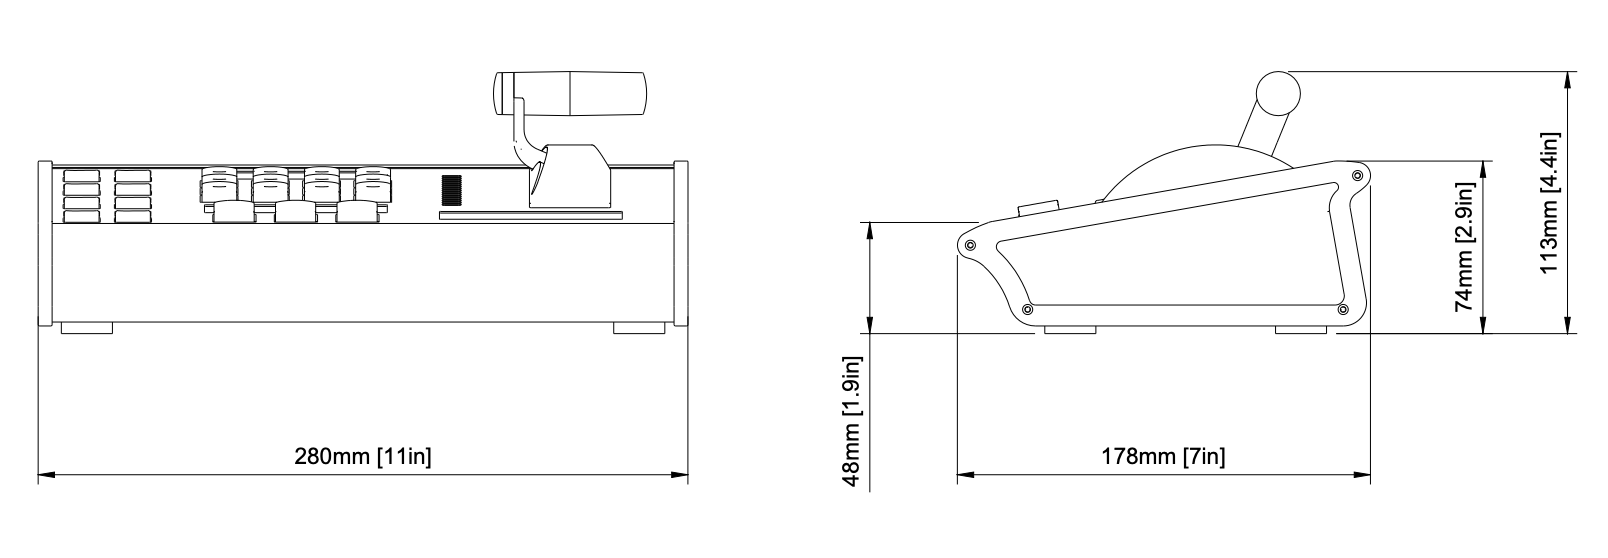](https://wiki.skaarhoj.com/uploads/images/gallery/2022-10/mkt1b.png) # Tally Box Eth-Tally Link [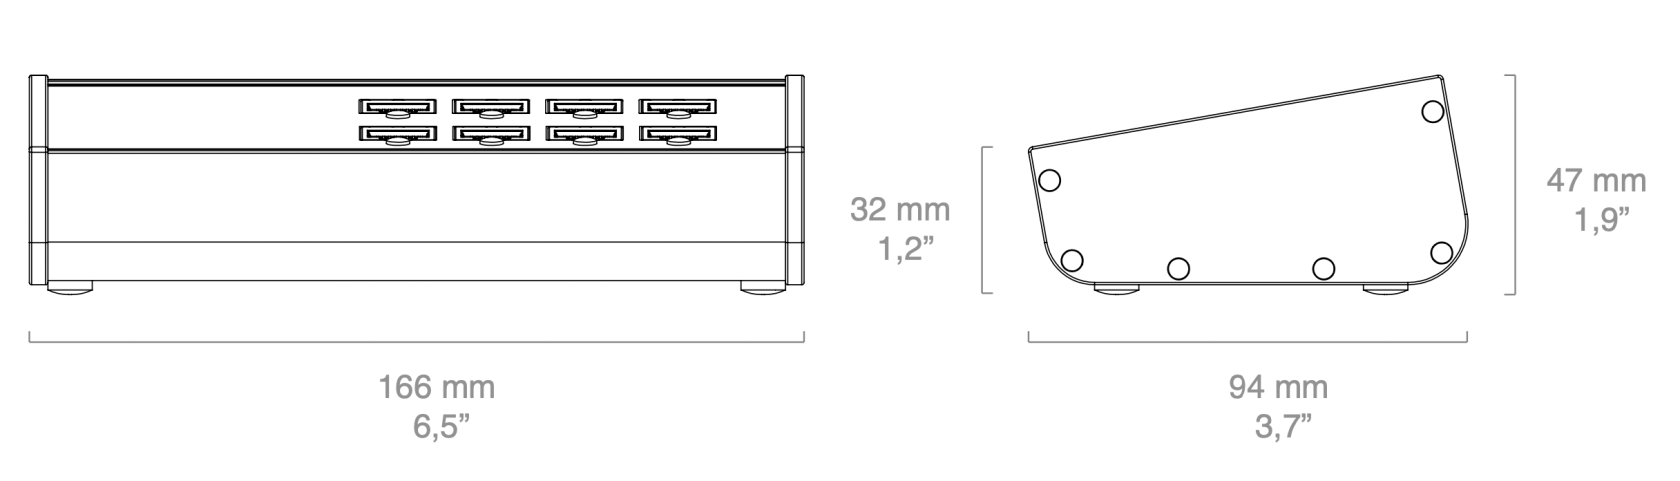](https://wiki.skaarhoj.com/uploads/images/gallery/2022-10/d5ytally-box.png) # Tally Light [](https://wiki.skaarhoj.com/uploads/images/gallery/2023-04/screenshot-2023-04-26-at-11-29-08.png) # Time Spin Formerly XC-8 [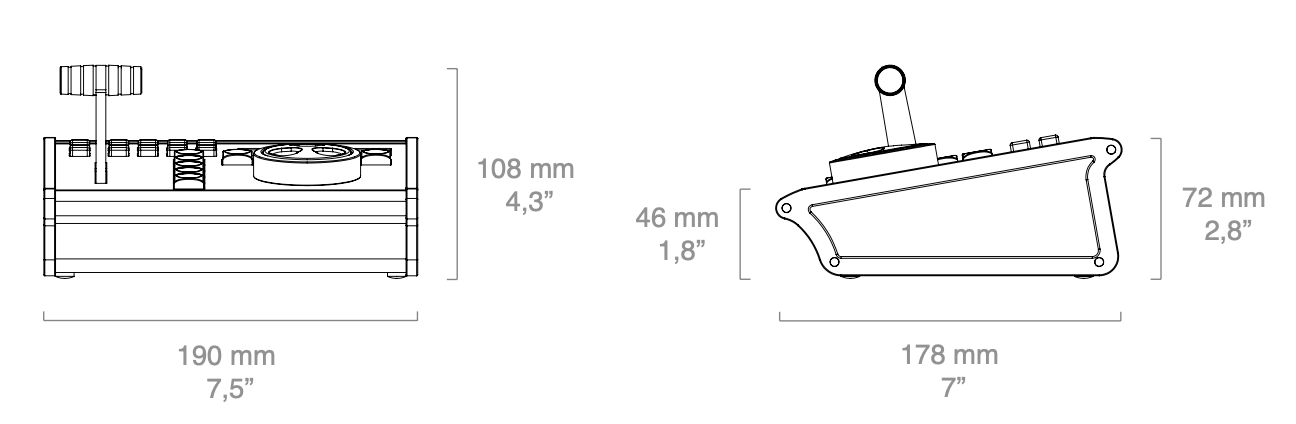](https://wiki.skaarhoj.com/uploads/images/gallery/2022-10/xc-8-v2.png) # TCP Link for Atem [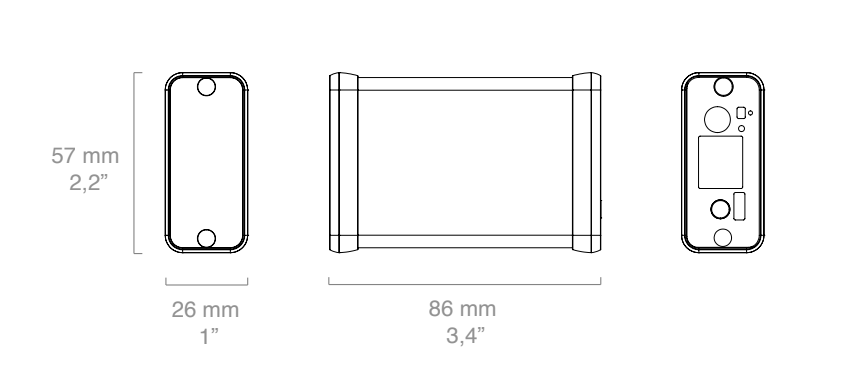](https://wiki.skaarhoj.com/uploads/images/gallery/2023-03/screenshot-2023-03-23-at-2-45-51-pm.png) # Wave Board Mini Standard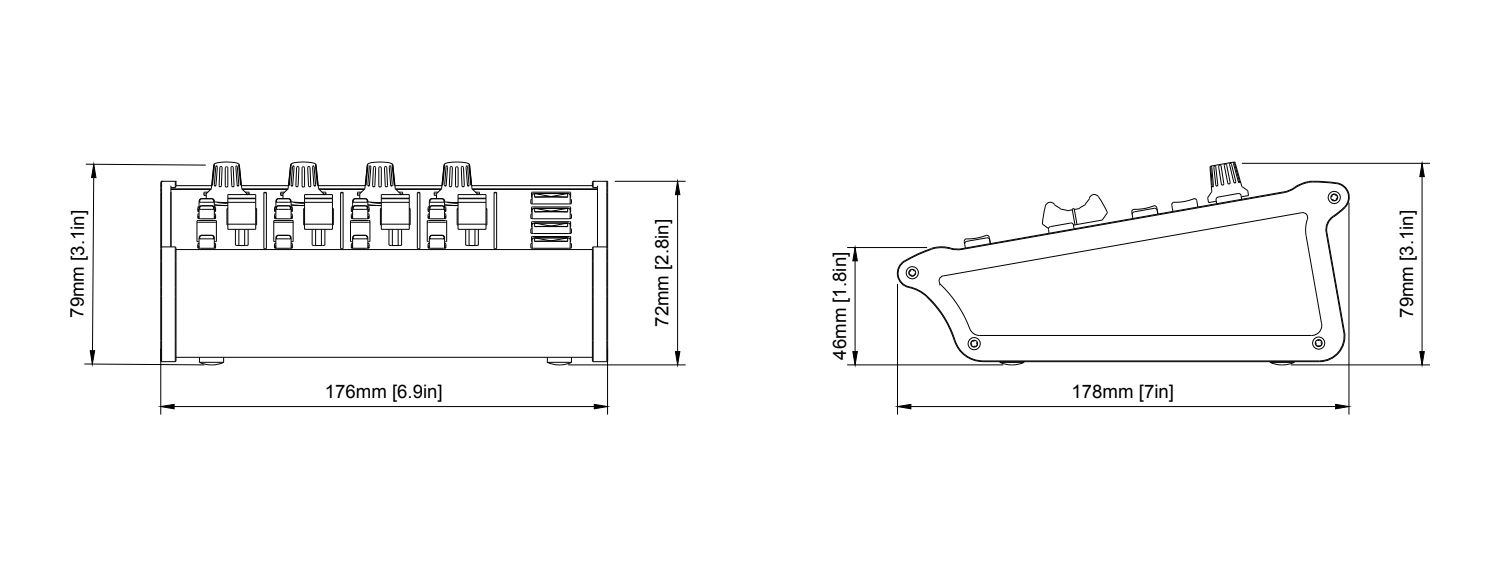 Slim 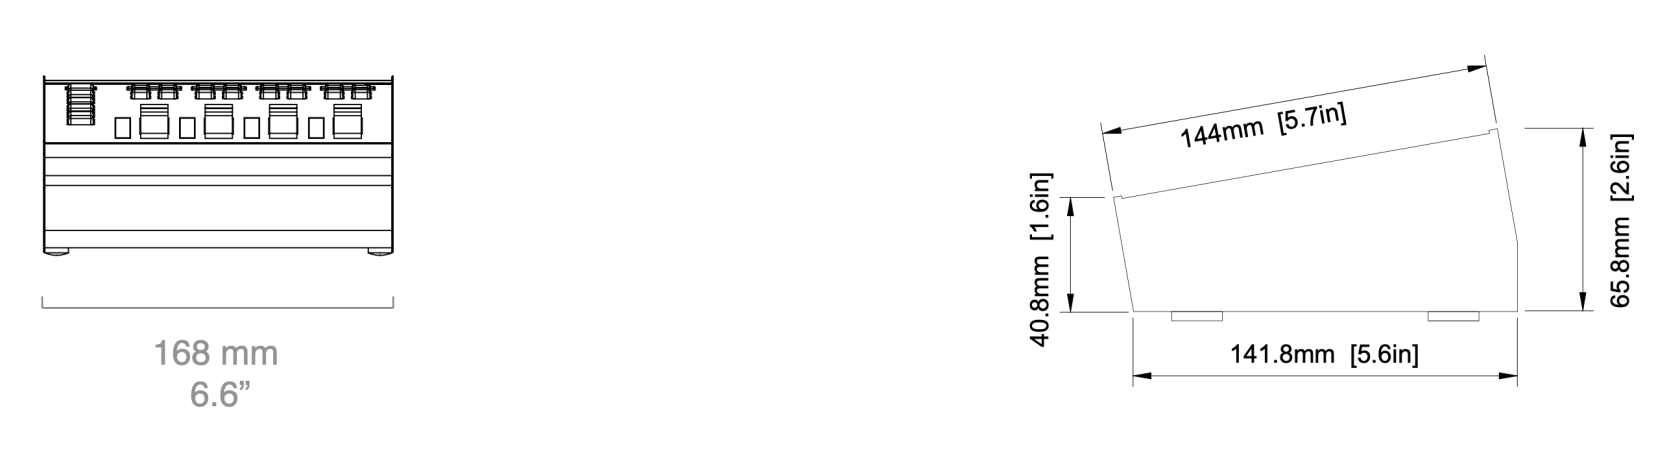 # Wave Board v1 [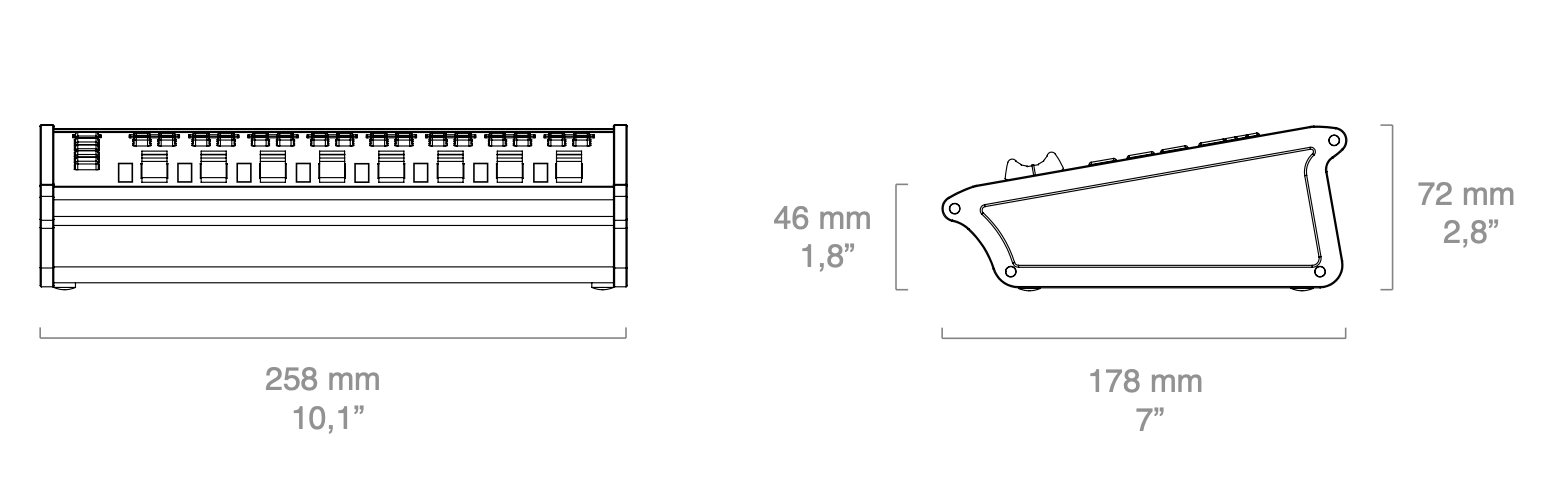](https://wiki.skaarhoj.com/uploads/images/gallery/2022-10/wave-board-v1.png) # Wave Board v2 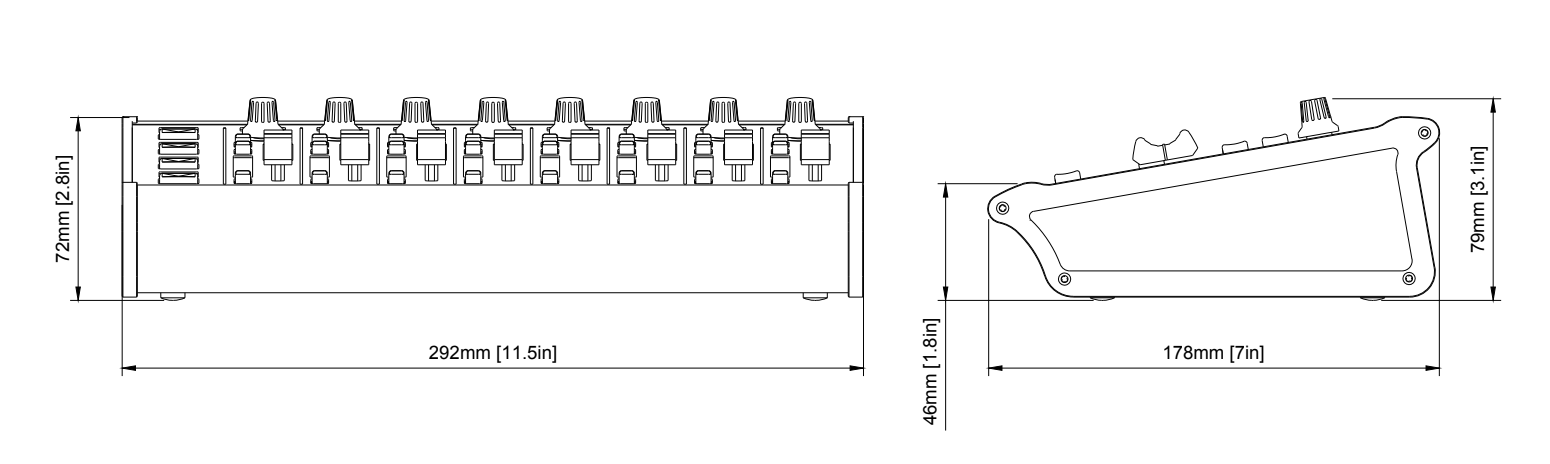 # XC-7 [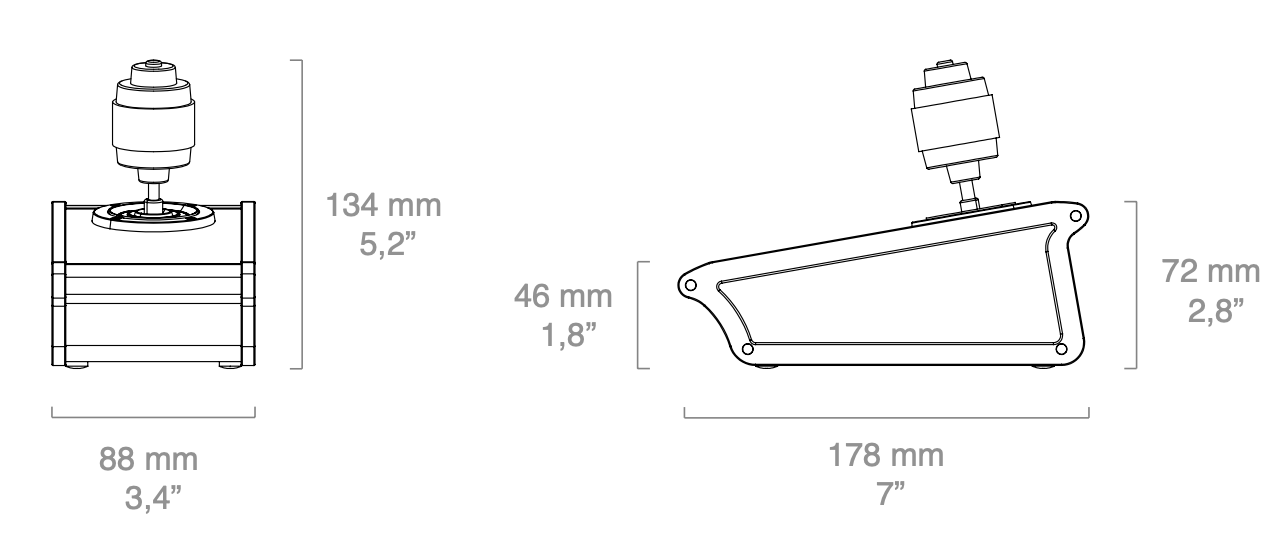](https://wiki.skaarhoj.com/uploads/images/gallery/2022-10/xc-7.png) # XPoint 24 [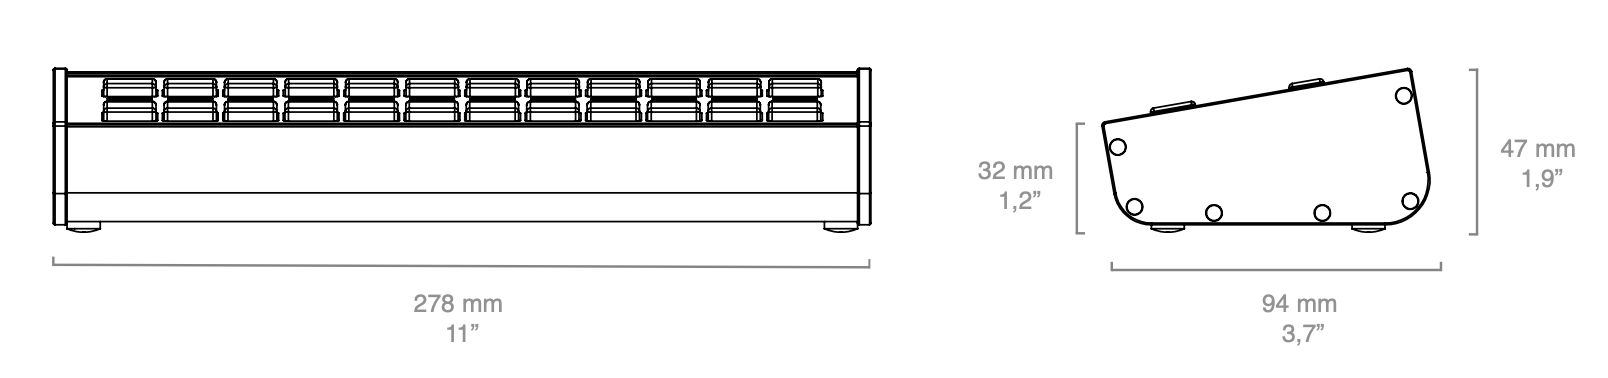](https://wiki.skaarhoj.com/uploads/images/gallery/2022-10/xpoint-24.png) # XPoint 48 [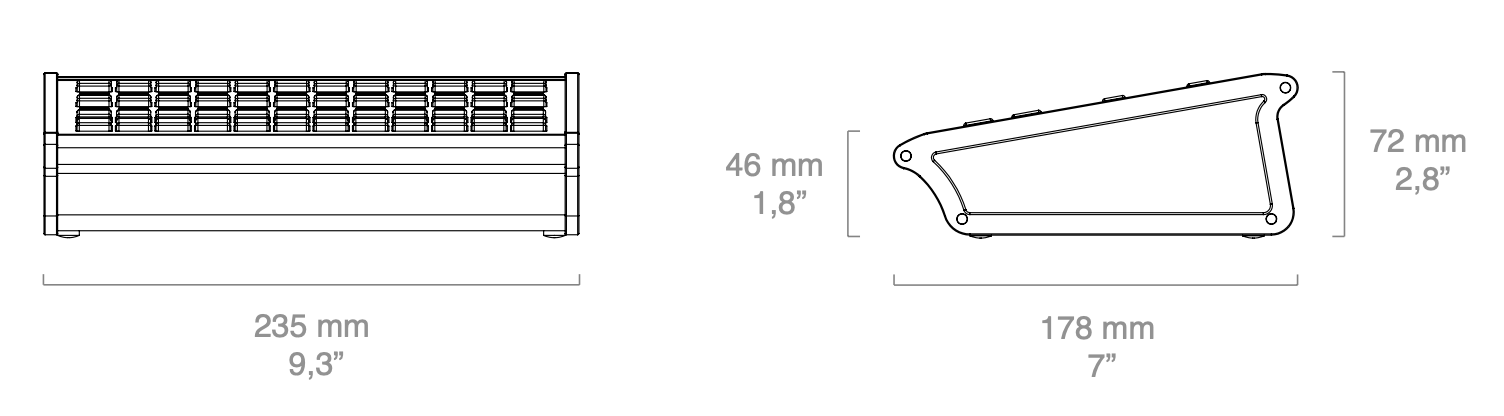](https://wiki.skaarhoj.com/uploads/images/gallery/2022-10/xpoint-48.png) # Parts of Reactor A breakdown of the different sections and elements within Reactor # Projects Projects are the unit that have a title, description and references to a panel collection, a device collection, and a configuration. This design provides the flexibility to use the same set of SKAARHOJ panels but quickly change to another location of devices with other IP addresses for example. Or keep the same devices and panels, but run a different configuration serving a different user group of operators. When a Blue Pill ships it has a default configuration is as below. It is set in simple view with only the basic information available. 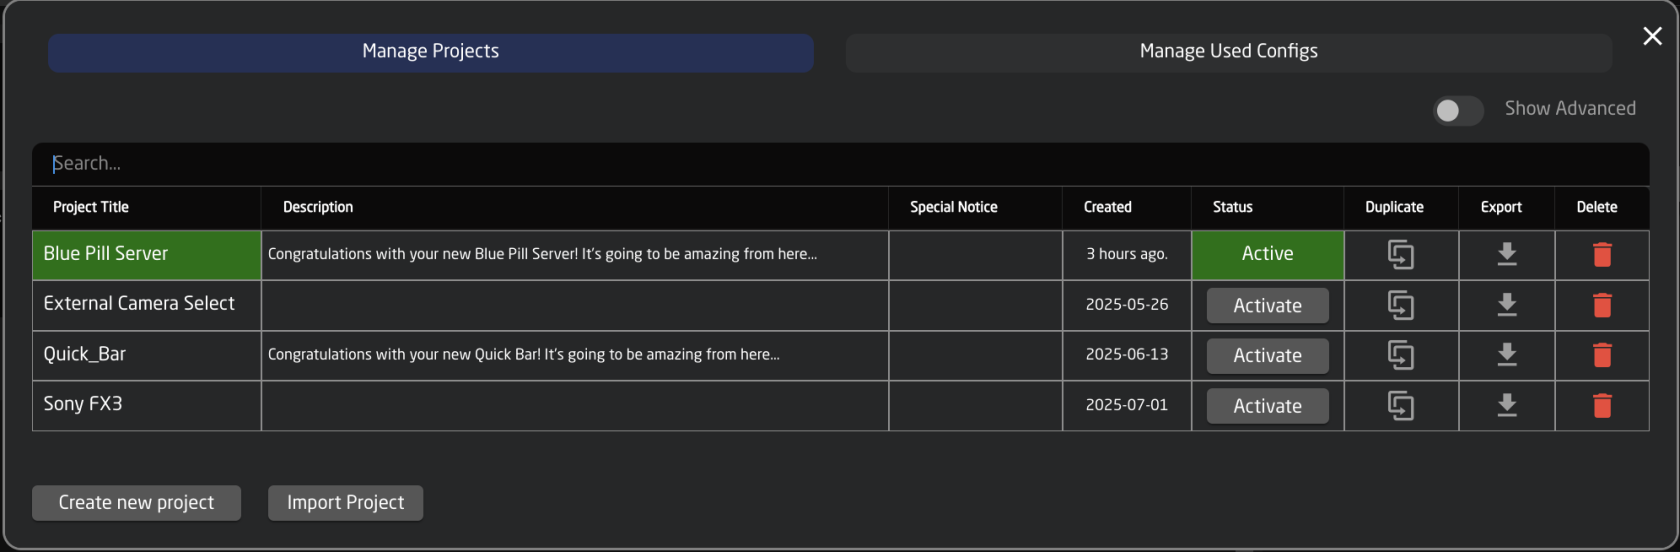 Over time a project collection could look like below, with different projects sharing some files like device collection, panel collection, or configurations. [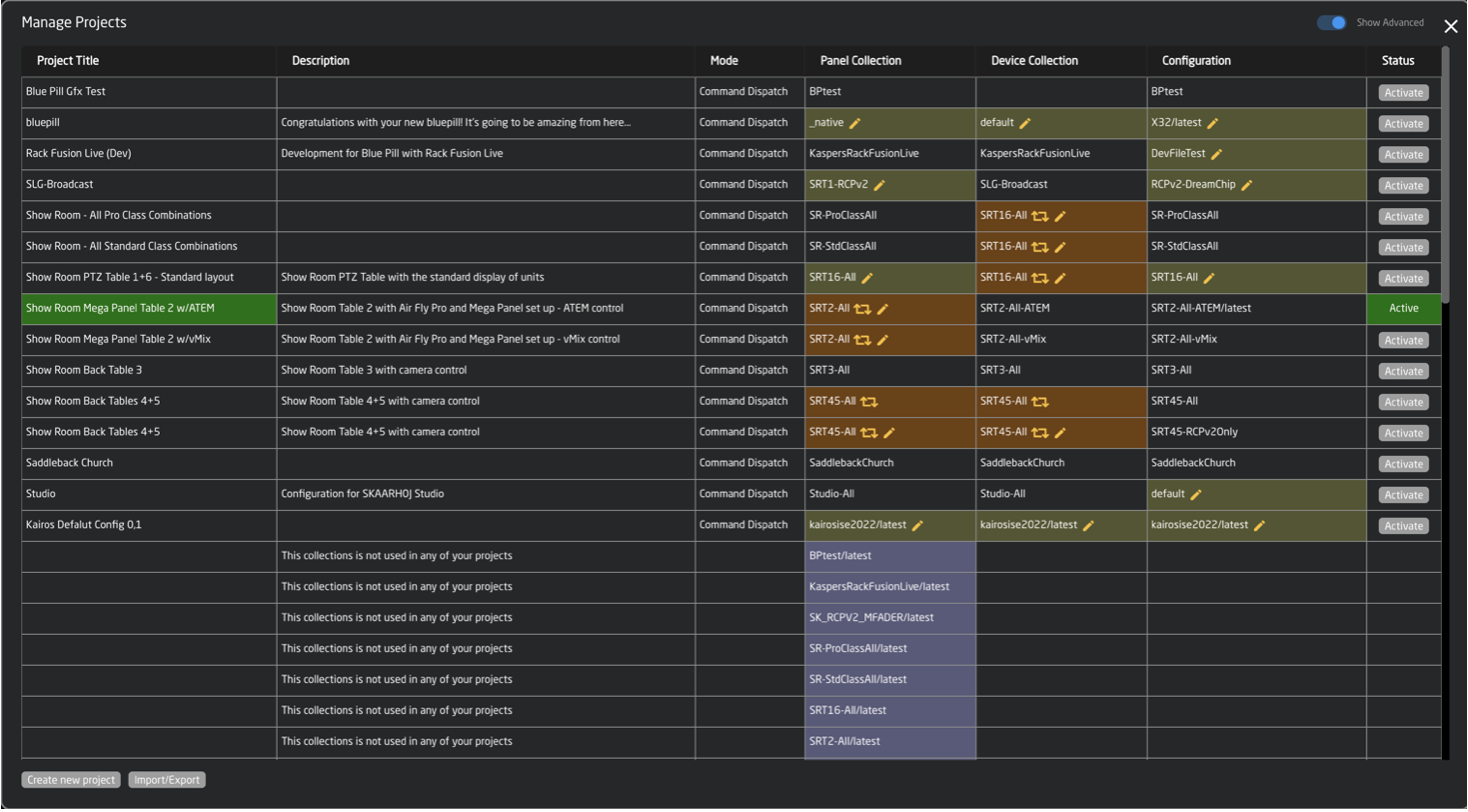](https://wiki.skaarhoj.com/uploads/images/gallery/2022-10/complex.png) Unlike UniSketch where a change of configuration and device cores needed an online connection to SKAARHOJ server, on Blue Pill everything is stored locally in Reactor. Only software upgrades or installations of non-existing device cores and applications need communication with the server.| Name | Customizable project name |
| Description | Option description of the project for reference |
| **Mode** | 1. Normal for normal operation 2. Devices only for when a Blue Pill will only be used to run device cores and not panels |
| **File Name** | Master name for the file when making new collection, configuration, and exports |
| **Panel Collection** | Allows for the sharing of panel collections across projects on a Blue Pill device. |
| **Device Collection** | Allows for the sharing of devices collections across projects on a Blue Pill device. |
| **Configuration** | Allows for the selection of a specific layer files in the configuration across projects on a Blue Pill device |
| **Duplicate** | Duplicates the projects |
| **Delete** | Deletes the project |
| **Save** | Saves changes to the project details |
| **New** | Creates a new panel collection, device collection, or configuration file for the project. 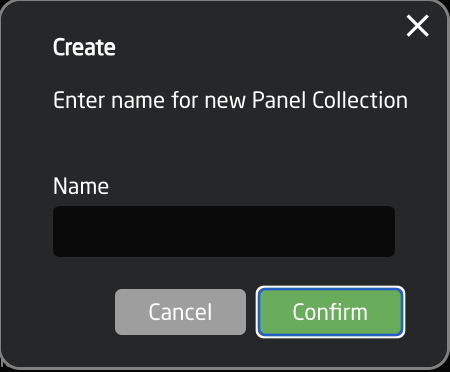 |
For compatibility with Blue Pill, a UniSketch panel needs to be running UniSketch v2.5.14 or later. Starting with UniSketch v2.5.18, there were changes made to the Raw Panel implementation which is used to connect to the Blue Pill. These changes allow for better hardware mapping inside Blue Pill.
Please make sure your UniSketch panel is running the latest UniSketch release version using the [Firmware Updater Application. ](https://www.skaarhoj.com/support/firmware-updater)
| **Name** | **Description** |
| Maturity Level | Development maturity level of the device core. See Packages section for more information on the different levels. |
| Manual | Opens device core manual to see controllable parameter list. |
| Auto-fix Potential Problems | Re-syncs device core locally. |
| Address | The location of the device core. Local references the core on the individual Blue Pill. To connect to the core running off of a remote Blue Pill, use the IP address of the remote Blue Pill (must be accessible from local subnet). |
| Description | Custom description for personal reference. |
| Delete | Deletes all devices using the core but not the core itself. |
| Simulate | Runs the device cores in simulation mode to see how it would work on the controller. The individual devices needs to be ‘active’ for it to simulate. |
| UsePrereleases | Uses the prerelease versions of the device core. |
| Disable AutoResolve | coming soon |
| Use Encryption | coming soon |
| Core specific settings | Settings specific to the individual device cores. Mouse over the name in the web interface for more details. |
| **Column** | **Description** |
| Drag | Allows for quick rearranging of camera order. Right clicking on drag will allow for deleting the row. |
| Mute | Allows for removing access to a specific camera or to leave a blank spot on the panel |
| Binding | Allows for the selecting of a specific connected camera |
| Camera Name | Customizable name to appear on the displays. Character limit is determined by size of display and can vary. |
| Device Number | Ties the camera selector to the specific device. This is found in the Devices section. Each device will have a unique device number per device core. This box should auto-populate when a camera is selected in binding |
| Link Selector | Selects the protocol based configuration associated with camera. Needed protocol can be seen in the Devices section, each device is grouped into their native protocols. **Double check the correct configuration is selected. Improper selection will effect camera control.** |
| Channel Link | Selects the needed protocol for Iris/Master Black control. For cameras without a variable lens this will follow the same protocol as the device. For cameras with a variable lens, select the protocol for the attached lens. **Not available on all configuration classes.** |
| Tally Index | Sets the Tally Index number to connect with associated tally source device. See Blue Pill/Reactor Manual for more information. **This column does not need to be filled out for standard operation.** |
| Route Index | Sets the Route Index number to connect with associated routing device. See Blue Pill/Reactor Manual for more information. **This column does not need to be filled out for standard operation.** |
| FrameLink Window | Sets the FrameLink Window value associated with the FrameLink device core for use with FrameLink compatible devices. See Blue Pill/Reactor Manual for more information. **This column does not need to be filled out for standard operation.** |
| **Column** | **Description** |
| Drag | Allows for quick rearranging of input/output order on the panel. |
| Mute | Allows for removing access to a specific input/output or to leave a blank spot on the panel. |
| Output Number/Input Number | Ties the selector to the specific input/output of the controlled device. This is determined by the individual router. |
| Alternative Label | Customizable name to appear on the displays. Character limit is determined by size of display and can vary. |
| Color | Sets the button feedback color. Color options are: OFF, WHITE, WARM, RED, ROSE, PINK, PURPLE, AMBER, YELLOW, DARKBLUE, BLUE, ICE, CYAN, SPRING, GREEN, MINT. The format for color selection is all large letters with no spaces between words. |
Please Note: This page is about the configuration page but is not a guide on how to make an advanced configuration. For guides on making configurations please check out: [https://wiki.skaarhoj.com/books/blue-pill-reactor/chapter/advanced-configuration](https://wiki.skaarhoj.com/books/blue-pill-reactor/chapter/advanced-configuration)
The Configuration page is described how it appears starting with Reactor v2.0.
For a more customized configuration either self constructed or to modify a default configuration used in the Mapping section it is necessary to move off of the Home page and into the Configuration page. There are three main parts of the Configuration page, however only two of them are directly presented, Controller section for an overall view of the panels and the Inspector where parameters and behaviors are assigned to the hardware components. The third, more advanced section, is the Tree view (not pictured) where you can see the whole mapping of the configuration and gives more advanced ways to configure the panel. [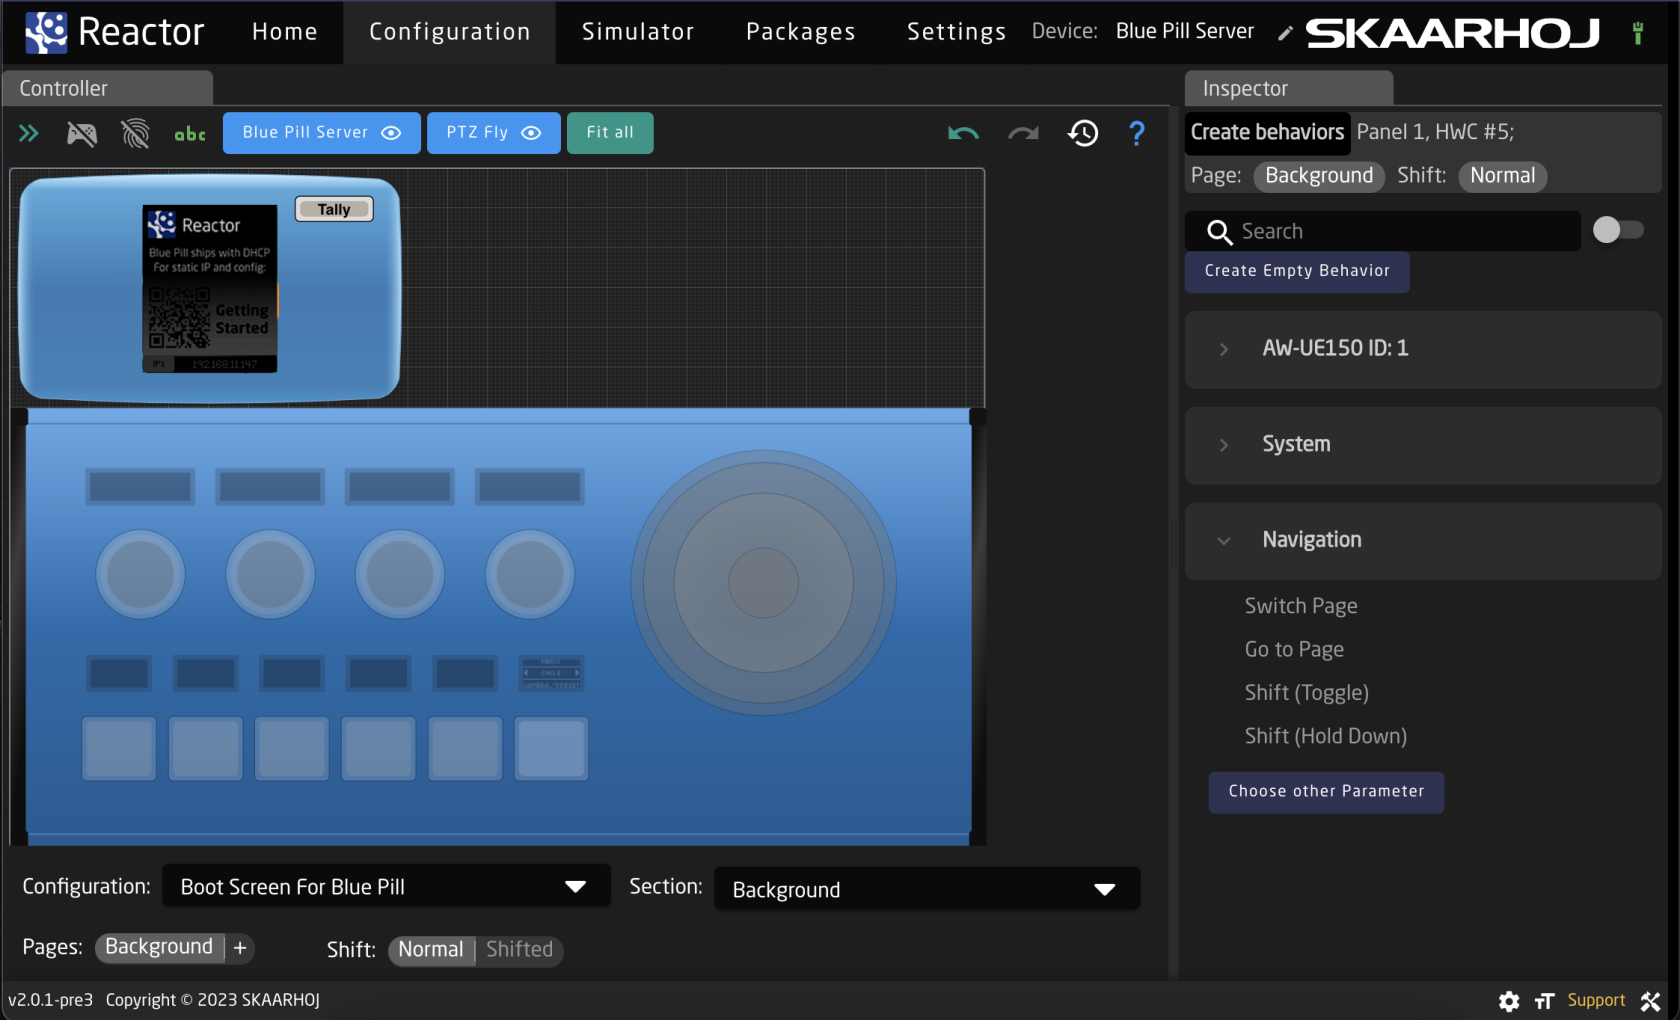](https://wiki.skaarhoj.com/uploads/images/gallery/2023-11/screenshot-2023-11-02-at-15-33-37.png)Please note, this section may act or look different when the Tree section is open.
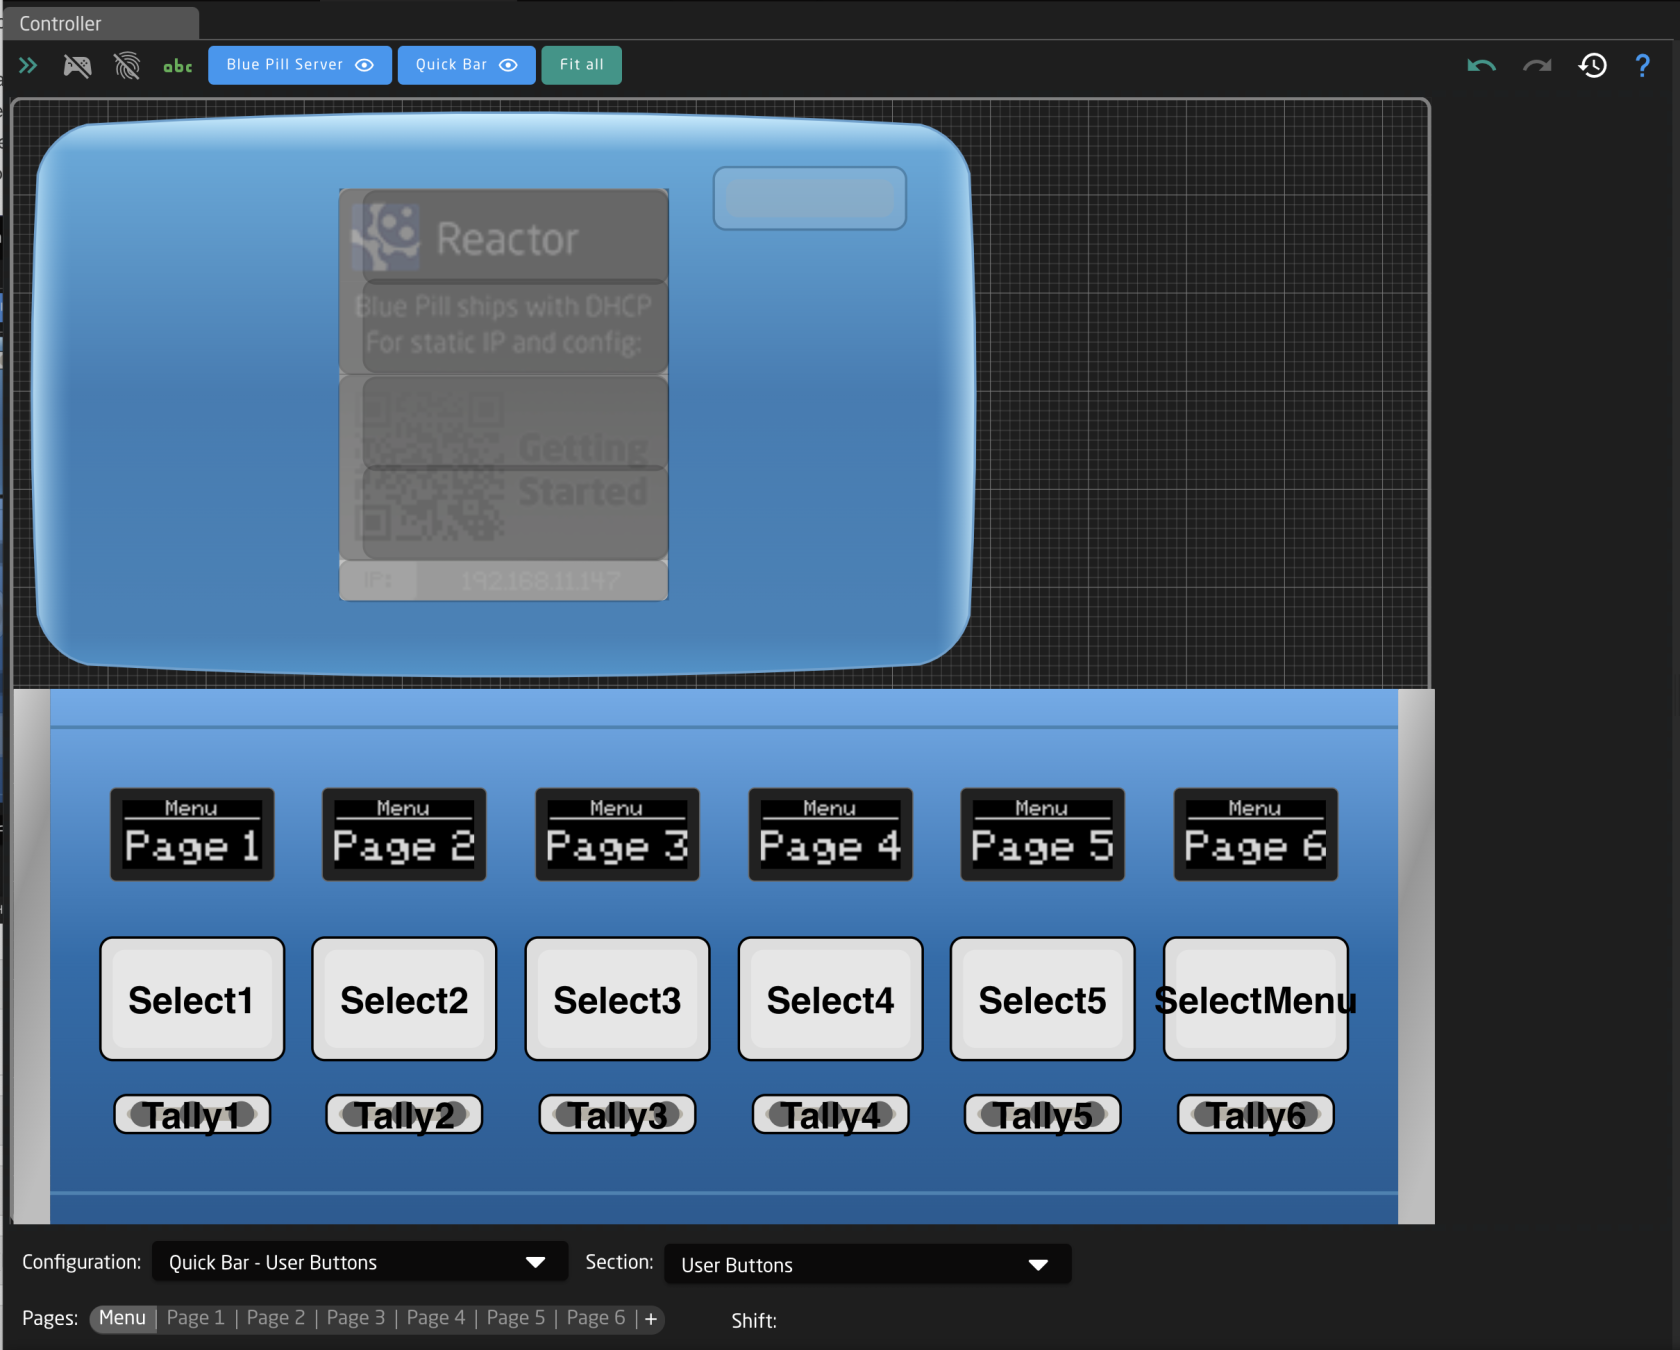 Starting at the top of the page, there are a few different ways to interact with the interface. [](https://wiki.skaarhoj.com/uploads/images/gallery/2023-11/screenshot-2023-11-10-at-12-13-45-pm.png)| Arrows Icon | Toggles open/close the Tree View. (see Tree section for more information) |
| Controller Icon | Toggles on/off simulation mode. When on, the graphical view of the panels acts as a real panel. When simulation mode is not on, it is in configuration mode. |
| Fingerprint Icon | Toggles on/off listening mode. When on, interacting with a physical hardware component on the Skaarhoj panel will open that component in the Inspector. |
| ABC Icon | Toggles on/off the text labels in the graphical view of the panels. |
| Panel Names | Centers graphical view on selected panel. |
| Eye Icon | Toggles on/off the view of the specific panel in the graphical view. Button turns grey when panel is not visible. |
| Fit All | Positions graphical view to show all visible panels. |
| Back Arrow Icon | Undoes the last change made in the Inspector |
| Forward Arrow Icon | Redoes the last change made in Inspector |
| History Icon | Opens the History View. See [History View](https://wiki.skaarhoj.com/books/blue-pill-reactor/page/history-view) page for more information. |
| Question Mark | Opens the graphical view movement and color guide. See image below. |
| Create section | Creates a new section in the configuration. |
| Add to section | Adds the hardware component to to the current section. See expanded details below. |
| Remove from section | Removes the hardware component from the current section. |
| Copy | Copies the current configuration of the hardware component to be able to be pasted. |
| Cut | Cuts out the current configuration of the hardware component to be able to be pasted. |
| Paste | Pastes the last copied or cut configuration of a hardware component to the select component. |
| Delete Behavior(s) | Deletes the current behavior or behaviors configured on the component, plus makes it transparent if it is not currently. |
| Clear Contents | Deletes the current behavior or behaviors configured on the component. |
| Name | User defined name for the created section. |
| Transparent section | Selecting Transparent section will allow for behaviors configured on a lower layer of the tree for that hardware component to show through. If not transparent, the hardware component will remain blank unless configured. |
| Advanced | Toggles on/off Advanced for the section creation tool. |
| Layer Selection | Allows for the selection of which layer in the tree the section is created on. Available only with Advanced toggled on. See image below. |
| Cancel | Cancels the creation of a new section. |
| Submit | Submits and saves the new section. |
| Button | Small triangles represent left, right, top edge presses | [](https://wiki.skaarhoj.com/uploads/images/gallery/2023-11/screenshot-2023-11-10-at-3-16-10-pm.png) |
| Encoder and Knobs | Triangles represent direction of turn | [](https://wiki.skaarhoj.com/uploads/images/gallery/2023-11/screenshot-2023-11-10-at-3-16-52-pm.png) |
| PTZ Joystick Twist, Zoom Rocker, XC8 Shuttle Wheel | Arrows represent direction of twist and number is the speed component value | [](https://wiki.skaarhoj.com/uploads/images/gallery/2023-11/screenshot-2023-11-10-at-3-18-15-pm.png) |
| PTZ Joystick Up/Down | Arrows represent direction of movement and numbers the component value of X,Y axis | [](https://wiki.skaarhoj.com/uploads/images/gallery/2023-11/screenshot-2023-11-10-at-3-18-23-pm.png) |
| RCP Joystick Up/Down | Line represents the position of the virtual position of the joystick as it is not a motorized hardware component | [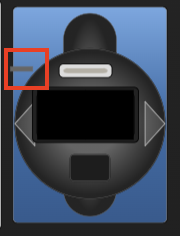](https://wiki.skaarhoj.com/uploads/images/gallery/2023-11/screenshot-2023-11-10-at-3-31-24-pm.png) |
| Hold down | Corresponds to pressing down the button or encoder without releasing it. |
| Release button | Corresponds to releasing the hold down of the button or encoder. |
| Long press | Corresponds to a 1 second long press. |
| Configuration | Select between the configuration in the project. The graphical view of the panel associated with the selected configuration will no longer be grayed out. |  |
| Section | Select between the different hardware component sections in the selected configuration. These sections are tied to the configuration, the pages, and the shift levels they were created on. | 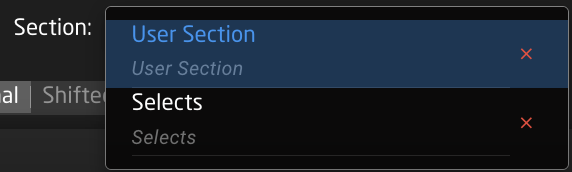 |
| Pages | Select between the different page layers of the configuration. Using the + symbol will add more pages. See below for more detail. |  |
| Shift | Select between the different shift layers of the currently selected page. |  |
| Copy | Create a duplicate copy of the clicked upon layer. |
| Rename | Rename the clicked upon layer. |
| Disable transparency | Disable the transparency for the clicked upon layer. |
| Delete | Delete the clicked upon layer. |
| Create behaviors | The lighter grey section indicates which specific hardware component is going to be configured, and on which configuration page and shift level it will be on. |
| Search | Search for the specific parameter to configure on the button |
| Device Grouping Toggle | Toggle between seeing Create Behaviors per device or per device core. |
| Create Empty Behavior | Skip Create Behaviors to create an empty behavior to fully configure. |
| Parameter | Select what is to be controlled by the hardware component. The parameters have various categories: Device Core, Variable, Literal Values, System, Reactor, Preset, Flag, Behavior, Panel Settings String Value, Constant Set Value; with different further options depending on what is selected. [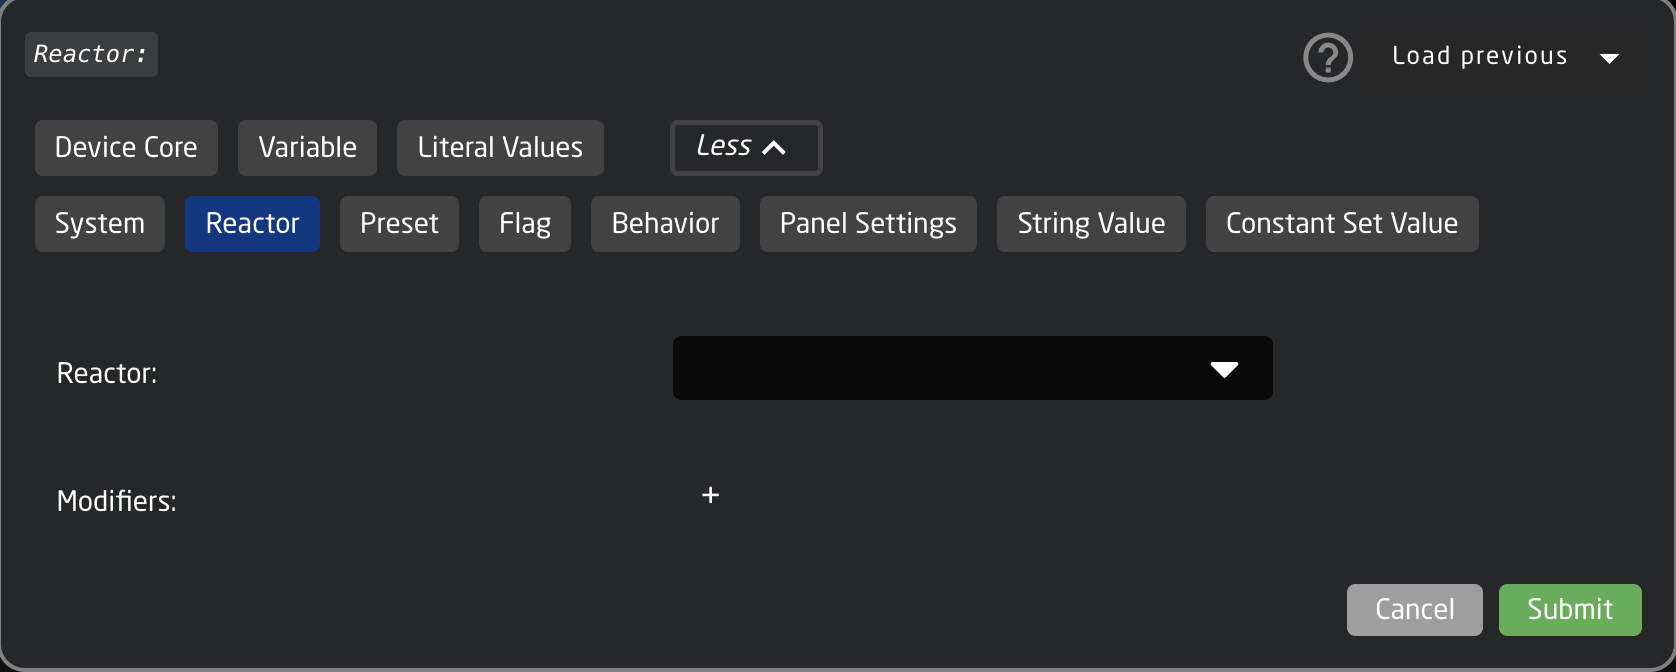](https://wiki.skaarhoj.com/uploads/images/gallery/2024-01/screenshot-2024-01-11-at-1-12-00-pm.png) There is a standard list of available modifiers to add. [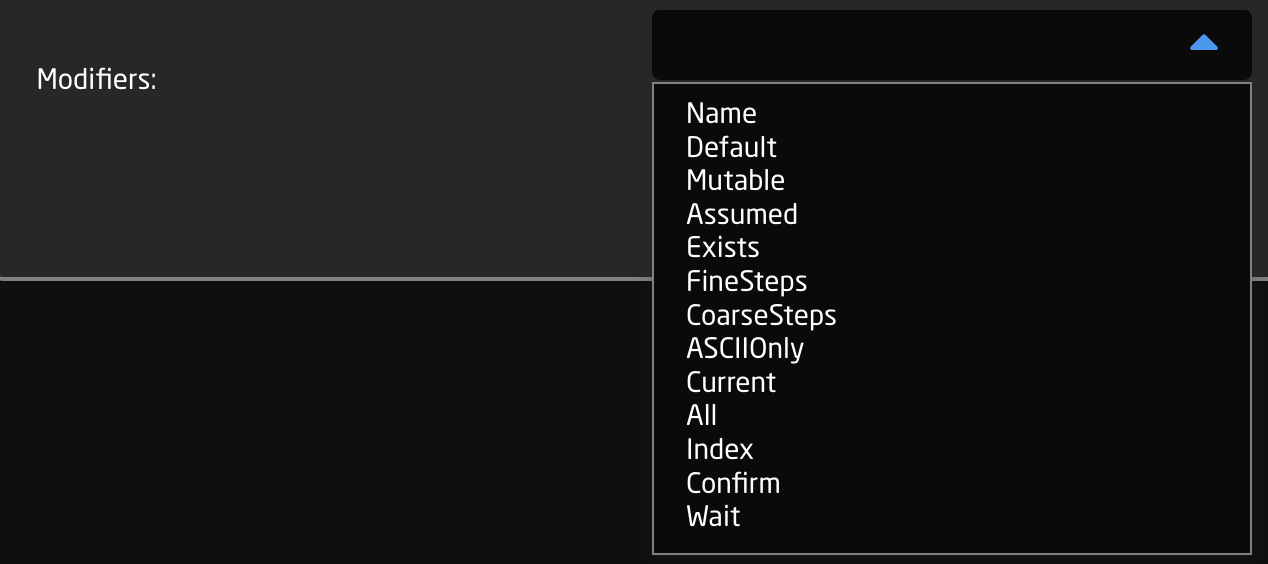](https://wiki.skaarhoj.com/uploads/images/gallery/2024-01/screenshot-2024-01-11-at-12-05-06-pm.png) There are scenarios where it is not needed to use the Parameter field when configuring a hardware component. |
| Settings Template | Predefined templates that can be paired with a parameter for quickly assigning functionality to a hardware component. They can be more generic to work in the same way with various parameters or tailored to specific parameters or device cores. Frequently these are auto selected or suggested when selecting a parameter. [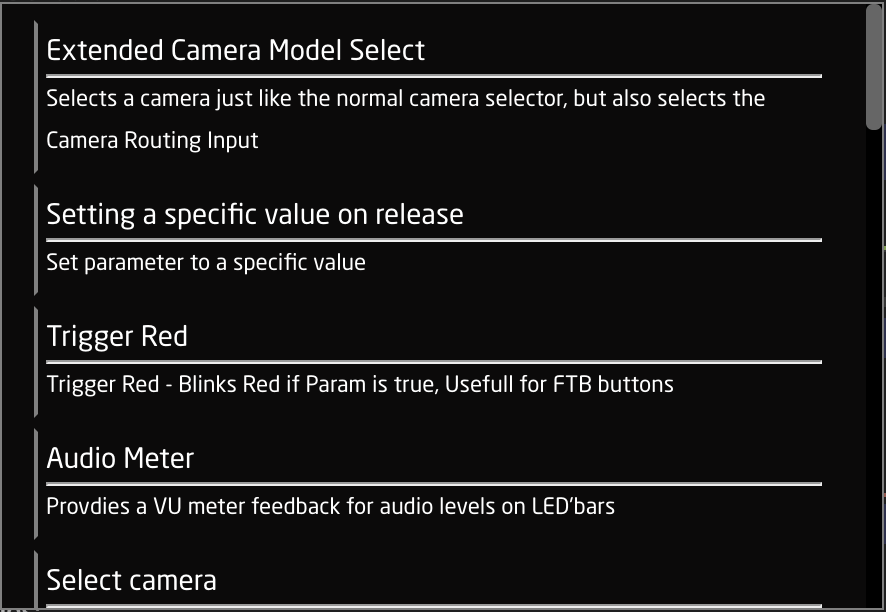](https://wiki.skaarhoj.com/uploads/images/gallery/2024-01/screenshot-2024-01-11-at-1-07-30-pm.png) As these are prebuilt templates, they contain information needed for Event Handles and Feedback. There are scenarios where it is not needed to use the Settings Template field when configuring a hardware component. |
| Hide More/Show More | Opens or closes more of the Inspector. |
| Clear All Settings | Clears all the current settings from the Inspector. |
| Index | Value assigned on feedback creation to rank the feedback's priority with higher values having higher priority in being displayed. |
| Active If | Conditions that need to be met for the feedback to be active. [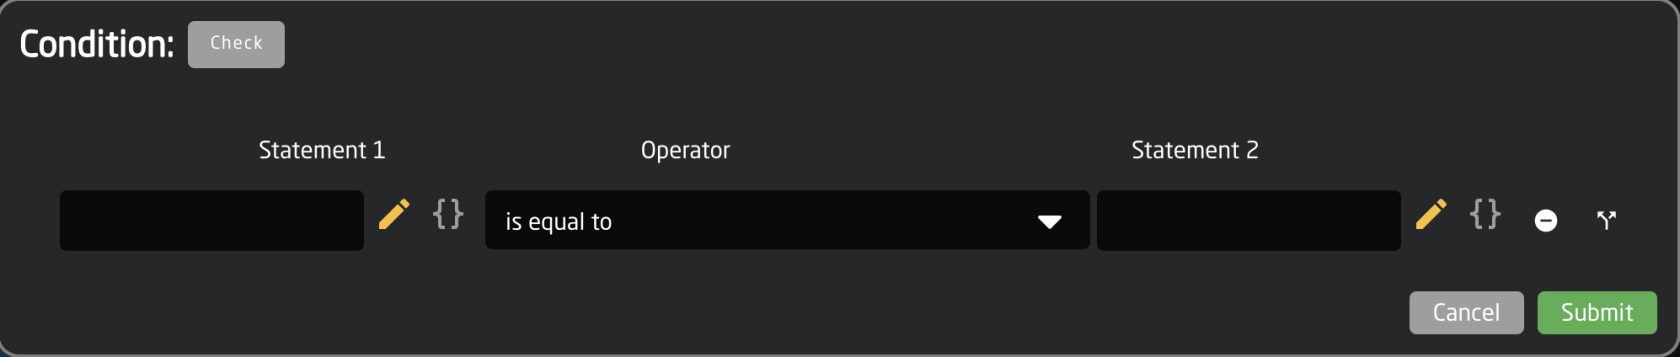](https://wiki.skaarhoj.com/uploads/images/gallery/2024-01/653screenshot-2024-01-11-at-1-46-45-pm.png) |
| Description | Easy to understand text string of the feedback's purpose |
| Intensity | Brightness of the LED feedback; On, Dimmed, or Off |
| Color | Hue assigned to the LED feedback. Choose from predefined color, pick on a color wheel, or set based on HEX value. [](https://wiki.skaarhoj.com/uploads/images/gallery/2024-01/screenshot-2024-01-11-at-2-08-50-pm.png) |
| Blink Pattern | Pattern at which the LED should blink. [](https://wiki.skaarhoj.com/uploads/images/gallery/2024-01/screenshot-2024-01-11-at-2-11-06-pm.png) |
| Title | Text string for top 1/3 of the display, often used for a title. |
| Title Font | Font used for the title; Default, Bold, Tiny |
| Text Size | Size used for the title; Default (0,0), Small (1,1), Narrow (1,2), Medium (2,2), Large (3,3) |
| Solid Title Bar | Sets title bar's background as while and text color as black for top 1/3 of display; On, Off, No Title |
| Textline 1 | Text string for bottom 2/3 of display if Textline 2 is left blank or middle 1/3 of display if Textline 2 is used. Character length is dependent on display size. |
| Textline 2 | Text string for bottom 1/3 of display. Character length is dependent on display size. |
| Auto Wrap | Used with Textline 1 to split text into 2 lines if it is too long; on, off |
| Use Graphics for UniCode | Allows for text based character outside of the standard English alphanumeric characters. |
| Modifier Icon | Adds a modifier icon to the display; No icon, cycle, Down, Up, Hold, Toggle, OK, Question |
| State Icon Lock | Active If condition to show a lock icon in the display. Overrides the No Access and Fine icons. |
| State Icon No Access | Active If condition to show a no access icon in the display. Overrides the Fine icon. |
| State Icon Fine | Active If condition to show a fine icon in the display. |
| Don't Inherit | Advanced setting to stop the inheritance of the feedback from a parent behavior. |
| Graphic Source | Select graphic for display in place of text based display; Icon, IOReference, QRcode. Icon can be from internal library or uploaded. Additional options may exist within IOReference and QRcode. |
| Handler Type | Sets type of hardware component type for the component to act as; Binary (Button), Pulsed (Encoder, Roller Wheel), Analog (Fader, T-Bar, RCP Joystick), Speed (Zoom Rocker, PTZ Joystick). See below for more detail. |
| Active If | Conditions that need to be met for the feedback to be active. [](https://wiki.skaarhoj.com/uploads/images/gallery/2024-01/653screenshot-2024-01-11-at-1-46-45-pm.png) |
| Parameter | Parameter to be affected by the event handler. If left blank it will affect the main parameter. |
| Description | Easy to understand text string of the event handler purpose. |
| Event Preprocessor | Transforms incoming trigger type. *Advanced* |
| Don't inherit | Advanced setting to stop the inheritance of the event handler from a parent behavior. |
| Create New | Create new event handler and set name for it. |
| Binary Type | Which binary the handler responds to: button press, Act Down, or release, Act Up |
| Edge Filter | Which edge of a 4-way button the handler responds to: Any edge, No edge, Top, Left, Bottom, Right, Left & Right, Top & Bottom, Encoder Click |
| Set Mode | Set, Toggle, Add, Remove, Toggle Add/Remove, Cycle Up, Cycle Down, Cycle Up and Roll Over, Cycle Down and Roll Over, Clear, Random, Sequence |
| Set Values | To set a specific value or to copy a value from another parameter |
| Invert Conditions | To set the conditions on which the action will be the invert or opposite |
| Rollover Conditions | Conditions for the end value to rollover to the start value when cycling through |
| Fine Step IO reference | Can be a set value for size of a fine step or can be set via na IO reference |
| Coarse Step IO reference | Can be a set value for size of a coarse step or can be set via na IO reference |
| Coarse Condition | Set conditions for switching between coarse and fine mode |
| Ganged Control Mode | Way ganged control works; Set All to First, Change All Relatively |
| Invert Condition | To set the conditions on which the action will be the invert or opposite |
| Discontinuity | Strategy for detecting movement of a hardware component to adjust a parameters via an analog component; Double Linear, Offset, Non |
| Invert Condition | To set the conditions on which the action will be the invert or opposite |
| Invert Condition | To set the conditions on which the action will be the invert or opposite |
More information on Event Preprocessors coming soon.
Variables are used in many different ways and in many places within a configuration. The basic idea of a variable is it is an adjustable There are two types of variable: Range and Options. A range variable is to be used with any number value from X to Y defined by the user. 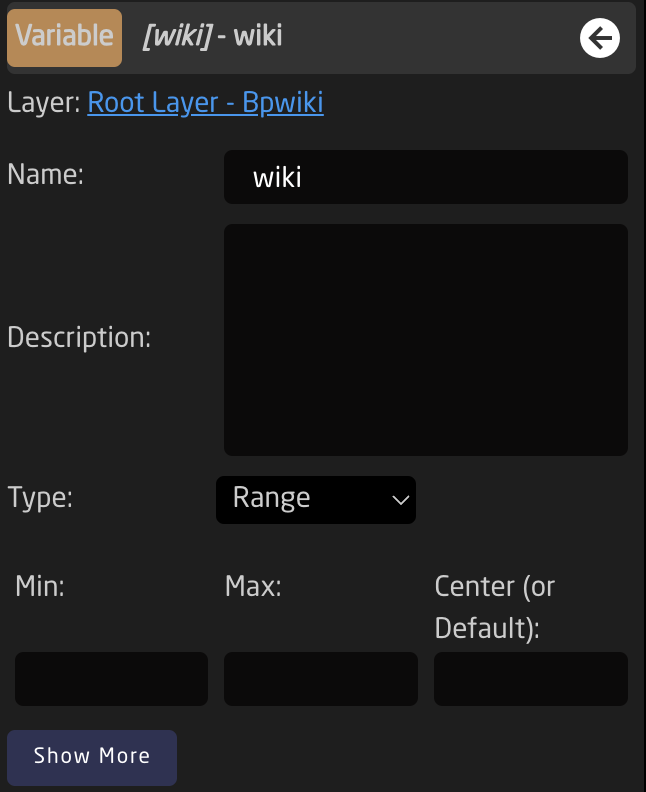 An options variable is to be used with any defined text string with independently set labels. 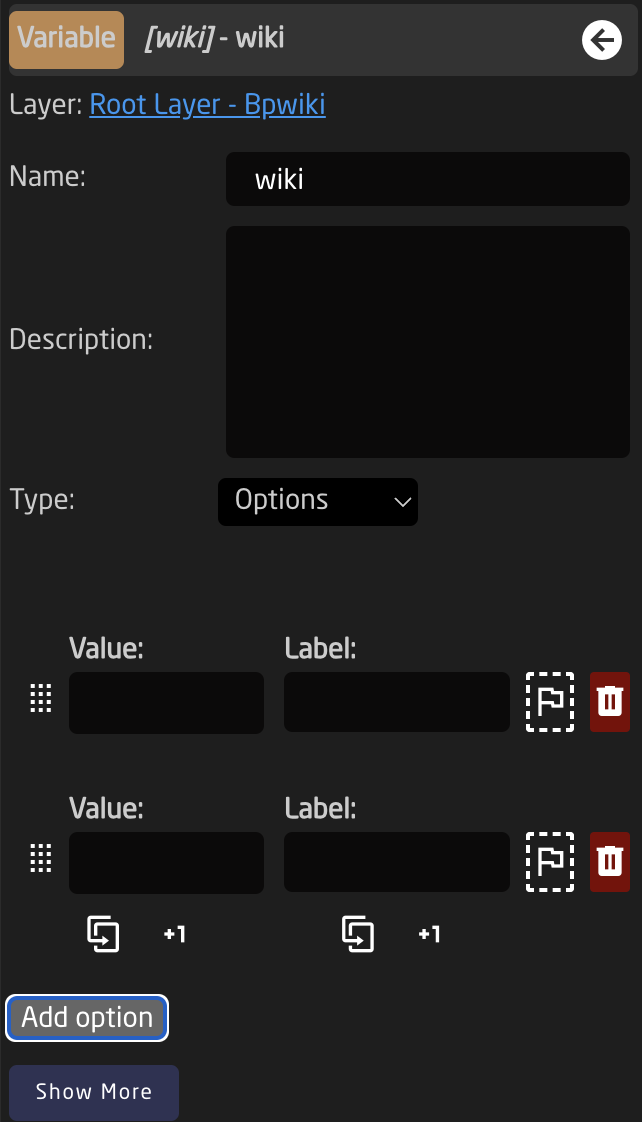 Event ScriptsMore details coming soon
For users with a background in JSON, this could be the easiest and fastest way to work with our configurations. For most users, it is best to leave this section untouched as every character can effect the functionality of a configuration.
The JSON editor can be found by clicking on the **Edit Raw** links in the Tree on the layers with Include Files. The JSON available via these links is the Include File layers. 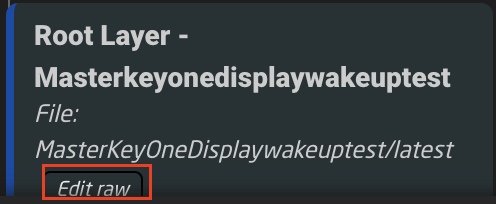 The JSON editor opens on its own web browser page. From here it is possible to do a few different things. [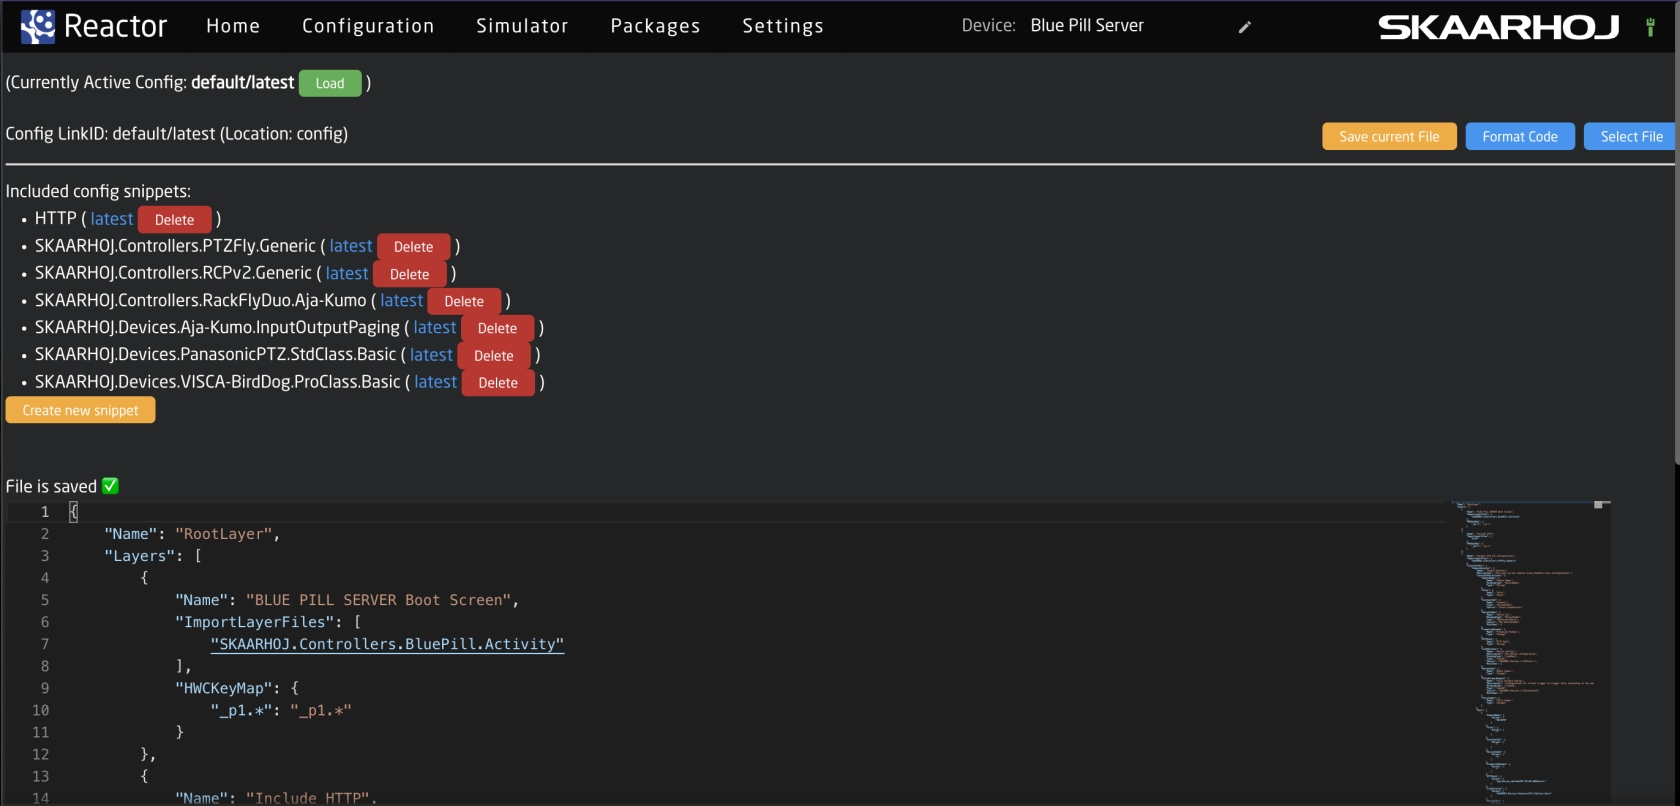](https://wiki.skaarhoj.com/uploads/images/gallery/2023-11/screenshot-2023-11-06-at-14-56-31.png) Taking a look at the top section of the page. [](https://wiki.skaarhoj.com/uploads/images/gallery/2023-11/screenshot-2023-11-06-at-15-07-21.png)| Currently Active Config: | The name of the currently configuration file selected in the package. This can be shared on multiple different projects. |
| Config Link ID: | The selected link ID selected to edit. There can be multiple available per Currently Active Configuration on different layers in the tree. |
| Save Current File: | Save the current text in the JSON editor. |
| Format Code: | Format code for better layout on the page. |
| Select File: | Allows for the selection of a different configuration file to load into the currently selected layer that has an include layer. See image below. |
| Layer Configurations | Configuration files available on the Blue Pill device |
| Library Configurations | Configuration files available from Skaarhoj |
| Snippet Name | The include file name for that specific snippet. |
| Latest | Loads the latest version of the snippet into the JSON editor |
| Delete | Deletes the snippet |
| Create new snippet | Allow for the creation of a new snippet file. See image below. |
It is possible to simulate both the panel and the device from a stand alone Blue Pill to get an idea of what that mapping is like and what actions are available. Some data is not able to be simulated as it relies on the connected device for details.
[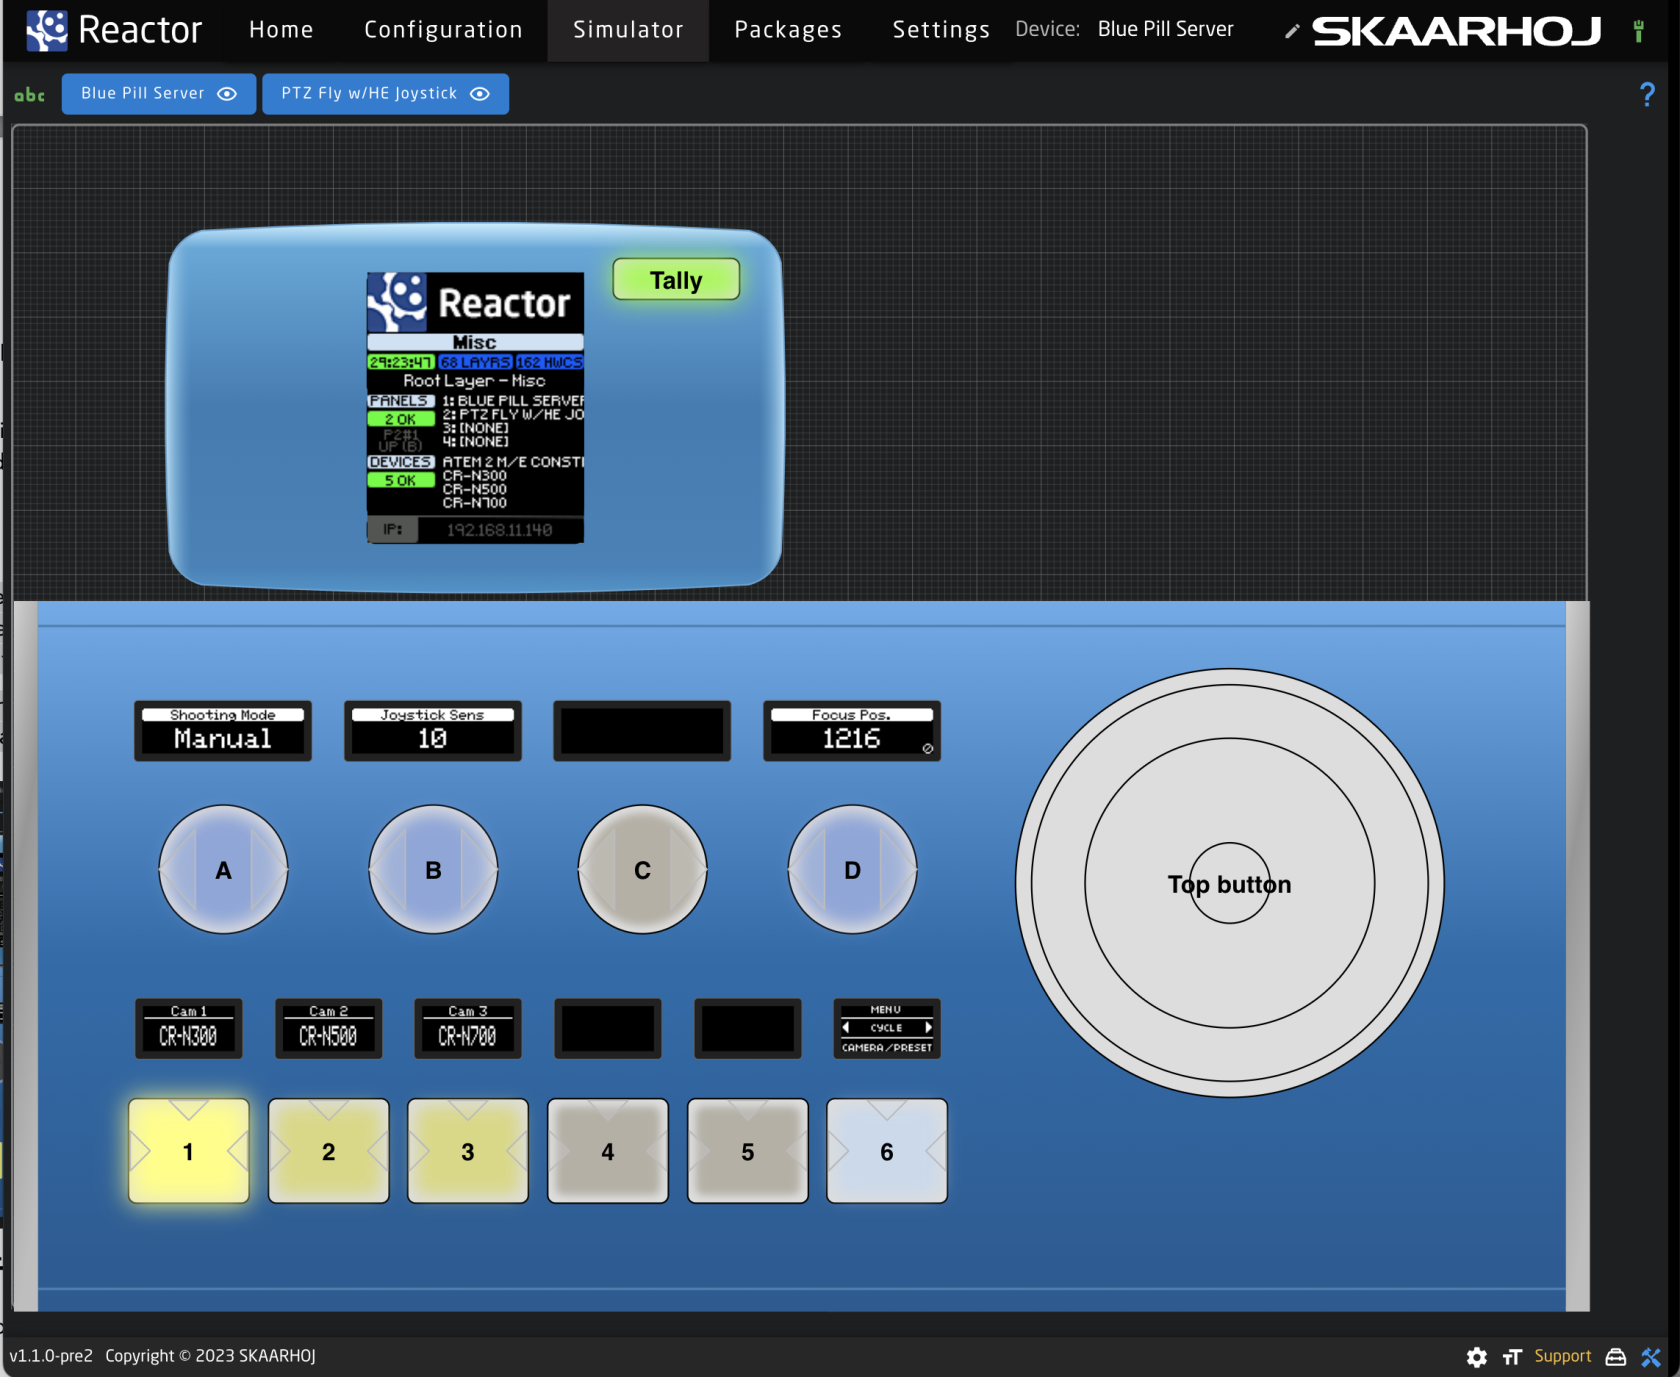](https://wiki.skaarhoj.com/uploads/images/gallery/2023-08/screenshot-2023-08-08-at-3-35-19-pm.png)Please note, prerelease updates are only available when using the Show Pre-Release toggle at the top of the page. [](https://wiki.skaarhoj.com/uploads/images/gallery/2023-08/screenshot-2023-08-15-at-12-34-27-pm.png)
If working in a offline environment, it is possible to manually upload a device core package from a file on your computer. This is done from the Upload and install package button at the bottom of the Packages page. [](https://wiki.skaarhoj.com/uploads/images/gallery/2023-08/screenshot-2023-08-15-at-12-51-36-pm.png)All of our current stable release and prerelease of our cores are available on our website devices.skaarhoj.com.
Clearing the Config Directory for the Reactor package will erase all projects on the device. It is suggested to export any needed project before clearing the config directory of that package.
It is also possible to completely Uninstall a package from this page. Doing so will not remove previously connected devices, but will cause them to be disconnected. When setting the Blue Pill into advanced mode, filtering options become available for the core logs. [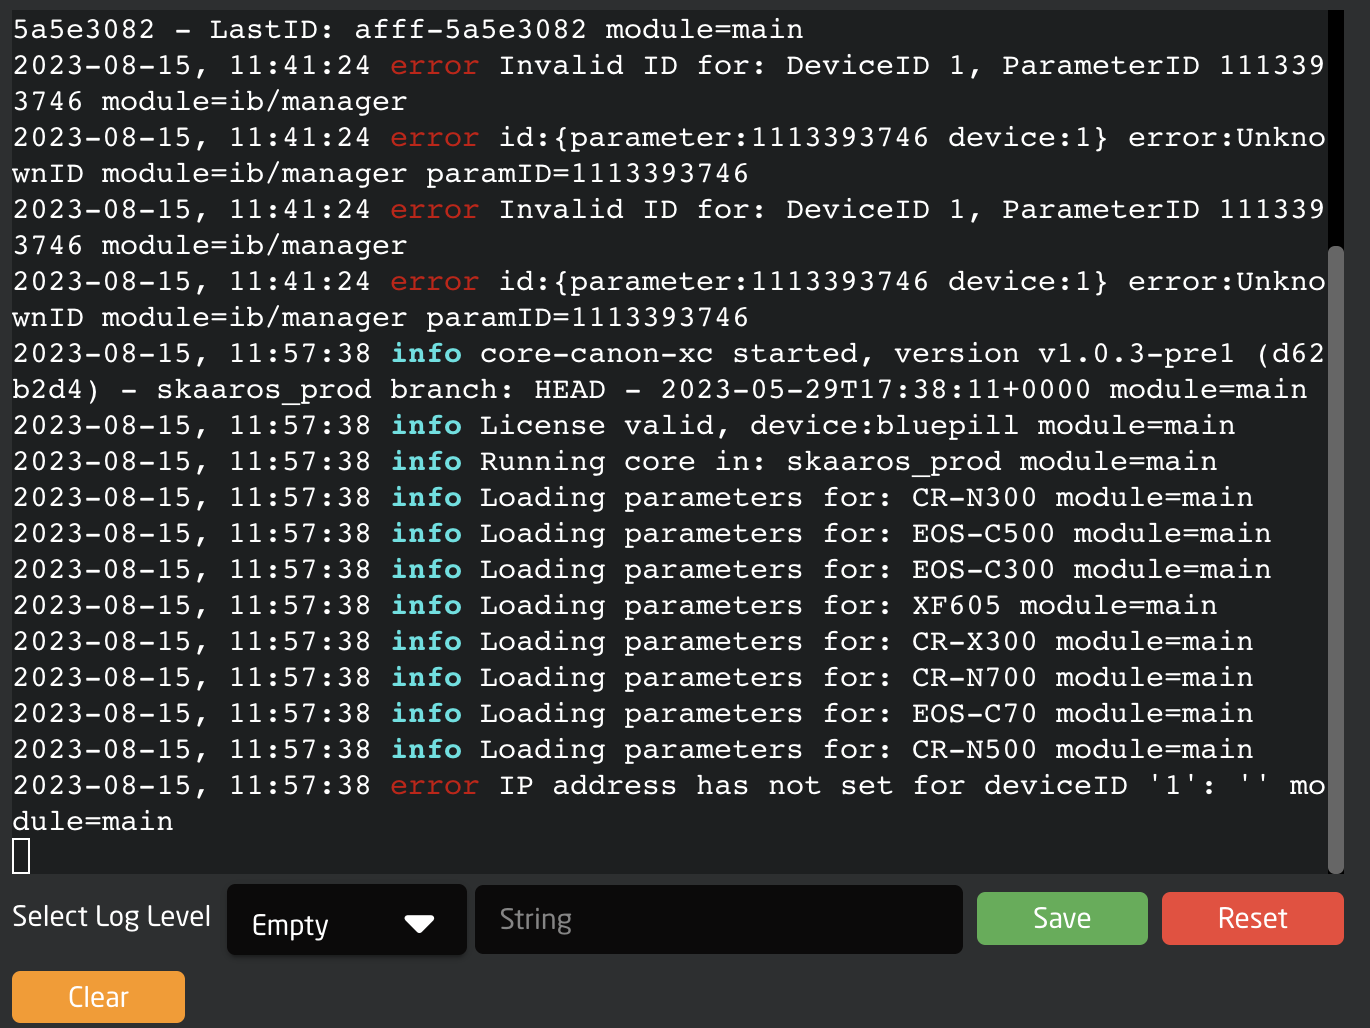](https://wiki.skaarhoj.com/uploads/images/gallery/2023-08/screenshot-2023-08-15-at-12-07-47-pm.png)Generally Updating or Downgrading a device core package requires internet connectivity to our servers, however we do offer an offline update method.
Packages with updates available with updates available with have a green UPDATE TO X.X.X button next to the current version. Pressing the update button will update that individual package. Pressing the Update All button on the top will run all available package updates. [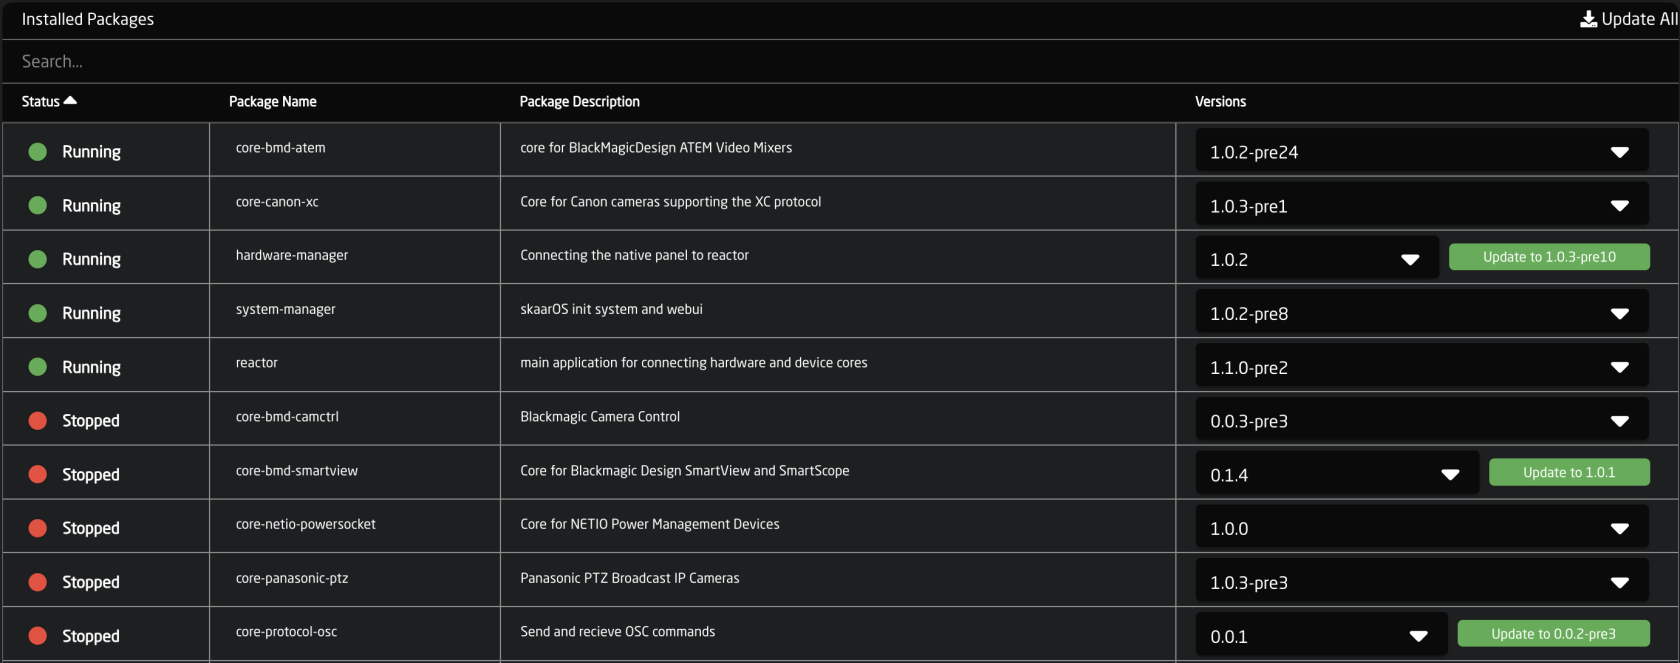](https://wiki.skaarhoj.com/uploads/images/gallery/2023-08/screenshot-2023-08-15-at-12-35-59-pm.png)Please note, prerelease updates are only available when using the Show Pre-Release toggle at the top of the page. [](https://wiki.skaarhoj.com/uploads/images/gallery/2023-08/screenshot-2023-08-15-at-12-34-27-pm.png)
To revert back to a previous version of a package click on the drop down in the Versions column and select the desired version. [](https://wiki.skaarhoj.com/uploads/images/gallery/2023-08/screenshot-2023-08-15-at-12-38-28-pm.png) It can be necessary to manually upload a package file from your computer, this could be because the panel is used in an offline workflow or because support has sent a package file for the customer to test. This is done from the Upload and install package button at the bottom of the Packages page. [](https://wiki.skaarhoj.com/uploads/images/gallery/2023-08/screenshot-2023-08-15-at-12-51-36-pm.png)All of our current stable release and prerelease of our cores are available on our website devices.skaarhoj.com.
The licensed packages can all be downloaded and installed but have a run time of 10 mins. This allows for our customers to test the packages to see if they will meet their needs before needing to purchase the license. To continue the testing, restart the device core package, wait 1 minute, then you can use it again for another 10 minutes.
Please note, doing a Reset will erase all installed packages, IP configuration, and any projects. This will return the Blue Pill to factory settings. It is not possible to recover any lost information after a Reset which is why it is hidden in Advanced Mode.
**Licenses** See next sections for detailed information.Internet access is needed for the Blue Pill device to touch the Skaarhoj server to register an assigned license. If that is not an option, please let the support team know.
By default the IP is set to DHCP, if DHCP is not available on the network a fallback IP address of 192.168.10.99 will be used.
[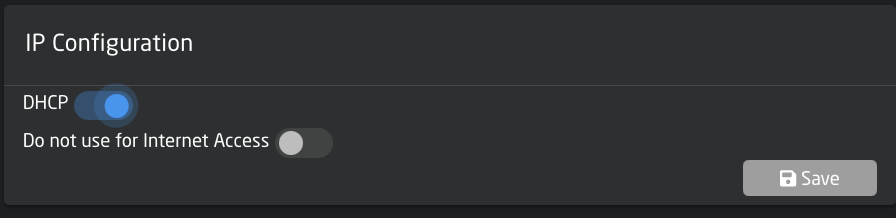](https://wiki.skaarhoj.com/uploads/images/gallery/2023-10/Dzescreenshot-2023-10-24-at-11-28-25.png)Please note, changing the IP information will cause the web interface to lose connection as the IP address has been re-assigned.
By enabling the "Do not use for internet Access" toggle, you can turn off general internet connection to the Blue Pill device on networks that have general internet access. [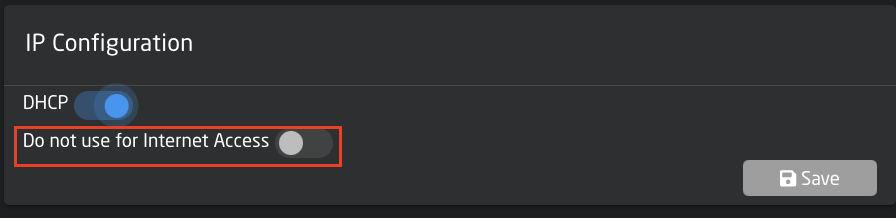](https://wiki.skaarhoj.com/uploads/images/gallery/2023-10/Nvdscreenshot-2023-10-24-at-11-28-25.png) When Internet access has been restricted the ethernet cable icon in the top right corner of the screen will have changed from green to red. [](https://wiki.skaarhoj.com/uploads/images/gallery/2023-10/screenshot-2023-10-24-at-11-38-04.png)Please note, internet access is needed to install, update, or revert packages. For offline updating please check out the [Updating Software](https://wiki.skaarhoj.com/books/blue-pill-reactor/page/uploading-device-corespackagesos-from-offline-RId) section of our Wiki.
By default the IP is set to DHCP, there is no fallback static IP address for WiFi.
[](https://wiki.skaarhoj.com/uploads/images/gallery/2023-10/Dzescreenshot-2023-10-24-at-11-28-25.png)Please note, changing the IP information will cause the web interface to lose connection as the IP address has been re-assigned.
By enabling the "Do not use for internet Access" toggle, you can turn off general internet connection to the Blue Pill device on networks that have general internet access. [](https://wiki.skaarhoj.com/uploads/images/gallery/2023-10/Nvdscreenshot-2023-10-24-at-11-28-25.png) **Disable WiFi** Enabling the Disable WiFi feature will disable all wireless features from the Blue Pill device. [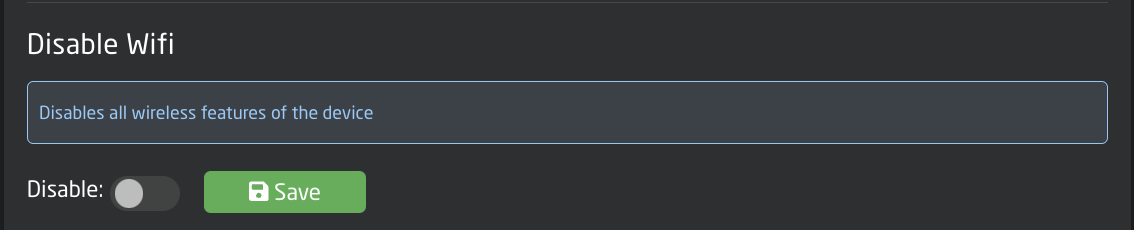](https://wiki.skaarhoj.com/uploads/images/gallery/2023-10/screenshot-2023-10-24-at-12-50-11.png) **Access Point Settings** Used to access the Blue Pill via an internal WiFi to establish a connection and set the needed network information for regular connection. In this section the Access Point can be enabled/disabled and the password set. The web interface is then accessed at the IP address: **192.168.4.1** By default the password is **skaarhoj**. See the [Getting Started ](https://wiki.skaarhoj.com/books/blue-pill-reactor/chapter/blue-pill-inside-bpi-getting-started)section for more information. [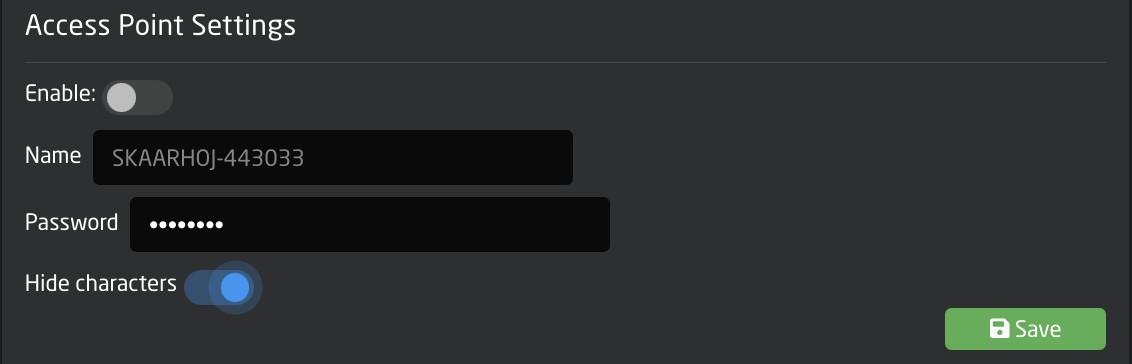](https://wiki.skaarhoj.com/uploads/images/gallery/2023-10/screenshot-2023-10-24-at-12-58-06.png) **Connection Setting** Used to connect the Blue Pill to the local WiFi network. Pressing Scan will search for available networks. Clicking a network that appears after a scan will allow for the entering of the needed password to establish the connection. [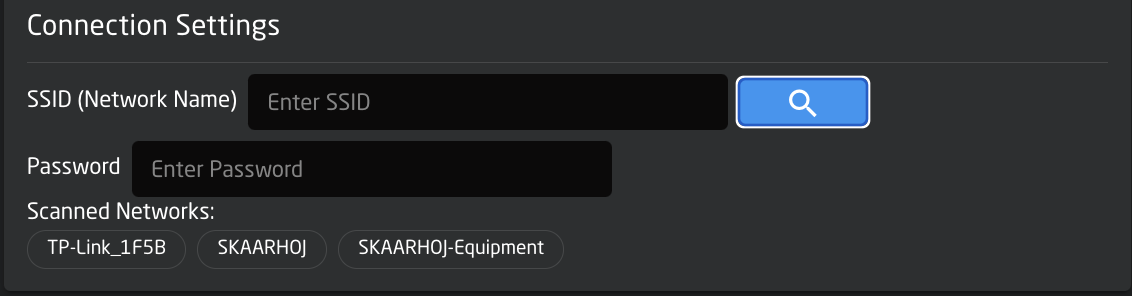](https://wiki.skaarhoj.com/uploads/images/gallery/2023-10/screenshot-2023-10-24-at-12-59-25.png)Please note connecting the Blue Pill to both the wired and wireless networks for internet access can cause instability in the connection.
Please note, wired internet access needs to be enabled for support to access the Blue Pill.
Please note, when USB-A is enabled, the USB-Micro port is disabled.
| **Column** | **Description** |
| Order | Allows for quick rearranging of channel order. Right clicking on order will allow for deleting the row. |
| Mute | Allows for removing access to a specific channel or to leave a blank spot on the panel |
| Device Config | Ties the fader to a specific device config. |
| Device Index | Ties the fader to a specific device associated with the config. See Device Details for the device index number. |
| Channel | Ties the fader to a specific channel in the selected device. See device parameter list for available channel number for the specific device. |
| Alternate Label | Customizable name to appear on the displays. Character limit is determined by size of display and can vary. |
| Color | Sets the button feedback color. Color options are: OFF, WHITE, WARM, RED, ROSE, PINK, PURPLE, AMBER, YELLOW, DARKBLUE, BLUE, ICE, CYAN, SPRING, GREEN, MINT. The format for color selection is all large letters with no spaces between words. |
| Config | Setup some extra configurable attributes on some specific device configs. |
|  | Delete the row. |
|  | Duplicates the details of the column. |
|  | Increments the number in the column by +1. |
|  | Adds a new line to create additional fader channels. |
|  | Opens a table to create multiple new fader channels. **See Batch Create section.** |
| Amount of Rows to Create | The number of additional rows to be created. |
| Column Name | Which settings table row's info being referenced. |
| Populate Behavior | Select if the settings table row is to be empty, copied, or incremented by 1. [](https://wiki.skaarhoj.com/uploads/images/gallery/2025-06/screenshot-2025-06-25-at-11-24-21.png) |
| Focus Row Value | Current value of the settings table row to be left empty, copied, or incremented in the new rows. |
| **Column** | **Description** |
| Order | Allows for quick rearranging of camera order. Right clicking on drag will allow for deleting the row. |
| Mute | Allows for removing access to a specific camera or to leave a blank spot on the panel |
| Bound Device | Allows for the selecting of a specific connected camera |
| Device ID | Ties the camera selector to the specific device. This is found in the Devices section. Each device will have a unique device number per device core. This box should auto-populate when a camera is selected in binding |
| Combo Device ID | The Device ID associated with the combo device (usually a pan/tilt head) when creating a combo device to present as a single device on the panel. |
| Camera Name | Customizable name to appear on the displays. Character limit is determined by size of display and can vary. |
| Camera Config | Selects the protocol based configuration associated with camera. Needed protocol can be seen in the Devices section, each device is grouped into their native protocols. **Double check the correct configuration is selected. Improper selection will effect camera control.** |
| Iris Channel Config | Selects the needed protocol for Iris/Master Black control. For cameras without a variable lens this will follow the same protocol as the device. For cameras with a variable lens, select the protocol for the attached lens. **Not available on all configuration classes.** |
| Tally Forward Config | Selects the needed protocol for Tally to the cameras. . **Not available on all configuration classes.** |
| Tally Index | Sets the Tally Index number to connect with associated tally source device. See Blue Pill/Reactor Manual for more information. **This column does not need to be filled out for standard operation.** |
| Route Index | Sets the Route Index number to connect with associated routing device. See Blue Pill/Reactor Manual for more information. **This column does not need to be filled out for standard operation. Additionally, if needing to route to multiple destinations, additional cells need to be added. See instructions below.** |
| FrameLink Window | Sets the FrameLink Window value associated with the FrameLink device core for use with FrameLink compatible devices. See Blue Pill/Reactor Manual for more information. **This column does not need to be filled out for standard operation.** |
| Ext. Cam Number | Sets an External Camera Select number that is used in a virtual trigger to allow for syncing the camera select between multiple panels. |
| Color | Allows for the selecting of a custom color for the camera select buttons. **This would be overridden as needed if Tally Forwarding from a switcher is set up.** |
| Presets | Customize name and color for presets associated with specific camera configurations. |
|  | Delete the row. |
|  | Duplicates the details of the column. |
|  | Increments the number in the column by +1. |
|  | Adds a new line to create additional camera selects. |
|  | Opens a table to create multiple new camera selects. **See Batch Create section below.** |
| Amount of Rows to Create | The number of additional rows to be created. |
| Column Name | Which settings table row's info being referenced. |
| Populate Behavior | Select if the settings table row is to be empty, copied, or incremented by 1. [](https://wiki.skaarhoj.com/uploads/images/gallery/2025-06/screenshot-2025-06-25-at-11-24-21.png) |
| Focus Row Value | Current value of the settings table row to be left empty, copied, or incremented in the new rows. |
This can be done after adding the camera or start with a blank line in the camera selector. Holding Shift while pressing New will allow for you to add a blank line in the table without first selecting a device.
2. In the Camera Config drop down, select the desired combo device configuration. [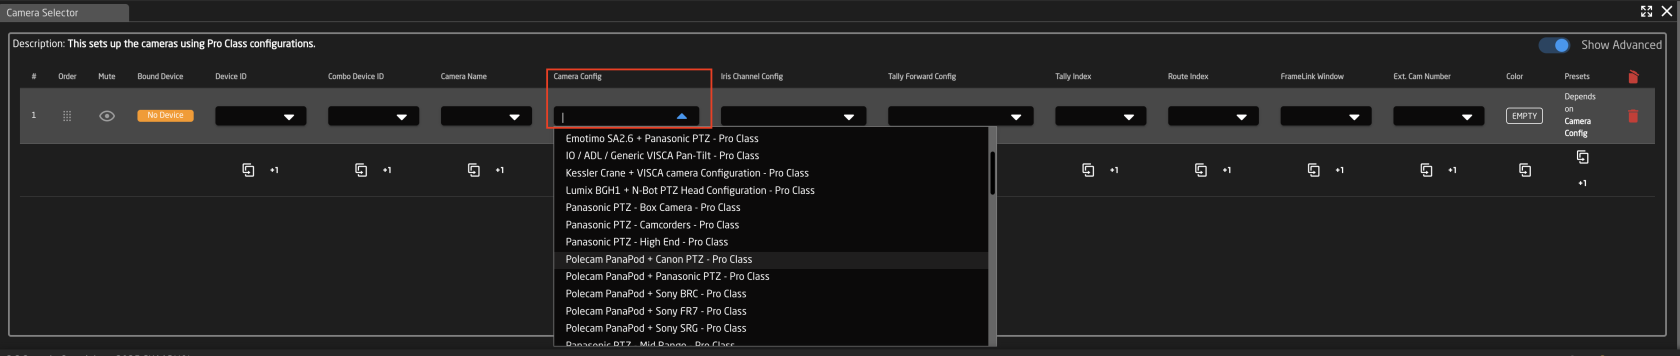](https://wiki.skaarhoj.com/uploads/images/gallery/2025-09/screenshot-2025-09-29-at-10-59-19-am.png) 3. To tie the configuration to the specific devices, enter the Device ID numbers associated with them in the Device ID and Combo Device ID column. The Device ID will be for the camera and the Combo Device ID will be for the other non camera device. You can find the specific Device ID number for each device in device details. [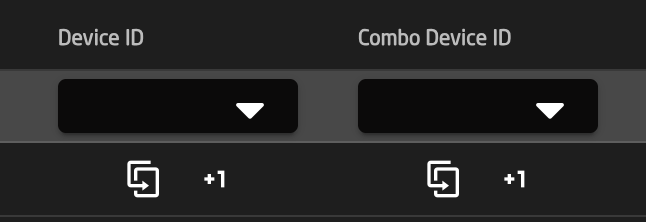](https://wiki.skaarhoj.com/uploads/images/gallery/2025-09/screenshot-2025-09-29-at-11-21-18-am.png) 4. Make sure the Iris Channel config is set to match the camera that is being control. [](https://wiki.skaarhoj.com/uploads/images/gallery/2025-09/screenshot-2025-09-29-at-11-29-33-am.png) 5. Set the Camera Name to whatever fits the operator's workflow. [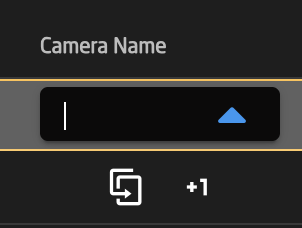](https://wiki.skaarhoj.com/uploads/images/gallery/2025-09/screenshot-2025-09-29-at-11-31-12-am.png) 6. Other fields are to be filled out based on need according the table at the top of the page. 7. The combo device should not be set up and ready to test.| **Column** | **Description** |
| Order | Allows for quick rearranging of router order. Right clicking on order will allow for deleting the row. |
| Mute | Allows for removing access to a specific router or to leave a blank spot on the panel |
| Bound Device | Allows for the selecting of a specific connected routing device. |
| Device Index | Ties the selector to a specific device associated with the config. See Device Details for the device index number. |
| Device Name | Customizable name to appear on the displays. Character limit is determined by size of display and can vary. |
| Description | Customizable description. Character limit is determined by size of display and can vary. |
| Device Configuration | Selects the protocol based configuration associated with the router. Needed protocol can be seen in the Devices section, each device is grouped into their native protocols. |
| Setting | Setup some extra configurable attributes on some specific device configs. For routers this is usual Input and Output mapping. **See Settings section below.** |
|  | Delete the row. |
|  | Duplicates the details of the column. |
|  | Increments the number in the column by +1. |
|  | Adds a new line to create additional routing select. |
|  | Opens a table to create multiple new routing selects. **See Batch Create section below.** |
| Amount of Rows to Create | The number of additional rows to be created. |
| Column Name | Which settings table row's info being referenced. |
| Populate Behavior | Select if the settings table row is to be empty, copied, or incremented by 1. [](https://wiki.skaarhoj.com/uploads/images/gallery/2025-06/screenshot-2025-06-25-at-11-24-21.png) |
| **Column** | **Description** |
| Order | Allows for quick rearranging of input/output order. Right clicking on drag will allow for deleting the row. |
| Mute | Allows for removing access to a specific input/output or to leave a blank spot on the panel |
| Output Number/Input Number | Ties the selector to the specific input/output. This is found is determined by the individual router. |
| Alternative Label | Customizable name to appear on the displays. Character limit is determined by size of display and can vary. |
| Color | Sets the button feedback color. Color options are: OFF, WHITE, WARM, RED, ROSE, PINK, PURPLE, AMBER, YELLOW, DARKBLUE, BLUE, ICE, CYAN, SPRING, GREEN, MINT. The format for color selection is all large letters with no spaces between words. |
|  | Delete the row. |
| Order | Allows for quick rearranging of layout order. Right clicking on drag will allow for deleting the row. |
| Mute | Allows for removing access to a specific layout or to leave a blank spot on the panel |
| Layout Number | Out internal reference number for the layout |
| Label | Text in displays of panel |
| Input Page Size | Input Page Size |
| Input Page Offset | Input Page Offset |
| Output Page Size | Output Page Size |
| Output Page Offset | Output Page Offset |
| Level Page Size | Level Page Size |
| Level Page Offset | Level Page Offset |
| Preset Recall Page Size | Preset Recall Page Size |
| Preset Recall Page Offset | Preset Recall Page Offset |
| Preset Store Page Size | Preset Store Page Size |
| Preset Store Offset | Preset Store Offset |
| Salvos Page Size | Salvos Page Size |
| Salvos Page Offset | Salvos Page Offset |
|  | Delete the row. |
|  | Duplicates the details of the column. |
|  | Increments the number in the column by +1. |
| **Column** | **Description** |
| Order | Allows for quick rearranging of camera order. Right clicking on drag will allow for deleting the row. |
| Mute | Allows for removing access to a specific camera or to leave a blank spot on the panel |
| Bound Device | Opens a pop up window to select the specific device to insert into the slot. Helps bind the core to the device. |
| Device ID | The device number for the router or switcher to be used. See Devices section of this page for location information. |
| Routing Device Name | The device name for the router or switcher to be used. See Devices section of this page for location information. |
| Use Switcher or Hub | Drop down to select the configuration snippet to be used. The snippet name usually contains the device's name for ease of identification. |
| ME/Bus Select | The ME/Bus/Aux number to route onto. |
| Fallback Input | If Joystick Override is used, this will be the fallback input **RCP only** |
|  | Delete the row. |
|  | Duplicates the details of the column. |
|  | Increments the number in the column by +1. |
|  | Adds a new line to create additional routing trigger. **Please Note, a Route Index cell needs to be added in the Camera Select Routing Index column for every new destination added.** |
|  | Opens a table to create multiple new routing trigger. **See Batch Create section below.** |
| Amount of Rows to Create | The number of additional rows to be created. |
| Column Name | Which settings table row's info being referenced. |
| Populate Behavior | Select if the settings table row is to be empty, copied, or incremented by 1. [](https://wiki.skaarhoj.com/uploads/images/gallery/2025-06/screenshot-2025-06-25-at-11-24-21.png) |
Please note that sometimes the first input might have an internal number of 0 (example: Atem Aux has Black as the first in the drop down, this is input 0 for aux routing)
If setting up multiple Routing Trigger destinations in the Routing Trigger Settings table, additional Route Index cells need to be add in the Routing Index column in the Camera Select Settings Table for the additional destinations to function.
 # Switcher Inputs An example of a switcher inputs selector can be seen below. These can be different depending on the selected configuration and device. From here the order of inputs for video and audio will be set as well as the desired name on the displays and button color.  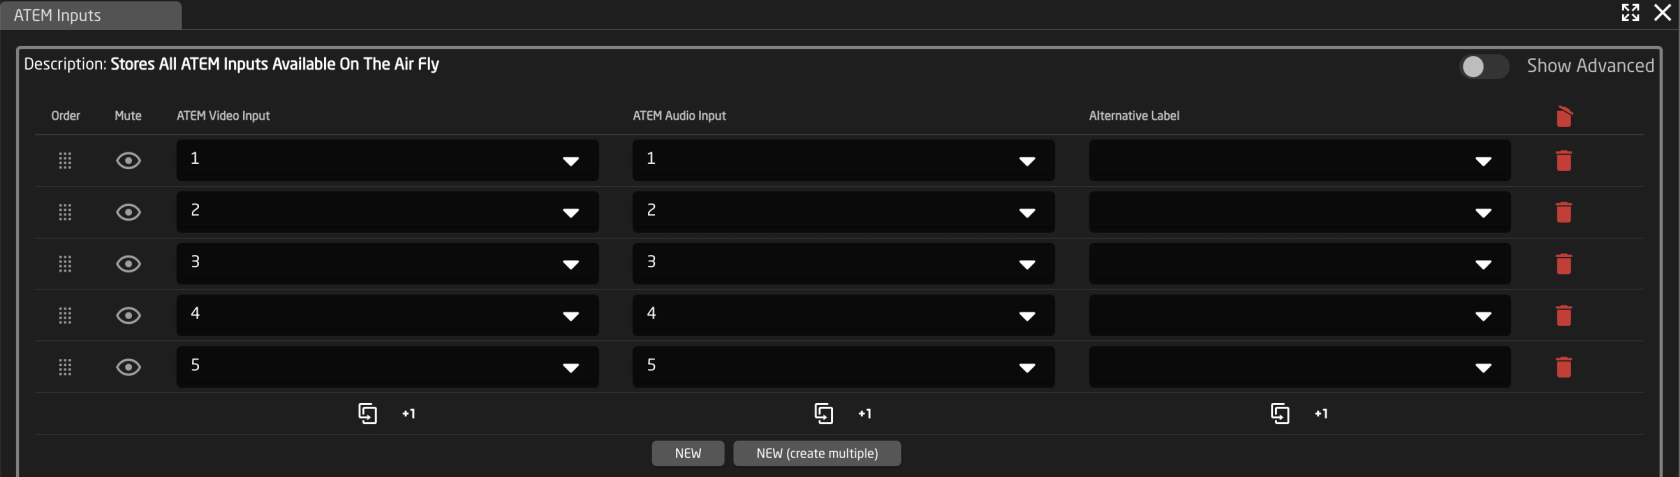| **Column** | **Description** |
| Order | Allows for quick rearranging of channel order. Right clicking on order will allow for deleting the row. |
| Mute | Allows for removing access to a specific channel or to leave a blank spot on the panel |
| Video Input | Sets video input order on the panel. |
| Audio Input | Sets audio input order on the panel. |
| Alternate Label | Customizable name to appear on the displays. Character limit is determined by size of display and can vary. |
|  | Delete the row. |
|  | Duplicates the details of the column. |
|  | Increments the number in the column by +1. |
|  | Adds a new line to create additional switching select. |
|  | Opens a table to create multiple new switching selects. **See Batch Create section below.** |
| Amount of Rows to Create | The number of additional rows to be created. |
| Column Name | Which settings table row's info being referenced. |
| Populate Behavior | Select if the settings table row is to be empty, copied, or incremented by 1. [](https://wiki.skaarhoj.com/uploads/images/gallery/2025-06/screenshot-2025-06-25-at-11-24-21.png) |
| **Column** | **Description** |
| Order | Allows for quick rearranging of camera order. Right clicking on drag will allow for deleting the row. |
| Mute | Allows for removing access to a specific camera or to leave a blank spot on the panel |
| Bound Device | Opens a pop up window to select the specific device to insert into the slot. Helps bind the core to the device. |
| Device Number | The device number for the router or switcher to be used. See Devices section of this page for location information. |
| Tally Device Name | The device name for the router or switcher to be used. See Devices section of this page for location information. |
| Use Switcher or Hub | Drop down to select the configuration snippet to be used. The snippet name usually contains the device's name for ease of identification. |
| ME/Bus Select | The ME/Bus pull the preview/program status from. |
|  | Delete the row. |
|  | Duplicates the details of the column. |
|  | Increments the number in the column by +1. |
| **Column** | **Description** |
| Order | Allows for quick rearranging of channel order. Right clicking on order will allow for deleting the row. |
| Mute | Allows for removing access to a specific channel or to leave a blank spot on the panel |
| Transition Index | Sets the transition type based on order available in the Kairos Creator, see chart below. |
| Alternate Label | Customizable name to appear on the displays. Character limit is determined by size of display and can vary. |
|  | Delete the row. |
|  | Duplicates the details of the column. |
|  | Increments the number in the column by +1. |
| 0 - Blank | 10- Wipe Box Bottom Right | 20- Barn Door Vertical | 30- PW 2 Blade Horizontal | 40- Wipe Fan Center Top | 50-W Swp Par Vertical | 60- windshield | 70- Rotate Top Right | 80- Squeeze Vertical Center |
| 1 - Mix | 11- Wipe Box Bottom Left | 21- Barn Door Horizontal | 31- PW 4 Blade | 41- WipeFan Center Right | 51- W Swp Par Diagonal | 61- Wipe Snake | 71- Rotate Bottom Right | 81- Squeeze Horizontal Center |
| 2 - Mix via Black | 12- WipeBox Top Center | 22- Barn Door Diagonal Bottom | 32- Swipe Clockwise Top | 42- Wipe Fan Top | 52- W Swp Opp Vertical | 62- Wipe Spiral | 72- Rotate Top Left Reverse | 82- Zoom |
| 3 - Mix Via White | 13- Wipe Box Right Center | 23- Barn Door Diagonal Top | 33- Swipe Clockwise Right | 43- Wipe Fan Right | 53- W Swp Opp Horizontal | 63- Scale | 73- Rotate Bottom Left Reverse | |
| 4 -Wipe Left | 14- Wipe Box Bottom Center | 24- Wipe Circle | 34- Swipe Clockwise Bottom | 44- Wipe Fan Bottom | 54- W Swp Diag Top Left | 64- Push Left | 74- Rotate Top Right Reverse | |
| 5 - Wipe Right | 15 - Wipe Box Left Center | 25- Wipe Star 4 | 35- Swipe Clockwise Left | 45- Wipe Fan Left | 55- W Swp Diag Bottom Left | 65- Push Right | 75- Rotate Bottom Right Reverse | |
| 6 - Wipe Top | 16- Wipe 4 Box In | 26- Wipe Star 5 | 36- Swipe clockwise Top Left | 46- Wipe Fan Out Vertical | 56- Saloon Door Top | 66- Push Up | 76- Squeeze Left | |
| 7- Wipe Bottom | 17- Wipe 4 Box Out | 27- Wipe Star 6 | 37- Swipe Counter clockwise Bottom Left | 47- Wipe Fan Out Horizontal | 57- Saloon Door Left | 67- Push Down | 77- Squeeze Right | |
| 8 - Wipe Box Top Left | 18- Wipe Diagonal Top Left | 28- Wipe Clock | 38- Swipe Clockwise Bottom Right | 48- Wipe Fan In Vertical | 58- Saloon Door Bottom | 68- Rotate Top Left | 78- Squeeze Top | |
| 9 - Wipe Box Top Right | 19- Wipe Diagonal Top Right | 29- PW 2 Blade Vertical | 39- Swipe Counter Clockwise Top Right | 49- Wipe Fan In Horizontal | 59- Saloon Door Right | 69- Rotate Bottom Left | 79- Squeeze Bottom |
| **Column** | **Description** |
| Order | Allows for quick rearranging of camera order. Right clicking on drag will allow for deleting the row. |
| Mute | Allows for removing access to a specific camera or to leave a blank spot on the panel |
| Bound Device | Allows for the selecting of a specific connected configuration |
| Device ID | Ties the camera selector to the specific device. This is found in the Devices section. Each device will have a unique device number per device core. This box should auto-populate when a device is selected in binding |
| Device Name | Enter the name to be used in the displays for the device selection button. |
| Description | Custom description for the configuration |
| Link Selector | Selects the needed configuration based on the device being connected. |
| Constant Sets | Opens up settings tables depending on the selected Quick Controls Config |
|  | Delete the row. |
|  | Duplicates the details of the column. |
|  | Increments the number in the column by +1. |
| **Supported** | **Not Supported** |
| Unmarked "HDMI Video Capture" as seen in picture above | Elgato Camlink 4K (Missing MJPEG support) |
| BMD Web Presenter (Old non HD version) | |
| BMD Web Presenter HD (New version) | |
| BMD Atem Mini Webcam |
This documentation might be outdated. Please consult the Reactor manual at [https://docs.skaarhoj.com/3\_configuration/default-configurations.html#engineering-menu](https://docs.skaarhoj.com/3_configuration/default-configurations.html#engineering-menu)
The engineering menu contains panel settings like, Brightness control and dim/sleep time. You can also find other settings like, expert mode and global Invert pan/tilt. It can be accessed in different ways based on the panel, and chosen configuration. ##### **How do I know which method my configuration is using?** Here we have listed the different 'panel configurations' that have the engineering menu. Remember this is a list of configurations. So the specific panels named here, only have access to the engineering menu, when the loaded configuration contains such menu. This also means that you will find panels not named here, that can also access an engineering menu. To find the exact method used in your panel config, you can navigate the list here, and try methods that is in correspondence with your panel type.For analog calibration of Blue Pill panels on the same network see the Calibration App: [https://wiki.skaarhoj.com/books/blue-pill-reactor/page/analog-component-calibration-bp-inside-](https://wiki.skaarhoj.com/books/blue-pill-reactor/page/analog-component-calibration-bp-inside-devices)
Scroll down to the bottom of the Tools Page to enable hardware calibration on panels that have an analog hardware component.Examples of analog hardware components are: T-Bar, PTZ Joystick, Fader
 Once it is enabled, the individual components will be exposed based on hardware component number. The below example is a PTZ Joystick on a PTZ Pro. Note that different hardware components may have different calibration options. 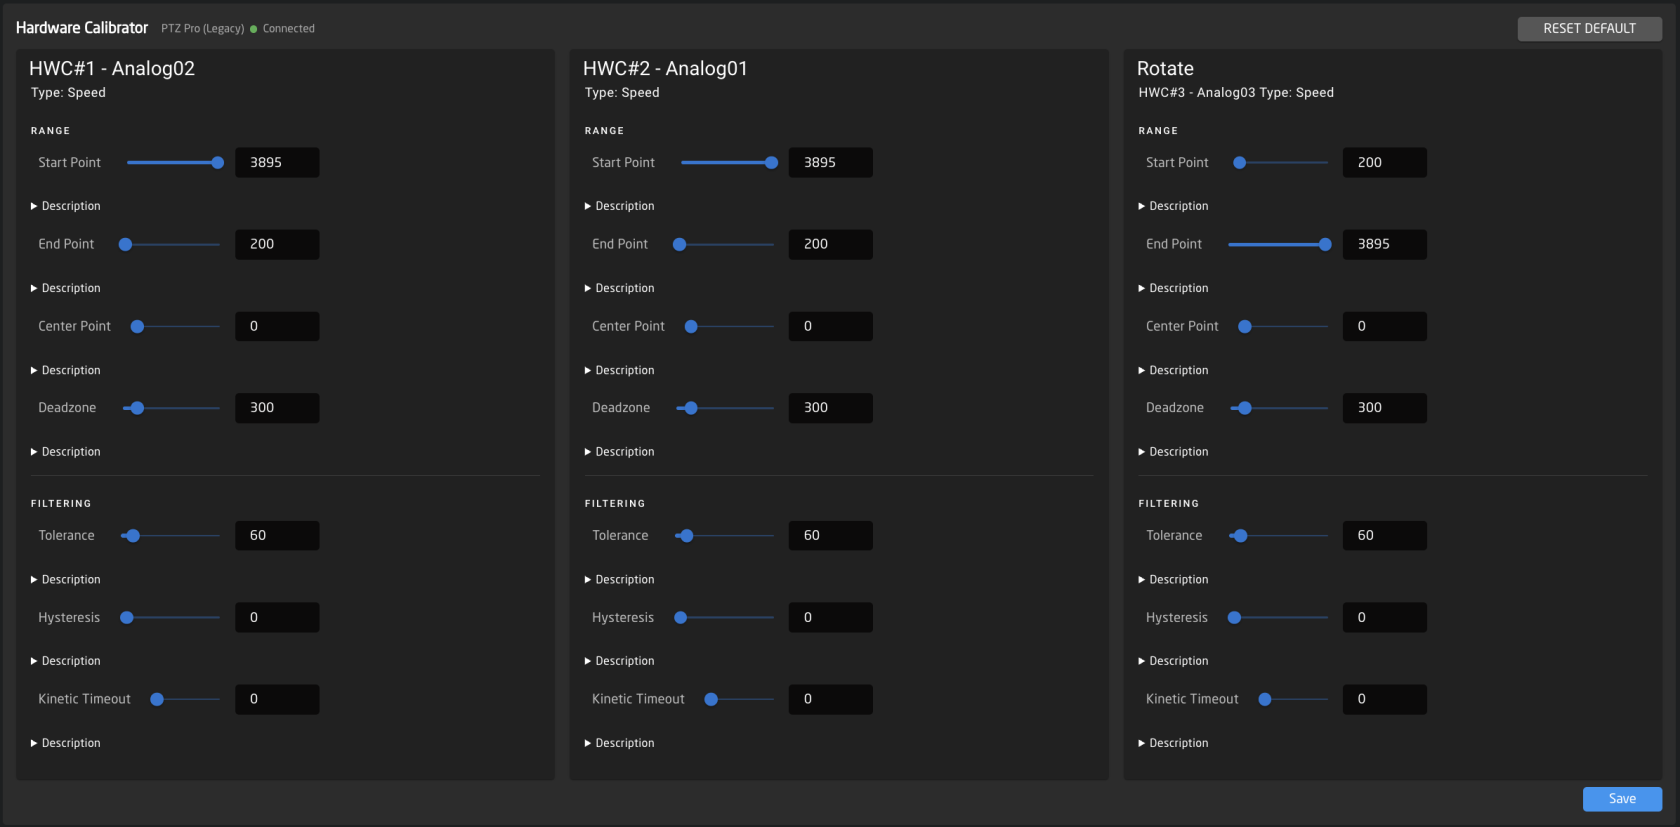 **Range** Start Point: control the ends of the component, think all the way up/down of a fader or T-bar, but all so the max movement range on a joystick or zoom rocker. If you find that you are not able to move a T-bar from 0-1000 in its raw value but instead you might only get something like 100-950 then you would move these values closer to the middle in order for the component to hit "Max/Min" before hitting the physical limit of its movement range. In the same manner, if you find that you have a lot of dead space at the ends, you can move these sliders further out to gain more resolution. End Point: control the ends of the component, think all the way up/down of a fader or T-bar, but all so the max movement range on a joystick or zoom rocker. If you find that you are not able to move a T-bar from 0-1000 in its raw value but instead you might only get something like 100-950 then you would move these values closer to the middle in order for the component to hit "Max/Min" before hitting the physical limit of its movement range. In the same manner, if you find that you have a lot of dead space at the ends, you can move these sliders further out to gain more resolution. Center Point: Allows you to move the centre of your value range, mainly found on components like the rotating component on the PTZ joysticks on a PTZ extreme. This can compensate for a slight drift in one or the other direction when you let go of the rotation. This also defines where the centre of the halfway point is on motorized faders. Deadzone: adjusts the "padding" around the centre value and how far you need to move it before it starts "moving." You would adjust this on a PTZ joystick or zoom rocker to change how sensitive it is in the middle. **Filtering** Tolerance: Is used to define how big or small a change is needed before the component sends a "change." In 99% of cases, this is not worth messing with, but if you have a stutter or maybe more than normal EMC (electromagnetic noise) in your environment, it might be worth raising this to prevent unintended movement. But again, this is only in very extreme cases. Hysteresis: The reduced change threshold used while the component is actively being moved. During movement, a change only needs to exceed this value (instead of the full Tolerance) to register, giving smoother tracking. Once movement stops (after Kinetic Timeout expires), the system reverts to requiring the full Tolerance threshold for noise rejection. A lower value means more responsive tracking during movement; a higher value filters out more jitter. Kinetic Timeout: Time in milliseconds after the last detected movement before the component switches from the lower hysteresis threshold back to the full tolerance threshold. While the component is being actively moved, smaller changes (governed by Hysteresis) are enough to register. Once movement stops for longer than this timeout, the system requires the full Tolerance value again to register a change, providing better noise rejection when the component is stationary. To disable the Hardware Calibrator again, in the Hardware Manager package toggle off Calibration Enable and press Save and Restart. 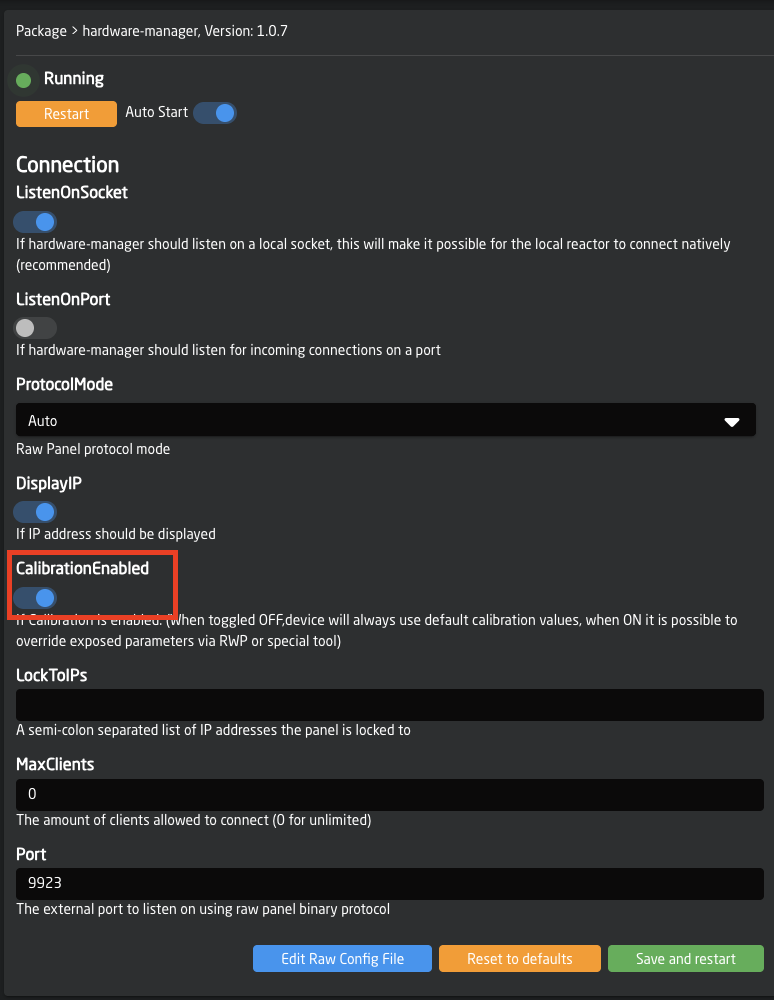 # History View**How long back can I go?** Every change from the last 24 hours is saved. After that it will be combined to 1 file per day, and saved for 10 days. It is also possible to add tags to individual versions. When a tag is added to the version, it will no longer be deleted based on the default time scale and will persist.
**What is being saved?** It's important to remember that these autosaved versions are only saving information from the Configuration tab. Although if you change things related to configurations, from the Home tab, it may also be saved, and therefore revertible from the History View. Example: Adding a Panel on the Home tab will not be part of an autosave, but choosing a configuration for it will.
If nothing shows when using a HWC, try refreshing the web browser's page.
No data will show if using the Simulator Page or simulating a panel in the Configuration Page. This is only for physical interactions with a panel.
[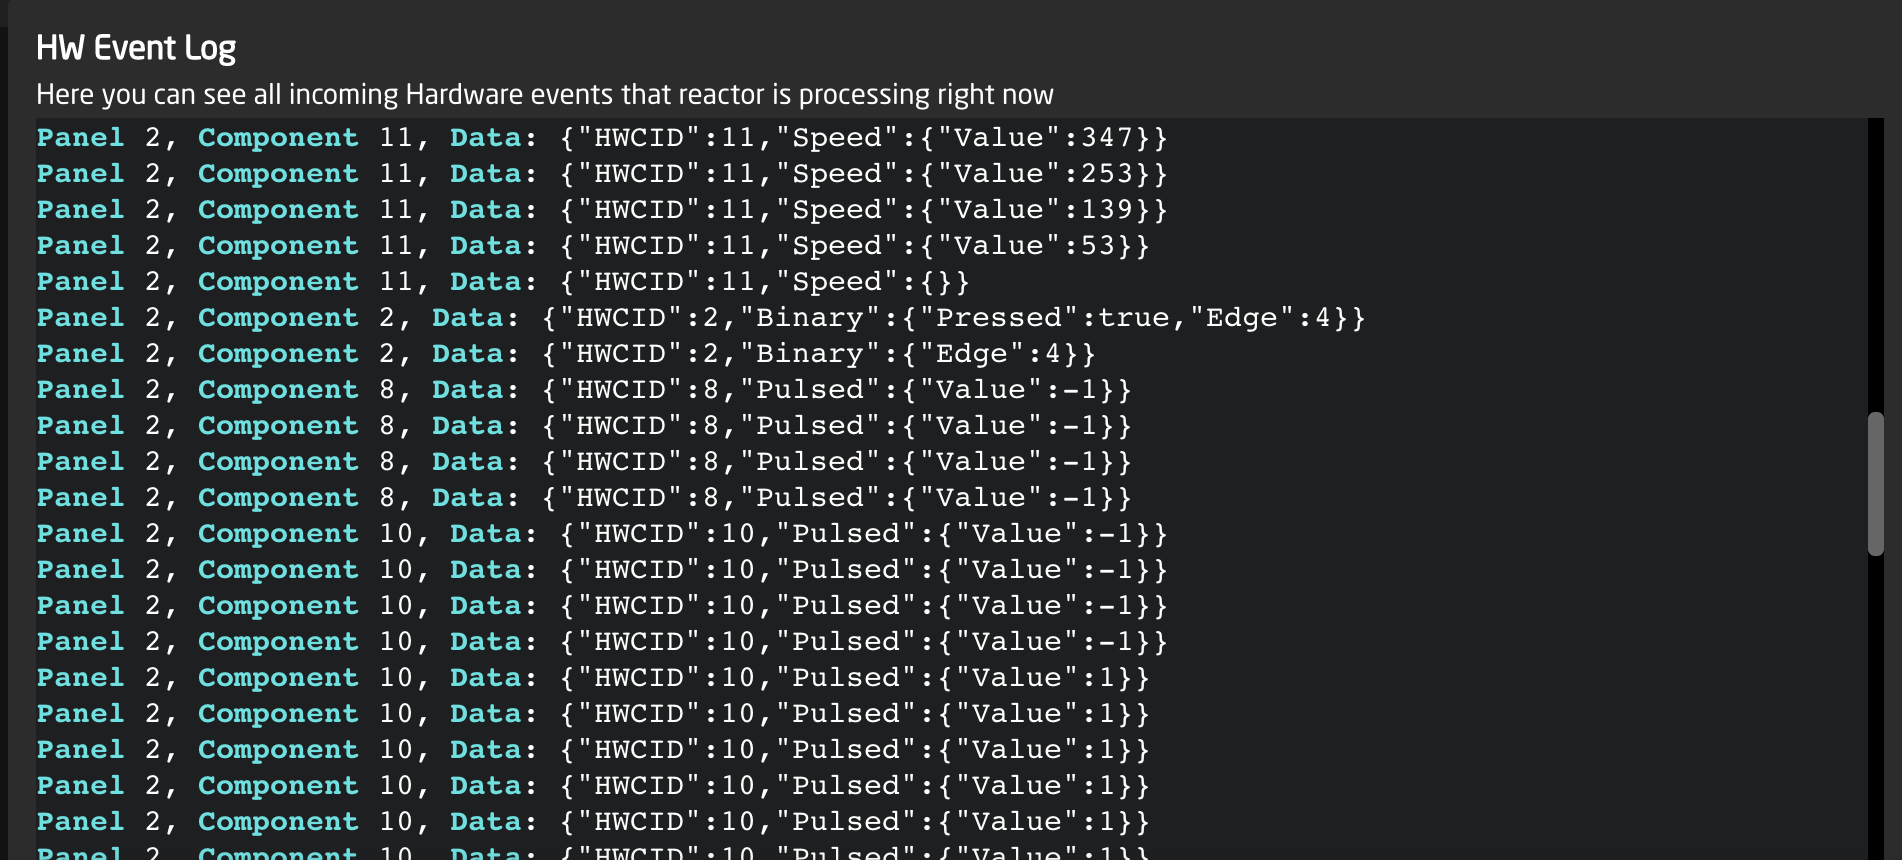](https://wiki.skaarhoj.com/uploads/images/gallery/2023-06/screenshot-2023-06-02-at-13-50-32.png) Here is a breakdown of the data: Panel 2, Component 8, Data: {"HWCID":10,"Pulsed":{"Value":-1}} The Panel # corresponds to the Panel ID number assigned on the Home Page [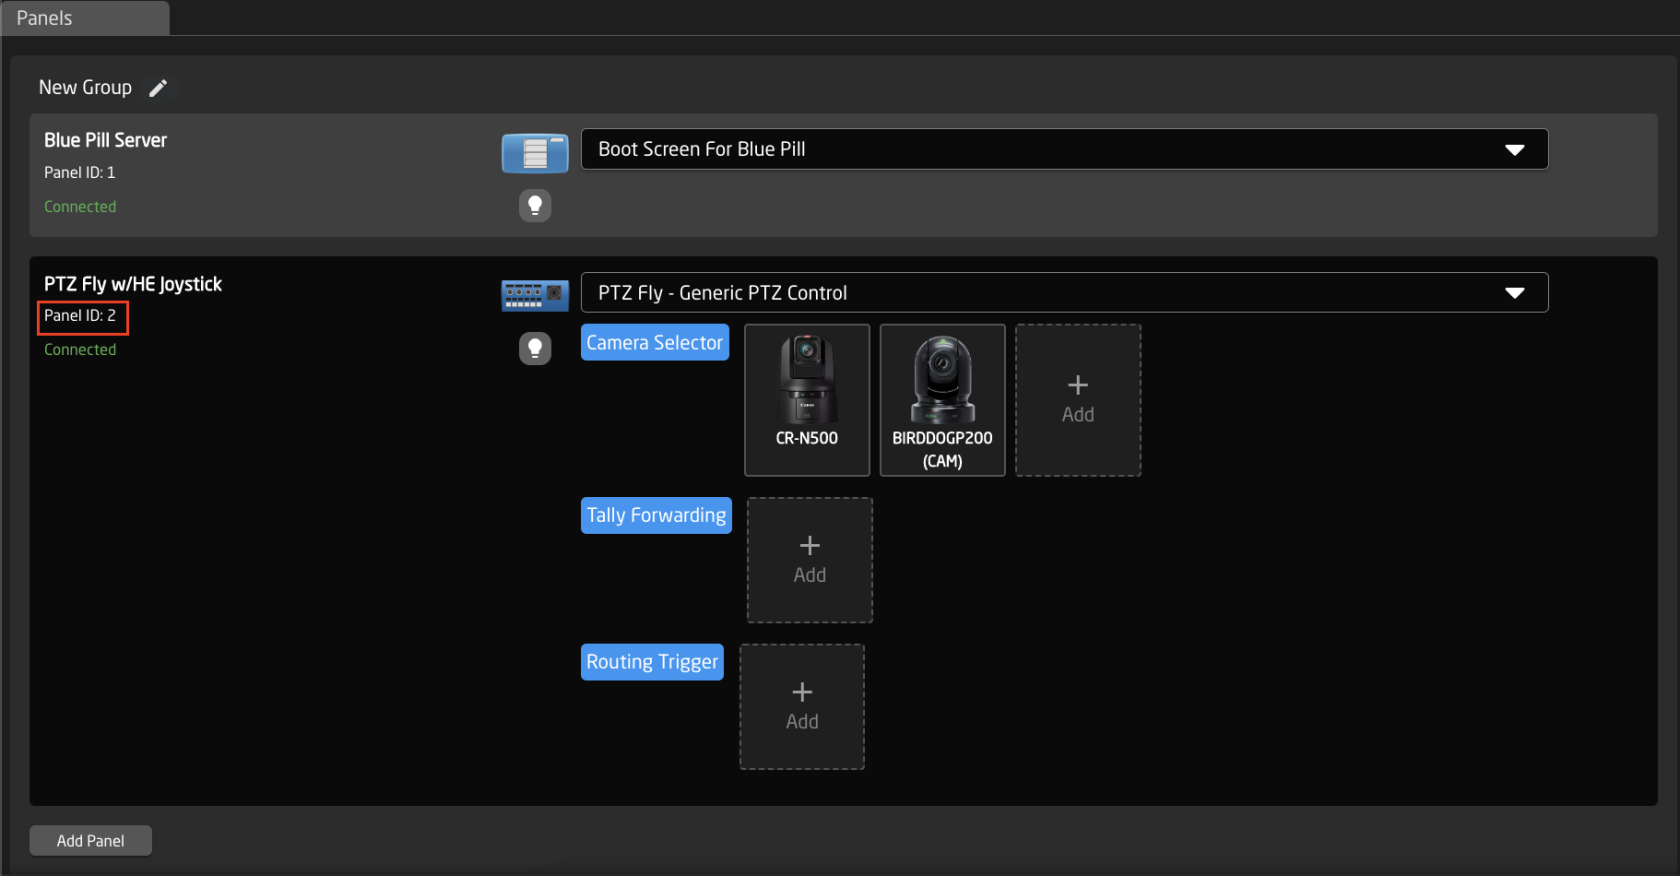](https://wiki.skaarhoj.com/uploads/images/gallery/2023-06/screenshot-2023-06-02-at-13-52-56.png) -Component # is the specific Hardware Component number for that specific component. The HWC number is the same on all panels of the same model for components that can be freely assigned. Is is possible to see the HWC number for each device here: https://devices.skaarhoj.com/panels -Data show exactly what happened. Example 1: {"HWCID":10,"Pulsed":{"Value":-1}} Hardware Component ID 10 had a pulsed input (encoder) with a value of -1 (turned counter clockwise 1 click). Example 2: {"HWCID":11,"Speed":{"Value":53}} Hardware Component ID 11 had a speed input (joystick) with a value of 53 Example 3: {"HWCID":2,"Binary":{"Pressed": true, "Edge":4}} Hardware Component ID 2 had a binary input (button) pressed true (press down) on edge 4 (down)The HW Event Log data can also be used to expose the JSON text format used by our devices. Read more about it in our Raw Panel integration manual: https://github.com/SKAARHOJ/Support/blob/master/Manuals/SKAARHOJ/SKAARHOJ\_RawPanel\_V2.pdf
# Internal Processes Stats Here you can see what is using the CPU on the device, the internal operating temperature, and more. It can sometimes be necessary to send this information to support. ### Guide: - **Use any browser to access the Blue Pill via its IP address** - **To access the statistics page write /api/getstats after the IP** *Example: XX.XX.XX.XX/api/getstats[](https://wiki.skaarhoj.com/uploads/images/gallery/2022-06/stats.png)* # mDNS Services Skaarhoj panel use mDNS to announce themselves on the network to make panel discovery easy for users. There are some network structures that can make it desired for this to be disabled. To disable this service add **disablemdns** into the log string in the System Manager package on the packages page. 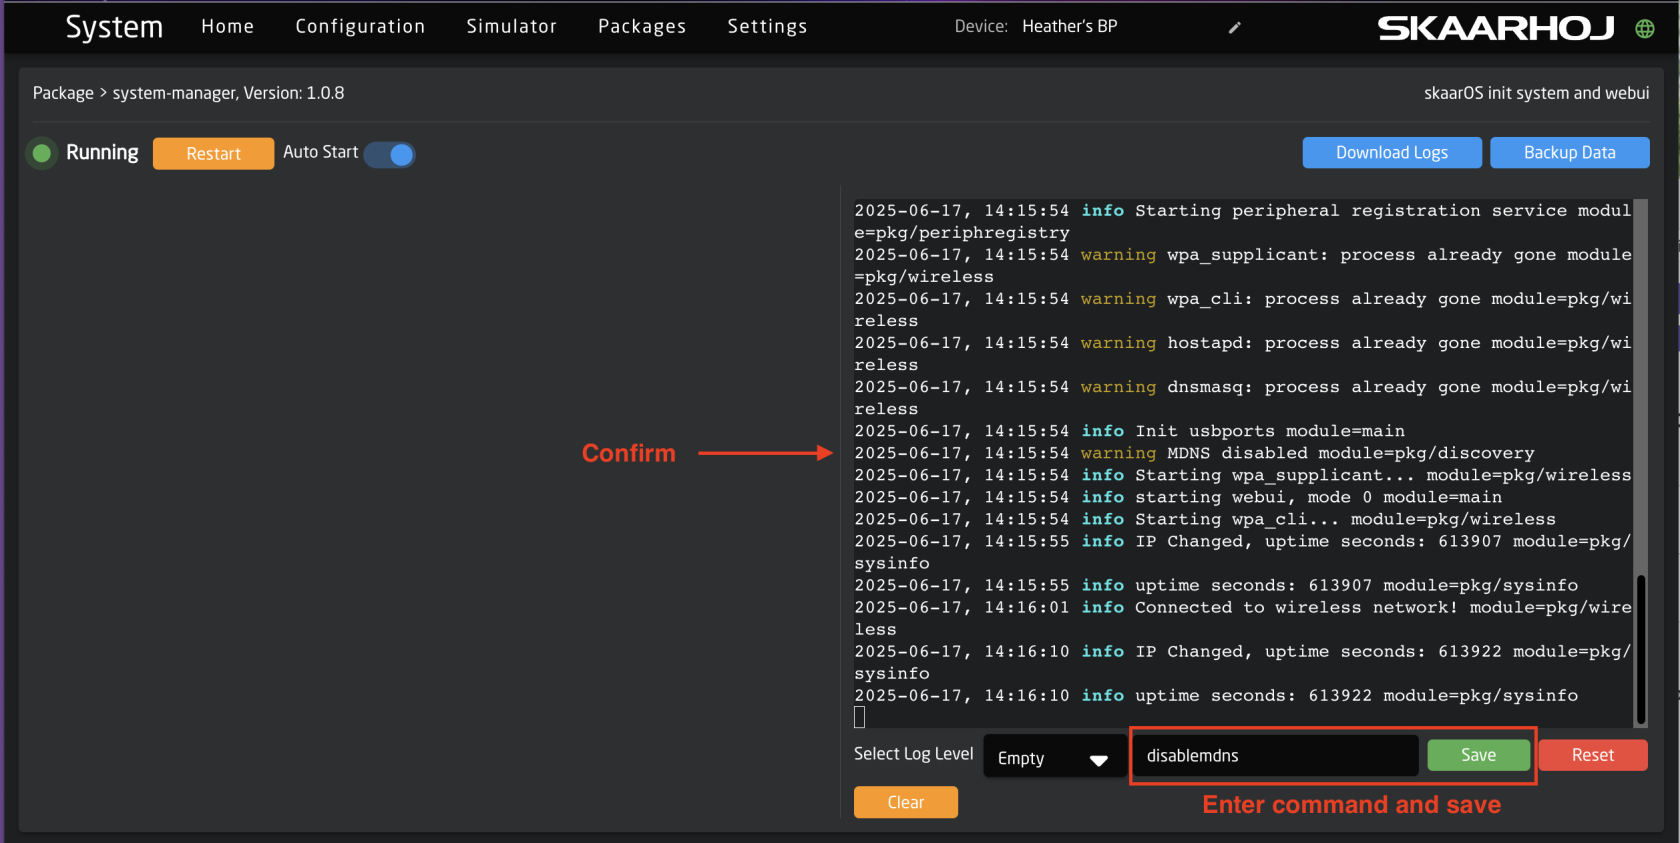 # Ping Tool Within Blue Pill it is possible to ping devices on the network allowing you to check that they are reachable from the Blue Pill or to check the stability and latency. [](https://wiki.skaarhoj.com/uploads/images/gallery/2022-06/ping-tool.png) ### Guide: - **Use any browser to access the Blue Pill via its IP address** - **To access the toolpage write /tools after the IP** *Example: XX.XX.XX.XX/tools* - **To start using the tool, write the IP of the device that should be pinged, and press the ‘Ping’ button or 'Enter' on the keyboard** *If it is able to ping the device successfully, it will write the Round Trip Time for each package* [](https://wiki.skaarhoj.com/uploads/images/gallery/2022-05/image-1651668603109.png) - **To stop the pinging press, the now Orange button, ‘stop ping’ or 'Escape' on the keyboard** *A final report will be displayed. It contains information about how many packages were successfully transmitted and the minimum, maximum and average RTT* [](https://wiki.skaarhoj.com/uploads/images/gallery/2022-05/image-1651668693479.png) # skaarOS Stats Page View processes, temperature and cpu load of your skaarOS device. ### How to access: There is two ways getting to the Stats Page ##### **Option 1** **Access the toolpage write /tools after the IP** *Example: XX.XX.XX.XX/tools* And then from there click Open, under skaarOS Stats Page [](https://wiki.skaarhoj.com/uploads/images/gallery/2022-08/screen-recording-2022-08-04-at-09-55-33-adobeexpress.gif) ##### **Option 2** **Go directly to Stats Page by writing /api/getstats after the IP** *Example: XX.XX.XX.XX/api/getstats* # Tools Page In Reactor there is a dedicated Tools Page to bring a few specific options into a single place. To access the Tools Page, use the Tools symbol in the lower right corner 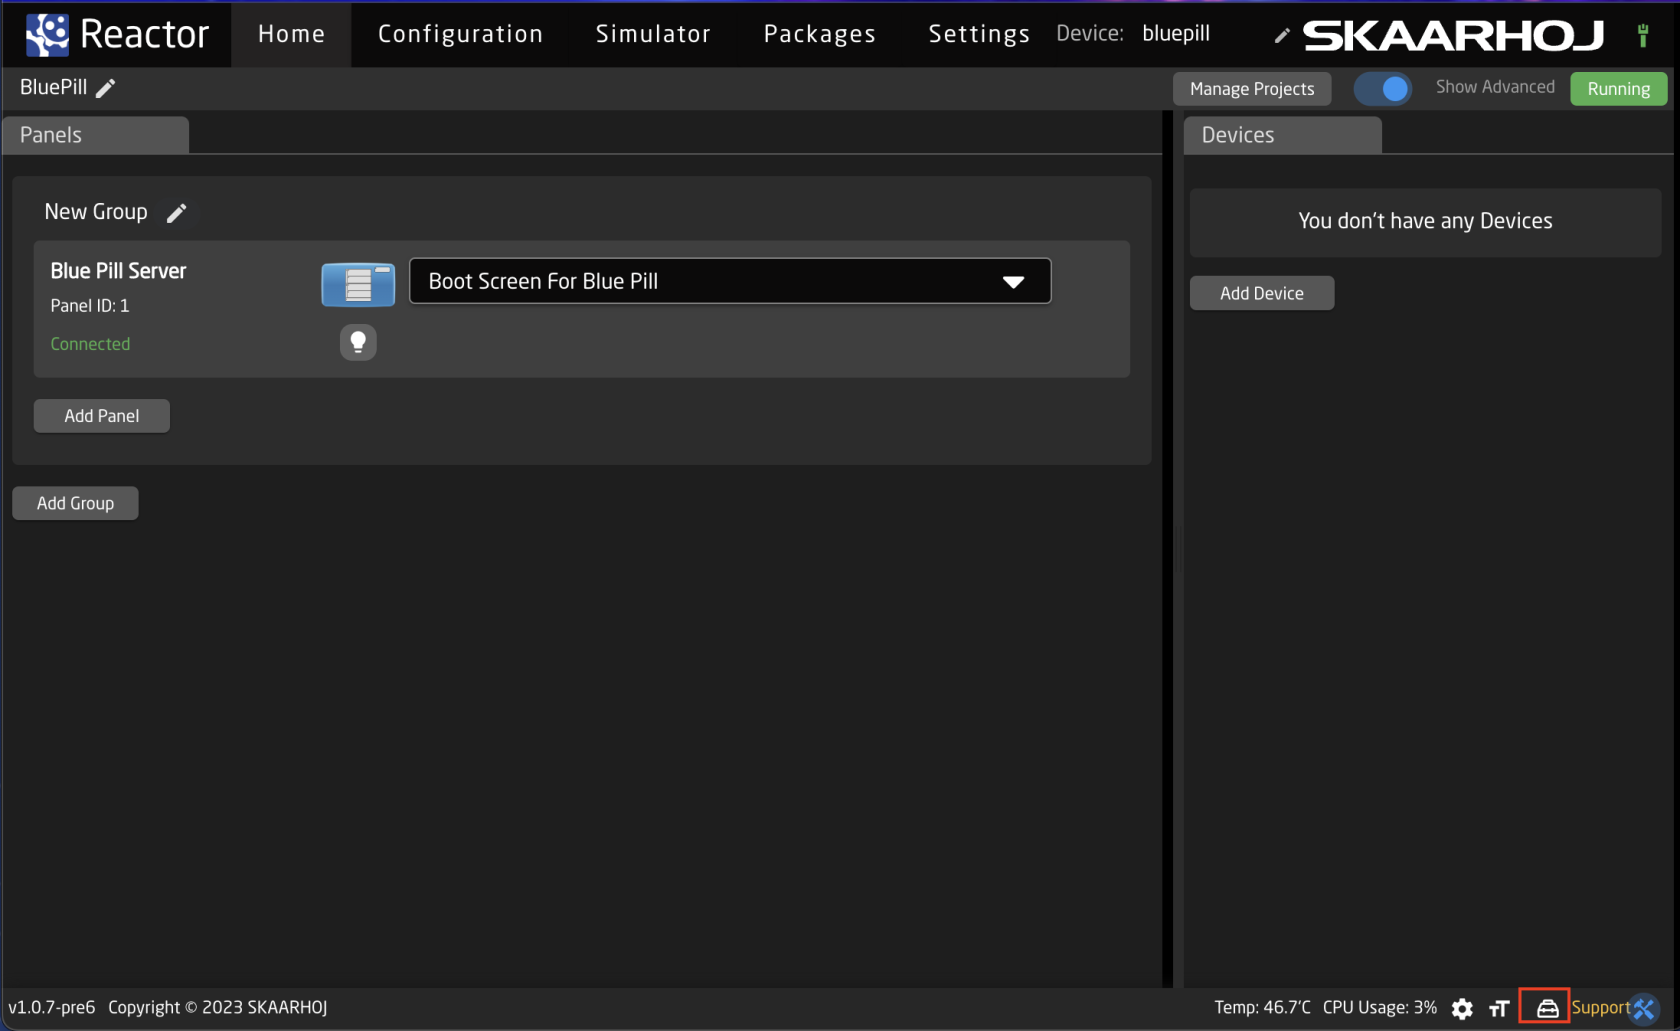 This will bring you to the full Tools page. On this page you can: [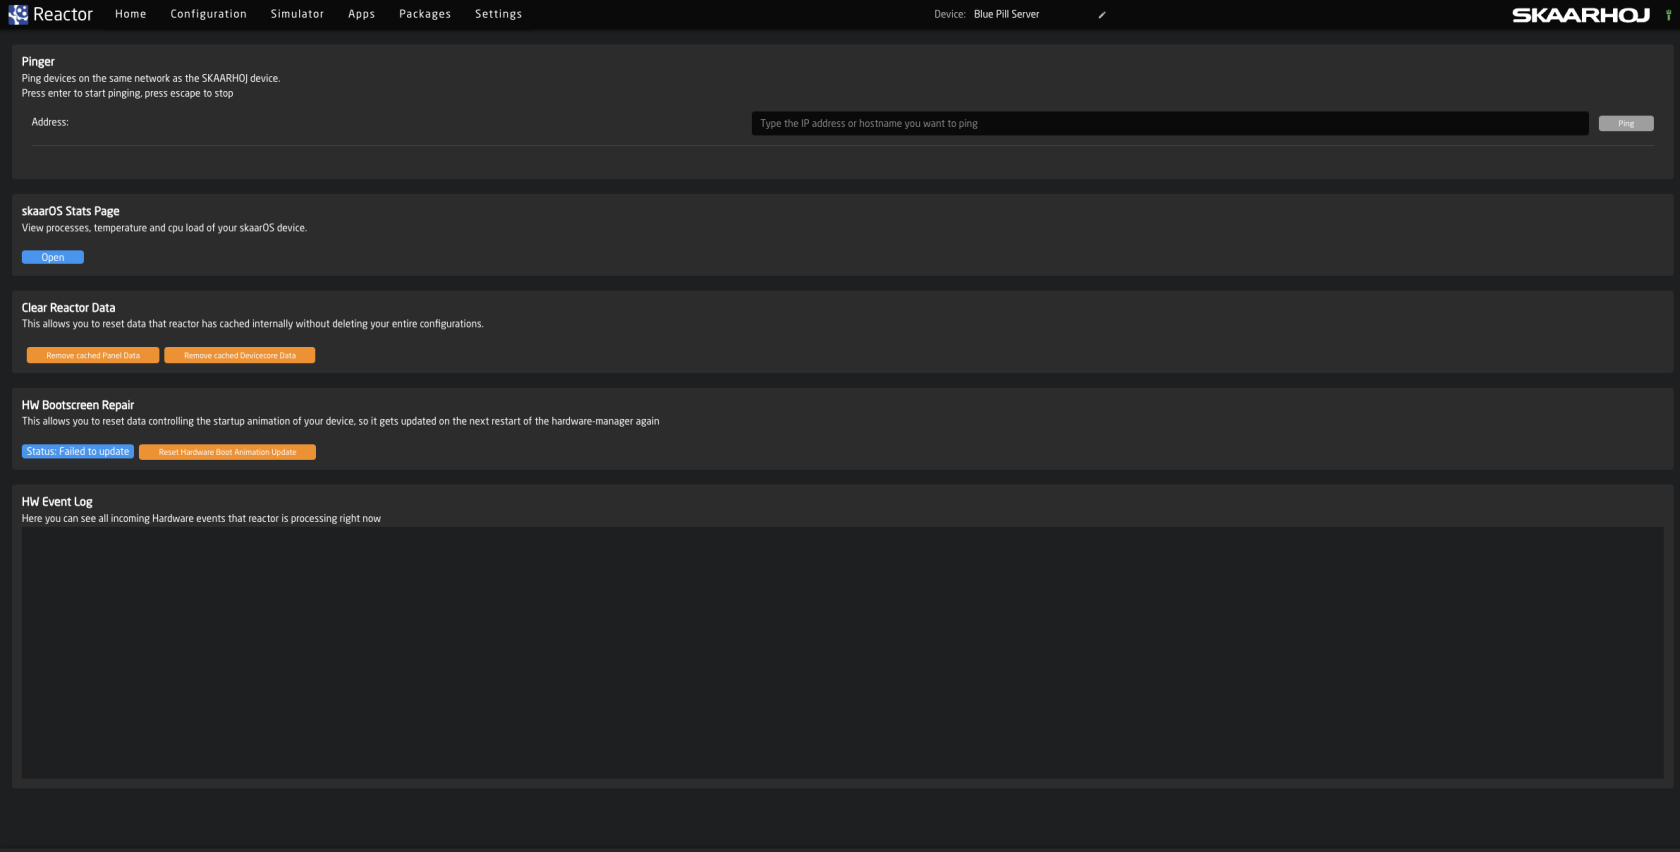](https://wiki.skaarhoj.com/uploads/images/gallery/2024-05/screenshot-2024-05-02-at-10-15-19.png) 1. Pinger Tool, to check availability of other devices on your network. [https://wiki.skaarhoj.com/books/blue-pill-reactor/page/ping-tool](https://wiki.skaarhoj.com/books/blue-pill-reactor/page/ping-tool) 2. IP Scanner, to scan for devices on other devices on your network. 3. SkaarOS Stats Page, to check the internal processes of the Blue Pill device [https://wiki.skaarhoj.com/books/blue-pill-reactor/page/skaaros-stats-page](https://wiki.skaarhoj.com/books/blue-pill-reactor/page/skaaros-stats-page) 4. Clear Reactor Data, to clear the Reactor Cached data for the Panels and/or Devices 5. Hardware Bootscreen Repair allows you to reset data controlling the startup animation of your device, so it gets updated on the next restart of the hardware-manager again 6. HW Event Log, to help troubleshoot a potential hardware component issue. [ ](https://wiki.skaarhoj.com/books/blue-pill-reactor/page/hw-event-log)[https://wiki.skaarhoj.com/books/blue-pill-reactor/page/hw-event-log](https://wiki.skaarhoj.com/books/blue-pill-reactor/page/hw-event-log) 7. Debuglog, If enabled it logs all hardware events and stats to a downloadable file for diagnostic purposes. 8. Prometheus Metrics, generates Prometheus Metrics available at the Blue Pill devices IP address/metrics. This is then usable by Grafana to help monitor the devices processes for more intensive monitoring. 9. Hardware Calibrator, allows for the calibrations of analog hardware on the local Blue Pill panel. [https://wiki.skaarhoj.com/books/blue-pill-reactor/page/hardware-calibrator](https://wiki.skaarhoj.com/books/blue-pill-reactor/page/hardware-calibrator) # Using a USB Network Adapters or LTE modems In some circumstances it might be useful to use a secondary network cable on your BluePill or BluePill-Inside Product To do that you can use the USBA Port of the device to connect an external network adapters. Requirements: Make sure you are running **system-manager** **v1.0.3-pre7** or higher. **skaarOS** should be **1.2-pre5** or higher. 1\. Make sure USBA is enabled on your device. Go to the "Settings" tab and change the USBA switch to ON. You might need to reboot your device after toggeling. [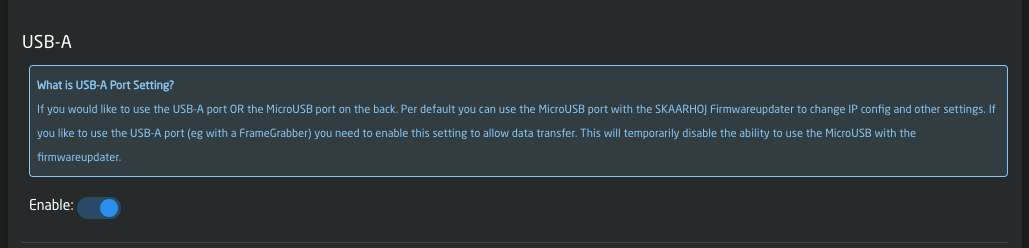](https://wiki.skaarhoj.com/uploads/images/gallery/2024-01/screenshot-2024-01-29-at-16-46-51.png) 2\. Plug in a USB to Ethernet Adapter into the devices USBA port and wait about 5 seconds, then refrehs the settings page in your browser. You should now see an "Other" tab in your network settings, that will let you configure the IP settings for the external connection. [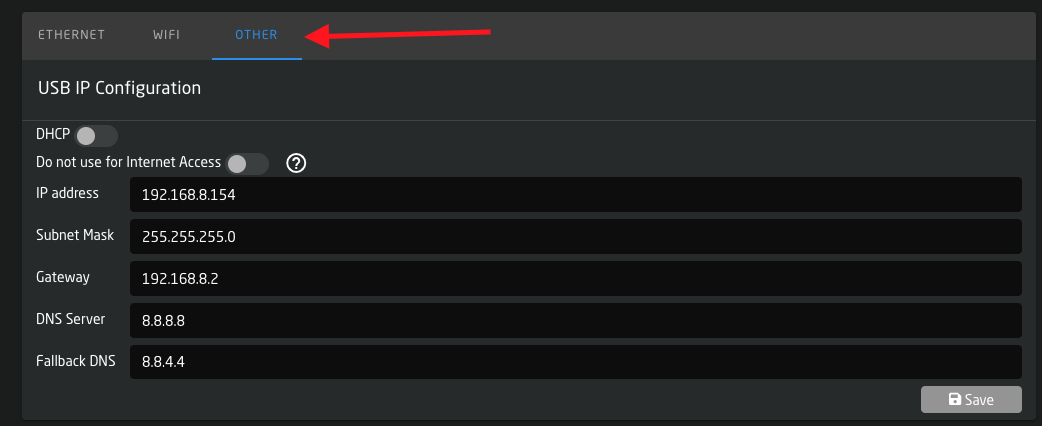](https://wiki.skaarhoj.com/uploads/images/gallery/2024-01/hUHscreenshot-2024-01-29-at-16-51-13.png) Done ! ✅ ##### Note on Compatible Devices: **Tested Working 👍** We have tested this feature with many different ethernet adapters. Most Adapters powered by Realtek will work fine rtl8153b-2 rtl8153a-4 **Tested NOT Working 👎** Some rare cases do not work, notably Apple-branded USB-Ethernet Adapters and adapters with the **ASIX AX88179** chipset. (eg pluggable USB3-E1000) #### Using LTE Modems In the same way you are also able to use your device over LTE. The modems you can use should not need too much power and support the native cdc\_ether linux drivers. [](https://wiki.skaarhoj.com/uploads/images/gallery/2024-01/huawaimodem.jpeg) We have tested this with the **Huawai E3372 Modems**. Other modems are not supported at this time. Simply connect this modem on the USB A port as well. Select DHCP as network config. The device will usually get a 192.168.8.X IP address from the modem. Make sure your modem connects to the internet automatically (no sim pin lock or others) Done! ✅ # Troubleshooting Troubleshooting scenarios and things to try. # Blue Pill Controller Showing Unknown If the Blue Pill or Blue Pill Inside controller is showing in the panels sections of the Home screen as Unknown it could be a few issues. [](https://wiki.skaarhoj.com/uploads/images/gallery/2022-08/unknown.png) 1\. Check that the panel's IP address in the device details section is set to HOST. This indicates that the device has the Blue Pill native inside and is not controlled by another device. [](https://wiki.skaarhoj.com/uploads/images/gallery/2022-08/host.png) 2\. If it is set correctly but still not registering, delete the panel from the home page and re-add it. It can be deleted[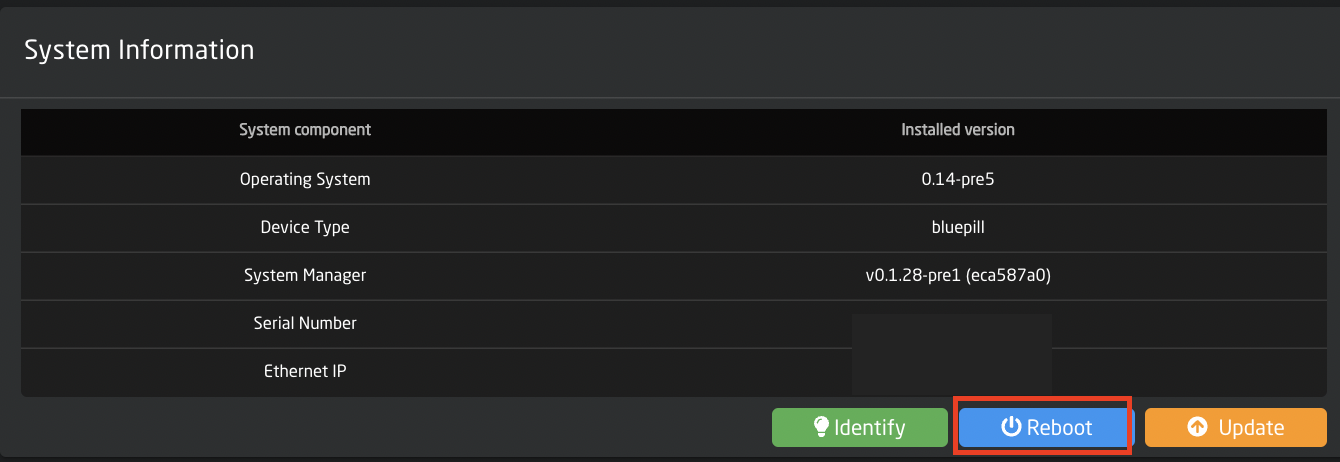](https://wiki.skaarhoj.com/uploads/images/gallery/2022-08/bDhreboot.png) by right clicking on the panel name and selecting either Remove panel from configuration or Remove panel and configuration. [](https://wiki.skaarhoj.com/uploads/images/gallery/2022-08/remove-panel.png) It is easily added again by clicking Add Panel and selecting Connect next to the notification about the native panel not being connected. [](https://wiki.skaarhoj.com/uploads/images/gallery/2022-08/add-panel.png) 3\. If the panel is still not properly connecting to itself, try rebooting the panel. This can be done by pressing Reboot on the Setting page under System Information. [](https://wiki.skaarhoj.com/uploads/images/gallery/2022-08/bDhreboot.png) 4\. If the panel still does not connect, reset the Hardware Manager settings to default. On the Packages page, click on the Hardware-Manager. At the bottom, click on Reset to Default. [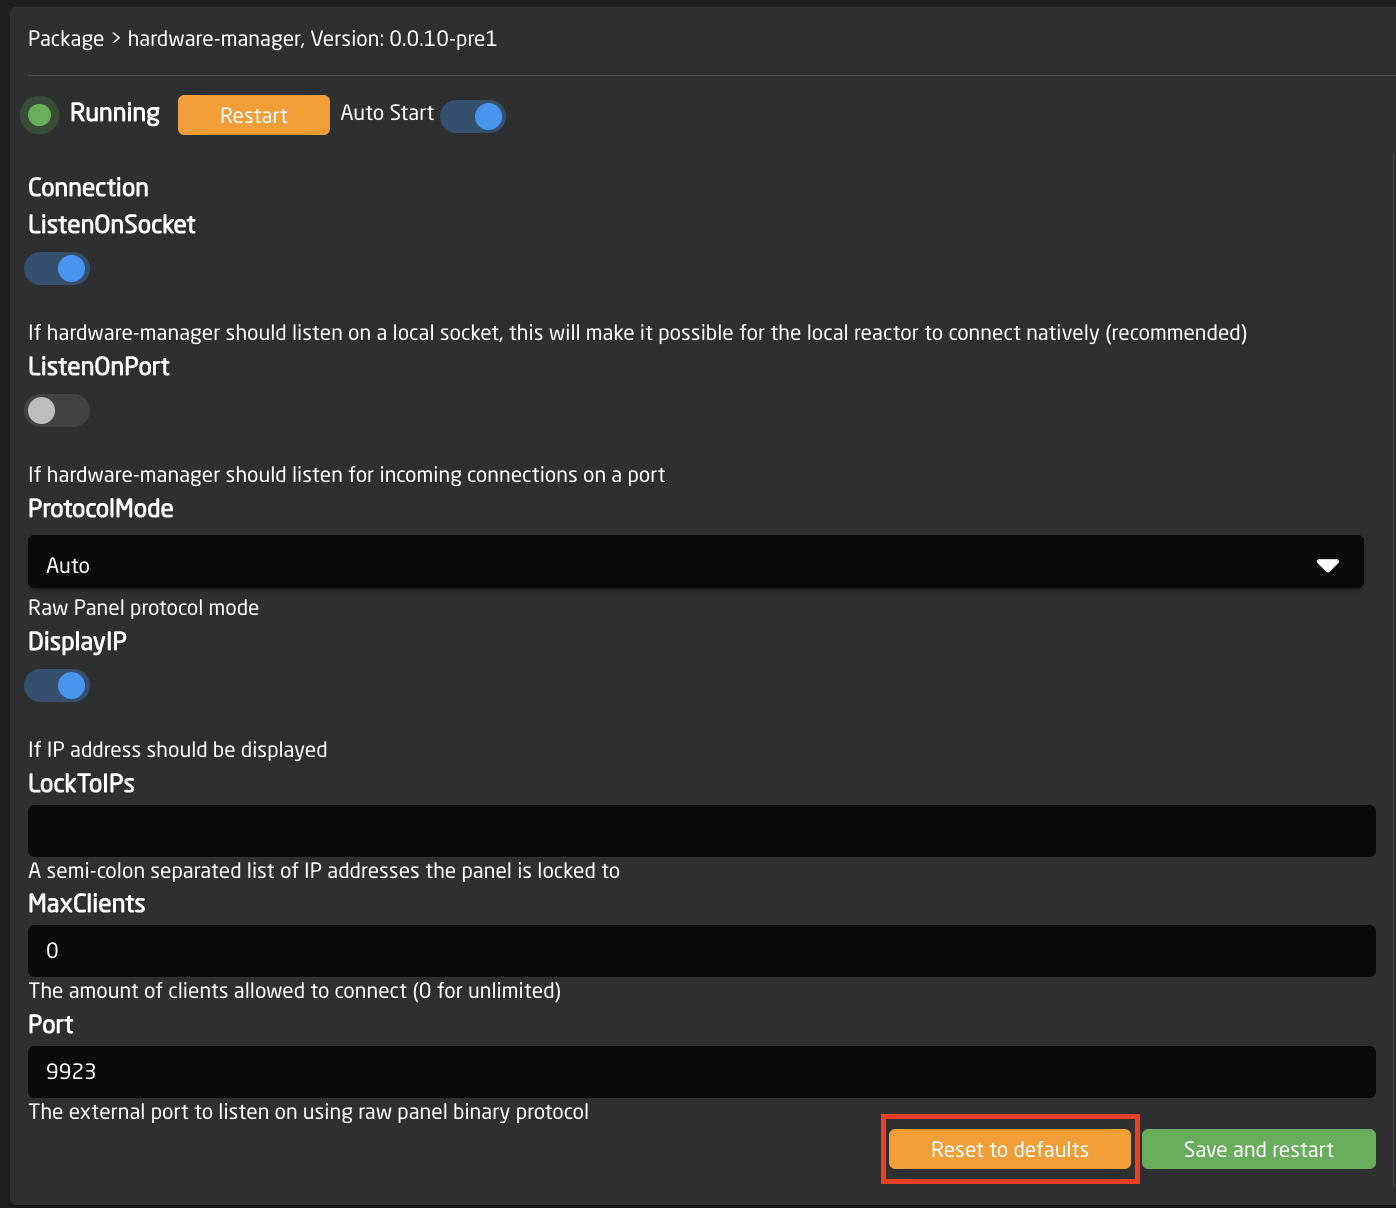](https://wiki.skaarhoj.com/uploads/images/gallery/2022-08/default-hardware.png) 5\. The next option, if the others have not worked, is to clear the config directory for the Hardware Manager. On the Packages page in the Hardware Manager package, press Clear Config Directory. [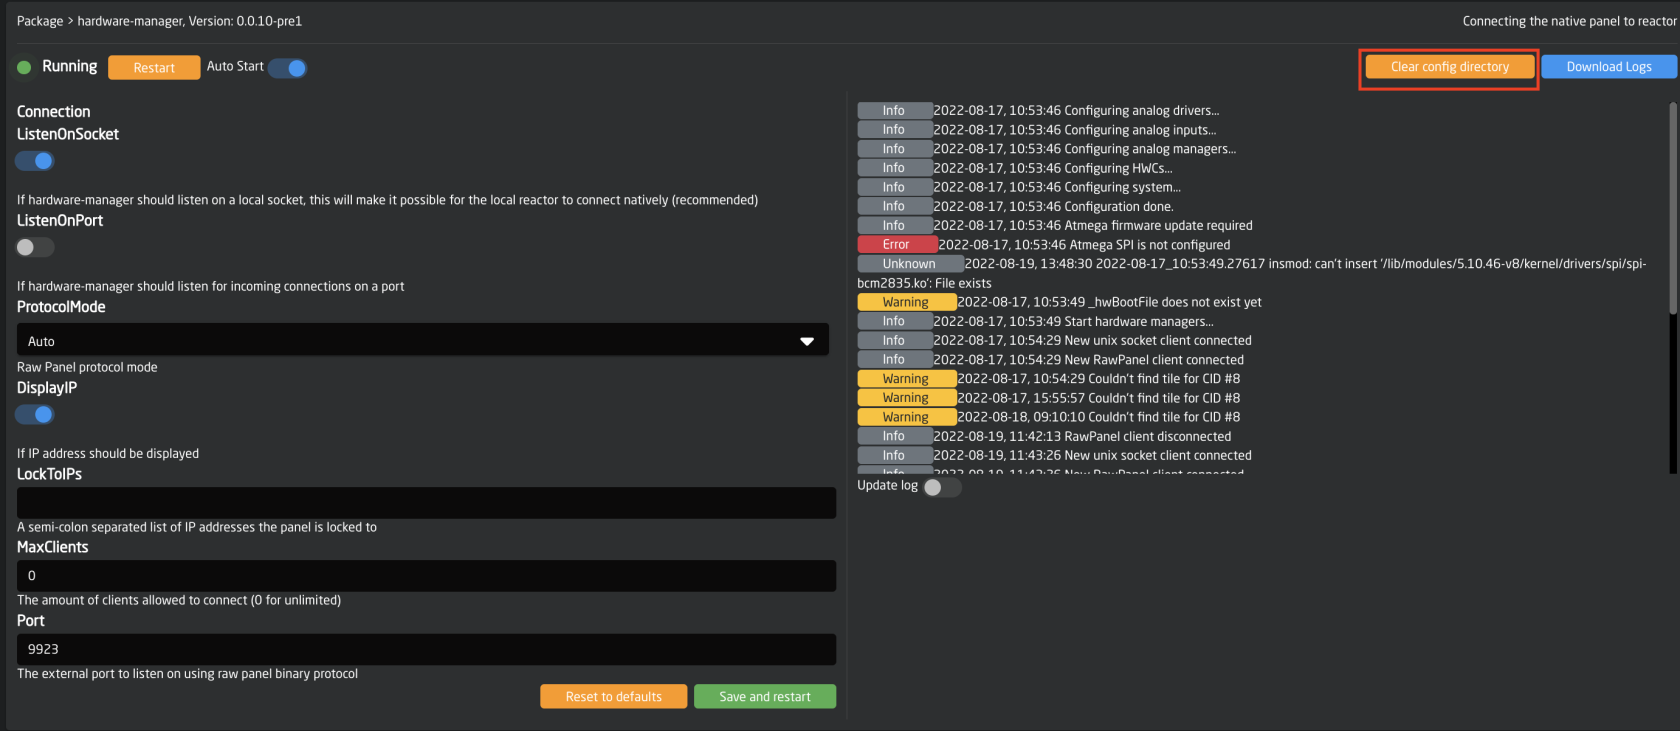](https://wiki.skaarhoj.com/uploads/images/gallery/2022-08/clear-config.png) After clearing the config directory, go back to the main Packages page and click on the status next to the Reactor package. This will trigger a pop up with some quick actions. Press Restart.  6\. The last option is more of a nuclear option since it will completely wipe clean all configurations, added devices, added panels, and projects. Please contact Skaarhoj support before attempting to see if they can find another solution. The last resort is to clear the config directory for Reactor. On the Packages page go into the Reactor package and press Clear Config Directory. Then reboot the Blue Pill panel. [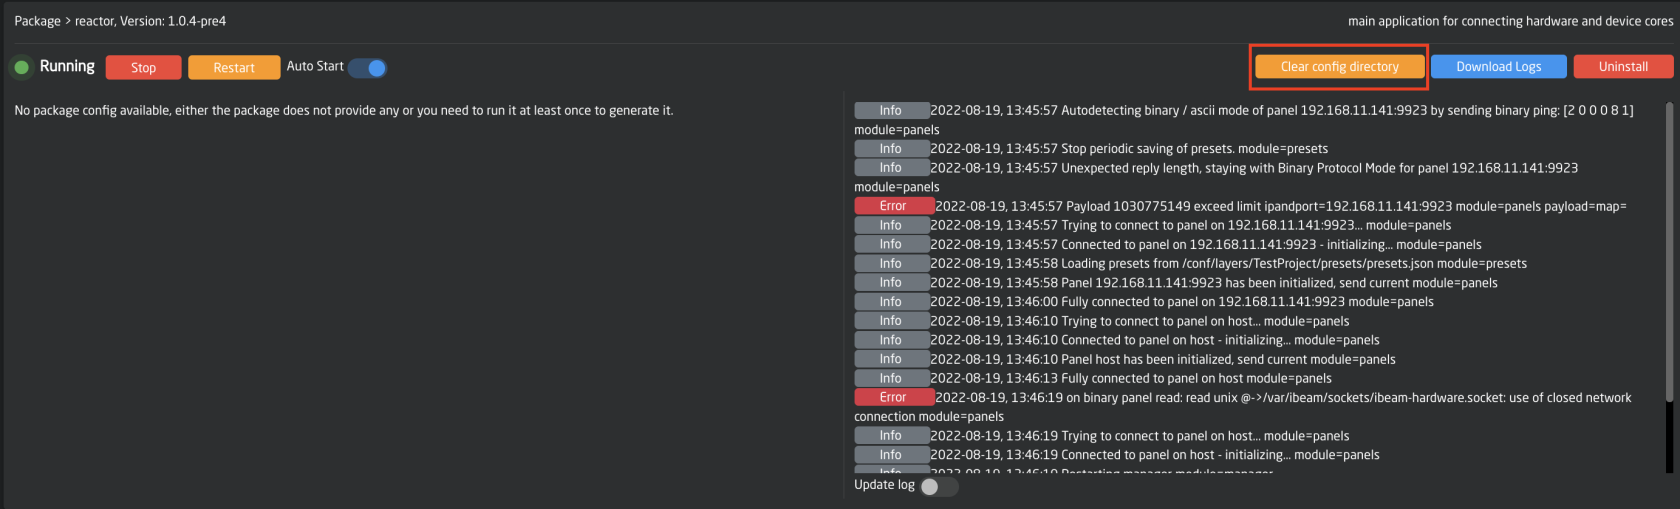](https://wiki.skaarhoj.com/uploads/images/gallery/2022-08/reactor-config-directory.png) # Blue Pill panels boot animation during startup. **Should my BPI product have an animation during startup ?** Below is a table summarising the status of implementing the boot animations to various products:| **Controller** | **Status** | **Comments** |
| AIRFLY | RELEASED | |
| QUICKBAR | RELEASED | |
| AIRFLYPROV2 | On hold | |
| AIRFLYPROV3 | RELEASED | |
| BLUE PILL SERVER | RELEASED | |
| COLORFLYV3 | RELEASED | |
| FRAMESHOTUNO | RELEASED | |
| HEIREPLAYV2 | RELEASED | |
| HEISIDECAR | RELEASED | |
| INLINE10 | RELEASED | |
| INLINE22V2 | RELEASED | |
| LIVEFLY | RELEASED | Nkk version was added in v 0.1.7 |
| MASTERKEYONEV2 | RELEASED | 2 Versions: single and double bus |
| MINIFLY | RELEASED | |
| MK48 | RELEASED | |
| MKA1 | TO BE DONE | |
| MKA2/PTZ VIEW | RELEASED | |
| MKA3 | TO BE DONE | |
| MKA4 | Quickshot | RELEASED | |
| MKT1A/B |
T-Block R/L | RELEASED | |
| PTZEXTREMEV2 | RELEASED | |
| PTZFLY | RELEASED | |
| PTZPROV2 | RELEASED | |
| PTZWIZV2 | RELEASED | |
| RACKCONTROLDUO | RELEASED | |
| RACKCONTROLUNO | RELEASED | |
| RACKCTRLXK1 | RELEASED | |
| RACKCTRLXK2 | RELEASED | |
| RACKCTRLXK3 | RELEASED | |
| RACKFLYDUO | RELEASED | |
| RACKFLYTRIO | RELEASED | |
| RACKFLYUNO | RELEASED | |
| RACKFUSIONLIVE | RELEASED | Nkk added in v0.2.9. |
| RACKPRO1 | RELEASED | |
| RACKPRO2 | RELEASED | |
| RACKPRO3 | RELEASED | |
| RCPPRO | RELEASED | |
| RCPV2 | RELEASED | |
| WAVEBOARDV2 | RELEASED | |
| WAVEBOARD MINI | RELEASED | |
| XC8S | RELEASED | |
| XPOINT24 | RELEASED | Had wrong file, fixed in v0.1.9 |
| XPOINT48V2 | RELEASED | |
| FRAMESHOTPRO | RELEASED | |
| REDIRON/
RC-SK5 | RELEASED |
| Status | Boot Animation at Startup | Comments |
| OK | YES | Everything is good, no need to do anything |
| OK | NO | Click on "Reset Hardware Boot Animation Update" and restart hardware-manager when asked |
| Failed to update | NO | Click on "Reset Hardware Boot Animation Update" and restart hardware-manager when asked |
| Unknown | YES/NO | This means your panel or specific version of your panel does not have a Bootscreen animation firmware available. |
If you do not have internet access on your Blue Pill device see: [https://wiki.skaarhoj.com/books/blue-pill-reactor/page/uploading-device-corespackagesos-from-offline-RId](https://wiki.skaarhoj.com/books/blue-pill-reactor/page/uploading-device-corespackagesos-from-offline-RId)
4\. Sometimes after manually adding the package the device still does not show up in the devices section of the home page. In that case, click into the device core package on the packages page and press Clear Config Directory. [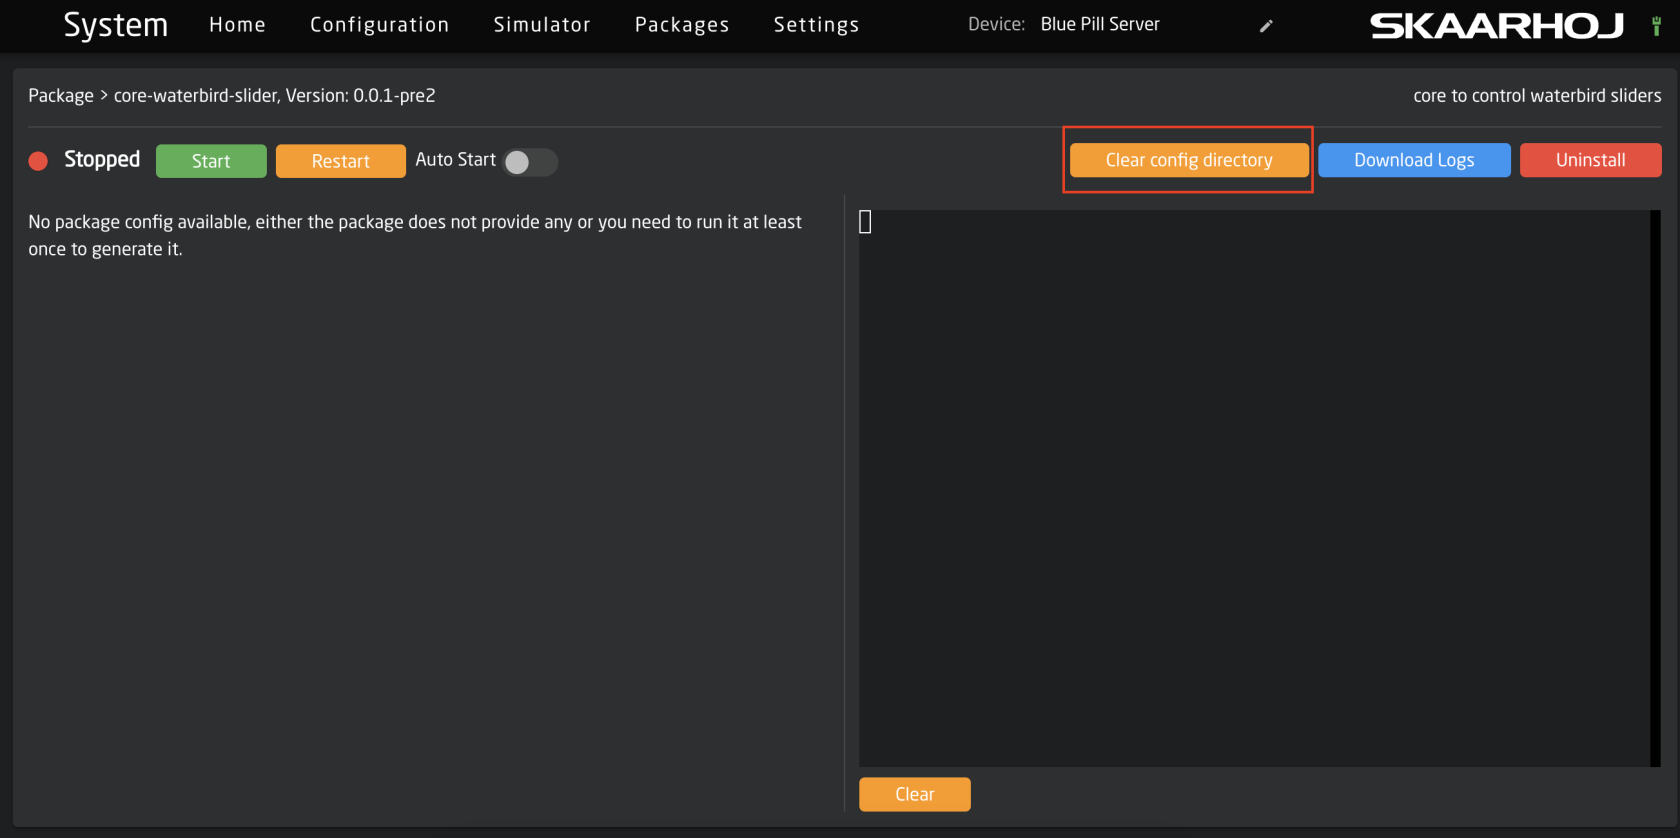](https://wiki.skaarhoj.com/uploads/images/gallery/2023-10/screenshot-2023-10-25-at-14-09-07.png) 5\. After clearing the config directory, go back to the main packages page. Click on the status of the Reactor package, then press Restart. [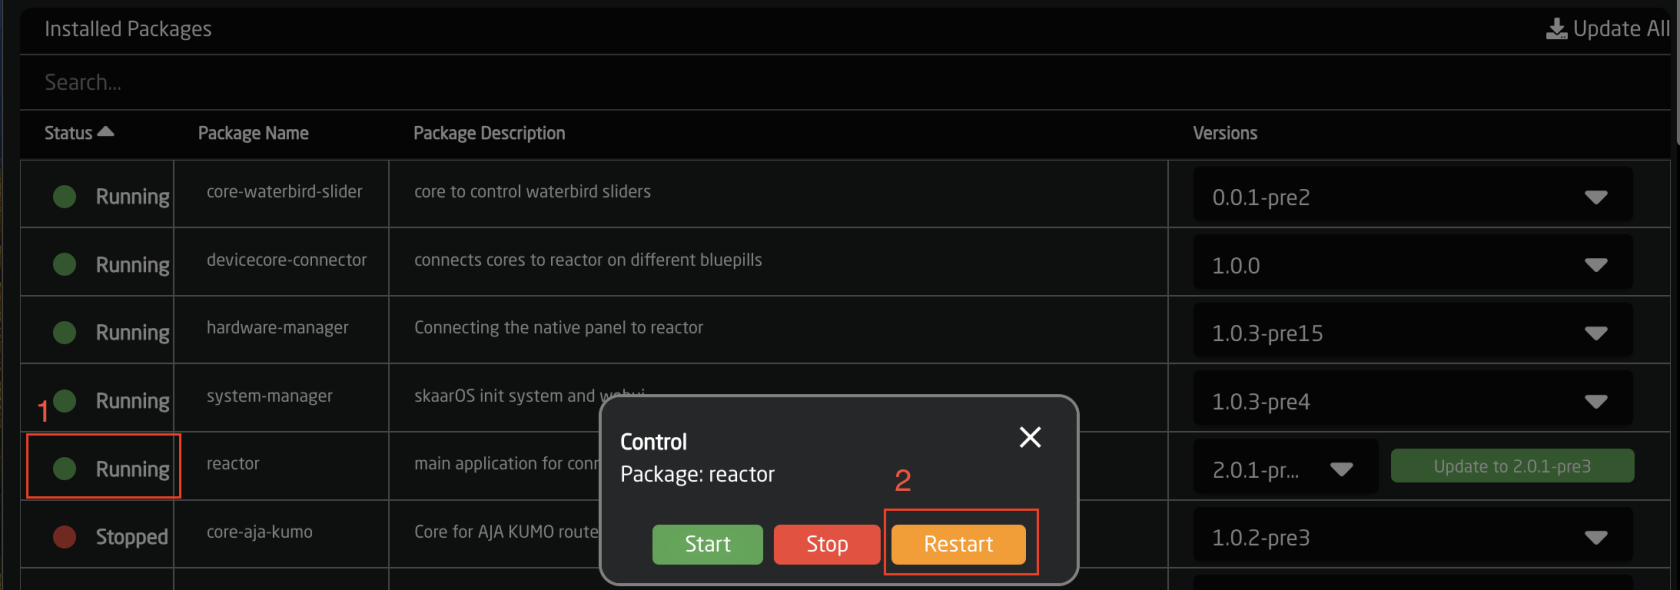](https://wiki.skaarhoj.com/uploads/images/gallery/2023-10/screenshot-2023-10-25-at-14-11-17.png) 6\. The device should now be available to add in devices on the home page. [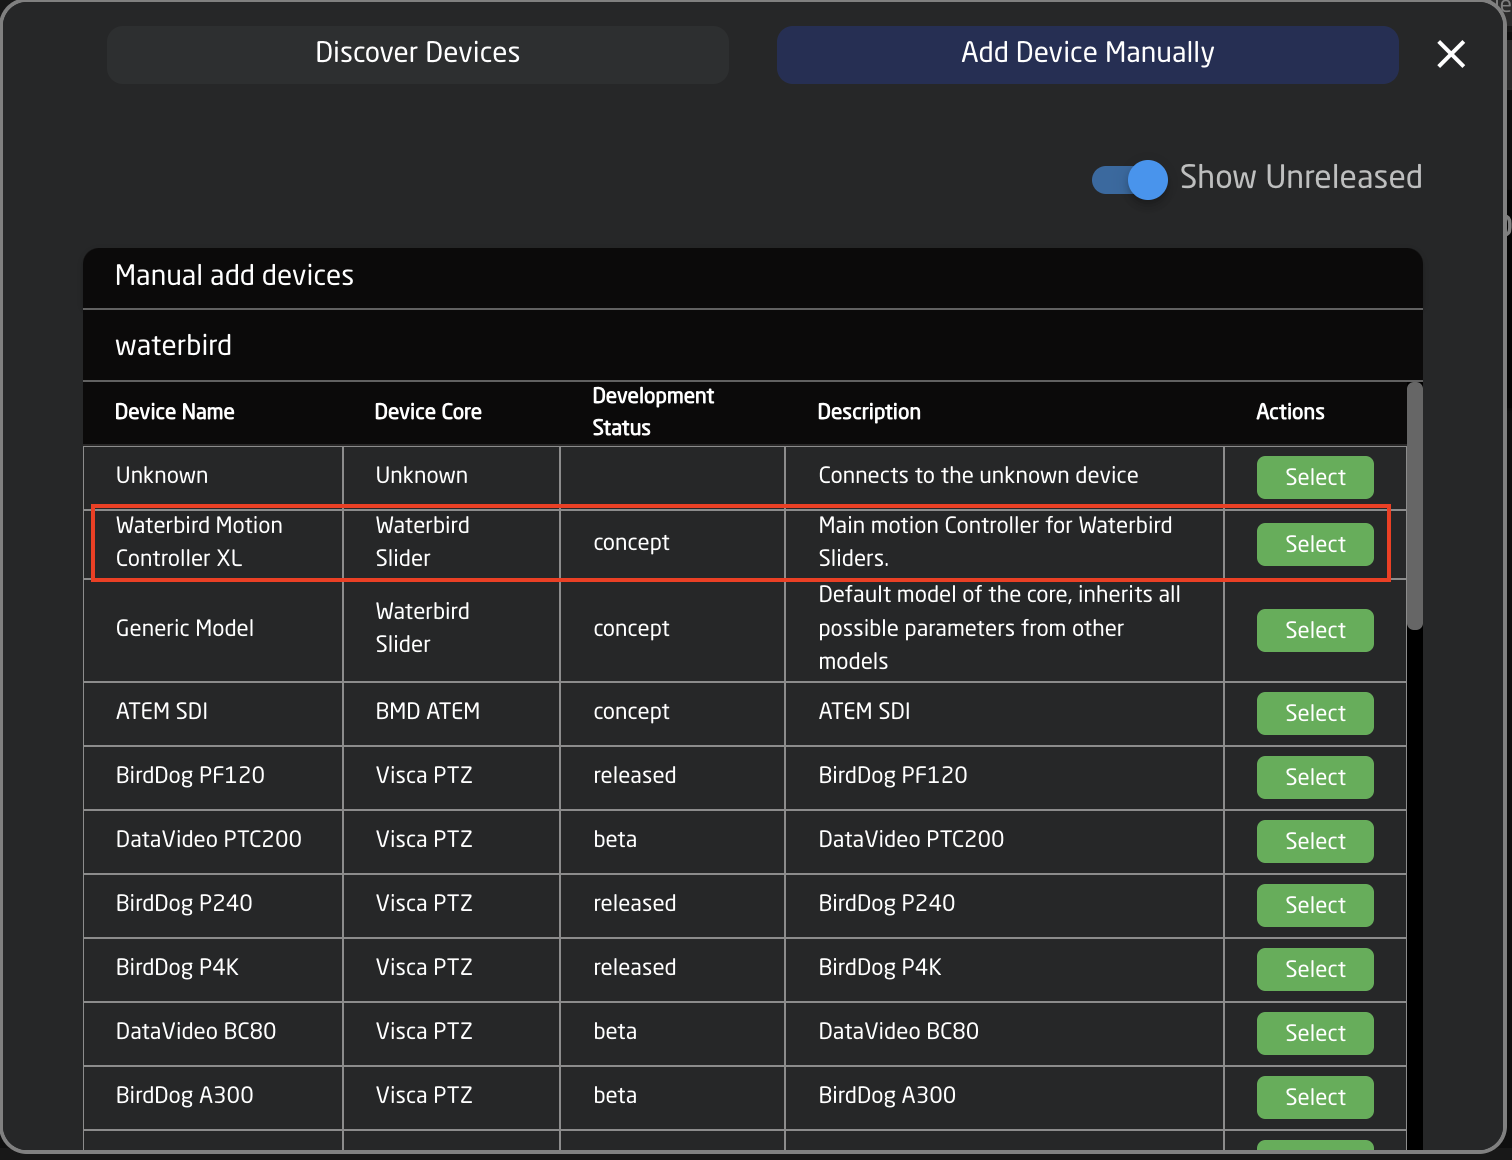](https://wiki.skaarhoj.com/uploads/images/gallery/2023-10/screenshot-2023-10-25-at-14-15-08.png) # Panel Not Displaying Connected Switcher If after setting up your controller and connecting it to a switching device, your Skaarhoj panel is not properly showing the connection then it could be that the Device ID does not match the one the panel is looking for. [](https://wiki.skaarhoj.com/uploads/images/gallery/2022-08/no-switching.png) By default, the Skaarhoj Panel is going to try to connect to Device ID #1 for the specific device core that it is looking for. The device IDs are auto generated and unique per device cores (if you have two different devices cores, each can have a device ID #1). [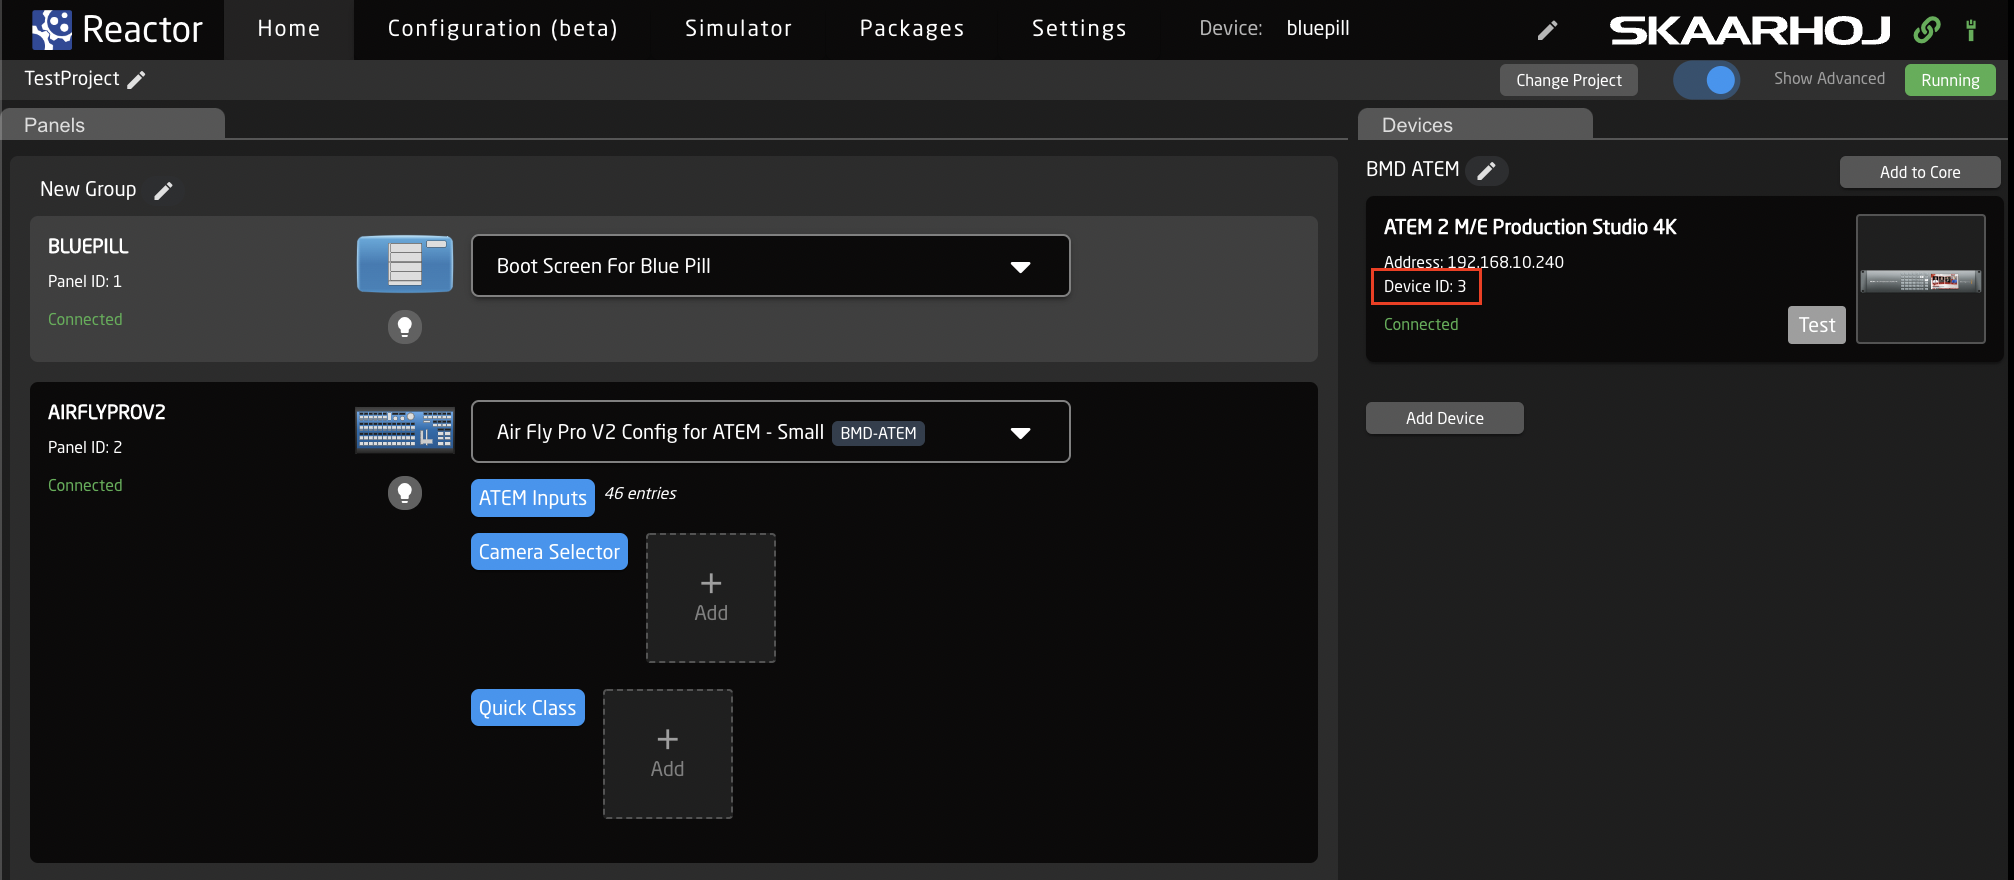](https://wiki.skaarhoj.com/uploads/images/gallery/2022-08/devices-connected.png) If you only have a single switching panel, set the device ID to 1 in the Device Details. This will bring the switcher up on the Skaarhoj panel. [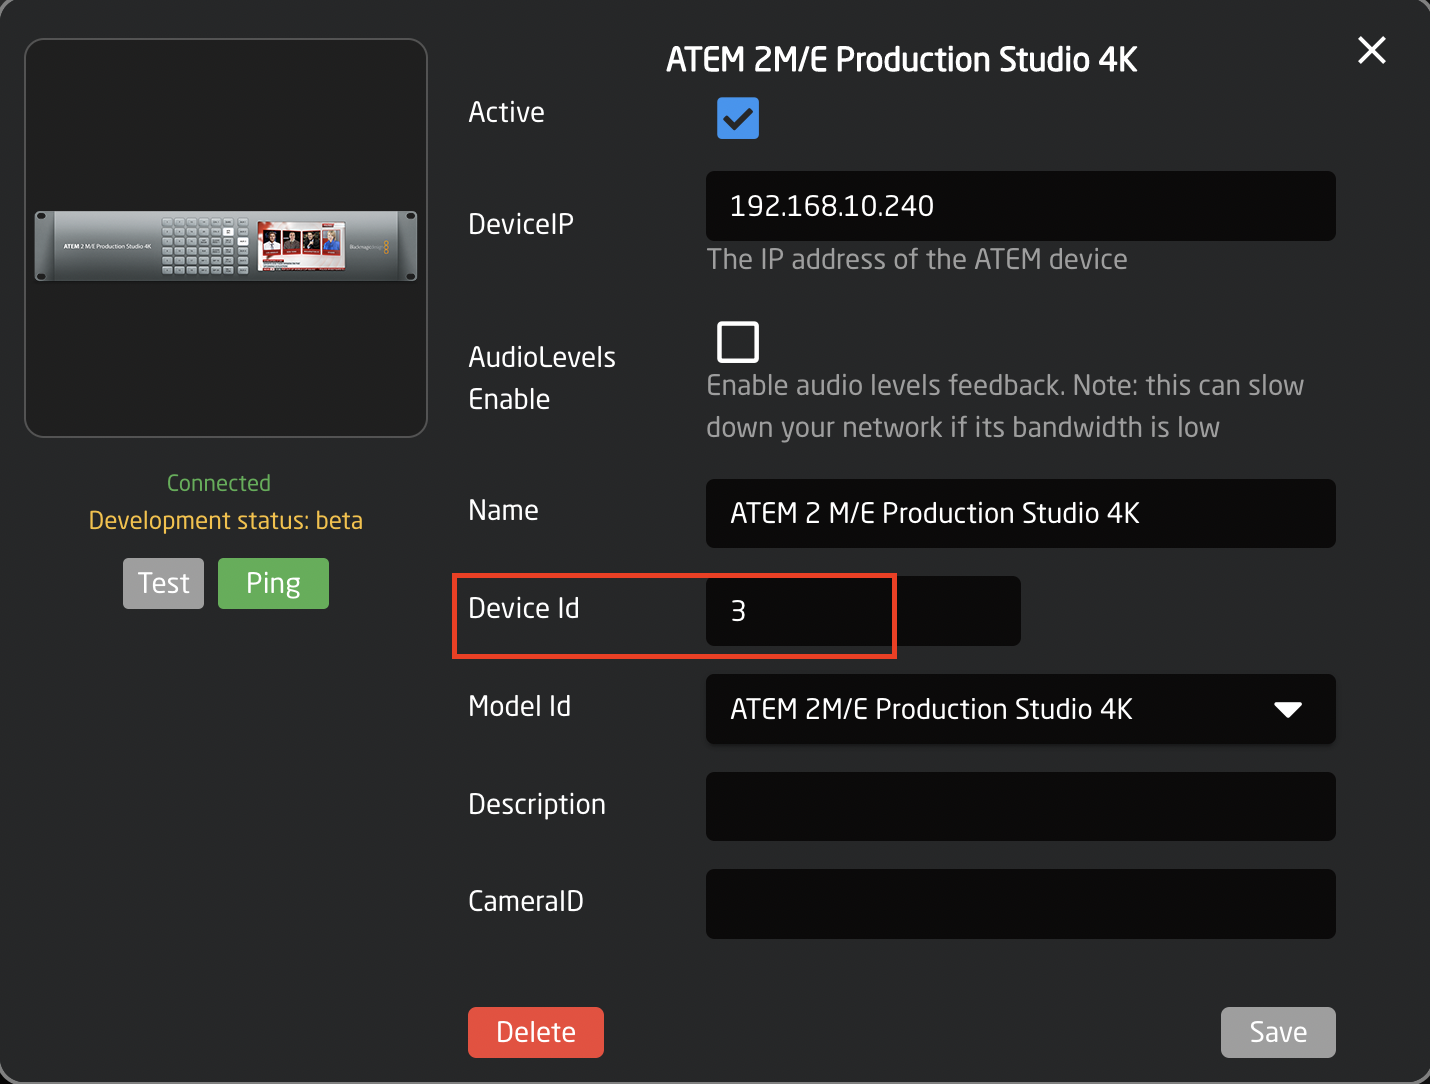](https://wiki.skaarhoj.com/uploads/images/gallery/2022-08/device-id.png) If you have multiple of the same device you want to be able to switch between, this can be done by accessing the ENG menu for your device. To find the ENG menu for you panel, please check out the instructions at: [https://wiki.skaarhoj.com/books/blue-pill-reactor/page/engineering-menu](https://wiki.skaarhoj.com/books/blue-pill-reactor/page/engineering-menu) For most switching panels, the ENG menu is accessed by holding down the SHIFT button on the panel then pressing the FTB button when it turns green. Once the ENG menu is open you can switch between connected switcher using the Device ID selector button. [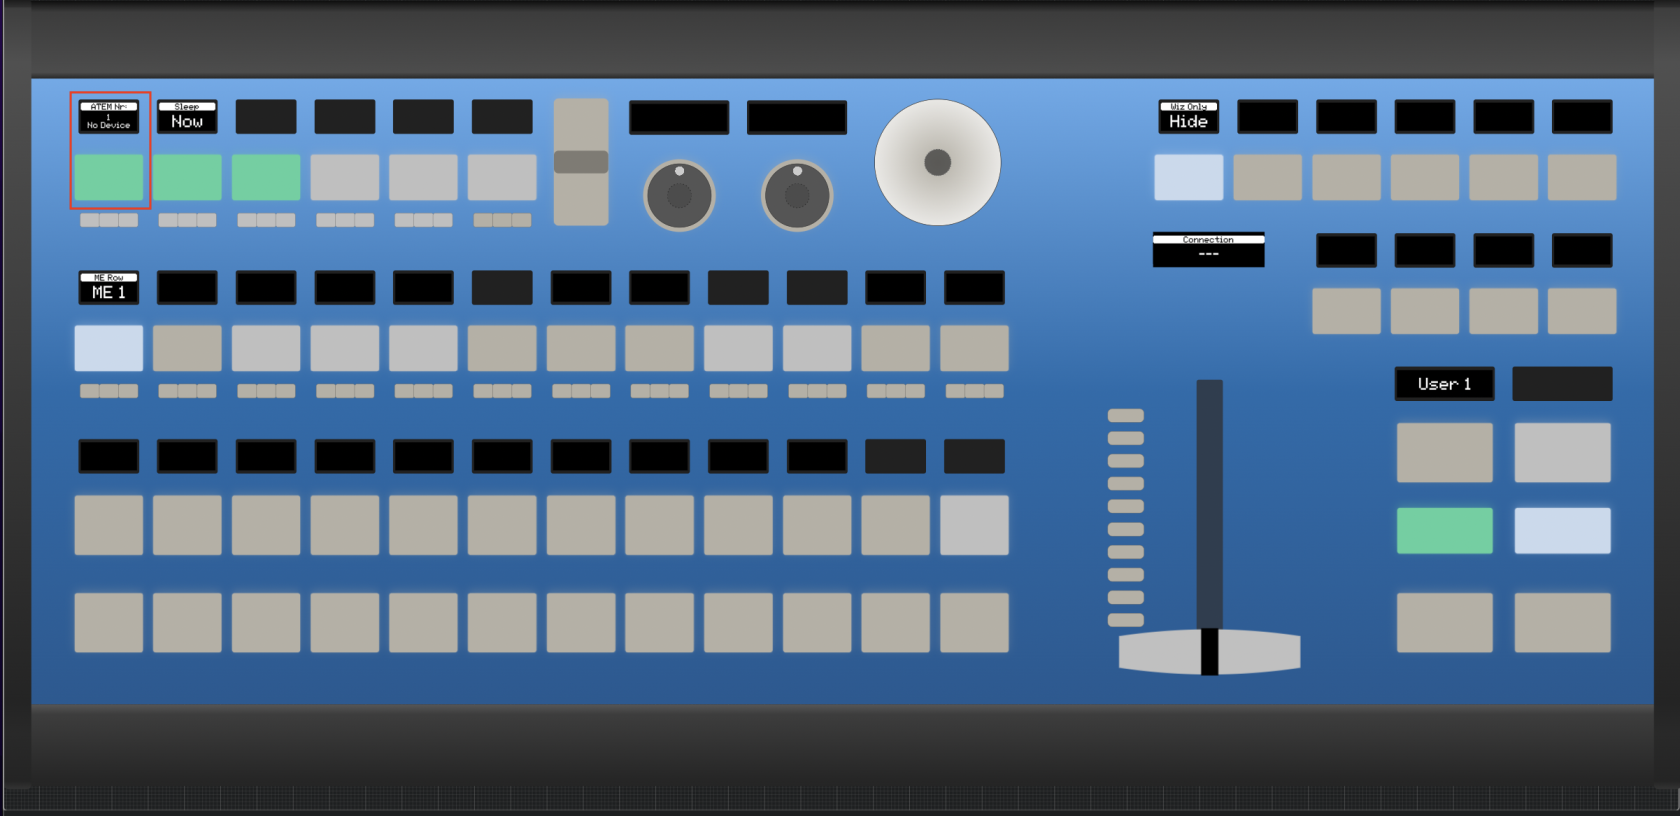](https://wiki.skaarhoj.com/uploads/images/gallery/2022-08/F8Seng-menu.png) When the proper device number is selected, the panel should display everything correctly. [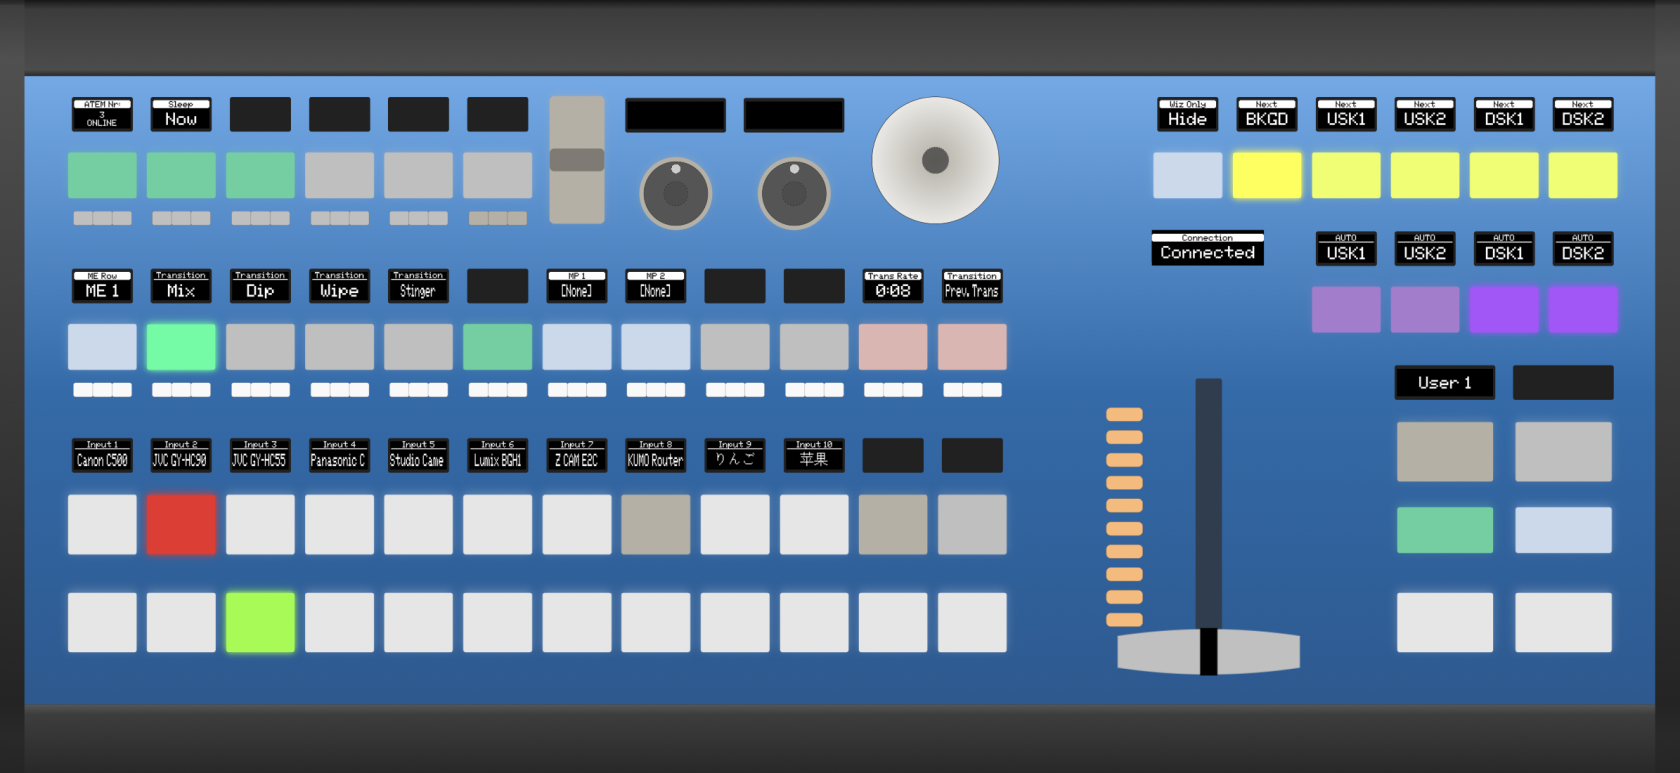](https://wiki.skaarhoj.com/uploads/images/gallery/2022-08/connection.png) # PTZ Extreme - Joystick rotated 90° A small batch of PTZ Extreme \[BPI\] have left factory with joystick rotated 90°. The fix for this is two steps: • add the serial number to our database of 'rotated joysticks' • connect device to internet and update it (it will automatically get a new profile) #### Known serial numbersNOTE: For this procedure you need the assistance from SKAARHOJ Customer Support !
Please contact:
ALERT: This procedure will ERASE ALL configurations on the device.
**It is not possible to roll back SkaarOS versions, even by reflashing.**
**REQUIREMENTS** You need the following software: • BalenaEtcher version 1.18 or later [https://www.balena.io/etcher/](https://www.balena.io/etcher/) (free download) • skaarOS image file (this can only be obtained from SKAARHOJ Customer Support) • The device needs internet access after the procedure to sync its settings with our server **PROCEDURE** 1. disconnect power to turn the panel off 2. make sure you have the 'skaarOS' image file ready on your Desktop (you get this file from SKAARHOJ Customer Support) 3. open BalenaEtcher app (remember, this must be version 1.18 or later) 4. click 'Flash from file' > select the 'skaaros\_xxxx' image file from the Desktop (pic 1 and 2) 5. click 'Select target' 6. connect Blue Pill device to computer via micro USB > hold paperclip pressed in the config button on the device > connect power (PSU or PoE) to device (pic 3) 7. when you see 'Compute Module' in BalenaEtcher, remove paperclip 8. select 'Compute Module' > click 'Select' (pic 4) 9. click 'Flash!' > enter computer password > wait approx 5 min (pic 5) 10. after flash procedure is done, quit BalenaEtcher 11. disconnect the micro USB and power from Blue Pill device > connect power again to reboot (will take approx 0,5-1 min) The Blue Pill device should start up, and display the DHCP IP address it can be found at. \- For initial setup we recommend a network with DHCP server -| **Important:** After reflash the Blue Pill device must be restarted (done in step 10). At this time it **MUST have internet access**. This is needed to get basic settings from our server. |
| Note: This will ERASE ALL CONFIGURATIONS on the device. This does not change network settings. Please export any project files you do not want to lose. |
| Note: This will ERASE EVERYTHING you have done on the Blue Pill device including network settings. |
Please note: Blue Pill devices running Skaar OS v0.11 or earlier and/or init v0.1.23 or earlier may have trouble loading packages from offline. Please contact support if you experience any difficulty.
# UniSketch Panel Displaying Weird in Simulator Tab If your UniSketch panel is displaying weird in the Simulator tab, it may be due to old firmware on the UniSketch panel. For compatibility with Blue Pill, a UniSketch panel needs to be running UniSketch v2.5.14 or later. Starting with UniSketch v2.5.18, there were changes made to the Raw Panel implementation which is used to connect to the Blue Pill. These changes allow for better hardware mapping inside Blue Pill. Please make sure your UniSketch panel is running the latest UniSketch release version using the Firmware Updater Application. https://www.skaarhoj.com/support/firmware-updater # Uploading Device Cores/Packages/OS from OfflinePlease note: Blue Pill devices running Skaar OS v0.11 or earlier and/or init v0.1.23 or earlier may have trouble loading packages from offline. Please contact support if you experience any difficulty.
# Updating Software & Licenses Follow this guide to update system software and packages # Installing a License on your SKAARHOJ Controller #### If the controller is online If your controller is online and has internet access through its network, it will automatically detect and apply any assigned licenses. You can confirm that your controller is connected to the internet by looking for a green icon in the upper right corner next to the SKAARHOJ logo.  Please navigate to the Settings tab and refresh the page once or twice. After doing so, you should see the license displayed in the license drop-down menu. [](https://wiki.skaarhoj.com/uploads/images/gallery/2023-11/xlsimage.png) #### If the controller is offline You can obtain a license in the form of a file, which you can upload via the Packages tab. If you haven't received your license file and need it for installation, contactIt is not possible to roll back SkaarOS.
In the drop down next to the device core package you can select from previously released versions. [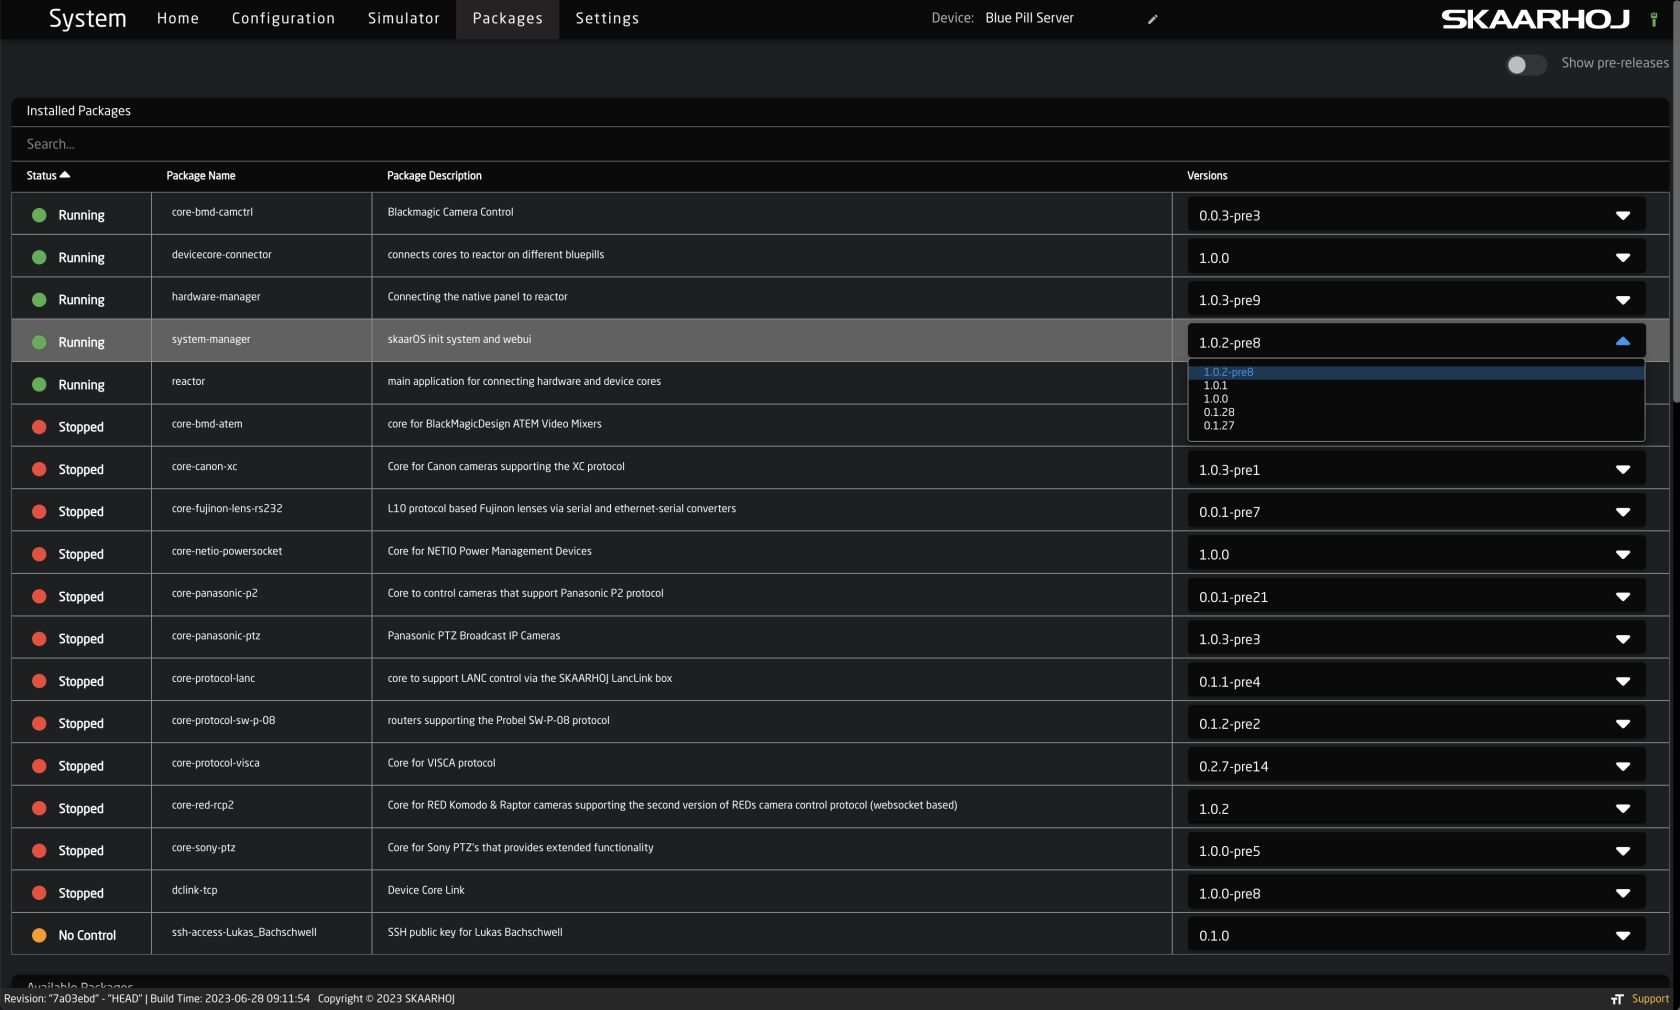](https://wiki.skaarhoj.com/uploads/images/gallery/2023-07/screenshot-2023-07-13-at-1-10-01-pm.png) Once selected, click Install [](https://wiki.skaarhoj.com/uploads/images/gallery/2023-07/screenshot-2023-07-13-at-1-14-24-pm.png) To select from a previous pre-released version of the package, in the upper right corner, enable the Show pre-release toggle. [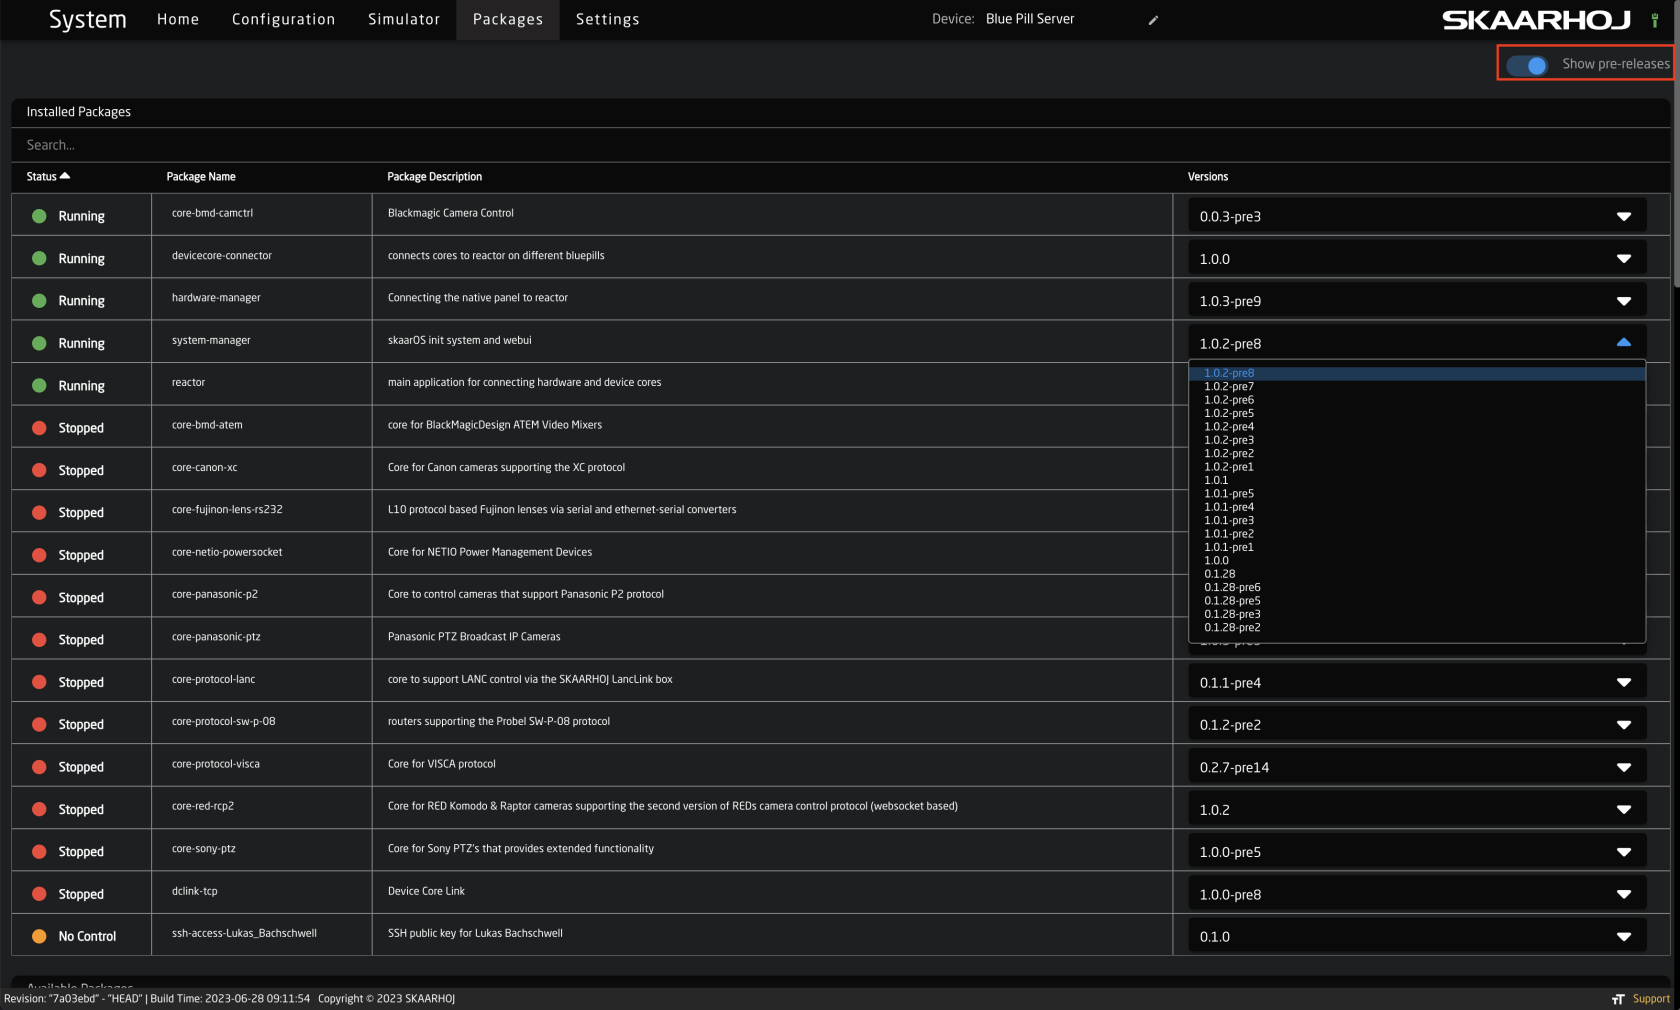](https://wiki.skaarhoj.com/uploads/images/gallery/2023-07/screenshot-2023-07-13-at-1-10-31-pm.png) **Offline Method** If internet connection is not an option, it is possible to download the latest stable release and prerelease version from our site [devices.skaarhoj.com](https://wiki.skaarhoj.com/devices.skaarhoj.com) Navigate to the device core package you need based on the device you are trying to control. Then select either the Pre or Stable version.Main Blue Pill firmware packages and the operating system can be found under Other Packages: [https://devices.skaarhoj.com/otherpackages](https://devices.skaarhoj.com/otherpackages)
[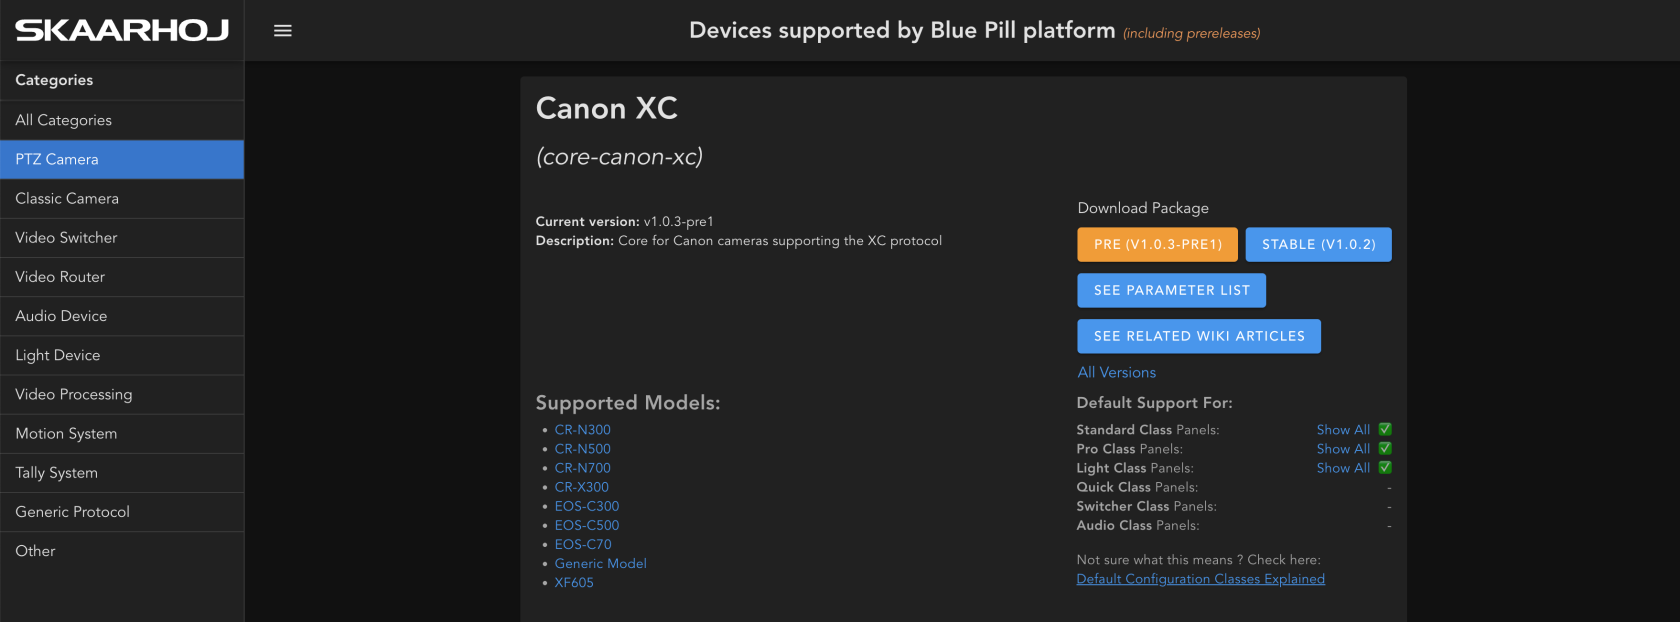](https://wiki.skaarhoj.com/uploads/images/gallery/2023-07/screenshot-2023-07-13-at-1-21-13-pm.png) For some select packages it is possible to download more versions offline. Packages with that option will have an All Versions option. [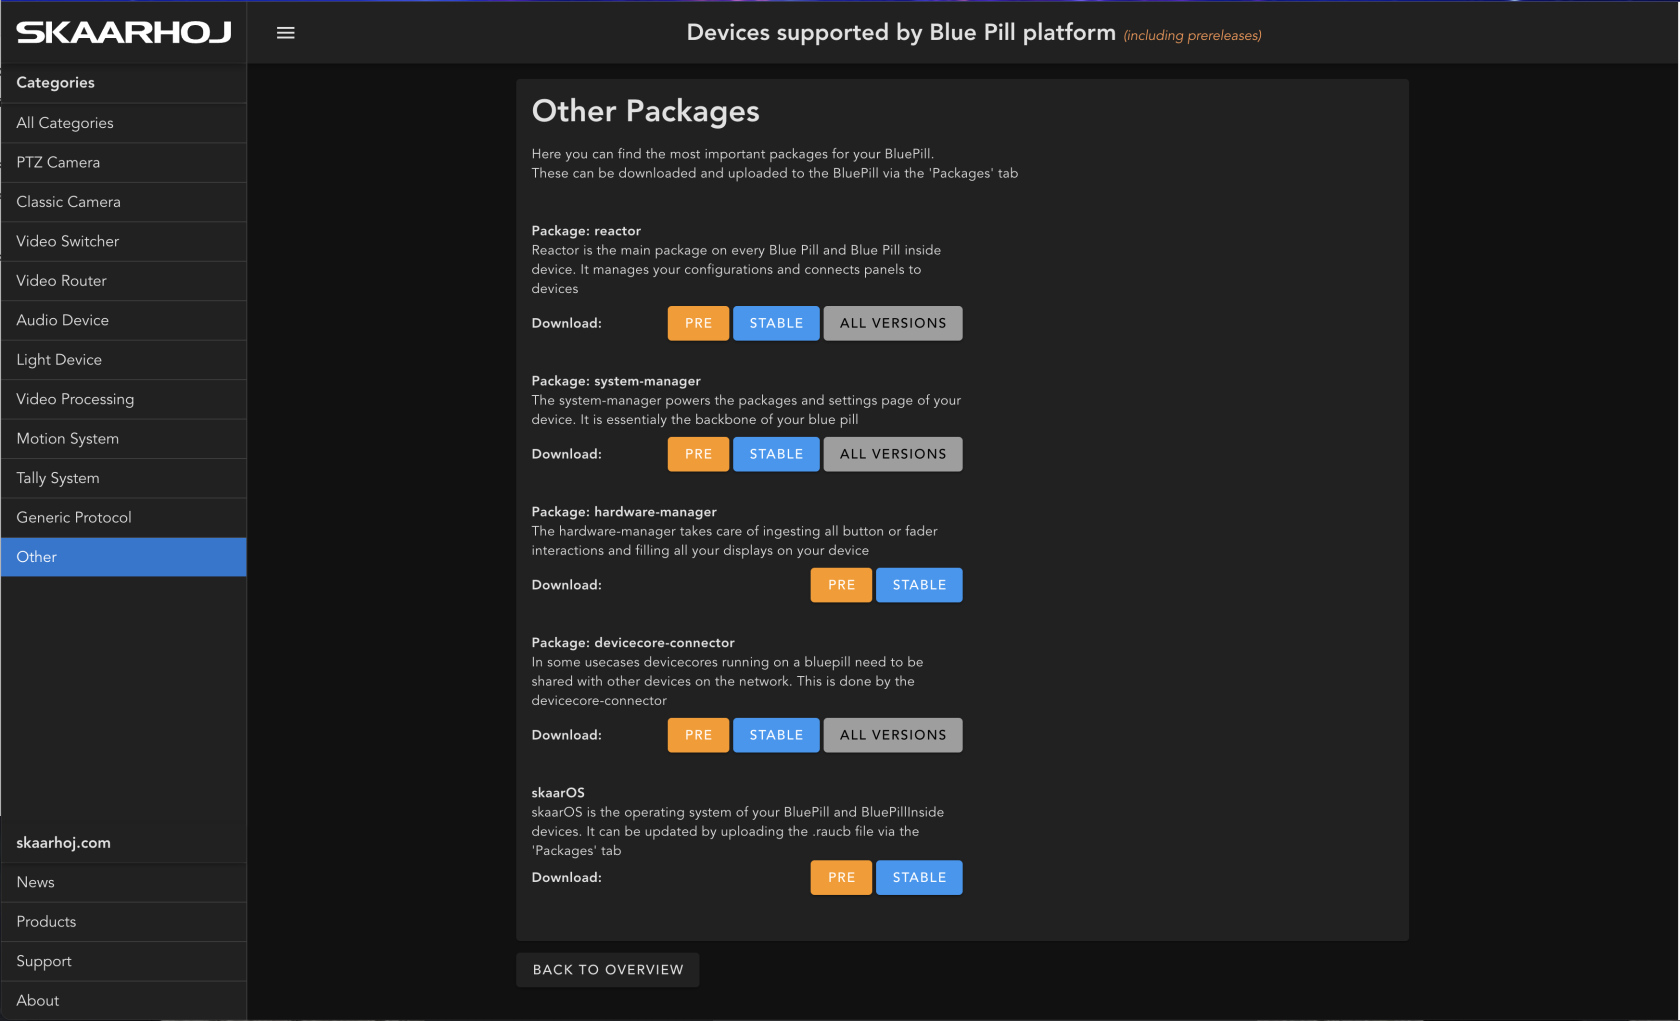](https://wiki.skaarhoj.com/uploads/images/gallery/2023-07/screenshot-2023-07-13-at-1-10-53-pm.png) Select the desired version then download. [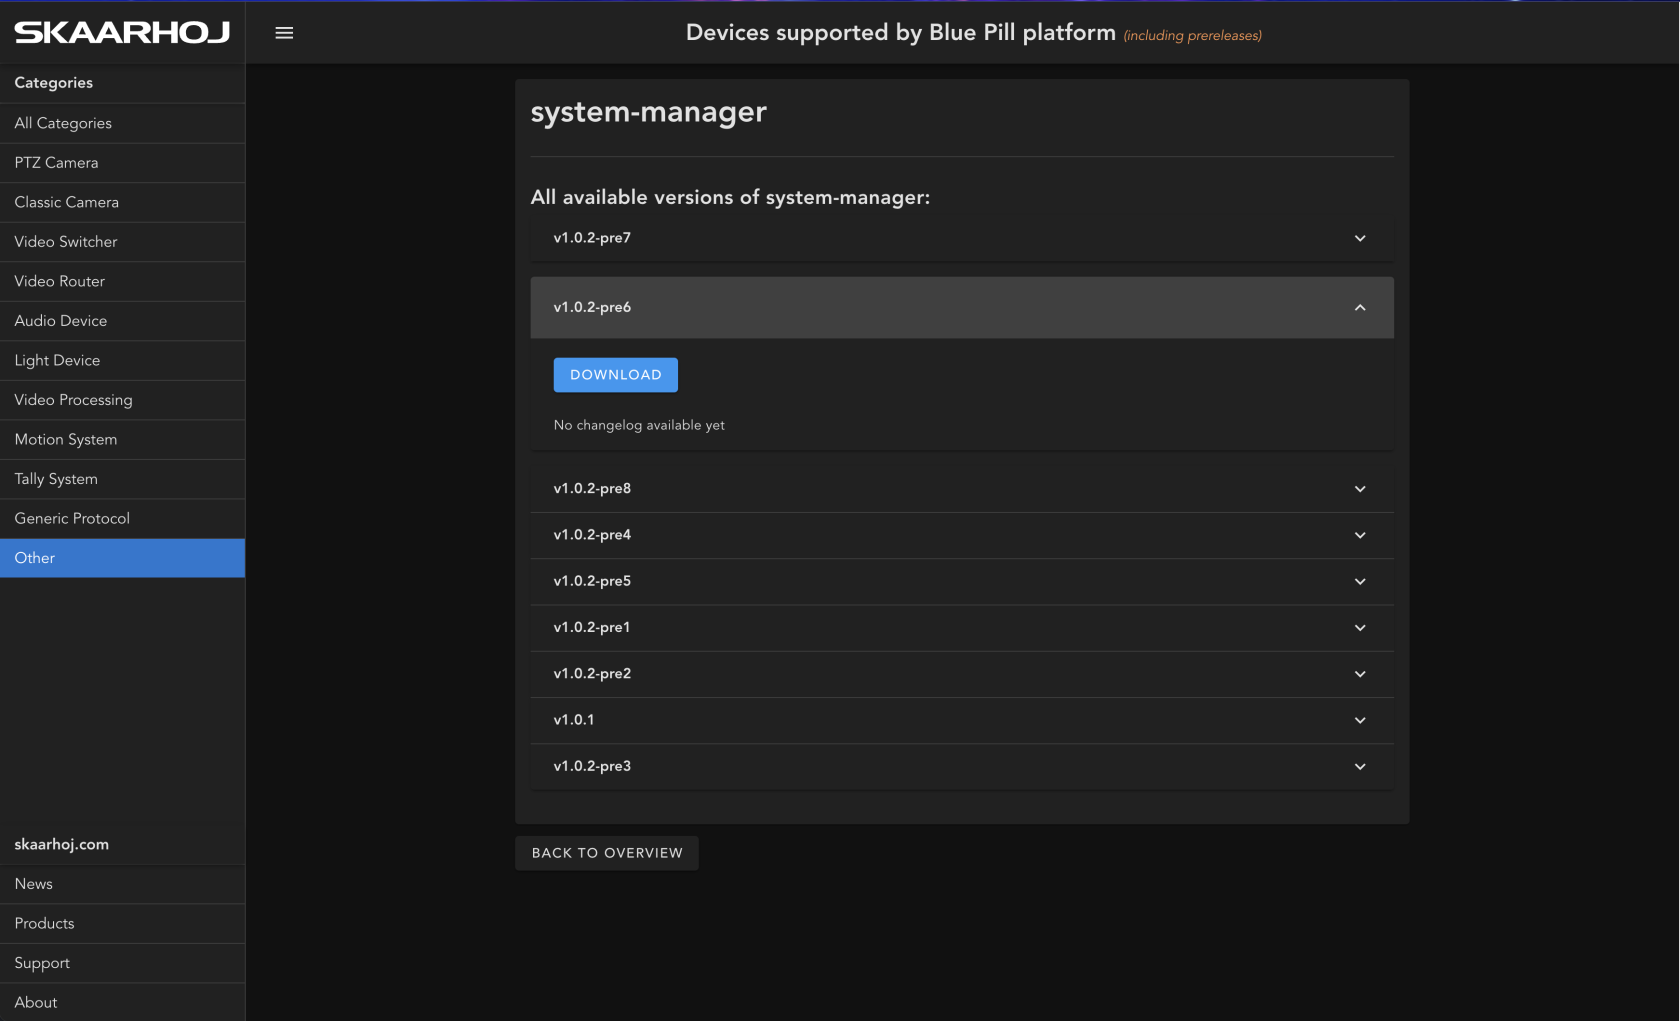](https://wiki.skaarhoj.com/uploads/images/gallery/2023-07/screenshot-2023-07-13-at-1-11-39-pm.png) The .ipks package can then be uploaded to the Blue Pill device from the bottom of the Packages page. [](https://wiki.skaarhoj.com/uploads/images/gallery/2023-07/screenshot-2023-07-13-at-1-25-27-pm.png) # Update Software Follow this guide to update the Blue Pill software.If the Blue Pill device does not have access to the internet, the option to download the core via the web browser should be available.
If Blue Pill is unable to communicate with our server, please read the troubleshooting chapter: [https://wiki.skaarhoj.com/books/blue-pill-reactor/page/unable-to-update-device-corespackagesos](https://wiki.skaarhoj.com/books/blue-pill-reactor/page/unable-to-update-device-corespackagesos) #### **Update Operating Packages** Open the 'Packages' page. Locate the 4 lines: 'hardware-manager' / 'system-manager' / 'reactor' / 'SkaarOS\* If a green 'Update' button is displayed to the right of any of them, this means there is an update available. If so, please click the 'Update' button for each of them or the Update All button ( After the update, if they do not display 'Running' you must click the 'Stopped' text and select 'Restart'. )System Manager and SkaarOS do not update via the Update All option. These need to be updated individually.
It is recommended to update SkaarOS last as it requires a reboot.
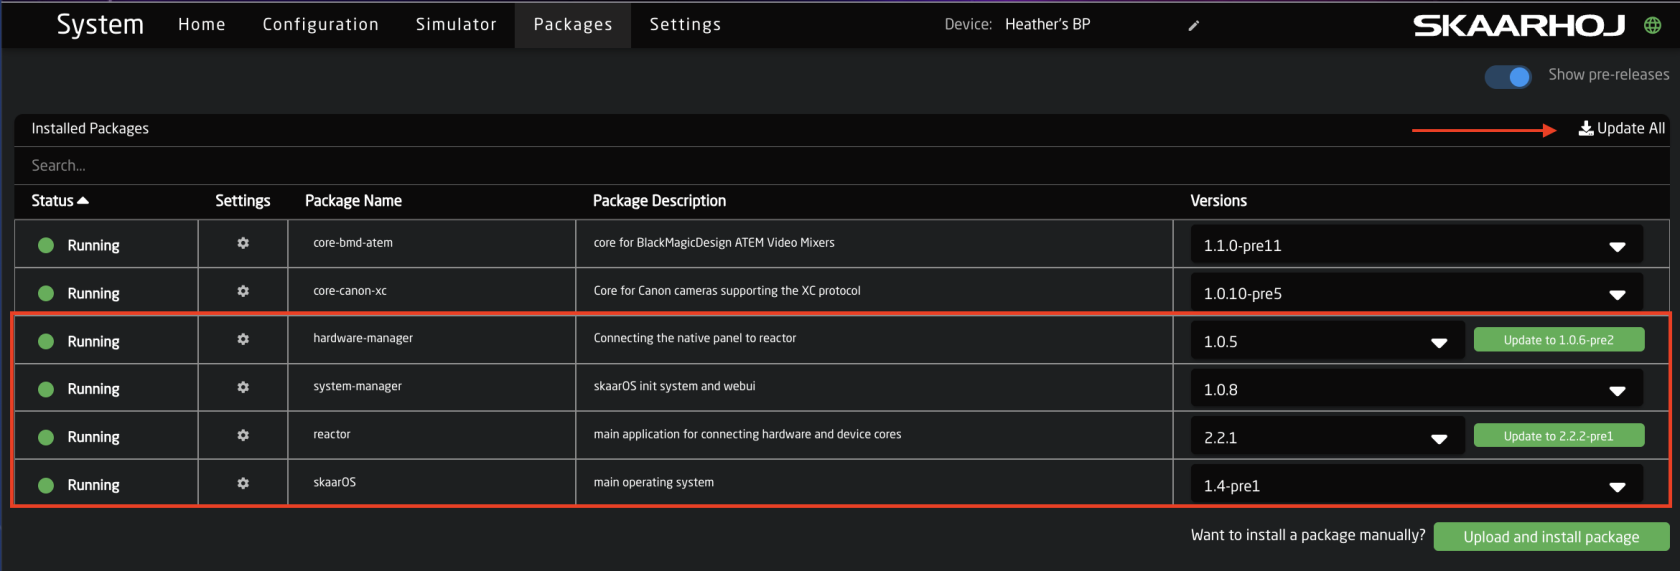 #### **Update Pre-Release Versions** Show Pre-Release must be enabled to see pre-release versions on the Packages page. This is done by clicking on the toggle at the top of the Packages page. ( This only affect the current web browser in the current session. It will be off next time you log in. ) [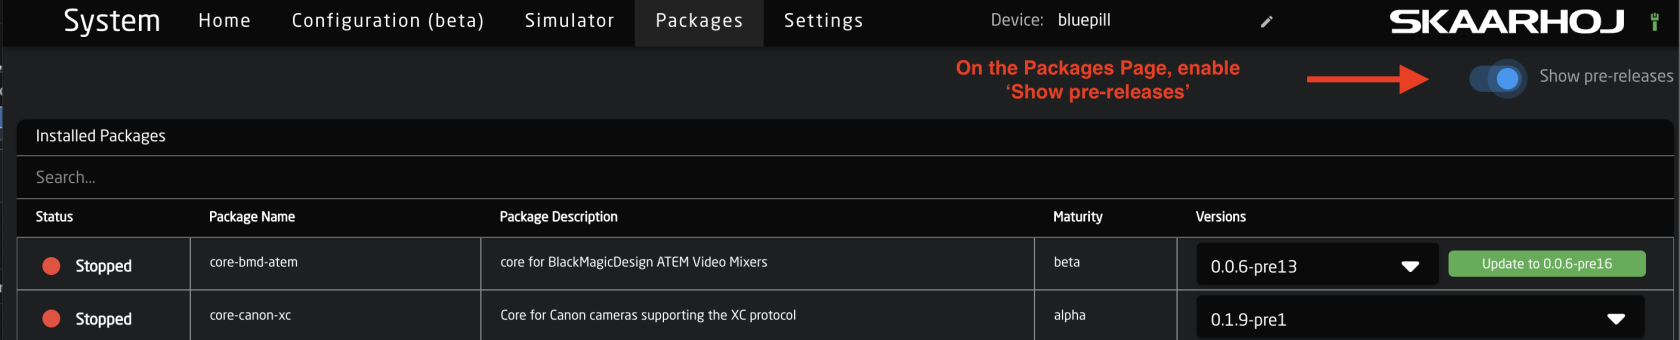](https://wiki.skaarhoj.com/uploads/images/gallery/2022-08/show-prerelease.png) #### **White list our server URL's** In order to download software, Blue Pill must have network access to these 3 domains: • [https://pkg.skaarhoj.com](https://pkg.skaarhoj.com) • [https://init.skaarhoj.com](https://init.skaarhoj.com) • [https://lb1.skaarhoj.com](https://lb1.skaarhoj.com) # Uploading Device Cores/Packages/OS from OfflinePlease note: Blue Pill devices running Skaar OS v0.11 or earlier and/or init v0.1.23 or earlier may have trouble loading packages from offline. Please contact support if you experience any difficulty.
# Username and Password Default Username - Disabling Authentication - Resetting Password # Default Username and Password When you access Reactor (the configuration web page) you are met by a login screen, asking for username and password. The default factory username and password is: Username: admin Password: skaarhoj [](https://wiki.skaarhoj.com/uploads/images/gallery/2022-06/image-1655883985066.jpg) # Disable Authentication The login screen, where you enter username and password, can be disabled. This removes the need to enter username and password at all. 1. First log in as normal 2. Click 'Settings' in main menu [](https://wiki.skaarhoj.com/uploads/images/gallery/2022-06/image-1655884654722.jpg) 3. Click to disable 'Authentication' [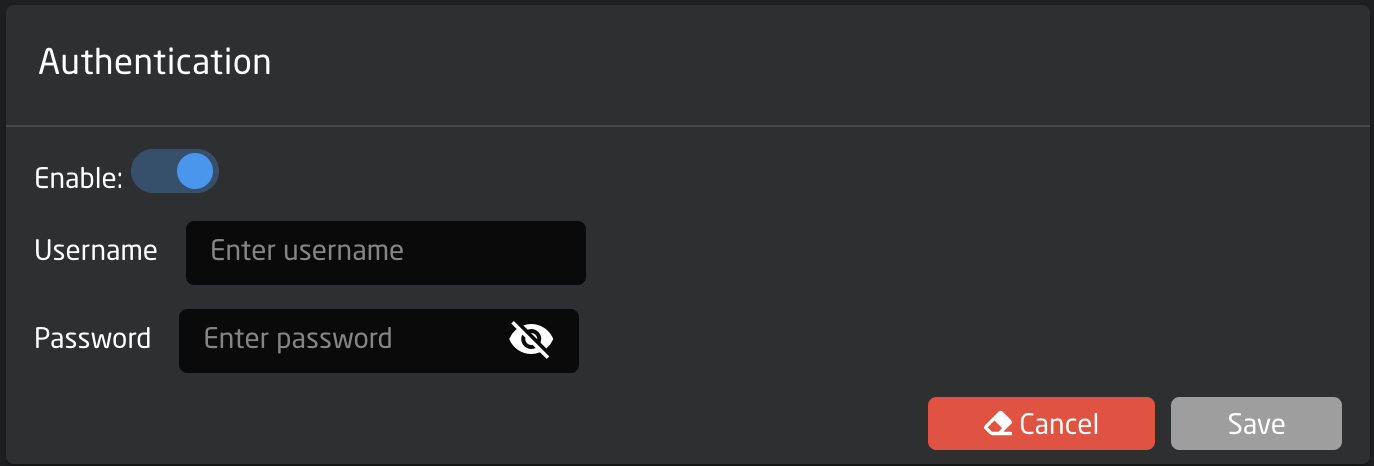](https://wiki.skaarhoj.com/uploads/images/gallery/2026-02/screenshot-2026-02-10-at-9-09-23-am.png) # Reset Password If you have forgotten the username or password for your Blue Pill product you can use one of these procedures to reset them.| **Note:** We introduced a new and much easier way to reset the password in System Manager v.1.0.8 software update. Please try the new method first - and if it does not work (your panel is running older software), use the old method below instead. |
| If you are not able to mount the disk (progress stays at 0% or 10%), then please contact SKAARHOJ support. They will assist you in mounting the disk using the BalenaEtcher app instead.
Send email to |