# Blue Pill Panel Connections

**Blue Pill Units**

**[![BP Connections.png](https://wiki.skaarhoj.com/uploads/images/gallery/2022-10/scaled-1680-/bp-connections.png)](https://wiki.skaarhoj.com/uploads/images/gallery/2022-10/bp-connections.png)**

<table border="1" class="align-center" id="bkmrk-1-usb-a-port.-see-se" style="border-collapse: collapse; width: 90%; border: 2px solid rgb(0, 0, 0); height: 215.578px;"><colgroup><col style="width: 7.79703%;"></col><col style="width: 92.203%;"></col></colgroup><tbody><tr style="height: 30.7969px;"><td style="border-width: 2px; border-color: rgb(0, 0, 0); height: 30.7969px;">**1**</td><td class="align-left" style="border-width: 2px; border-color: rgb(0, 0, 0); height: 30.7969px;">USB-A Port. See Settings page for more details</td></tr><tr style="height: 30.7969px;"><td style="border-width: 2px; border-color: rgb(0, 0, 0); height: 30.7969px;">**2**</td><td class="align-left" style="border-width: 2px; border-color: rgb(0, 0, 0); height: 30.7969px;">SKAARHOJ Expansion Slot</td></tr><tr style="height: 30.7969px;"><td style="border-width: 2px; border-color: rgb(0, 0, 0); height: 30.7969px;">**3**</td><td class="align-left" style="border-width: 2px; border-color: rgb(0, 0, 0); height: 30.7969px;">HDMI Port serial diagnostics and debugging</td></tr><tr style="height: 30.7969px;"><td style="border-width: 2px; border-color: rgb(0, 0, 0); height: 30.7969px;">**4**</td><td class="align-left" style="border-width: 2px; border-color: rgb(0, 0, 0); height: 30.7969px;">Config Button to enable WiFi Access Point. See Accessing Blue Pill section in Getting Started Guide</td></tr><tr style="height: 30.7969px;"><td style="border-width: 2px; border-color: rgb(0, 0, 0); height: 30.7969px;">**5**</td><td class="align-left" style="border-width: 2px; border-color: rgb(0, 0, 0); height: 30.7969px;">Status LED for monitoring and debugging. See below for more information.</td></tr><tr style="height: 30.7969px;"><td style="border-width: 2px; border-color: rgb(0, 0, 0); height: 30.7969px;">**6**</td><td class="align-left" style="border-width: 2px; border-color: rgb(0, 0, 0); height: 30.7969px;">IP Network RJ45 Port for IP control and 5W-30W PoE (+)/PoE Standard: IEEE 802.3af/t</td></tr><tr style="height: 30.7969px;"><td style="border-width: 2px; border-color: rgb(0, 0, 0); height: 30.7969px;">**7**</td><td class="align-left" style="border-width: 2px; border-color: rgb(0, 0, 0); height: 30.7969px;">Micro USB Port for serial communication and 5V power</td></tr></tbody></table>

**Blue Pill Inside Units**

**[![BPI Connections.png](https://wiki.skaarhoj.com/uploads/images/gallery/2022-10/scaled-1680-/bpi-connections.png)](https://wiki.skaarhoj.com/uploads/images/gallery/2022-10/bpi-connections.png)**

<table border="1" class="align-center" id="bkmrk-1-micro-usb-port-for" style="border-collapse: collapse; width: 88.0247%; border: 2px solid rgb(0, 0, 0); height: 215.578px;"><colgroup><col style="width: 8.16832%;"></col><col style="width: 91.8317%;"></col></colgroup><tbody><tr style="height: 30.7969px;"><td style="border-width: 2px; border-color: rgb(0, 0, 0); height: 30.7969px;">**1**</td><td class="align-left" style="border-width: 2px; border-color: rgb(0, 0, 0); height: 30.7969px;">Micro USB Port for serial communication with SKAARHOJ Firmware Updater</td></tr><tr style="height: 30.7969px;"><td style="border-width: 2px; border-color: rgb(0, 0, 0); height: 30.7969px;">**2**</td><td class="align-left" style="border-width: 2px; border-color: rgb(0, 0, 0); height: 30.7969px;">IP Network RJ45 Port for IP control and 5W-30W PoE (+)/PoE Standard: IEEE 802.3af/t</td></tr><tr style="height: 30.7969px;"><td style="border-width: 2px; border-color: rgb(0, 0, 0); height: 30.7969px;">**3**</td><td class="align-left" style="border-width: 2px; border-color: rgb(0, 0, 0); height: 30.7969px;">Status LED for monitoring and debugging (see below)</td></tr><tr style="height: 30.7969px;"><td style="border-width: 2px; border-color: rgb(0, 0, 0); height: 30.7969px;">**4**</td><td class="align-left" style="border-width: 2px; border-color: rgb(0, 0, 0); height: 30.7969px;">Not used</td></tr><tr style="height: 30.7969px;"><td style="border-width: 2px; border-color: rgb(0, 0, 0); height: 30.7969px;">**5**</td><td class="align-left" style="border-width: 2px; border-color: rgb(0, 0, 0); height: 30.7969px;">Config Button (see below)</td></tr><tr style="height: 30.7969px;"><td style="border-width: 2px; border-color: rgb(0, 0, 0); height: 30.7969px;">**6**</td><td class="align-left" style="border-width: 2px; border-color: rgb(0, 0, 0); height: 30.7969px;">12V DC Power Supply for connection to the supplied DC power adaptor</td></tr><tr style="height: 30.7969px;"><td style="border-width: 2px; border-color: rgb(0, 0, 0); height: 30.7969px;">**7**</td><td class="align-left" style="border-width: 2px; border-color: rgb(0, 0, 0); height: 30.7969px;">USB-A Port. See Settings page for more details, not available on all models</td></tr></tbody></table>

**Status LED**

Off: Normal startup/idle  
Cleared at boot, after burnin ends, after identify-me timeout

Purple: WiFi Access Point Active and temporarily sets authentication to default  
AP enabled in config at startup or config button held 3 seconds  
Authentication is temporarily reset to default after held in for 3 seconds. Reverts to customer set authentication after reboot.

Blinking Red/Green: Burn-in mode  
Alternates 1s red - 1s green, used during our QC process

Red: Identify Me  
gRPC notification from Init Server (IdentifyMe notification) - lasts N seconds then clears

**Config Button**

A 3 second hold triggers the following:  
-Disables burnin; if active  
-Enables WiFi AP with default password; if device has WiFi  
-Switches USB-A to Micro-USB mode  
-Enables authentication override and sets authentication to panel default  
 (Reverts to customer set authentication after reboot)

**Color Fly DB-25 Connector**

<p class="callout info">
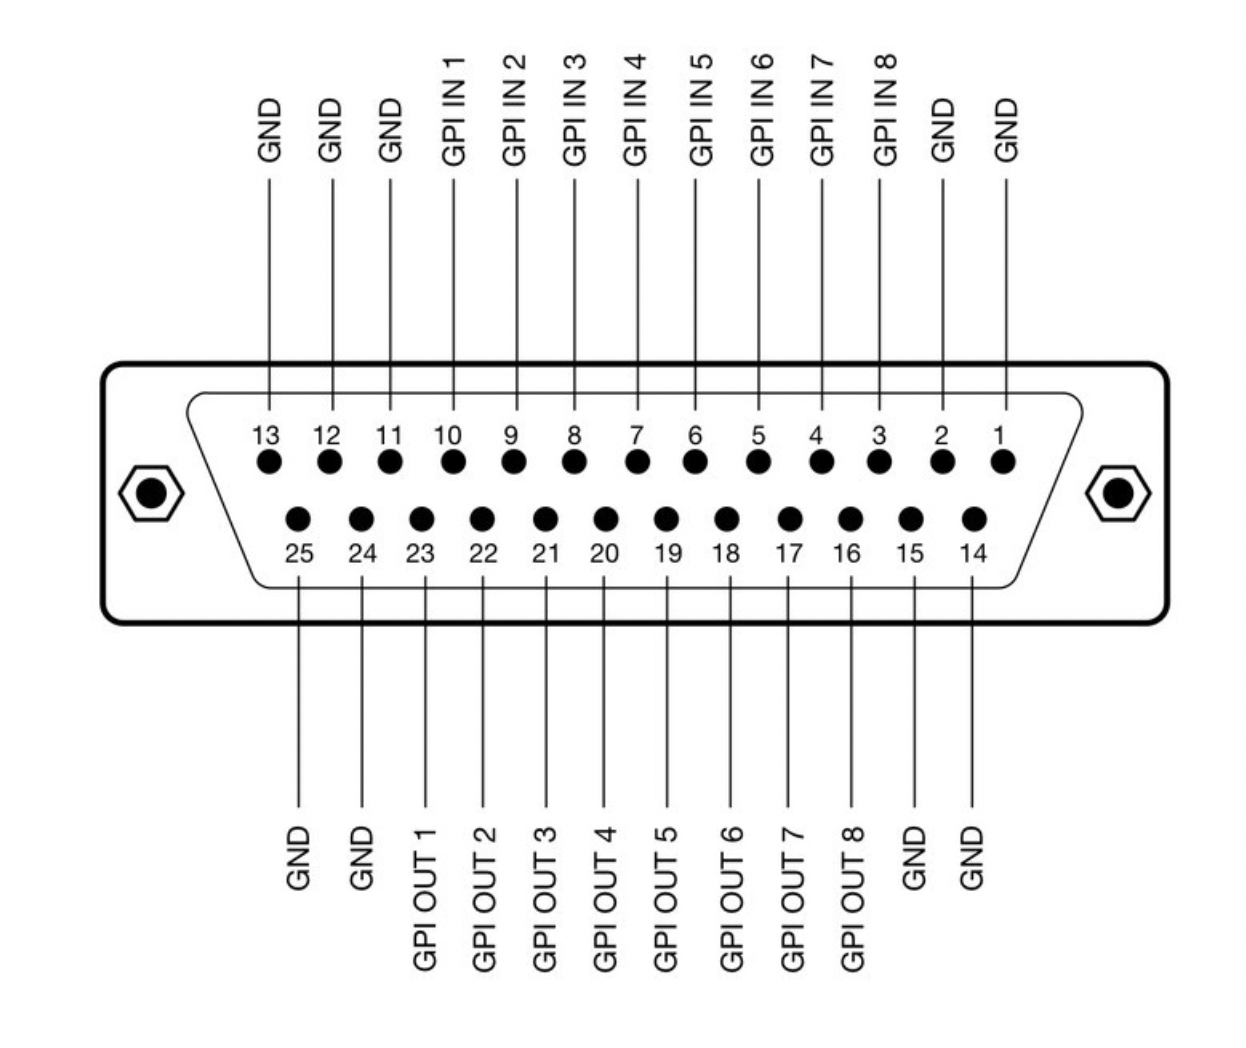
GPI is an add on option for the Color Fly v3B, it does not come standard.
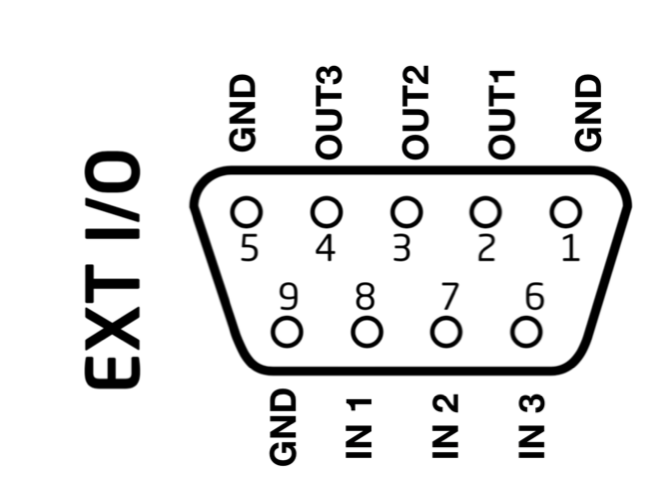
</p>

**[![Eth-GPI.png](https://wiki.skaarhoj.com/uploads/images/gallery/2022-10/scaled-1680-/eth-gpi.png)](https://wiki.skaarhoj.com/uploads/images/gallery/2022-10/eth-gpi.png)**

**RCP Pro DB-9 Connector**

<p class="callout info">The RCP Pro only has 3x GPI Input and 3x GPI Outputs that are programmable, this is different than the RCPv2.</p>

**[![DB15 Connector.png](https://wiki.skaarhoj.com/uploads/images/gallery/2022-10/scaled-1680-/db15-connector.png)](https://wiki.skaarhoj.com/uploads/images/gallery/2022-10/db15-connector.png)**

**3G SDI Arduino Shield**

<p class="callout info">SDI is an add on option for the Color Fly v3B, it does not come standard.</p>

**[![SDI.png](https://wiki.skaarhoj.com/uploads/images/gallery/2022-10/scaled-1680-/sdi.png)
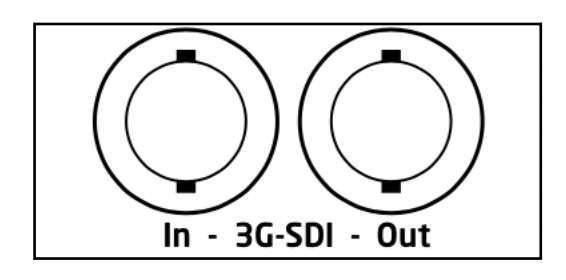
](https://wiki.skaarhoj.com/uploads/images/gallery/2022-10/sdi.png)**The Blackmagic 3G-SDI Arduino Shield supports the following formats using SDI Level B: 720p50, 720p59.94, 720p60, 1080i50, 1080i59.94, 1080i60, 1080p23.98, 1080p24, 1080p25, 1080p29.97, 1080p30, 1080p50 (output only), 1080p59.94 (output only) and 1080p60 (output only), but the camera doesn't have to be running the same video format as the program input, so you can use cameras in Ultra HD while the camera protocol is sent over HD signal to the camera.