Producer Assistant
Video Follow Audio - Producer Assistant
The Video Follow Audio model of the Skaarhoj Producer Assistant core provides functionalities for automated switcher control, based on logic inputs, such as an audio meter.
This can be used in simple scenarios, such as a debate or radio program, to automatically cut to a camera on the person speaking.
How it works
The Video Follow Audio system works by monitoring an audio level for each person (called participants) in the system. It checks periodically if a new participant is talking more than others, and then cuts to that participant. If the same person has been talking for a long time, it will periodically cut to a wide shot (a safe source, if set up) or to the participant previously on, as a listening shot.
Each participant has one or more actions — the camera shots that can be used when that participant is talking. An action is either a fixed switcher input or a PTZ camera preset, and when a participant has several actions, the system picks between them so the framing stays varied.
Requirements
For the system to work, it requires an audio level parameter for each participant. This will usually be a channel meter from an audio mixer or from the switcher's audio mixer.
Not all devices provide the same quality of audio meters. Some have a slow update rate, some have a high latency and some are not too precise. This means that though it might work in theory, some parameters are less than ideal for reliable switcher control. If possible, please try it out before you buy the license.
Configuration
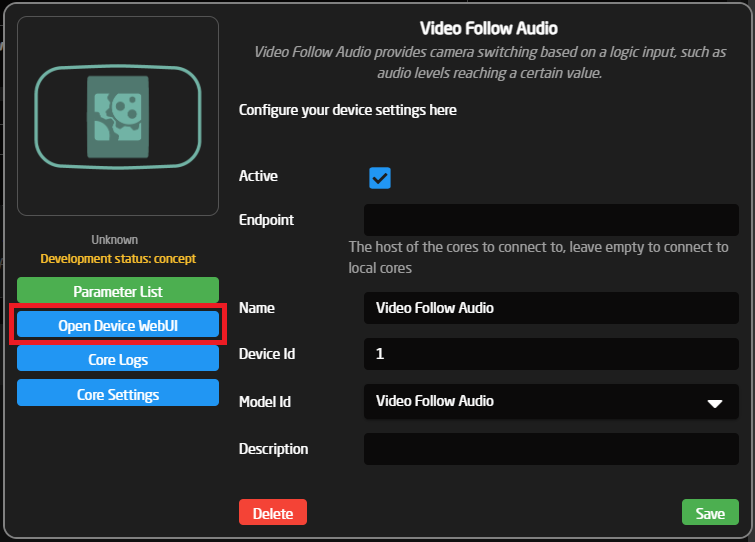
All configuration happens in the Device WebUI. To open it, open the device configuration on the home page of Reactor, and press 'Open Device WebUI'. It can also be found in the packages menu.
Switcher & Cameras
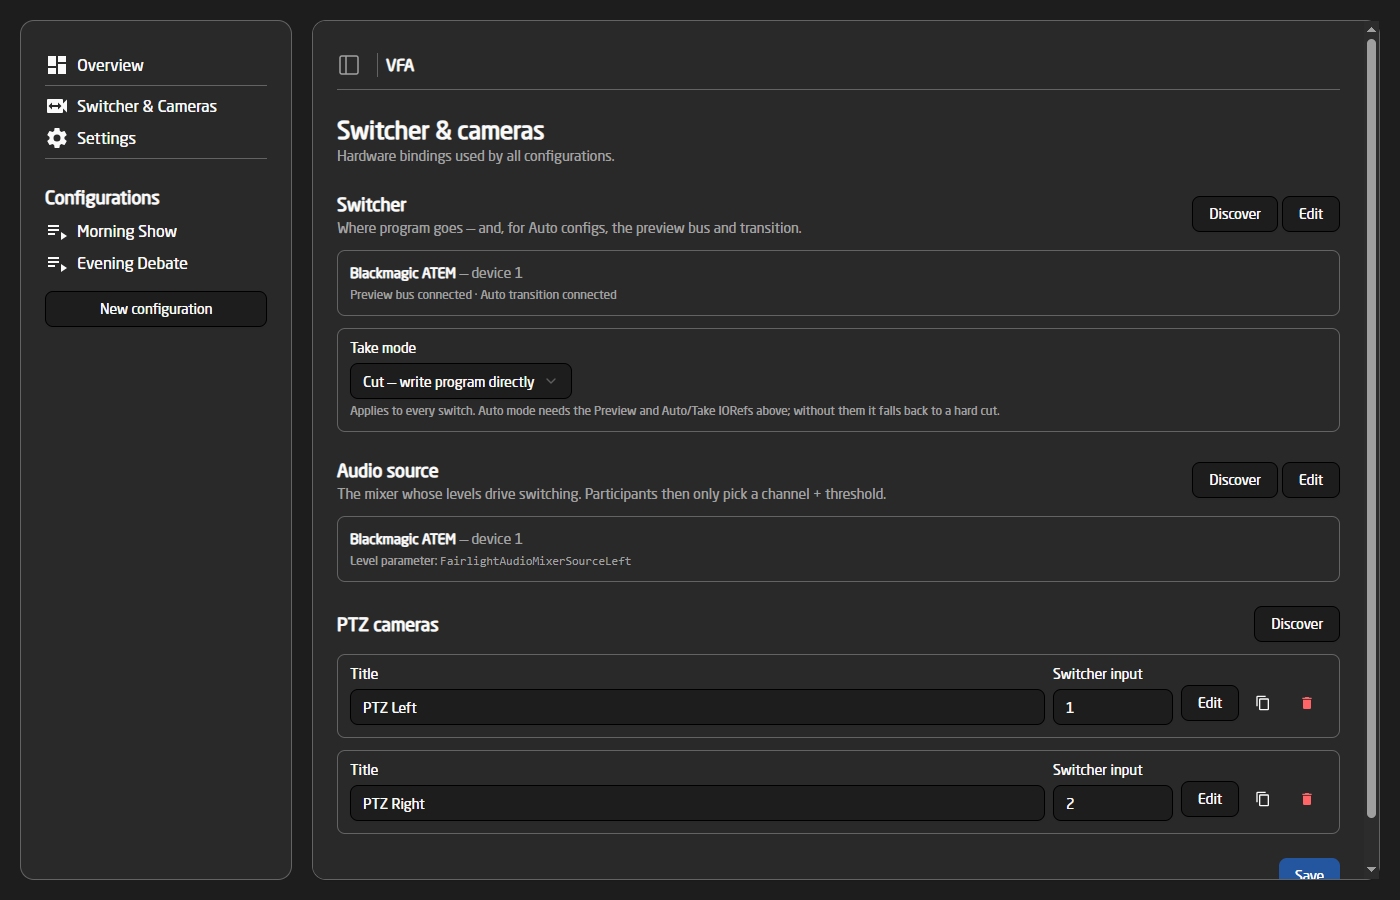
The 'Switcher & Cameras' page holds the hardware bindings shared by all configurations: the switcher, the audio source and the PTZ cameras.
When you are finished editing this page, remember to press Save at the bottom of the page!
Switcher
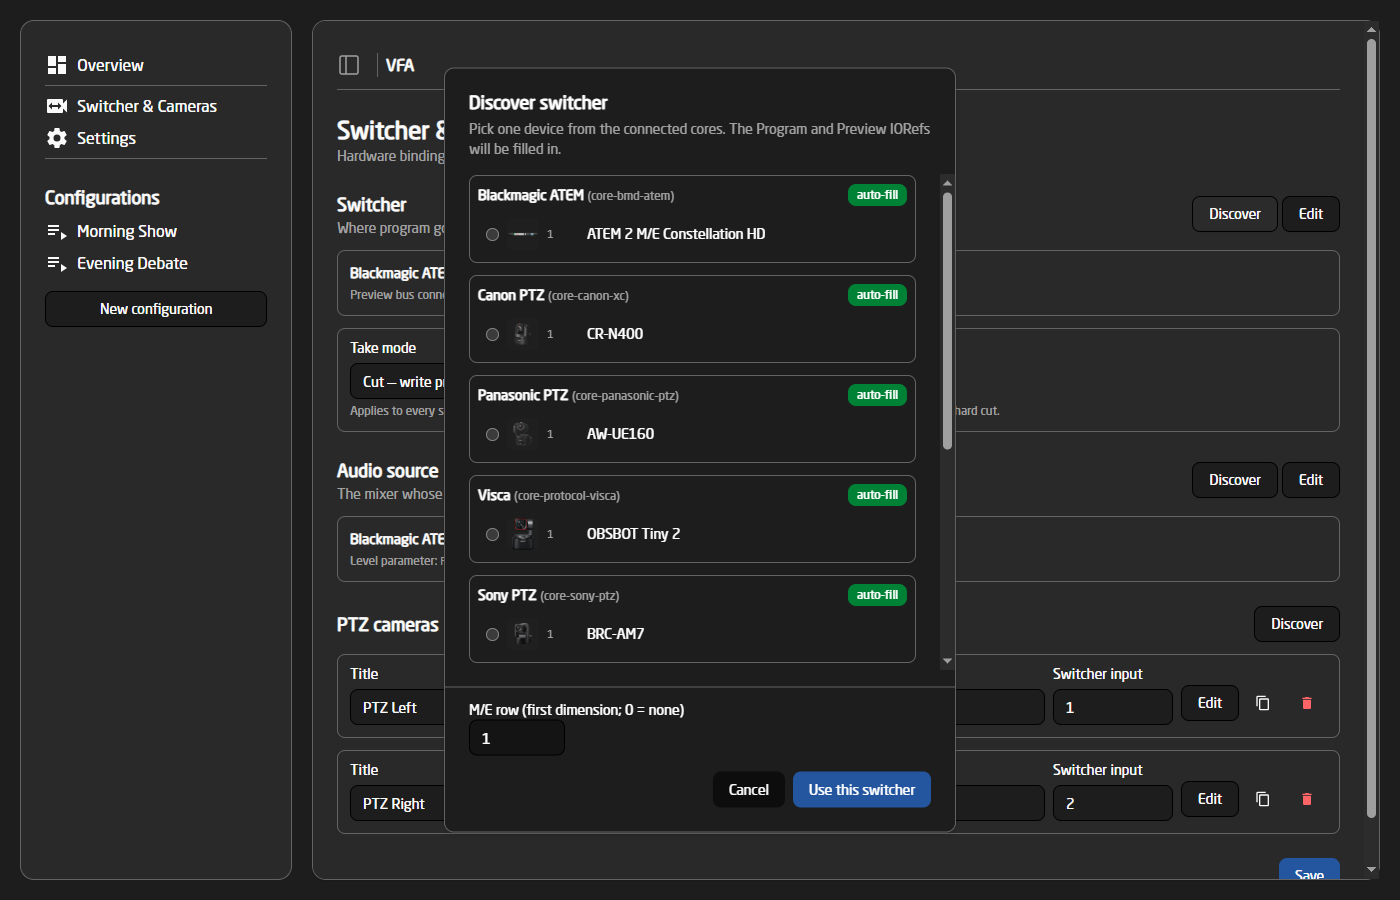
This is the switcher the system controls. The easiest way to set it up is the 'Discover' button, which lists the switchers found on the connected cores and fills in the parameters for you:
The 'Take mode' setting decides how a source is landed on program:
- Cut — the program input is written directly (hard cut).
- Auto — the source is staged on the preview bus and the transition is fired. This requires the Preview and Auto/Take parameters to be set, which the Discover dialog fills in automatically.
Audio source
The audio source is the mixer whose levels drive the switching. It is picked once here — participants then only choose a channel number and a threshold, and never have to deal with parameters directly.
Use 'Discover' to pick the mixer, or 'Edit' to choose the core, device ID and level parameter manually. For known mixers the recommended level parameters are highlighted in the dropdown:
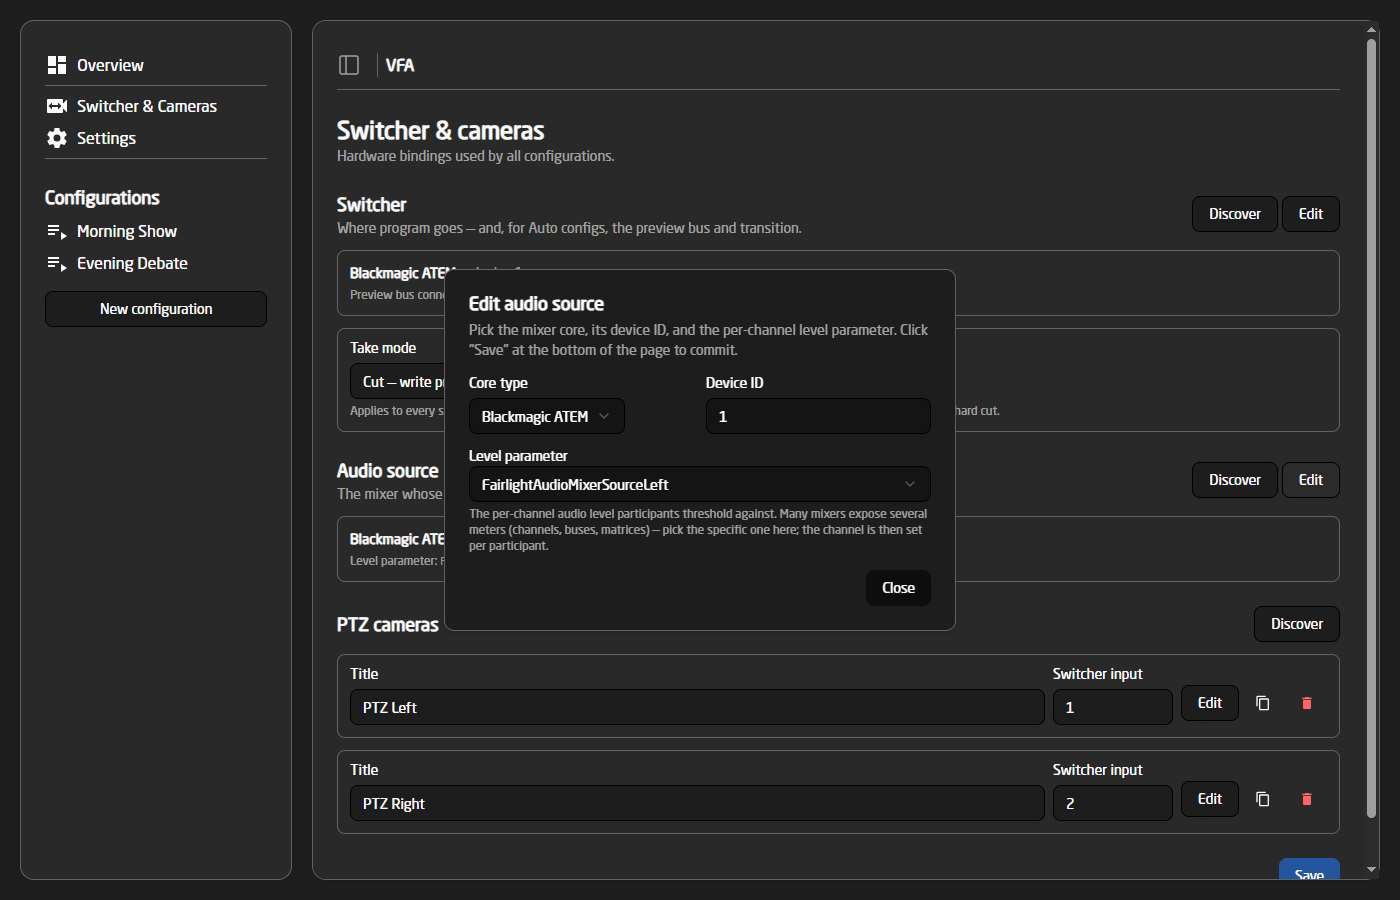
Many mixers expose several meters (channels, buses, matrices…) — pick the specific parameter here; the channel is then set per participant.
PTZ cameras
PTZ cameras can be used to film specific participants, so you don't need a fixed shot on each person. Multiple cameras can be configured, and the 'Discover' button can add them automatically from the connected cores.
Each camera has a title, its switcher input number, and (behind the 'Edit' button) the device ID, core type and preset recall parameter. Picking a core type auto-fills the standard recall parameter for that manufacturer.
Configurations
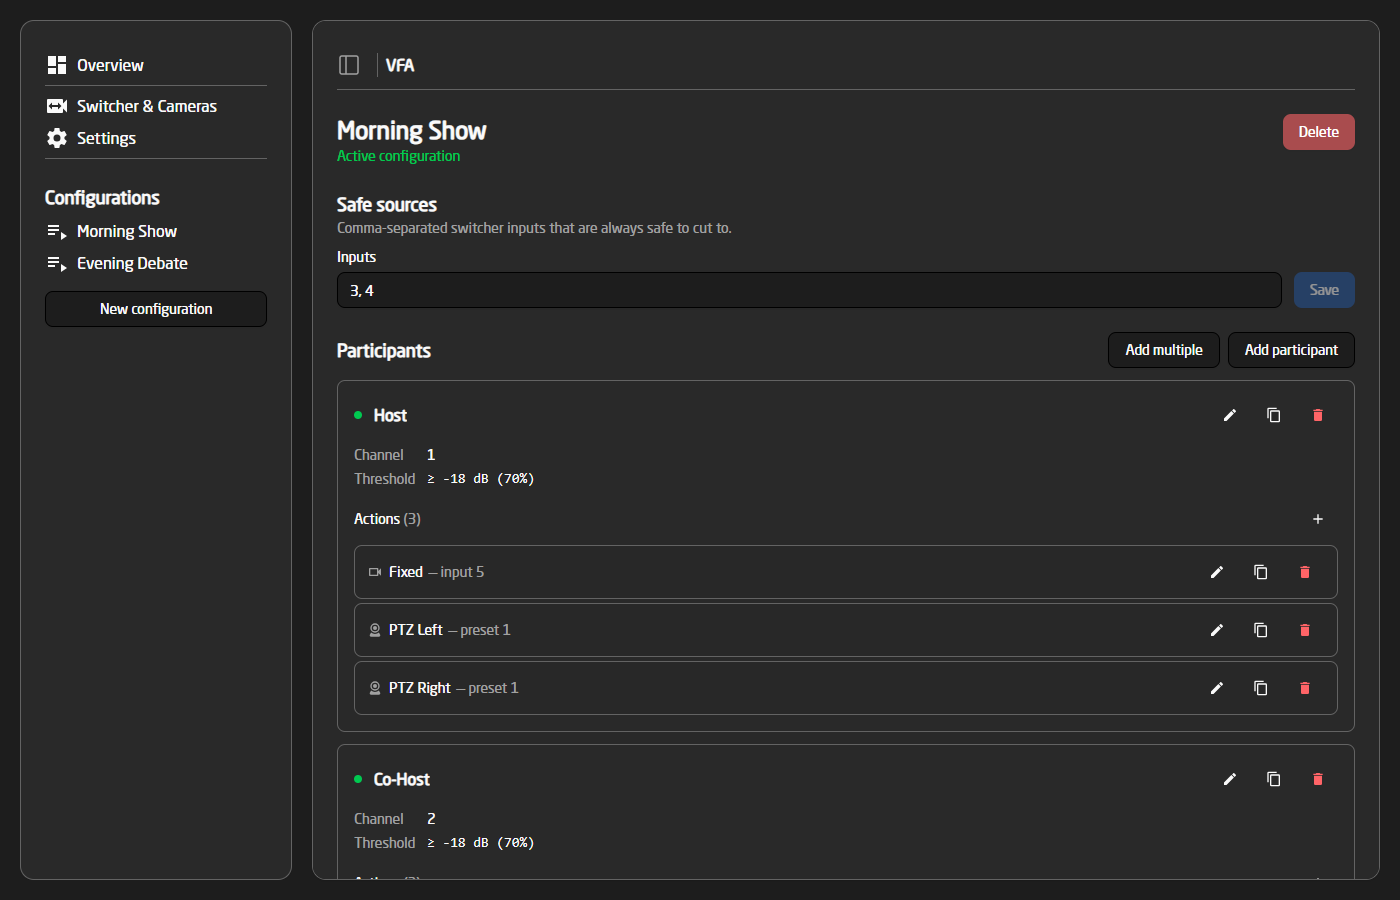
Safe sources
Safe sources are switcher inputs that are always safe to cut to, for example a wide or audience shot. They are used as listening shots when one participant has been on for a long time, and as a fallback when a PTZ camera needs to be repositioned while it is live.
Participants
This is where you set up each person in the system. A participant has a name, a channel and threshold for when they count as talking, and one or more actions. A participant can also be enabled or disabled, shown by the small indicator on the card.
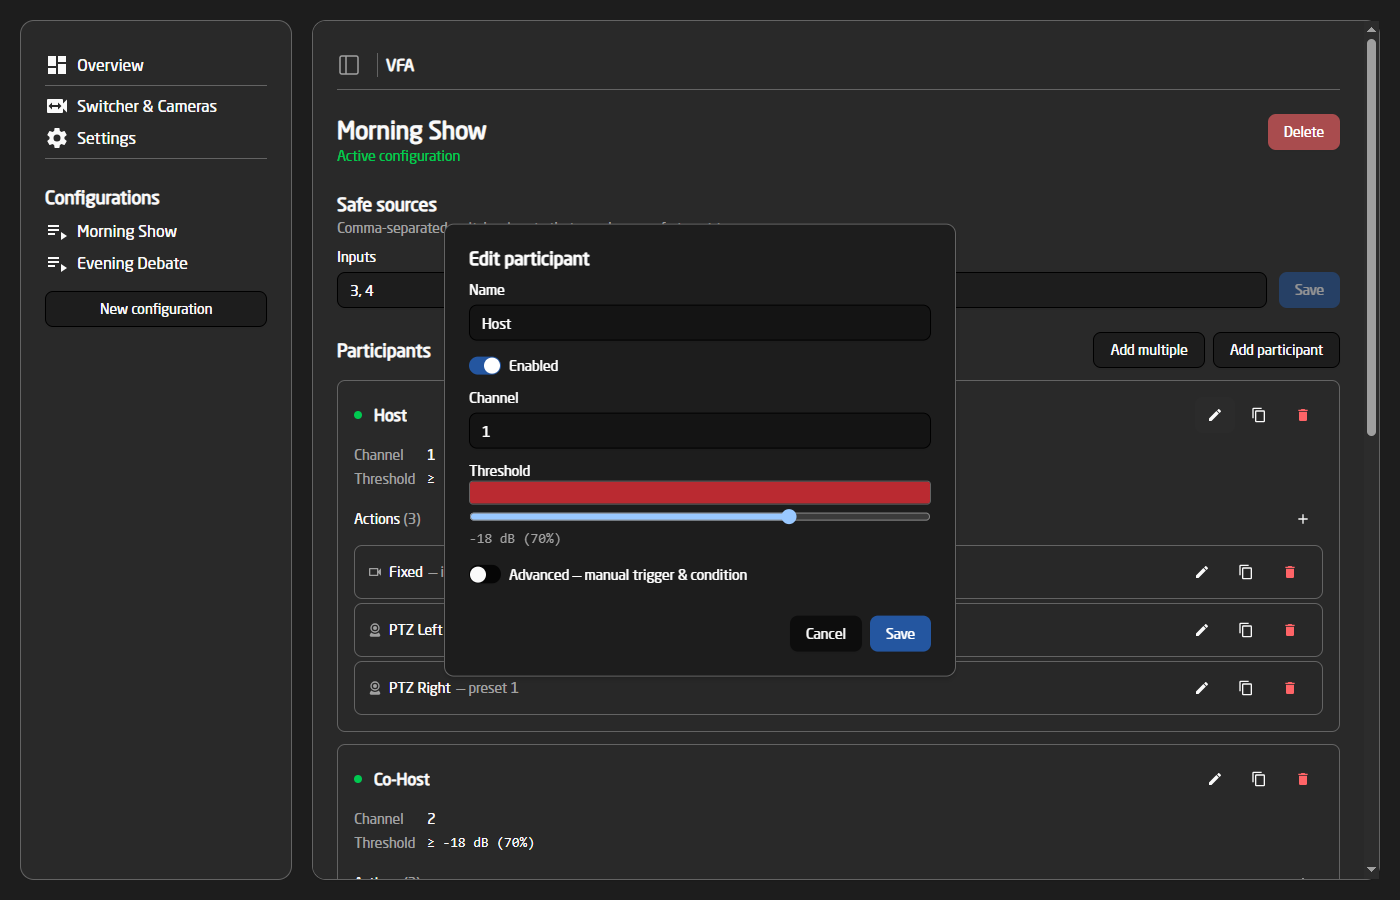
The channel is the participant's channel on the audio source, and the threshold is set with a slider. While the dialog is open, a live meter shows the incoming audio level behind the slider, so the threshold can be set by simply watching the person talk. In this example, the participant counts as speaking whenever channel 1 is above -18 dB.
For special cases, the 'Advanced' switch reveals the raw trigger and condition, where any IO Reference and logic expression (e.g. >= -18) can be entered manually.
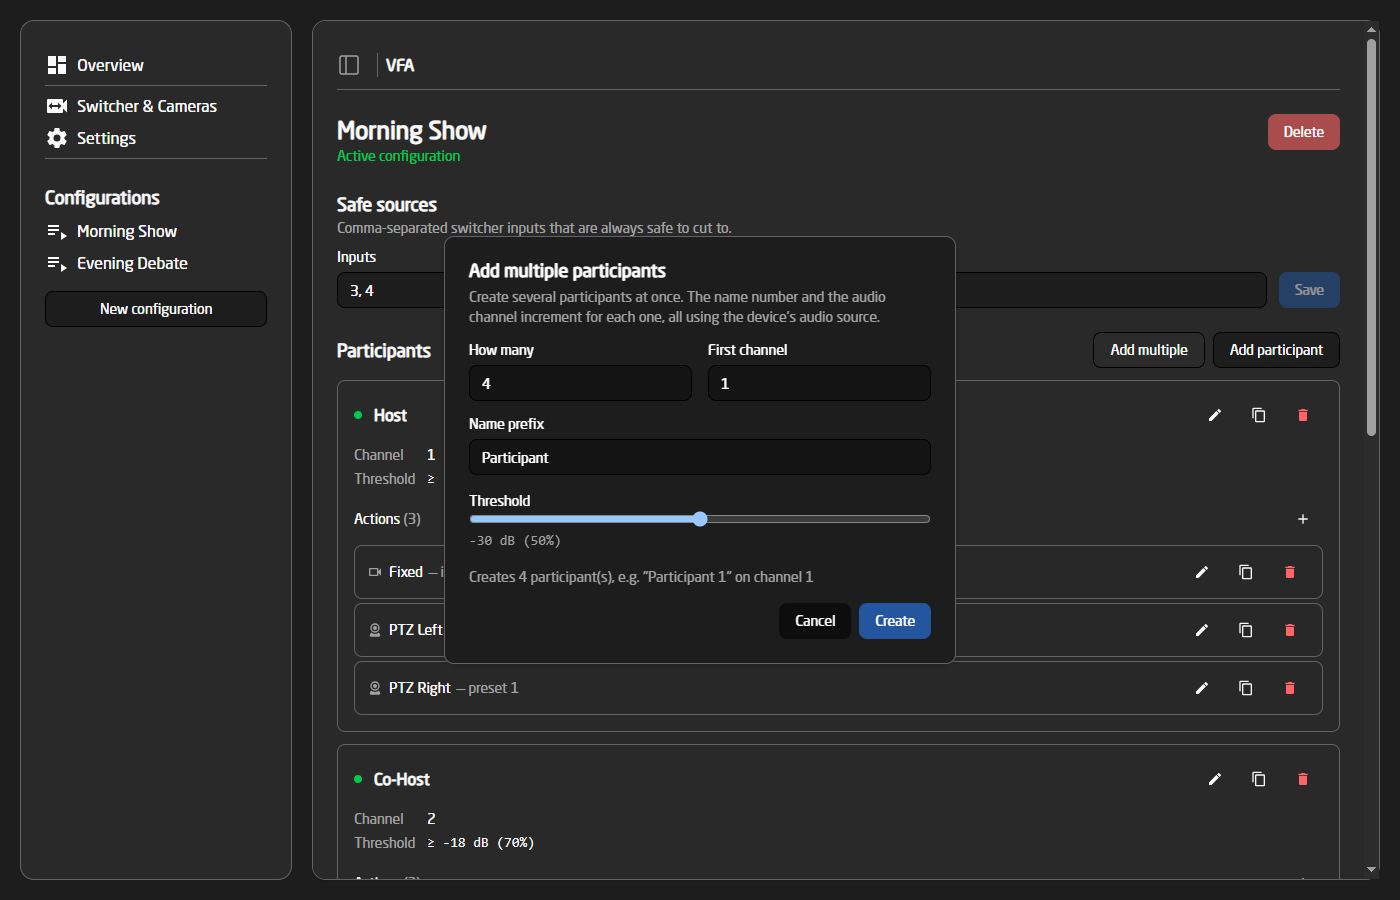
The 'Add multiple' button bulk-creates participants for the common "one audio channel per guest" layout — each new participant gets the next channel number and a shared threshold:
Actions
Each participant will need one or more actions. An action is either a fixed camera (a switcher input) or a PTZ camera preset:
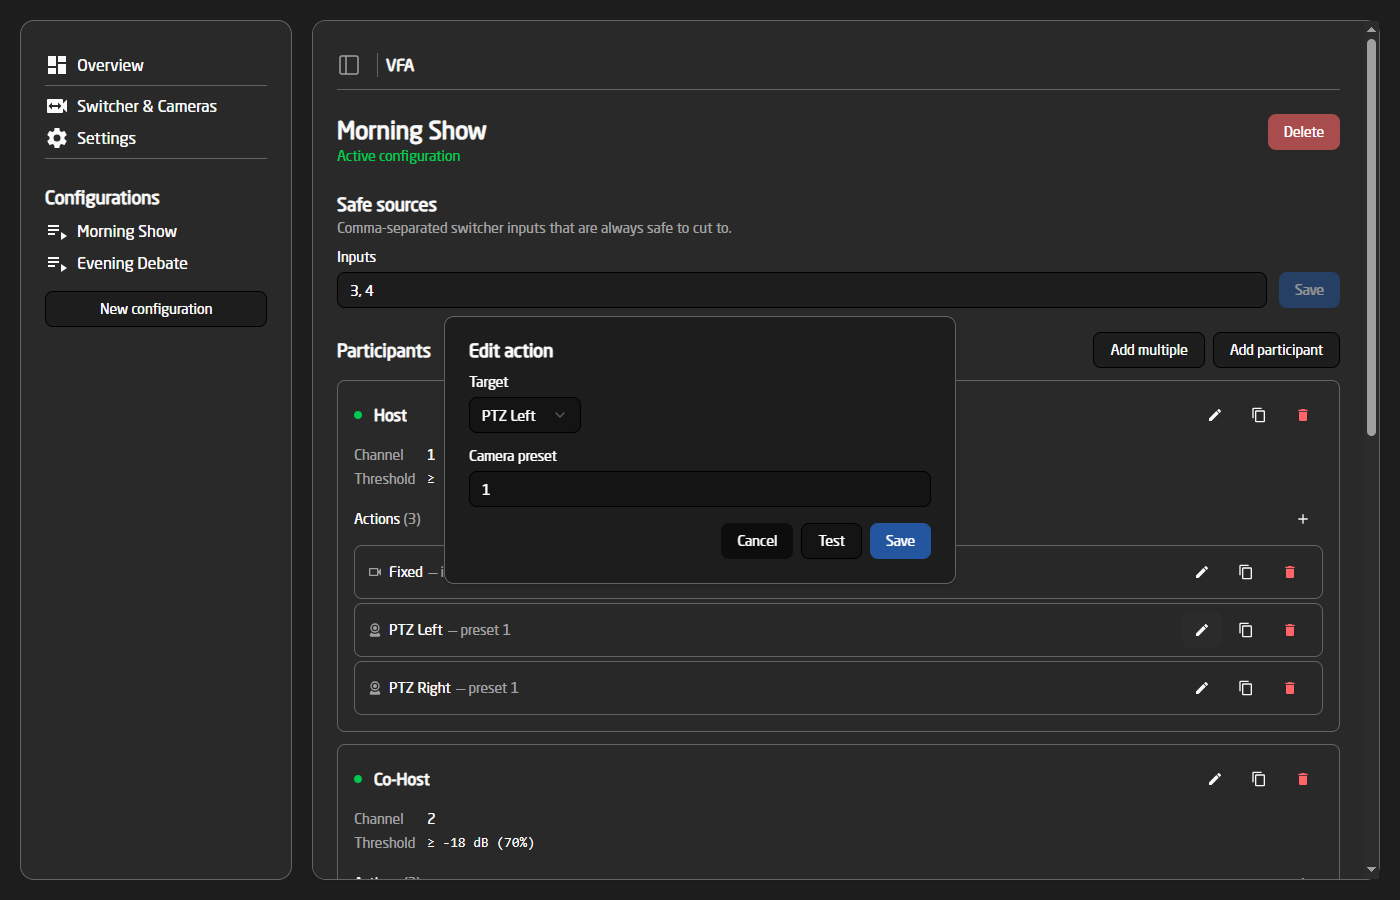
- Fixed — the switcher simply cuts to the given input.
- PTZ camera — the camera (picked from the cameras on the Setup page) recalls the given preset before the switcher cuts to it. The 'Test' button fires the preset so the shot can be checked while editing.
When a participant has several actions, the system picks between them, so the same person isn't always shown from the same angle. If a participant only has PTZ actions, the system prefers a camera that is not currently live. If only the live camera can be used, the system cuts to a safe source first, then repositions the camera and cuts back.
Settings
The Settings page holds the tuning knobs for the engine:
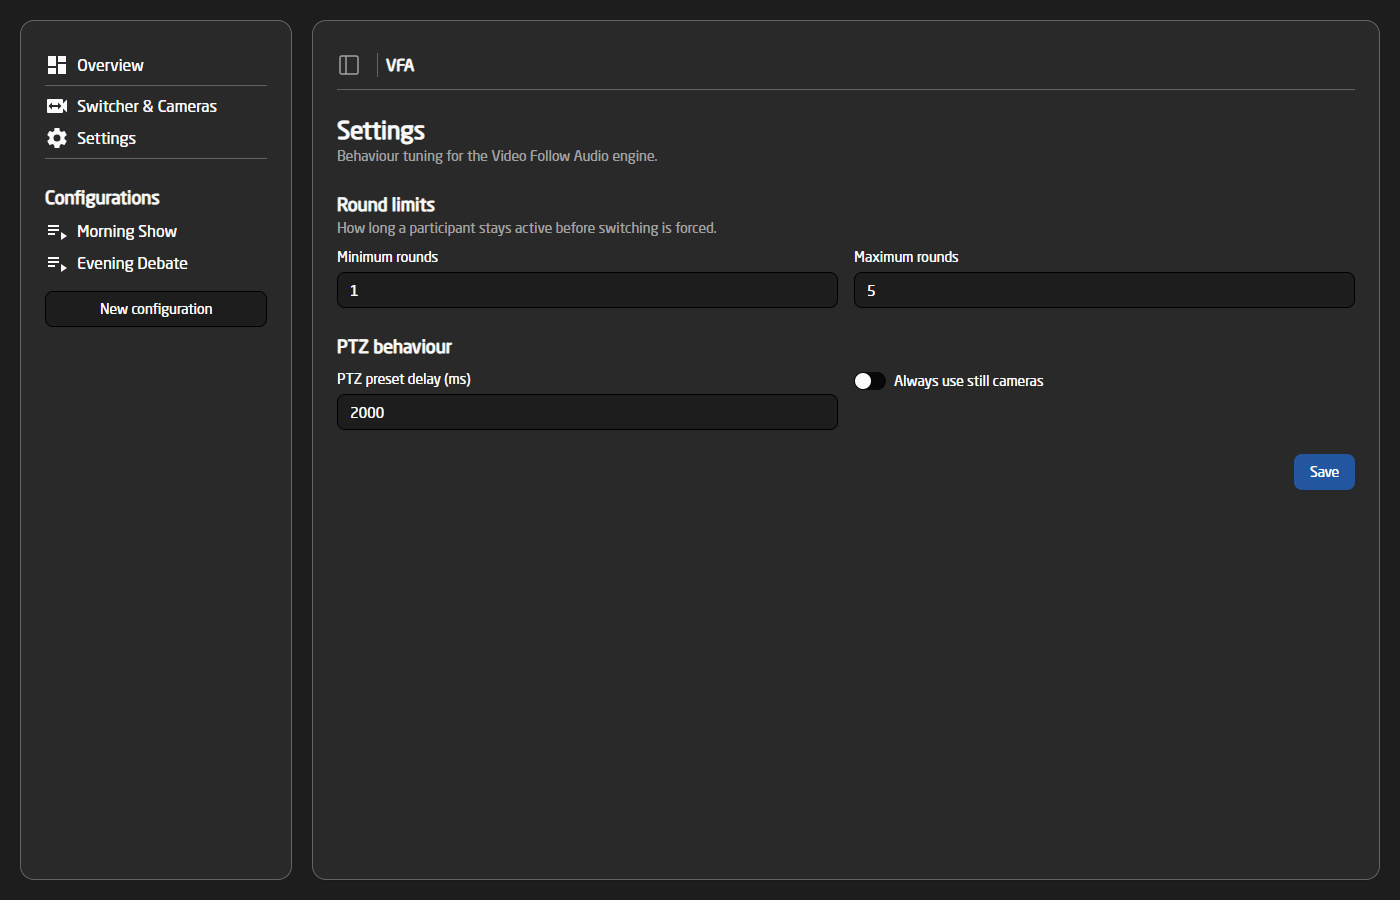
- Minimum rounds — how long a participant must stay on before the system is allowed to switch away.
- Maximum rounds — how long a participant can stay on before a listening shot is forced (the participant previously on, or a safe source).
- PTZ preset delay — how long the system waits after recalling a preset before cutting to that camera, giving it time to reach its position.
- Always use still cameras — when set, fixed actions are always preferred over PTZ actions.
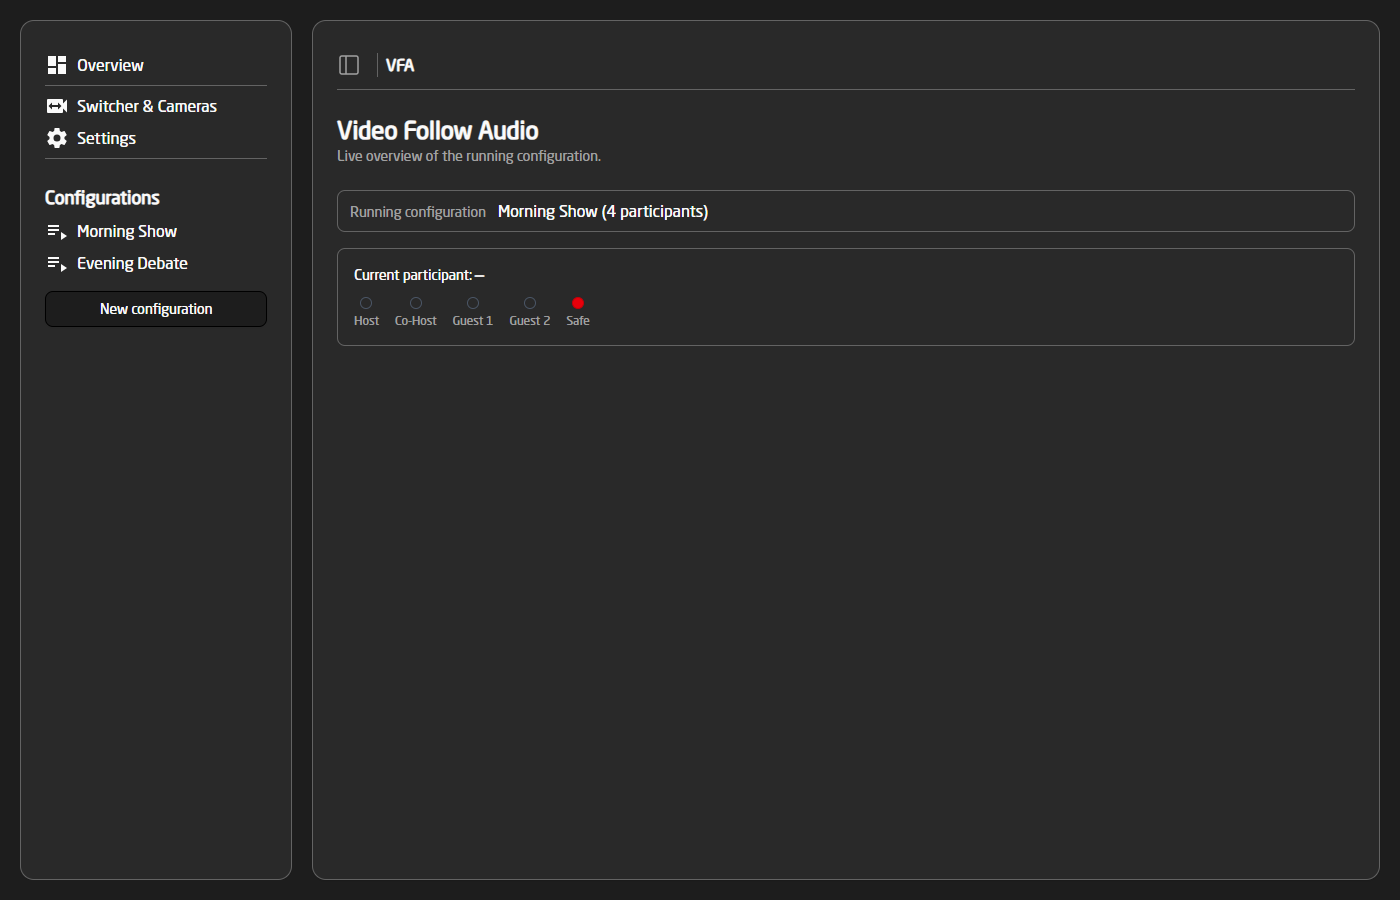
Overview
The Overview page shows a live view of the running configuration: the current participant on air, and a tally indicator for each participant (plus the safe shot), updating in real time:
PTZ Playlist - Producer Assistant
The PTZ Playlist model of the Skaarhoj Producer Assistant automates PTZ preset recall during a production. It keeps your off-air cameras moving to fresh shots, can stage the next shot on preview for you, or even run the switcher fully automatic.
This is useful for single-operator or unmanned productions, such as talk shows, panel debates, conferences and house of worship, where a few PTZ cameras need to keep offering new framings without a dedicated camera operator.
How it works
The PTZ Playlist works with a list of cameras, each with a library of up to 20 presets. A configuration selects which cameras and which of their presets are part of the rotation. The autopilot then acts on a timer, picking the next camera in the rotation and recalling a random preset from its selection (avoiding the most recently used shots).
The system reads the program and preview bus of your switcher, so it always knows which camera is on air. The camera on program is never moved.
The autopilot has three modes, deciding how far it is allowed to go:
- Reposition only — The autopilot only moves cameras that are off air, so every off-air camera always offers a fresh shot. A human cuts on the switcher.
- Preview assist — The autopilot picks the next camera, recalls a preset on it, waits for the camera to settle, and then parks it on the preview bus. The producer decides when to take it. Once the shot is taken, the cycle continues.
- Full auto — Like preview assist, but after the timer runs out the system also takes the shot to program. If an Auto/Take transition is configured, the take is done with a transition; otherwise the program bus is cut directly.
Requirements
For the system to work, it requires:
- One or more PTZ cameras controlled through a Skaarhoj device core with preset recall (for example Canon, Sony, Panasonic, BirdDog, Bolin, Vaddio, VISCA or ONVIF cameras).
- A switcher controlled through a device core (for example a Blackmagic ATEM), used for program/preview tally and, in full auto, for switching.
- The switcher input number for each camera, so tally can be matched to the right camera.
Configuration
All configuration happens in the Device WebUI. To open it, open the device configuration on the home page of Reactor, and press 'Open Device WebUI'. It can also be found in the packages menu.
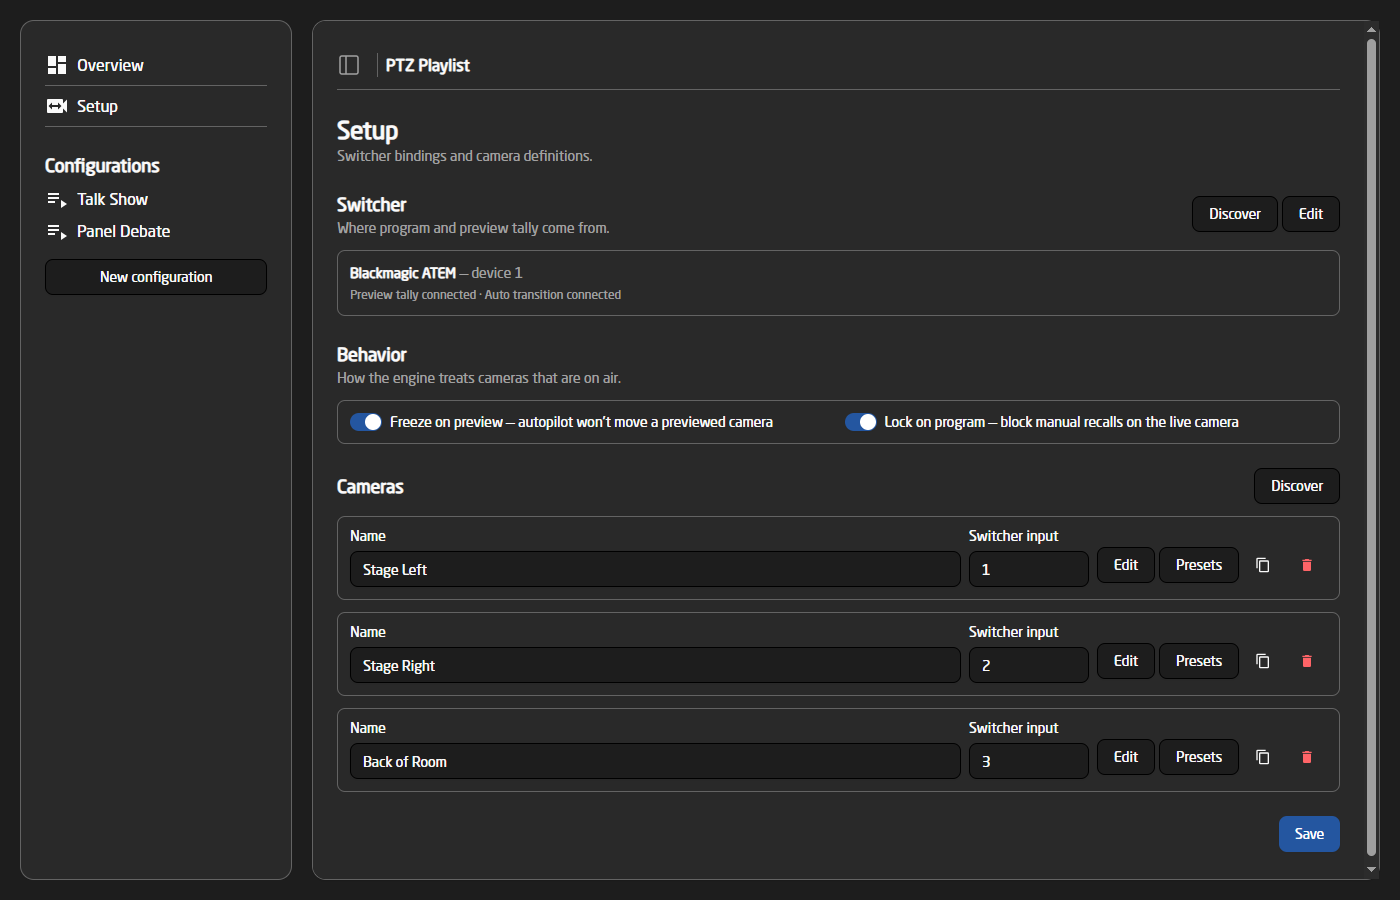
Setup
The Setup page holds the hardware bindings shared by all configurations: the switcher and the camera definitions.
When you are finished editing the Setup page, remember to press Save at the bottom of the page!
Switcher
The switcher provides program and preview tally, and is what the system controls in full auto mode. The easiest way to set it up is the 'Discover' button, which lists the switchers found on the connected cores and fills in the parameters for you.
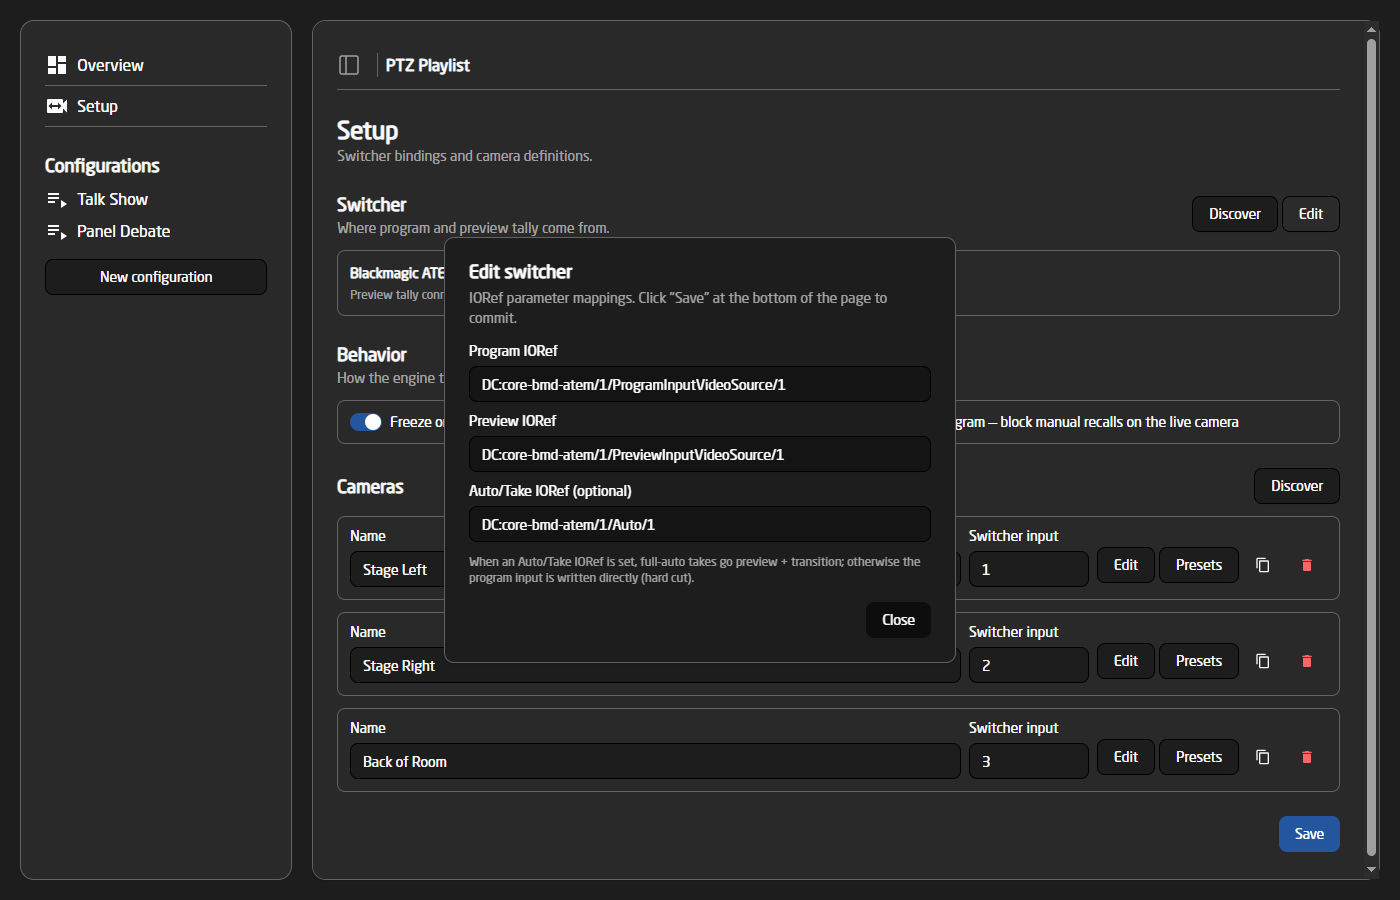
- Program IORef — the program bus. Read for red tally, and written for direct takes.
- Preview IORef — the preview bus. Read for green tally, and written when the autopilot stages a shot.
- Auto/Take IORef (optional) — a transition trigger. When set, full-auto takes go preview + transition instead of cutting the program bus directly.
Behavior
Two switches control how the engine treats cameras that are on air:
- Freeze on preview — the autopilot will not move a camera that sits on the preview bus.
- Lock on program — manual preset recalls (from the WebUI or a panel) are blocked on the camera that is live on program.
Cameras
Each camera needs a name and its switcher input number. The 'Discover' button lists the PTZ cameras found on the connected cores, and can add several at once with their parameters auto-filled:
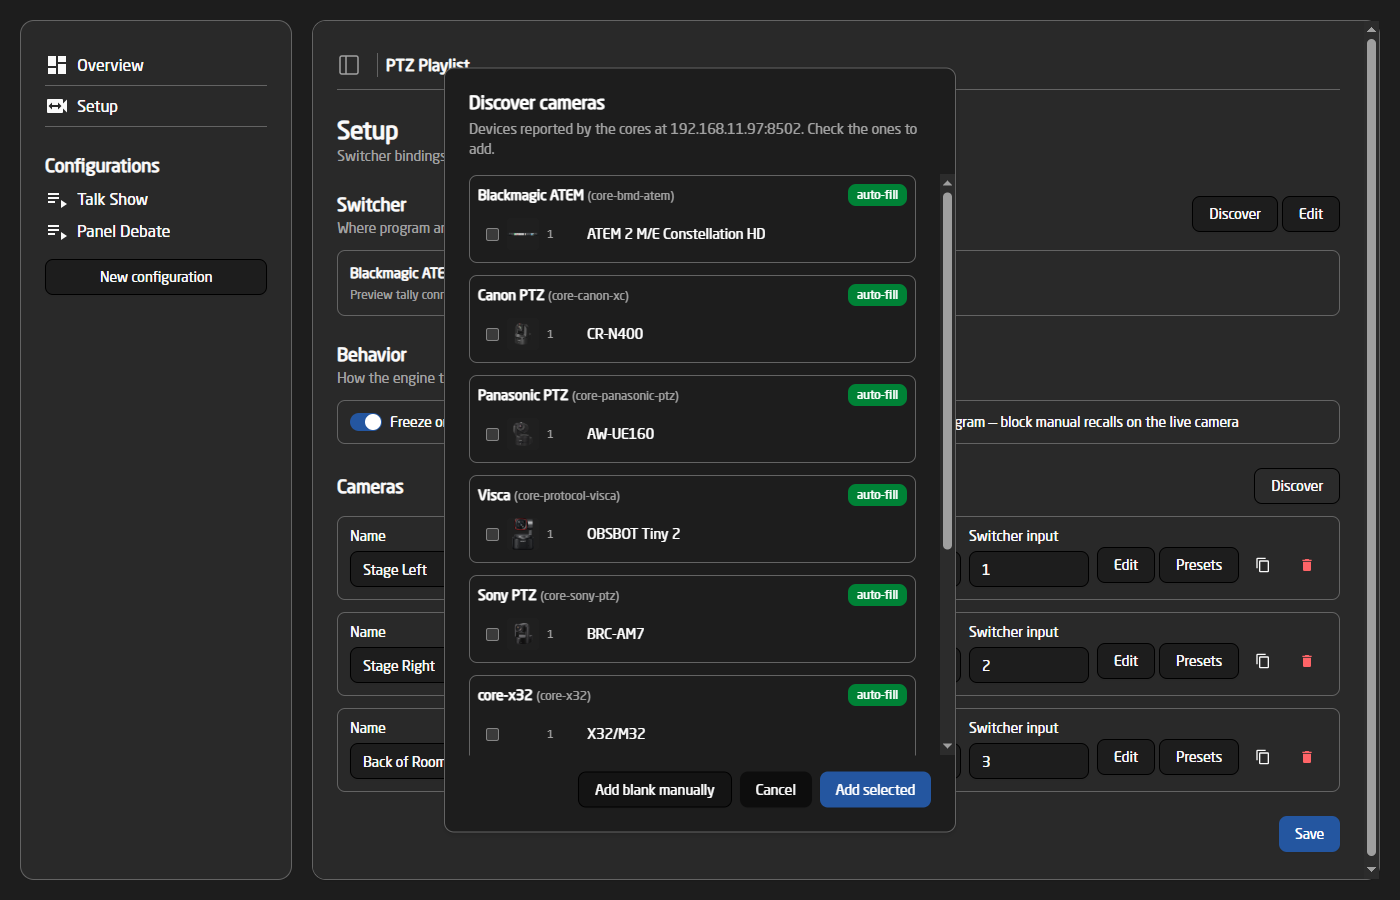

- Device ID and Core type — which core and device this camera is. Picking a core type auto-fills the standard parameter names for that manufacturer.
- Settle time — how long the camera needs after a preset recall before it is safe to put on air. The autopilot waits this long before staging the shot on preview. Defaults to 2000 ms.
- Recall / Pan / Tilt / Zoom parameters — the parameter names used to recall presets and to drive dynamic movements.
Presets
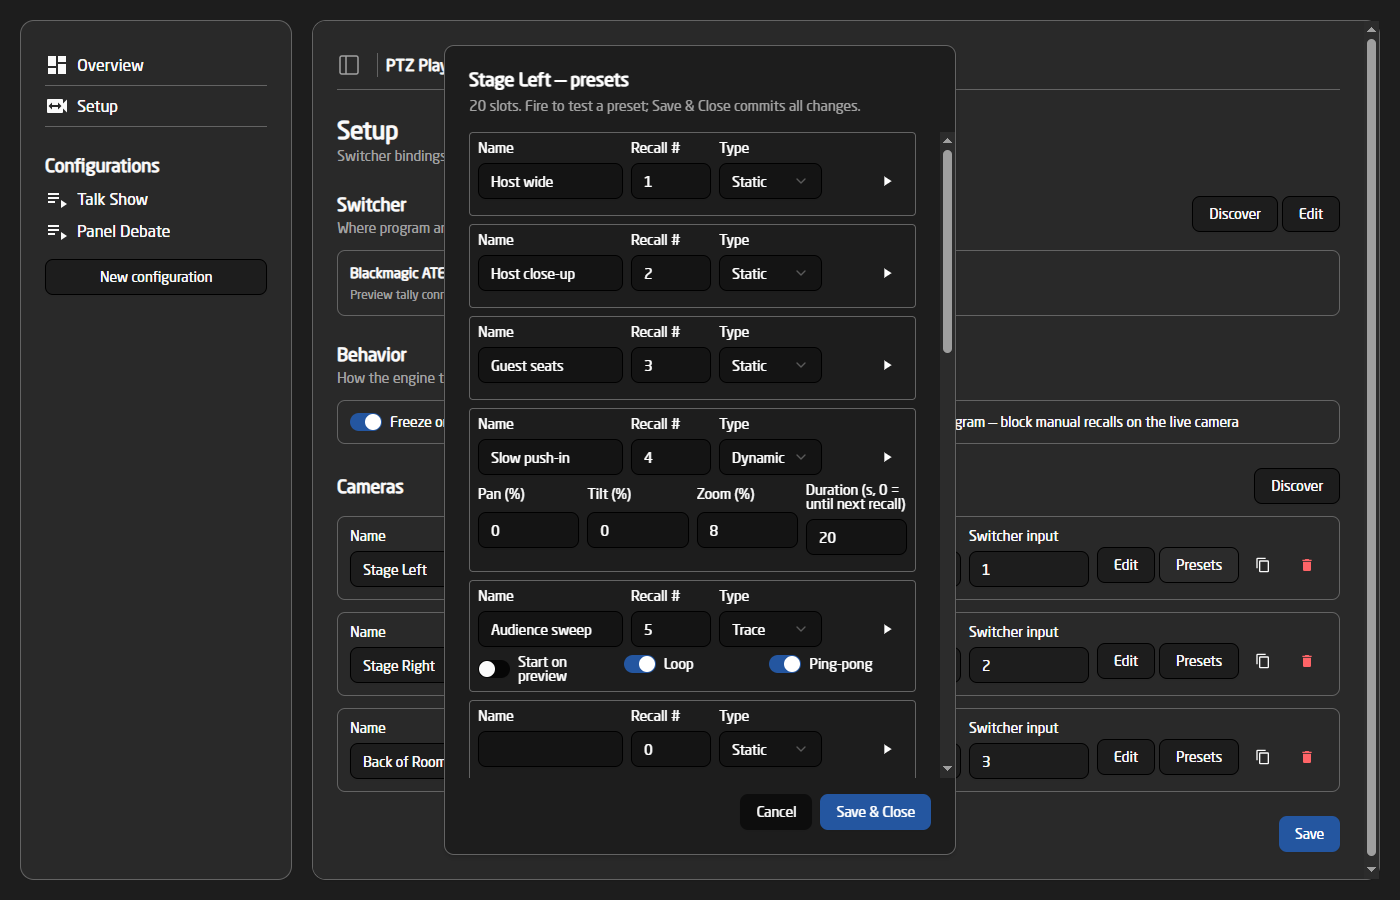
There are three preset types:
- Static — a plain preset recall. The camera moves to the stored position and stays there.
- Dynamic — a preset recall followed by a slow movement. Pan, tilt and zoom are given as a relative speed from -100% to 100% (0 = axis unused), and the core automatically translates that into whatever speed values the specific camera expects. The movement starts once the camera has settled on the recalled position, and stops after the given duration — or, with a duration of 0, when the next preset is recalled on the camera. Use this for subtle pushes, drifts and creeps that keep a live shot alive.
- Trace — plays a recorded camera trace (using the standardized dcTrace parameters available on PTZ cores). The trace number is the preset number. The trace is armed on recall and starts playing the moment the camera comes on program — or already on preview, if 'Start on preview' is set. 'Loop' and 'Ping-pong' control how the trace repeats. The trace is stopped automatically once the camera is fully off air.
In the preset rotation buttons around the WebUI, dynamic presets are shown with an amber border and trace presets with a purple border, so the special shots are easy to spot.
Configurations
Each configuration has its own autopilot settings and its own selection of cameras and presets:
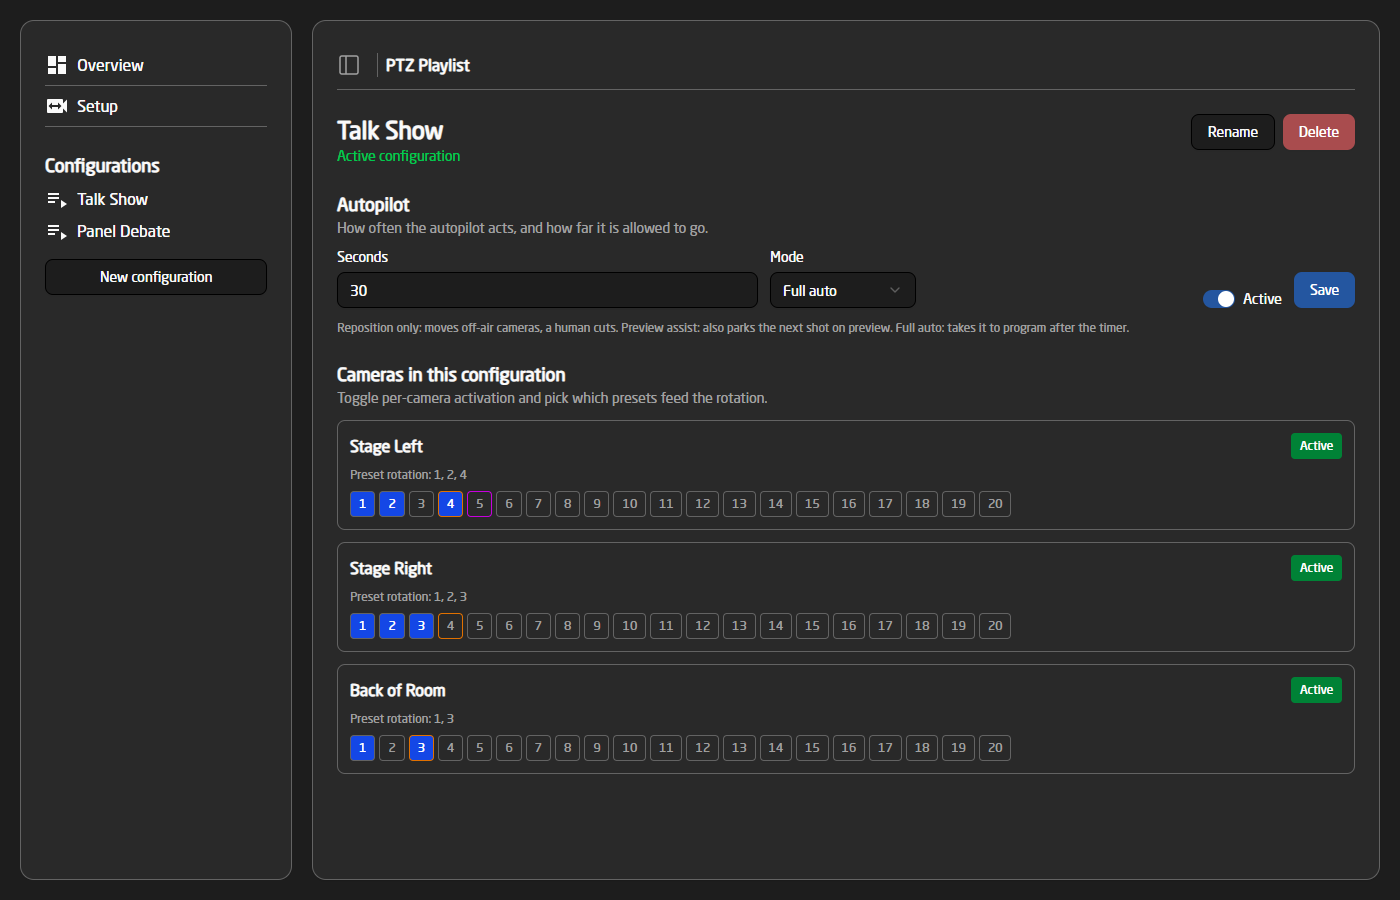
Autopilot
- Seconds — how often the autopilot acts. In reposition mode this is the dwell per camera; in preview assist and full auto it is the time between shots.
- Mode — Reposition only, Preview assist or Full auto, as described above.
- Active — whether the autopilot runs when this configuration is active. It can also be started and stopped from the Overview page or a panel.
Cameras in this configuration
Each camera can be activated or deactivated for this configuration, and the numbered buttons select which of its presets are part of the rotation. The autopilot only uses active cameras and selected presets.
When picking the next shot, the system avoids the presets it used most recently, so the rotation feels varied. Rotations with three or fewer presets are cycled in order instead.
Overview
The Overview page is the live operating view of the active configuration:
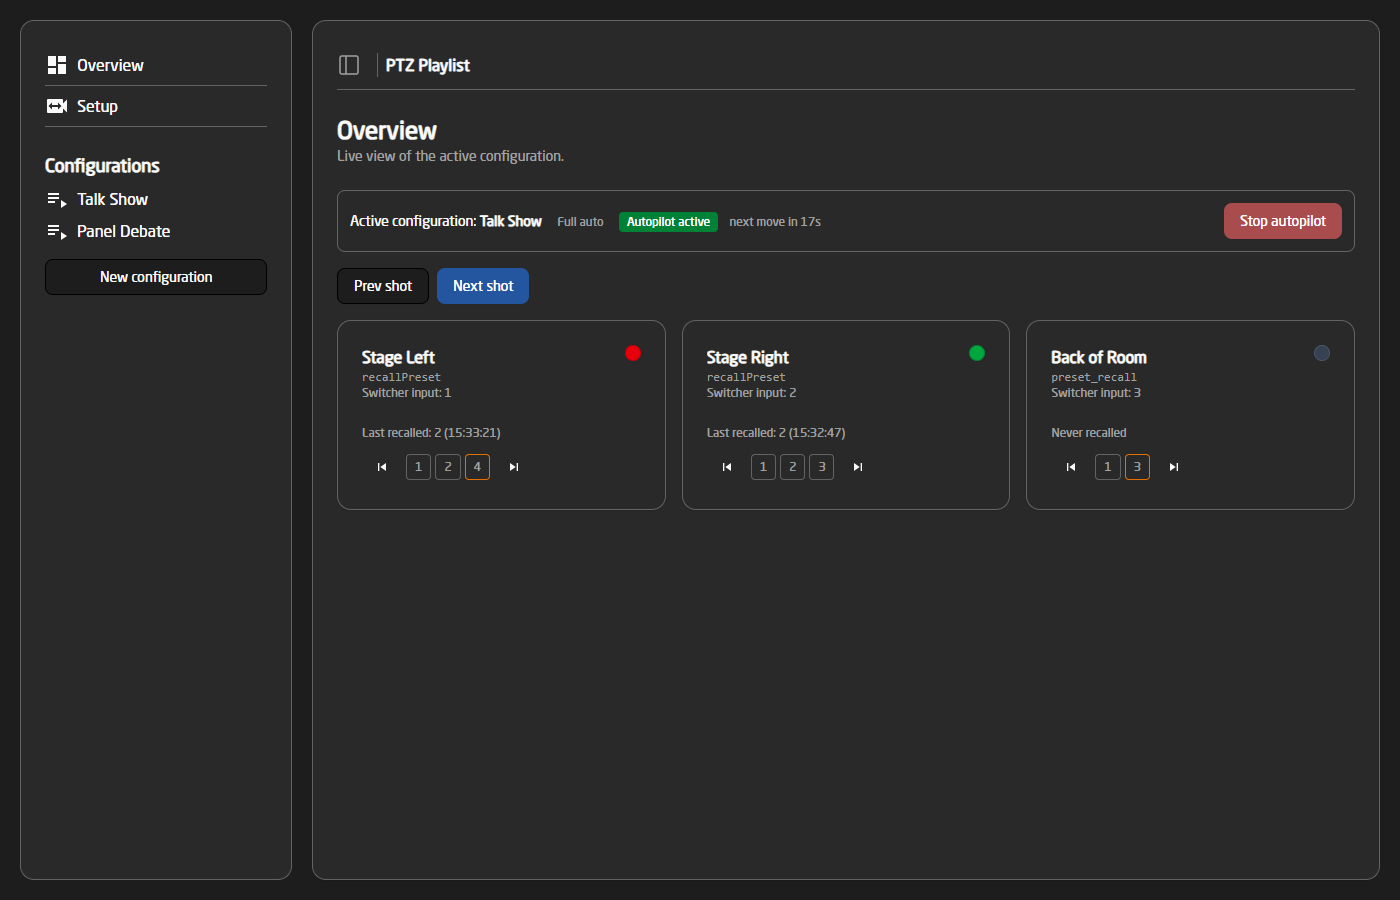
The top strip shows the active configuration, the autopilot mode and state, and a countdown to the autopilot's next move, together with a start/stop button. Each camera has a tile with its tally state (red = program, green = preview), the last recalled preset, and a badge when the camera is settling, moving or playing a trace.
The page also offers manual control:
- Next shot / Prev shot — manually advance the rotation to a fresh shot, or go back to the previous shot from the history. Next shot is mode-aware: in preview assist and full auto, the new shot is staged for preview just like the autopilot would.
- Per-camera preset buttons — fire a specific preset on a camera, or step the camera forward/backward through its rotation.
Panel control
The most important functions are also available as device core parameters, so they can be mapped to a Skaarhoj panel in Reactor:
- Autopilot — start/stop the autopilot for the active configuration.
- Switch Configuration — change the active configuration.
- Next Shot / Previous Shot — same as the Overview page buttons.
- Selected Camera + Camera Next/Previous Preset — pick a camera and step it through its rotation manually.
- Pause — pause the whole engine.
- Current Configuration, Autopilot Countdown and Last Shot — feedback parameters for panel displays, showing the running configuration, the seconds until the autopilot's next action, and the camera/preset of the most recent recall.