Protocol-OSC
Open Sound Control (OSC) is a widely used protocol for controlling all sorts of devices. This is a generic protocol implementation, so you have to know the exact commands your device reacts to, and how to connect to it.
OSC works by sending commands with an address and often also an argument. An example: To control 'level' on a device, the command could look like this:
• Address: '/level/1'
• Argument: '1.5'
Most OSC commands use slashes in the address to divide the address into fields. The address above, '/level/1', could specify that we want to control the level parameter on channel number 1.
These addresses need to be known beforehand, and can often be found in the manual or the OSC specification for the device.
At the moment our OSC device core only works via UDP. This is the standard for most OSC devices, but a few use TCP.
Configuration
To configure the device you need to set some device specific information.
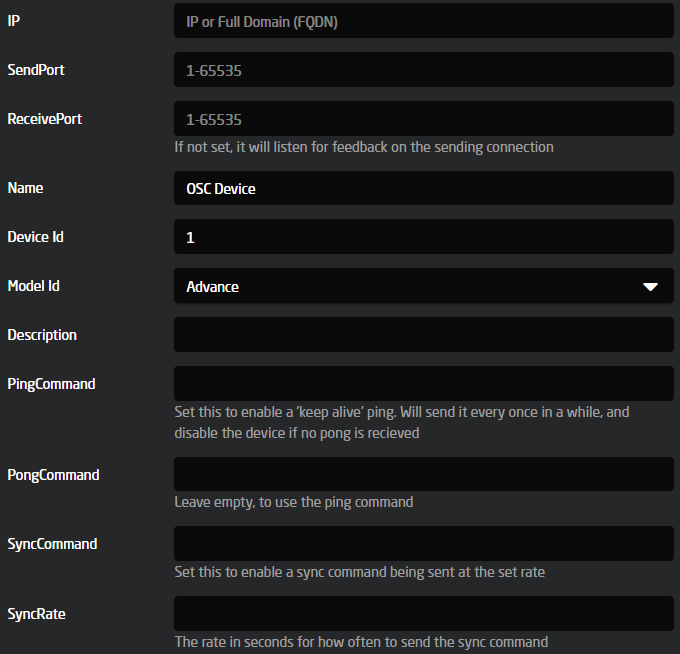
- IP
Set the IP address of the device to control - Send Port
Set the port to send OSC commands to. This can either be set on the device or found in the manual. - Receive Port
Set the port to listen for OSC commands. Some devices send the return commands to the port they receive commands from. If this is the case, then leave it empty, otherwise set the port specified on the device or found in the manual. - Ping Command
To check if the device is connected and active, you can specify a command to send once in a while. If we receive a response, we expect the device to be connected. This is often something like "/Ping" or "/KeepAlive".
If the Ping Command is not set, the device status will always be connected, since there is no way of knowing if there is a device listening. - Pong Command
On some devices, the response to the Ping Command is different from the command sent. For instance, some devices will respond with "/Pong" when a "/Ping" is sent. Specify it here, or leave it empty to use the Ping Command. - Sync Command
Some devices need to receive a sync command once in a while to keep sending feedback. This can be left empty. - Sync Rate
Set how often the Sync Command should be sent. In seconds.
Models
The OSC core provides 3 different models to use:
1. Simple model
This model includes parameters for very simple one way OSC control.
A control parameter has to be specified with a few meta parameters.
- Address: This is the address to send the command to.
Type specific meta parameters.
- New Max: This specifies the max of the range for float and integer parameters.
- New Min: This specifies the min of the range for float and integer parameters.
- Float64: OSC can send both Float32 and Float64 arguments. The default is Float32 but set this to use Float64.
- Factor: Float commands can have a factor applied before being sent. For instance some faders go between -90 to 10, but the argument sent needs to be between 0-1. A factor can be specified to do this. Set 'x' as the value and write the math needed. For instance '(x+90)/100'.
- As Integer: For Bool commands it can either be sent with an argument of 'true' or 'false', or as an integer with value 1 or 0.
- Invert: Bool commands can be inverted when sent.
2. Dynamic model
This model includes everything from the simple model, but also a way to receive feedback on parameters.
Each parameter has a number of dimensions. These dimensions are assigned different commands, that then can be controlled, or could listen to feedback.
3. Advanced model
This model includes everything from both the simple and dynamic model, but also a way to set up multiple dimensions of a parameter. For instance if you have many faders to control, you only have to configure it one time, and it will auto populate the second dimension of control.
The main difference is that when setting the address or feedback, a string formatter can be used. For instance if you have 20 level commands ('/Level/1', '/Level/2', '/Level/n'...). Instead of setting them up one by one, the Address can be set to '/Level/%d', and then the Count meta parameter set to 20. Now the parameter will be populated with 20 sub dimensions to control, one for each level control.
Some devices will need leading zeros, for instance '/Level/01'. To set this, use '/Level/%02d'. That will make it a width of 2 and pad it with zeros.
The web UI
The easier way to set up the dynamic and advanced control parameters is through the web UI. To open it, a dynamic or advanced model needs to be configured. Open Reactor and navigate to the 'Packages' menu. Here you can find the osc package, and a button to open the UI.

Each page shows a table with one row per parameter slot, listing the configured address, the feedback address and a few flags. Click the pencil icon on a row to open the editor for that slot.

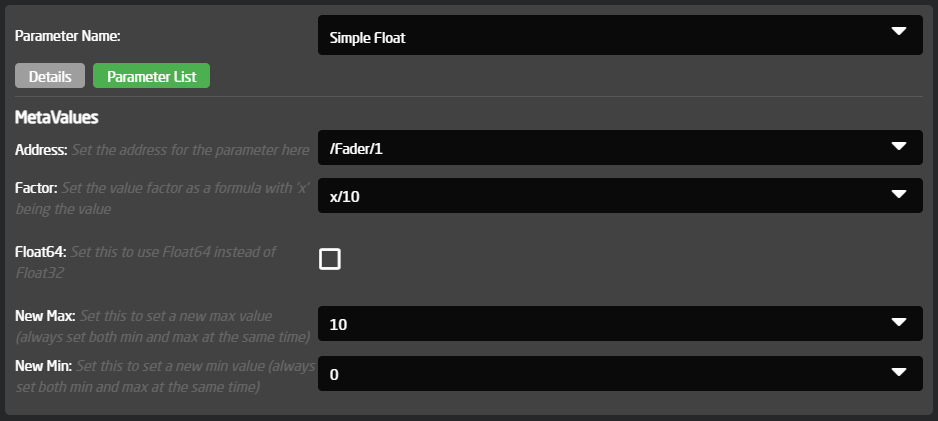
The editor contains everything needed to set up a command. The same settings are also available through the config parameter of each type, for setups where the UI is not used.
- Address: The OSC address commands are sent to. Leave it blank to make a slot that only listens for feedback.
- Feedback: Some devices have a different address for feedback compared to the control address. Specify it here, or leave it blank to use the Address.
- Ask for feedback: Some devices won't reply to a command, but need to receive the address without an argument to return the current value. Enable this to request values that way.
- No feedback: If the device does not return feedback for this parameter, enable this.
- Command Factor / Feedback Factor (integers and floats): Math applied to the value before it is sent, and after it is received. Set 'x' as the value and write the math needed, for instance '(x+90)/100'. The two factors need to be each other's inverse: if the Command Factor is 'x*10', the Feedback Factor needs to be 'x/10'.
- Min OSC value / Max OSC value (integers and floats): The range of the value as it is sent on the wire, that is after the Command Factor has been applied. The range of the control itself is calculated automatically by running these limits through the Feedback Factor.
- Count (advanced types only): How many sub dimensions to populate from the address formatter, as described under the advanced model.
- Type switches: Per type alternative encodings. 'Use float64' for floats, 'Use int64' for integers, and 'Use int (0/1) instead of bool' for devices that expect 1 or 0 instead of 'true' or 'false'.
The Test box at the bottom of the editor sends a one-off value to the address in the dialog, without saving anything. This is useful for trying out an address found in a manual before committing to it. Clicking Save sends the configuration to the device and stores it immediately.
OSC Monitor
Under the 'Tools' section in the sidebar, the OSC Monitor shows a live view of the OSC messages the core sends and receives, newest first, with the direction, device, address and arguments of each message. Combined with the test field in the editor, this makes it easy to debug an address that does not respond as expected, or to discover the addresses a device sends out when it is operated directly.

Example: Resolume Arena
Resolume is a popular VJ application with a well documented OSC implementation. The full address list can be found in the Resolume manual, and the exact address of any control can be seen in Resolume itself via Shortcuts > Edit OSC.
Resolume listens for OSC on UDP port 7000 by default (Preferences > OSC). So in the device configuration, the IP is set to the machine running Resolume and the Send Port to 7000.
To get feedback, enable OSC Output in the same preferences panel, point it at the IP of the SKAARHOJ panel and pick an outgoing port, for instance 7001. Set the same port as the Receive Port in the device configuration. Finally, select the 'Output All OSC Messages' preset under Shortcuts > Edit OSC, so Resolume sends out everything that changes in its interface.
Resolume's continuous parameters are floats from 0.0 to 1.0, so no factors are needed, and layers and clips are numbered from 1 without leading zeros.
Composition master through dynamic floats
The composition master fader has a single fixed address, so it fits a dynamic float: Address '/composition/master', Min OSC value 0, Max OSC value 1. The first screenshots on this page show this setup.
Layer opacity through advanced floats
The opacity of all layers is set up in one go with the address '/composition/layers/%d/video/opacity' and the Count set to the number of layers in the composition, here 8. Since Resolume layer numbers have no leading zeros, the plain '%d' formatter is used. The OSC range is 0 to 1 with no factors.
Layer bypass through advanced bools
'/composition/layers/%d/bypassed' toggles a layer on or off. Resolume expects an integer of 1 or 0 rather than a 'true' or 'false' value, so 'Use int (0/1) instead of bool' is enabled.
Example: 12 channel audio mixer
As an example, let's say we want to control a simple audio mixer with 12 channels. From the manual, we find the following OSC parameters we want to control:
Fader control - a 0 to 1 float with the address '/mixer/level/x'. The x marks the channel number from 01-12.
Mute control - a 0 or 1 integer with the address '/mixer/mute/x'.
Pan control - a -100 to 100 integer with the address '/mixer/pan/x'.
In the manual, we also see that in order to get a current value from the device, we can send the address without a value, and it will return the current value.
Since we have multiple channels for each command, we will use an advanced model.
To set up each command, we open the UI as described earlier and configure one slot on each of the advanced pages.
Fader control through floats
Here the last part of the address is set up as %02d. This is a string formatter that will take the channel number and insert it as a number with a width of 2 padded with zeros. E.g. channel 1 would be: '/mixer/level/01'.
The feedback is left empty, and will then default to the same as the address.
Ask for feedback is enabled, since we can get the current value by asking for it.
From the manual, we know the fader on the device goes from -90dB to 10dB, but the float sent over OSC needs to be from 0 to 1. The Command Factor '(x+90)/100' converts the dB value to the OSC value, and the Feedback Factor 'x*100-90' converts it back.
The Min and Max OSC values are set to 0 and 1, since that is the range actually sent on the wire. The core derives the -90 to 10 control range automatically from the Feedback Factor.
Finally we set the Count to 12, since that is the amount of channels we want to control.
Mute control through bools sent as integers
Most things are set up as above. Since the mixer wants an integer of 0 or 1 instead of 'true' or 'false' values, 'Use int (0/1) instead of bool' is enabled.
Pan control through integers
Again, many of the things are the same as above. The Min and Max OSC values are now set directly to -100 and 100, with no factors. This will send the raw value from -100 to 100.