# Raw Panel

# Stream Deck on Raw Panel

With SKAARHOJs Stream Deck application (*xpanel-streamdeck* package) you can **connect one or more Stream Deck** surfaces to a SKAARHOJ product (with USB-A or Ethernet in case of Stream Deck Studio) and integrate the Stream Deck seamlessly with your existing SKAARHOJ devices. In this way you can enjoy even **more freedom of user friendly integration with professional SKAARHOJ panels** and your existing fleet of Stream Deck devices.<span class="Apple-converted-space"> </span>

[![image.png](https://wiki.skaarhoj.com/uploads/images/gallery/2022-11/scaled-1680-/ockimage.png)](https://wiki.skaarhoj.com/uploads/images/gallery/2022-11/ockimage.png)

The **Stream Deck devices become network enabled** as they are turned into **Raw Panel compliant devices**. This means that Reactor and any other third party application fully compliant with Raw Panel can use them. This is an advantage even for Stream Deck Studio (which already has network capability), as Raw Panel offers a simpler, unified, and standardized protocol for third-party integration.

Below, you see a Stream Deck Plus connected directly to a SKAARHOJ Blue Pill Server which in turn is connected to a PoE powered network switch. The Stream Deck can be accessed via the Raw Panel TCP protocol on the IP address of the Blue Pill Server.

[![IMG_6216.JPG](https://wiki.skaarhoj.com/uploads/images/gallery/2022-11/scaled-1680-/img-6216.JPG)](https://wiki.skaarhoj.com/uploads/images/gallery/2022-11/img-6216.JPG)

Multiple Stream Deck panels can be driven by a single Blue Pill using a charging (powered) USB hub in between:

[![IMG_6217.JPG](https://wiki.skaarhoj.com/uploads/images/gallery/2022-11/scaled-1680-/img-6217.JPG)](https://wiki.skaarhoj.com/uploads/images/gallery/2022-11/img-6217.JPG)

Using the [Raw Panel Protocol](https://github.com/SKAARHOJ/Support/blob/master/Manuals/SKAARHOJ/SKAARHOJ_RawPanel_V2.pdf), you can easily send colors, text content and monochrome, grayscale and color images to the Stream Deck panels:

[![image.png](https://wiki.skaarhoj.com/uploads/images/gallery/2022-11/scaled-1680-/vBQimage.png)](https://wiki.skaarhoj.com/uploads/images/gallery/2022-11/vBQimage.png)

### Watch it

<iframe allowfullscreen="allowfullscreen" height="314" src="https://www.youtube.com/embed/8GXB3DgSvQs" width="560"></iframe>

Stream Deck devices are routinely used in our videos, so you will find many more examples in addition to this video.

### Getting Started

- **Connect your Stream Deck** to your SKAARHOJ Blue Pill Inside product (with USB-A).   
    Please check table below, you may need to use a powered USB hub in between. In case of Stream Deck Studio over Ethernet, please see separate section.
- Go to the **Settings tab** of the Web UI of your SKAARHOJ device, find where it says **"USB-A" and turn it on**. After doing so, please power cycle your SKAARHOJ device once or twice and then confirm that USB-A is still enabled. (This step is not necessary for Stream Deck Studio via Ethernet).  
    [![image.png](https://wiki.skaarhoj.com/uploads/images/gallery/2022-11/scaled-1680-/xFqimage.png)](https://wiki.skaarhoj.com/uploads/images/gallery/2022-11/xFqimage.png)
- Go to the **Packages tab** of the Web UI of your SKAARHOJ device  
    [![image.png](https://wiki.skaarhoj.com/uploads/images/gallery/2022-11/scaled-1680-/72eimage.png)](https://wiki.skaarhoj.com/uploads/images/gallery/2022-11/72eimage.png)
- Find the ***xpanel-streamdeck*** package in the list of Available Packages. Click "Install". (Latest version was v2.4.1 @Sept 2024)  
    [![image.png](https://wiki.skaarhoj.com/uploads/images/gallery/2022-11/scaled-1680-/nEDimage.png)](https://wiki.skaarhoj.com/uploads/images/gallery/2022-11/nEDimage.png)
- When installed, you should find it listed as "Running" in the top of the Packages page:  
    [![image.png](https://wiki.skaarhoj.com/uploads/images/gallery/2022-11/scaled-1680-/M52image.png)](https://wiki.skaarhoj.com/uploads/images/gallery/2022-11/M52image.png)
- **Click the package name "xpanel-streamdeck"** to go to the configuration page. Here you may want to make sure it's set up for Auto Start and attend to other config settings (see below)  
    [![image.png](https://wiki.skaarhoj.com/uploads/images/gallery/2022-11/scaled-1680-/bVCimage.png)](https://wiki.skaarhoj.com/uploads/images/gallery/2022-11/bVCimage.png)
- After (re-)starting the xpanel-streamdeck application **you should see a nice animated boot screen** on any attached Stream Deck:  
    [![IMG_6227.JPG](https://wiki.skaarhoj.com/uploads/images/gallery/2022-11/scaled-1680-/img-6227.JPG)](https://wiki.skaarhoj.com/uploads/images/gallery/2022-11/img-6227.JPG)
- Shortly after you should see the "Waiting for Blue Pill" screen. This indicates that the Stream Deck is ready to be used over network, but no TCP client is connected. One of the displays will reveals the IP address and port on which to connect:  
    [![IMG_6228.JPG](https://wiki.skaarhoj.com/uploads/images/gallery/2022-11/scaled-1680-/img-6228.JPG)](https://wiki.skaarhoj.com/uploads/images/gallery/2022-11/img-6228.JPG)
- Using PuTTy, Telnet or nc you can now make a TCP connection manually to test it. On a Mac, try "nc 192.168.11.5 9923" from the Terminal, then it should connect, type in "list"+Enter and you should see something like this:  
    [![Screen Shot 2022-11-30 at 10.07.49.png](https://wiki.skaarhoj.com/uploads/images/gallery/2022-11/scaled-1680-/screen-shot-2022-11-30-at-10-07-49.png)](https://wiki.skaarhoj.com/uploads/images/gallery/2022-11/screen-shot-2022-11-30-at-10-07-49.png)
- Try pressing a few buttons and turn the encoders (if you have a Stream Deck Plus) and you will see trigger messages arrive in a human readable form. This is the **Raw Panel protocol in ASCII version**. You can also send commands back to the StreamDeck to put colors, text and graphics into the displays.  
    ![Screen Shot 2022-11-30 at 10.08.41.png](https://wiki.skaarhoj.com/uploads/images/gallery/2022-11/scaled-1680-/screen-shot-2022-11-30-at-10-08-41.png)
- With PuTTy on Windows you should make sure to set "Implicit CR in every LF"
    
    [![image.png](https://wiki.skaarhoj.com/uploads/images/gallery/2022-11/scaled-1680-/521image.png)](https://wiki.skaarhoj.com/uploads/images/gallery/2022-11/521image.png)
- Issues? At this point we don't know what common issues may exist, but if after following the steps above you don't see the blue SKAARHOJ boot screen on the Streamdeck, please read the rest of this page to search for clues, then reach out to <innovationlab@skaarhoj.com> and let us help you! :-)

### Device Support

This is the Stream Deck models supported

<table border="1" id="bkmrk-stream-deck-model-su" style="border-collapse: collapse; width: 100%;"><colgroup><col style="width: 22.1577%;"></col><col style="width: 17.2735%;"></col><col style="width: 23.349%;"></col><col style="width: 22.6347%;"></col><col style="width: 14.414%;"></col></colgroup><tbody><tr><td>**Stream Deck Model**</td><td>**Support**</td><td>**Power Consumption @5V** (Full brightness white)</td><td>**Direct Connection to Blue Pill w/USB-A**</td><td>**License Points Required** </td></tr><tr><td>Stream Deck Original</td><td>Yes (multiple revisions supported)

</td><td>370 mA</td><td>Yes</td><td>100</td></tr><tr><td>Stream Deck MK2</td><td>Yes

</td><td>250 mA</td><td>Yes</td><td>100</td></tr><tr><td>Stream Deck Mini</td><td>Yes (multiple revisions supported)

</td><td>130 mA</td><td>No (use powered Hub)</td><td>70</td></tr><tr><td>Stream Deck XL</td><td>Yes (multiple revisions supported)

</td><td>490 mA</td><td>No (use powered Hub)</td><td>139</td></tr><tr><td>Stream Deck Pedal</td><td>Yes

</td><td>80 mA</td><td>Yes</td><td>0</td></tr><tr><td>Stream Deck Plus</td><td>Yes

</td><td>360 mA / white full brightness</td><td>Yes</td><td>199</td></tr><tr><td>Stream Deck Neo</td><td>Yes

</td><td>180 mA</td><td>Yes</td><td>100</td></tr><tr><td>Stream Deck Studio</td><td>Yes

</td><td>(Observed to draw 8.7W on a PoE switch when showing white displays and LEDs on max brightness)</td><td>Yes (with additional USB-C power)</td><td>501</td></tr></tbody></table>

Notice: By default, every newly connected Stream Deck gets a new port number assigned to its serial and until the configuration data gets cleared out, this will stick. It means that it won't always be port 9923 where you find a connected Stream Deck and especially for the Pedal you need to look in the logs (or use Raw Panel Explorer to find it on the network) to know what the port number may be since it has no display to show it.

#### Stream Deck Studio

The Stream Deck Studio is slightly different from other Stream Deck Panels in that it offers ethernet connectivity, is rack mounted and has a price tag which is targeted at the professional AV- and broadcast market. SKAARHOJ supports this panel as well of course.

[![StreamDeckStudio.jpg](https://wiki.skaarhoj.com/uploads/images/gallery/2024-09/scaled-1680-/streamdeckstudio.jpg)](https://wiki.skaarhoj.com/uploads/images/gallery/2024-09/streamdeckstudio.jpg)

Here, we are sharing some technical observations about this panel:

- Keys need to be pressed relatively firm to deliver reliable and consistent keypresses.
- Display tile sizes are 144x112 pixels
- LED rings around encoders are 24 segments RGB LEDs
- Ethernet connectivity is on TCP port 5343. Requires a simple keep-alive package sent about every 4 seconds. Accepts multiple connecting clients.
- Package format/Protocol on ethernet is the same as on USB, so it's binary data
- Protocol details can be deducted from our free Go-lang Github repo: [https://github.com/SKAARHOJ/go-streamdeck](https://github.com/SKAARHOJ/go-streamdeck)
- USB plug on the front seems to *not* be a USB hub, but rather it adds another Stream Deck as additional keys to the messages, like "button 33, button 34" etc. This was surprising to us and makes it difficult to leverage. When on Ethernet it also reports the presence or a Stream Deck Panel connected to that port, but no events was detected.
- NFC Reader returns the card ID numer as ASCII in a packet (typically 32bit/8 hex chars, but can be longer)
- Broadcasts itself via mDNS when Ethernet connected

##### Additional config for Stream Deck Studio

In the package configuration, there is a field called "Deep Config". For Stream Deck Studio, this can be used to customize how the panels operate. The configuration is entered as a single JSON string without any line breaks.

[![image.png](https://wiki.skaarhoj.com/uploads/images/gallery/2024-10/scaled-1680-/image.png)](https://wiki.skaarhoj.com/uploads/images/gallery/2024-10/image.png)

In a formatted view, it would look like this:

```
{
    "SDStudioLEDSegments": 13,
    "SDStudioLEDOffset": -7,
    "NFCUserGroups": [
        {
            "Name": "Admin",
            "Users": [
                {
                    "Name": "Kasper Keyfob",
                    "CardNumber": "B5EF4A23"
                },
                {
                    "Name": "Kasper Tesla Card",
                    "CardNumber": "153B2FA2845F80"
                }
            ]
        },
        {
            "Name": "User",
            "Users": [
                {
                    "Name": "Kasper VISA",
                    "CardNumber": "75AE20B4"
                }
            ]
        }
    ]
}
```

- The field **"SDStudioLEDSegments"** defines the number of LEDs used on the encoder LED rings, with a default of 24.
- The field **"SDStudioLEDOffset"** determines which LED is the starting point, with a default of 0 (the top LED). For example, using 13 LEDs with an offset of -7 creates a semi-circle from the "9 o'clock" to the "3 o'clock" position.
- A field called "**TextColorInversionThreshold**" defines the brightness threshold for a background color (0-100). If the background brightness exceeds this threshold, the text will be rendered in black. This is used when the LED Mode is set to "Background," where the text is displayed on a background in the specified LED color. Default value is 78.
- The structure **"NFCUserGroups"** is likely temporary until a proper UI for setting up NFC cards is implemented. For now, it allows you to create user groups and assign NFC cards to each group. Each group generates a new hardware component on the panel topology, which sends a button trigger to the connected application when a card is presented. The receiving Raw Panel clients can decide how to handle the button trigger. For example, if used for panel access with Reactor, it could toggle a variable that controls layer visibility in Reactor.

### USB Hubs

Even if your Stream Deck should be able to connect directly to your Blue Pill and get its power from the Blue Pill we **strongly recommend to use an external powered hub** instead. This is mostly to avoid the power short circuit of the Blue Pill to be strained too much by powering a hungry USB device.

In any case, if you want **multiple Stream Decks connected simultaneously** to a single Blue Pill, you need a charging USB hub with external power anyway. We have tested that a Blue Pill is able to run at least 4 diverse Stream Deck panels simultaneously this way.

USB hubs we have tried and found working are:

<table border="1" id="bkmrk-usb-hub-specs-commen" style="border-collapse: collapse; width: 100%;"><colgroup><col style="width: 23.115%;"></col><col style="width: 26.8161%;"></col><col style="width: 50.069%;"></col></colgroup><tbody><tr><td>**USB Hub**</td><td>**Specs**</td><td>**Comment**</td></tr><tr><td>[i-tec, U3CHARGEHUB10](https://i-tec.pro/en/produkt/u3chargehub10-2/)</td><td>10 port hub, USB-3, DC12V</td><td>Our favourite, as it feels pretty strong and has power buttons for each USB plug.</td></tr><tr><td>[StarTech ST53004U1C](https://www.startech.com/en-eu/cards-adapters/st53004u1c)</td><td>4+1 ports</td><td>Works</td></tr><tr><td>[LC-Power, LC-HUB-ALU-2B-7](https://www.lc-power.com/en/product/accessories/usb-hubs/lc-hub-alu-2b-7/)</td><td>7 ports</td><td>Works</td></tr><tr><td>[D-Link, DUB-H4](https://www.dlink.com/en/products/dub-h4-4-port-usb-20-hub)</td><td>4 ports</td><td>Works, but not as convincingly as the others, especially this may get into trouble because if external power is not applied, it will try to get the power out of the Blue Pill and that becomes an issue.</td></tr></tbody></table>

Notice, we do not accept responsibility for the above information to be correct or sufficient, we are just kindly sharing our own (limited) experiences. Our impression is that most other powered "charging" USB hubs would work as well.

#### Limitations observed

- There may be a practical limit of four or fewer Stream Decks per USB hub, depending on overall USB load and other connected devices. No specific number is guaranteed to work in all situations. If your setup is critical, you should assume nothing and validate it thoroughly under real-world conditions.
- On macOS, using a USB-C–to–USB-A dongle, up to four Stream Decks have been successfully connected for development purposes with xpanel-streamdeck.
- In a separate macOS setup, seven Stream Decks were used successfully when distributed across multiple dongles and hubs, even with relatively high update rates.
- A Blue Pill device generally supports up to three Stream Decks reliably. While it may enumerate more, bandwidth limitations can cause conflicts when multiple Stream Decks update display tiles simultaneously, leading to missed or incomplete updates. This configuration requires careful testing and should not be assumed to work reliably without validation.

### Licensing

The xpanel-streamdeck application will always give you about **10 minutes of free and unlimited Raw Panel usage** since 30 seconds after application (re-)start of any number of Stream Deck controllers. After 10 minutes an unlicensed Stream Deck panel won't send or receive triggers anymore, but rather show a "License Required" message in the displays. Re-starting the xpanel-streamdeck package in the Blue Pill Web UI will reset the period.

**Licenses for use of Stream Decks on a Blue Pill device currently costs 79 EUR / 96 USD** (September 2024). Please contact <support@skaarhoj.com> or <sales@skaarhoj.com> to place your order and get a license assigned. Remember to include your Blue Pill serial number in the request.

The amount of Stream Decks this license covers range from 1 (Stream Deck Studio) over 7 (Stream Deck XL) to 14 (Stream Deck Mini) based on a point system but remember there may also be a practical limit in system resources of the Blue Pill device depending on what else it's doing. A license gives you 1000 points.

### Configuration

By default, the *xpanel-streamdeck* application will scan for Stream Deck panels on the USB port and as it finds them, assign them a Raw Panel port number starting with 9923 - and locking that to their serial numbers.

You can change this behavior. The configuration page for the xpanel-streamdeck application has a number of options worth knowing about.

[![image.png](https://wiki.skaarhoj.com/uploads/images/gallery/2022-11/scaled-1680-/U6limage.png)](https://wiki.skaarhoj.com/uploads/images/gallery/2022-11/U6limage.png)

The Server Starting Port should be changed if you have other applications running on the same Blue Pill trying to use this port. There is not clear indication if this is the case, but if something doesn't work, please check the logs if there are errors related to binding to the port.

The protocol mode can mostly stay as it is since most SKAARHOJ applications at least will detect whether ASCII or Binary mode can/should be used. Max Clients and Lock to IP is to help you guard your Raw Panel enabled Stream Deck against too many connected clients or connections from unauthorized IP addresses. It's still a fairly low-tech type of security that still assumes a friendly network environment, just keep that in mind.

Lock Serials to Port is on by default because we assume it would be nicest that any panel that once was connected to your Blue Pill you receive the same port next time it is connected.

Large Text and No LED Bar is related to rendering on the panels. For example, by default the rendering in the displays has a little rectangular area on top that is painted in the "LED color" sent to the button from the Raw Panel protocol. This helps to make buttons on Stream Decks just as useful as they are on a real SKAARHOJ panel. But if you want to use the whole display area for graphics, just enable this. Notice that these two options - if enabled - will override the same options being set for Fixed Panels. Read on...

#### Fixed Panels

For fixed installations, it's recommended that you set up discrete Stream Decks as fixed panels. This allows you to assign a specific port to a specific serial number and set individual settings for the above mentioned general settings for the panels.

[![image.png](https://wiki.skaarhoj.com/uploads/images/gallery/2022-11/scaled-1680-/Xz9image.png)](https://wiki.skaarhoj.com/uploads/images/gallery/2022-11/Xz9image.png)

### Don'ts

While in our testing the *xpanel-streamdeck* package seems very robust to hot plugging and unplugging Stream Deck devices, we have also observed that excessive so-doing can lead to lock-ups on the USB bus so that even a reboot of the Blue Pill is required. So, play nice and we are sure you will find this quite reliable and stable.

### Exploring with Raw Panel

Above you saw how simple it is to connect to a Raw Panel enabled device. Here is the [full protocol information](https://github.com/SKAARHOJ/Support/blob/master/Manuals/SKAARHOJ/SKAARHOJ_RawPanel_V2.pdf) and in addition we will advice you to download and play with the [Raw Panel Explorer](https://github.com/SKAARHOJ/raw-panel-explorer/releases/). To help you succeed with SKAARHOJs command-line-applications, please check out these wiki pages for [windows](https://wiki.skaarhoj.com/books/applications/page/running-cli-applications-windows) and [mac](https://wiki.skaarhoj.com/books/applications/page/running-cli-applications-mac).

When you start the Raw Panel Explorer, it will scan the network for Raw Panel compliant devices. It would find your connected Stream Decks and show them on the web page that opened:

[![image.png](https://wiki.skaarhoj.com/uploads/images/gallery/2022-11/scaled-1680-/obgimage.png)](https://wiki.skaarhoj.com/uploads/images/gallery/2022-11/obgimage.png)

Click the "Connect" button to the right of the XP\_STREAMDECK-PLUS panel and you will see this:

[![image.png](https://wiki.skaarhoj.com/uploads/images/gallery/2022-11/scaled-1680-/TrGimage.png)](https://wiki.skaarhoj.com/uploads/images/gallery/2022-11/TrGimage.png)

The drawing you see on this page comes straight out of the Raw Panel protocol - one of the many awesome features: Raw Panel allows any connecting client to ask for the topology of the panel and it lets any client know exactly which features a panel has and how to render it visually. This info is provided as a mix of JSON and SVG data.

For example, the various components of a Stream Deck plus, such as screens, buttons, encoders, swipe areas are provided by JSON and could be tabularized like this:

[![image.png](https://wiki.skaarhoj.com/uploads/images/gallery/2022-11/scaled-1680-/BKrimage.png)](https://wiki.skaarhoj.com/uploads/images/gallery/2022-11/BKrimage.png)

This should get you started. Have fun! :-)

Please write to <innovationlab@skaarhoj.com> for any comments or questions. We would love to hear (positive and constructive) remarks from you.

\- kasper

# X-keys on Raw Panel

With SKAARHOJ's X-keys application (*xpanel-xkeys* package), you have the capability to **connect one or more X-keys keyboards** to a SKAARHOJ product, equipped with USB-A. This integration allows the X-keys keyboard to function as a control panel alongside your existing SKAARHOJ devices. As a result, you'll experience increased user-friendly integration between SKAARHOJ panels and your HID devices, expanding your overall control freedom.

- <span class="Apple-converted-space">Mix your X-keys devices with SKAARHOJ controllers</span>
- <span class="Apple-converted-space">Enjoy easy and powerful configuration with Reactor</span>
- <span class="Apple-converted-space">No external computer needed - connects to SKAARHOJ devices directly</span>
- <span class="Apple-converted-space">Raw Panel enables X-keys over network with PoE</span>
- <span class="Apple-converted-space">Add unique workflows with X-keys specialty devices  
    </span>

[![image.png](https://wiki.skaarhoj.com/uploads/images/gallery/2023-08/scaled-1680-/45vimage.png)](https://wiki.skaarhoj.com/uploads/images/gallery/2023-08/45vimage.png)

#### Support Table

The X-keys models supported are listed below.

<table border="1" id="bkmrk-stream-deck-model-su" style="border-collapse: collapse; width: 100%;"><colgroup><col style="width: 30.4079%;"></col><col style="width: 12.8554%;"></col><col style="width: 32.5093%;"></col><col style="width: 24.3511%;"></col></colgroup><tbody><tr><td>**Name**</td><td>**Tested**</td><td> **Comment**</td><td>**Image**</td></tr><tr><td><div><div>XK-24</div></div> </td><td>Yes </td><td> </td><td>[![XK24.jpg](https://wiki.skaarhoj.com/uploads/images/gallery/2023-08/scaled-1680-/xk24.jpg)](https://wiki.skaarhoj.com/uploads/images/gallery/2023-08/xk24.jpg)

</td></tr><tr><td><div><div>XK-12 Jog-Shuttle</div></div></td><td> Yes</td><td> </td><td>[![XK12JOG.jpg](https://wiki.skaarhoj.com/uploads/images/gallery/2023-08/scaled-1680-/xk12jog.jpg)](https://wiki.skaarhoj.com/uploads/images/gallery/2023-08/xk12jog.jpg)

</td></tr><tr><td><div><div>XK-12 Joystick</div></div> </td><td>Yes </td><td>Joystick rotation is an encoder component. </td><td>[![XK12JOYSTICK.jpg](https://wiki.skaarhoj.com/uploads/images/gallery/2023-08/scaled-1680-/xk12joystick.jpg)](https://wiki.skaarhoj.com/uploads/images/gallery/2023-08/xk12joystick.jpg)

</td></tr><tr><td><div><div>XK-68 Joystick</div></div></td><td>Yes</td><td>  
</td><td>[![XK68JOYSTICK.jpg](https://wiki.skaarhoj.com/uploads/images/gallery/2023-08/scaled-1680-/xk68joystick.jpg)](https://wiki.skaarhoj.com/uploads/images/gallery/2023-08/xk68joystick.jpg)

</td></tr><tr><td><div><div>XK-60</div></div></td><td>Yes</td><td>  
</td><td>[![XK60.jpg](https://wiki.skaarhoj.com/uploads/images/gallery/2023-08/scaled-1680-/xk60.jpg)](https://wiki.skaarhoj.com/uploads/images/gallery/2023-08/xk60.jpg)

</td></tr><tr><td><div><div>XK-80</div></div></td><td>Yes</td><td>  
</td><td>[![XK80.jpg](https://wiki.skaarhoj.com/uploads/images/gallery/2023-08/scaled-1680-/xk80.jpg)](https://wiki.skaarhoj.com/uploads/images/gallery/2023-08/xk80.jpg)

</td></tr><tr><td><div><div>XKE-124 T-bar</div></div></td><td>Yes</td><td>  
</td><td>[![XKE124TBAR.jpg](https://wiki.skaarhoj.com/uploads/images/gallery/2023-08/scaled-1680-/xke124tbar.jpg)](https://wiki.skaarhoj.com/uploads/images/gallery/2023-08/xke124tbar.jpg)

</td></tr><tr><td><div><div>XKE-128</div></div></td><td>Yes</td><td>  
</td><td>[![XKE128.jpg](https://wiki.skaarhoj.com/uploads/images/gallery/2023-08/scaled-1680-/xke128.jpg)](https://wiki.skaarhoj.com/uploads/images/gallery/2023-08/xke128.jpg)

</td></tr><tr><td><div><div>XK-68 Jog-Shuttle</div></div></td><td>Yes</td><td>  
</td><td>[![XK68JOGSHUTTLE.jpg](https://wiki.skaarhoj.com/uploads/images/gallery/2023-08/scaled-1680-/xk68jogshuttle.jpg)
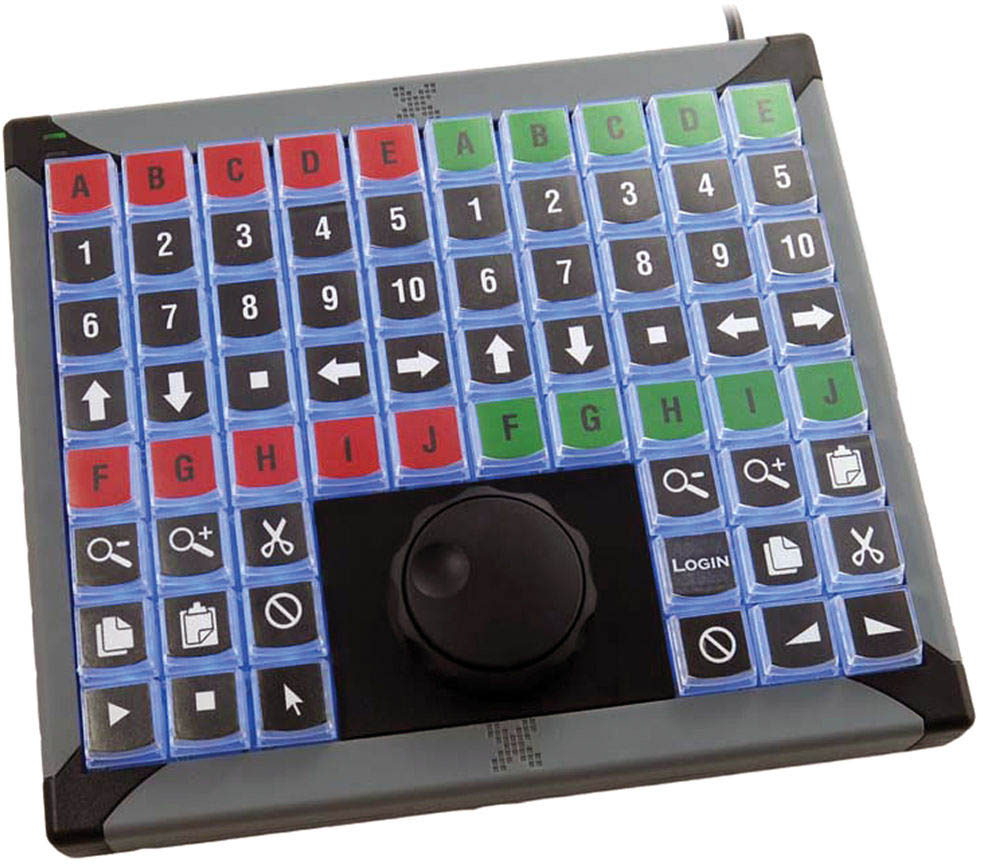
](https://wiki.skaarhoj.com/uploads/images/gallery/2023-08/xk68jogshuttle.jpg)

</td></tr><tr><td><div><div>XKE-64 Jog T-bar</div></div></td><td>Yes</td><td>  
</td><td>[![XK64JOGTBAR.jpg](https://wiki.skaarhoj.com/uploads/images/gallery/2023-08/scaled-1680-/xk64jogtbar.jpg)
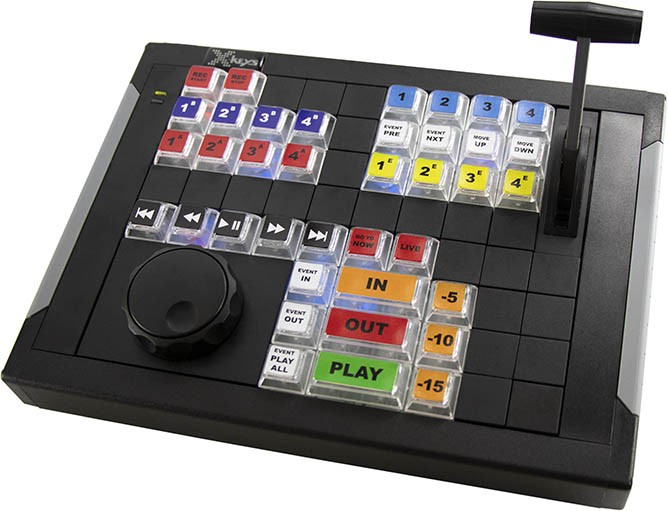
](https://wiki.skaarhoj.com/uploads/images/gallery/2023-08/xk64jogtbar.jpg)

</td></tr><tr><td><div><div>XK-4 Stick</div></div></td><td>Yes</td><td>  
</td><td>[![XK4.jpg](https://wiki.skaarhoj.com/uploads/images/gallery/2023-08/scaled-1680-/xk4.jpg)
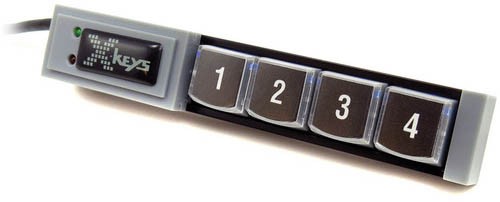
](https://wiki.skaarhoj.com/uploads/images/gallery/2023-08/xk4.jpg)

</td></tr><tr><td><div><div>XK-8 Stick</div></div></td><td>Yes</td><td>  
</td><td>[![XK8.jpg](https://wiki.skaarhoj.com/uploads/images/gallery/2023-08/scaled-1680-/xk8.jpg)
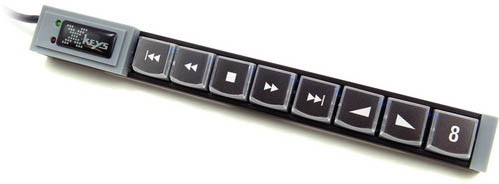
](https://wiki.skaarhoj.com/uploads/images/gallery/2023-08/xk8.jpg)

</td></tr><tr><td><div><div>XK-16 Stick</div></div></td><td>Yes</td><td>  
</td><td>[![XK16.jpg](https://wiki.skaarhoj.com/uploads/images/gallery/2023-08/scaled-1680-/xk16.jpg)](https://wiki.skaarhoj.com/uploads/images/gallery/2023-08/xk16.jpg)

</td></tr><tr><td><div><div>XK-3 Switch Interface</div></div></td><td>Yes</td><td>  
</td><td>[![XK3SI.jpg](https://wiki.skaarhoj.com/uploads/images/gallery/2023-08/scaled-1680-/xk3si.jpg)
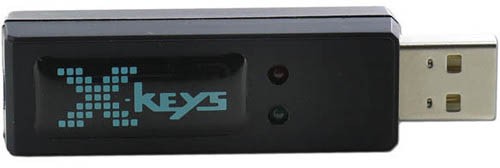
](https://wiki.skaarhoj.com/uploads/images/gallery/2023-08/xk3si.jpg)

</td></tr><tr><td><div><div>XKE-40</div></div></td><td>Yes</td><td>  
</td><td>[![XKE40.jpg](https://wiki.skaarhoj.com/uploads/images/gallery/2023-08/scaled-1680-/xke40.jpg)](https://wiki.skaarhoj.com/uploads/images/gallery/2023-08/xke40.jpg)

</td></tr><tr><td><div><div>XK-3 Foot Pedal</div></div></td><td>Yes</td><td>  
</td><td>[![XK3FOOT.jpg](https://wiki.skaarhoj.com/uploads/images/gallery/2023-08/scaled-1680-/xk3foot.jpg)
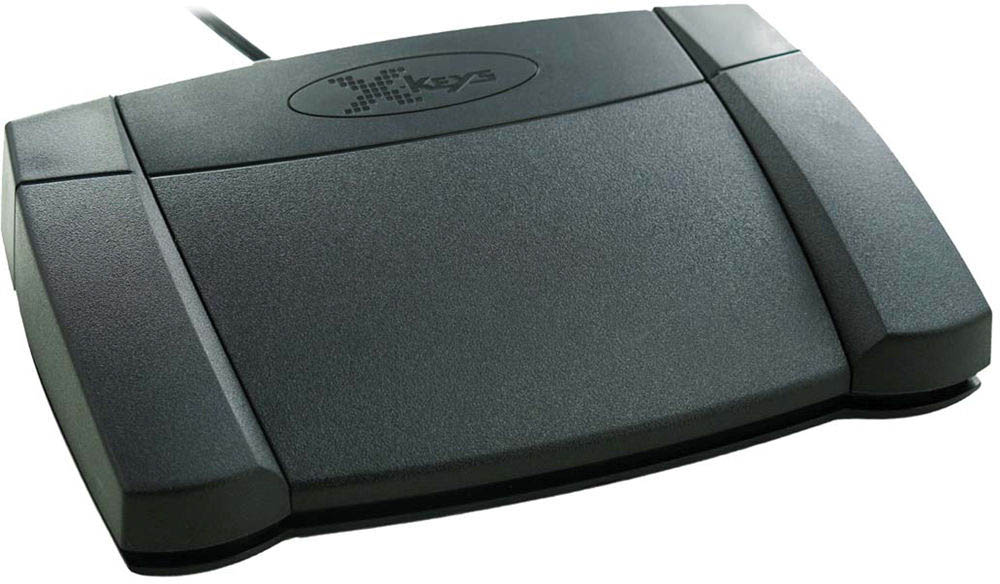
](https://wiki.skaarhoj.com/uploads/images/gallery/2023-08/xk3foot.jpg)

</td></tr><tr><td><div><div><div><div>XBA-T-bar Module</div></div></div></div></td><td>Yes</td><td>A 3D printable STEP-file for a stand that will make the T-bar module align with SKAARHOJ products like Air Fly can be downloaded here.

[XKE-14\_T-bar\_XC\_v2.step](https://wiki.skaarhoj.com/attachments/49)

</td><td>[![XBATBAR.jpg](https://wiki.skaarhoj.com/uploads/images/gallery/2023-08/scaled-1680-/xbatbar.jpg)
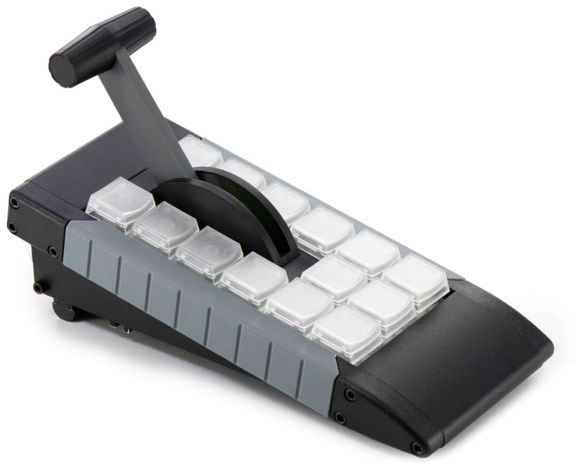
](https://wiki.skaarhoj.com/uploads/images/gallery/2023-08/xbatbar.jpg)

</td></tr><tr><td>XK-12 Switch Interface</td><td>Yes</td><td> </td><td>[![image.png](https://wiki.skaarhoj.com/uploads/images/gallery/2023-11/scaled-1680-/HRbimage.png)
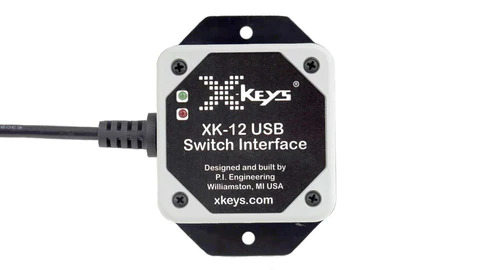
](https://wiki.skaarhoj.com/uploads/images/gallery/2023-11/HRbimage.png)

</td></tr><tr><td>HD15 Wire Interface</td><td>Yes</td><td>  
</td><td>[![image.png](https://wiki.skaarhoj.com/uploads/images/gallery/2023-11/scaled-1680-/u5aimage.png)
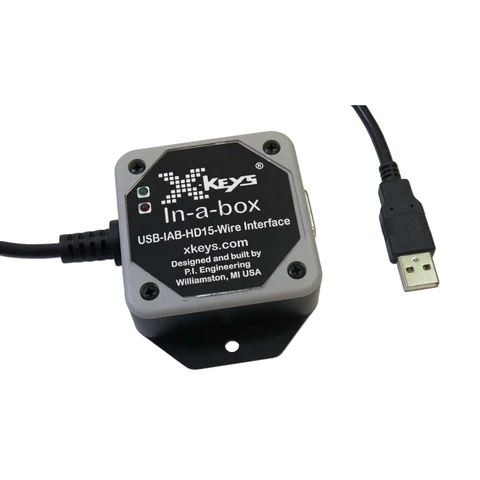
](https://wiki.skaarhoj.com/uploads/images/gallery/2023-11/u5aimage.png)

</td></tr><tr><td>USB GPIO</td><td>Yes</td><td>  
</td><td>[![image.png](https://wiki.skaarhoj.com/uploads/images/gallery/2023-11/scaled-1680-/xhzimage.png)
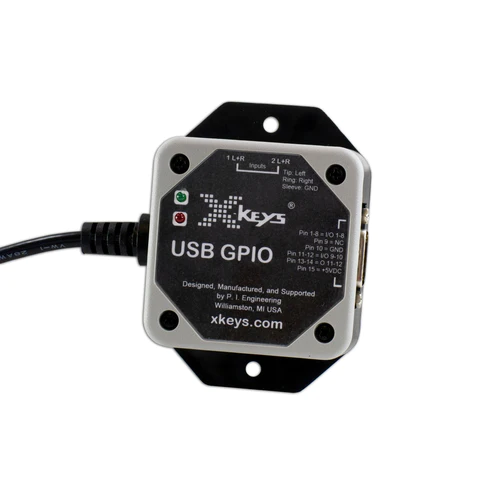
](https://wiki.skaarhoj.com/uploads/images/gallery/2023-11/xhzimage.png)

</td></tr></tbody></table>

#### How It Works

The **X-keys devices become network enabled** as they are turned into **Raw Panel compliant devices**. This means that Reactor and any other third party application fully compliant with Raw Panel can use them.

Below, you see an X-keys XK-24 connected directly to a SKAARHOJ Blue Pill Server which in turn is connected to a PoE powered network switch. The X-keys device can be accessed via the Raw Panel TCP protocol on the IP address of the Blue Pill Server.

[![IMG_8012.JPG](https://wiki.skaarhoj.com/uploads/images/gallery/2023-08/scaled-1680-/img-8012.JPG)](https://wiki.skaarhoj.com/uploads/images/gallery/2023-08/img-8012.JPG)

Multiple X-keys devices can be driven by a single Blue Pill using a (powered) USB hub in between:

[![IMG_8015.JPG](https://wiki.skaarhoj.com/uploads/images/gallery/2023-08/scaled-1680-/img-8015.JPG)](https://wiki.skaarhoj.com/uploads/images/gallery/2023-08/img-8015.JPG)

You can use an application like [Raw Panel Explorer](https://github.com/SKAARHOJ/raw-panel-explorer/releases) to search for and test your Raw Panel enabled X-keys devices. Here is an example of a scan for panels on the network (using the -aggressive setting):

[![image.png](https://wiki.skaarhoj.com/uploads/images/gallery/2023-08/scaled-1680-/CiCimage.png)](https://wiki.skaarhoj.com/uploads/images/gallery/2023-08/CiCimage.png)

Inside Reactor you can discover the panels on the network, add them and configure actions for their buttons, knobs, faders and joysticks:

[![image.png](https://wiki.skaarhoj.com/uploads/images/gallery/2023-08/scaled-1680-/yDQimage.png)](https://wiki.skaarhoj.com/uploads/images/gallery/2023-08/yDQimage.png)

[![image.png](https://wiki.skaarhoj.com/uploads/images/gallery/2023-08/scaled-1680-/YY4image.png)](https://wiki.skaarhoj.com/uploads/images/gallery/2023-08/YY4image.png)

### Watch it

<iframe allowfullscreen="allowfullscreen" height="314" src="https://www.youtube.com/embed/8v-hNG4BxqE" width="560"></iframe>

### Getting Started

- **Connect your X-keys device** to your SKAARHOJ Blue Pill Inside (with USB-A).
- Go to the **Settings tab** of the Web UI of your Blue Pill device, find where it says **"USB-A" and turn it on**. After doing so, please power cycle your Blue Pill once or twice and then confirm that USB-A is still enabled:  
    [![image.png](https://wiki.skaarhoj.com/uploads/images/gallery/2022-11/scaled-1680-/xFqimage.png)](https://wiki.skaarhoj.com/uploads/images/gallery/2022-11/xFqimage.png)
- Go to the **Packages tab** of the Web UI of your Blue Pill device  
    [![image.png](https://wiki.skaarhoj.com/uploads/images/gallery/2022-11/scaled-1680-/72eimage.png)](https://wiki.skaarhoj.com/uploads/images/gallery/2022-11/72eimage.png)
- Find the ***xpanel-xkeys*** package in the list of Available Packages. Click "Install"  
    [![image.png](https://wiki.skaarhoj.com/uploads/images/gallery/2023-08/scaled-1680-/xD2image.png)](https://wiki.skaarhoj.com/uploads/images/gallery/2023-08/xD2image.png)
- When installed, you should find it listed as "Running" in the top of the Packages page:  
    [![image.png](https://wiki.skaarhoj.com/uploads/images/gallery/2023-08/scaled-1680-/opsimage.png)](https://wiki.skaarhoj.com/uploads/images/gallery/2023-08/opsimage.png)
- **Click the package name "xpanel-xkeys"** to go to the configuration page. Here you may want to make sure it's set up for Auto Start and attend to other config settings:  
      
    [![image.png](https://wiki.skaarhoj.com/uploads/images/gallery/2023-08/scaled-1680-/lKRimage.png)](https://wiki.skaarhoj.com/uploads/images/gallery/2023-08/lKRimage.png)
- Please check the log view on the right side. It may contain important information such as licensing status. Since the X-keys panels don't have displays there will be no other indications of errors or license quarantine than what you see in this view:  
    [![image.png](https://wiki.skaarhoj.com/uploads/images/gallery/2023-08/scaled-1680-/QHJimage.png)](https://wiki.skaarhoj.com/uploads/images/gallery/2023-08/QHJimage.png)
- Using PuTTy, Telnet or nc you can now make a TCP connection manually to test it. On a Mac, try "nc 192.168.10.204 9933" from the Terminal, then it should connect, type in "list"+Enter and you should see something like this:  
    [![image.png](https://wiki.skaarhoj.com/uploads/images/gallery/2023-08/scaled-1680-/qfAimage.png)](https://wiki.skaarhoj.com/uploads/images/gallery/2023-08/qfAimage.png)
- With PuTTy on Windows you should make sure to set "Implicit CR in every LF"
    
    [![image.png](https://wiki.skaarhoj.com/uploads/images/gallery/2022-11/scaled-1680-/521image.png)](https://wiki.skaarhoj.com/uploads/images/gallery/2022-11/521image.png)

### USB Hubs

You can operate multiple devices simultaneously by using a USB hub. For the best results, it is recommended to use a powered hub if possible.

### Licensing

**Licenses for unlimited use of X-keys on a Blue Pill device currently costs 79 EUR / 96 USD** (January 2024). Please contact <support@skaarhoj.com> or <sales@skaarhoj.com> to place your order and get a license assigned. Remember to include your Blue Pill serial number in the request.


The xpanel-xkeys application will always provide approximately **10 minutes of free and unlimited Raw Panel usage**. This starts 30 seconds after the application (re-)start for any number of X-keys devices. Please note that after 10 minutes, an unlicensed X-keys device will stop sending triggers. However, you can reset this period by re-starting the xpanel-xkeys package in the Blue Pill Web UI.

The xpanel-xkeys logs will report when the quarantine periods start and end:

[![image.png](https://wiki.skaarhoj.com/uploads/images/gallery/2023-08/scaled-1680-/eaJimage.png)](https://wiki.skaarhoj.com/uploads/images/gallery/2023-08/eaJimage.png)

### Configuration

By default, the *xpanel-xkeys* application will scan for X-keys devices on the USB port and as it finds them, assign them a Raw Panel port number starting with 9933 - and locking that to their serial numbers (which are hashes of the USB Product ID)

You can change this behavior. The configuration page for the xpanel-xkeys application has a number of options worth knowing about.

[![image.png](https://wiki.skaarhoj.com/uploads/images/gallery/2023-08/scaled-1680-/yabimage.png)](https://wiki.skaarhoj.com/uploads/images/gallery/2023-08/yabimage.png)

The Server Starting Port should be changed if you have other applications running on the same Blue Pill trying to use this port. There is no clear indication if this is the case, but if something doesn't work, please check the logs if there are errors related to binding to the port.

The protocol mode can mostly stay as it is since most SKAARHOJ applications at least will detect whether ASCII or Binary mode can/should be used. Max Clients and Lock to IP is to help you guard your Raw Panel enabled X-keys against too many connected clients or connections from unauthorized IP addresses. It's still a fairly low-tech type of security that still assumes a friendly network environment, just keep that in mind.

Lock Serials to Port is on by default because we assume it would be nicest that any panel that once was connected to your Blue Pill you receive the same port next time it is connected.

#### Fixed Panels

For fixed installations, it's recommended that you set up discrete X-keys as fixed panels. This allows you to assign a specific port to a specific serial number and set individual settings for the above mentioned general settings for the panels.

[![image.png](https://wiki.skaarhoj.com/uploads/images/gallery/2023-08/scaled-1680-/llWimage.png)](https://wiki.skaarhoj.com/uploads/images/gallery/2023-08/llWimage.png)

#### Serial Numbers

X-keys devices don't report unique serial numbers until recent versions and therefore when X-keys devices don't report a serial number, the Raw Panel server generates a sort-of serial number by making a so called "hash" (like "fb3ab267") based on the USB Product ID in case the X-keys device doesn't report it. The Product ID will usually be the exact same for the same product. So if you have two XK-24 X-keys devices, they will report the same serial number.

The serial number may be found in the logs or you can discover it using Raw Panel Explorer.

**Handling Multiple Similar devices**

The fact that serial numbers of older X-keys will be the same for the same Product IDs still needs a really good solution. P.I. Engineering (the company behind X-keys) propose to set a unique ID in the X-keys internal memory, but that is not available to the Raw Panel server before it's connected to the panel, so this cannot be used (at least not readily).

At this point we have solved it by the option "Multiple Similar" which includes a hash of the USB path. This will at least give the possibility of attaching multiple of the similar X-Keys device, but unfortunately the USB path may change when you reboot your USB-HUB, so this may not be a stable solution either. Of course you can (and should ;-) just attach the same type of X-keys device to multiple SKAARHOJ Blue Pill devices so they will sit on different IP addresses, can have the same port and same serial and then the problem is solved in a stable way.

Please write to <innovationlab@skaarhoj.com> for any comments or questions. We would love to hear (positive and constructive) remarks from you.

\- kasper

# Touch on Raw Panel

With SKAARHOJ's *xpanel-touch* package for our controllers, users can create software UIs accessible through browsers, which appear on the local network as Raw Panel devices.   
Both third-party applications adhering to the Raw Panel Protocol and SKAARHOJ's in-house Broadcast Control, Automation, and Monitoring application, Reactor™, can interface with these UIs. They can process inputs and provide feedback. These UIs are operable from any touch device equipped with a web browser or from a desktop computer, utilizing straightforward HTTP and SVG technology.

- Broad Access: Use from touch devices to PCs.
- Integrative: Add touch without extra development.
- Quick Setups: Fast configuration with Quick Classes.
- Versatile: Access UIs across local networks easily.
- Cost-Efficient: Evaluate with trial before purchase.

[![image.png](https://wiki.skaarhoj.com/uploads/images/gallery/2023-08/scaled-1680-/1qLimage.png)](https://wiki.skaarhoj.com/uploads/images/gallery/2023-08/1qLimage.png)

#### How It Works

The application creates a webserver that serves a dynamic SVG file that shows itself in full screen on the screen device it's presented on. This could be a real touch device or any other computer with screen. So it's really a virtual panel, not only for touch screens.

To communicate with the panel, the user would connect with TCP to the Raw Panel server.

#### Examples of touch application

[![phone.jpg](https://wiki.skaarhoj.com/uploads/images/gallery/2023-08/scaled-1680-/phone.jpg)](https://wiki.skaarhoj.com/uploads/images/gallery/2023-08/phone.jpg)

[![iPadWithTouchApp_horizontal.jpg](https://wiki.skaarhoj.com/uploads/images/gallery/2023-08/scaled-1680-/ipadwithtouchapp-horizontal.jpg)](https://wiki.skaarhoj.com/uploads/images/gallery/2023-08/ipadwithtouchapp-horizontal.jpg)

[![iPadWithTouchApp.jpg](https://wiki.skaarhoj.com/uploads/images/gallery/2023-08/scaled-1680-/ipadwithtouchapp.jpg)](https://wiki.skaarhoj.com/uploads/images/gallery/2023-08/ipadwithtouchapp.jpg)

[![monitor.jpg](https://wiki.skaarhoj.com/uploads/images/gallery/2023-08/scaled-1680-/monitor.jpg)](https://wiki.skaarhoj.com/uploads/images/gallery/2023-08/monitor.jpg)

Touch Devices will appear on the network. You can discover them using Raw Panel Explorer:

[![image.png](https://wiki.skaarhoj.com/uploads/images/gallery/2023-08/scaled-1680-/Advimage.png)](https://wiki.skaarhoj.com/uploads/images/gallery/2023-08/Advimage.png)

At the bottom you find the XP\_TOUCH-STREAMDECK which is mimicking a Stream Deck device on screen. It's found on port 9953 as a Raw Panel device. The topology will look like this when Raw Panel Explorer connects to it:

[![image.png](https://wiki.skaarhoj.com/uploads/images/gallery/2023-08/scaled-1680-/B2gimage.png)](https://wiki.skaarhoj.com/uploads/images/gallery/2023-08/B2gimage.png)

In this case the touch application itself is on port 7950. Here it is shown with some dummy content loaded into it:

[![image.png](https://wiki.skaarhoj.com/uploads/images/gallery/2023-08/scaled-1680-/ayAimage.png)](https://wiki.skaarhoj.com/uploads/images/gallery/2023-08/ayAimage.png)

In Reactor, the touch panel can be added like any other Raw Panel device:

[![image.png](https://wiki.skaarhoj.com/uploads/images/gallery/2023-08/scaled-1680-/vLyimage.png)](https://wiki.skaarhoj.com/uploads/images/gallery/2023-08/vLyimage.png)

  
In the Configuration Tab, components are available for configuration with behaviors:

[![image.png](https://wiki.skaarhoj.com/uploads/images/gallery/2023-08/scaled-1680-/mK4image.png)](https://wiki.skaarhoj.com/uploads/images/gallery/2023-08/mK4image.png)

### Watch it

(TODO)

### Configuration

- **Click the package name "xpanel-touch"** after installing it and you will see the configuration page:  
      
    [![image.png](https://wiki.skaarhoj.com/uploads/images/gallery/2023-08/scaled-1680-/y9rimage.png)](https://wiki.skaarhoj.com/uploads/images/gallery/2023-08/y9rimage.png)
- The first many config options are the same as found on the other Xpanel-applications (Stream Deck, X-keys, HIDs etc).
- The Webserver port is where you find the webserver for the touch UI.
- To select the UI style, you use the Layout dropdown. It has these options:  
    [![image.png](https://wiki.skaarhoj.com/uploads/images/gallery/2023-08/scaled-1680-/Qvjimage.png)](https://wiki.skaarhoj.com/uploads/images/gallery/2023-08/Qvjimage.png)
- You can also select a ratio which will help you to optimize how it looks on your destination device:  
    [![image.png](https://wiki.skaarhoj.com/uploads/images/gallery/2023-08/scaled-1680-/IjZimage.png)](https://wiki.skaarhoj.com/uploads/images/gallery/2023-08/IjZimage.png)
- Using PuTTy, Telnet or nc you can now make a TCP connection manually to test it. On a Mac, try "nc 192.168.11.5 9953" from the Terminal, then it should connect, type in "list"+Enter and you should see something like this:  
    [![image.png](https://wiki.skaarhoj.com/uploads/images/gallery/2023-08/scaled-1680-/cEgimage.png)](https://wiki.skaarhoj.com/uploads/images/gallery/2023-08/cEgimage.png)
- With PuTTy on Windows you should make sure to set "Implicit CR in every LF"
    
    [![image.png](https://wiki.skaarhoj.com/uploads/images/gallery/2022-11/scaled-1680-/521image.png)](https://wiki.skaarhoj.com/uploads/images/gallery/2022-11/521image.png)

### Licensing

**A license for up to ten distinct Touch applications (with unlimited clients connected) on a Blue Pill device currently costs 314 EUR / 383 USD** (January 2026). Please contact <support@skaarhoj.com> or <sales@skaarhoj.com> to place your order and get a license assigned. Remember to include your Blue Pill serial number in the request.


The xpanel-touch application will always provide approximately **10 minutes of free and unlimited Raw Panel usage.** This starts 30 seconds after the application (re-)start. Please note that after 10 minutes, an unlicensed application device will stop sending triggers. However, you can reset this period by re-starting the xpanel-touch package in the Blue Pill Web UI.

The xpanel-touch logs will report when the quarantine periods start and end:

[![image.png](https://wiki.skaarhoj.com/uploads/images/gallery/2023-08/scaled-1680-/eaJimage.png)](https://wiki.skaarhoj.com/uploads/images/gallery/2023-08/eaJimage.png)

Please write to <innovationlab@skaarhoj.com> for any comments or questions. We would love to hear (positive and constructive) remarks from you.

\- kasper

# Riedel Smartpanel on Raw Panel Protocol

The SKAARHOJ Smartpanel application, also known as *xpanel-riedelsmartpanel*, allows you to integrate one or more Riedel Smartpanels with Reactor™ and any Raw Panel™ compliant system. Riedel Smartpanels can operate in a special mode where you can activate various applications, particularly the Control Panel Application (CPA). The CPA transforms sections or the entire panel into a control panel instead of an intercom system. The SKAARHOJ Smartpanel application takes advantage of this feature.

[![rsp.jpg](https://wiki.skaarhoj.com/uploads/images/gallery/2023-11/scaled-1680-/rsp.jpg)](https://wiki.skaarhoj.com/uploads/images/gallery/2023-11/rsp.jpg)

With SKAARHOJ's Smartpanel integration, Riedel Smartpanels can control various functions, similar to other SKAARHOJ devices. Essentially, the Smartpanel becomes a versatile control surface that can be customized according to your needs. The Smartpanel application is available for purchase from SKAARHOJ and can be installed on any Blue Pill platform-enabled SKAARHOJ device, which includes most devices sold today.

Some benefits and applications:

- Transform your existing intercom panel into a device control unit.
- Control over routers, switchers, and cameras.
- Enjoy complete customization flexibility.
- Enable Raw Panel on your Smartpanel for third party applications supporting Raw Panel.
- Utilize the user-friendly Reactor 2.0 interface for efficient control configuration.
- Control any parameter of any SKAARHOJ device core via your Smartpanel

[![Riedel-Smartpanel-on-Raw-Panel-Protocol.jpg](https://wiki.skaarhoj.com/uploads/images/gallery/2023-11/scaled-1680-/riedel-smartpanel-on-raw-panel-protocol.jpg)](https://wiki.skaarhoj.com/uploads/images/gallery/2023-11/riedel-smartpanel-on-raw-panel-protocol.jpg)

In the above picture, two Riedel Smartpanels, the RSP-1216HL and RSP-1232HL, are controlling a video router via SKAARHOJ Reactor. Input and output names are shown as labels in the displays.

Inside of Reactor you can assign configurations easily:

[![image.png](https://wiki.skaarhoj.com/uploads/images/gallery/2023-11/scaled-1680-/Tjgimage.png)](https://wiki.skaarhoj.com/uploads/images/gallery/2023-11/Tjgimage.png)

You can also verify the configuration via the Simulator:

[![image.png](https://wiki.skaarhoj.com/uploads/images/gallery/2023-11/scaled-1680-/NgBimage.png)](https://wiki.skaarhoj.com/uploads/images/gallery/2023-11/NgBimage.png)

The features mentioned are standard for any panel managed by Reactor, and this applies equally to Riedel Smartpanels.

### Watch it

(Coming soon)

### Getting Started

**On your Riedel Smartpanel:**

- Go to the **IP address** of the panel in a web browser:  
    [![image.png](https://wiki.skaarhoj.com/uploads/images/gallery/2023-11/scaled-1680-/EYzimage.png)](https://wiki.skaarhoj.com/uploads/images/gallery/2023-11/EYzimage.png)
- Make sure the "Control Panel App Enable" toggle is on. Also, check that the Key Modules (Top/Bottom Left/Right) are assigned one or more CPA KeyBlocks.
- Setup NMOS support: Port number may often be 4450 - as long as it matches what xpanel-riedelsmartpanel expects, it's fine:  
    [![image.png](https://wiki.skaarhoj.com/uploads/images/gallery/2023-11/scaled-1680-/DAvimage.png)](https://wiki.skaarhoj.com/uploads/images/gallery/2023-11/DAvimage.png)
    
    Notice: The implementation has only been tested with Peer-2-Peer mode (P2P), not with an NMOS registry.[![image.png](https://wiki.skaarhoj.com/uploads/images/gallery/2023-11/scaled-1680-/Stfimage.png)](https://wiki.skaarhoj.com/uploads/images/gallery/2023-11/Stfimage.png)
- You can verify some of this by going to the IP:Port of the panel and you should see something like this:  
    [![image.png](https://wiki.skaarhoj.com/uploads/images/gallery/2023-11/scaled-1680-/Tnbimage.png)](https://wiki.skaarhoj.com/uploads/images/gallery/2023-11/Tnbimage.png)

**On your SKAARHOJ device:**

- Go to the **Packages tab** of the Web UI of your SKAARHOJ device  
    [![image.png](https://wiki.skaarhoj.com/uploads/images/gallery/2022-11/scaled-1680-/72eimage.png)](https://wiki.skaarhoj.com/uploads/images/gallery/2022-11/72eimage.png)
- Find the ***xpanel-riedelsmartpanel*** package in the list of Available Packages. Click "Install"  
    [![image.png](https://wiki.skaarhoj.com/uploads/images/gallery/2023-11/scaled-1680-/TwRimage.png)](https://wiki.skaarhoj.com/uploads/images/gallery/2023-11/TwRimage.png)
- When installed, you should find it listed as "Running" in the top of the Packages page:  
    [![image.png](https://wiki.skaarhoj.com/uploads/images/gallery/2023-11/scaled-1680-/aPjimage.png)](https://wiki.skaarhoj.com/uploads/images/gallery/2023-11/aPjimage.png)
- **Click the package name "xpanel-riedelsmartpanel"** to go to the configuration page. Here you may want to make sure it's set up for Auto Start and attend to other config settings (see below for configuration instructions.)  
    [![image.png](https://wiki.skaarhoj.com/uploads/images/gallery/2023-11/scaled-1680-/8MGimage.png)](https://wiki.skaarhoj.com/uploads/images/gallery/2023-11/8MGimage.png)
- After correct setup, you'll encounter the "Waiting for Blue Pill" screen. This screen indicates that the Smartpanel is set up for network use as a control panel through the Raw Panel Protocol, but it's still waiting for a TCP client to connect. One of the displays will show the IP address and port needed for connection. These details correspond to the IP and port of the SKAARHOJ device running the xpanel-riedelsmartpanel package. This package facilitates the conversion between the native IP protocol (NMOS IS-7) of the Smartpanel and the Raw Panel Protocol.  
    [![IMG_8723.JPG](https://wiki.skaarhoj.com/uploads/images/gallery/2023-11/scaled-1680-/img-8723.JPG)](https://wiki.skaarhoj.com/uploads/images/gallery/2023-11/img-8723.JPG)
- Using PuTTy, Telnet or nc you can now make a TCP connection manually to test it. On a Mac, try "nc 192.168.11.5 9973" from the Terminal, then it should connect, type in "list"+Enter and you should see something like this:  
    [![Screenshot 2023-11-15 at 14.09.03.png](https://wiki.skaarhoj.com/uploads/images/gallery/2023-11/scaled-1680-/screenshot-2023-11-15-at-14-09-03.png)](https://wiki.skaarhoj.com/uploads/images/gallery/2023-11/screenshot-2023-11-15-at-14-09-03.png)
- Try pressing a few lever buttons and turn the encoders and you will see trigger messages arrive in a human readable form. This is the **Raw Panel protocol in ASCII version**. You can also send commands back to the Smartpanel to put colors, text and graphics into the displays.  
    [![Screenshot 2023-11-15 at 14.10.32.png](https://wiki.skaarhoj.com/uploads/images/gallery/2023-11/scaled-1680-/screenshot-2023-11-15-at-14-10-32.png)](https://wiki.skaarhoj.com/uploads/images/gallery/2023-11/screenshot-2023-11-15-at-14-10-32.png)
- With PuTTy on Windows you should make sure to set "Implicit CR in every LF"
    
    [![image.png](https://wiki.skaarhoj.com/uploads/images/gallery/2022-11/scaled-1680-/521image.png)](https://wiki.skaarhoj.com/uploads/images/gallery/2022-11/521image.png)
- Issues? At this point we don't know what common issues may exist, but if after following the steps above you don't see the blue SKAARHOJ boot screen on the Streamdeck, please read the rest of this page to search for clues, then reach out to <innovationlab@skaarhoj.com> and let us help you! :-)

### Device Support

This is the Smartpanel models supported:

<table border="1" id="bkmrk-stream-deck-model-su" style="border-collapse: collapse; width: 100%;"><colgroup><col style="width: 44.9938%;"></col><col style="width: 55.0062%;"></col></colgroup><tbody><tr><td>**Stream Deck Model**</td><td>**Support**</td></tr><tr><td>RSP-1216HL</td><td>Yes, 16 lever buttons, encoders, displays and LED feedback

</td></tr><tr><td>RSP-1232HL</td><td>Yes, 32 lever buttons, encoders, displays and LED feedback

</td></tr></tbody></table>

Notice: The CPA on Riedel Smartpanels requires a license that must be purchased from Riedel.

#### Notes on Keyblocks

The panels topologies will reflect a configuration with CPA KeyBlocks set as by default (1,2,3,4...) which is Upper Left, Lower Left, Upper Right, Lower Right.

If you swap the KeyBlocks around you will have to restart *xpanel-riedelsmartpanel* to pick up the changes.

#### Raw Panel implementation notes and limitations

The Raw Panel implementation is limited by constraints of the Riedel Smartpanel:

- Displays cannot show graphics, only text. The values of "Title" and "Textline1" is shown on the displays and sub- and main labels, everything else is ignored.
- Colors are mapped 1:1 to Raw Panel standard colors, except a few colors that didn't find any match. Sending arbitrary RGB values will be mapped to the closest matching color on the panel
- Color feedback to a button will set the color of both the upper and lower half circle LED as well as the display tile border.
- Setting a button to state "On" will set the display in inverse. LED intensity is not changed since it cannot be controlled.
- No support for the Smartpanels's library of icons

### Licensing

**A license for unlimited number of Smartpanels with unlimited Raw Panel clients connecting on a Blue Pill device currently costs 299 EUR / 365 USD** (March 2024). Please contact <support@skaarhoj.com> or <sales@skaarhoj.com> to place your order and get a license assigned. Remember to include your Blue Pill serial number in the request.

The *xpanel-riedelsmartpanel* application will always give you about **10 minutes of free and unlimited Raw Panel usage** since 30 seconds after application (re-)start. After 10 minutes an unlicensed Smartpanel won't send triggers or reactor to feedback anymore, but rather show a "License Required" message in the displays. Re-starting the *xpanel-riedelsmartpanel* package in the Blue Pill Web UI will reset the period.

### Configuration

The *xpanel-riedelsmartpanel* application needs you to manually set up any panels. You must know the IP and port of a panel and enter into the configuration:

[![image.png](https://wiki.skaarhoj.com/uploads/images/gallery/2023-11/scaled-1680-/6Fdimage.png)](https://wiki.skaarhoj.com/uploads/images/gallery/2023-11/6Fdimage.png)

The Server Port should be changed if you have other applications running on the same Blue Pill trying to use this port. There is not clear indication if this is the case, but if something doesn't work, please check the logs if there are errors related to binding to the port.

The protocol mode can mostly stay as it is since most SKAARHOJ applications at least will detect whether ASCII or Binary mode can/should be used. Max Clients and Lock to IP is to help you guard your Raw Panel enabled Smartpanel against too many connected clients or connections from unauthorized IP addresses. It's still a fairly low-tech type of security that still assumes a friendly network environment, just keep that in mind.

Please write to <innovationlab@skaarhoj.com> for any comments or questions. We would love to hear (positive and constructive) remarks from you.

\- kasper

# Tally-MA on Raw Panel

With SKAARHOJ's Tally-MA application (*xpanel-tallyma* package), you have the capability to **connect one or more WiFi based [Tally-MA lamps](https://www.tally-ma.com/)** to a SKAARHOJ product.

[![IMG_8021.JPG](https://wiki.skaarhoj.com/uploads/images/gallery/2023-08/scaled-1680-/img-8021.JPG)](https://wiki.skaarhoj.com/uploads/images/gallery/2023-08/img-8021.JPG)

The SKAARHOJ product allows direct control of the lamps using UDP packets, eliminating the need for the Tally-MAs software application TallyServer. However, the TallyServer software is still essential for configuring the lamps' static IP addresses and Wi-Fi connection.

Multiple Tally-MA lamps will be grouped into a single Raw Panel device. This configuration allows SKAARHOJ to assign tally information directly within Reactor.

### Tally-MA Configuration

For guidance on configuring the lamps, please visit Tally-MA. We cannot assist with this process. It requires connecting the lamps to your computer, downloading the TallyServer software, and then setting the Wi-Fi credentials and **static IP addresses.** The latter is necessary for compatibility with SKAARHOJ's xpanel-tallyma.

Ensure the lamps are on the same network as the SKAARHOJ product you intend to use for control. Using a web browser, navigate to their IP addresses. If set up correctly, you'll see a webpage listing commands. Once confirmed, proceed with the next steps.

### Configuration

On the 'Packages' tab of your SKAARHOJ product, after successful installation, you'll find the configuration for *xpanel-tallyma*. Post-installation and initialization, it should resemble the following layout:

[![image.png](https://wiki.skaarhoj.com/uploads/images/gallery/2023-08/scaled-1680-/heAimage.png)](https://wiki.skaarhoj.com/uploads/images/gallery/2023-08/heAimage.png)

This configuration allows you to organize multiple Tally-MA lamps into an array to be controlled by a single Raw Panel instance. While it's possible to create several lamp arrays, most users typically only need one.

##### Add lamps!

Begin by adding the accessible lamps on your network. Click "Add Entry" beside 'Lamps' and follow the prompts. Lamps are numerically named, e.g., Lamp 1, Lamp 2, based on the order they're added.

[![image.png](https://wiki.skaarhoj.com/uploads/images/gallery/2023-08/scaled-1680-/z6himage.png)](https://wiki.skaarhoj.com/uploads/images/gallery/2023-08/z6himage.png)

### Testing the Raw Panel

(Optional but recommended for understanding)  
Using the Raw Panel Explorer, locate the panel you've created in the web UI. The Tally-MA raw panel instance should display as follows in the main window:

[![image.png](https://wiki.skaarhoj.com/uploads/images/gallery/2023-08/scaled-1680-/zt2image.png)](https://wiki.skaarhoj.com/uploads/images/gallery/2023-08/zt2image.png)

Click Connect and you should see this:

[![image.png](https://wiki.skaarhoj.com/uploads/images/gallery/2023-08/scaled-1680-/VCeimage.png)](https://wiki.skaarhoj.com/uploads/images/gallery/2023-08/VCeimage.png)

Each added lamp is represented by a rectangular placeholder. For example, two lamps appear like this. You can click on each to assign a color. To illuminate them, click "On" and select a preferred hue.

### Reactor Configuration - Out of the Box

To integrate the lamp with devices like a video switcher, add the panel in Reactor. Click 'Add Panel' and locate it on the network. In the "Tally Trigger" dropdown, choose from the preset mappings SKAARHOJ provides for widely-used video switchers and routers.

[![image.png](https://wiki.skaarhoj.com/uploads/images/gallery/2023-08/scaled-1680-/aaOimage.png)](https://wiki.skaarhoj.com/uploads/images/gallery/2023-08/aaOimage.png)

[![image.png](https://wiki.skaarhoj.com/uploads/images/gallery/2023-08/scaled-1680-/Q9Rimage.png)](https://wiki.skaarhoj.com/uploads/images/gallery/2023-08/Q9Rimage.png)

Click the blue button "Tally Device", add a new entry like this:

[![image.png](https://wiki.skaarhoj.com/uploads/images/gallery/2023-08/scaled-1680-/IOUimage.png)](https://wiki.skaarhoj.com/uploads/images/gallery/2023-08/IOUimage.png)

In the drop-down called "Tally Trigger" you select existing mappings SKAARHOJ have done for popular video switchers and routers.

### Customization

The Tally-MA lamps, being consolidated as RGB outputs in a Raw Panel device, offer flexible usage, including bespoke configurations through the 'Configuration' tab in Reactor. While more advanced than the ready-made configurations, those wishing to explore custom setups will find this feature invaluable. However, a deeper dive into this topic will be covered in another article.

[![image.png](https://wiki.skaarhoj.com/uploads/images/gallery/2023-08/scaled-1680-/9biimage.png)](https://wiki.skaarhoj.com/uploads/images/gallery/2023-08/9biimage.png)

# HID devices on Raw Panel

With SKAARHOJs HID application (*xpanel-hids* package) you can **connect one or more particular USB devices** to a SKAARHOJ product (with USB-A) and integrate the USB device as a control panel with your existing SKAARHOJ devices. In this way you can enjoy even **more freedom of user friendly integration with professional SKAARHOJ panels** and your existing HID devices.<span class="Apple-converted-space"> </span>

[![image.png](https://wiki.skaarhoj.com/uploads/images/gallery/2023-08/scaled-1680-/ZJYimage.png)](https://wiki.skaarhoj.com/uploads/images/gallery/2023-08/ZJYimage.png)

The devices supported are specific models and brands of HID devices. We know this list is very short at the moment, and we are looking to extend it by your help, so reach out to [innovationlab@skaarhoj.com](mailto:innovationlab@skaarhoj.comi) if you have a device you think should be supported here.

<table border="1" id="bkmrk-stream-deck-model-su" style="border-collapse: collapse; width: 100%;"><colgroup><col style="width: 24.8455%;"></col><col style="width: 11.2485%;"></col><col style="width: 11.1248%;"></col><col style="width: 32.7565%;"></col><col style="width: 19.9011%;"></col></colgroup><tbody><tr><td>**Device**</td><td>**Vendor ID**</td><td>**Product ID**</td><td>**Comment**</td><td>  
</td></tr><tr><td>**Tangent Ripple**

("TangentRipple")

</td><td><div><div><div><div>1240</div></div></div></div></td><td><div><div>64015</div></div></td><td>Trackballs are read out as two encoders, one for each axis.   
Encoders and trackballs are scaled down by a factor 20 to reach a usable level for most applications, such as Reactor. You can change this by setting this JSON string into the "Deep Config" field which will set scaling to "1:1" instead. You can experiment with the values to reach your desired resolution.

{"EncoderScaler":1,"TrackballScaler":1}

A mount for the Tangent Ripple ([rippleMount.stp](https://wiki.skaarhoj.com/attachments/53)) has been contributed by user Jaron Berman. Thanks!

</td><td>[![image.png](https://wiki.skaarhoj.com/uploads/images/gallery/2023-11/scaled-1680-/wbPimage.png)
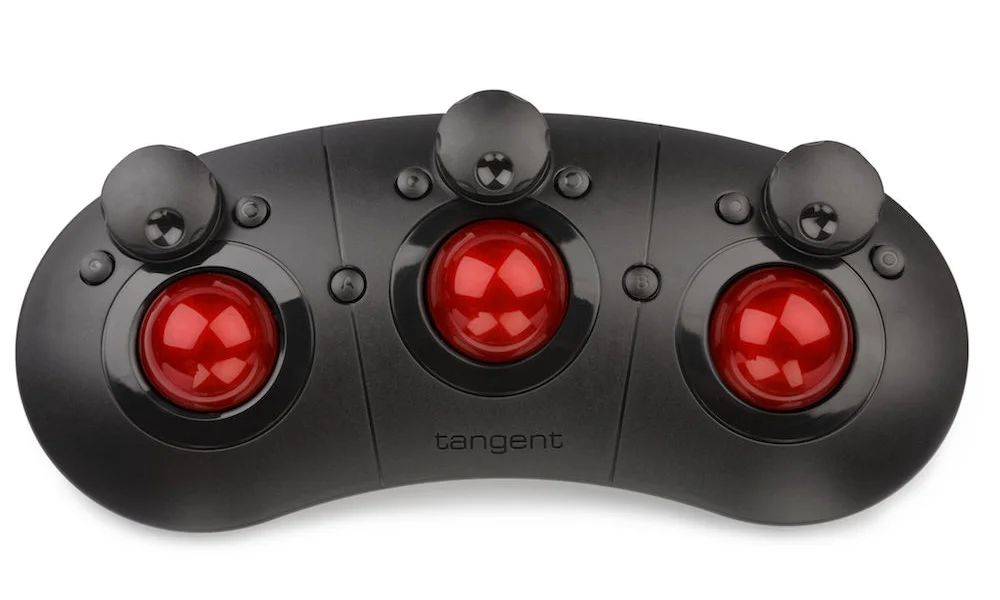
](https://wiki.skaarhoj.com/uploads/images/gallery/2023-11/wbPimage.png)

</td></tr><tr><td>**USB Generic Gamepad**

("GamePad")

</td><td><div><div>2064</div></div></td><td>1

</td><td>Supports all buttons. Left button array is linked to left joystick. Analog button changes that function. Precision of the joysticks is very low.

</td><td>[![image.png](https://wiki.skaarhoj.com/uploads/images/gallery/2023-08/scaled-1680-/woEimage.png)
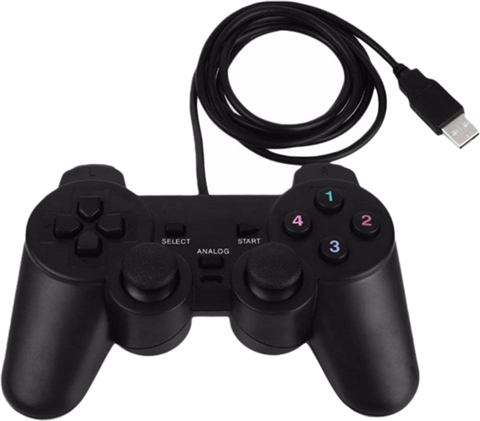
](https://wiki.skaarhoj.com/uploads/images/gallery/2023-08/woEimage.png)

</td></tr><tr><td><div><div>**[Delcom FootSwitch Mouse](https://www.delcomproducts.com/productdetails.asp?PartNumber=703600-5M)**</div><div>("FootSwitchDelcom")</div></div></td><td><div><div><div><div>4037</div></div></div></div></td><td><div><div>13921</div></div></td><td></td><td>[![image.png](https://wiki.skaarhoj.com/uploads/images/gallery/2023-08/scaled-1680-/QdFimage.png)
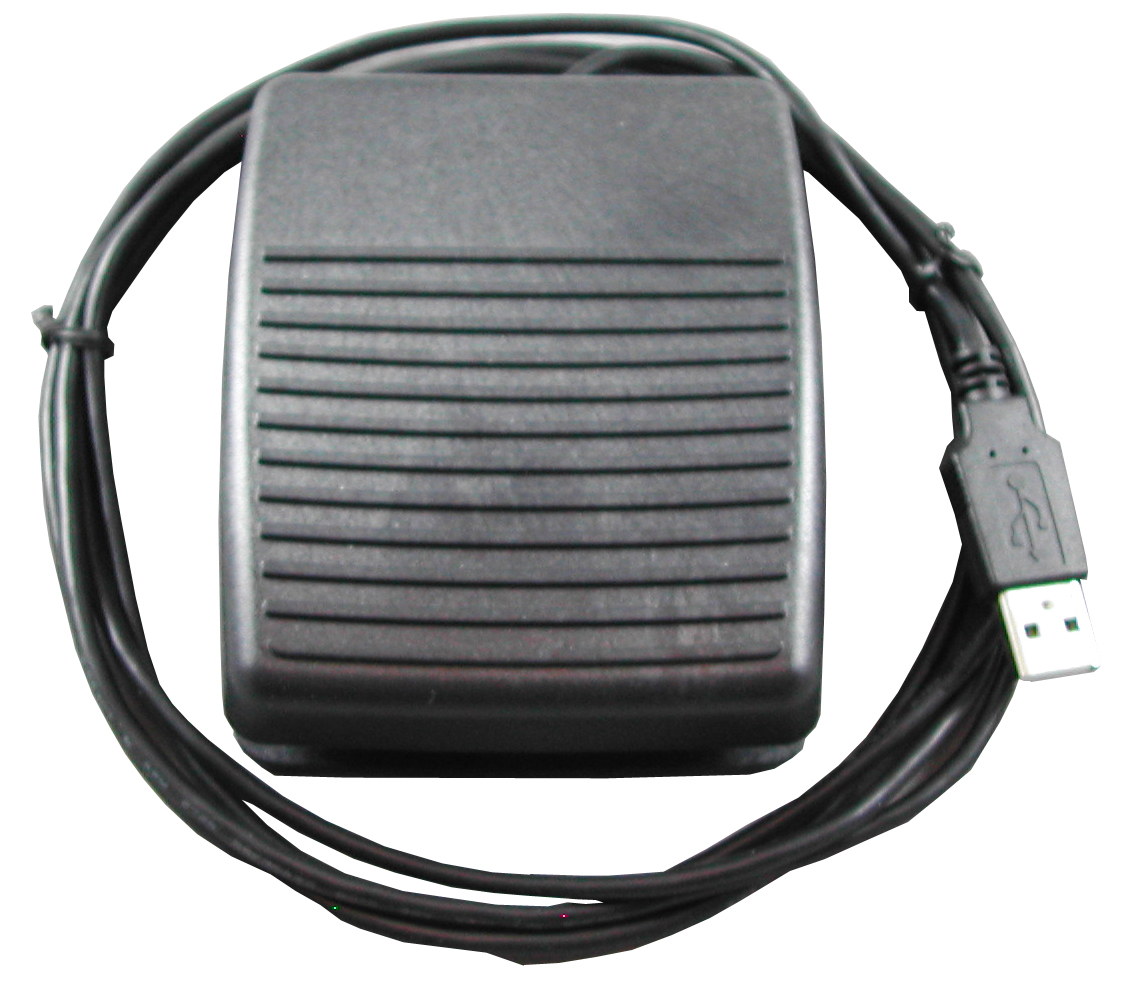
](https://wiki.skaarhoj.com/uploads/images/gallery/2023-08/QdFimage.png)

</td></tr><tr><td><div><div><div><div>**Contour ShuttlePro**  
("ContourShuttlePro")</div></div></div></div></td><td><div><div><div><div><div><div>2867</div></div></div></div></div></div></td><td><div><div><div><div>48</div></div></div></div></td><td></td><td>[![image.png](https://wiki.skaarhoj.com/uploads/images/gallery/2023-08/scaled-1680-/image.png)
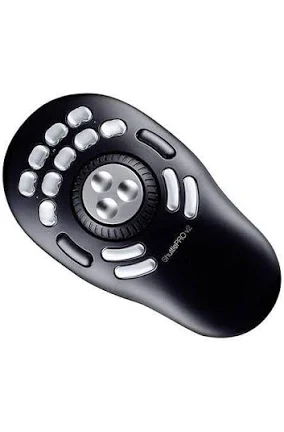
](https://wiki.skaarhoj.com/uploads/images/gallery/2023-08/image.png)

</td></tr><tr><td><div><div><div><div>**Logitech Presenter R400**  
</div></div><div>  
</div><div>("LogitechR400")</div></div></div></td><td><div><div><div><div><div><div>1133</div></div></div></div></div></div></td><td><div><div><div><div><div><div>(50477)</div></div></div></div></div></div></td><td>(see R500)

</td><td>[![image.png](https://wiki.skaarhoj.com/uploads/images/gallery/2024-02/scaled-1680-/rF8image.png)
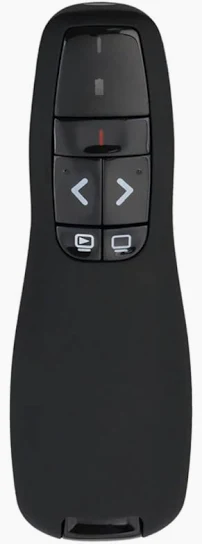
](https://wiki.skaarhoj.com/uploads/images/gallery/2024-02/rF8image.png)

</td></tr><tr><td><div><div><div><div>**Logitech Presenter R500s**</div><div>  
</div></div><div>("LogitechR500")</div></div></div></td><td><div><div><div><div><div><div>1133</div></div></div></div></div></div></td><td>50496  
(50494)</td><td>The presenter remote recognizes two types of button presses: forward and backward. It only responds to short presses (less than 0.5 second), ignoring longer ones. Upon releasing the button, the down-press trigger is sent, followed by an automatic up-press trigger approximately 50ms after the initial press.

</td><td>[![image.png](https://wiki.skaarhoj.com/uploads/images/gallery/2024-02/scaled-1680-/ewZimage.png)](https://wiki.skaarhoj.com/uploads/images/gallery/2024-02/ewZimage.png)

</td></tr><tr><td><div><div><div><div><div><div>**APEM HF-45S10-U Joystick**</div><div>  
("APEM-HF45S10U")</div></div></div></div></div></div></td><td><div><div><div><div><div><div>1678</div></div></div></div></div></div></td><td>415</td><td>APEM USB Joystick with two buttons on top.

</td><td>[![image.png](https://wiki.skaarhoj.com/uploads/images/gallery/2024-06/scaled-1680-/HDgimage.png)
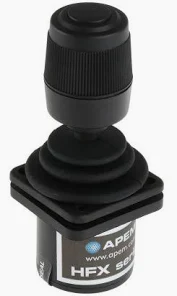
](https://wiki.skaarhoj.com/uploads/images/gallery/2024-06/HDgimage.png)

</td></tr><tr><td><div><div><div><div>**Generic Keyboard**</div><div>  
</div></div><div>("GenericKeyboard")</div></div></div></td><td><div><div><div><div><div><div>1133</div></div></div></div></div></div></td><td><div><div>49974</div></div></td><td>Logitech G213 (Y-U0029)

*Many other keyboards would work too, but you will need to detect it's vendor and product IDs and inject into the package. See below for instructions.*

</td><td></td></tr><tr><td><div><div><div><div>**Generic Mouse**</div></div></div></div><div>  
</div><div>("GenericMouse")</div></td><td><div><div><div><div><div><div>1133</div></div></div></div></div></div></td><td><div><div>49271</div></div></td><td>Logitech B100 (M-U0026). Notice that by default the X/Y positions are reported as encoder input scaled down by a factor 5 and also sampled at only 10Hz.

*Many other mice would work too, but you will need to detect it's vendor and product IDs and inject into the package. See below for instructions.*

</td><td></td></tr></tbody></table>

The USB HID devices are network-enabled as they are transformed into Raw Panel compliant devices. This transformation implies that Reactor, along with any other third-party application fully compliant with Raw Panel, can utilize them.

In the illustration below, you'll observe a Delcom Footswitch Mouse directly connected to a SKAARHOJ Blue Pill Server. This server is then linked to a Power over Ethernet (PoE) powered network switch. The Footswitch can be accessed via the Raw Panel TCP protocol, using the IP address of the Blue Pill Server.

[![IMG_8011.JPG](https://wiki.skaarhoj.com/uploads/images/gallery/2023-08/scaled-1680-/img-8011.JPG)](https://wiki.skaarhoj.com/uploads/images/gallery/2023-08/img-8011.JPG)

Multiple HID devices can be operated by a single Blue Pill. To do this, insert a powered USB hub between the devices.

[![IMG_8013.JPG](https://wiki.skaarhoj.com/uploads/images/gallery/2023-08/scaled-1680-/img-8013.JPG)](https://wiki.skaarhoj.com/uploads/images/gallery/2023-08/img-8013.JPG)

With the Raw Panel Protocol, you can readily integrate button presses, joystick movements, and encoder rotations, often referred to as 'triggers', back into your broadcast and AV applications. Devices compliant with Raw Panel will appear in a visually pleasing graphical form in the corresponding applications. Here are two examples from the Raw Panel Explorer and Reactor:

[![image.png](https://wiki.skaarhoj.com/uploads/images/gallery/2023-08/scaled-1680-/0X6image.png)](https://wiki.skaarhoj.com/uploads/images/gallery/2023-08/0X6image.png)

[![image.png](https://wiki.skaarhoj.com/uploads/images/gallery/2023-08/scaled-1680-/Sjgimage.png)](https://wiki.skaarhoj.com/uploads/images/gallery/2023-08/Sjgimage.png)

### Watch it

(TODO)

### Getting Started

- **Connect your HID Device** to your SKAARHOJ Blue Pill Inside product (with USB-A).
- Go to the **Settings tab** of the Web UI of your SKAARHOJ device, find where it says **"USB-A" and turn it on**. After doing so, please power cycle your SKAARHOJ device once or twice and then confirm that USB-A is still enabled:  
    [![image.png](https://wiki.skaarhoj.com/uploads/images/gallery/2022-11/scaled-1680-/xFqimage.png)](https://wiki.skaarhoj.com/uploads/images/gallery/2022-11/xFqimage.png)
- Go to the **Packages tab** of the Web UI of your SKAARHOJ device  
    [![image.png](https://wiki.skaarhoj.com/uploads/images/gallery/2022-11/scaled-1680-/72eimage.png)](https://wiki.skaarhoj.com/uploads/images/gallery/2022-11/72eimage.png)
- Find the ***xpanel-hids*** package in the list of Available Packages. Click "Install"  
    [![image.png](https://wiki.skaarhoj.com/uploads/images/gallery/2023-08/scaled-1680-/wJOimage.png)](https://wiki.skaarhoj.com/uploads/images/gallery/2023-08/wJOimage.png)
- When installed, you should find it listed as "Running" in the top of the Packages page:  
    [![image.png](https://wiki.skaarhoj.com/uploads/images/gallery/2023-08/scaled-1680-/HwBimage.png)](https://wiki.skaarhoj.com/uploads/images/gallery/2023-08/HwBimage.png)
- **Click the package name "xpanel-hids"** to go to the configuration page. Here you may want to make sure it's set up for Auto Start and attend to other config settings:  
      
    [![image.png](https://wiki.skaarhoj.com/uploads/images/gallery/2023-08/scaled-1680-/Ndximage.png)](https://wiki.skaarhoj.com/uploads/images/gallery/2023-08/Ndximage.png)
- Check the log in the right side to see if panels are recognized and check it also for quarantine information (see licensing further down):  
    [![image.png](https://wiki.skaarhoj.com/uploads/images/gallery/2023-08/scaled-1680-/UIIimage.png)](https://wiki.skaarhoj.com/uploads/images/gallery/2023-08/UIIimage.png)
- Using PuTTy, Telnet or nc you can now make a TCP connection manually to test it. On a Mac, try "nc 192.168.11.5 9923" from the Terminal, then it should connect, type in "list"+Enter and you should see something like this below. Try pressing a few buttons and you will see trigger messages arrive in a human readable form. This is the Raw Panel protocol in ASCII version.   
    [![image.png](https://wiki.skaarhoj.com/uploads/images/gallery/2023-08/scaled-1680-/JMlimage.png)](https://wiki.skaarhoj.com/uploads/images/gallery/2023-08/JMlimage.png)
- With PuTTy on Windows you should make sure to set "Implicit CR in every LF"
    
    [![image.png](https://wiki.skaarhoj.com/uploads/images/gallery/2022-11/scaled-1680-/521image.png)](https://wiki.skaarhoj.com/uploads/images/gallery/2022-11/521image.png)

### USB Hubs

You can operate multiple devices simultaneously by using a USB hub. For the best results, it is recommended to use a powered hub if possible.

### Licensing

**Licenses for unlimited use of HID devices on a Blue Pill device currently cost 79 EUR / 96 USD** (January 2024). Please contact <support@skaarhoj.com> or <sales@skaarhoj.com> to place your order and get a license assigned. Remember to include your Blue Pill serial number in the request. A single license will allow up to about 10 USB devices to be connected and Raw Panel enabled.


The xpanel-hids application will always provide approximately **10 minutes of free and unlimited Raw Panel usage.** This starts 30 seconds after the application (re-)start for any number of HID devices. Please note that after 10 minutes, an unlicensed HID device will stop sending triggers. However, you can reset this period by re-starting the xpanel-hids package in the Blue Pill Web UI.

The xpanel-hids logs will report when the quarantine periods start and end.

### Configuration

By default, the *xpanel-hids* application will scan for supported HID devices on the USB port and as it finds them, assign them a Raw Panel port number starting with 9963 - and locking that to their serial numbers.

You can change this behavior. The configuration page for the xpanel-hids application has a number of options worth knowing about.

[![image.png](https://wiki.skaarhoj.com/uploads/images/gallery/2023-08/scaled-1680-/LC6image.png)](https://wiki.skaarhoj.com/uploads/images/gallery/2023-08/LC6image.png)

The Server Starting Port should be adjusted if other applications running on the same Blue Pill are attempting to use this port. There is no explicit indication if this is the case, but if something isn't functioning properly, please check the logs for errors related to port binding.

The protocol mode can mostly remain unchanged since most SKAARHOJ applications will determine whether ASCII or Binary mode should be utilized. The Max Clients and Lock to IP features help protect your Raw Panel enabled HID devices against excessive client connections or connections from unauthorized IP addresses. However, remember that this is a relatively low-tech security measure, which assumes a friendly network environment.

By default, Lock Serials to Port is enabled because we anticipate that it would be most convenient for users if any panel that was previously connected to your SKAARHOJ controller were assigned the same port the next time it is connected.

#### Fixed Panels

For fixed installations, it's recommended that you set up discrete HIDs as fixed panels. This allows you to assign a specific port to a specific serial number and set individual settings for the above mentioned general settings for the panels.

[![image.png](https://wiki.skaarhoj.com/uploads/images/gallery/2023-08/scaled-1680-/wPKimage.png)](https://wiki.skaarhoj.com/uploads/images/gallery/2023-08/wPKimage.png)

### Exploring with Raw Panel

Above you saw how simple it is to connect to a Raw Panel enabled device. Here is the [full protocol information](https://github.com/SKAARHOJ/Support/blob/master/Manuals/SKAARHOJ/SKAARHOJ_RawPanel_V2.pdf) and in addition we will advice you to download and play with the [Raw Panel Explorer](https://github.com/SKAARHOJ/raw-panel-explorer/releases/). To help you succeed with SKAARHOJs command-line-applications, please check out these wiki pages for [windows](https://wiki.skaarhoj.com/books/applications/page/running-cli-applications-windows) and [mac](https://wiki.skaarhoj.com/books/applications/page/running-cli-applications-mac).

When you start the Raw Panel Explorer, it will scan the network for Raw Panel compliant devices. It would find your connected HID devices and show them on the web page that opened:

[![image.png](https://wiki.skaarhoj.com/uploads/images/gallery/2023-08/scaled-1680-/5Vvimage.png)](https://wiki.skaarhoj.com/uploads/images/gallery/2023-08/5Vvimage.png)

Click the "Connect" button to the right of the XP\_HIDS-GAMEPAD panel and you will see this:

[![image.png](https://wiki.skaarhoj.com/uploads/images/gallery/2023-08/scaled-1680-/Zreimage.png)](https://wiki.skaarhoj.com/uploads/images/gallery/2023-08/Zreimage.png)

The drawing you see on this page comes straight out of the Raw Panel protocol - one of the many awesome features: Raw Panel allows any connecting client to ask for the topology of the panel and it lets any client know exactly which features a panel has and how to render it visually. This info is provided as a mix of JSON and SVG data.

### Deep Configuration

It's possible to provide additional JSON based configuration to the application. This is done by adding JSON to the "Deep Config" field:

[![image.png](https://wiki.skaarhoj.com/uploads/images/gallery/2024-05/scaled-1680-/image.png)](https://wiki.skaarhoj.com/uploads/images/gallery/2024-05/image.png)

Here is examples of config that can be helpful:

<table border="1" id="bkmrk-deep-config-descript" style="border-collapse: collapse; width: 100%; height: 251.771px;"><colgroup><col style="width: 54.8037%;"></col><col style="width: 45.2625%;"></col></colgroup><tbody><tr style="height: 29.349px;"><td style="height: 29.349px;">**Deep Config**</td><td style="height: 29.349px;">**Description**</td></tr><tr style="height: 62.9427px;"><td style="height: 62.9427px;">`{"Development":{"Mode":"Scan"}}`  
</td><td style="height: 62.9427px;">Stops normal run mode of the application and scans the USB hub repeatedly, reporting in detail the results. This is very technical and output looks very chaotic.</td></tr><tr style="height: 130.13px;"><td style="height: 130.13px;">`{"Development":{"Mode":"Log","SleepMS":100}}`  
  
`{"Development":{"Mode":"Log","SleepMS":500,"VendorID":1240}}`  
</td><td style="height: 130.13px;">Stops normal run mode of the application and and rather connects to the first found device that corresponds to the filter settings. After that it will report back the received HID reports as bytes in the log with a max period of 100 ms.  
Filters include "VendorID", "ProductID", "UsagePage", "Usage", "InterfaceNum"</td></tr><tr style="height: 29.349px;"><td style="height: 29.349px;">`{"InjectVIDsAndPIDs":{"GenericKeyboard":[[1267, 259]]}}`  
</td><td style="height: 29.349px;">This adds the VID (1267) and PID (259) to the existing list of devices recognized as a Generic Keyboard. "GenericKeyboard" is the identifier found under the title of the device type in the table of supported devices in the top.  
This can be used to test if a mouse, keyboard, game pad, remote control etc. could potentially work as one of the known devices. If successful the user can help SKAARHOJ make the support permanent by reporting a working pair of VID and PID.</td></tr><tr><td>`{"XYScaler":5} `  
</td><td>Divides the Generic Mouse input for X/Y positions by 5. </td></tr><tr><td> </td><td>  
</td></tr></tbody></table>

Here is an example of the log output from Log mode, and a Logitech Keyboard inserted, pressing "a", "b", "c". Note that log reports are updated at a frequency of about 1 second in the UI.

[![image.png](https://wiki.skaarhoj.com/uploads/images/gallery/2024-05/scaled-1680-/dG4image.png)](https://wiki.skaarhoj.com/uploads/images/gallery/2024-05/dG4image.png)

### Feedback

Please write to <innovationlab@skaarhoj.com> for any comments or questions. We would love to hear (positive and constructive) remarks from you.

\- kasper

# Using Densitron UReady 1U and UReady 2U Displays for with Raw Panel

The [SKAARHOJ *xpanel-touch*](https://wiki.skaarhoj.com/books/raw-panel/page/touch-on-raw-panel "Touch on Raw Panel") package allows users to create browser-accessible software UIs, appearing on the local network as Raw Panel devices.

Densitron presents compelling touch screen options for use with *xpanel-touch*. Their rack-mountable designs are notable. Additionally, certain screens come equipped with an internal computer, enabling direct web browser operation on the screen without requiring an external driving computer.

[![Our Product Rance.png](https://wiki.skaarhoj.com/uploads/images/gallery/2023-11/scaled-1680-/our-product-rance.png)](https://wiki.skaarhoj.com/uploads/images/gallery/2023-11/our-product-rance.png)

Options include:

- For a 1RU, 2RU, or 4RU Densitron touch display connected to any computer as a screen: This guide does not cover this setup. Essentially, you will need to launch a web browser in kiosk mode (full screen) directed to the SKAARHOJ Blue Pill device hosting the xpanel-touch webserver.
- A 2RU or 4RU unit with an integrated computer, running Lubuntu: We cover this setup below with instructions on autostarting the web browser.
- Build a compact "rack" style touch panel using a 1RU USB display and a Raspberry Pi driving it. Covered below as well as a DIY project.

This guide will assist in quickly setting up such configurations.


### UReady 2U (with built-in x86) setup 

The UReady 2U displays, and likely the 4U versions as well, are available with HDMI like a regular monitor or with a built-in computer. This setup guide focuses on the latter.[![Lubunto.jpg](https://wiki.skaarhoj.com/uploads/images/gallery/2023-11/scaled-1680-/lubunto.jpg)](https://wiki.skaarhoj.com/uploads/images/gallery/2023-11/lubunto.jpg)

**Initial Setup:**

1. **Out-of-the-Box Functionality:**
    
    
    - The units come pre-installed with the Lubuntu distribution, which should work immediately upon setup. This simplifies the process, requiring only the setup of an autostart sequence to open the browser in full-screen mode.
2. **Preparing for Setup:**
    
    
    - Since our unit did not have an SSH server installed, you will need a keyboard and, preferably, a mouse.
    - The default username and password are "densitron/densitron."
3. **Physical Setup:**
    
    
    - Connect your keyboard and mouse to the unit.
    - Power on the unit.
4. **Access Terminal:**
    
    
    - After the device boots, locate the terminal icon on the taskbar and open it.
5. **Create Autostart Entry:**
    
    
    - To create a new autostart entry, type the following command in the terminal:

```
sudo nano /etc/xdg/autostart/display.desktop
```

If prompted, enter the password. This action will open an empty file for editing.  
Lubuntu comes with the Firefox Browser pre-installed, which you'll use for this setup.

You will need to edit the content of the file to suit your needs. The content should resemble the following template, but you'll need to replace it with the **IP address and port** of your *xpanel-touch* server:

```
[Desktop Entry]
Name=Firefox
Exec=firefox  --kiosk http://192.168.11.5:7952
```

Save the changes and exit. That's all there is to it! When the panel restarts, Firefox will open in full-screen mode at the address specified in the configuration. If you need to change the IP address later, simply edit the file again.

```
sudo nano /etc/xdg/autostart/display.desktop
```

To prevent the browser from automatically starting up, you can follow these steps:

```
sudo rm /etc/xdg/autostart/display.desktop
```

##### Variant with embedded version of xpanel-touch

It's possible to run the *xpanel-touch* application directly on the Densitron panels with built-in computer. This entails:

- Receiving a special xpanel-touch application from SKAARHOJ upon request, licensed to your device.
- Setting it up to start on every boot of the panel
- Pointing the screens web browser to the localhost instead of external IP address.

**Running the binary:**

There are likely several methods to transfer the *xpanel-touch* binary from SKAARHOJ to your Densitron panel. One effective approach is using a USB stick via the USB port. We recommend copying the binary into the home directory of the *densitron* user, setting execute permissions, and running it from there. Below are examples with the copy command and changing permissions:

[![IMG_8761.JPG](https://wiki.skaarhoj.com/uploads/images/gallery/2023-11/scaled-1680-/img-8761.JPG)](https://wiki.skaarhoj.com/uploads/images/gallery/2023-11/img-8761.JPG)

After running it for the first time, two things will happen:

- A config file, xpanel-touch.toml, has been created in the home folder.
- A code, "MID", is shown, please send that to SKAARHOJ to receive your license. In return you will get a new binary which is licensed for your Densitron panel.

[![IMG_8762.JPG](https://wiki.skaarhoj.com/uploads/images/gallery/2023-11/scaled-1680-/img-8762.JPG)](https://wiki.skaarhoj.com/uploads/images/gallery/2023-11/img-8762.JPG)

**Configuration**

You can use *nano* to edit the config file:

`nano xpanel-touch.toml`

This will lead you to an editor where you should modify at least the Ratio and Layout settings, for example to these values:

`Ratio = "UReady 2U"Layout = "Stream Deck Adapt"`

The layout can be other options known from the configuration of xpanel-touch.

WSPort set to 7950 would be standard and Port for raw panel is usually set to 9953

[![IMG_8766.JPG](https://wiki.skaarhoj.com/uploads/images/gallery/2023-11/scaled-1680-/img-8766.JPG)](https://wiki.skaarhoj.com/uploads/images/gallery/2023-11/img-8766.JPG)

**Setting up Auto start:**

It can be started by *systemd* creating a config file, rawpanel.service, in /etc/systemd/system/ with the following contents:

`[Unit]`  
`Description=Raw Panel Server`

`[Service]`  
`ExecStart=/home/densitron/xpanel-touch.Linux-386`  
`Restart=always`  
`User=densitron`  
`Group=densitron`  
`WorkingDirectory=/home/densitron`

`[Install]`  
`WantedBy=multi-user.target`

After creating this file, you must reload systemd and set it to auto start on every boot:

`<span class="s1">sudo systemctl daemon-reload</span>`

`<span class="s1">sudo systemctl enable rawpanel.service</span>`

Restart if needed with this:

`<span class="s1">sudo systemctl restart rawpanel.service</span>`

Check status like this:

`<span class="s1">sudo systemctl status rawpanel.service</span>`

**Changing the URL for Firefox**

Finally, change the URL for Firefox to localhost on port 7950 by editing the file "/etc/xdg/autostart/display.desktop" as per above:

[![IMG_8768.JPG](https://wiki.skaarhoj.com/uploads/images/gallery/2023-11/scaled-1680-/img-8768.JPG)](https://wiki.skaarhoj.com/uploads/images/gallery/2023-11/img-8768.JPG)

**Test**

Reboot the panel. Upon booting, you should see the touch UI displayed, similar to the image below (note that in the image, a Raw Panel client is connected, populating the buttons with content).

[![IMG_8776.JPG](https://wiki.skaarhoj.com/uploads/images/gallery/2023-11/scaled-1680-/img-8776.JPG)](https://wiki.skaarhoj.com/uploads/images/gallery/2023-11/img-8776.JPG)

To test the connection, you can use a telnet client. For Mac users, you can use the command 'nc \[IP address of panel\] 9953' in the terminal. After connecting, type 'list', and you should see an output resembling this:

[![image.png](https://wiki.skaarhoj.com/uploads/images/gallery/2023-11/scaled-1680-/aD0image.png)](https://wiki.skaarhoj.com/uploads/images/gallery/2023-11/aD0image.png)Note: During our tests, we observed that the Raw Panel server operating on the Densitron panel did not announce itself on the network via mDNS. The reason for this is unclear, but it may be addressed in future updates.

### UReady 1U + Raspberry Pi 4/5 setup (Easy Setup, Recommended)

This guide will help you to set up an off-the-shelf Raspberry Pi 4 or 5 to drive the UReady 1U screen via USB

##### Prerequisites

- DM-066GN-OPUR01 UReady 1U Single Monitor
- Raspberry Pi 4 or 5 (with proper power supply (Pi4: 15W, Pi5: 27W) and optionally casing)
- microSD card for the operating system
- Two USB cables (Micro-USB to USB-A)
- Network cable for access to a wired network with DHCP.
- Monitor + Micro-HDMI / HDMI cable (only needed during initial setup)

##### Flashing

- Download [Raspberry Pi Imager](https://www.raspberrypi.com/software/)
- Insert the microSD Card into a card reader on your computer
- Start Raspberry Pi Imager and choose Device, OS and Storage:

[![image.png](https://wiki.skaarhoj.com/uploads/images/gallery/2024-03/scaled-1680-/image.png)](https://wiki.skaarhoj.com/uploads/images/gallery/2024-03/image.png)

[![image.png](https://wiki.skaarhoj.com/uploads/images/gallery/2024-03/scaled-1680-/Ptbimage.png)](https://wiki.skaarhoj.com/uploads/images/gallery/2024-03/Ptbimage.png)

[![image.png](https://wiki.skaarhoj.com/uploads/images/gallery/2024-03/scaled-1680-/OoQimage.png)](https://wiki.skaarhoj.com/uploads/images/gallery/2024-03/OoQimage.png)

- Next, you will be asked to customize the Operating System. Answer "Edit Settings":

[![image.png](https://wiki.skaarhoj.com/uploads/images/gallery/2024-03/scaled-1680-/102image.png)](https://wiki.skaarhoj.com/uploads/images/gallery/2024-03/102image.png)

- On the "General" tab, set username and password to your liking:

[![image.png](https://wiki.skaarhoj.com/uploads/images/gallery/2024-03/scaled-1680-/YQeimage.png)](https://wiki.skaarhoj.com/uploads/images/gallery/2024-03/YQeimage.png)

- On the "Services" tab, enable SSH:

[![image.png](https://wiki.skaarhoj.com/uploads/images/gallery/2024-03/scaled-1680-/dDOimage.png)](https://wiki.skaarhoj.com/uploads/images/gallery/2024-03/dDOimage.png)

- Press "Save" and when you return, press "Yes" to customize. You will be asked to prefill Wifi password. If this is your preferred way to access the network, feel free to do that:

[![image.png](https://wiki.skaarhoj.com/uploads/images/gallery/2024-03/scaled-1680-/wtuimage.png)](https://wiki.skaarhoj.com/uploads/images/gallery/2024-03/wtuimage.png)

- Finally, you will be asked to confirm that you want to erase the microSD card:

[![image.png](https://wiki.skaarhoj.com/uploads/images/gallery/2024-03/scaled-1680-/k3rimage.png)](https://wiki.skaarhoj.com/uploads/images/gallery/2024-03/k3rimage.png)

- If you agree to this, press "Yes". Next, it will take a few minutes to write and verify the operating system to the memory card. You may be asked to type in a password to confirm this operation.

##### Preparing the Operating System to run the Densitron screen over USB

- Insert the microSD card into the Raspberry Pi
- Connect an HDMI monitor to one of the Micro-HDMI plugs on the Pi
- Connect the Densitron Screen to the Raspberry Pi (any two of the four USB ports can be used) using both USB cables: One cable goes into the USB In (Signal) and another cable goes into one of the two USB Out (additional power)
- Connect the Ethernet jack to your network
- Connect your power supply to boot it up.

You should see it boot up on the HDMI monitor. It will automatically reboot a few times before it finally settles with a standard desktop. It's important to stay alert because on the final desktop you will see the DHCP provided IP address shown in the upper right corner. You need that in the next step.

[![Untitled-1.jpg](https://wiki.skaarhoj.com/uploads/images/gallery/2024-03/scaled-1680-/untitled-1.jpg)](https://wiki.skaarhoj.com/uploads/images/gallery/2024-03/untitled-1.jpg)

[![Untitled-2.jpg](https://wiki.skaarhoj.com/uploads/images/gallery/2024-03/scaled-1680-/untitled-2.jpg)](https://wiki.skaarhoj.com/uploads/images/gallery/2024-03/untitled-2.jpg)

- On your computer, open a terminal (such as Putty on Windows) to connect with SSH to the Pi. On a Mac it would look like this:

[![image.png](https://wiki.skaarhoj.com/uploads/images/gallery/2024-03/scaled-1680-/klXimage.png)](https://wiki.skaarhoj.com/uploads/images/gallery/2024-03/klXimage.png)

- Here, you need to use the username ("admin" in this case) and password that you selected when customizing the OS earlier. If you have issues with logging in, you may need to attach a mouse and keyboard to your Pi and change password using the UI (Preferences &gt; Raspberry Pi Configuration)
- In the terminal, run the following command to download the script:

```
curl -O https://raw.githubusercontent.com/SKAARHOJ/Support/master/Files/Densitron/patch.tar.gz
```

- Next, we need to extract the archive we have just downloaded:

```
sudo tar -xzf ./patch.tar.gz
```

- Set permission to execute the script:

```
sudo chmod 777 ./install_all.sh
```

- Now we are ready to execute the script. Execute following command:

```
sudo sh ./install_all.sh
```

- When prompted, enter the IP address and port of your *xpanel-touch* web server (the Blue Pill device where it's installed) and then press ENTER.

These steps will look like this:

[![image.png](https://wiki.skaarhoj.com/uploads/images/gallery/2024-03/scaled-1680-/HEEimage.png)](https://wiki.skaarhoj.com/uploads/images/gallery/2024-03/HEEimage.png)

- Finally, you will be asked if you want to reboot. Disconnect the HDMI cable (important!) and select "Yes". The Raspberry Pi will close it's connection to your terminal and reboot.

[![image.png](https://wiki.skaarhoj.com/uploads/images/gallery/2024-03/scaled-1680-/tiCimage.png)](https://wiki.skaarhoj.com/uploads/images/gallery/2024-03/tiCimage.png)

As the Raspberry Pi reboots, you should experience that the Densitron screen is used as a monitor and that a web browser opens that tries to load page from the IP address and port you specified.

##### Changing the browser target URL

If you need to change the IP address and port entered during the setup, then follow these steps:

- Log in via ssh, using your username and password
- Edit this file:

```
sudo nano /etc/xdg/autostart/display.desktop
```

- Edit the URL inside to your liking:

```
[Desktop Entry]
Name=Chrome
Exec=chromium-browser --app=http://192.168.11.5:7952 --kiosk --app-shell-hosted
```

- Press CTRL+X and answer "Y" to save it.
- Reboot

##### Variant with embedded version of xpanel-touch

*The instructions below are mostly a repetition of the ones given for a Densitron screen with x86 inside above. You will need to request the ARM version of the binary from SKAARHOJ and there are some variations to the config files.*

It's possible to run the *xpanel-touch* application directly on the Raspberry Pi driving your UReady 1U. This entails:

- Receiving a special xpanel-touch application from SKAARHOJ upon request, licensed to your Pi.
- Setting it up to start on every boot of the panel.
- Pointing the web browser to the localhost instead of external IP address.

**Running the binary:**

There are likely several methods to transfer the *xpanel-touch* binary from SKAARHOJ to your Raspberry Pi. Since you have already used the terminal and SSH for setup, using SCP may be the easier one:

```
scp xpanel-touch scp://admin@192.168.1.240
```

IP address should be that of your Raspberry Pi.

After transfer:

- Log in on the Raspberry Pi using SSH
- Set execute permissions on the file on the Pi ("chmod a+x xpanel-touch")
- Run it

After running it for the first time, two things will happen:

- A config file, xpanel-touch.toml, has been created in the home folder.
- A code, "MID", is shown, please send that to SKAARHOJ to receive your license. In return you will get a new binary which is licensed for your Raspberry Pi.

**Configuration**

You can use *nano* to edit the config file:

`nano xpanel-touch.toml`

This will lead you to an editor where you should remove everything existing and substitute with this:

```
[[TouchApplications]]
  Active = true
  Name = "UReady #1"
  Description = ""
  Port = 9923
  ProtocolMode = ""
  MaxClients = 0
  LockToIPs = ""
  WSPort = 7950
  Layout = "Stream Deck Custom (RxC)"
  Ratio = "UReady 1U"
  ConfigFile = "RxC=1x7"
  Cursor = "Hidden"
```

The layout can be other options known from the configuration of xpanel-touch.

WSPort set to 7950 would be standard and Port for raw panel is usually set to 9923

**Setting up Auto start:**

It can be started by *systemd* creating a config file, rawpanel.service, in /etc/systemd/system/ with the following contents:

`<span class="s1">sudo nano /etc/systemd/system/rawpanel.service</span>`

```
[Unit]
Description=Raw Panel Server

[Service]
ExecStart=/home/admin/xpanel-touch.arm64
Restart=always
User=admin
Group=admin
WorkingDirectory=/home/admin

[Install]
WantedBy=multi-user.target
```

<span class="s1">The above config assumes you named your user "admin" and keep the binary in the home directory.</span>

After creating this file, you must reload systemd and set it to auto start on every boot:

`<span class="s1">sudo systemctl daemon-reload</span>`

`<span class="s1">sudo systemctl enable rawpanel.service</span>`

Restart if needed with this:

`<span class="s1">sudo systemctl restart rawpanel.service</span>`

Check status like this:

`<span class="s1">sudo systemctl status rawpanel.service</span>`

<span class="s1">Follow log messages from the service like this:</span>

`<span class="s1">journalctl -u rawpanel.service -f</span>`

**Changing the URL for the browser**

- Edit this file:

```
sudo nano /etc/xdg/autostart/display.desktop
```

- Edit the URL inside to localhost so it loads the UI of itself:

```
[Desktop Entry]
Name=Chrome
Exec=chromium-browser --app=http://localhost:7950 --kiosk --app-shell-hosted
```

(--app-shell-hosted will avoid certain browser pop-ups you don't like in kiosk full screen mode)

- Press CTRL+X and answer "Y" to save it.
- Reboot

**Test**

Reboot the panel. Upon booting, you should see the touch UI displayed.

To test the connection, you can use a telnet client. For Mac users, you can use the command 'nc \[IP address of panel\] 9923' in the terminal. After connecting, type 'list', and you should see an output resembling this:

### \[LEGACY\] UReady 1U + Raspberry Pi 4/5 setup (Alternative Instructions)

The instructions in this section include additional details and reference an older version of Raspbian. They are provided for historical context and may offer useful insights.

[![image.png](https://wiki.skaarhoj.com/uploads/images/gallery/2023-11/scaled-1680-/GM0image.png)](https://wiki.skaarhoj.com/uploads/images/gallery/2023-11/GM0image.png)

**Prerequisites**

- Raspberry Pi 4 or 5
- 5V/3A PSU with USB Type C cable
- DM-066GN-OPUR01 UReady 1U Single Monitor
- microSD card for the operating system
- USB keyboard/mouse (only needed during initial setup)
- Monitor (only needed during initial setup)
- USB FlashDrive (optional, only needed during initial setup)

**Extra Power for Densitron Screen**

The Densitron UReady 1U screen requires additional 5V power. There are two recommended methods to provide this power:

1. **Using a MicroUSB Cable**
    
    
    - Connect an additional microUSB cable from one of the two "USB Out" ports on the screen to another USB port on the Raspberry Pi or to an external power supply. This is probably the easiest.
2. **Using a 5V Power Plug:**
    
    
    - Alternatively, you can use the 5V Power Plug, which is compatible with a Molex 43025-0200 and 43030 series crimp terminals.

[![Pasted Graphic 35.png](https://wiki.skaarhoj.com/uploads/images/gallery/2023-11/scaled-1680-/pasted-graphic-35.png)](https://wiki.skaarhoj.com/uploads/images/gallery/2023-11/pasted-graphic-35.png)

**Operating System**

- We recommend using the Raspbian OS (Buster) version dated 2020-08-24. It can be downloaded [here](https://downloads.raspberrypi.org/raspios_armhf/images/raspios_armhf-2020-08-24/).\*
- We suggest using the Raspberry Pi Imager for flashing the OS. It's available for various operating systems and can be downloaded [here](https://www.raspberrypi.com/software/).
- If you're unsure about the process at this stage, helpful guidance can be found in [this article](https://www.raspberrypi.com/documentation/computers/getting-started.html).

\*Apparently newer Raspberry Pi 4 revisions as well as new 5th generation are not supported by suggested version of Raspbian OS. Therefore some extra steps are needed to achieve the same with latest [release](https://downloads.raspberrypi.com/raspios_arm64/images/raspios_arm64-2023-12-06/) Raspbian Bookworm 2023-12-05. Please download exactly this release as it is not guaranteed that proposed patch will work on others. Follow instructions from **Easy Setup Method ( Raspbian Bookworm 2023-12-05)**

**Setting Up Your Touch Panel:**

1. **Initial Setup:**
    
    
    - Insert the pre-flashed SD card into the Raspberry Pi (RPI).
    - Connect a HDMI-compatible monitor and the USB keyboard and mouse.
    - Connect the Densitron screen to the RPI using a USB-A to microUSB cable (into either USB 2.0 or USB 3.0 port). Note: The Densitron screen won't display anything at this stage.
    - Power on the RPI.
2. **Complete Raspbian OS Installation:**
    
    
    - Follow the onscreen instructions to complete the installation. This includes setting up the user, time zone, WiFi network, etc.
3. **Enable Remote Access:**
    
    
    - To facilitate future adjustments without needing a keyboard and mouse, enable SSH and VNC servers on the RPI.
    - Click the raspberry icon in the upper left corner of the screen.
    - Navigate to Preferences -&gt; Raspberry Pi Configuration.
    - In the 'Interfaces' tab, enable SSH and/or VNC.
    - Click 'OK' and reboot the RPI.

After rebooting, you should be able to remotely access the RPI via SSH or VNC.

[![image.png](https://wiki.skaarhoj.com/uploads/images/gallery/2023-11/scaled-1680-/image.png)](https://wiki.skaarhoj.com/uploads/images/gallery/2023-11/image.png)

**Post-Setup Process**

Now, our next steps are to activate the Densitron screen and configure the browser to automatically open at the required URL address. To simplify this process, we have created a small shell script that will automatically make the necessary modifications for you.

**Easy Setup Method (Raspbian OS (Buster) version dated 2020-08-24)**

1. Open the Terminal application on your Raspberry Pi.
2. Run the following command to download the script. (If your Raspberry Pi doesn't have internet access, download the file on another machine with internet access and transfer it to your Raspberry Pi using a USB flash drive. Then, continue from step 3.)

```
curl -O https://raw.githubusercontent.com/SKAARHOJ/Support/master/Files/Densitron/DensitronSetup1U.sh
```

 3. Next we need to give permissions to execute the file we have just downloaded. Execute following command:

```
sudo chmod 777 ./DensitronSetup1U.sh
```

 4. Now we are ready to execute the script. Execute following command:

```
sudo sh ./DensitronSetup1U.sh
```

When prompted, enter the IP address and port of your *xpanel-touch* web server (the Blue Pill device where it's installed) and then press ENTER.

[![image.png](https://wiki.skaarhoj.com/uploads/images/gallery/2023-11/scaled-1680-/Egvimage.png)](https://wiki.skaarhoj.com/uploads/images/gallery/2023-11/Egvimage.png)

 5. That is it, you can now power down your RPI, **disconnect keyboard,mouse and HDMI screen**. Next time you power it on the browser should open in full screen mode on the Densitron screen.

**Easy Setup Method ( Raspbian Bookworm 2023-12-05)**

Assuming you have installed that version of OS and configured everything you need. We have to proceed with patching the kernel procedure. To save time we provide a simple script to setup up what is needed.

1. Open the Terminal application on your Raspberry Pi.
2. Run the following command to download the script. (If your Raspberry Pi doesn't have internet access, download the file on another machine with internet access and transfer it to your Raspberry Pi using a USB flash drive. Then, continue from step 3.)

```
curl -O https://raw.githubusercontent.com/SKAARHOJ/Support/master/Files/Densitron/patch.tar.gz
```

 3. Next we need to extract to execute the file we have just downloaded. Execute following command:

```
sudo tar -xzf ./patch.tar.gz
```

You might need to provide permission to execute the script.

```
sudo chmod 777 ./install_all.sh
```

 4. Now we are ready to execute the script. Execute following command:

```
sudo sh ./install_all.sh
```

When prompted, enter the IP address and port of your *xpanel-touch* web server (the Blue Pill device where it's installed) and then press ENTER. You will also so be asked if you want to reboot now or later. Choose later.

 5. That is it, you can now power down your RPI, **disconnect keyboard,mouse and HDMI screen**. Next time you power it on the browser should open in full screen mode on the Densitron screen.

**Advanced Setup Method**

For advanced users interested in creating a custom setup, such as combining two Densitron screens or pairing a Densitron screen with an HDMI screen, detailed guidance is beyond the scope of this introductory tutorial. However, we will provide some basic hints to get you started:

- Edit or create /etc/X11/xorg.conf - in order to "describe" your multi monitor setup.
- Edit or create /etc/xdg/autostart/display.desktop for browser auto startup "tuning".
- Edit /etc/xdg/lxsession/LXDE-pi/autostart. **It is crucial to add the following parameters:**

```
@xset s off
@xset -dpms
```

If you don't apply the recommended modifications, you may encounter USB dropouts, where the device disconnects and then reconnects during screen saver activation or wake-up. This issue can result in a 'green' and unresponsive screen. The Light Display Manager doesn't automatically detect this problem. Therefore, you'll need to either manually restart the Light Display Manager or create a udev rule to restart the service automatically when this condition occurs.

\*\*\*

If you are to do this on newer than Raspbian OS (Buster) version dated 2020-08-24 release without using our script, below are a few things you must know:

- These screens need the udlfb(not udl) driver to work correctly. 
    - This driver was removed from the "default" kernel build config and substituted with udl instead.
    - You will have to build it yourself and patch the kernel.
- Proposed method assumes X11/Xorg is used , these days by default Raspbian works on Wayland and Wayfire as composer for it. You can switch back to X11 using raspi-config command line tool.

# Crestron Modules (USP) for Raw Panel

With the Raw Panel Dummies application it's possible to generate Crestron USP files for any SKAARHOJ panel so they are easy to integrate with Crestron systems as a control device in SIMPL Windows.

[![image.png](https://wiki.skaarhoj.com/uploads/images/gallery/2023-01/scaled-1680-/zIdimage.png)](https://wiki.skaarhoj.com/uploads/images/gallery/2023-01/zIdimage.png)

### Features and Facts

- USP files are generated by the Raw Panel Dummies application. Why? Because a full module for a SKAARHOJ controller could be extremely long and you may want only partial features from the panel. So, to keep things tidy for you, Raw Panel Dummies allows to generate a module for only certain features on the panel.
- Raw Panel Dummies would actually generate this for any Raw Panel compliant topology profiles, so other devices could be integrated this way too.
- The .usp file must be compiled into a .ush file for Crestron SIMPL windows to use it

### Ready made modules

We have full ready made modules for many models here: https://github.com/SKAARHOJ/raw-panel-dummies-releases

### Steps 

**Generate USP file with raw-panel-dummies**

To generate the USP file, you will need the [raw-panel-dummies application](https://github.com/SKAARHOJ/raw-panel-dummies-releases/releases) from SKAARHOJ. It's a command line application and to help you use that, we have a [little guide included](https://wiki.skaarhoj.com/books/applications) with the download. When it's started, it basically creates a virtual SKAARHOJ panel of any type on your computer, but as a little bonus we have included a parameter to make it write .usp files for SIMPL windows! Isn't that cool...

So, here is an example of how you would run the raw-panel-dummies emulator for an AIRFLYPROV3 model and have it generate a complete .usp file:

`./raw-panel-dummies -dontOpenBrowser -panel AIRFLYPROV3 -SIMPLModuleHWCids '*' `

(On Windows you don't put the asterisk in single quotes...)

After starting it like this, you will find a new file in the folder on your disk from where you ran raw-panel-dummies. It would be called AIRFLYPROV3.usp.

Obviously, you should use the model code for the particular SKAARHOJ model you are after. Try to run raw-panel-dummies with the -list option - that will tell you what is available.

Also, after running it like this, just press CTRL+C to exit the application again.

**Move file into the Usrmacro folder**

Next, you move this .usp file into the "Usrmacro" folder on your computer. To be perfectly honest, there may be other and better ways to do what you are about to do, and if you believe that, you are probably more of an expert than us. We are just providing one, known way to make this work and for Crestron experts - well, feel free to do it the better way you know exists.

But here is how we did it: We had a folder on c:/Users/Public/Public Documents/Crestron/SIMPL/Usrmacro/ and that is where we put the .usp file:

[![image.png](https://wiki.skaarhoj.com/uploads/images/gallery/2023-01/scaled-1680-/image.png)](https://wiki.skaarhoj.com/uploads/images/gallery/2023-01/image.png)

**Compile it**

Now, double click the file - you should see "SIMPL+" editor open up (see below). In here, you select only "4" out of the targets and then you click the "Save and Compile" button. After a few seconds the application will likely crash. At least it consistently does for us. But... if there is a ".ush" file with the same name in the folder you should be good anyway. So consider it a nice service that the application shuts down for you :-)

[![image.png](https://wiki.skaarhoj.com/uploads/images/gallery/2023-01/scaled-1680-/m3dimage.png)](https://wiki.skaarhoj.com/uploads/images/gallery/2023-01/m3dimage.png)

[![image.png](https://wiki.skaarhoj.com/uploads/images/gallery/2023-01/scaled-1680-/Bs3image.png)](https://wiki.skaarhoj.com/uploads/images/gallery/2023-01/Bs3image.png)

**Start SIMPL**

Open SIMPL and make a new project. We have a project stored in the Usrmacro folder. This is probably the wrong place for it and once again, if you think so as well based on experience, it just means you know more than us about SIMPL:

[![image.png](https://wiki.skaarhoj.com/uploads/images/gallery/2023-01/scaled-1680-/EqOimage.png)](https://wiki.skaarhoj.com/uploads/images/gallery/2023-01/EqOimage.png)

If you don't see the module under "Miscellaneous" or "-- All project Modules --" in the Symbol Library tab, please go to Options in the menu and select "Reload Device and Symbol Libraries from Disk". This should update the list and add the newly compiled module:

[![image.png](https://wiki.skaarhoj.com/uploads/images/gallery/2023-01/scaled-1680-/4VOimage.png)](https://wiki.skaarhoj.com/uploads/images/gallery/2023-01/4VOimage.png)

Now, drag one or more of the modules over under "\*!\* Logic" in the Program View and from here, double click it to show the Details View on the very right side:

[![image.png](https://wiki.skaarhoj.com/uploads/images/gallery/2023-01/scaled-1680-/87gimage.png)](https://wiki.skaarhoj.com/uploads/images/gallery/2023-01/87gimage.png)

[![image.png](https://wiki.skaarhoj.com/uploads/images/gallery/2023-01/scaled-1680-/5WMimage.png)](https://wiki.skaarhoj.com/uploads/images/gallery/2023-01/5WMimage.png)

Done!

Now you hopefully know what to do next!

# Raw Panel Applications

### Raw Panel Explorer

This application is helpful to scan the network for Raw Panel devices, connect to them and explore their properties, learn the commands for integration and other utility purposes.

[![image.png](https://wiki.skaarhoj.com/uploads/images/gallery/2025-06/scaled-1680-/Tjjimage.png)](https://wiki.skaarhoj.com/uploads/images/gallery/2025-06/Tjjimage.png)

#### Source Code

The full source code is available in the github repository [https://github.com/SKAARHOJ/raw-panel-explorer](https://github.com/SKAARHOJ/raw-panel-explorer)

#### Downloads

You can download CLI (Command Line) binaries for Mac and Windows platforms here [https://github.com/SKAARHOJ/raw-panel-explorer/tree/main/binaries](https://github.com/SKAARHOJ/raw-panel-explorer/tree/main/binaries)

Of special interest for **Mac OS users**, you can download a [signed Mac OS application](https://github.com/SKAARHOJ/raw-panel-explorer/blob/main/binaries/Raw%20Panel%20Explorer.app.zip) which is super convenient to run. For **Windows users**, here is a [GUI version](https://github.com/SKAARHOJ/raw-panel-explorer/blob/main/binaries/Raw%20Panel%20Explorer.exe.zip) as well.