Eth-B4 Link Lens Control
Skaarhoj Eth-B4 Link offer a way to control iris on B4 lens separate from the camera they are connected to. You can find initial device set up in the device manual: Skaarhoj B4 Links Manual
Firmware versions can be found here: Standalone Firmware Downloads
Connecting the device inside Blue Pill is simple.
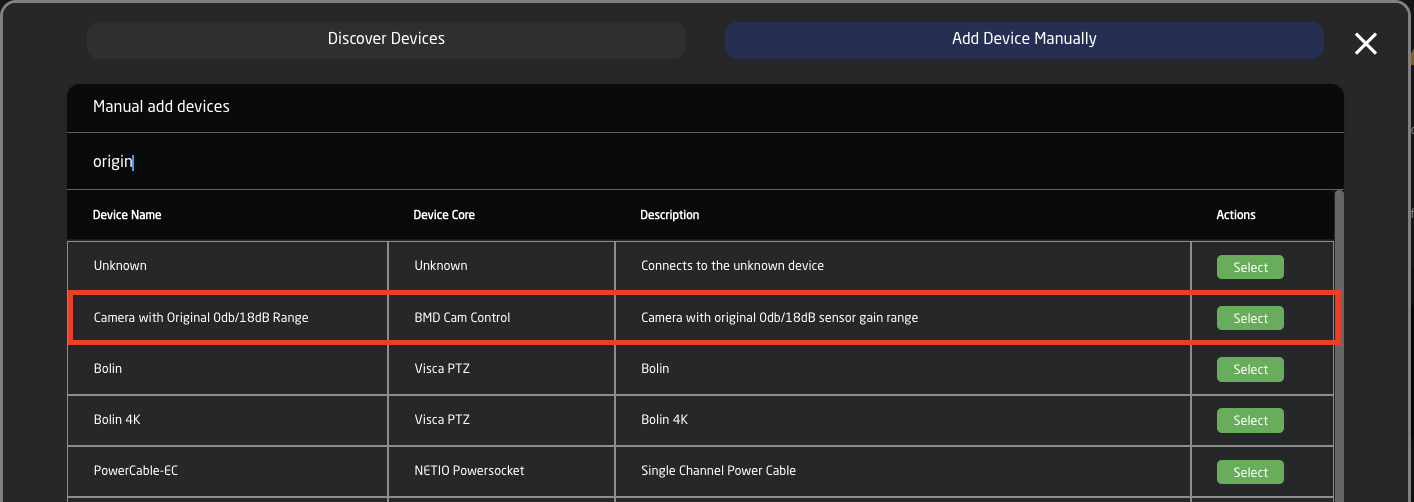
- Add a generic Blackmagic Design camera as a device. This can be the Camea with Original 0db/18dB Range as only Iris is being controlled.
- In the device details:
Add the IP address of the Eth-B4 Link as the IP of the camera.
The Port is 5463.
Set the Camera ID to match the camera number.
The Name is however is easiest for you to identify it.
The Device ID needs to match the Device ID number of the camera you are connecting it to. If you have your set up includes multiple types of cameras using different device cores (example: a Red and an Arri camera), make sure the Device ID for each camera is unique to help tie it to the B4 Link and lens.
Save
- In the Camera Selector constant set for the Skaarhoj Panel, under Iris Channel Config, select: BMD Cam Control Iris.

Please Note: the Device ID number is used here to tie the camera and the B4 Link/lens together. If two cameras had the same Device ID, they would have conflicting lens control.


This set up does not use the core-analog-b4 device core package or the B4 Analog via Blue Pill Extension Iris Channel Config.
Calibration And Setup Of The ETH-B4 Link
Relevant for units on firmware v1.0.3 and forward
On firmware v1.0.3 and forward we have added a PID controller to help with the precision, particularly on older lenses. the default tune that the firmware comes with is based on internal testing for the best all-around performance, but might not give an accurate F-stop reading/position on all lenses, but should be better than on older firmware.
If you want to disable this and get back to how it was on v1.0.2 you can do that via the serial monitor in the SKAARHOJ updater. Just type "pid-en=0" and you will be back to how it was.
Now that we have that out of the way. Let's look at how we can use this new controller. This will work when controlled by either the Unisketch or Blue Pill platform.
Calibration For Use With Unisketch
If you are using the ETH-B4 Link with a Unisketch controller, please download the manual and follow the Calibration steps in there, for how to ensure that your ETH-B4 Link is calibrated.
In short, connect the lens to the unit, move the selection wheel to the "F" or "15" position and wait for it to show a solid Green on the Tally LED. then your unit is fully calibrated. Power cycle the device and it's ready for use.
Calibration For Use with Blue Pill
When paired with Blue Pill, please clear the config on the unit, in essence, it's ready to go out of the box. To clear the calibration move the wheel to the "E" or "14" position and wait for the solid "Green" light. Power cycle the device and it's ready for use.
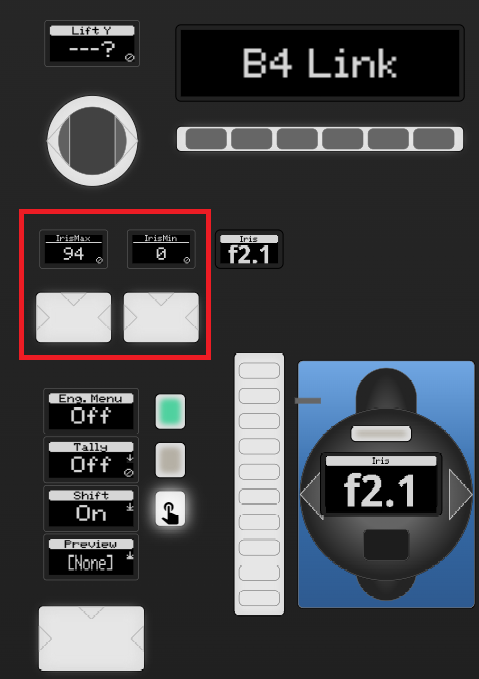
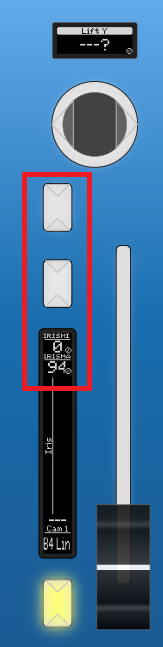
The iris limiting is done by reactor instead, directly from the controller. This is done by holding down "Shift" on the panel and using the "Max" and "Min" buttons that should now appear on the panel. move the joystick/fader on your panel to the furthest position up where the lens reacts and click "Max" then move the lens to the lowest position where the lens reacts or depending on how dark you wanna be able to go, and click "Min". Then your joystick should now limit you to only being able to control within that range, to clear the calibration just hold down the top edge on the button you want to reset.
"Iris Max" = More light, so lower F-values, or joystick/fader up
"Iris Min" = Less Light, so higher F-values, or joystick/fader down
Here can be seen where to find these min/max calibration buttons on some different controllers, while holding shift:
| Wave Board / Colorfly Iris Channels |
RCPv2 and RCP Pro Iris Sections |
 |
|