Protocol-HTTP Advanced Model
The HTTP Device Core is a generic device core that lets a SKAARHOJ controller talk to any device or online service that exposes an HTTP / REST API — power switchers, lighting bridges, media servers, automation platforms, or your own backend. Because it is generic, you tell it exactly which requests to send and how to read the replies; nothing is hard-coded for a specific brand.
Every request is built from a base URL (the device’s address, configured per device) and a path (configured per parameter). For example, with a base URL of ‘https://192.168.10.20/’ and a path of ‘api/v1/recall?preset=3’, the core sends a request to ‘https://192.168.10.20/api/v1/recall?preset=3’. You choose the HTTP method (GET, POST, PUT, PATCH, DELETE), optionally attach headers and a body, and optionally read a value back out of the response.
Configuration
A device is configured on the Setup page of the core’s web UI (and the same fields appear in Reactor’s device-core configuration). These settings are per device — the address and credentials of the specific unit you are talking to.
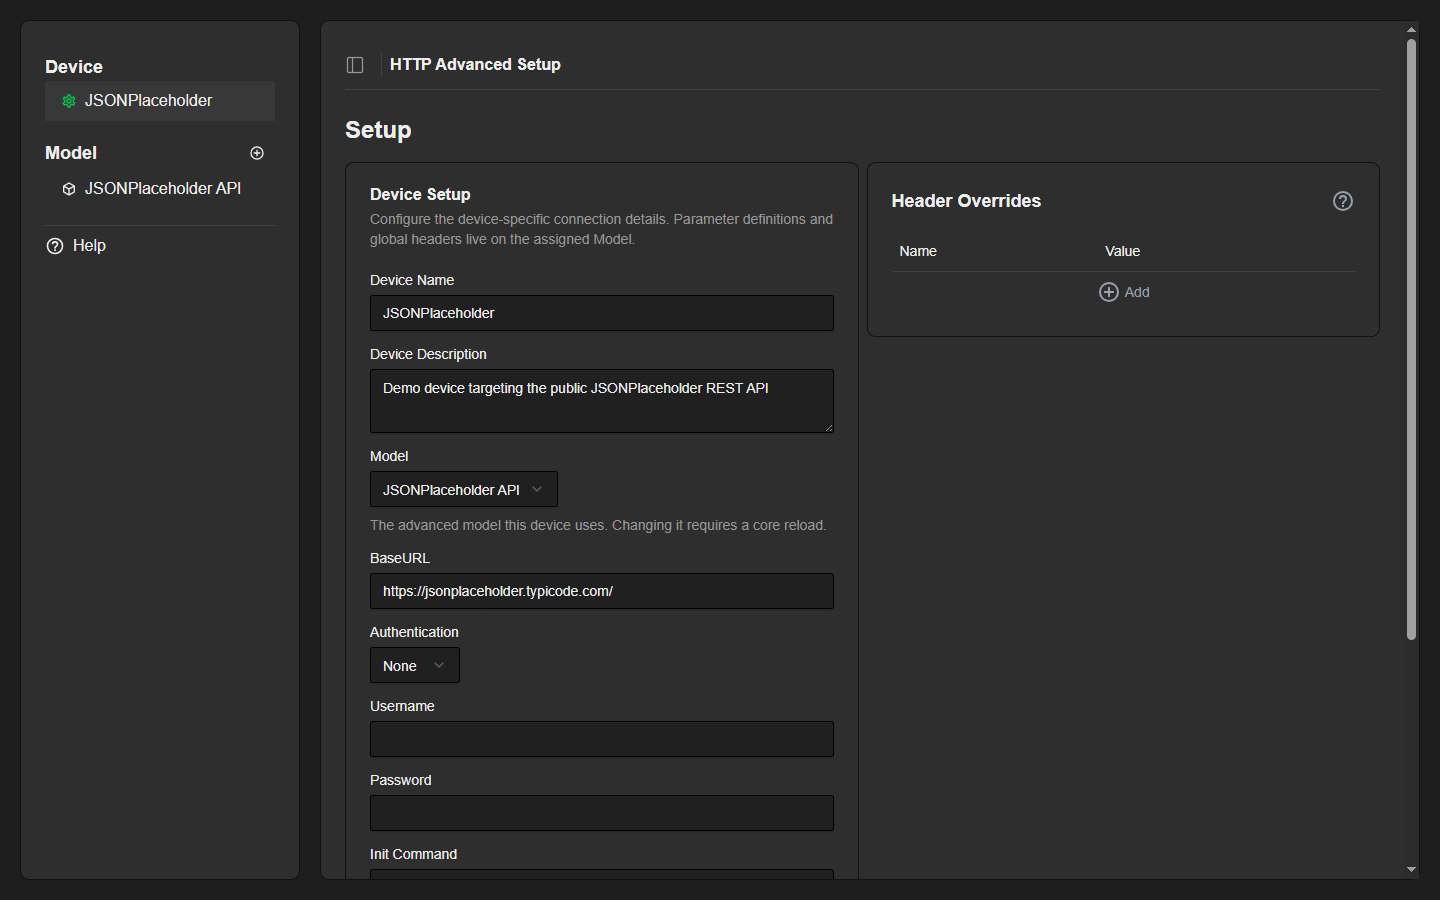
- Device Name / Description
Free text used to identify the device in the UI and in Reactor. - Model
The advanced model this device uses. A model holds the parameter definitions and global headers (see Models & Parameters below). Changing the model requires a core reload. - BaseURL
The domain (and port) of the service, for example ‘https://www.example.com/’ or ‘http://192.168.11.10:8080/’. It must begin with http:// or https:// and end with a trailing slash. You may embed credentials directly as ‘http://user:pass@host/’ for Basic auth. - Authentication
None, Basic, or Digest. For Basic and Digest, fill in the Username and Password fields below. - Username / Password
Credentials used when Authentication is Basic or Digest. - Init Command
A path requested once (as a GET) every time the device connects. Use it to arm or wake a device. Optional. - Login Command
A path requested on connect to obtain a session (e.g. for Digest login). Optional. - Test Command
A path sent (as a GET) when you press the Test button on the device. Pick something whose effect is easy to see on the device. Optional. - Header Overrides
Headers added for this device only, on top of the model’s global headers. Useful for per-unit API tokens. - Allow Insecure TLS (advanced)
Accept HTTPS connections even when the certificate is invalid or self-signed.
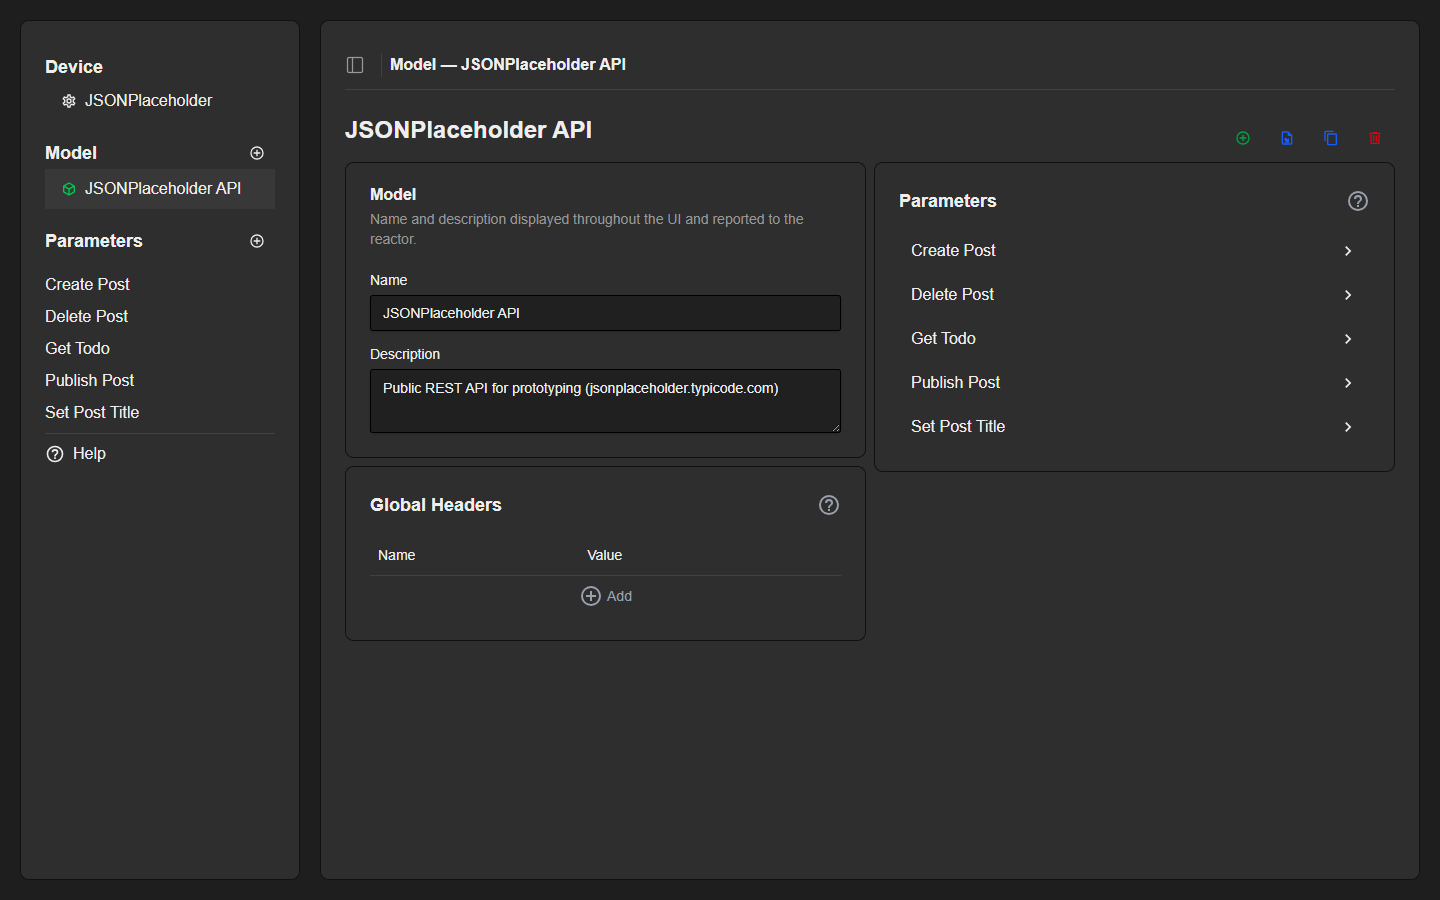
Models & Devices
The core separates what you can control from which unit you control. A Model holds a set of parameters (the individual HTTP requests) plus global headers that apply to all of them. A Device is one physical/online endpoint — it has a base URL and credentials, and it points at a model. Several devices can share the same model, so you define your control surface once and reuse it across many identical units.
Open a model to edit its name and description, manage its global headers, and see the list of parameters it provides. Each parameter links to its own editor.
Two ways to define control
The core offers two mechanisms for defining requests:
- Advanced Parameters — the modern, flexible approach, edited in the web UI and the focus of this article. Each parameter is a fully-described request with typed variables, a body, headers and response handling, and can be exported and imported as a JSON file.
- Stored Commands — a simpler, legacy mechanism configured directly in Reactor’s device-core settings. Good for quick on/off style controls and periodic status polling. See the section near the end of this article.
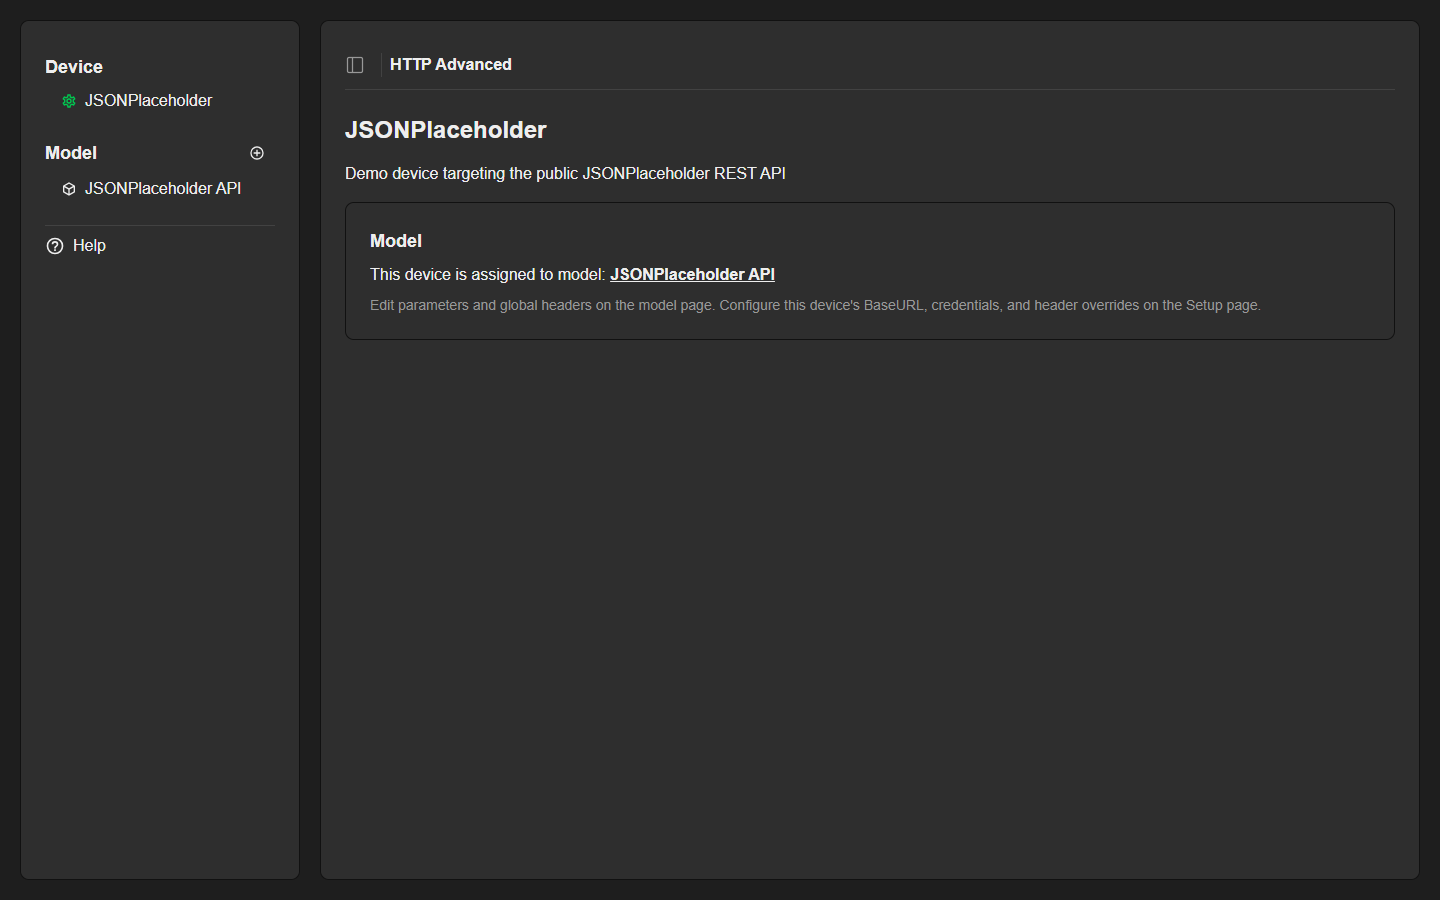
Opening the web UI
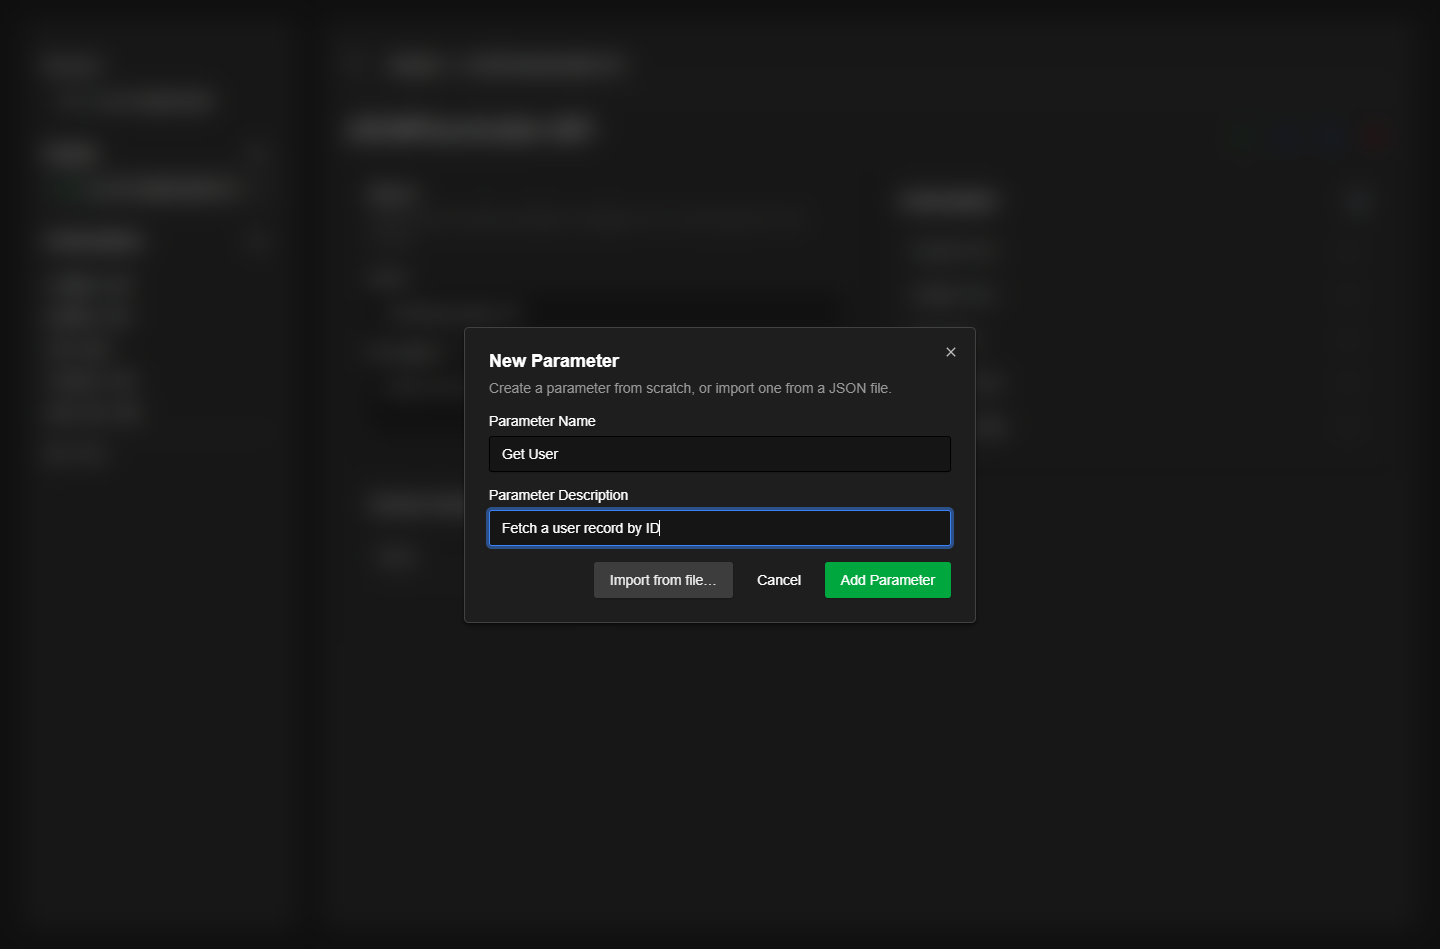
Once a device with a model has been configured, open Reactor and navigate to the Packages menu. Find the HTTP core package and use the button to open its UI. (When running standalone, the UI is reachable at ‘{core address}/app/core-protocol-http/{device id}’.) From here you create, edit, test, import and export parameters.
The parameter editor
Each parameter is a single HTTP request. The editor is split into cards; the left column describes the request, the right column describes how the parameter behaves and which variables it uses.
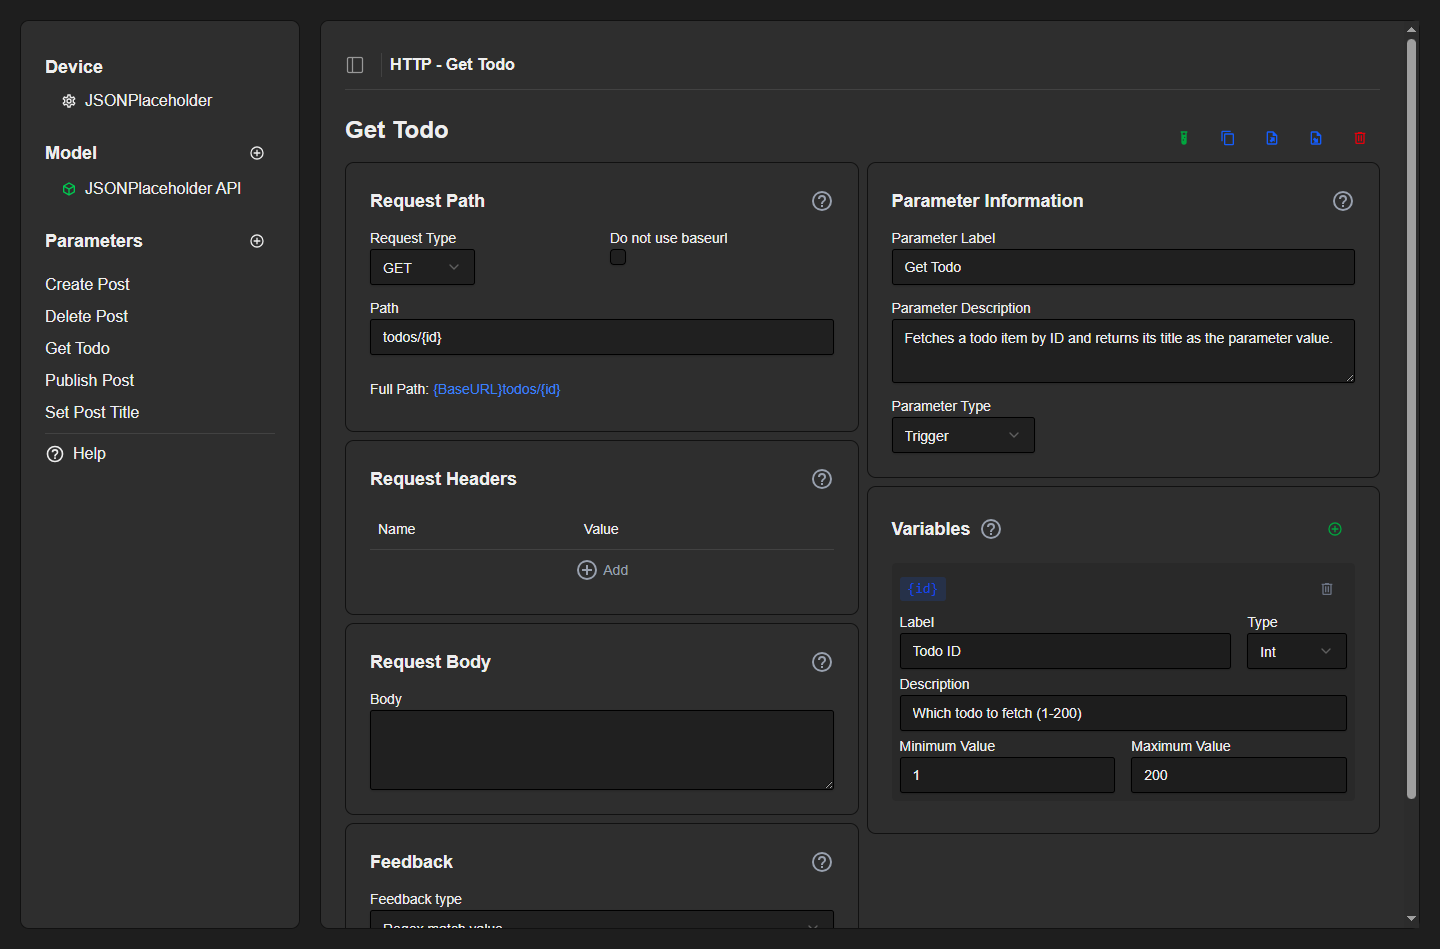
Request Path
- Request Type — the HTTP method: GET, POST, PUT, PATCH, DELETE, or Variable. Choosing Variable lets the operator pick the method at runtime in Reactor.
- Do not use baseurl — when checked, the path must be a full absolute URL; otherwise the path is appended to the device’s BaseURL. The Full Path line previews the result.
- Path — the endpoint, e.g. ‘todos/{id}’. You can embed placeholders such as
{value}or{id}(see Variables). To send a literal brace, escape it as\{or\}.
Request Headers
- Add HTTP headers as key/value pairs, e.g.
Content-Type: application/jsonor an API token. - Headers can also be set globally on the model and overridden per device. Precedence, highest first: parameter header → device override → model global header.
Request Body
- The payload sent with POST, PUT or PATCH. Enter JSON, XML or any format the API expects.
- Use placeholders like
{value}or{id}to insert dynamic data, e.g.{"title": "{value}"}.
Parameter Information
This defines how the parameter appears and behaves in Reactor.
- Label / Description — display name and help text shown in Reactor.
- Parameter Type:
- Trigger — a button that fires the request once when pressed.
- Toggle — an on/off switch. The value
{value}becomes the On Value or Off Value you specify (default true/false). - String — a text field; the text is available as
{value}. - Integer / Float — a number field with a Min/Max range; the number is available as
{value}.
Variables
Any {tag} you type into the path, body or a header is detected automatically and listed as a variable for you to configure. Each variable becomes an input the operator can set in Reactor.
{value}— the built-in main value of the parameter; present for every type except Trigger.- Custom variables — use
{anyName}anywhere in the request. For each, set a Label, Type (String, Int, Float, Binary), Description and (for numbers) Min/Max. - Placeholder matching is case-insensitive. Click a variable’s blue chip to insert its placeholder where you are typing.
The example below shows a POST parameter that builds a JSON body from three variables and sends a Content-Type header.
Feedback
Feedback controls whether and how the device’s response is reflected back in Reactor.
- None — fire-and-forget; the value is assumed applied.
- Confirm on status 2xx — the value is confirmed only when the HTTP status is 200–299.
- Regex match value — a regular expression is run on the response body and the last captured group becomes the parameter’s value. Use this to read state back out of JSON, XML or text.
- Confirm on regex match — the value is confirmed if the regex matches anything in the response.
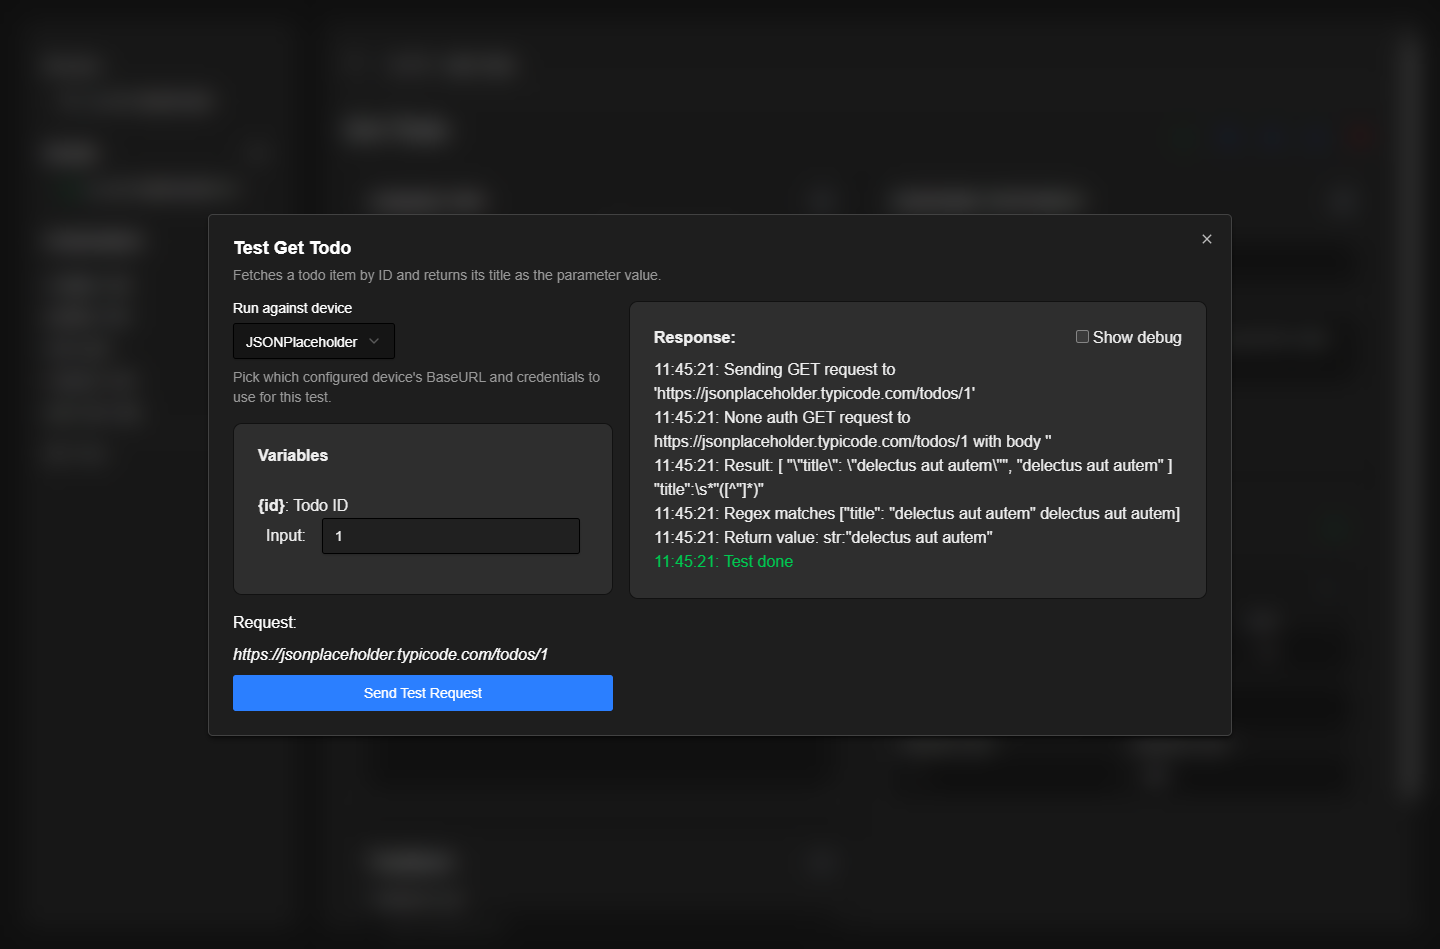
Testing a parameter
Use the Test button (the green test-tube icon at the top of the parameter editor) to fire the request against a real device and see the response — before you ever touch a controller. Pick which configured device to run against, fill in any variables, and send. The response pane shows the request that was sent, the raw reply, any regex matches and the resulting value.
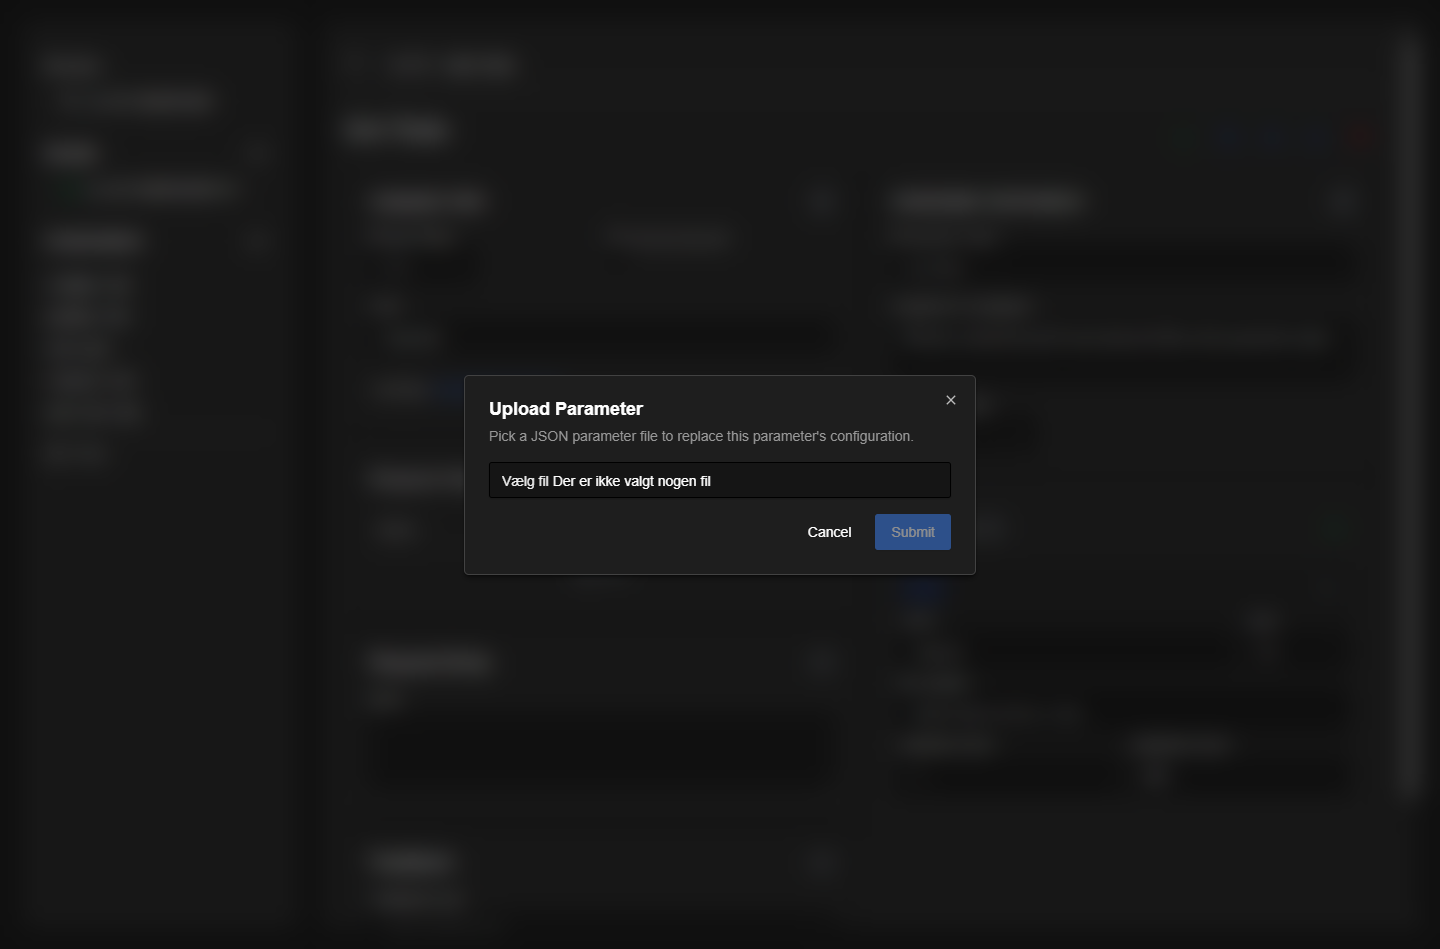
Importing & exporting parameters
Any parameter can be exported to a .json file and imported again — on the same core or a different one. This makes it easy to back up your work, share parameters between models, or build a library of ready-made integrations.
- Export — the export icon on a parameter downloads it as ‘{Label}.json’.
- Import as a new parameter — on a model page, use Import parameter (or Add parameter → Import from file…). You can select several files at once.
- Import over an existing parameter — the import icon on a parameter replaces its configuration with the uploaded file.
- The file name becomes the parameter label — e.g. importing ‘Recall Preset.json’ creates a parameter called Recall Preset.
Generating parameter files with AI
Because parameter files are plain JSON with a small, well-defined structure, you can have an AI assistant write them for you. We provide a companion document — LLM.md — that fully describes the file format, the rules and several worked examples. Paste that document into an assistant such as Claude, then paste your device’s API documentation and ask it to produce one importable .json file per action. Save each file under the name you want the parameter to have and import it as above.
Example walkthrough — controlling a public REST API
This example uses the free, public testing API at ‘https://jsonplaceholder.typicode.com/’, so you can reproduce every step yourself. Five ready-to-import files are attached to this page; import them, or build them by hand following along.
1. Create a device. On the Setup page, set the BaseURL to ‘https://jsonplaceholder.typicode.com/’, leave Authentication as None, and assign it to a model (create one if needed).
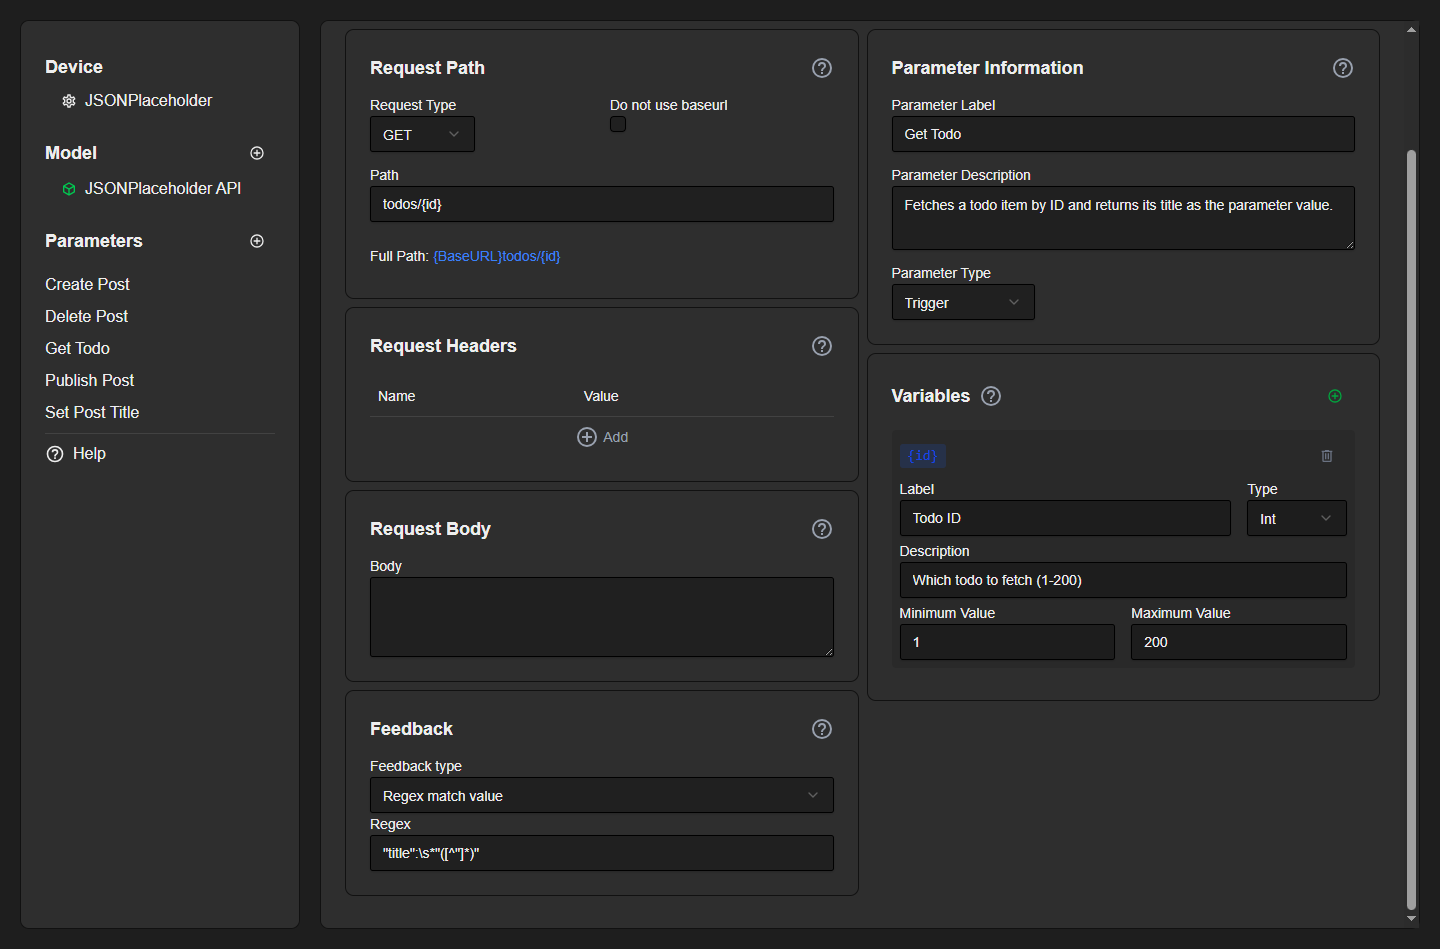
2. Add a read-back trigger — ‘Get Todo’. A button that fetches a todo by ID and surfaces its title.
- Request Type: GET, Path: ‘todos/{id}’
- Type: Trigger
- Variable {id}: type Int, range 1–200
- Feedback: Regex match value with regex
"title":\s*"([^"]*)"
Pressing Test against the device returns a real todo and extracts its title, e.g. “delectus aut autem”.
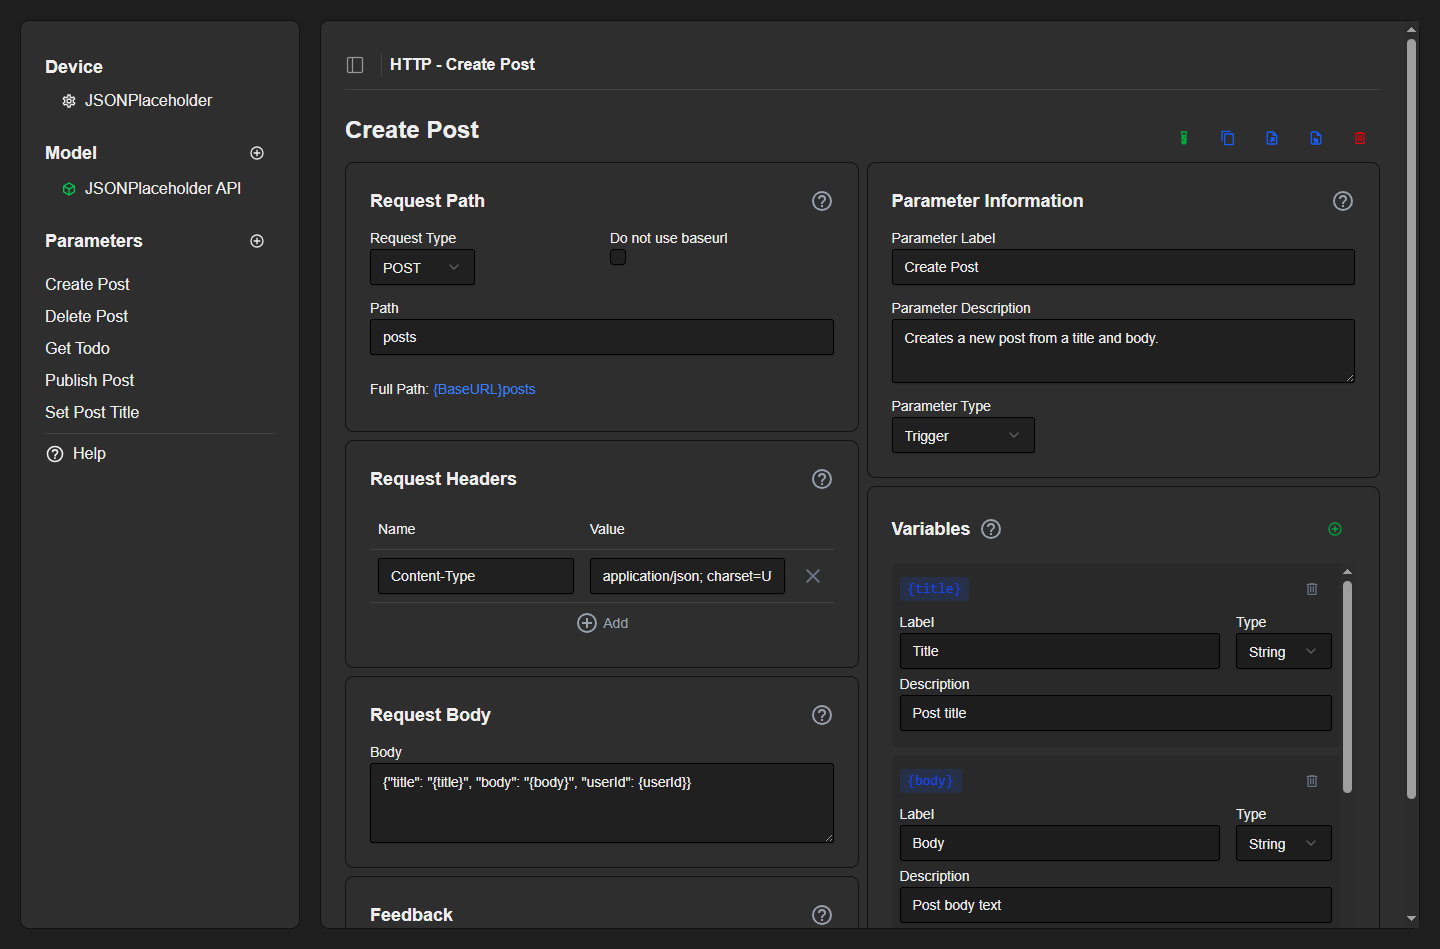
3. Add a POST with a body — ‘Create Post’.
- Request Type: POST, Path: ‘posts’
- Header:
Content-Type: application/json; charset=UTF-8 - Body:
{"title": "{title}", "body": "{body}", "userId": {userId}} - Variables: {title} and {body} (String), {userId} (Int 1–10)
- Type: Trigger
4. Add a string value — ‘Set Post Title’. A text parameter whose value is PUT to the API.
- Request Type: PUT, Path: ‘posts/{id}’, Body:
{"title": "{value}"} - Type: String; Feedback: Confirm on status 2xx
- Variable {id}: Int 1–100
5. Add a toggle — ‘Publish Post’. An on/off switch that sends a different value for each state.
- Request Type: PUT, Path: ‘posts/{id}’, Body:
{"id": {id}, "published": {value}} - Type: Toggle; On Value true, Off Value false
- Variable {id}: Int 1–100
6. Add a delete trigger — ‘Delete Post’. Request Type DELETE, Path ‘posts/{id}’, Type Trigger, variable {id} (Int 1–100).
After adding parameters you may be prompted to Reload Core to push the changes to Reactor; make all your edits first, then reload once.
Stored Commands (legacy)
Stored Commands are a simpler mechanism configured directly in Reactor’s device-core settings (not the web UI). Each stored command provides a small set of fixed parameters and is handy for basic on/off control and periodic status polling.
- Label — feeds the read-only Label parameter.
- Request Type — GET, POST, PUT, PATCH or DELETE.
- Command A / Command B — two request paths. The Command Toggle A/B parameter sends A when switched on and B when switched off; Command A and Command B are also exposed as one-shot triggers.
- Header / Body — JSON-encoded header fields and request body. Bodies support positional substitutions (e.g.
\d1,\d2) fed by the Parameter 1 / Parameter 2 meta values. - Matching Return Value — a regular expression run on the reply; the last captured group is published to the Status parameter.
- Periodic Request — if greater than 0, the command is sent automatically on this interval (in seconds), which is the usual way to poll a device for its current status.
There is also a free-form Cowboy Trigger parameter for one-off requests, where the method, path, body and header are all supplied at runtime in Reactor.
See this page for more info.
Reference
Request methods: GET, POST, PUT, PATCH, DELETE, and Variable (operator chooses at runtime).
Parameter types: Trigger, Toggle, String, Integer, Float.
Feedback types: None; Confirm on status 2xx; Regex match value; Confirm on regex match.
Placeholders: {value} is the parameter’s own value (all types except Trigger); {tag} is a declared variable; escape a literal brace as \{ or \}.
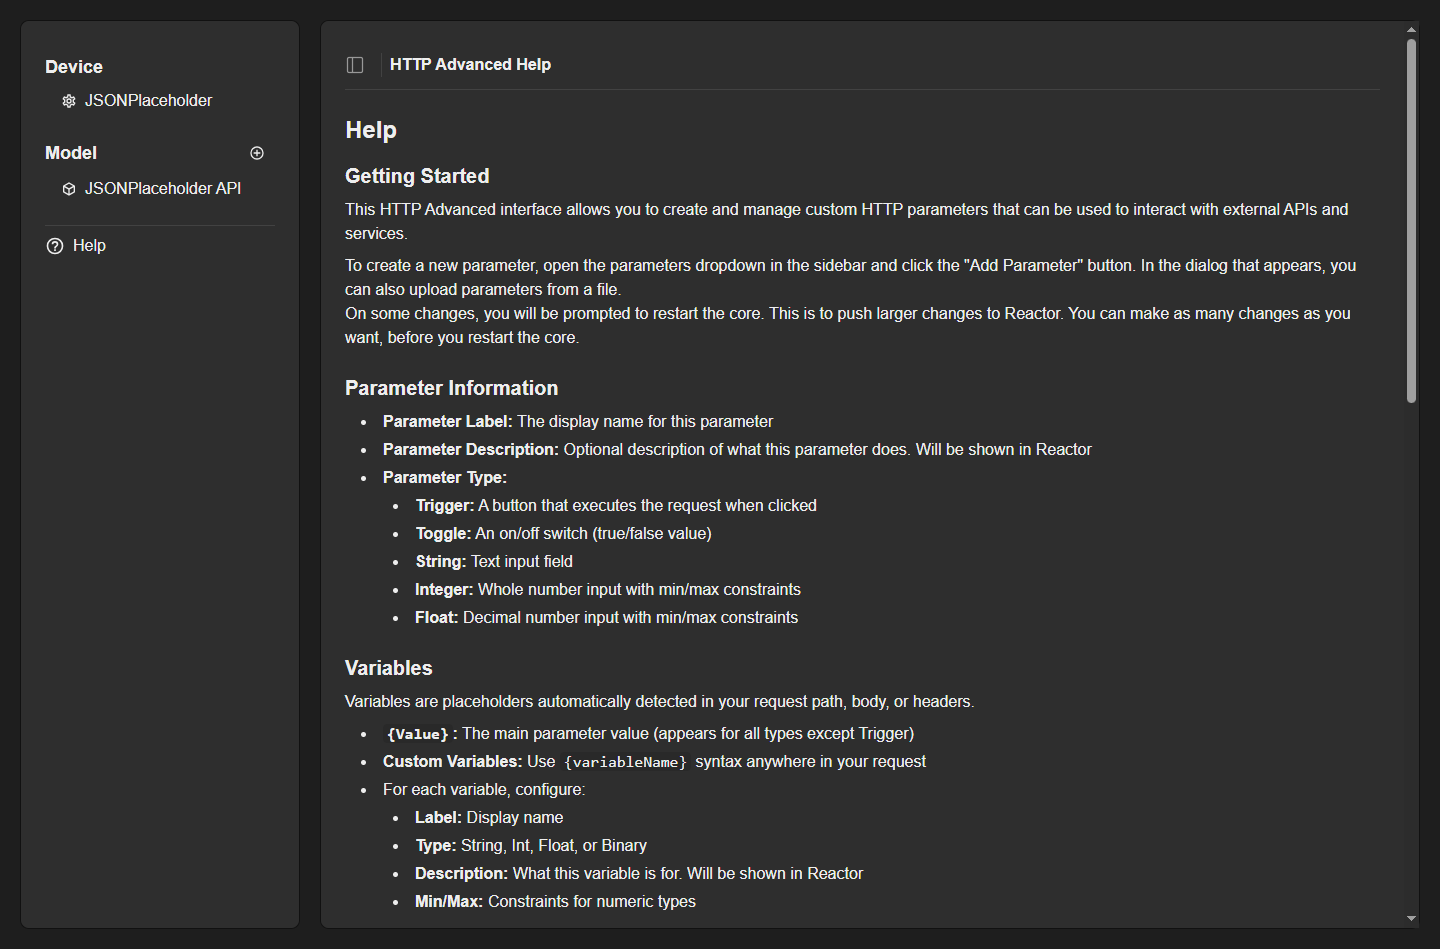
The web UI also has a built-in Help page summarising parameter types, variables and feedback for quick reference while you work.