HTTP Device Core
The HTTP Device Core for Blue Pill, core-protocol-http, allows users to send and to some extend receive and process information via HTTP requests. Effectively, this can help to bridge communication with devices with RESTful APIs where a dedicated device core is not available.
The device core has a basic mode and some more complex features that can come in handy in some cases. It has been designed to align with the feature set of the corresponding HTTP Client device core on the UniSketch platform, but it's far more robust and easy to extend to include new approaches.
Basic Configuration
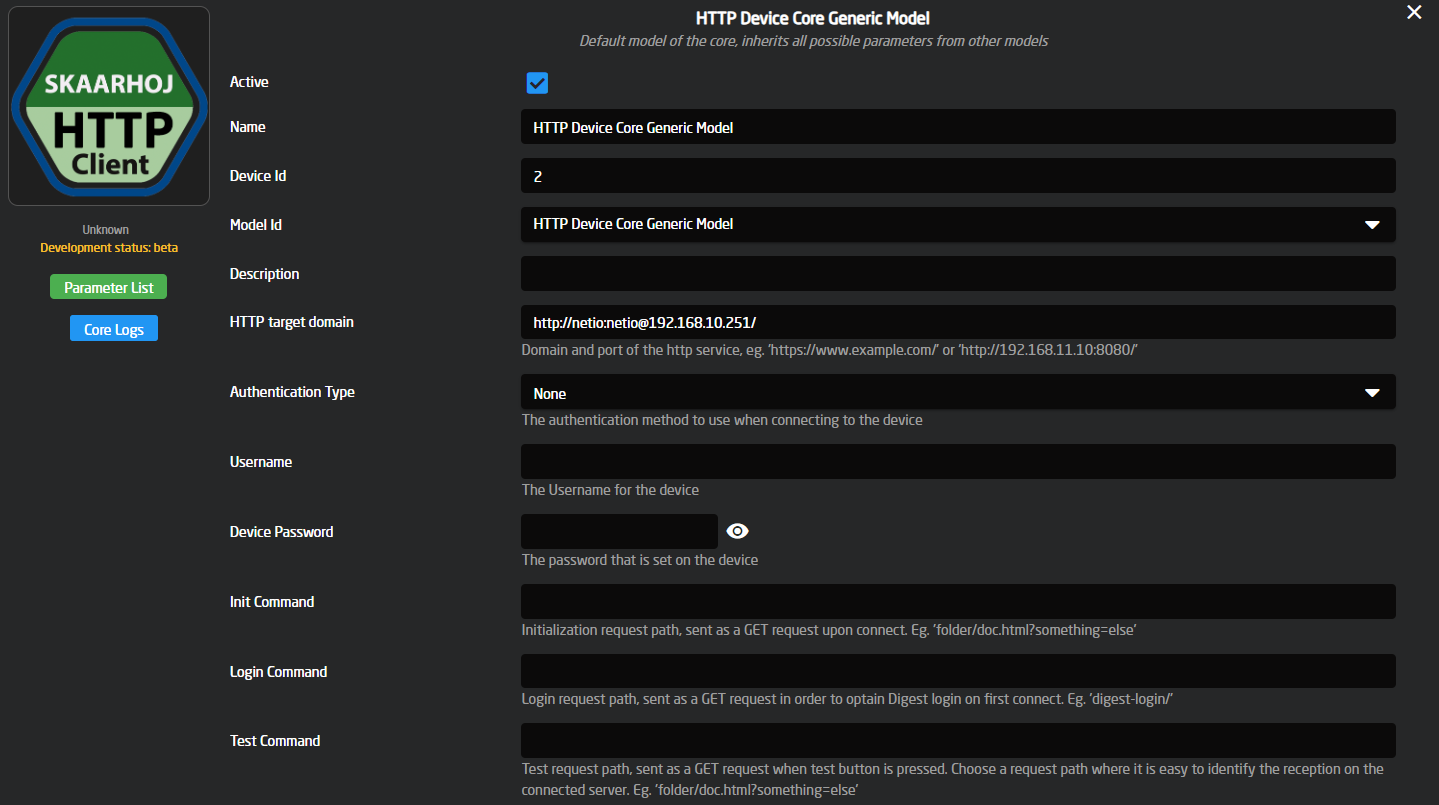
Each device in the device core has the usual configuration available. Looks like this:
-
The HTTP Target Domain is set up here. All individual commands will consist of paths under this domain. Notice that the username and password are also entered here in clear text.
- The Init Command is a path under the HTTP Target Domain to be requested in a GET request as the core initializes.
- The Login Command is the path under the HTTP Target Domain to be requested as a GET request to get the DIGEST login nonce, used to log in to the device on the first request sent. (if none the HTTP Target is used as is)
- The Test Command is a path under the HTTP Target Domain to be requested in a GET request when the Test trigger is activated (that's typically available as a button in Reactor).
- Authentication Type defines the type of authentication (login) that your device uses, if you have a username and password defined as part of the HTTP Target Domain then that will overwrite this and be used instead, this field is also only relevant if the username and password are specified below it.
- Username is only used if the Authentication Type is set, and will also get ignored if the username and password are specified in the path
- Password is only used if the Authentication Type is set, and will also get ignored if the username and password are specified in the path
Cowboy Style
The most straight forward way to use the device core would be to send one-shot triggers cowboystyle. This requires only a minimum of configuration but provides the least amount of long term convenience. This is probably a good place to get started.
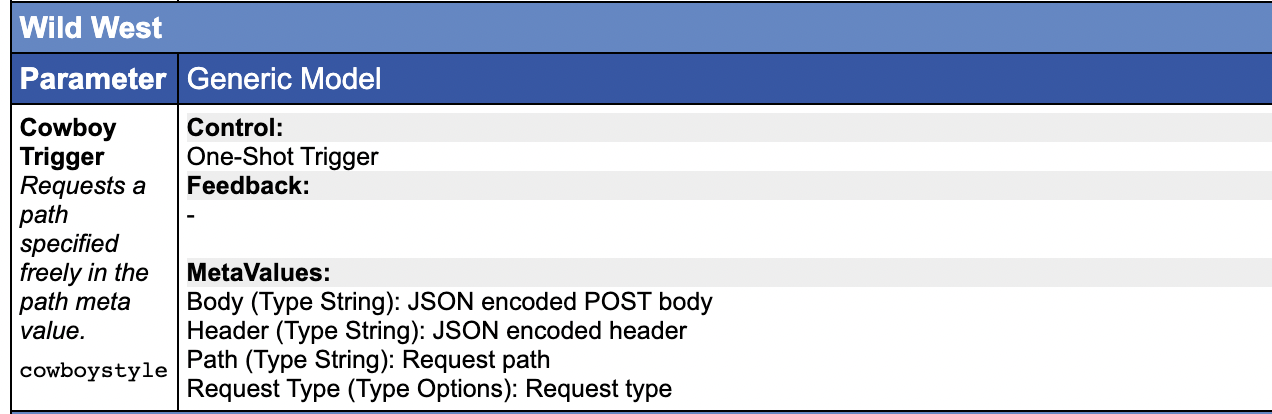
Notice the meta values here - they are essentially the configuration for the individual requests.
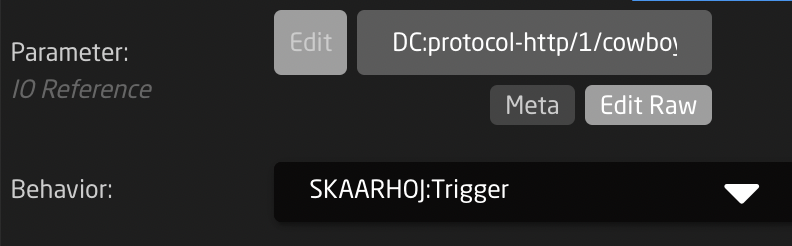
Adding a Cowboy Trigger to a panel is basically a matter of combining this parameter with a SKAARHOJ:Trigger master behavior:
The Meta value fields are the key to the whole thing. They would look like this:
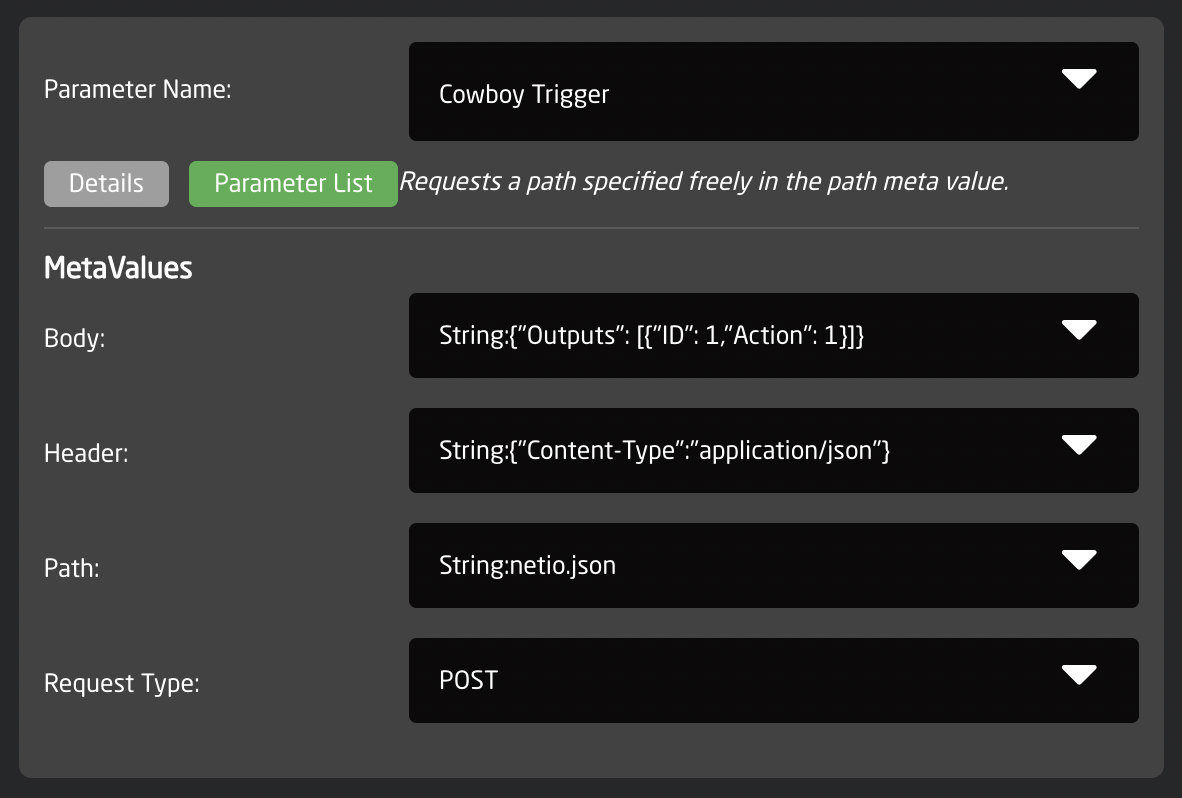
- The Path meta value is the path under the HTTP Target. Here it is "netio.json", could be "directory/file.ext?id=value&...." etc.
- The Request Type is the type of HTTP request. Standard is GET, but POST, PUT, PATCH, DELETE are other options you can use here.
- The Header shall be a JSON object where each key in the object corresponds to an HTTP header that will be set for the request
- The Body shall be any content that is used as the body in the requests as they support it. This is used for POST requests.
The meta fields are in fact so called IO references in Reactor and that means you can insert references to device cores, variables, constants etc. For example, some of these values could be derived from a constant like "Behavior:Const:Body". This is important because the value gets parsed and pasting pure JSON into these fields won't work, so to make sure a complex string like JSON gets correctly picked up, it must be prefixed "String:" as you see in the examples.
Now, go have fun, shoot from the hip and see how far you get that way... :-)
Command Configuration
The device core allows you to configure a number of fixed commands too. The advantage is that you can bundle an A and B command into a single action for toggles etc. Also, this is the way you can use meta values with the \p1,\p2, ... placeholders etc. like you can for the TCP and UDP device cores. Finally, it's actually possible to decode some level of status back from the returned content of the device via a regular expression.
Below you see the example from the cowboy style trigger, but with some level of parameterization applied now:
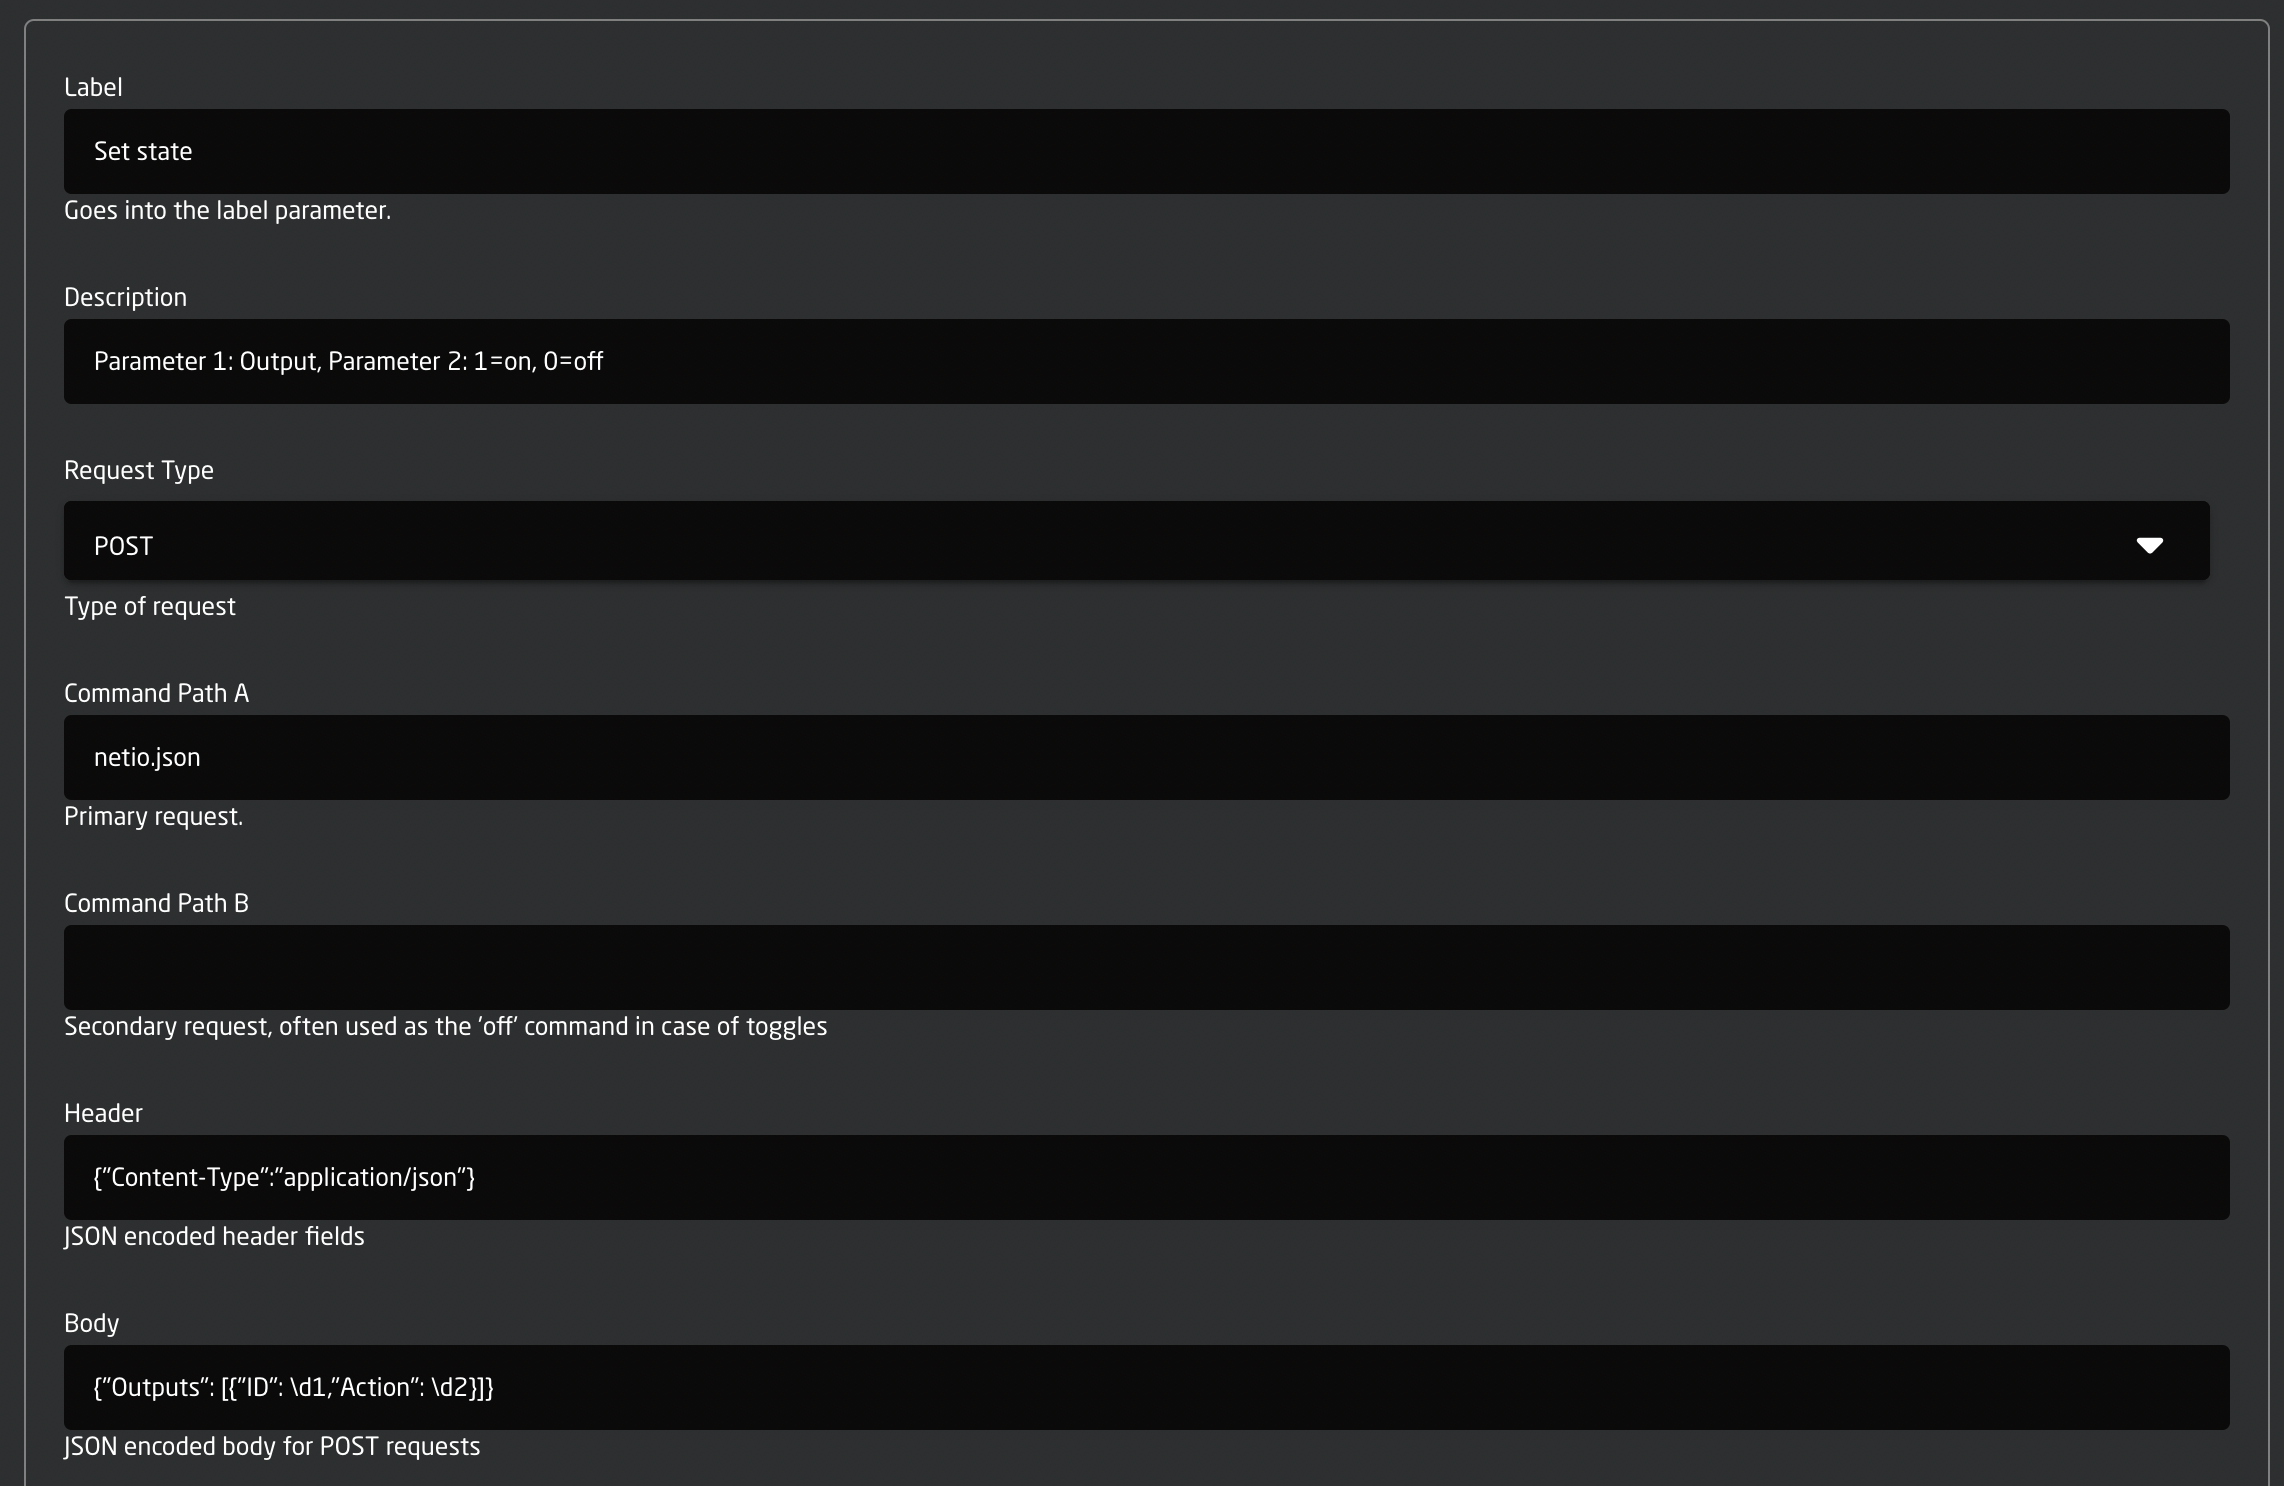
- The Label field will be set as a fixed value in the device core so you can import it as a label in Reactor. This could be used as a title in Reactor.
- The Command Path A and B are available to easily create toggle functionality. In this case, Command Path A is set to "netio.json"
- Header is straight forward JSON content type.
- The Body field has new features: The \d1 and \d2 are two placeholders that allow us to import values from the meta fields of the device core parameters we will use for the fixed commands, namely Toggle, On Trigger and Off Trigger
In reactor this can be applied to a button in this way:
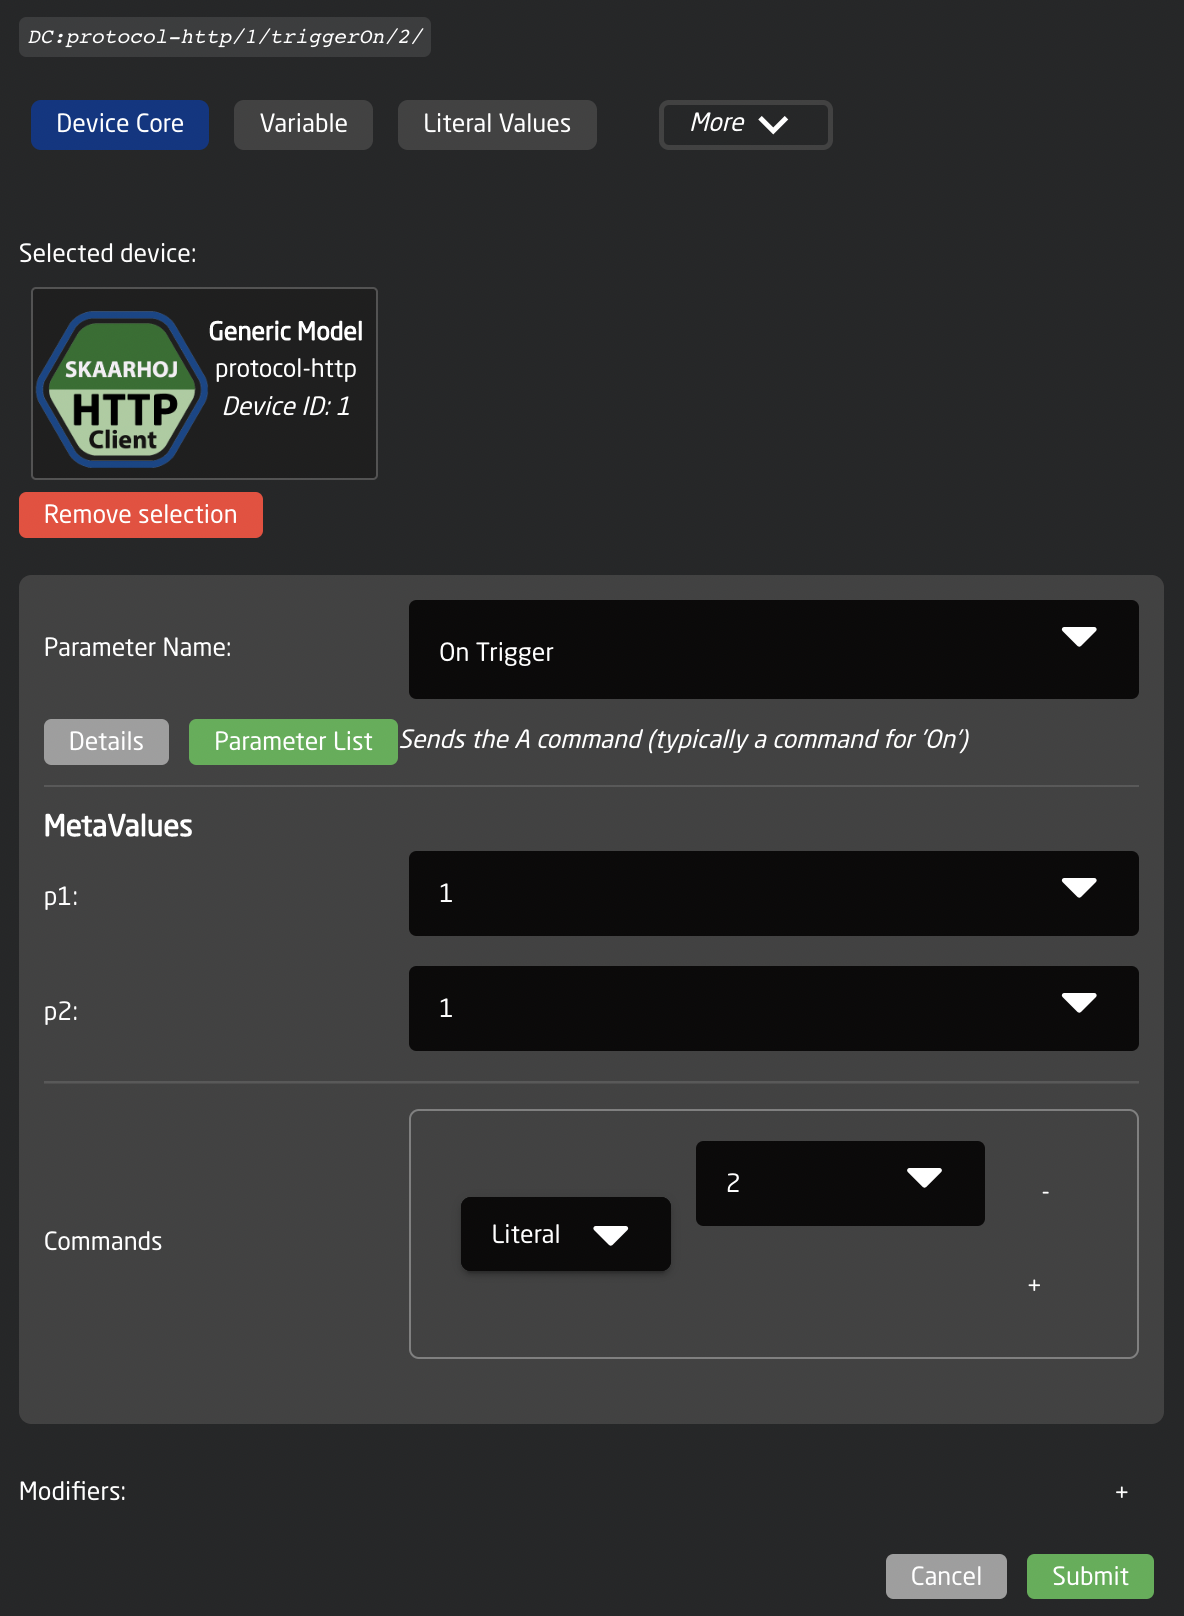
- The values for p1 and p2 are 1 and 1. p1 is the ID of the feature we want to turn on and p2 = 1 is the same as "on" according to the protocol.
- Commands has the value 2 and that is the number of the command from the configuration.
So to make a similar trigger for off, we can use the same command (2) but change the value of "p2" to 0 instead.
Parsing response and periodic requests
It's possible to parse the response of any request and let a matching part of that response get stored in the device core. This is done by the Matching Return Value field that contains a regular expression. You can study the format of regular expressions elsewhere, but they are basically very powerful and advanced string matching patterns.
Whenever the device core receives feedback from the server it will run the regular expressions set up for the command and if there is a match, it will take the value in parenthesis and store as the status value in the corresponding Status parameter. It's both possible for triggered requests as well as for periodic requests.
Here is an example:
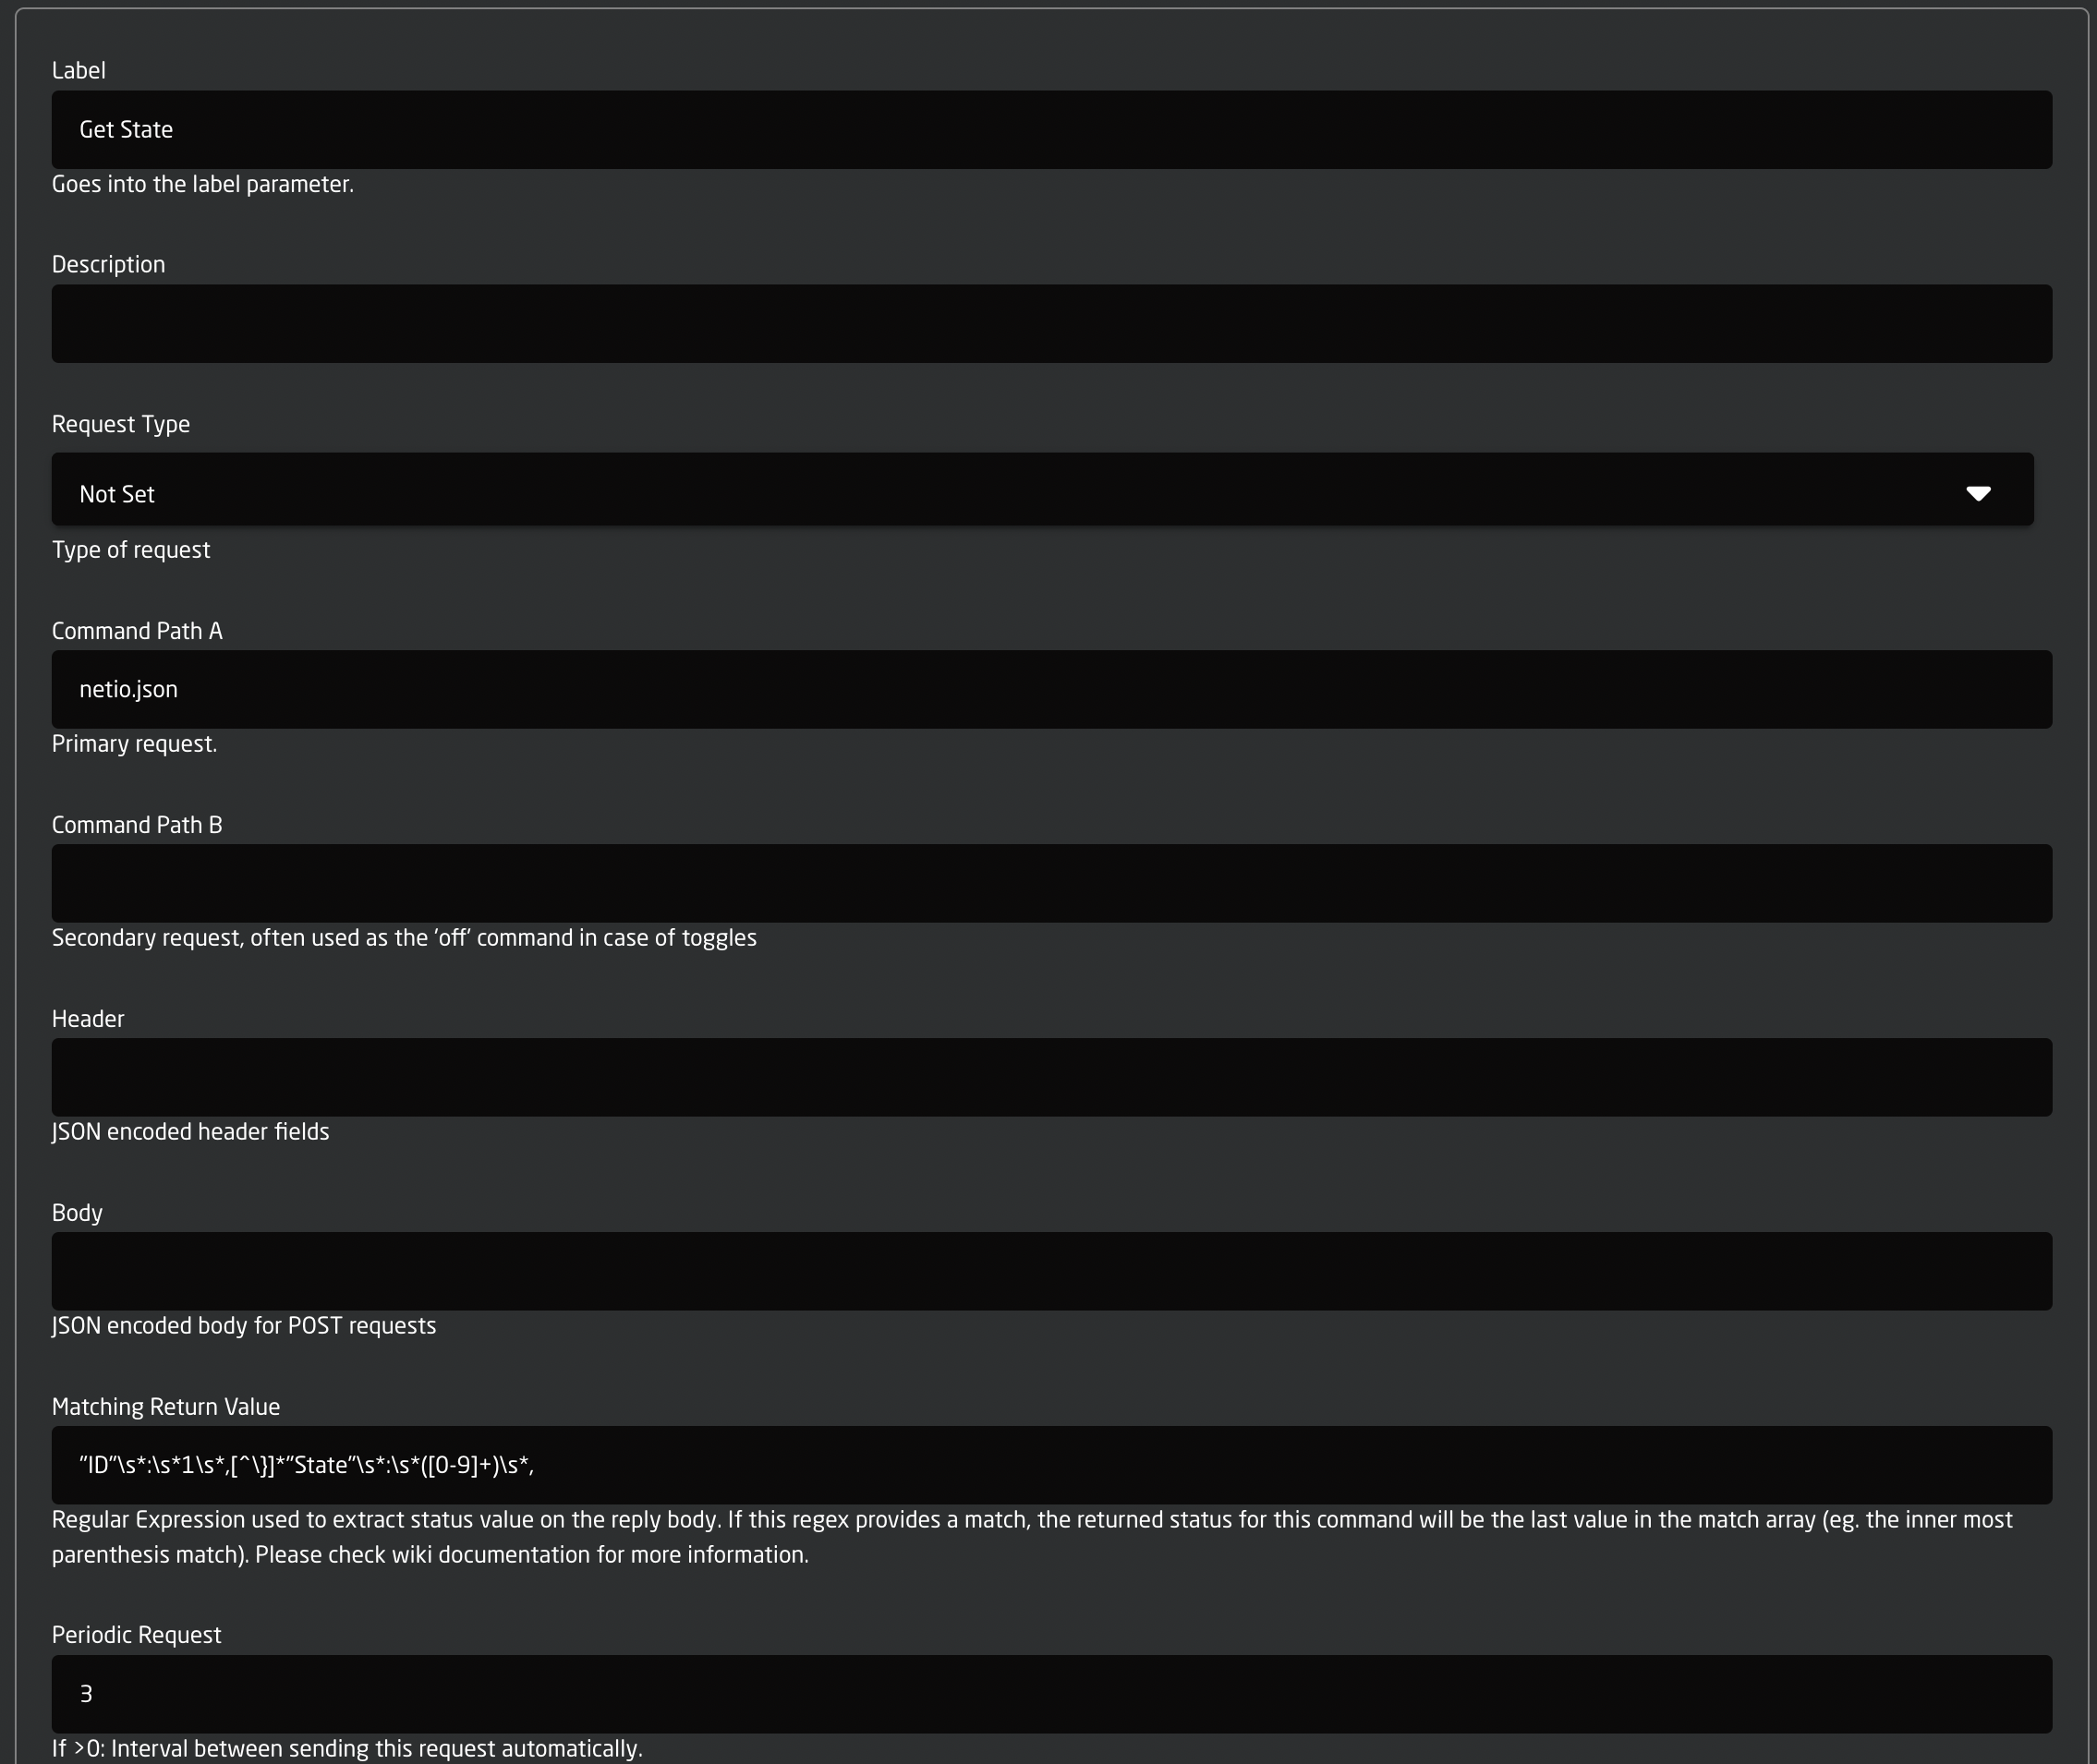
- Generally, it's really simple. The path is "netio.json", the request type is not even set (so it defaults to GET) and there is no header or body.
- The Matching Return Value is "ID"\s*:\s*1\s*,[^\}]*"State"\s*:\s*([0-9]+)\s*, - yes, that's true. Explained a bit more below...
- The Periodic Request is 3 - so every three seconds we will call this URL, parse it and store the contents in the Status parameters for this command.
Now, the return body from this request would look this way:
{
"Agent":{"Model":"3PF","DeviceName":"PowerBOX-E7","MAC":"24:A4:2C:38:DF:E7","SerialNumber":"24A42C38DFE7","JSONVer":"2.2","Time":"1970-01-01T16:51:29+01:00","Uptime":13889,"Version":"2.4.3","OemID":300,"VendorID":0,"NumOutputs":3},
"Outputs":[
{"ID":1,"Name":"PTZ (T8)","State":1,"Action":6,"Delay":2020},
{"ID":2,"Name":"Power output 2","State":0,"Action":6,"Delay":2020},
{"ID":3,"Name":"PoE Switch","State":0,"Action":6,"Delay":2020}
]}
And the regular expression will match exactly the portion of this JSON response that is highlighted in red. All the "\s*" is precautions to make sure any whitespace doesn't throw our parsing off, and there is an assumption that the ID attribute comes before the State attribute, but otherwise it should be a good example of how a regular expression can be built to provide some robustness towards variations. In the above case we have to bypass the Name attribute for example.
The main point is that the value of the State attribute is what we are after, but only when found for ID 1. To capture that value, we enclose it in parenthesis: "....([0-9]+)...."
And this happens every three seconds, so we are essentially monitoring the device for state change - on a single feature! And this also underlines the reason why SKAARHOJ generally integrates device cores custom to each device: There is just not efficient way to get all the state from any device by manually building up a ton of such expressions, capturing only one aspect at a time. And feedback from devices is the holy grails of quality integrations that are not simple pray-and-forget approaches to control.
But... now you have got it for the occasional case where there is only this type of "workaround" to get the job done.
Placeholders
The Body and the Path of requests are subjected to placeholders (see also the TCP and UDP device cores):
- \n and \r will send a newline or carriage return (bytes 10 and 13)
- \xHH will send a byte with the value HH (in hex): so \xFF will send a byte with value “255”, for more than one byte, apend the number of bytes up to 8 after the backslash, like this: \4xFFFFFFFF this will send: [255 255 255 255] and \2xFFFF will send [255 255] (remember 2 characters to one byte).
-
\p1 or \p2 (alternatively \d1, \d2, \h1, \h2) will insert a parameter value as defined by the meta value p1 and p2 in the device core parameters Toggle, On Trigger and Off Trigger.
The difference between using \p, \d and \h is whether the meta value is inserted as the byte value (\p), inserted as a decimal number like “255” or “37” or “3” (\d - there are no leading zeros) or in hexadecimal like FF or D0 or 00 (\h - in this case, it’s always two characters and uppercase). Using \p is limited to one byte, so 0-255 values, both \d and \h will scale to support any int value up to 32 bits. - \d1, \d2, \h1 and \h2 support appending 0's to conform to always sending a set number of digits or bytes. to do this add the number of digits in front of d and h, this also effectively limits your max value to the set amount of digits. The command structure is like this: \<0-9>d<1-2> so if we want to send the decimal value 255 with 4 digits from param1 we use \4d1 and it will send 0255 and the same for hex, using \4h1 we will get 00FF sent in the message. using \0d1 or \0h1 is the same as not using a number and will just scale to the minimum needed to show your value with no leading 0's
- \s1, \s2 In core v1.0.5-pre1 and newer: this will parse the value as a raw string, if you need to escape it for use in the Path A or Path B URLs, please do that before filling in the value, other than that it should be supported in all of the data fields.