Using Densitron UReady 1U and UReady 2U Displays for with Raw Panel
As already showcasedThe here, with SKAARHOJ'sSKAARHOJ xpanel-touch package for our controllers,allows users canto create browser-accessible software UIsUIs, accessible through browsers, which appearappearing on the local network as Raw Panel devices.
Densitron Productpresents rangecompelling cantouch offerscreen someoptions interestingfor options:use with xpanel-touch. Their rack-mountable designs are notable. Additionally, certain screens come equipped with an internal computer, enabling direct web browser operation on the screen without requiring an external driving computer.

OneOptions couldinclude:
- Build a
smallcompact“rack”"rack" style touch panelwithusing a 1RU USB display and a RaspberryPi,Piordrivingjustit. - Choose
witha 2RU unitwhichwithalreadyanhasintegratedacomputer.
This in.guide will assist in quickly setting up such configurations.
ThisUReady document1U will+ help you to quickly build such setup.
1. 1RU+Raspberry Pi4Pi setup.
4 setup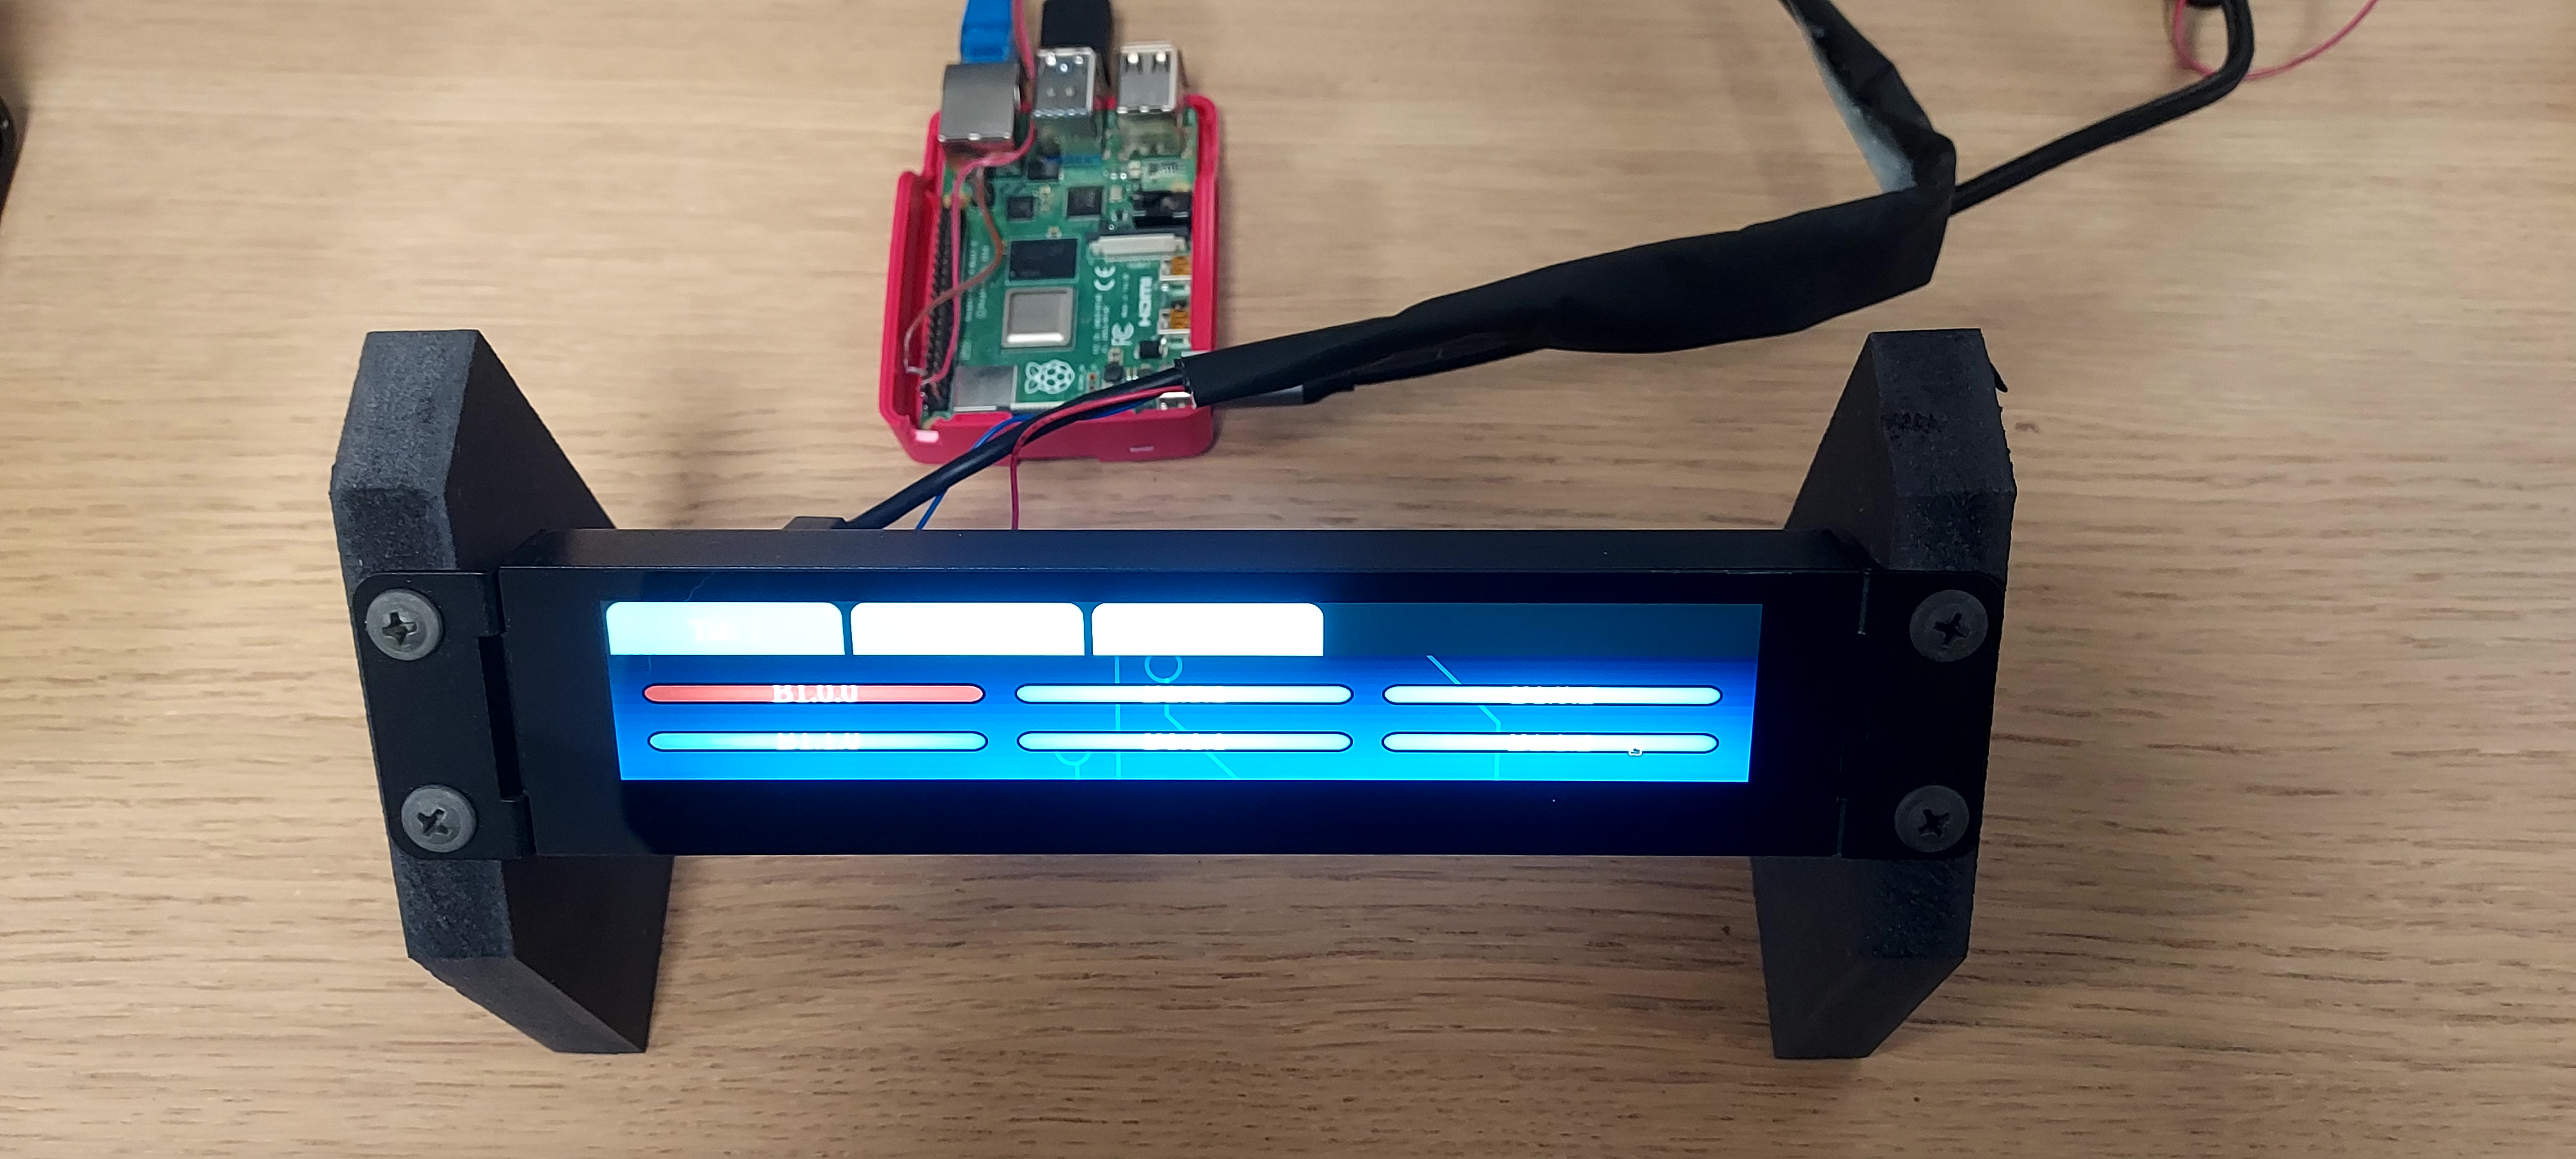
Prerequisites :
Raspberr yRaspberry Pi 4PSU5V/3A PSU withtypeUSB Type C cable- DM-066GN-OPUR01
1RUUReady 1U Single Monitor - microSD card for the operating system
- USB keyboard/mouse
*(only needed during initial setup) - Monitor
*(only needed during initial setup) - USB FlashDrive (
optional)*
*neededoptional, only needed during initial setup
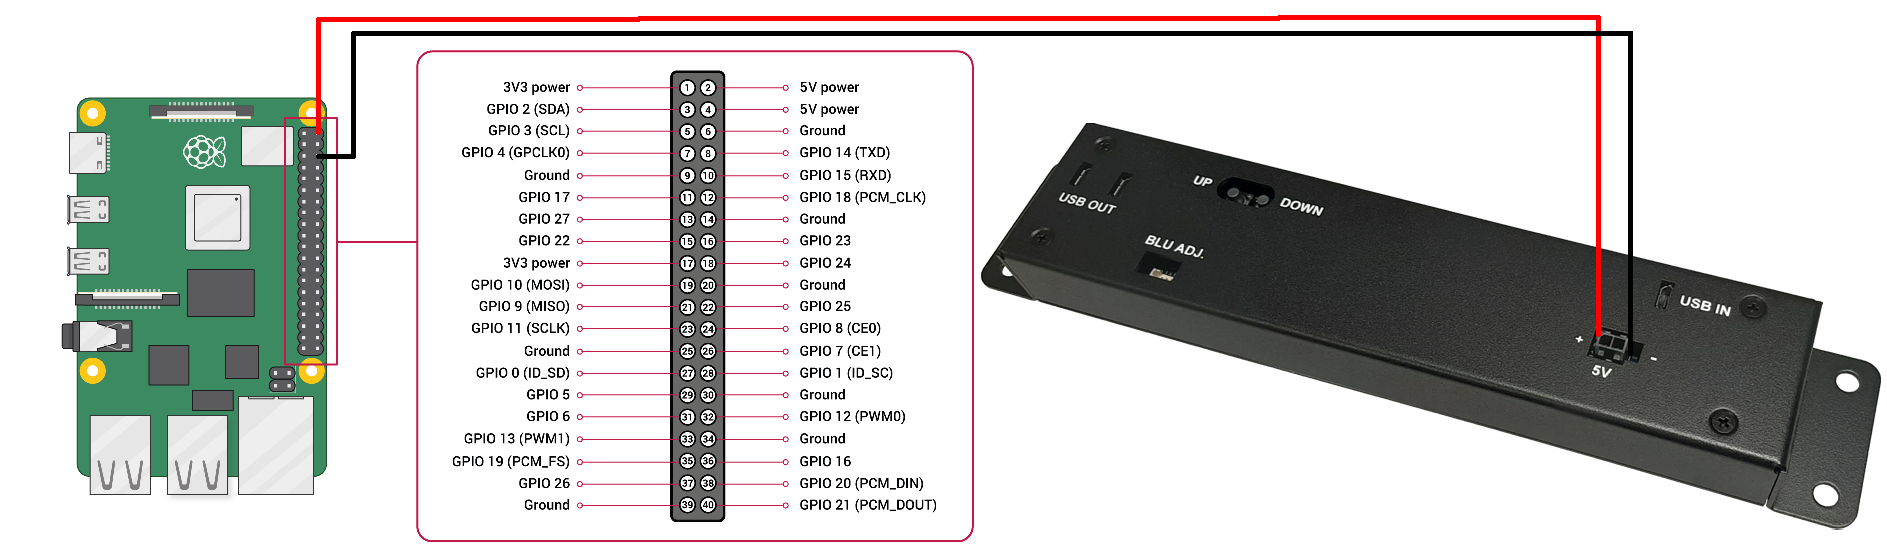
Extra Power for Densitron Screen
UnfortunatelyIt has been observed that powering the Densitron screen justsolely usingvia USB seemed tocan be unstable,unstable. soTo resolve this, we encouragerecommend tothe makefollowing this little "tweak" in ordermodification to provide moreadditional power to the Densitron screen.screen:
- Prepare
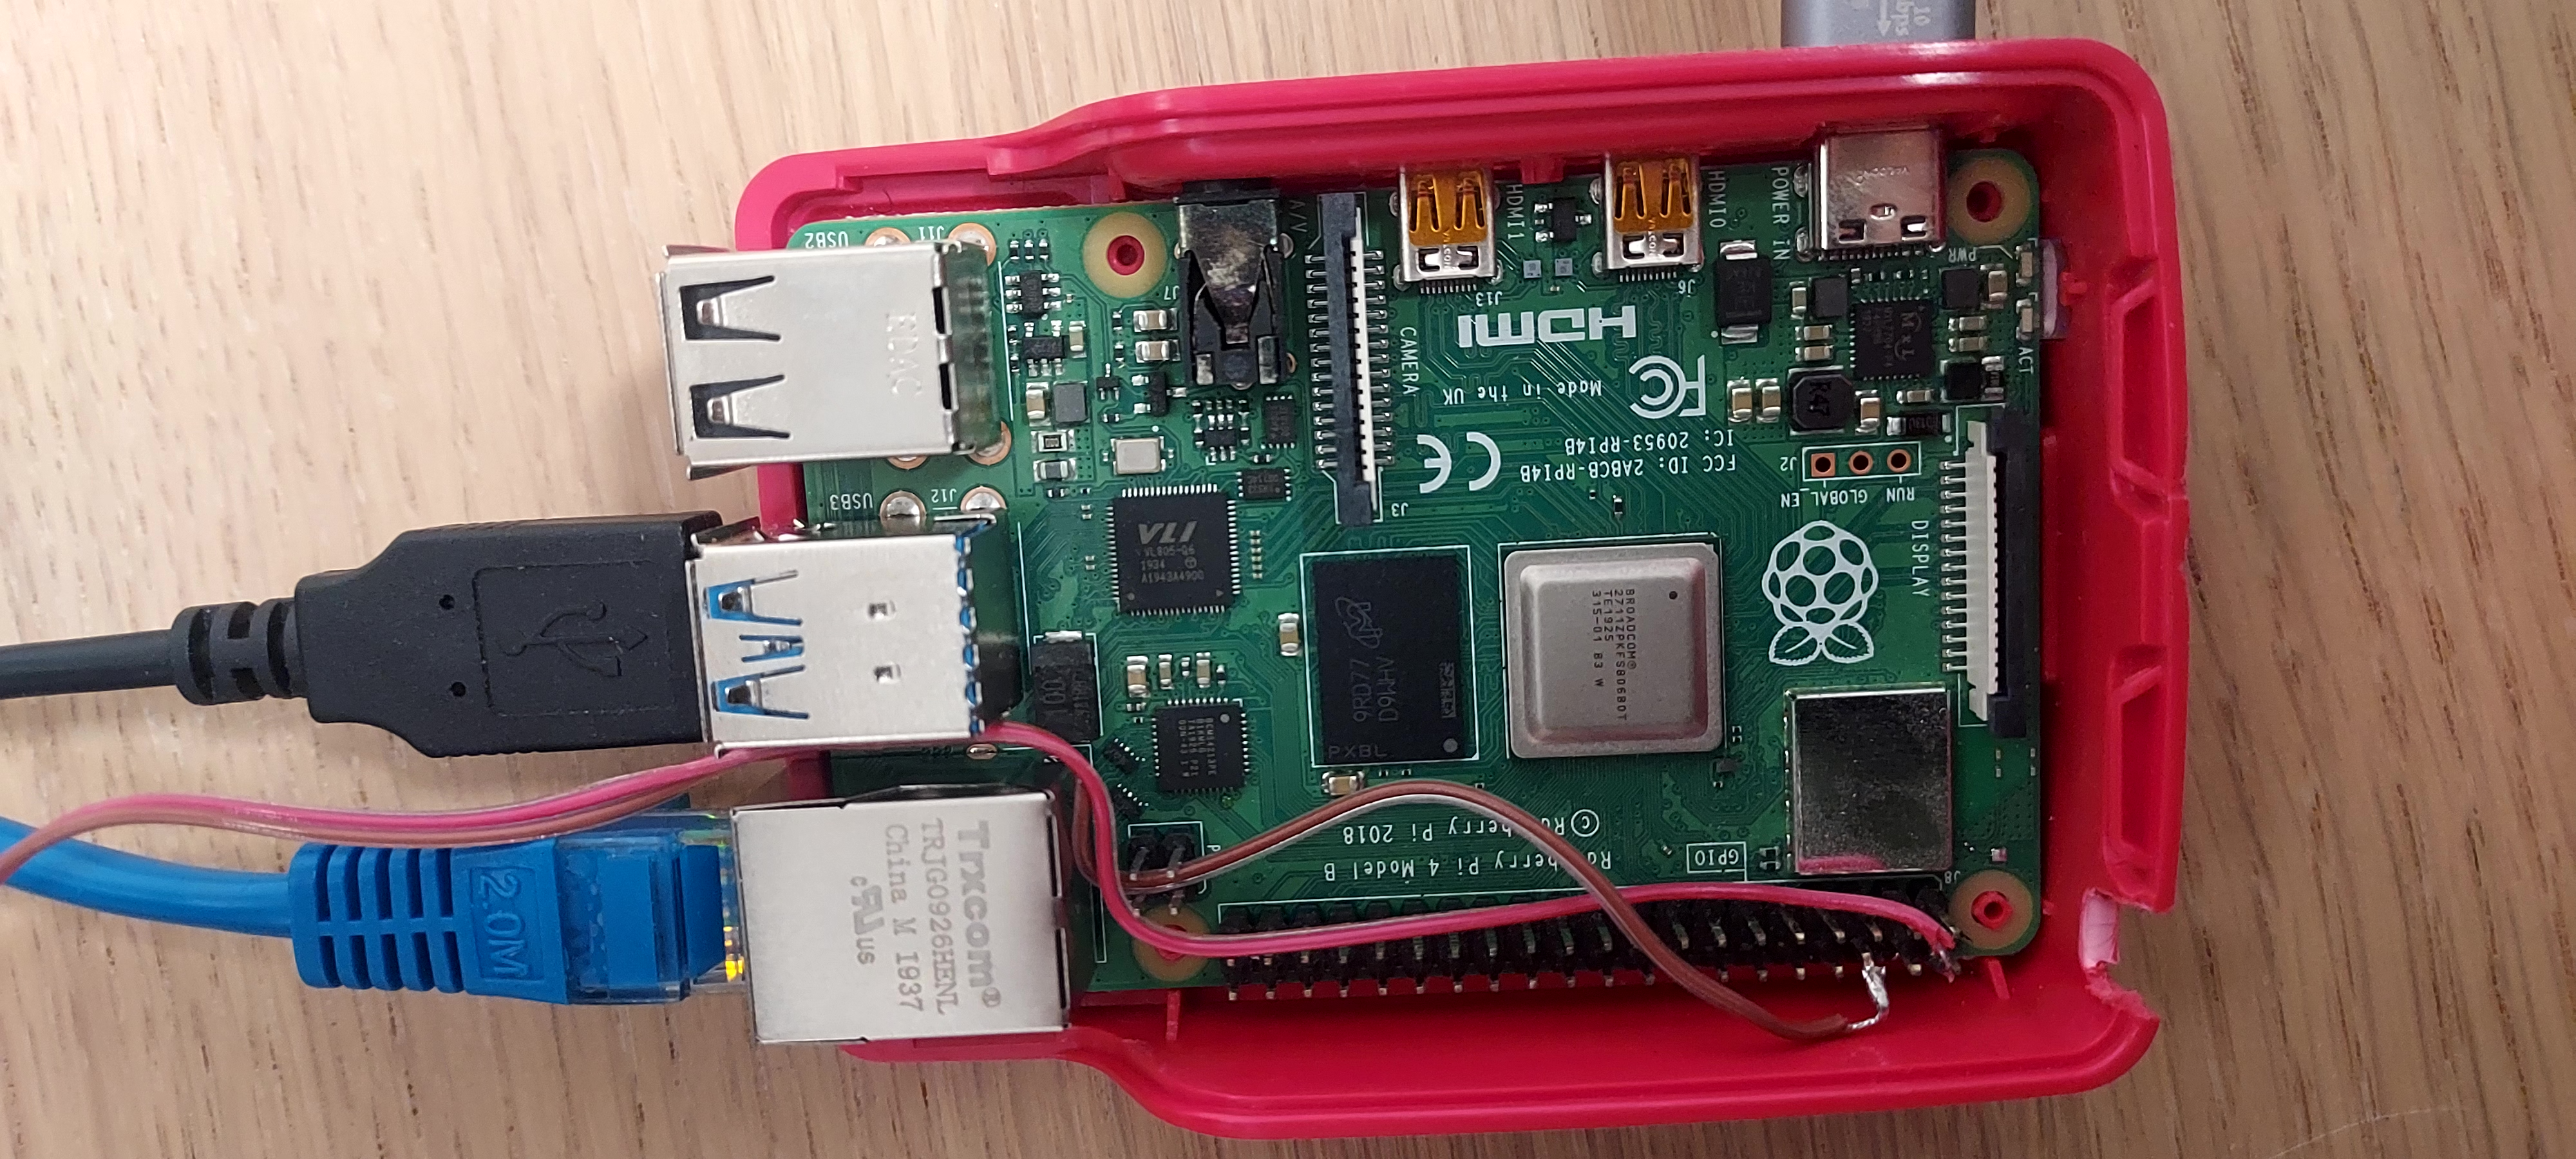
preparetwo2wires,wires (Almostapproximately the same length as the micro USB cable you plan to use betweenRPIthe Raspberry Pi andDensitron),thesolderDensitronthemscreen. - Solder these wires to
5theV pin5V and GNDpinpins onRPItheandRaspberry Pi. - Solder
themtherespectivelyother ends of these wires to theDensitronrespective 5V input port on the Densitron screen, whichcanisbe foundlocated on thebacksideback of the screen.
1. Operating System
Tested,
- We recommend
andusingproposed OS will bethe Raspbian OS (Buster)2020version08dated 2020-08-24.CanIt can be downloaded here. - We suggest using the Raspberry Pi Imager
toforperformflashing theflashing.OS.YouIt'scan download itavailable for variousOperatingoperatingSystemssystems and can be downloaded here. - If
youyou'reendunsureupaboutfeelingthelostprocess at this stage,youhelpfulwillguidancemostcanlikelybeget hints how to proceedfound in this article.
2.Setting PreUp setupYour Touch Panel:
-
AssumingInitialyouSetup:have- Insert the
OS image, we can start setting up our touch panel.Install thepre-flashed SD card into theRPI,RaspberryconnectPiyour(RPI). - Connect a HDMI-compatible
screenmonitorasandwelltheasUSB keyboard andmouse,mouse. - Connect the Densitron screen to the RPI
withusing a USB-A to microUSBcable,cablealthough(intoit will not display anything yet.(Either toeither USB 2.0 or USB 3.0Portport). Note: The Densitron screen won't display anything at this stage. - Power on
RPI,theshouldRPI.
already flashed your SD card withHDMIyou can also already pluginnoteplay - Insert the
-
Once the device boots, finish the installation of theComplete Raspbian OSfollowingInstallation:- Follow the onscreen
instructions.instructionsYoutowill havecomplete thepossibilityinstallation.toThissetincludes setting up the user,time-time zone,WIFInetwork...WiFiOncenetwork,thatetc.
iscomplete, - Follow the onscreen
-
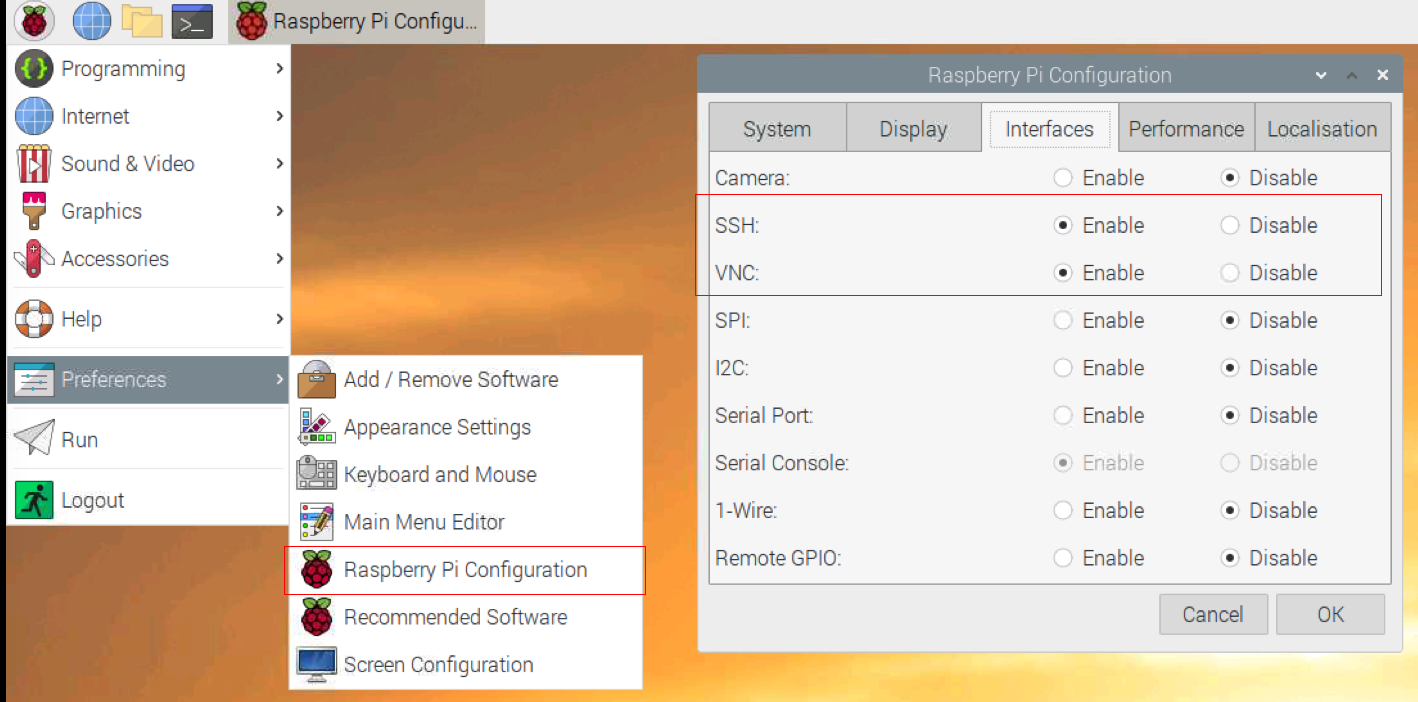
alsoEnable
proposeRemotetoAccess:leave- To facilitate future adjustments without needing a
"backdoor" for yourselfkeyboard and mouse, enablethe SHHSSH and VNC servers on theRPI,RPI. - Click the raspberry icon in the upper left corner of the
screen,screen. - Navigate to
"Interfaces"Preferences -> Raspberry Pi Configuration. - In the 'Interfaces' tab, enable SSH and/or
VNCVNC. - Click 'OK' and
clickrebootok.theReboot!RPI.
so in future you do not need to connect mouse and keyboard to make any tweaks. To do so, findclick it, and in preferences you will find "Raspberry pi Configuration" application. Launch it, navigateYou - To facilitate future adjustments without needing a
After rebooting, you should now be able to remotely access the RPI remotely either via SSH or VNC.
3.PostPost-Setup setupProcess
AtNow, thisour pointnext allsteps we haveare to do, is to enableactivate the Densitron screen and makeconfigure ourthe browser autostartto onautomatically neededopen at the required URL address. InTo order to makesimplify this a bit easierprocess, we have madecreated a small shell script whichthat will modifyautomatically make the needednecessary thingsmodifications for you.
Easy way.Setup Method
- Open the Terminal
appapplication on your Raspberry Pi. ExecuteRun the following commandbelow, this willto download thescript(script. (Ifnoyour Raspberry Pi doesn't have internetaccess on RPI,access, download the filebelowonmanually onanother machine with internet access and transfer it to yourRPIRaspberryonPi using a USBFlashflash drive.ThenThen,proceedcontinue from step3)3.)
curl -O https://raw.githubusercontent.com/SKAARHOJ/Support/master/Files/Densitron/DensitronSetup1U.sh3. Next we need to give permissions to execute the file we have just downloaded. Execute following command:
sudo chmod 777 ./DensitronSetup1U.sh4. Now we are ready to execute the script. Execute following command:
sudo ./DensitronSetup1U.shYouWhen willprompted, be asked to typeenter the ipIP address and port of your XTOUCHxpanel-touch web server,server do(the soBlue Pill device where it's installed) and hitthen press ENTER.
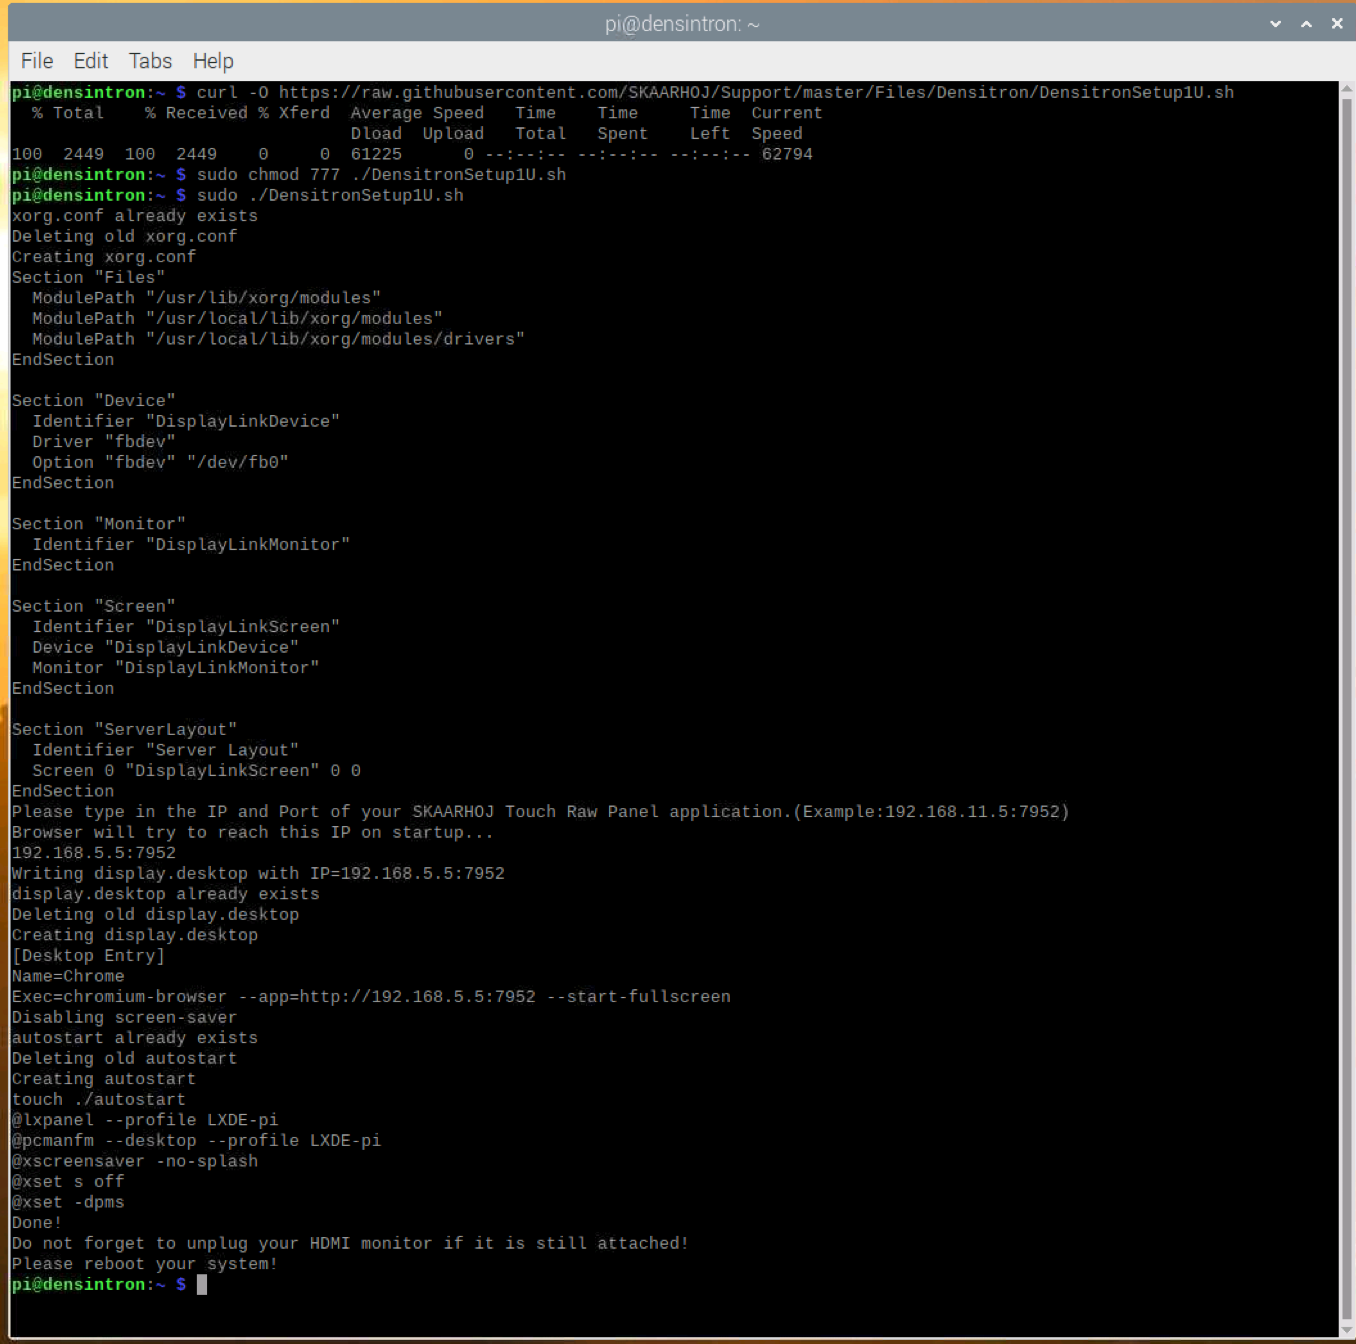
5. That is it, you can now power down your RPI, disconnect keyboard,mouse and HDMI screen. Next time you power it on the browser should open in full screen mode on the Densitron screen.
Advanced way.Setup Method
AdvancedFor advanced users mightinterested wantin to buildcreating a more custom setupsetup, such as combining 2two Densitron screens,screens or pairing a Densitron screen andwith an HDMI screen-Howscreen, exactlydetailed to do so,guidance is outbeyond ofthe scope of this getting startedintroductory tutorial. AlthoughHowever, we will provide some basic hints willto beget provided:you started:
- Edit or create /etc/X11/
/xorg.conf - in order to "describe" your multi monitor setup. - Edit or create /etc/xdg/autostart/display.desktop for browser auto startup "tuning".
- Edit /etc/xdg/lxsession/LXDE-pi/autostart. It is crucial to add the following parameters:
@xset s off
@xset -dpms
Without adding thisIf you willdon't experienceapply the recommended modifications, you may encounter USB Dropoutsdropouts, (disconnectwhere the device disconnects and then connect)reconnects eitherduring whenscreen RPIsaver goes to "screensaver/blank screen"activation or whenwake-up. itThis wakesissue up(Wecan experiencedresult both situations). Asin a result'green' you will be left with "green"and unresponsive screen. The Light Display Manager doesdoesn't notautomatically detect this issue,problem. soTherefore, oneyou'll hasneed to either manually restart the Light Display Manager manually or create a udev rule to restart the service automatically when this condition occurs.
sudo service lightdm restart2. 2RU
UReady 2U setup
Luckily, the units ship with Lubuntu distribution installed and should already "work" out of the box. That minimizes the effort needed to get it up and running, the only thing we need to do is to set up autostart flow to open the browser in full screen mode. Our unit came with SSH server not installed, so we will need a keyboard and preferably mouse in order to set it up. The username and password are densitron/densitron.
-
- Plugin your keyboard and mouse to the unit and power it on.
- Once device has booted, find terminal icon in taskbar and launch it.
- We need to create a new autostart entry, to do so type the following command :
sudo nano /etc/xdg/autostart/display.desktopEnter the password if asked. We should end-up with an empty file open. Lubuntu has Firefox Browser installed by default, so this is what we are going to use. The content of the file should look like below, except of ip and port of your XTOUCH server :
[Desktop Entry]
Name=Firefox
Exec=firefox  --kiosk http://192.168.11.5:7952
Save and exit! Basically this is it! Next time the panel restarts the Firefox browser will be opened in "full screen" on the address you have entered in the config.
If at some point you need to change the ip, just edit the file again.
sudo nano /etc/xdg/autostart/display.desktopIf you want to stop autostarting the browser:
sudo rm /etc/xdg/autostart/display.desktop