TCP Device Core - Advanced Model
The TCP Device Core has a new way to describe what a device can do. Instead of filling in a fixed table of commands, you build your own set of parameters in a web page — each one with a proper name, a type, its own inputs, and a rule for reading the device’s answers. Every parameter you define shows up in Reactor as a real parameter, ready to put on a button.
Nothing was taken away. The original TCP Command Table works exactly as it always has, side by side with this, and on the same devices — see TCP Device Core / UDP Device Core. Nothing needs migrating.
Reach for advanced parameters when you want a control that carries a value — a level, a preset number, a piece of text — or when you want the panel to show what the device is actually doing. Reach for the command table when a one-shot trigger is all you need.
Models and devices
Parameters live on a model, not on a device. A model describes one kind of equipment — a projector, a matrix, a power switch — and holds every command for it. A device is one physical unit: it has an address and a port, and it points at a model. Several devices can share one model, so you describe the protocol once and reuse it for every identical unit in the building.
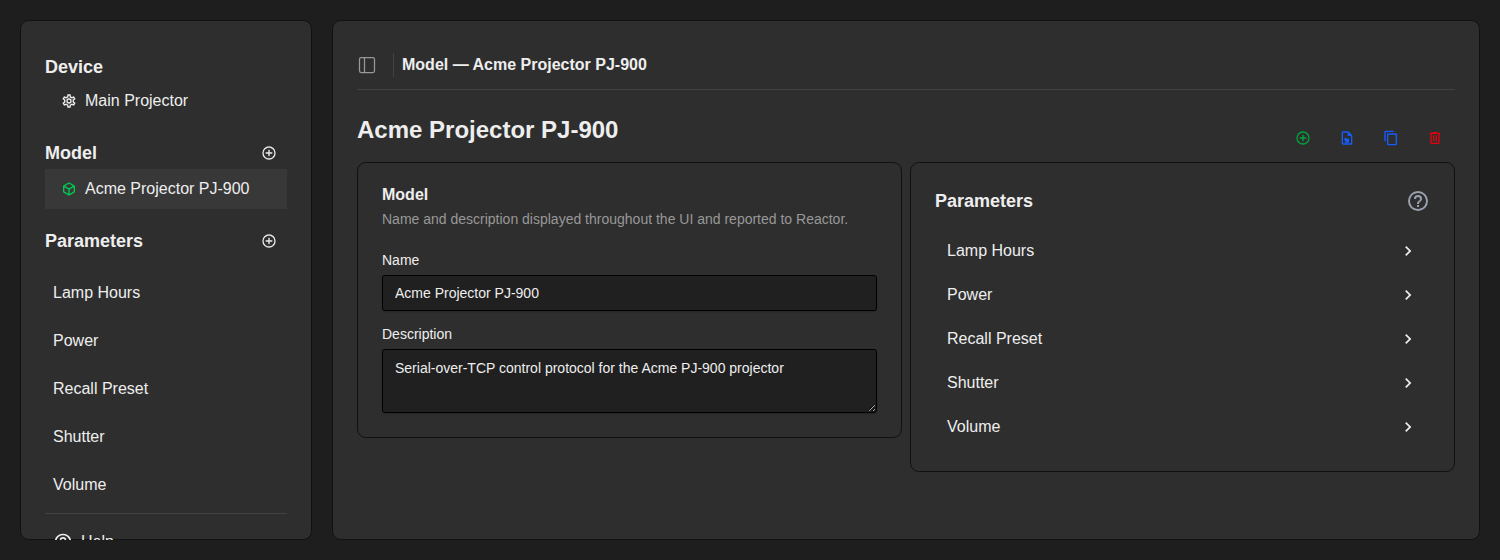
The first time the core starts it creates an empty model called ‘Default Advanced Model’ for you to write into. Add more from the + next to Model in the sidebar. Until you assign a device to a model, that device uses the generic model and has no advanced parameters.
Opening the web UI
Open Reactor, go to the Packages menu, find the TCP core package and use its button to open the UI. The sidebar lists your devices, your models, and every parameter on the model you are looking at.
Setting up a device
The Setup page holds everything specific to one unit: where it is, and what the core sends around a connection. A badge in the corner tells you whether the core currently has the socket open.
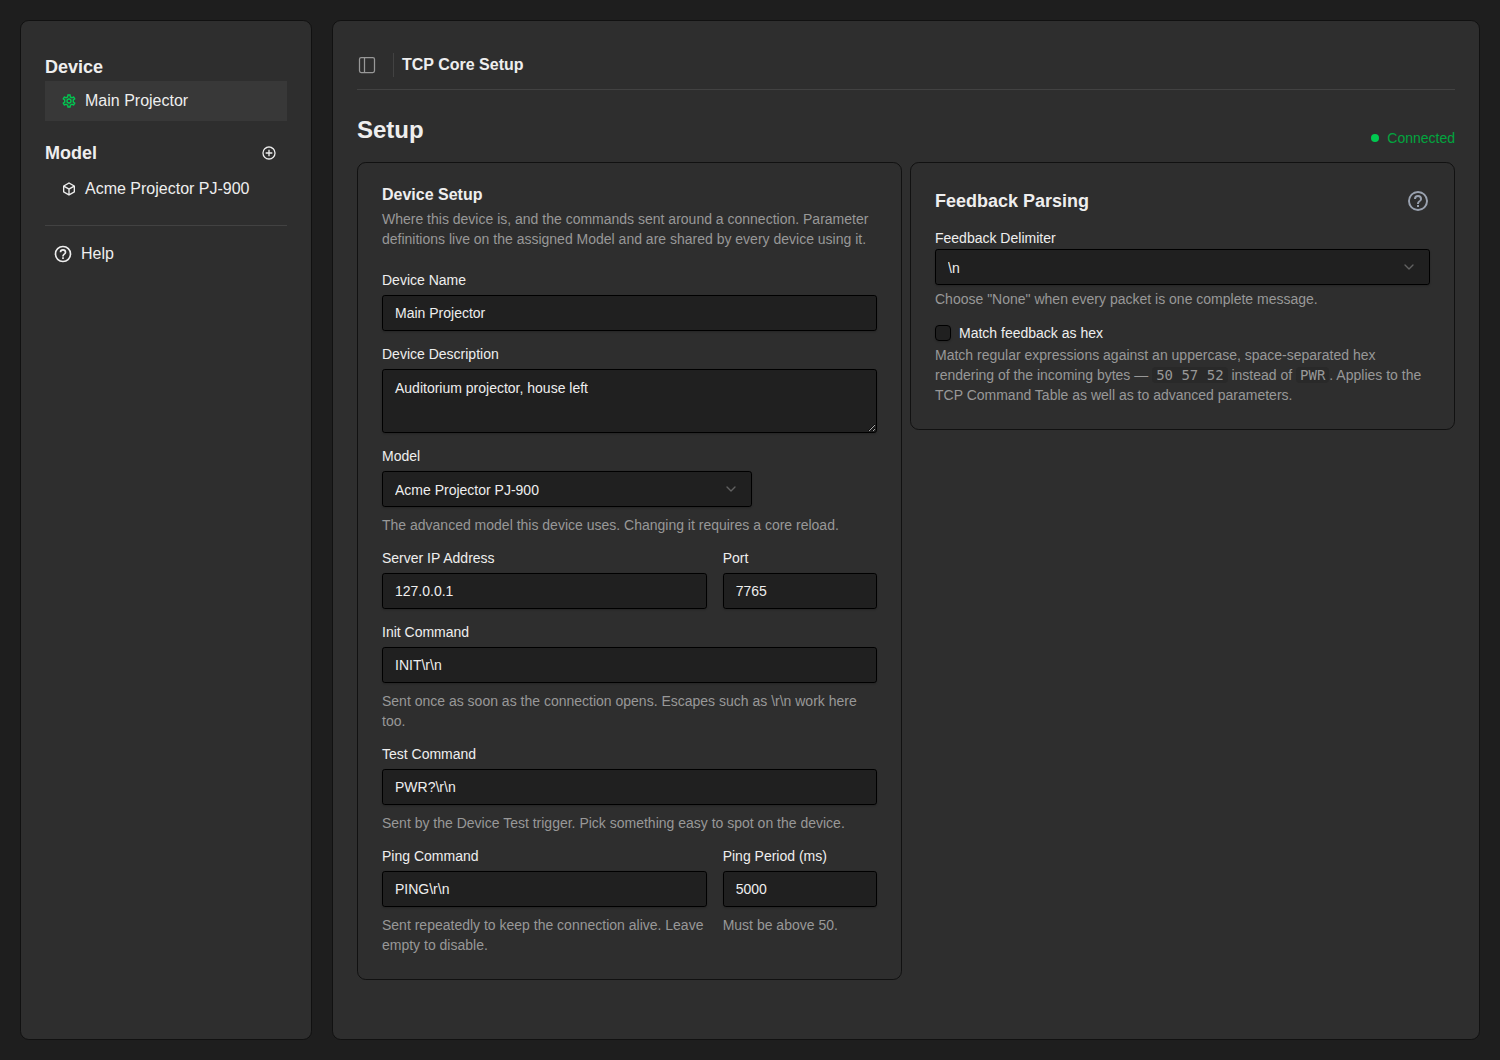
- Device Name / Description
How the unit is identified here and in Reactor. - Model
Which model this device uses. Changing it needs a core reload. - Server IP Address / Port
Where the device listens, e.g. ‘192.168.10.20’ port ‘4352’. - Init Command
Sent once, as soon as the connection opens. Use it to wake or arm a device. Backslash escapes such as\r\nwork here too. - Test Command
Sent by the device’s Test trigger. Pick something whose effect is easy to spot. - Ping Command / Ping Period
Sent over and over to keep an idle connection alive. Leave the command empty to switch it off.
Feedback Parsing
These two settings decide how the core chops up what the device sends, before any of your parameters look at it. Both start out doing what this core has always done, so an existing device is unaffected until you change them.
- Feedback Delimiter — where one message ends and the next begins:
\n,\r\n,\r, or None (whole packet). Choose None when the device sends one complete message per packet, which is the usual case for a binary protocol. - Match feedback as hex — show the core the incoming bytes as
50 57 52instead ofPWR, so you can write a matching rule for bytes that have no printable form.
If a device answers PWR:on followed by a carriage return and a newline, a delimiter of \n leaves the carriage return stuck on the end of the message — and a rule ending in $ will never match. Set the delimiter to \r\n for those devices.
Both settings apply to the TCP Command Table as well, since a device that needs them needs them for all of its feedback.
The parameter editor
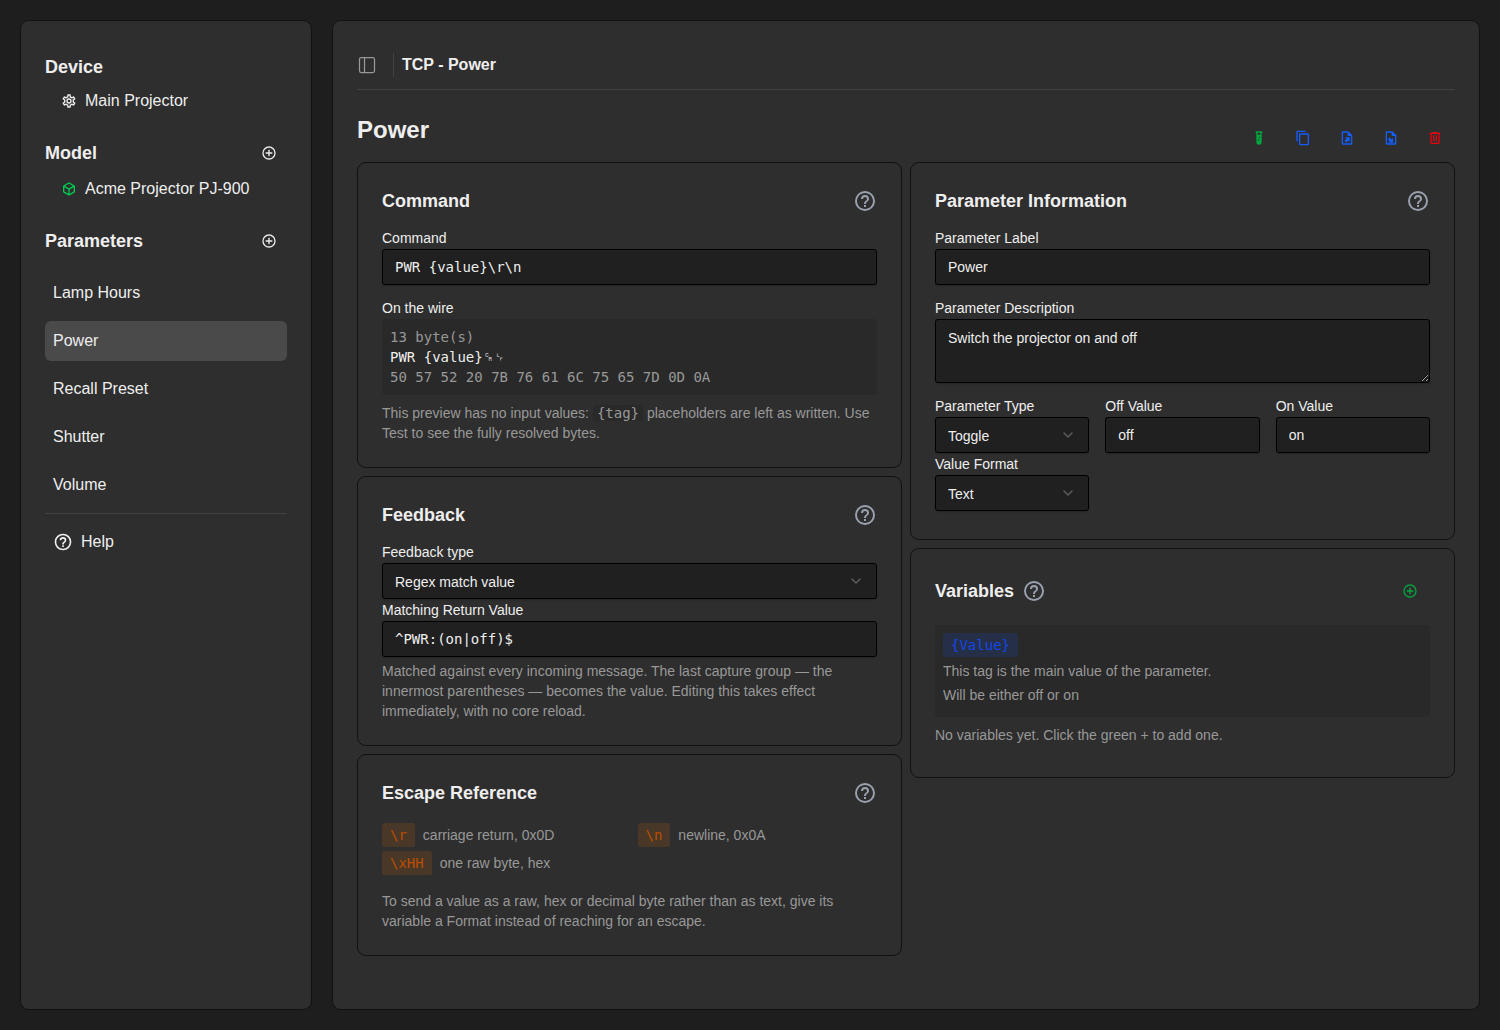
Each parameter is one command plus the rules around it. The left column is what gets sent; the right column is how the parameter appears in Reactor and what the operator can feed into it. Everything saves as you type.
Command
The exact bytes written to the socket. It is put together in two passes, always in this order:
- Placeholders are filled in — every
{tag}becomes its variable’s value, and{value}becomes the parameter’s own value. - Backslash escapes are turned into raw bytes.
| Escape | What it sends |
|---|---|
\r |
carriage return, 0x0D |
\n |
newline, 0x0A |
\xHH |
one raw byte written in hex, e.g. \x02 |
\{ \} |
a literal brace |
Under the field, On the wire shows the result: the byte count, the printable text, and the hex. It is produced by the same code that does the sending, so it cannot be out of date. Control characters appear as small symbols — ‘PWR on␍␊’ — so a command that ends in CR LF still fits on one line.
Watch the byte count. A missing \r is the single most common reason a device quietly ignores a command.
Because escapes are decoded second, a value can never turn into a control byte by accident — text typed by an operator is protected on the way in. What you type into the Command field itself is interpreted, and that is what lets you send arbitrary binary.
Parameter Information
How the parameter appears and behaves in Reactor.
- Parameter Label / Description — the display name and help text.
- Parameter Type:
- Trigger — a button. Sends the command once. It has no value of its own, so
{value}is not available. - Toggle — an on/off switch.
- String — a text field; the text is
{value}. - Integer / Float — a number field with a Minimum and Maximum; the number is
{value}.
- Trigger — a button. Sends the command once. It has no value of its own, so
- Value Format — how
{value}is written into the command. See Formats below.
Toggles
A toggle sends one command in both directions. {value} carries the word that tells on from off, and you set those two words in On Value and Off Value.
- When the two commands share most of their text, put the difference in the values:
PWR {value}\r\nwith On Value ‘on’ and Off Value ‘off’ sends ‘PWR on’ and ‘PWR off’. - When they share nothing, put the whole word in the values:
{value}\r\nwith On Value ‘SHUT ON’ and Off Value ‘SHUT OFF’.
Variables
A variable is a named blank in the command that the operator fills in. Type {slot} anywhere in the Command field and the editor offers to create the matching variable; or use the green + in the Variables card. Each one becomes an extra input on the parameter in Reactor, named after its Label.
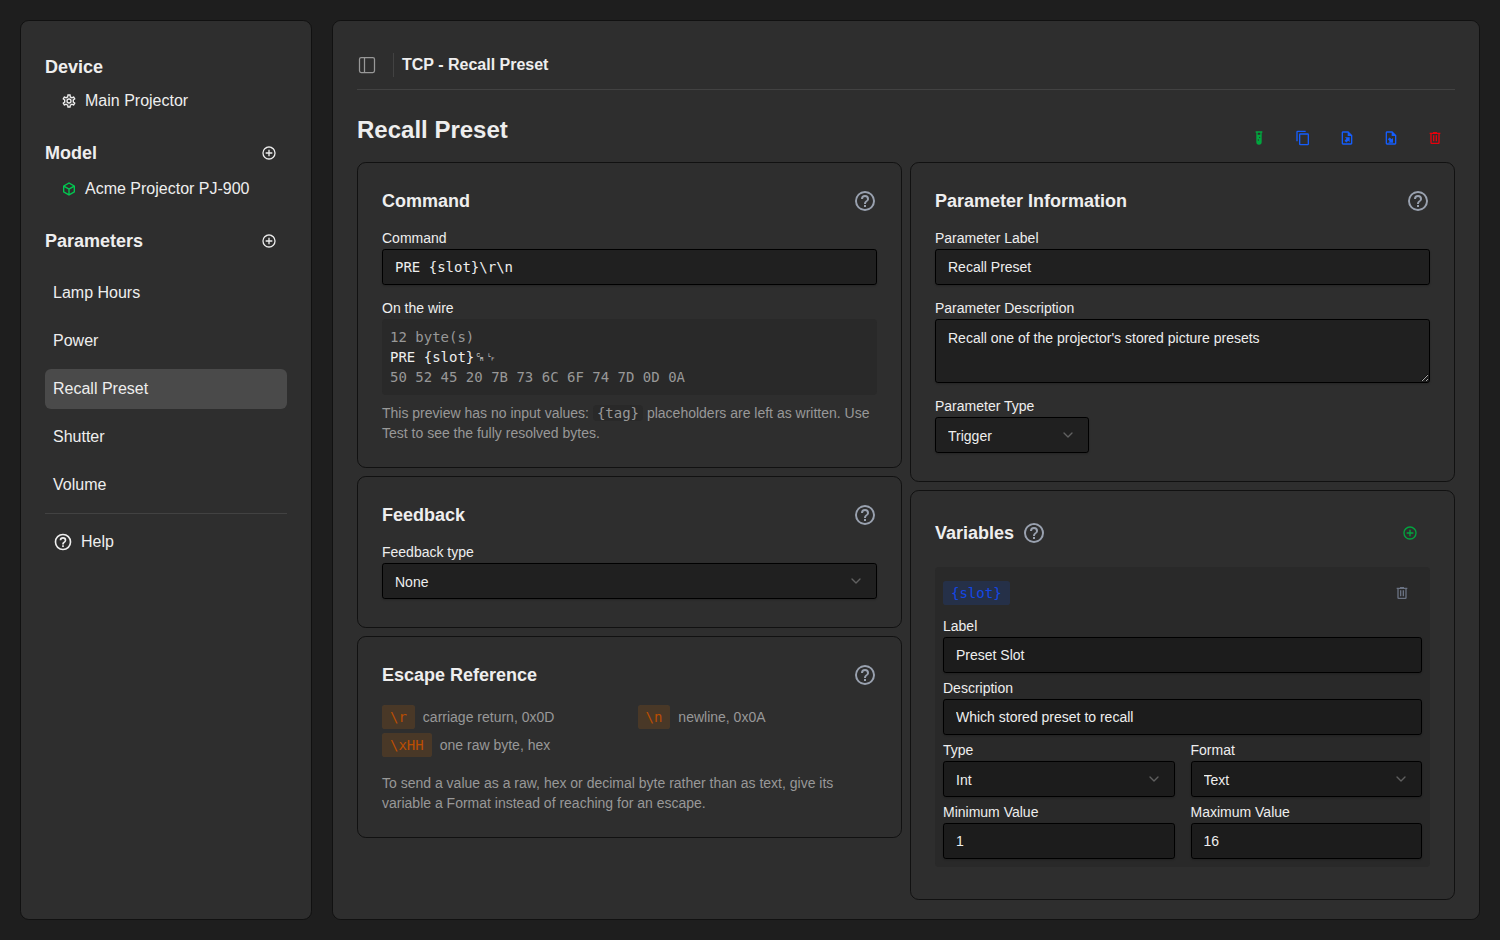
- Tag — the name inside the braces. Letters and numbers only.
- Label / Description — what the operator sees in Reactor.
- Type — String, Int, Float or Binary.
- Format — how the value is written into the command. See below.
- Minimum / Maximum — the allowed range for a number.
Click a blue tag badge to drop that placeholder wherever you were last typing. {value} is listed alongside your variables, but it is built in and has no settings of its own beyond the parameter’s type and Value Format.
Formats — sending a number as bytes
By default a value goes into the command as plain text: the number 15 is sent as the two characters ‘15’. A Format changes that. It is set per variable, and separately for the parameter’s own value as Value Format.
| Format | The value 15 goes in as | On the wire |
|---|---|---|
| Text (default) | ‘15’ | 31 35 |
| Raw byte | one byte | 0F |
| Hex byte | ‘0f’ | 30 66 |
| Decimal byte | ‘15’, limited to 0–255 | 31 35 |
| Scaled | the number divided by Scale — 1500 with Scale 1000 goes in as ‘1.500’ | ASCII digits |
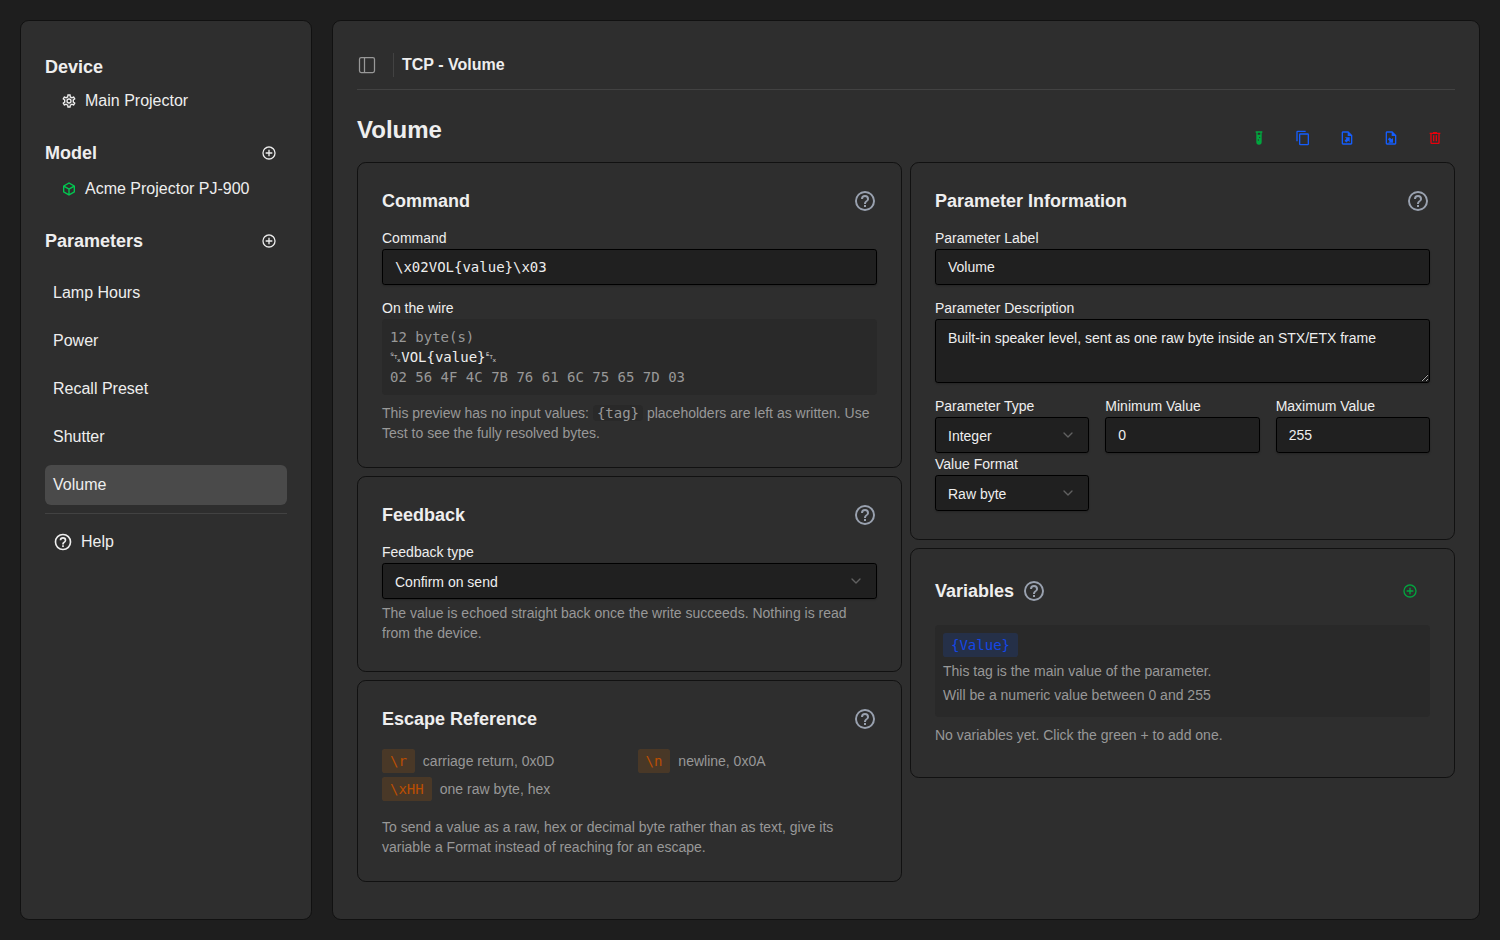
The example above sends a speaker level as a single raw byte wrapped in the framing bytes 0x02 and 0x03: the command is \x02VOL{value}\x03 with a Value Format of Raw byte. Between the escapes and the formats, most binary protocols can be described without writing any code.
Feedback — reading a value back
A TCP device sends what it likes, when it likes. Nothing ties a reply to the command that caused it, so feedback here watches everything the device sends rather than waiting for an answer.
- None — fire and forget. The parameter never reports a value.
- Confirm on send — the value is echoed back as soon as the bytes leave the socket. Use it for a device that is silent but reliable.
- Regex match value — a matching rule is checked against every message the device sends. When it matches, the last capture group — the innermost parentheses — becomes the parameter’s value.
A device that answers ‘PWR:on’ pairs with the rule ^PWR:(on|off)$. The ^ and $ pin the rule to a whole message, so unrelated chatter from the device cannot set your parameter by accident. For a toggle, set On Value and Off Value to the words the device itself uses and they will be compared against whatever the rule captured.
Editing the matching rule takes effect immediately — no reload. Changing the feedback type changes how the parameter is registered, so that one needs a reload. The editor flags a rule that is not valid, in red, before you ever send anything.
When the core needs a reload
Some changes only reach Reactor after the core restarts. When you make one, a red Reload Core button appears at the top of the sidebar. Make all your changes first, then press it once.
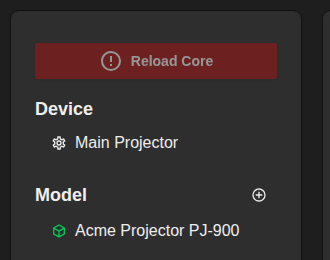
- Needs a reload — adding, copying, importing or deleting a parameter or a model; a parameter’s label, description, type, minimum, maximum or feedback type; a variable’s label, description or type, and adding or removing one; a model’s name or description; assigning a device to a different model.
- Takes effect straight away — the command text, the On/Off values, the matching rule, formats and scales, a variable’s tag and its minimum and maximum.
Testing a parameter
The green test-tube button at the top of the parameter page sends the command to a real device and shows you what happens — before you put it on a panel. Pick which device to run against, fill in the inputs, and press Send Command.
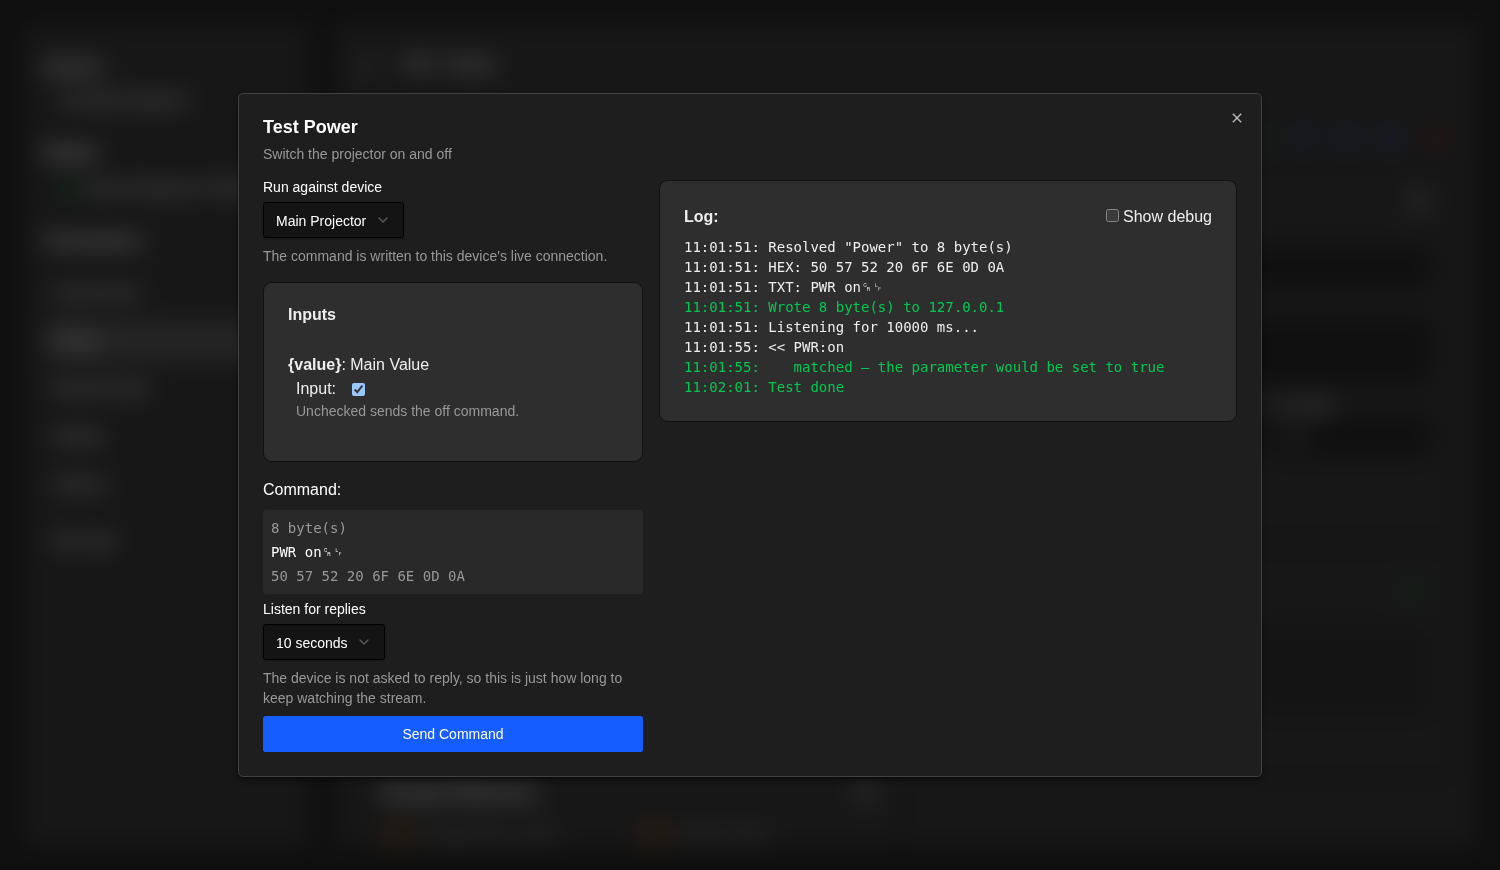
The log shows the fully resolved bytes as text and as hex, whether the write succeeded, and then every message the device sends during the listening window. When a message matches your rule, the log says so and names the value the parameter would be set to — which is the fastest way to get a matching rule right.
- The bytes are resolved by the same code the live core uses, so the preview can never disagree with what is actually sent.
- The preview appears even when the device is offline, so you can check your escaping without any hardware.
- Listen for replies chooses how long to keep watching — 1, 3 or 10 seconds. The device is never asked to reply; this is only how long the window stays open.
Testing writes to the device’s live connection, for real. Do not test Power Off during a show.
Sharing parameters as files
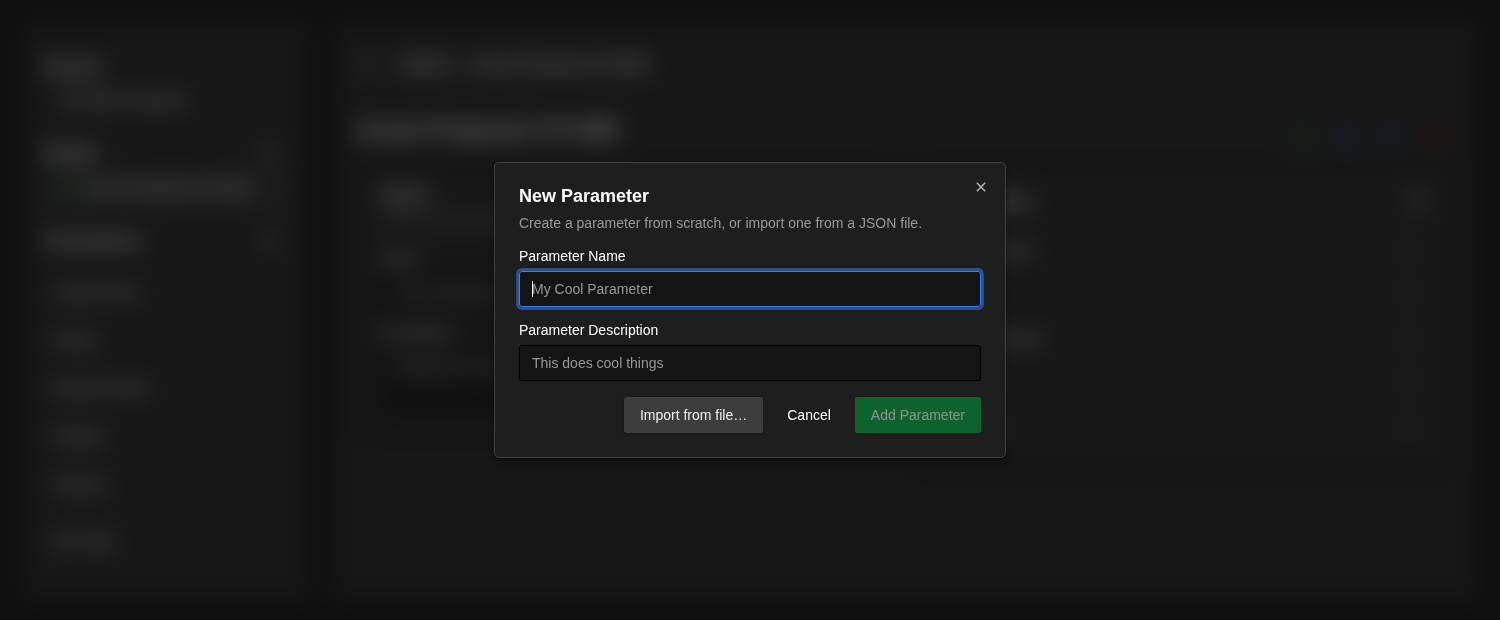
Any parameter can be saved to a .json file and loaded again — on the same core or a different one. Use it to back up your work, copy a parameter between models, or build a library of ready-made devices.
- Export — the export button on a parameter downloads it as ‘{Label}.json’.
- Import as new — the import button on the model page, or Import from file… in the New Parameter dialog. You can pick several files at once.
- Import over an existing parameter — the import button on a parameter replaces that parameter’s settings with the file.
- Copy — duplicates a parameter on the same model as ‘{Label} (copy)’.
The file name becomes the parameter’s name. Importing ‘Recall Preset.json’ creates a parameter called Recall Preset. If that name is taken, the core adds ‘(1)’ rather than overwriting anything.
Writing parameter files with AI
Parameter files are plain JSON with a small, fixed shape, so an AI assistant can write them for you from a device’s protocol documentation. Attached to this page is CLAUDE.md, a guide that describes the format, the rules and several worked examples.
- Paste CLAUDE.md into an assistant such as Claude.
- Paste your device’s protocol documentation — the manufacturer’s command list or serial-protocol PDF.
- Ask for one importable
.jsonfile per action, named after the action. - Import the files on the model page, then check each one with the Test button.
Always test what comes back. An assistant reading a protocol manual will get most of it right and can still get a terminator or a range wrong — and those are exactly the mistakes the Test dialog makes obvious.
Example walkthrough — a projector, from scratch
This builds a small but complete model for an imaginary projector whose protocol is line-based and ends every command with CR LF. The five finished parameters are attached to this page as .json files — import them, or follow along and build them by hand.
1. Create the device. On the Setup page, give it a name, set the IP address and port, and pick a model. Set the Feedback Delimiter to \r\n, since that is how this projector terminates its replies.
2. Power — a toggle that knows its own state. The projector accepts ‘PWR on’ and ‘PWR off’, and announces ‘PWR:on’ whenever it changes.
- Command:
PWR {value}\r\n - Type: Toggle, On Value ‘on’, Off Value ‘off’
- Feedback: Regex match value, rule
^PWR:(on|off)$
Power.json
3. Recall Preset — a button with an input. One button that can recall any of sixteen presets.
- Command:
PRE {slot}\r\n— typing{slot}creates the variable - Type: Trigger; Feedback: None
- Variable slot: Label ‘Preset Slot’, Type Int, range 1–16
Recall Preset.json
4. Lamp Hours — a number read off the device. Ask, and let the reply set the value.
- Command:
LAMP?\r\n - Type: Integer, Maximum 9999
- Feedback: Regex match value, rule
^LAMP:([0-9]+)$
Lamp Hours.json
5. Shutter — a toggle whose two commands share nothing. The projector wants ‘SHUT ON’ and ‘SHUT OFF’, so the whole word goes in the values.
- Command:
{value}\r\n - Type: Toggle, On Value ‘SHUT ON’, Off Value ‘SHUT OFF’
- Feedback: Regex match value, rule
^SHUT:(ON|OFF)$
Shutter.json
6. Volume — a binary command. The level is one raw byte, wrapped in framing bytes.
- Command:
\x02VOL{value}\x03 - Type: Integer, range 0–255, Value Format Raw byte
- Feedback: Confirm on send
Volume.json
7. Test, then reload. Check each parameter with the Test button — watch the byte count and the hex line — then press Reload Core once. The five parameters now appear in Reactor under the model’s name.
Using the parameters from a panel
After a reload, every parameter you defined shows up in Reactor under the model’s name, called Adv_ followed by its label with spaces turned into underscores — a parameter labelled Recall Preset is Adv_Recall_Preset. Its type decides the control: a Trigger is a button, a Toggle a switch, an Integer or Float a fader or encoder, a String a text field. Any variables you defined appear as extra inputs on the parameter, named after their labels.
The parameters from the TCP Command Table — Commands/label, toggle, triggerOn, triggerOff, status and the Wild West escape hatch — are still there too, on the same device.
Troubleshooting
- The device ignores the command — check the byte count in the wire preview. A missing
\ror\nis the usual cause. - The parameter never gets a value — open the Test dialog and watch the incoming lines. If the message looks right but does not match, the delimiter is probably leaving a stray carriage return on the end; set Feedback Delimiter to
\r\n. - The matching rule is flagged red — it is not a valid expression and will never match, so the parameter will never receive a value.
- A change does not show up in Reactor — look for the red Reload Core button in the sidebar.
- Nothing sends at all — check the connection badge on the Setup page. Advanced parameters write to the same socket the device loop keeps open.
- A binary reply matches nothing — turn on Match feedback as hex and write the rule against
50 57 52rather thanPWR.
Reference
Parameter types: Trigger, Toggle, String, Integer, Float.
Variable types: String, Int, Float, Binary.
Formats: Text, Raw byte, Hex byte, Decimal byte, Scaled.
Feedback types: None, Confirm on send, Regex match value.
Escapes: \r, \n, \xHH, and \{ / \} for a literal brace.
Placeholders: {value} is the parameter’s own value, available on every type except Trigger; {tag} is one of your variables.
Feedback Delimiter: \n, \r\n, \r, None (whole packet).
The UDP Device Core, core-protocol-udp, works the same way and has the same web UI. Everything on this page applies to it, with UDP packets in place of a TCP connection.
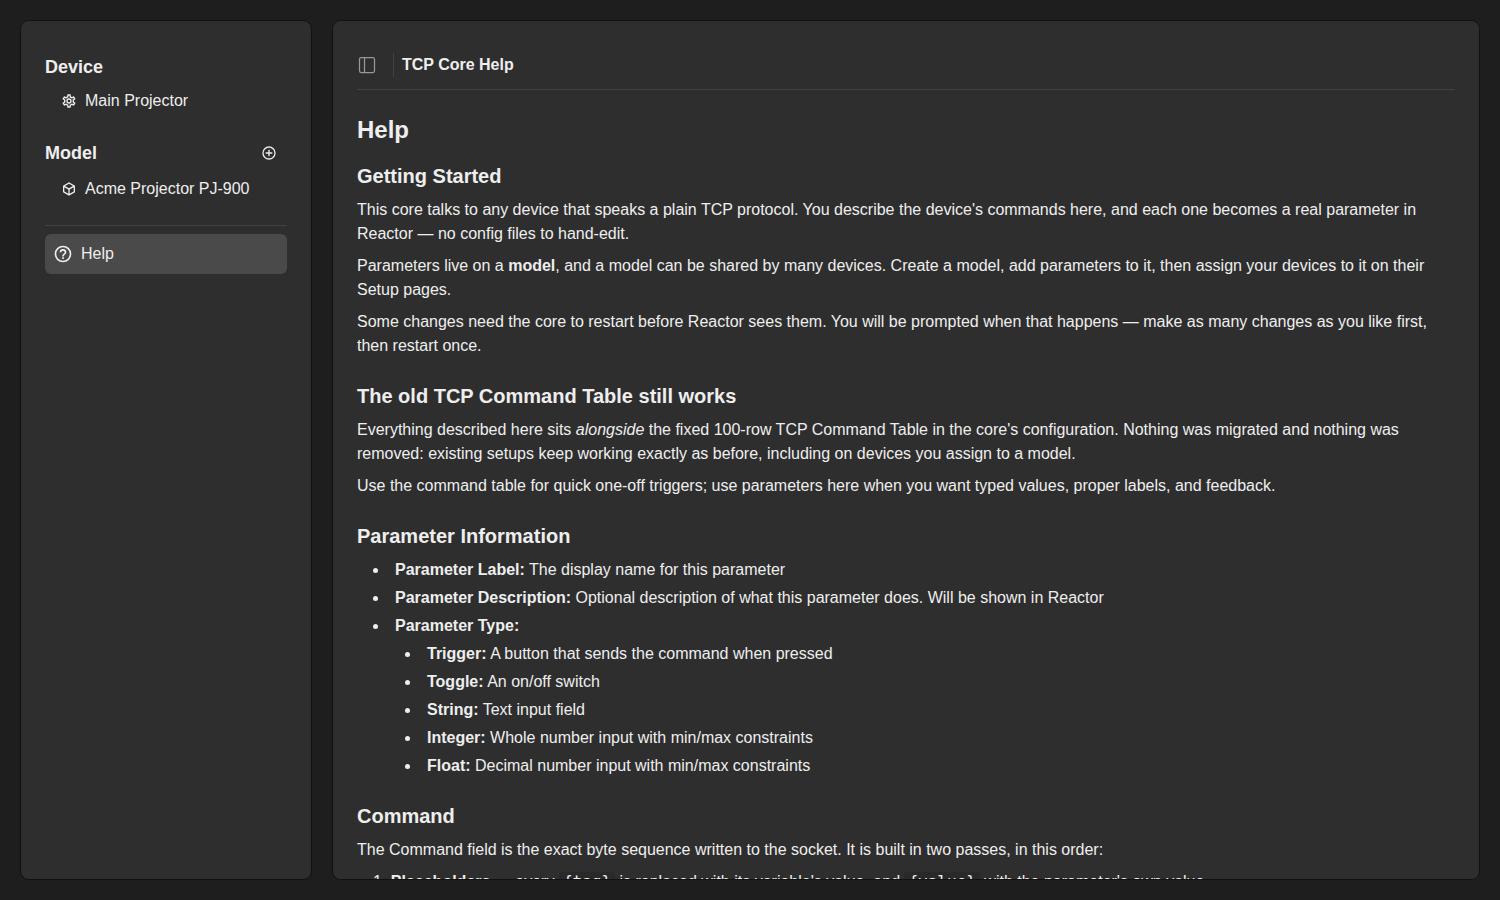
Built-in Help
The web UI carries its own Help page, reachable from the bottom of the sidebar. It covers the same ground as this article in shorter form, so you can check a format or a feedback type without leaving the editor.