Analog Component Calibration (BP Inside Devices)
Enable Calibration Profiles
Please note, The Calibration Tool is only for Blue Pill Inside panels running hardware-manager version 1.0.3-pre15 or higher. This is not for use with UniSketch OS panels.
1. One has to access the controllers web interface, navigate to packages tab and click on hardware-manager package.

2. Next you will see hardware-manager settings page.
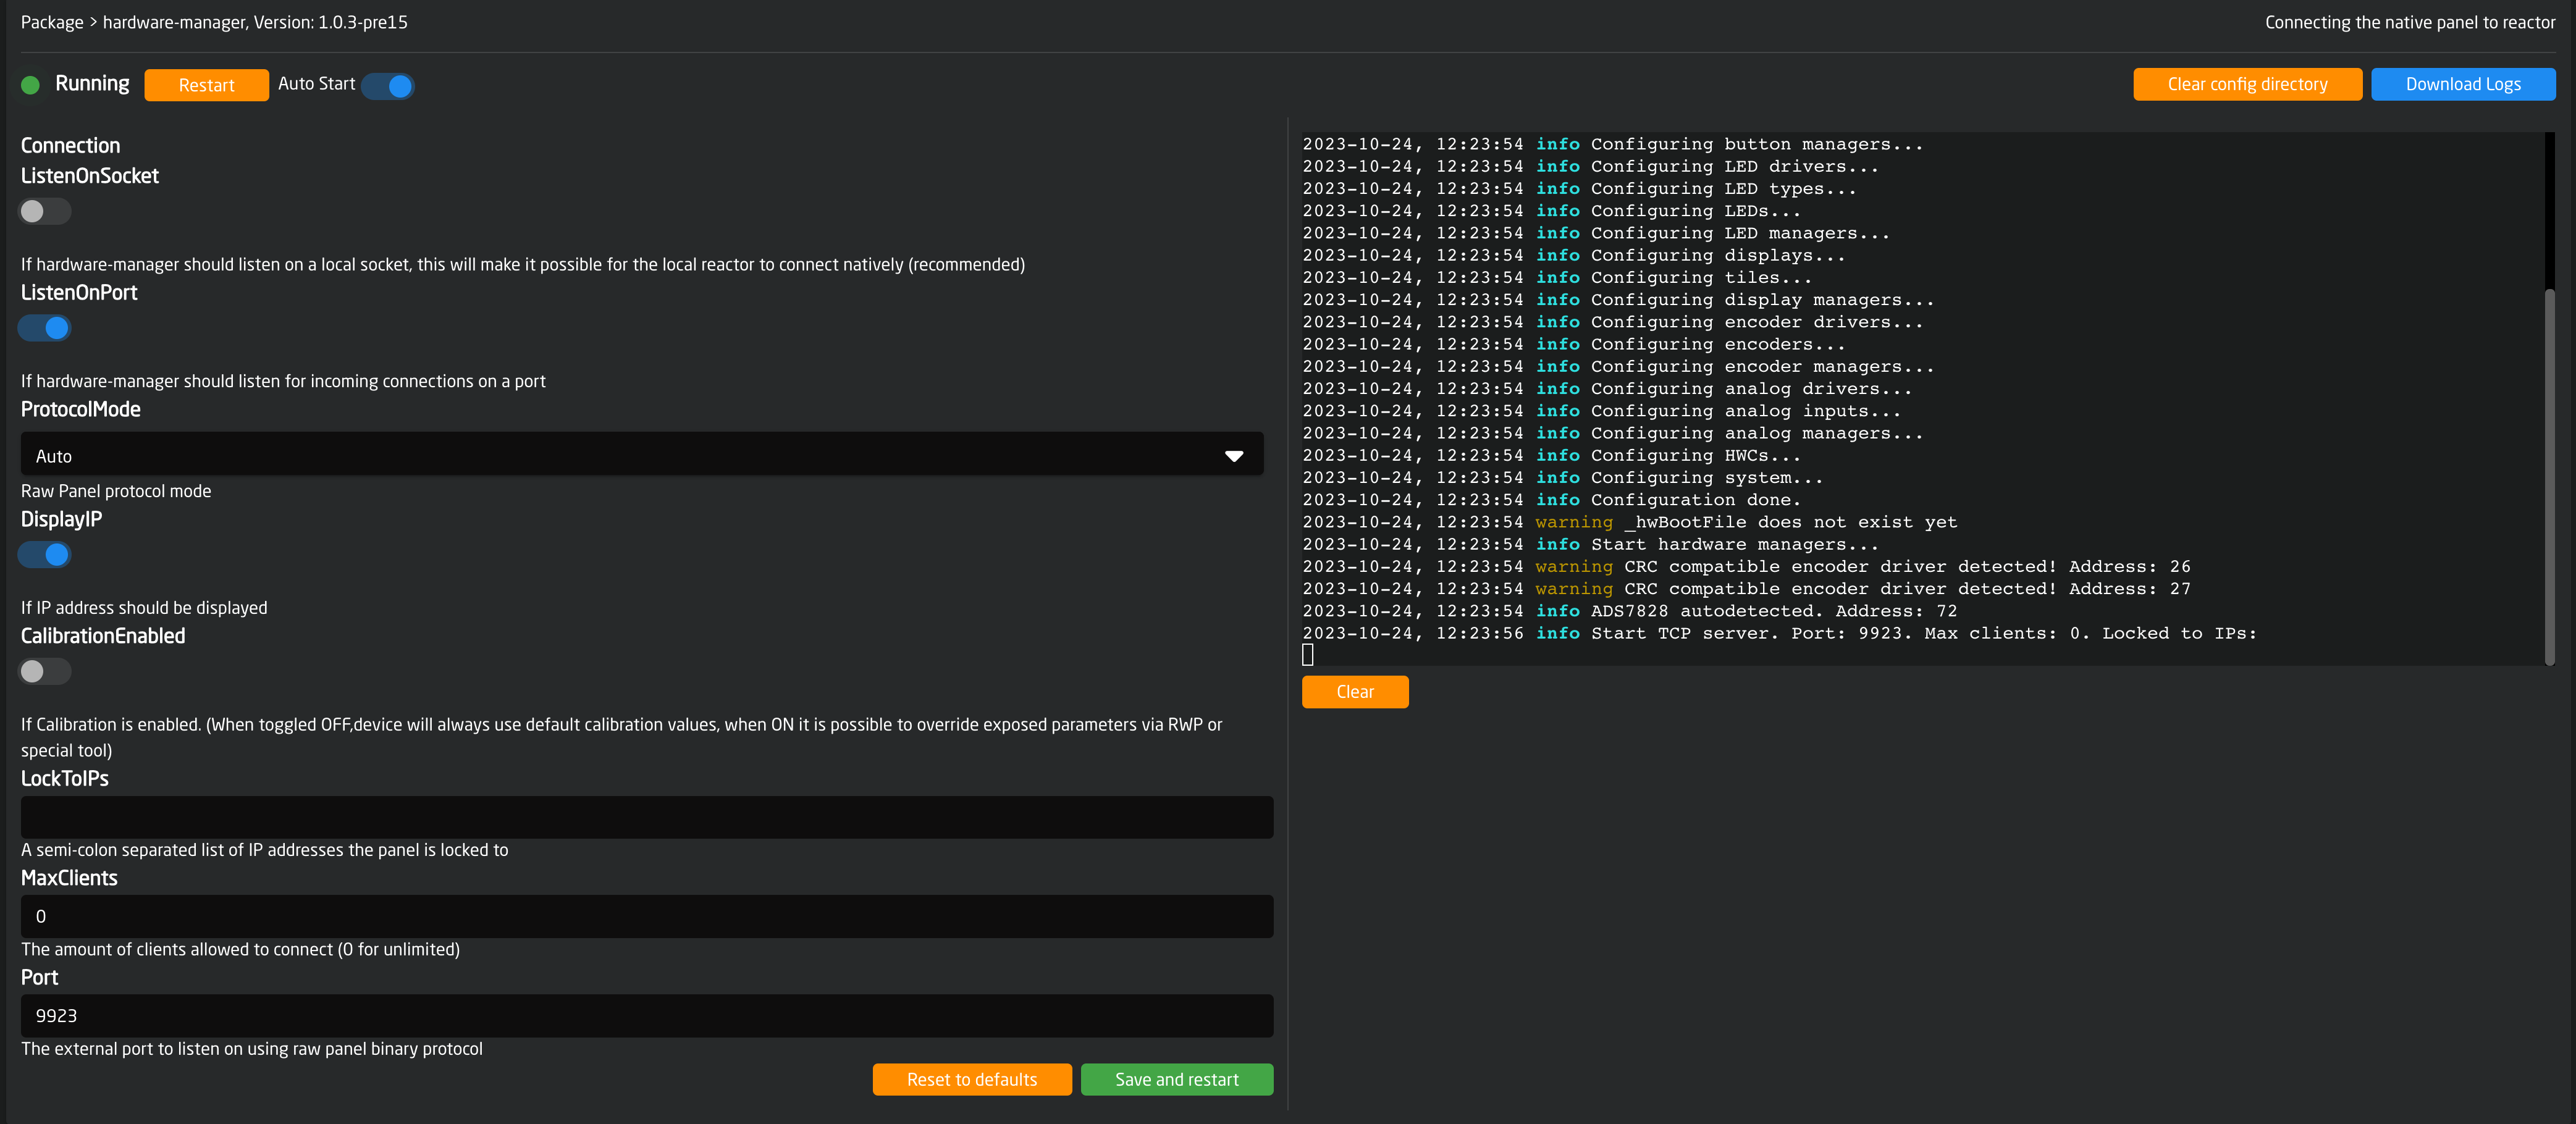
3. In order to establish a TCP connection to the controller, make sure to enable the ListenOnPort option.
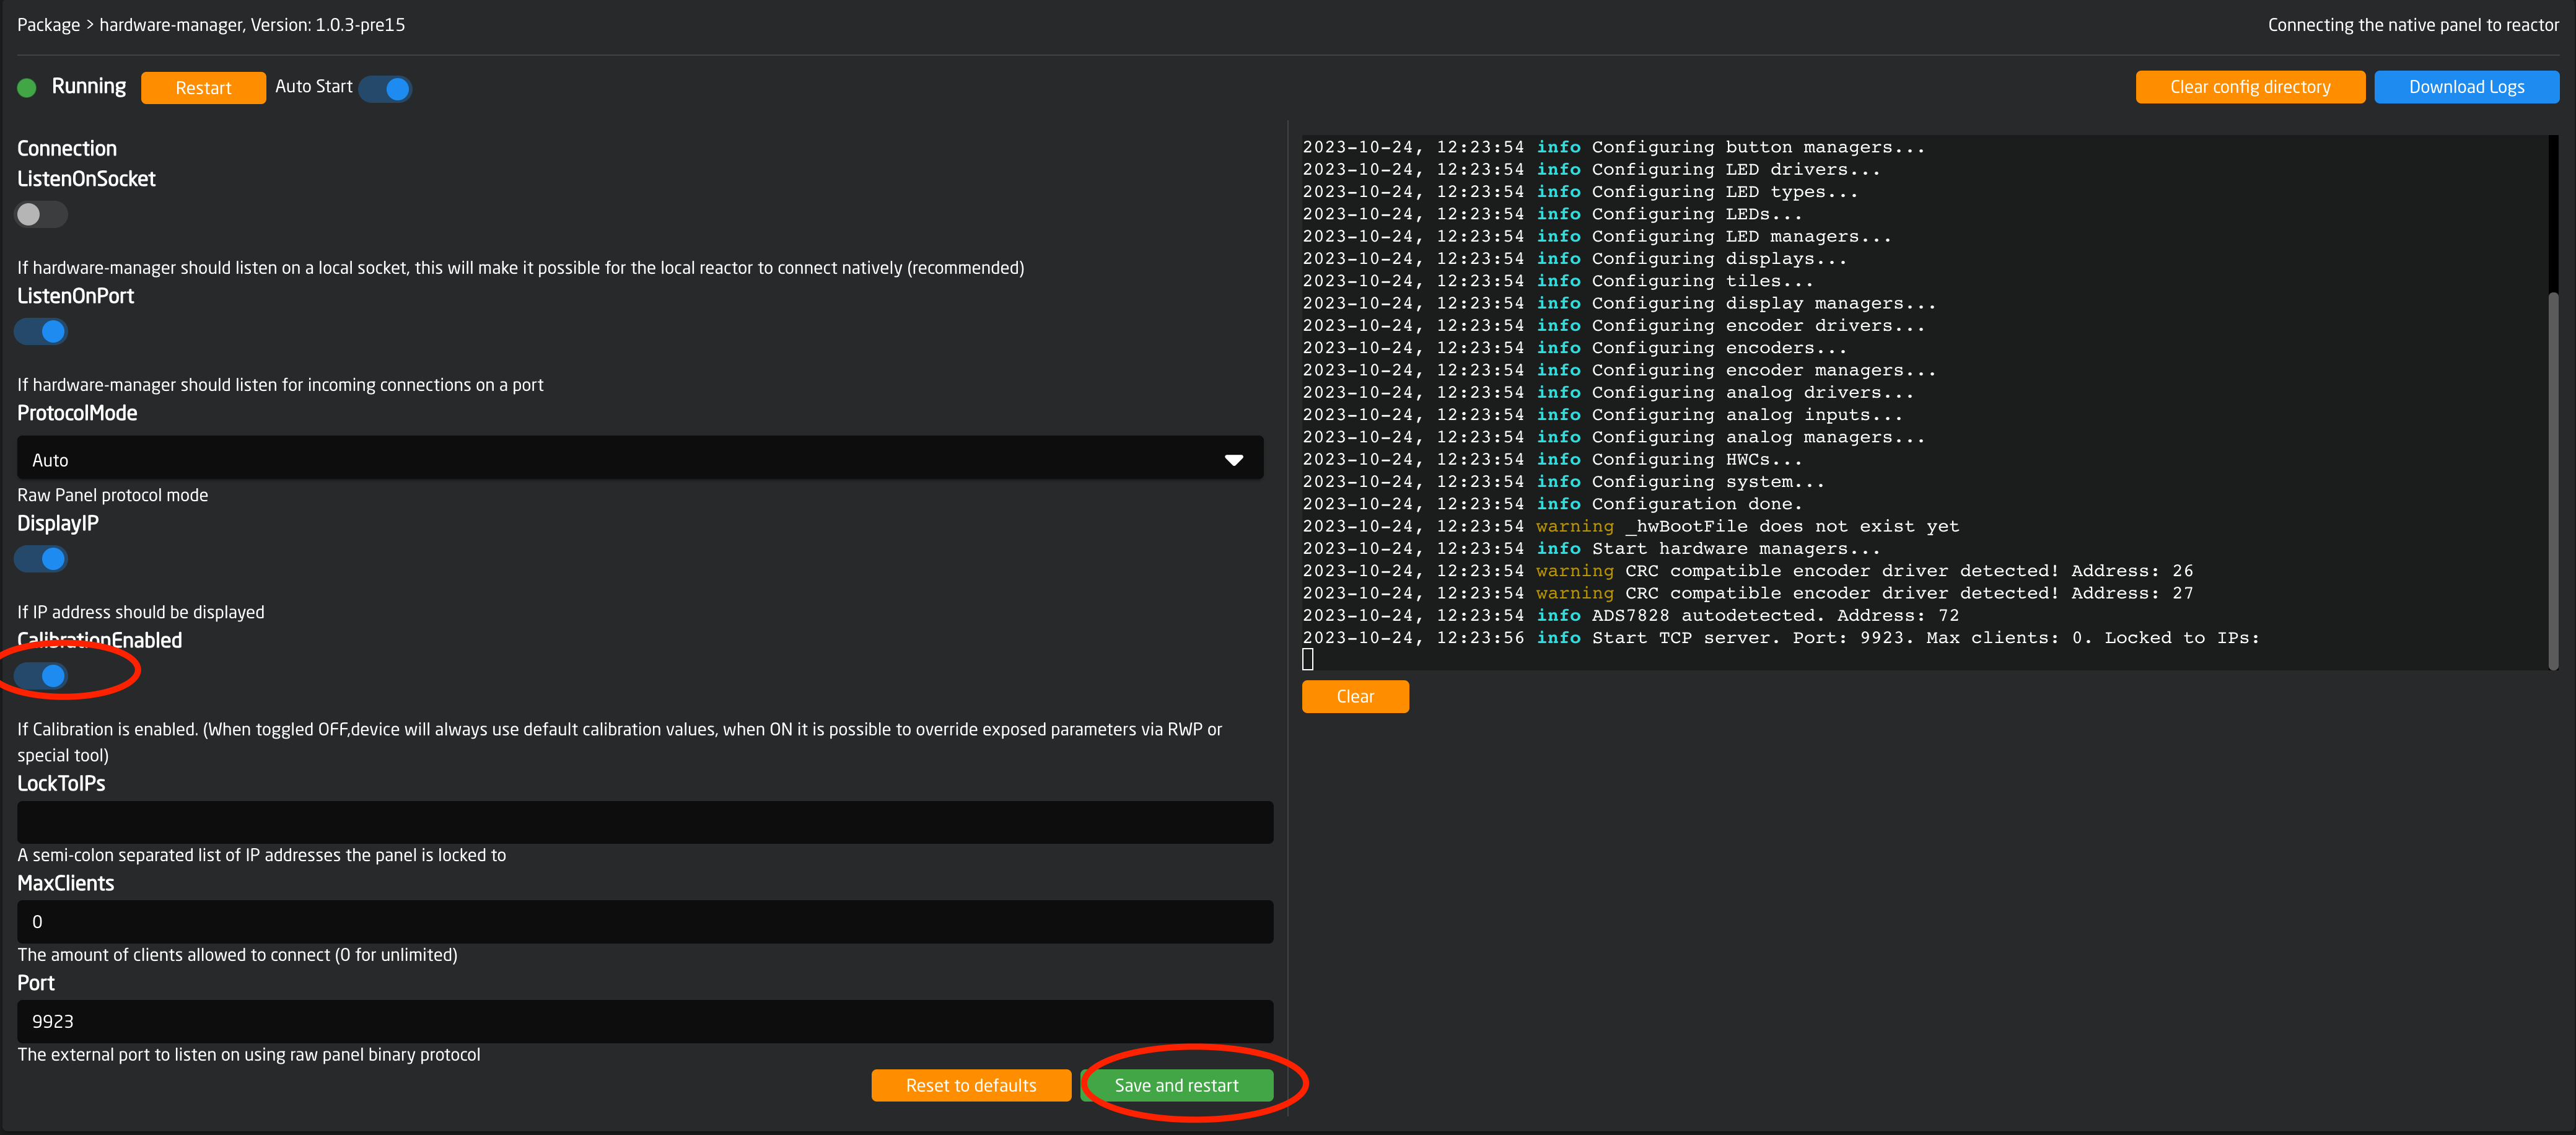
Enable the “CalibrationEnabled” toggle button, click save, and restart.
4. Use either the Hardware Calibrator App to connect and calibrate or manually connect over TCP to the BluePill device and calibrate it that way. To do this, follow one of the two guides below:
Calibrate With The Hardware Calibrator App
Please make sure you have system-manager version 1.0.5-pre2 or higher installed on the controller on which you want to run the Hardware Calibrator app
Ensure that you have the Hardware Calibrator App installed on at least one BP device in your network. You only need one of your devices to have this as it can connect to any BPI (BluePill Inside) device over the network. Fell free to install it on more than one but it's not required.
1.A Online install
(if you have internet access from the BPI device)

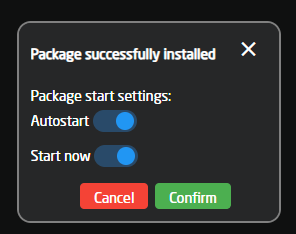
When it's done installing, enable "Autostart" and "Start now" as seen here:
1.B Offline Install
(if you are working with no public internet access on your BPI device)
Download the "hardware-calibrator" package from https://devices.skaarhoj.com/otherpackages
Go to the packages tab seen here and upload the downloaded package to your device via the button at the lower right corner of the packages tab on your device:

Select your downloaded file and click install
When it's done installing, enable "Autostart" and "start now", as seen here:
2. Open the App
After installing, you should now see a new tab at the top of your screen called "Apps", go to it and select the Hardware calibrator app.

If you do not see it here, or there is no "Apps" tab, go back to packages and ensure that the package for Hardware calibrator is running and that "system-manager" is updated.
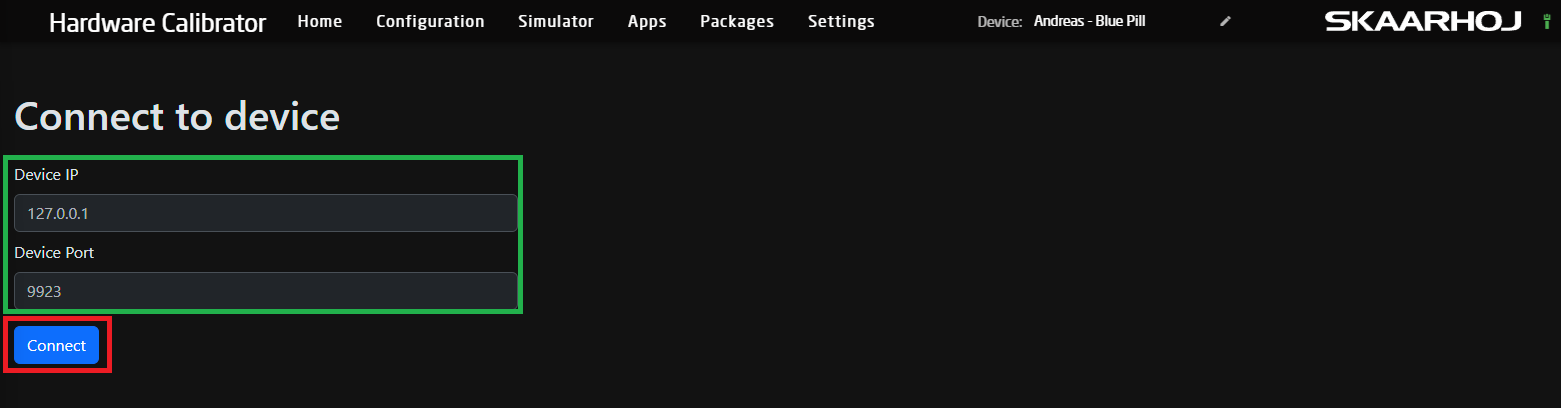
3. Connect to the device from Hardware Calibrator
If you wanna adjust the calibration on the same device as the one you are running hardware calibrator from, then you don't need to touch anything. Just click the "Connect" button marked in red.
If you want to connect to a different device, please fill in the IP of that device and the port if you have changed it; if you don't know, then leave the port as it is. :) Press the "Connect" button marked in red to connect.
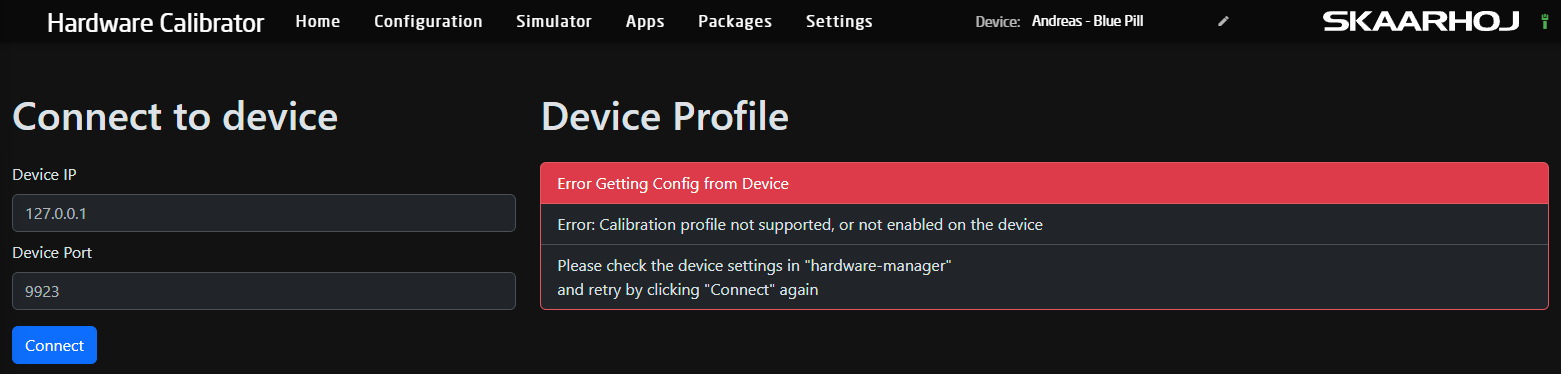
If you get a message like this, then please check the Hardware-Manager version, as well as the IP and port. If you are unsure about the port, you can find it inside Hardware-Manager:
You will also get this warning when connecting to a panel or Bluepill server that does not support calibration or where you might have skipped the steps at the top of this page about enabling the calibration profiles.
4. Understanding the "Calibration Profile" shown when connected
When connected, it will present you with a list of all the components on your device that you can manipulate, as well as two buttons, a reset and a save.
The reset button will poll the original calibration that your device came with and save that to the device. This functions as a Factory Reset button. After pressing it to update the UI, you must click "Connect" again. This will be fixed in a later version so it auto-updates.
"Save", does as it says on the button it saves all the settings currently shown on your screen with any changes you might have made. Any changes will only take effect when saved.
Note: Any changes, both saves and factory resets, only take effect after restarting the device or hardware-manager itself!
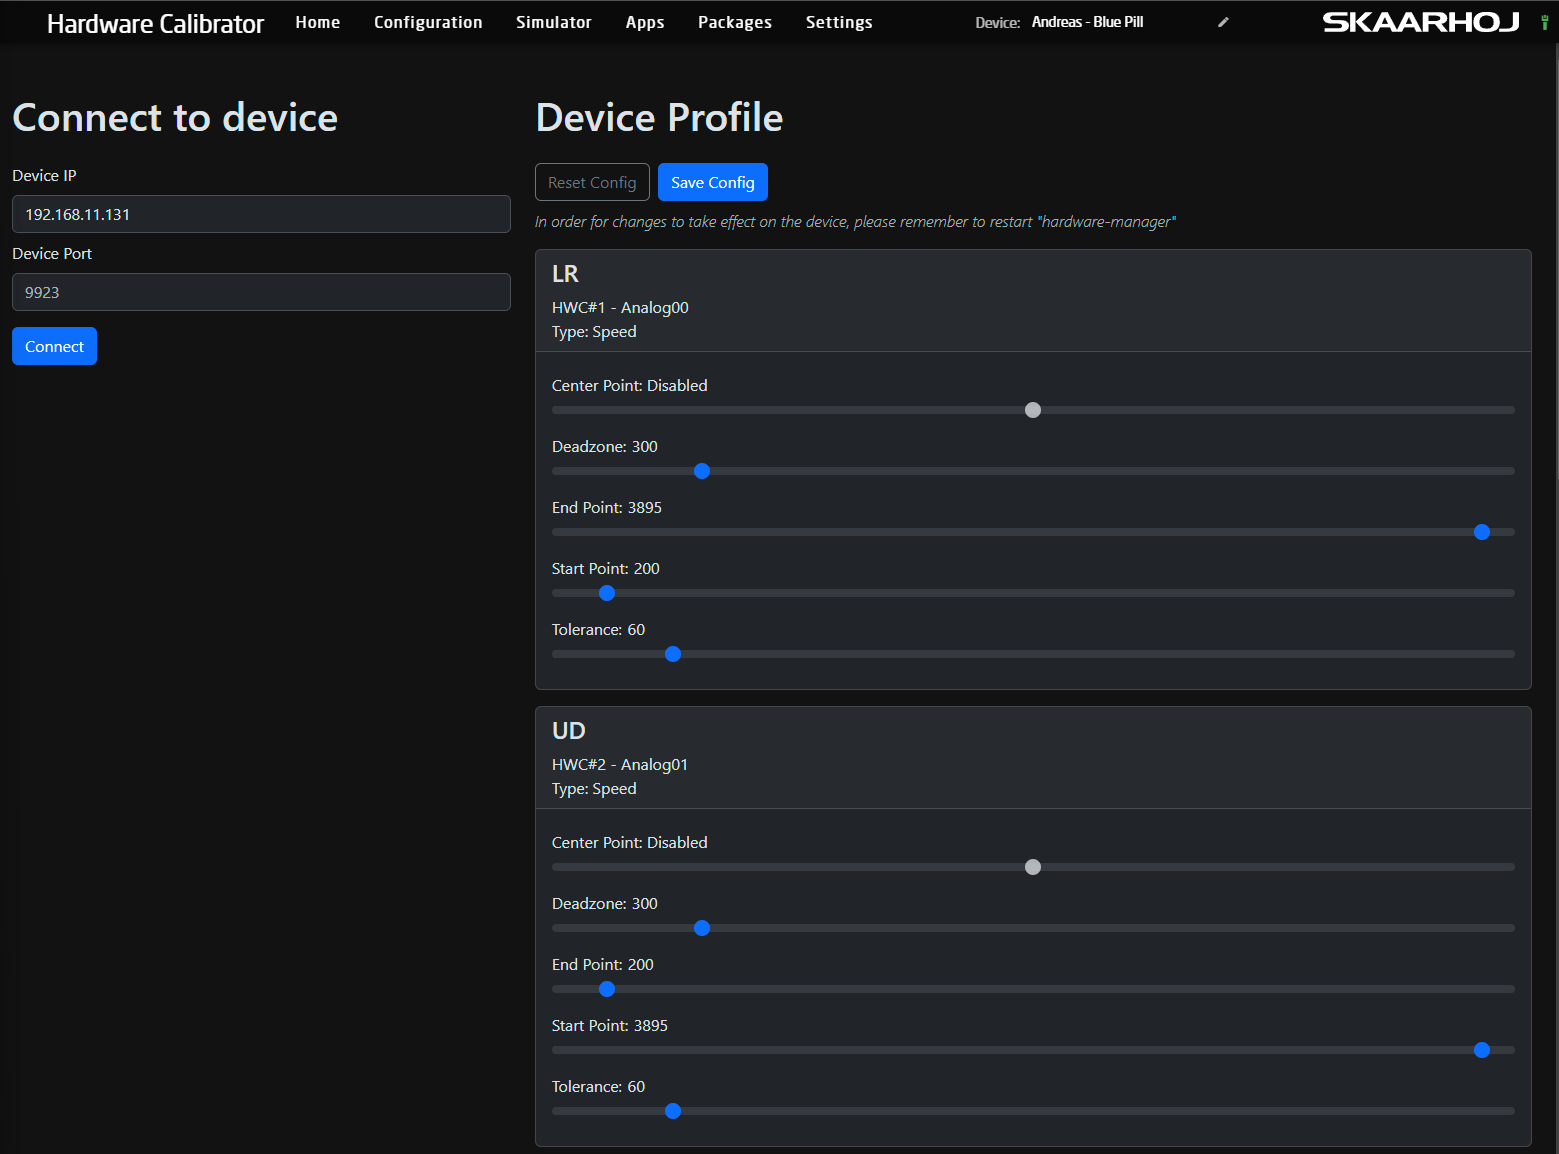
Depending on the type of hardware components the connected device has available, different options will be available or locked out.
What do these settings then mean and control:
- Centre point allows you to move the centre of your value range, mainly found on components like the rotating component on the PTZ joysticks on a PTZ extreme. This can compensate for a slight drift in one or the other direction when you let go of the rotation. This also defines where the centre of the halfway point is on motorized faders.
- Deadzone adjusts the "padding" around the centre value and how far you need to move it before it starts "moving." You would adjust this on a PTZ joystick or zoom rocker to change how sensitive it is in the middle.
- End Point and Start Point control the 2 ends of the component, think all the way up/down of a fader or T-bar, but all so the max movement range on a joystick or zoom rocker. If you find that you are not able to move a T-bar from 0-1000 in its raw value but instead you might only get something like 100-950 then you would move these values closer to the middle in order for the component to hit "Max/Min" before hitting the physical limit of its movement range. In the same manner, if you find that you have a lot of dead space at the ends, you can move these sliders further out to gain more resolution.
- Tolerance is used to define how big or small a change is needed before the component sends a "change." In 99% of cases, this is not worth messing with, but if you have a stutter or maybe more than normal EMC (electromagnetic noise) in your environment, it might be worth raising this to prevent unintended movement. But again, this is only in very extreme cases.
Most people will only need to play with the "Deadzone" for any speed components like if you like a more sensitive Joystick. Or the "Start/End point" if you have a T-Bar, Fader, RCP-Joystick or a Potentiometer that is not going the full range.
5. Test out your new Calibration
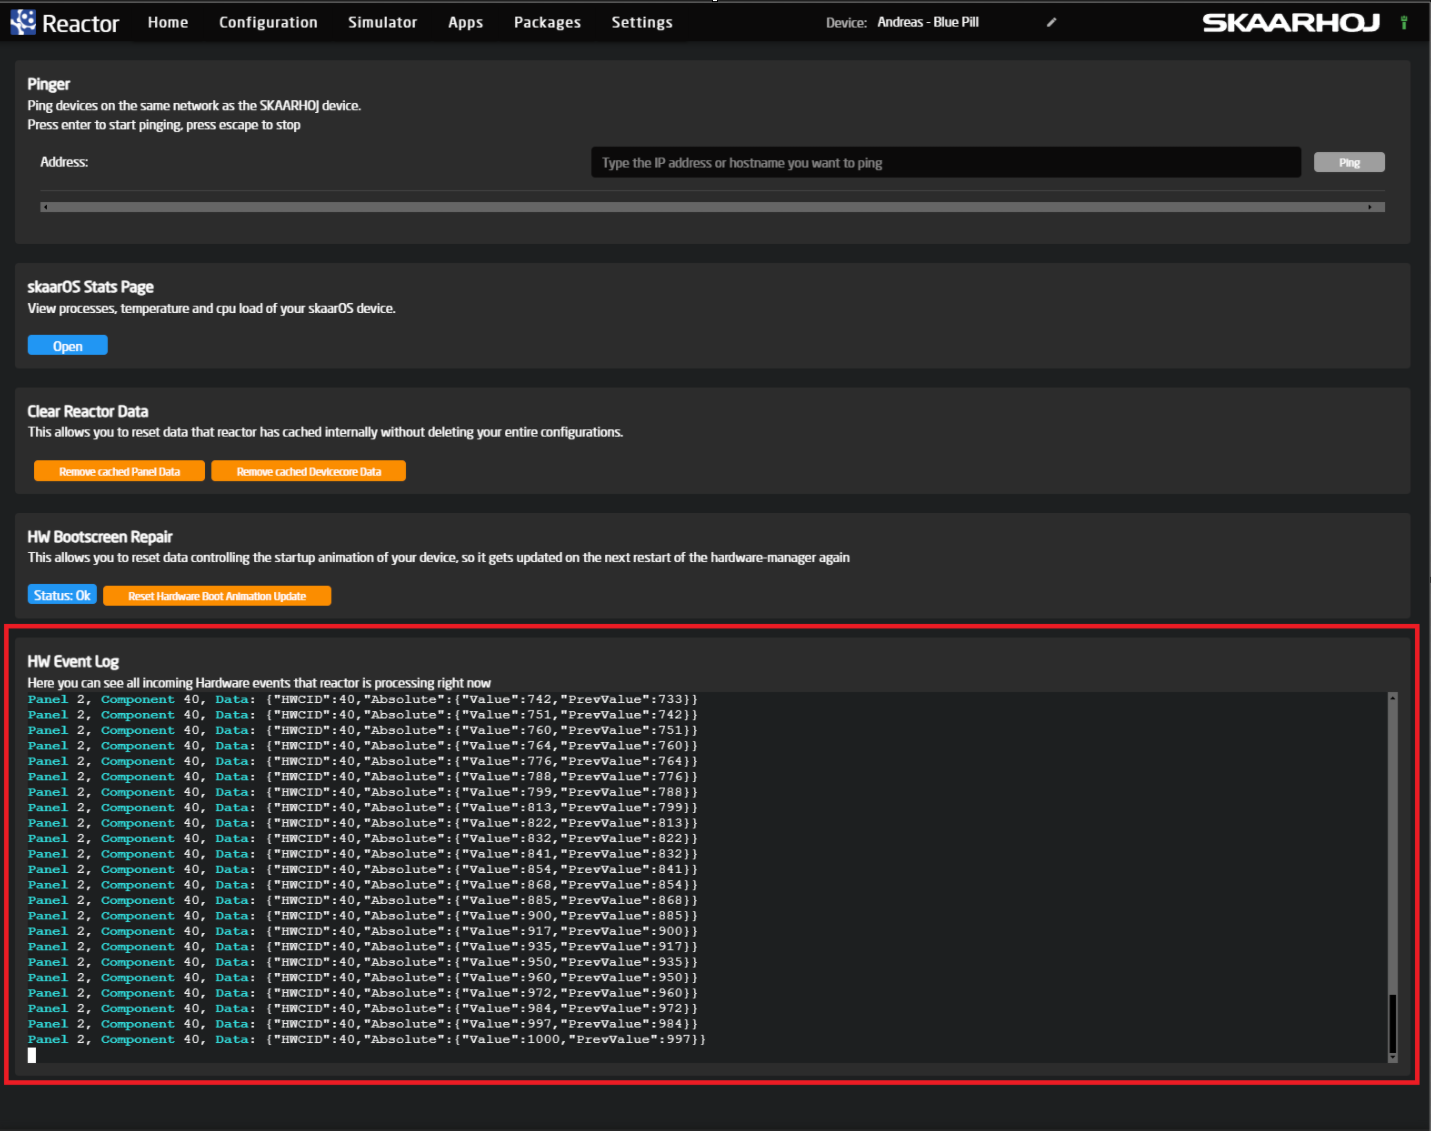
The simplest way to test out your new calibration is either by just playing with it on your setup or by using our build in hardware component testing tool, that's included in reactor.
To use this tool, make sure your panel is connected to Reactor and showing up, then go to the "Tools" page via this small button at the bottom right of Reactor's home page:

Or go to: http://<your reactor ip>/tools
Look at the window called "HW Event Log" This should show you all the values sent by hardware-manager to the reactor when you move or press any hardware components. if it's not showing up like below, reload the page:
Manual Calibration Over TCP
Please make sure the computer you will use has some sort of tool to maintain a TCP connection to the controller
Netcat utility can provide this functionality.
For Microsoft Windows the easiest way is to install Nmap package
For macOS, you can install it using Brew.
Please make sure your computer and controller are on the same network.
Step-by-step guide:
As the next step, we can now establish the TCP connection to the controller and verify that calibration is enabled.
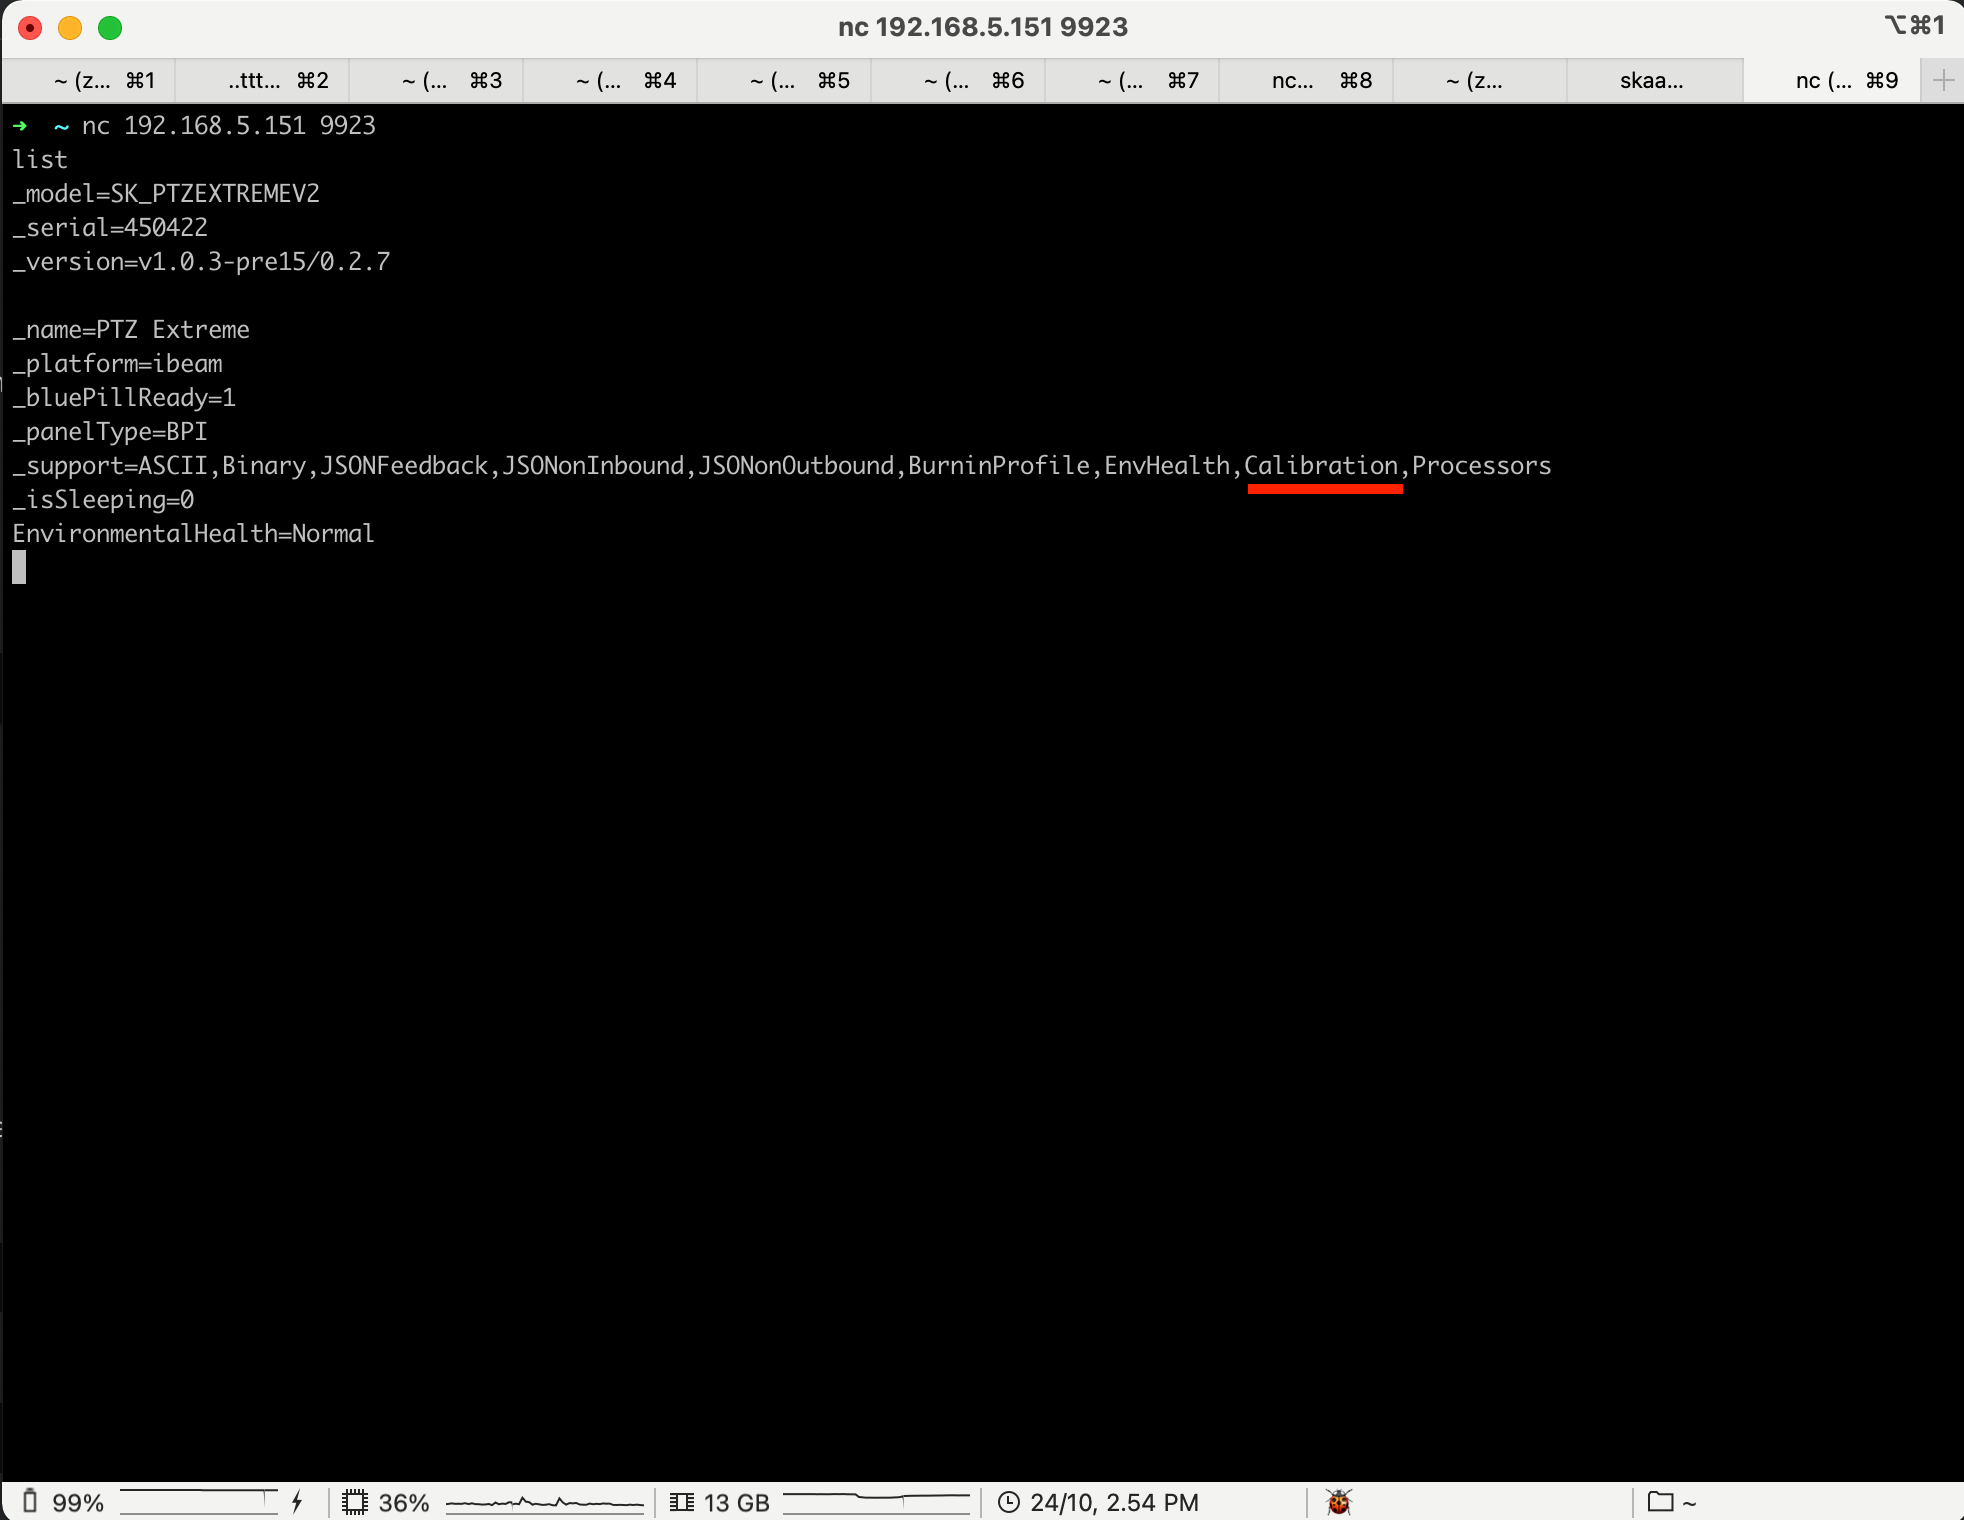
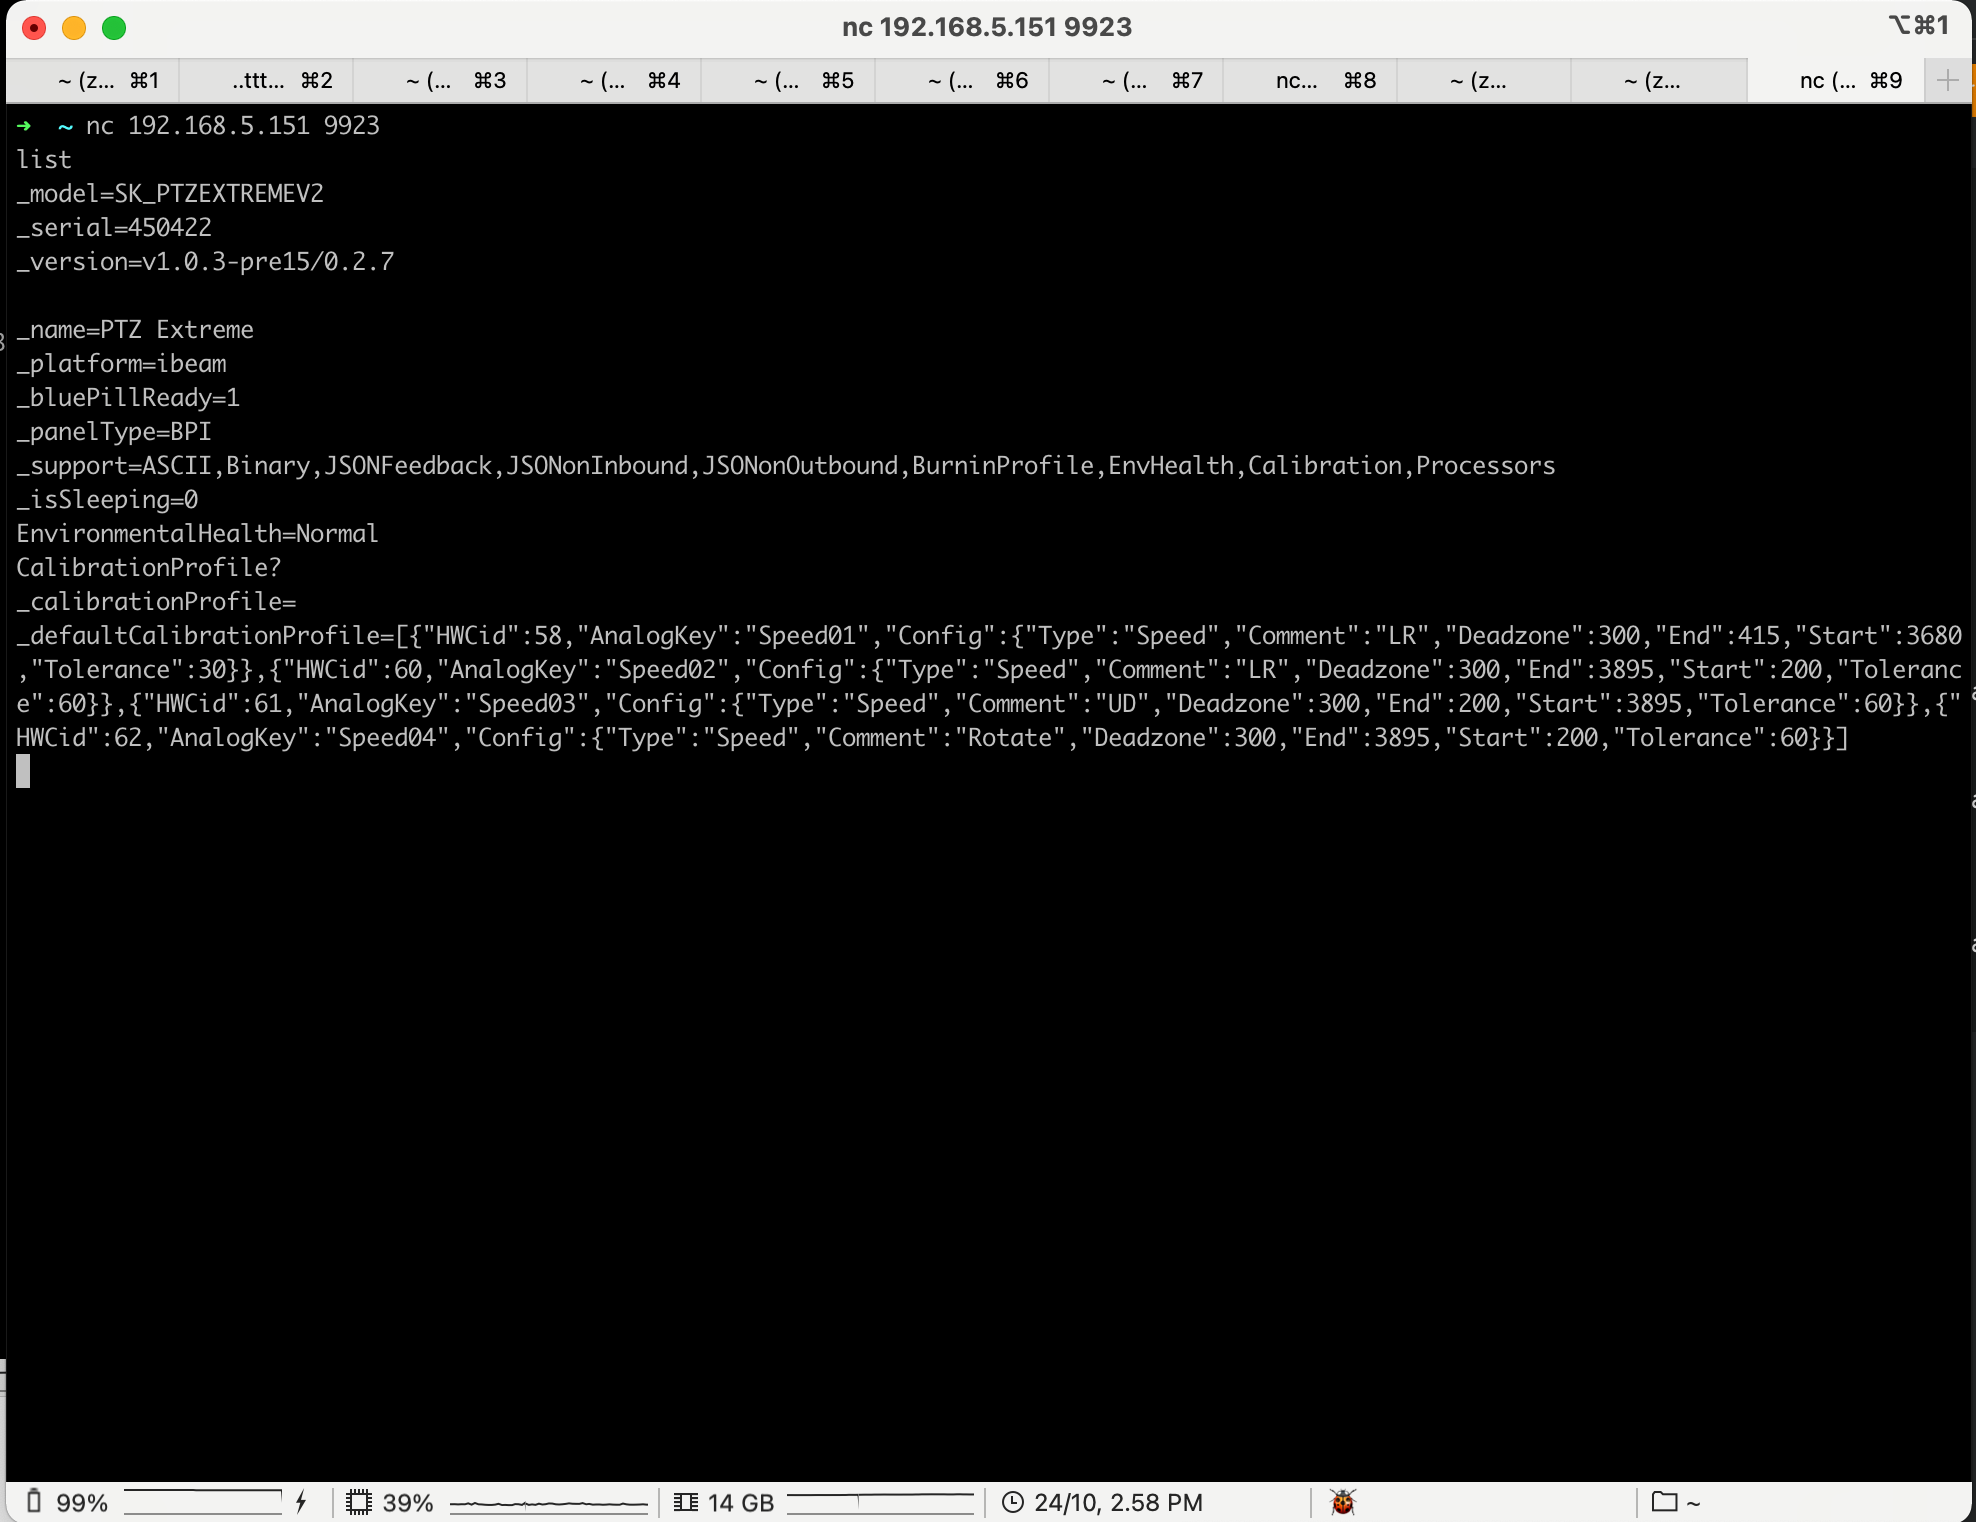
Open your terminal app and run the following command:
nc 192.168.5.151 9923
Of course the ip you use must be the ip of your controller and 9923 is the default port value, unless you have changed it in hardware-manager settings page.
Next, send the following command:
list
Verify that this is the controller you have intended to adjust by comparing the model and serial number.
Also, please verify that you see “Calibration” among other supported features.
Next, type the following command:
CalibrationProfile?
In response, one should see a JSON-formatted array of analog component parameters allowed to be modified by the user.
For example, we will modify the deadzone of the joystick on PTZ Extreme Controller.
One can look up the HWC assignments specific per controller on https://devices.skaarhoj.com/panels
In case of PTZ Extreme, HWC ids for joystick : 60- horizontal(LR-left/right), 61-vertical axis(UD-up/down). Please note down the values.
As the next step, we need to copy the array after the _defaultCalibrationProfile= or the whole thing together.
_defaultCalibrationProfile=[{"HWCid":58,"AnalogKey":"Speed01","Config":{"Type":"Speed","Comment":"LR","Deadzone":300,"End":415,"Start":3680,"Tolerance":30}},{"HWCid":60,"AnalogKey":"Speed02","Config":{"Type":"Speed","Comment":"LR","Deadzone":300,"End":3895,"Start":200,"Tolerance":60}},{"HWCid":61,"AnalogKey":"Speed03","Config":{"Type":"Speed","Comment":"UD","Deadzone":300,"End":200,"Start":3895,"Tolerance":60}},{"HWCid":62,"AnalogKey":"Speed04","Config":{"Type":"Speed","Comment":"Rotate","Deadzone":300,"End":3895,"Start":200,"Tolerance":60}}]
Next, we substitute _defaultCalibrationProfile with SetCalibrationProfile and modify the deadzone of HWCid 60 and 61 to a value of 200, for example.
As a result, the final command we need to send back should look like below.
SetCalibrationProfile=[{"HWCid":58,"AnalogKey":"Speed01","Config":{"Type":"Speed","Comment":"LR","Deadzone":300,"End":415,"Start":3680,"Tolerance":30}},{"HWCid":60,"AnalogKey":"Speed02","Config":{"Type":"Speed","Comment":"LR","Deadzone":200,"End":3895,"Start":200,"Tolerance":60}},{"HWCid":61,"AnalogKey":"Speed03","Config":{"Type":"Speed","Comment":"UD","Deadzone":200,"End":200,"Start":3895,"Tolerance":60}},{"HWCid":62,"AnalogKey":"Speed04","Config":{"Type":"Speed","Comment":"Rotate","Deadzone":300,"End":3895,"Start":200,"Tolerance":60}}]
If all is fine you should not get any response back. After sending CalibrationProfile? again you should see a similar message as first time, although _calibrationProfile= will have the new parameters you have just set manually.
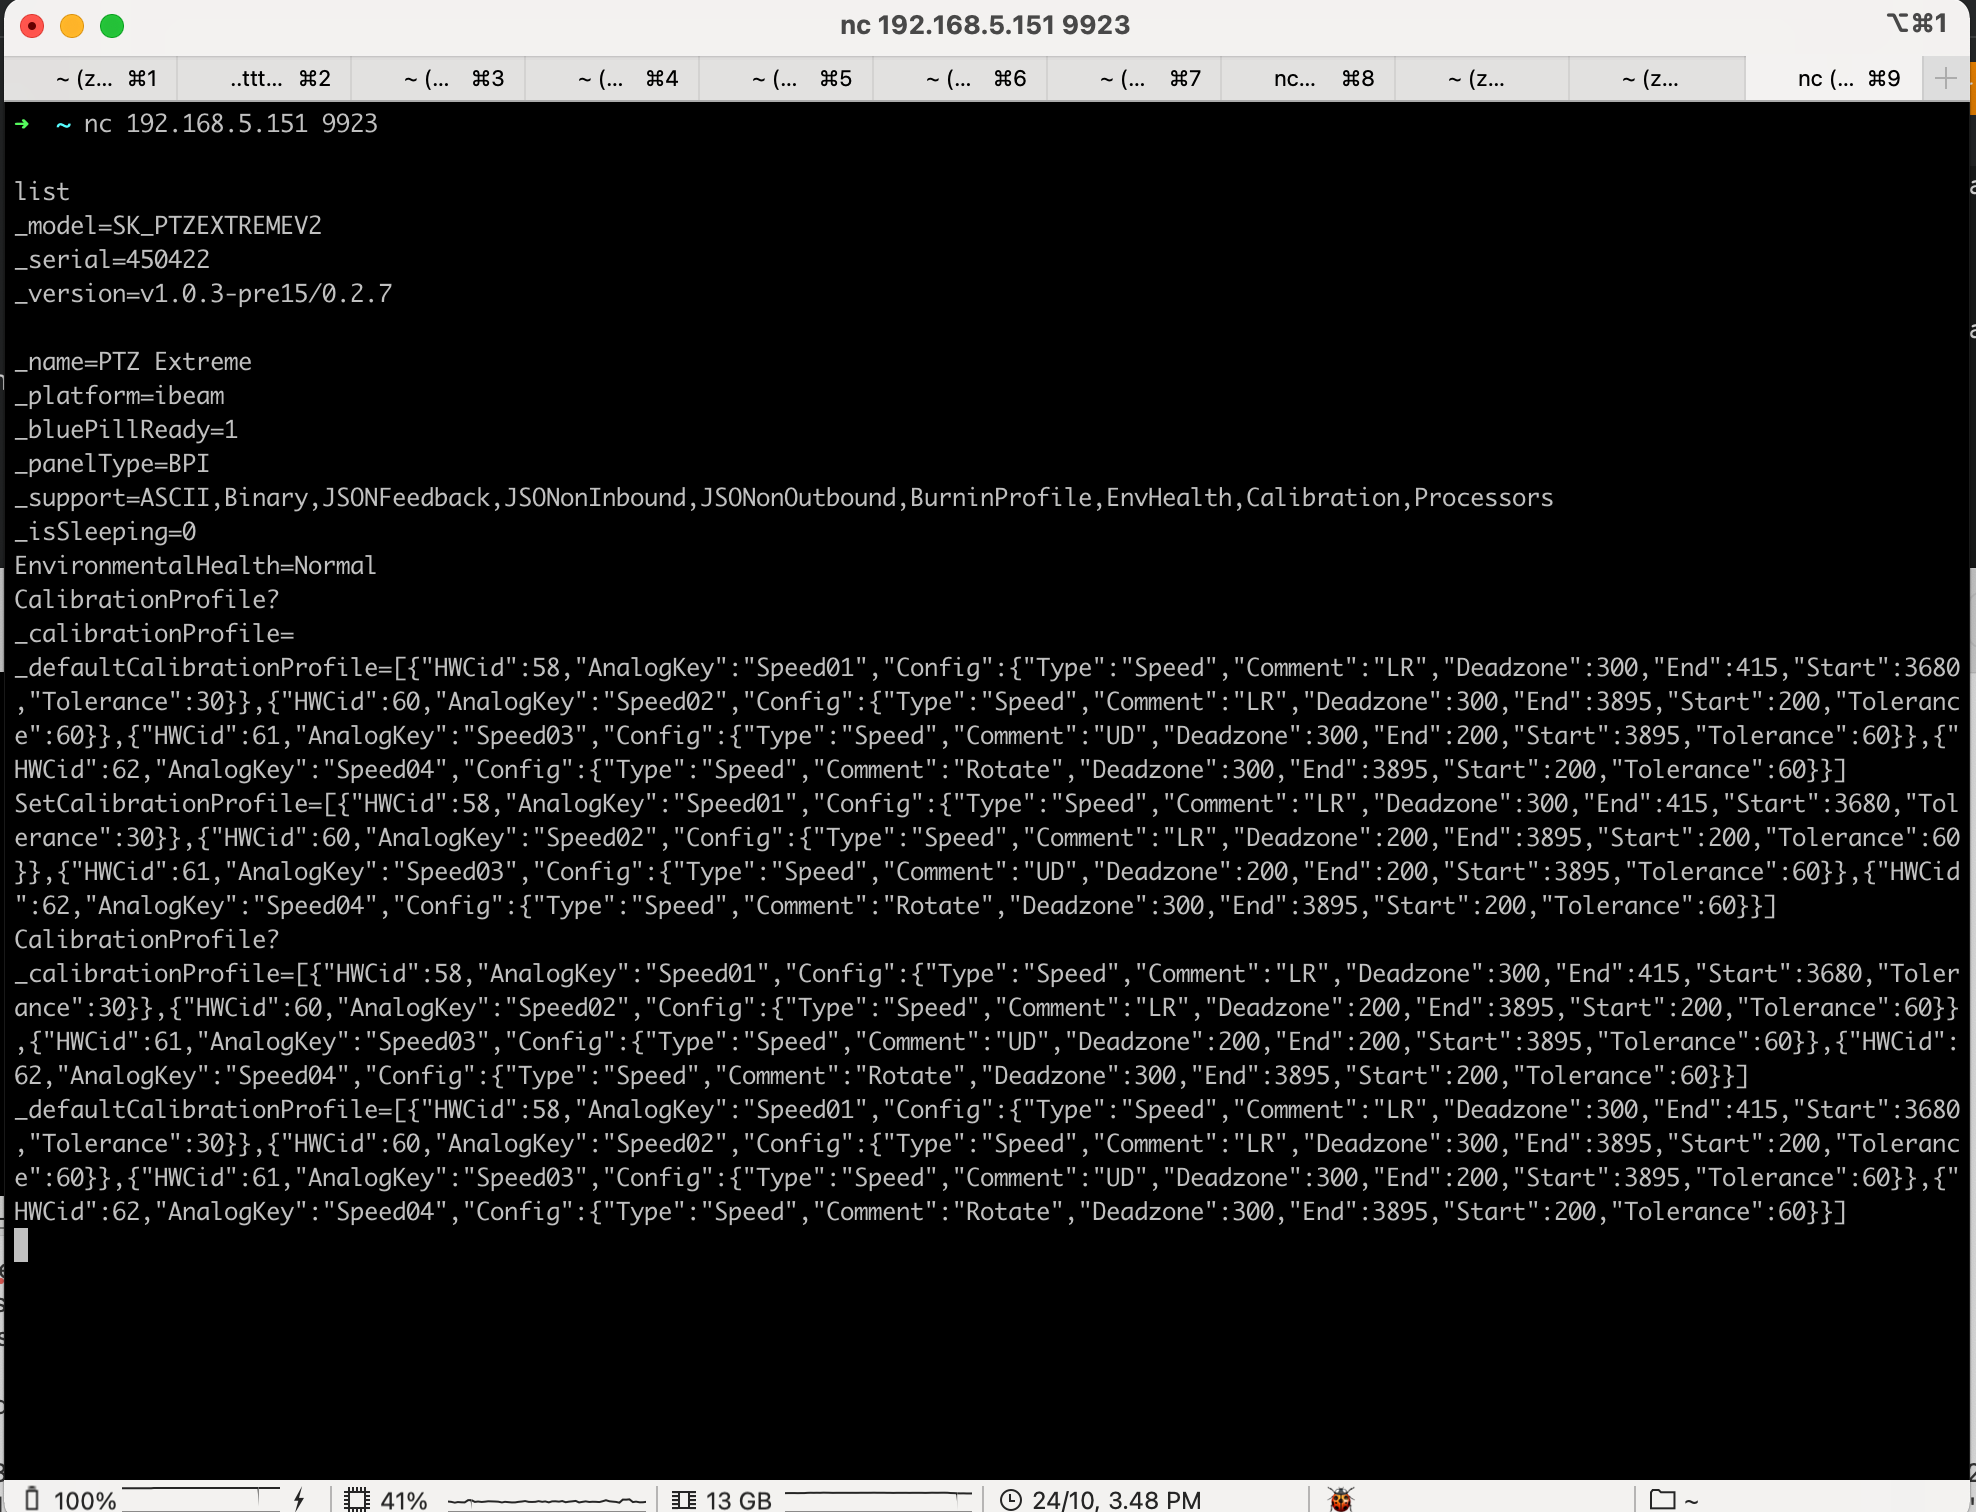
Additional verification can be found in the logs of hardware manager. If correct calibration profile was sent, you will find confirmation in the log, as seen below.

*If you get “nack” in response, the content received by JSON is not valid.
At this moment the new “parameters” are saved and will take effect next time hardware-manager starts.
So either power cycle the unit or restart the hardware-manager to test new settings.
You can always "roll-back" to original settings either by simply disabling the "CalibrationEnabled" in the settings and restarting, or copy-pasting values from _defaultCalibrationProfile to SetCalibrationProfile command and restarting.