External Camera Select
With a few simple steps it is easy to set up an external camera selector on your Standard or Pro Class Skaarhoj PTZ panels. This can be used to have the camera select of your PTZ panel follow along with a video router or video switcher or it could be used to set up an additional Skaarhoj panel for an expanded camera select.
External Camera Select from External Device
- Make sure you have connected to all your needed devices on the Home Page
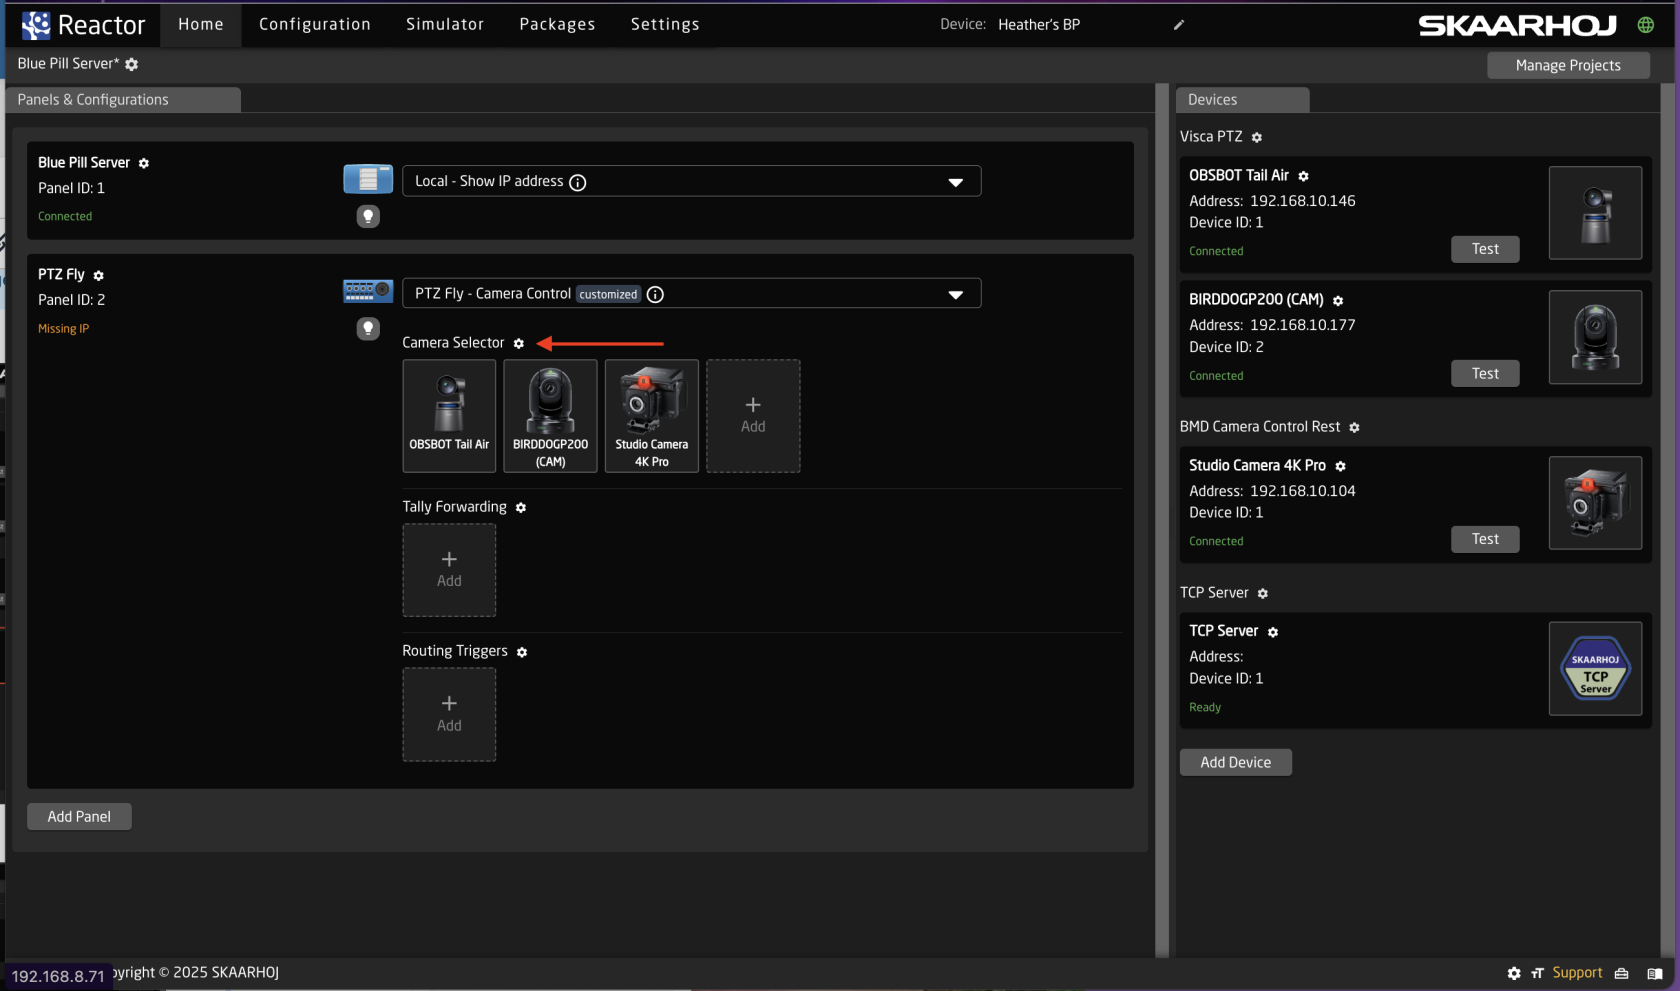
- On the Home Page, open the Camera Selector settings table.
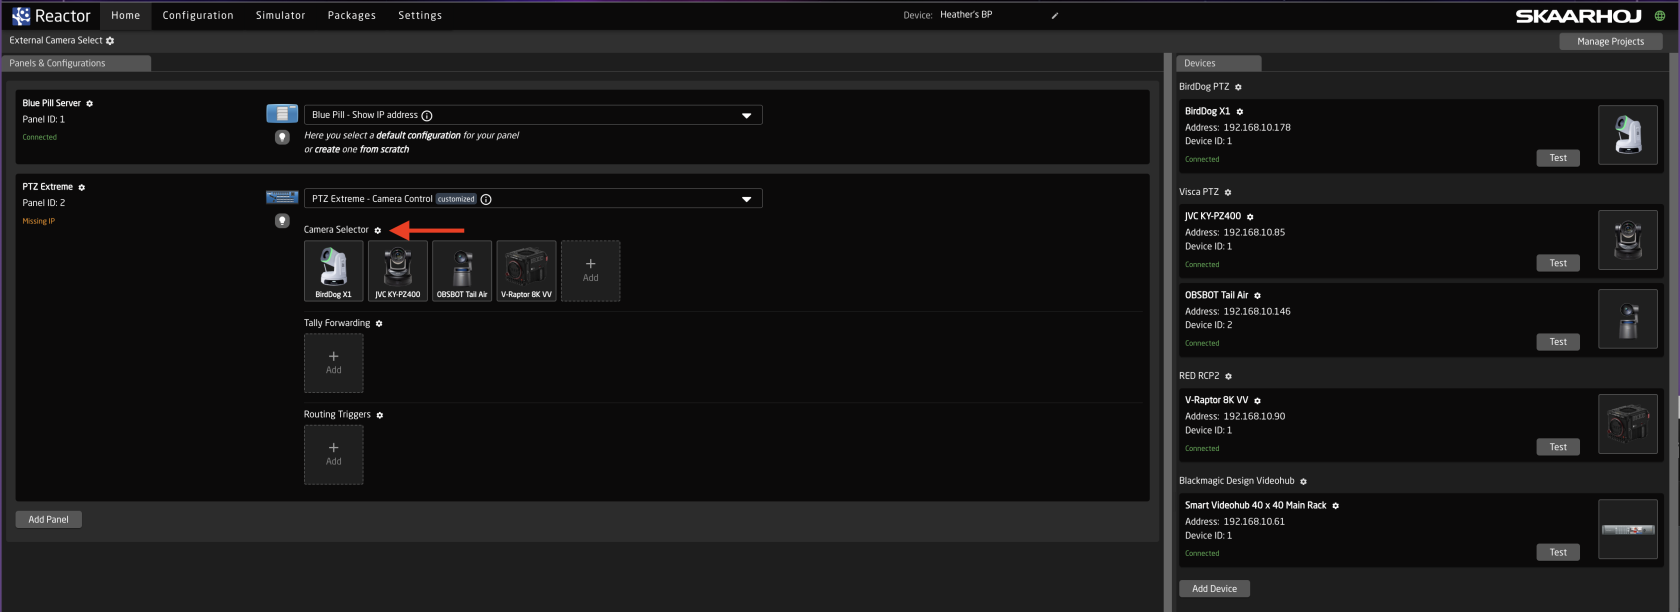
- Enable Show Advanced in the Camera Selector

- Input a unique number to associate with the camera in the Ext. Cam Number column.
It is recommended to use the same number as is used for the input on the triggering device. Example if using a BMD VideoHub and the camera is Input 5, set the Ext. Cam Number to 5 as well.

-
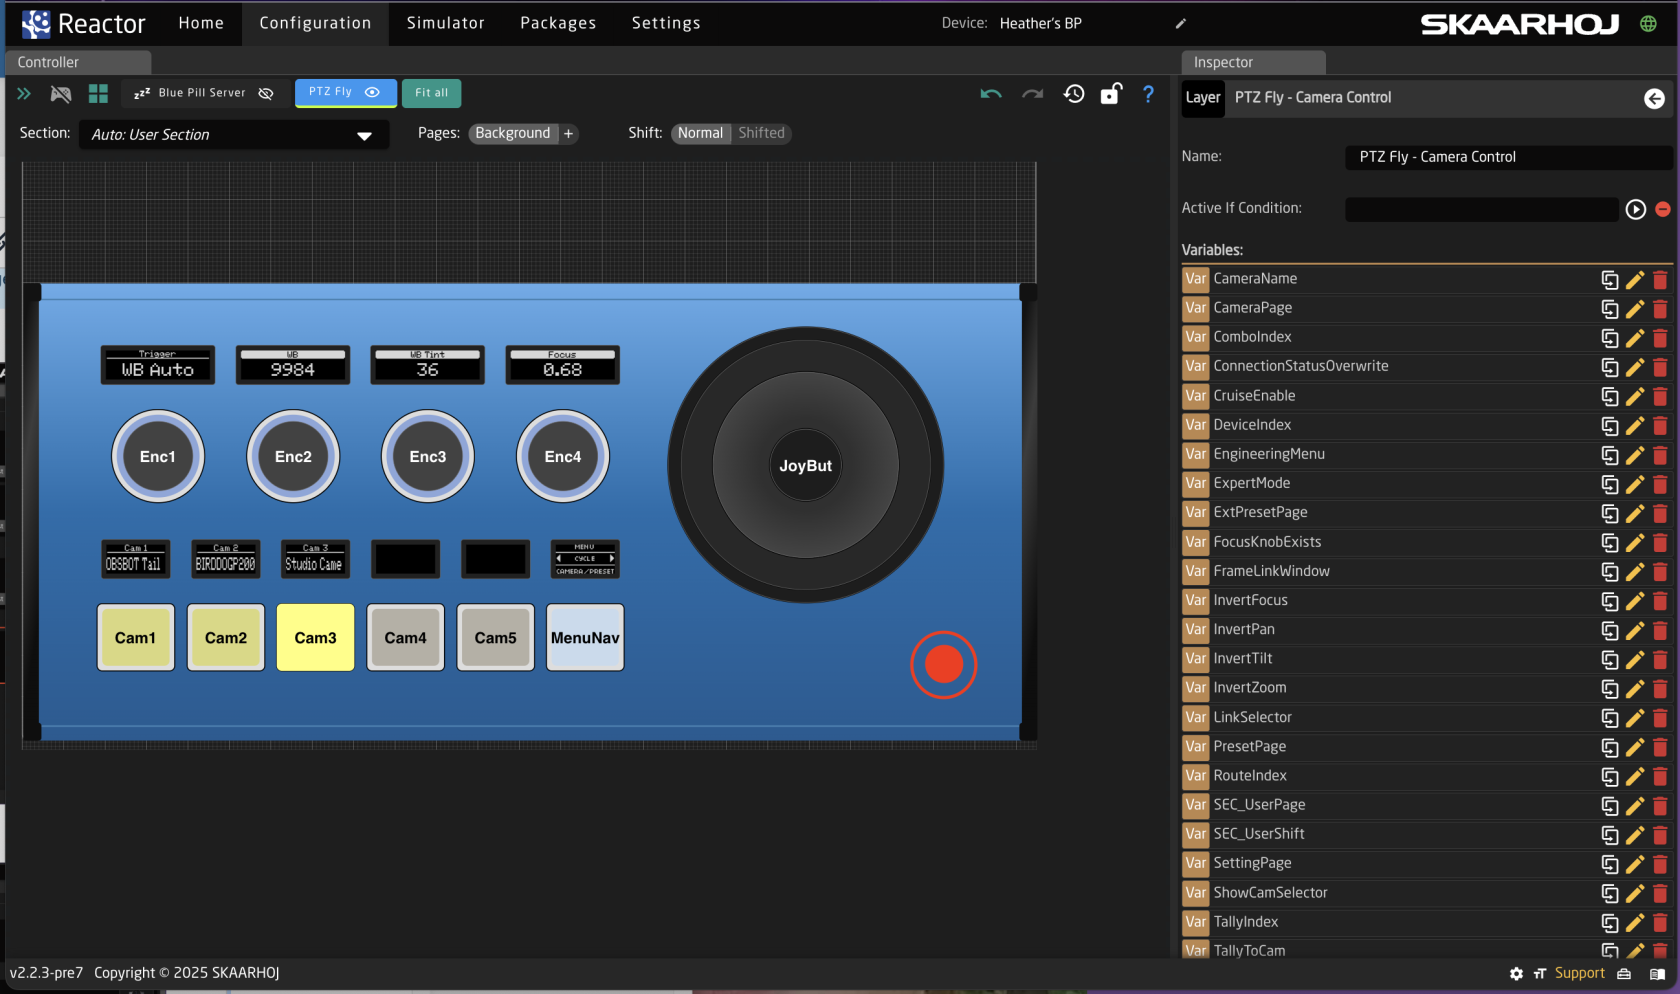
Navigate to the Configuration Page.
- If setting up for a single panel only, click anywhere on the panel background (blue part) to open the Inspector on the configuration base layer.
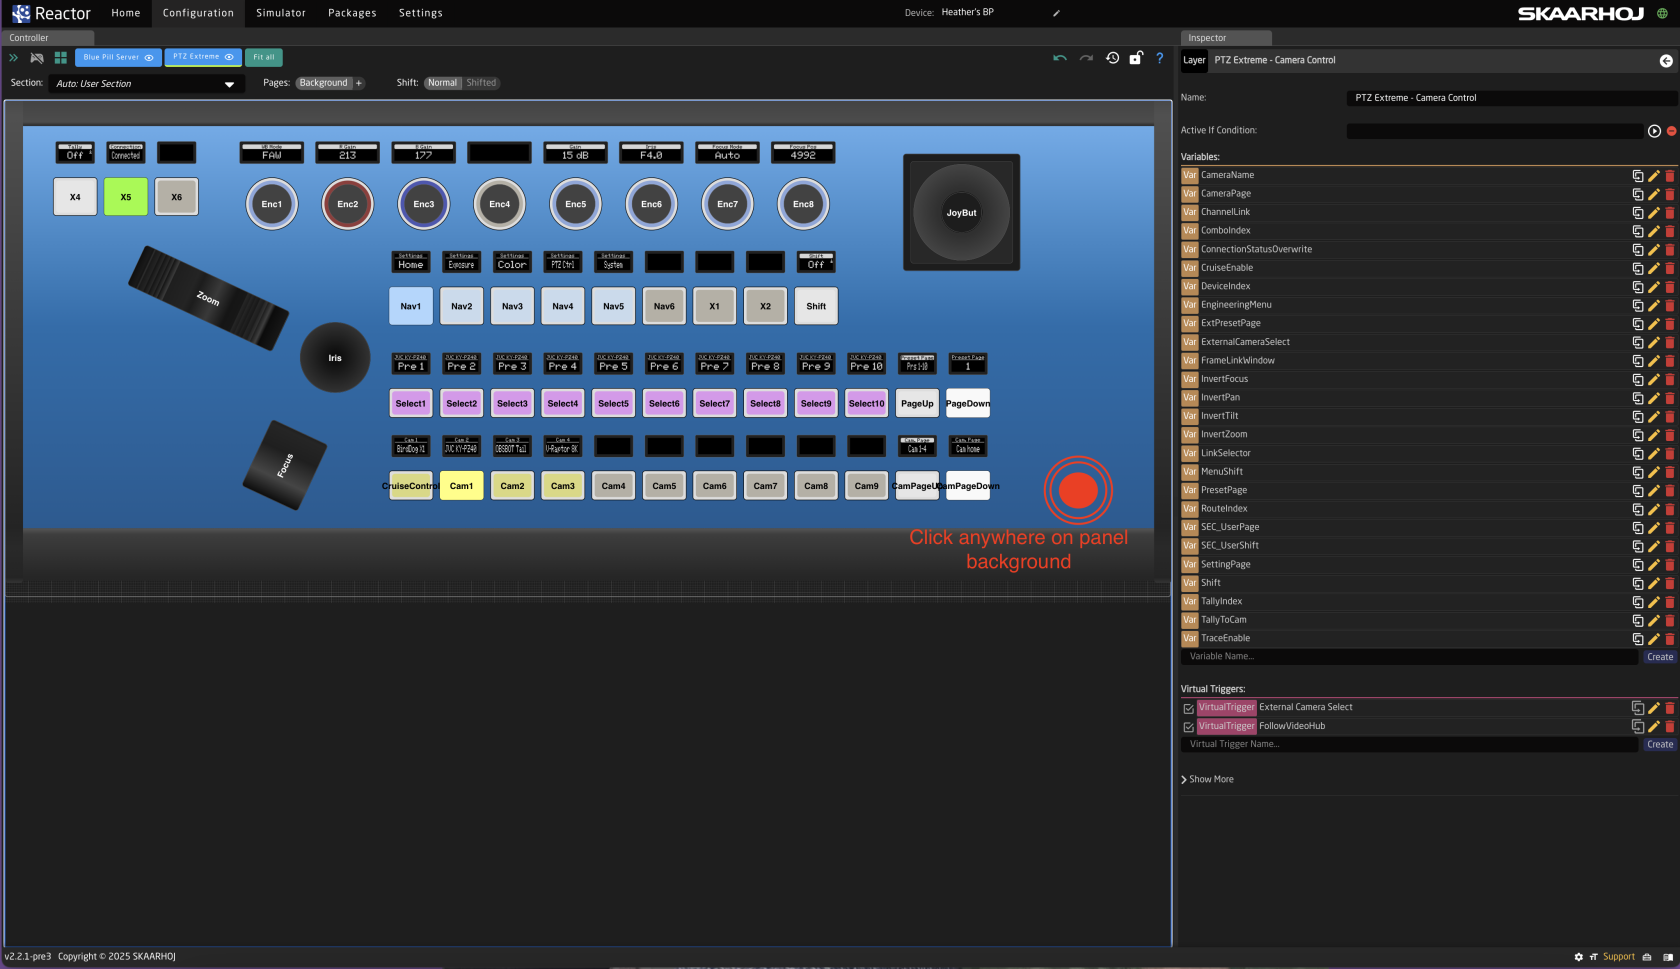
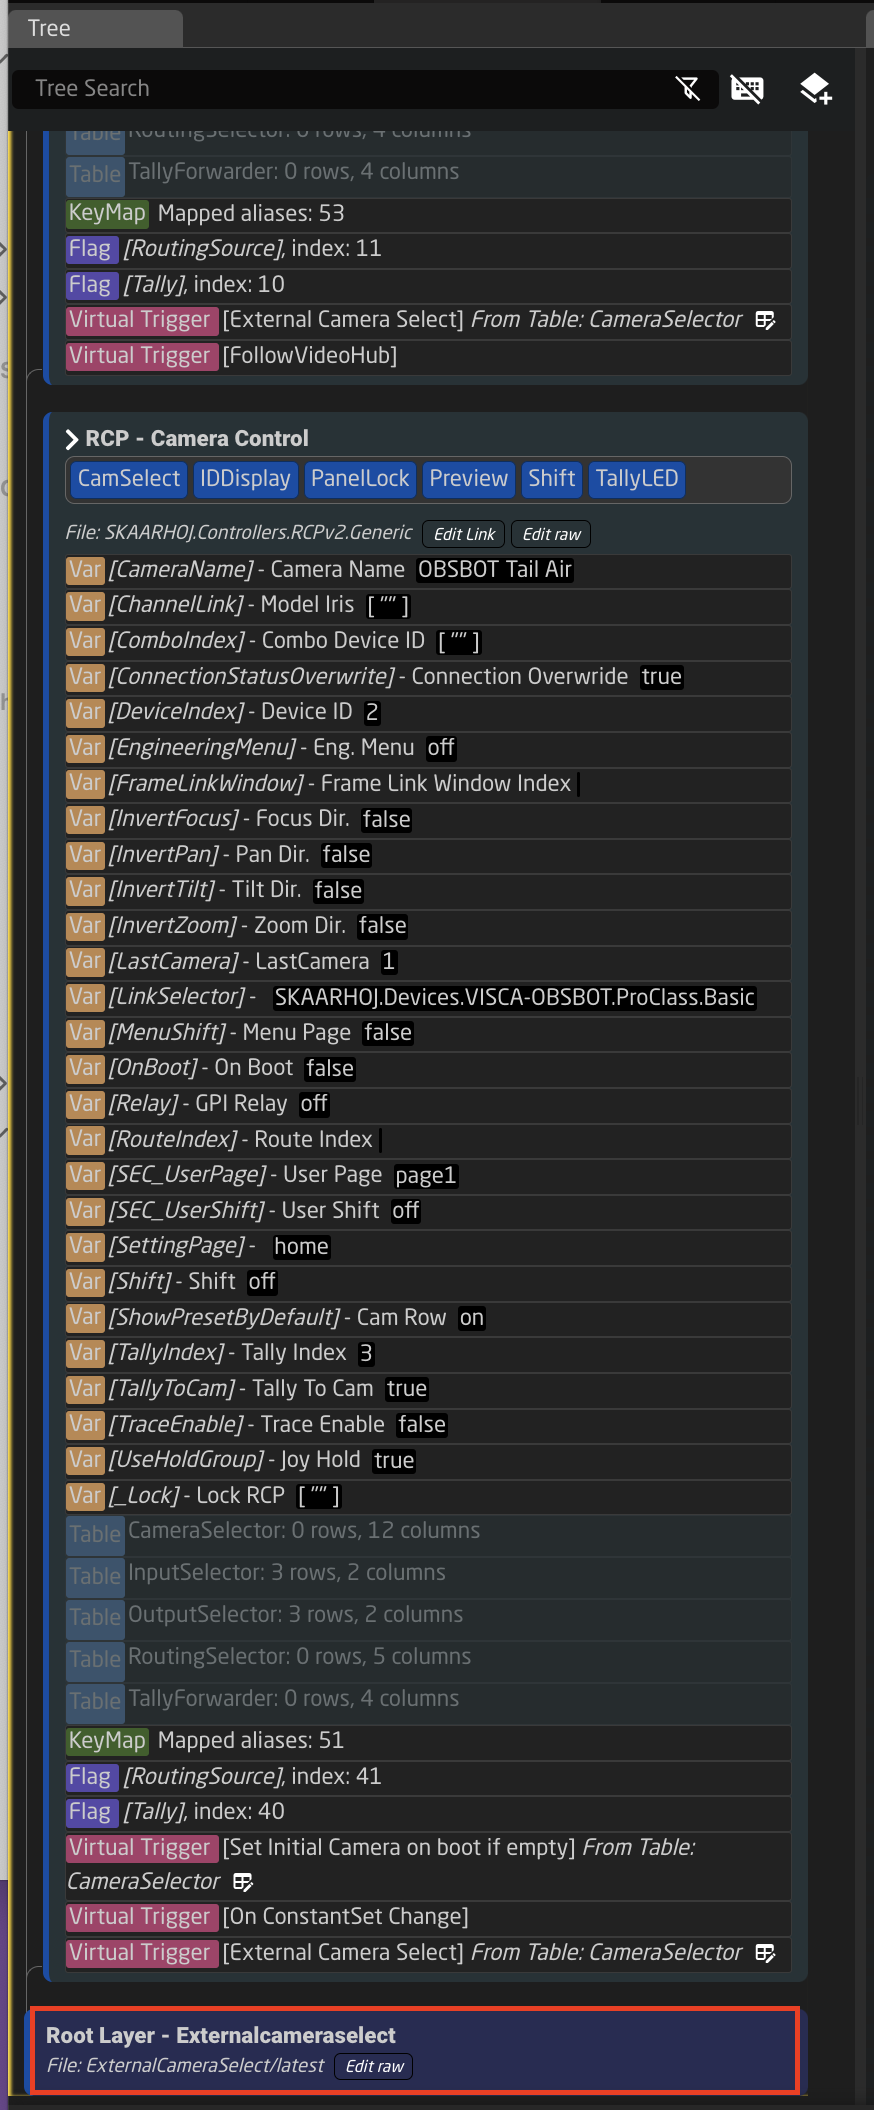
- If setting up for multiple panels within the same project, open the Configuration Tree and click on the Root Layer at the bottom.
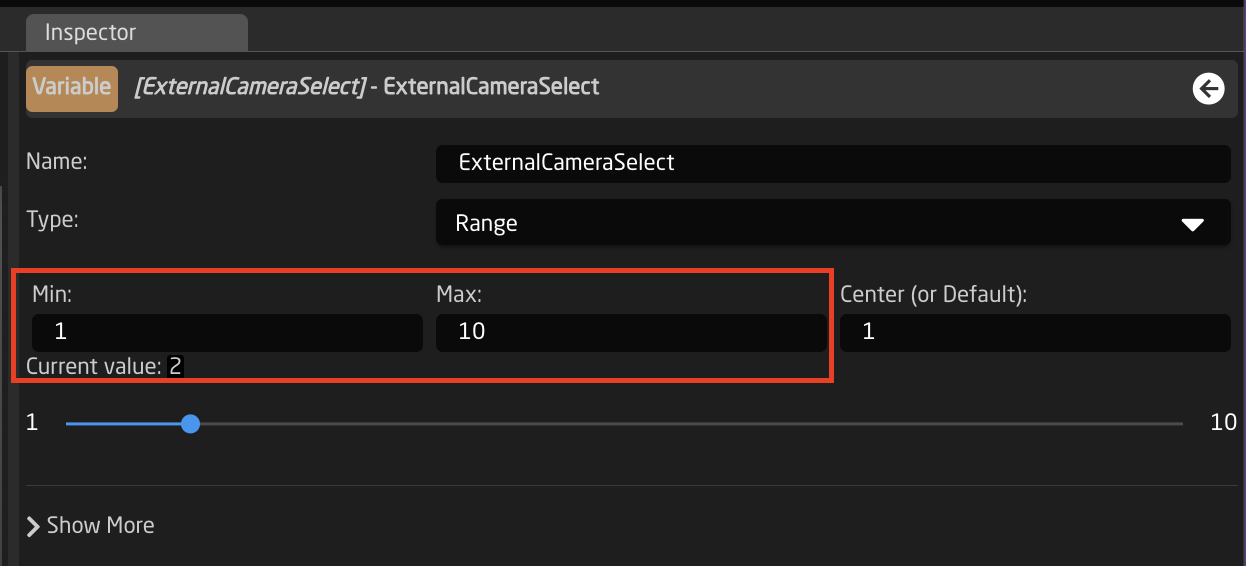
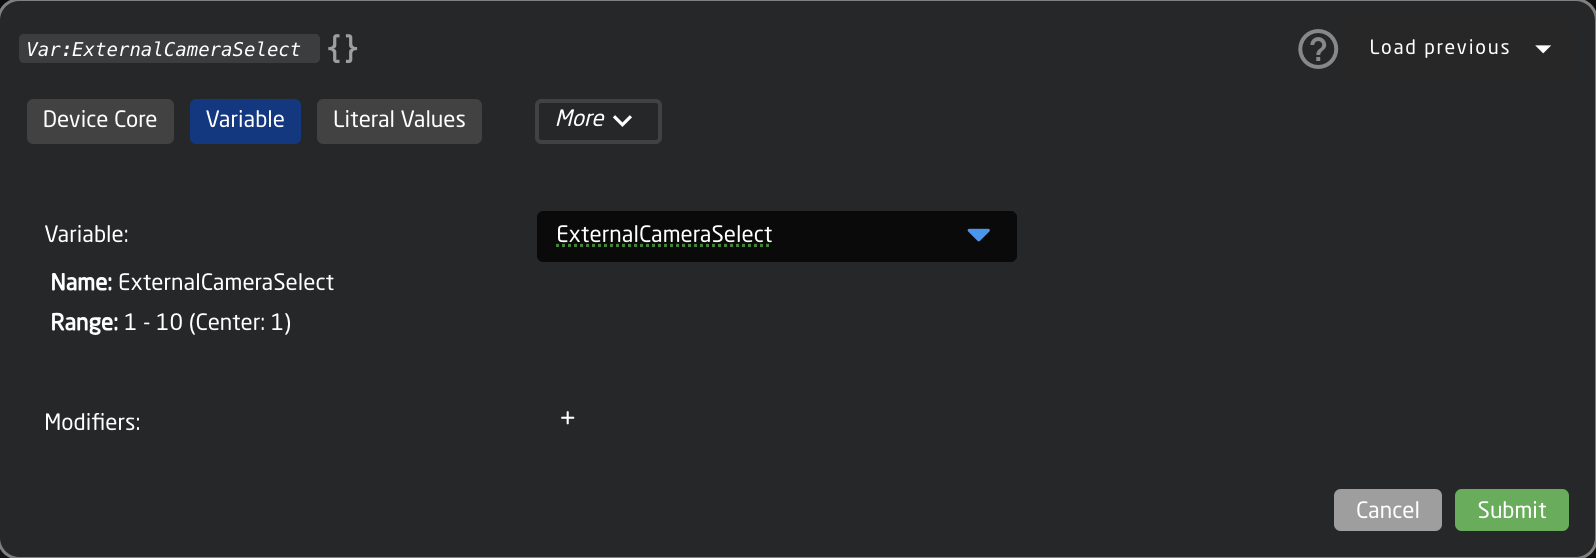
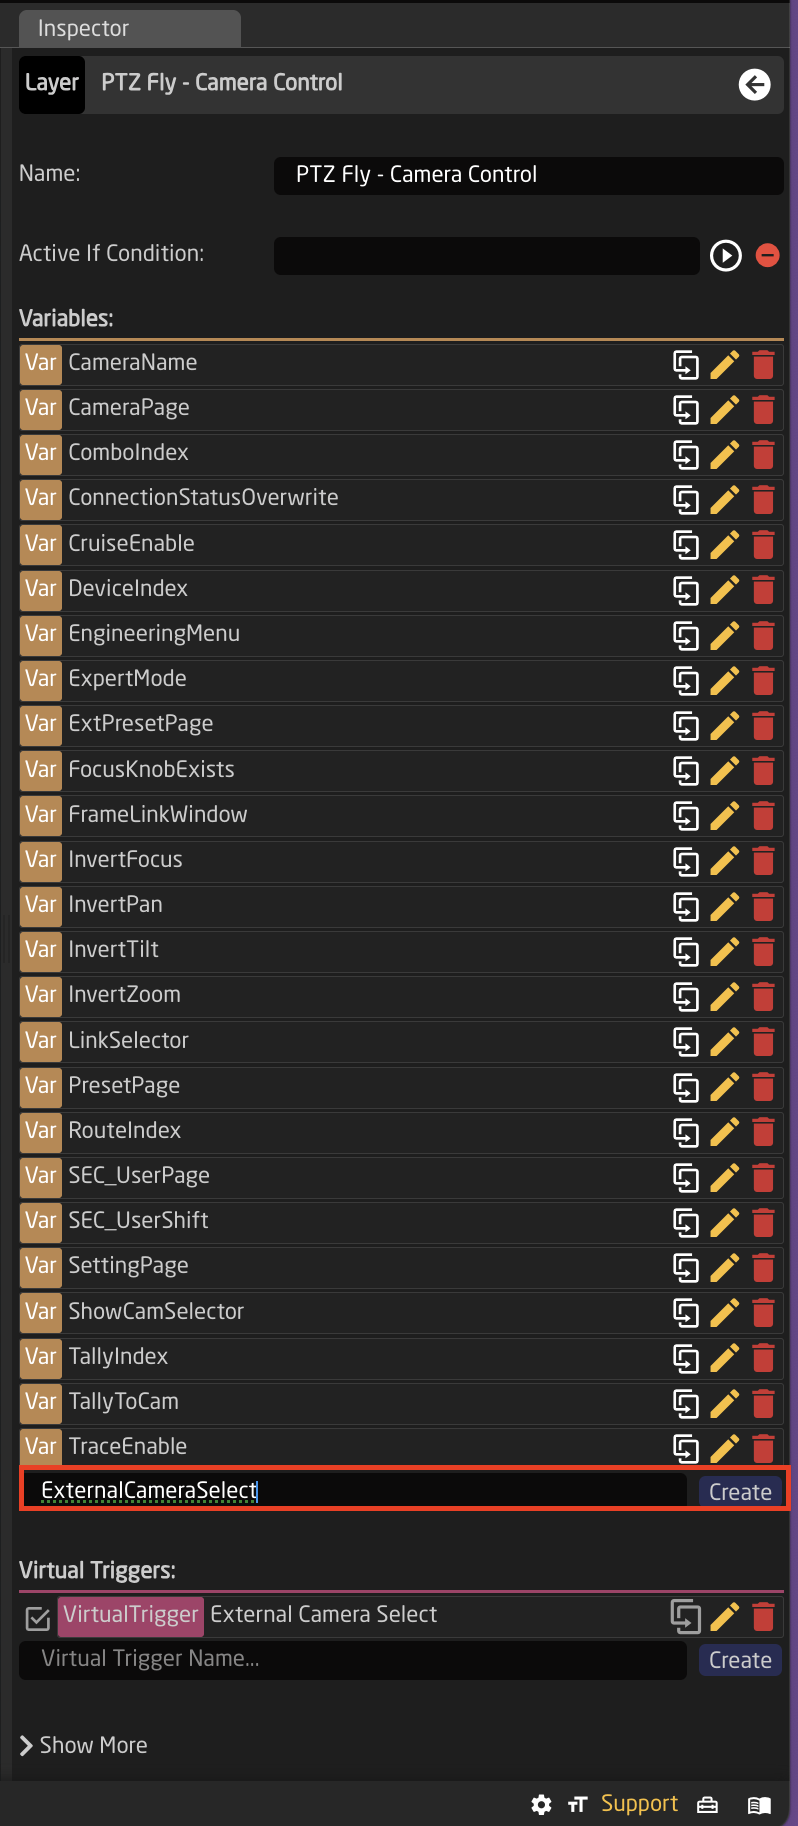
- Create Variable called ExternalCameraSelect Exact name is needed as it is prebuilt into a Virtual Trigger.
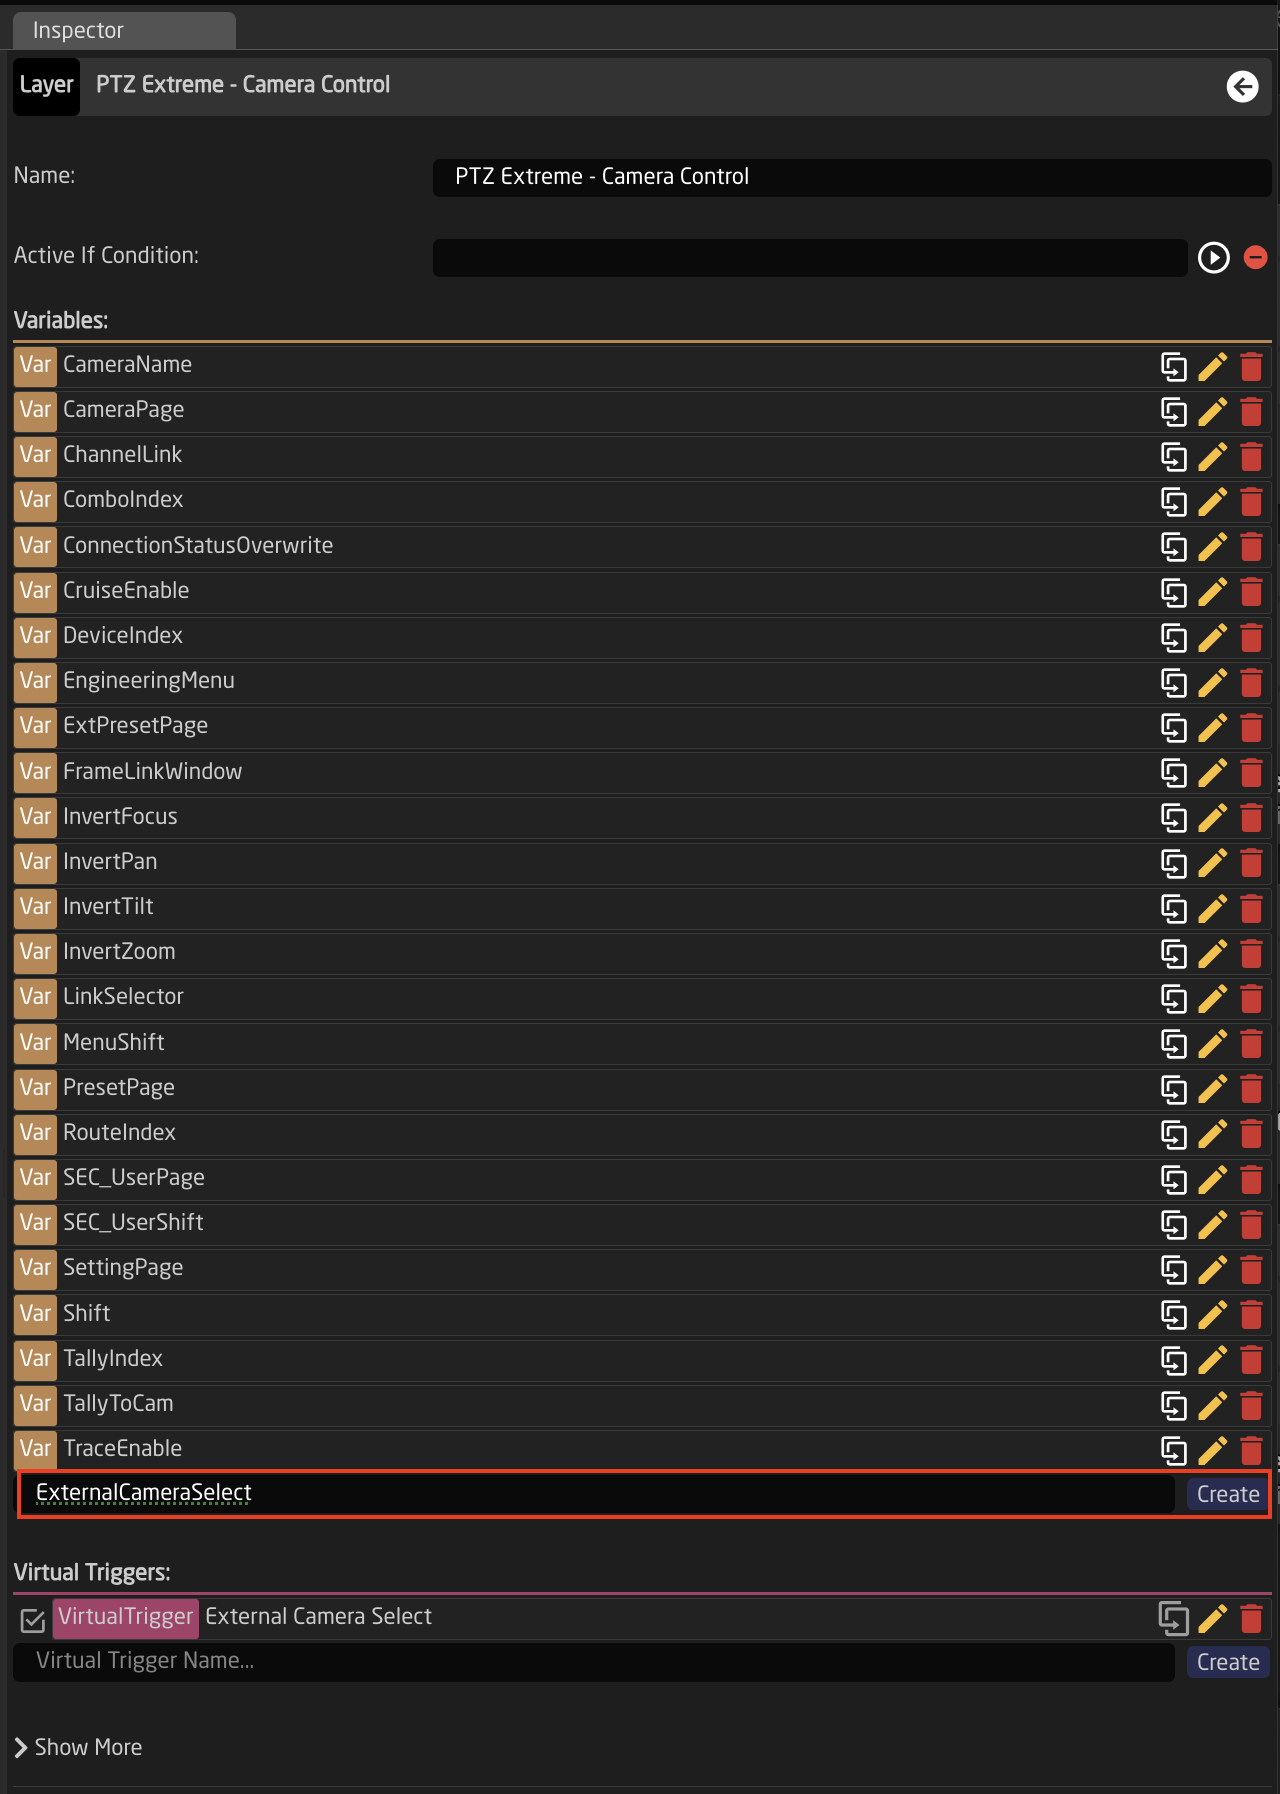
- Adjust the needed range of the Variable based on numbers used in the Camera Selector on the Home Page for the Ext. Cam Number. The range used should encompass all numbers you have defined. By default the range is 1-10, if that is all that is needed, then no adjustment is required.
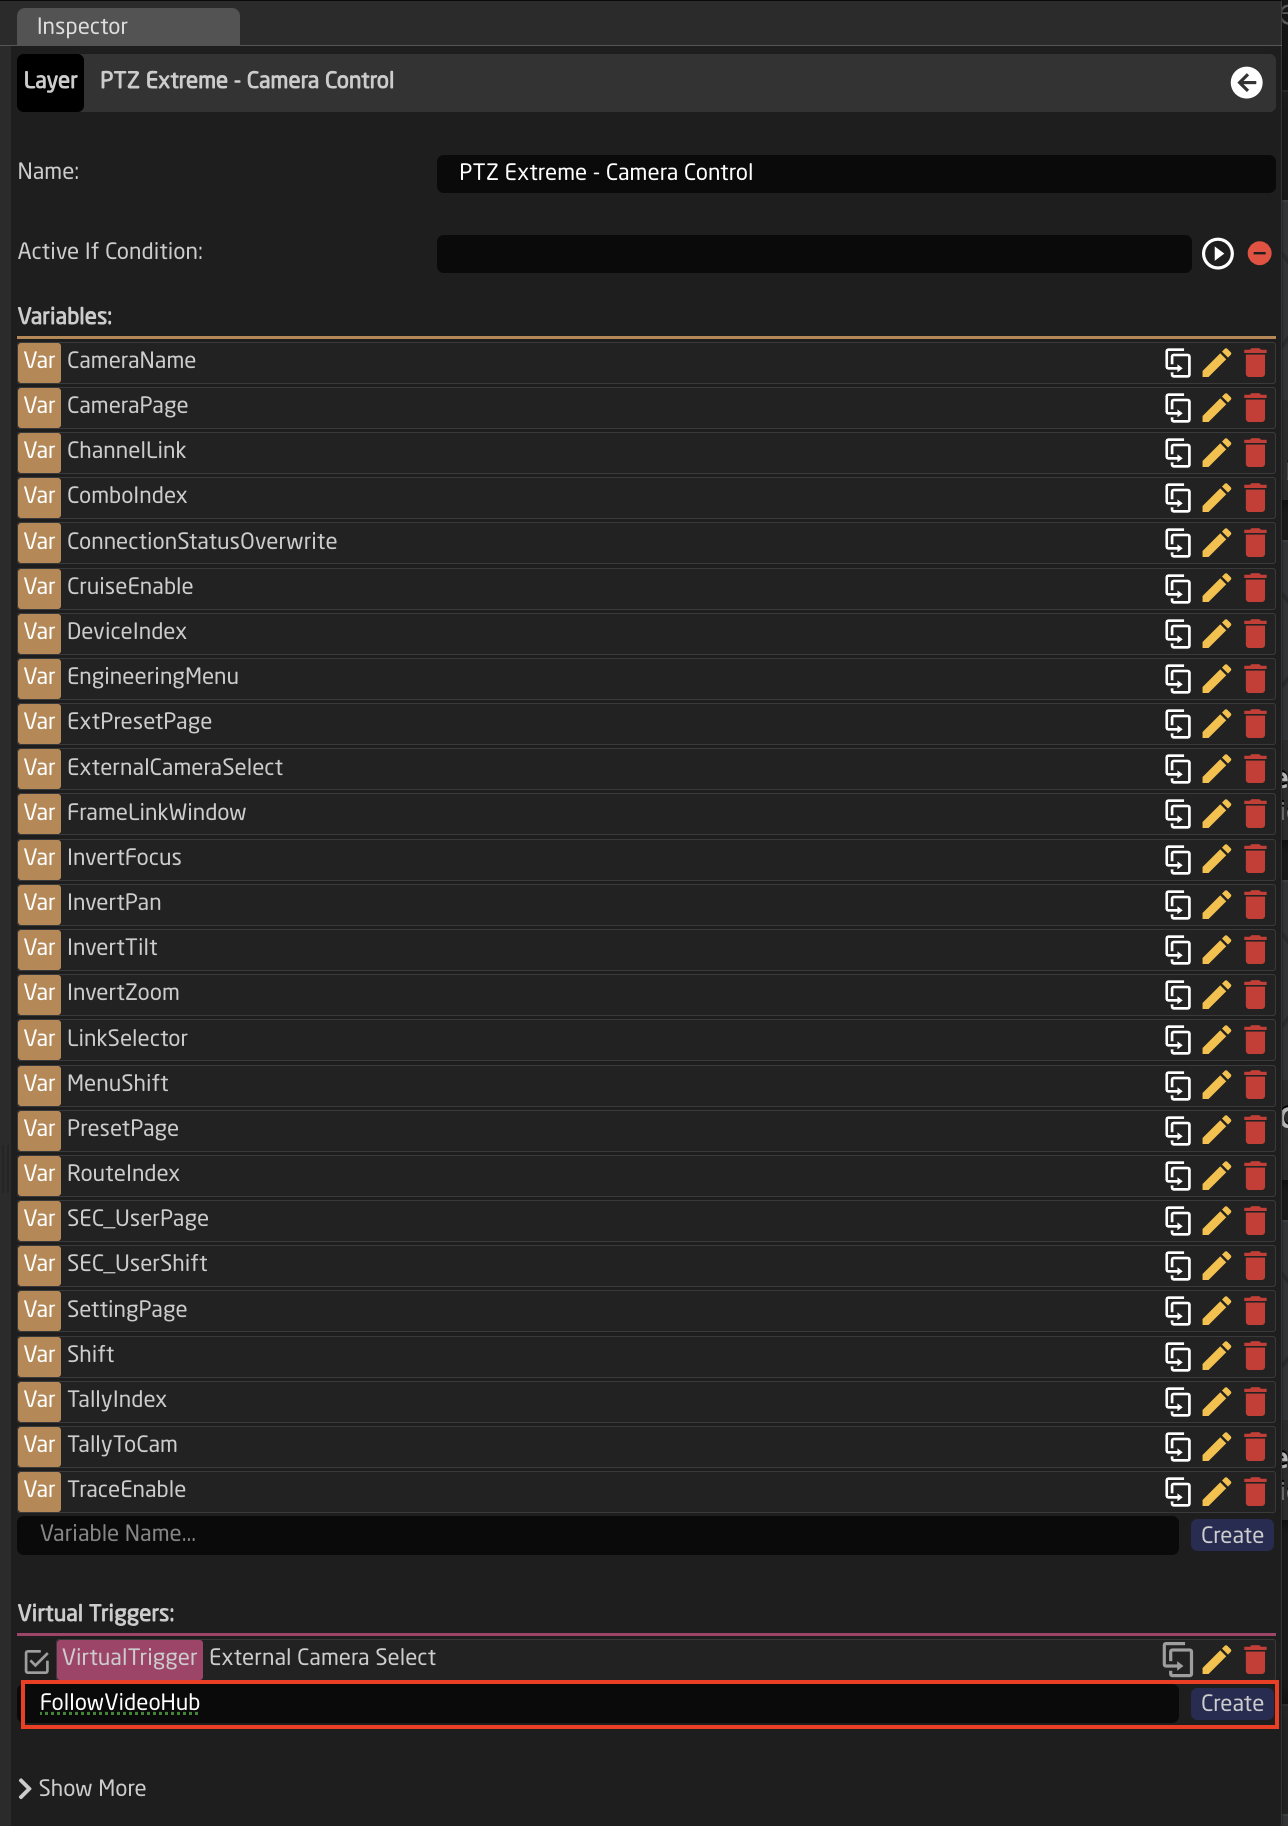
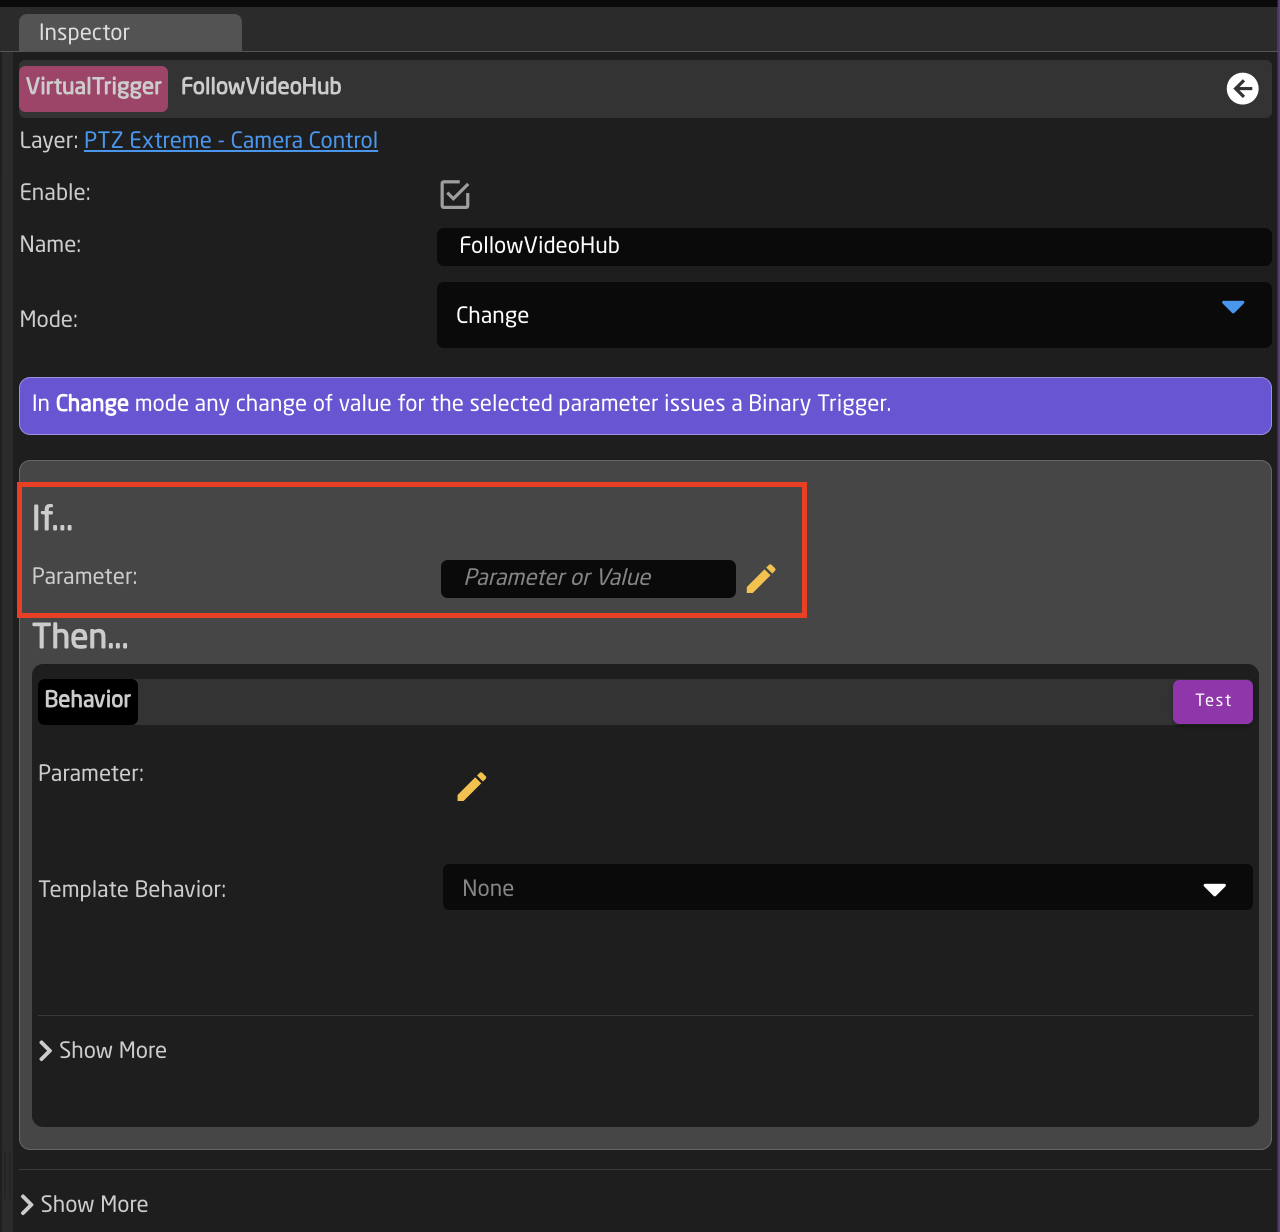
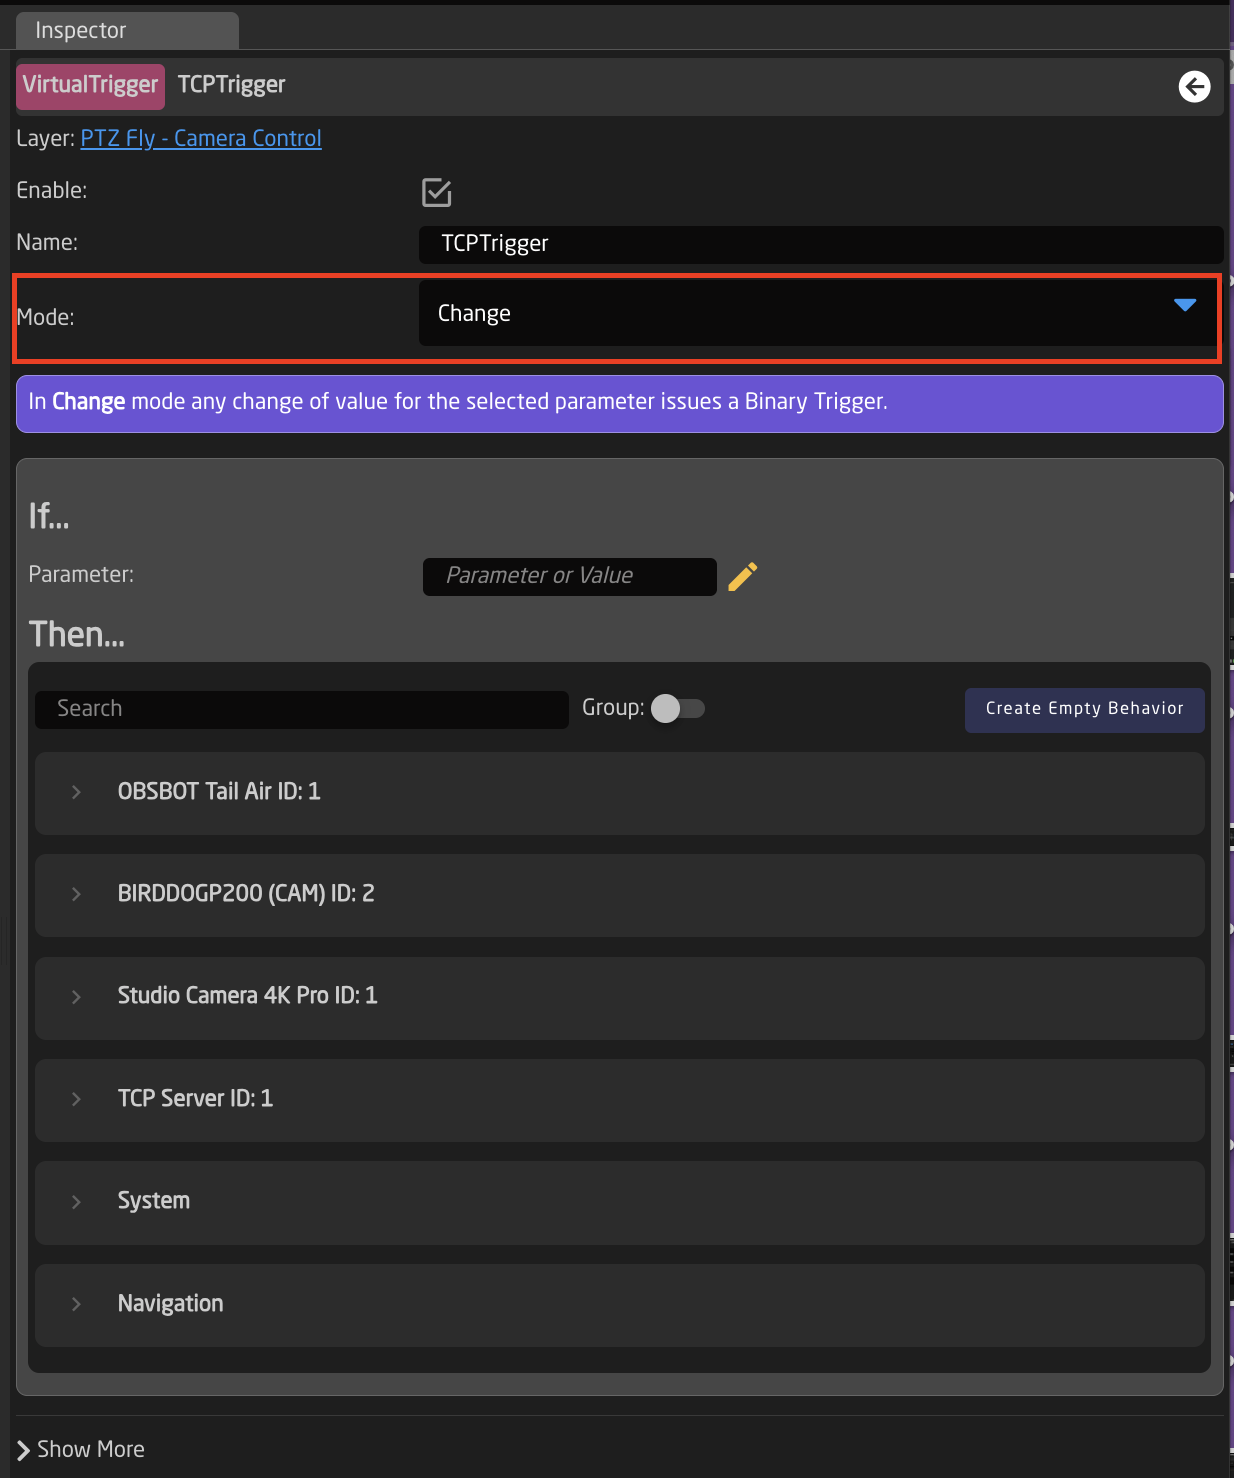
- Create a Virtual Trigger to set the ExternalCameraSelect Variable based on desired parameter. Name the Virtual Trigger something that will allow you to easily identify what it is doing.
Shown is an example using a Blackmagic VideoHub, but it can be any other device.
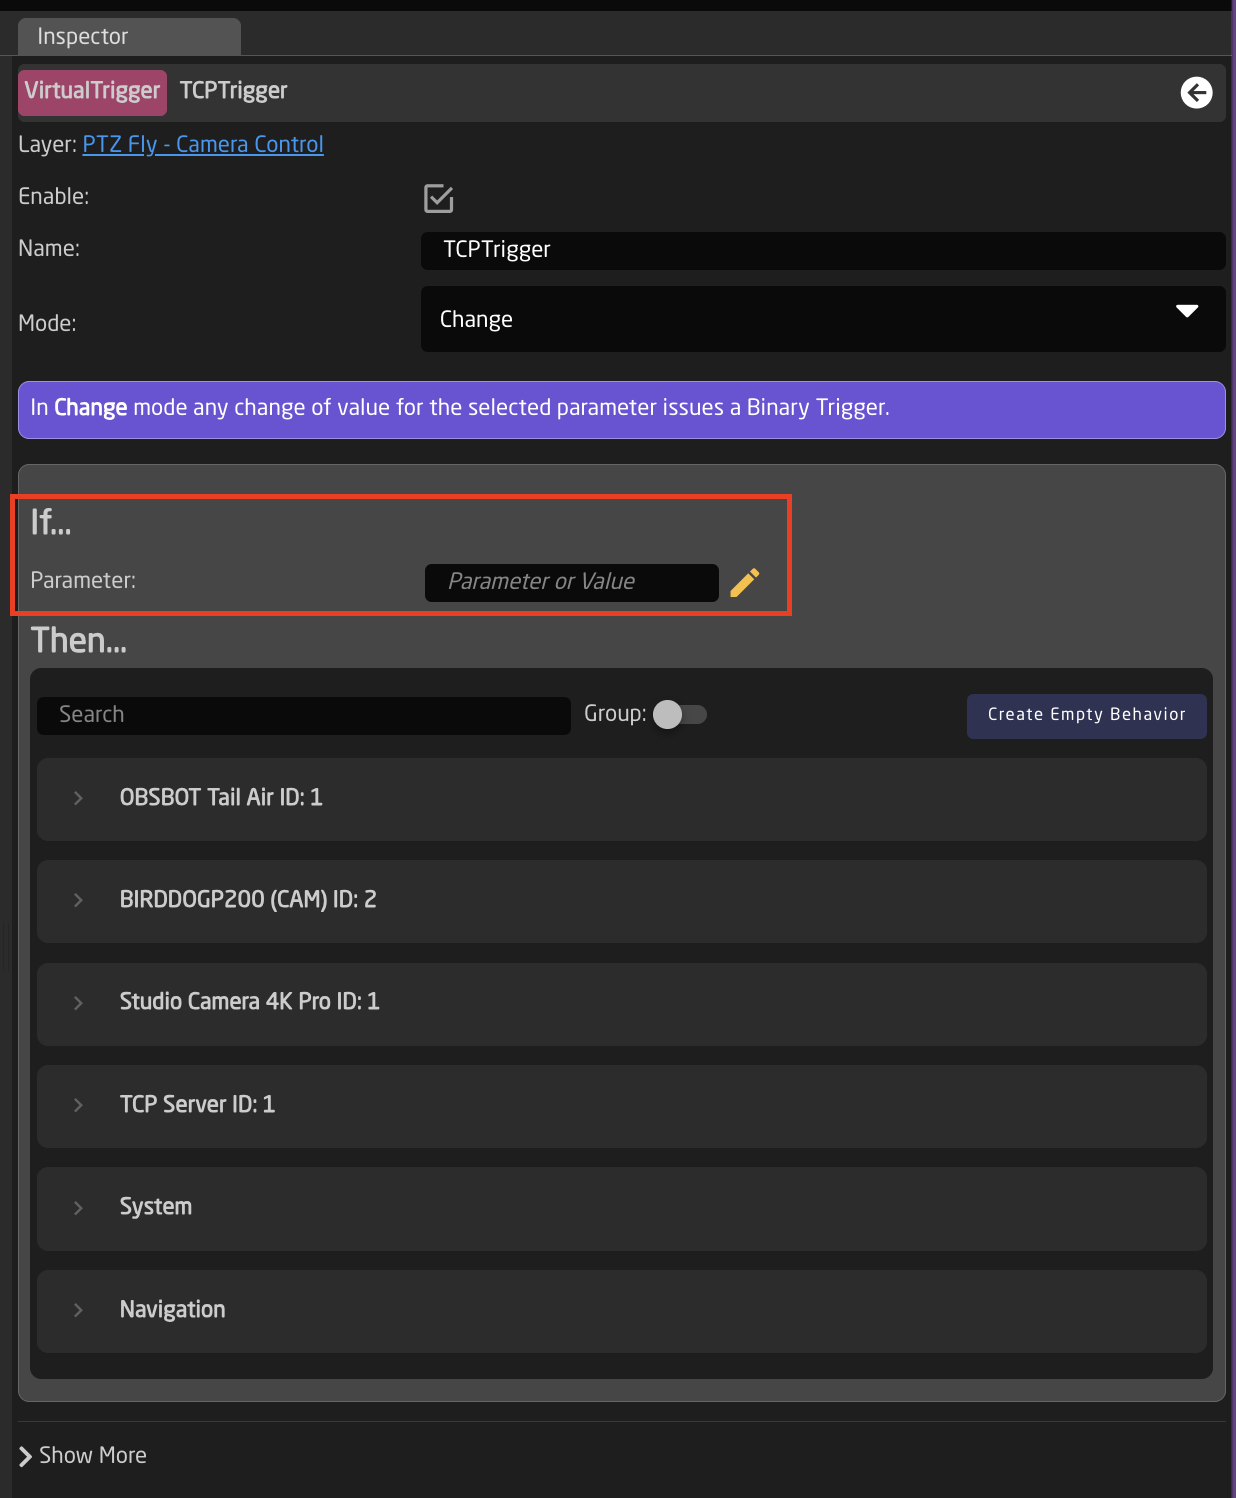
- Open the newly created Virtual Trigger.
-
Set the Mode to Change.
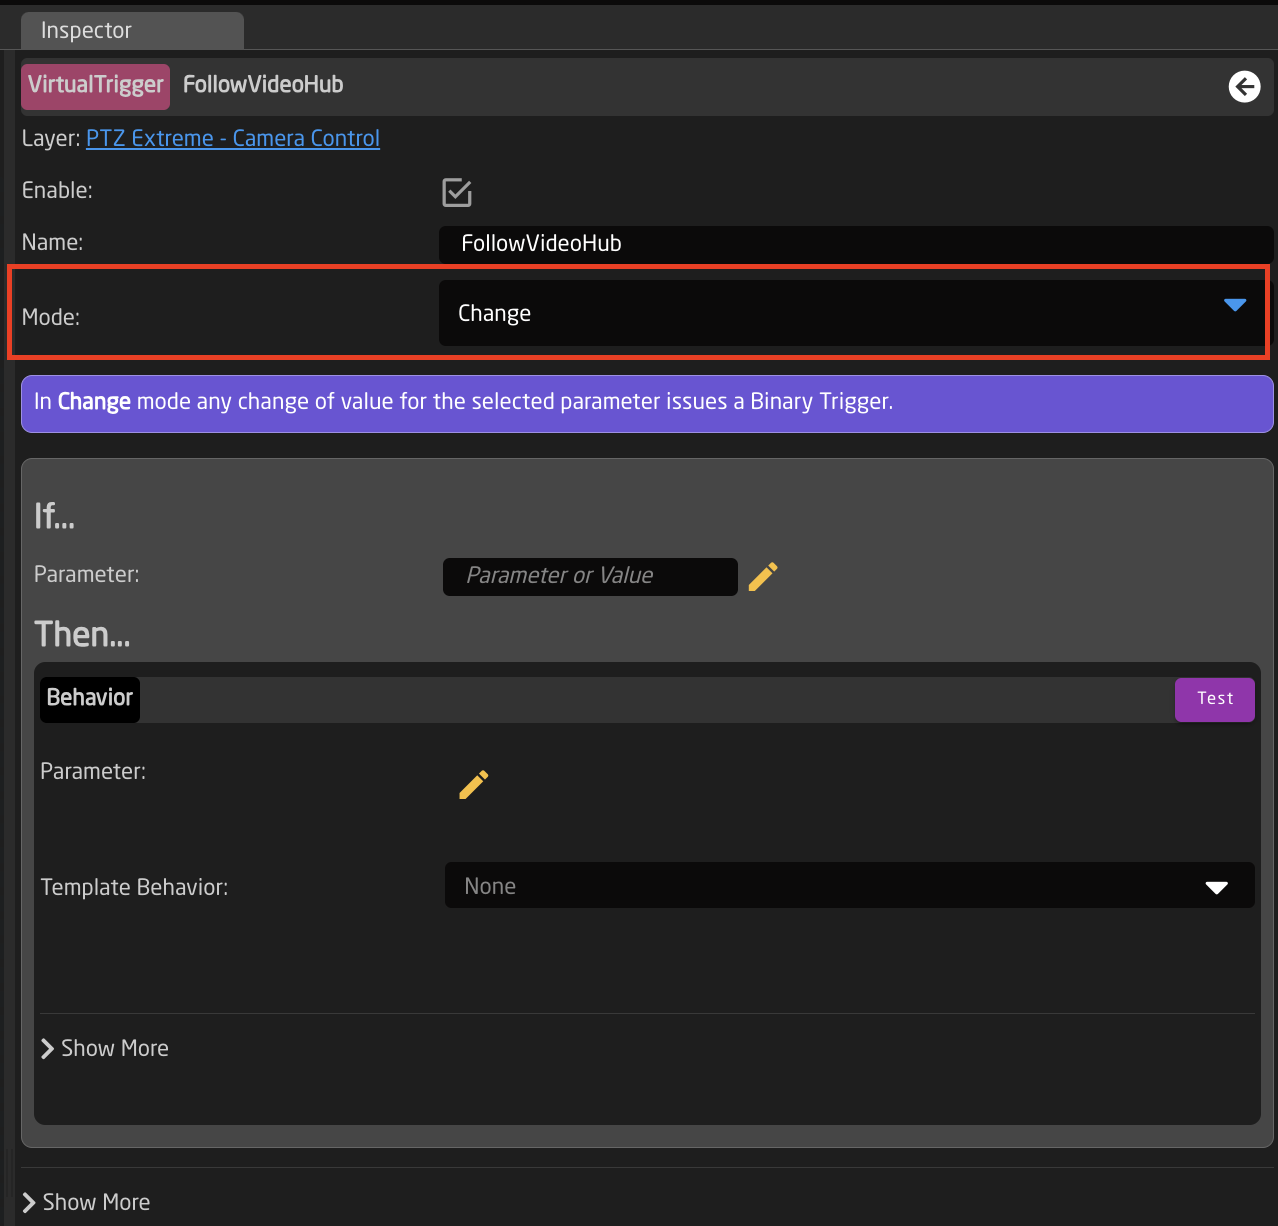
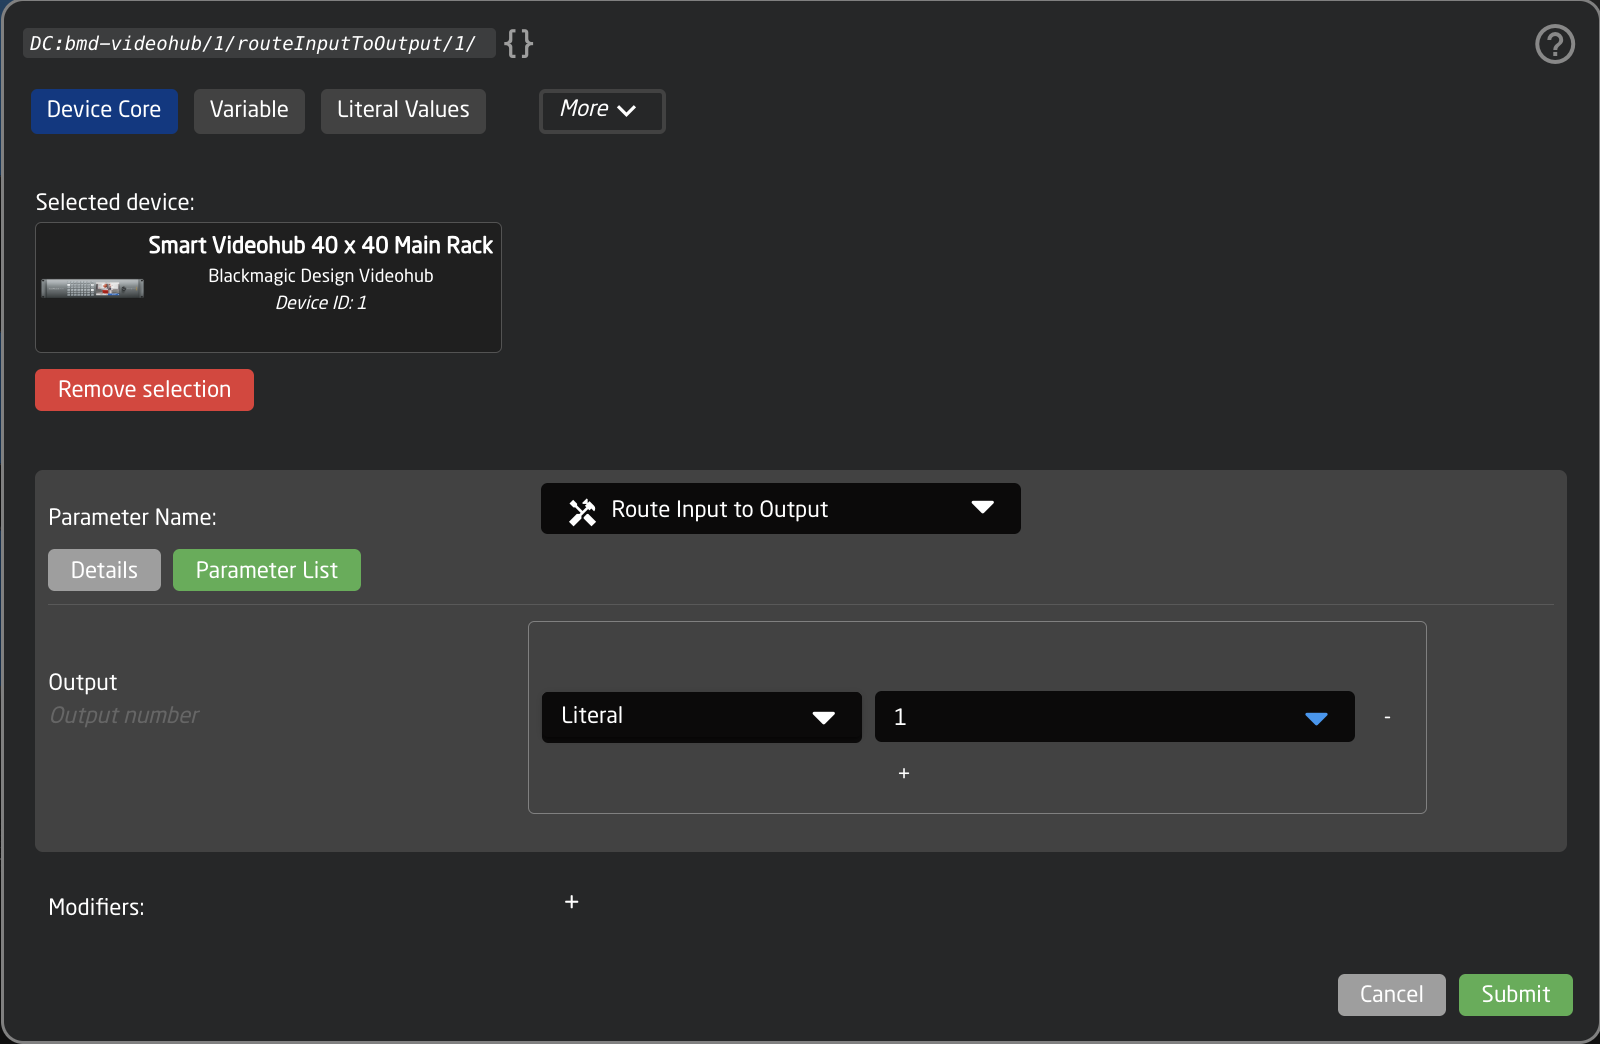
- For the IF parameter, set the source of the trigger. In this instance a route of the VideoHub on a specific output will be used to change the ExternalCameraSelect variable.

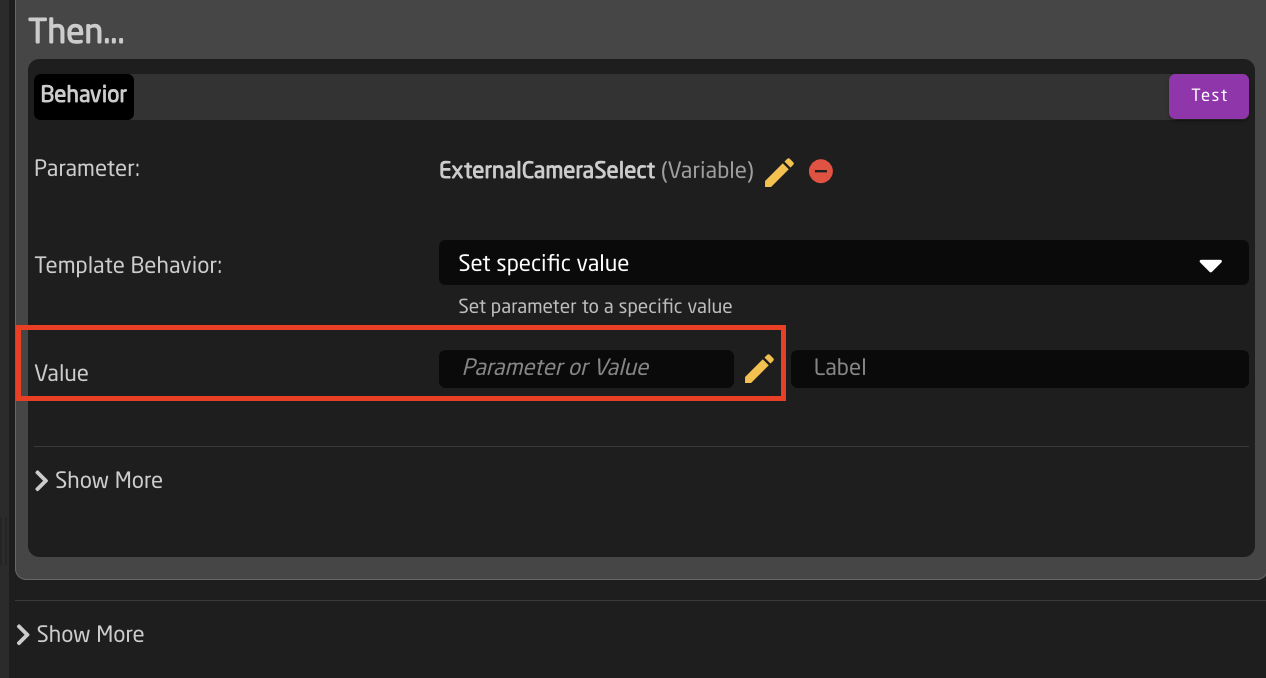
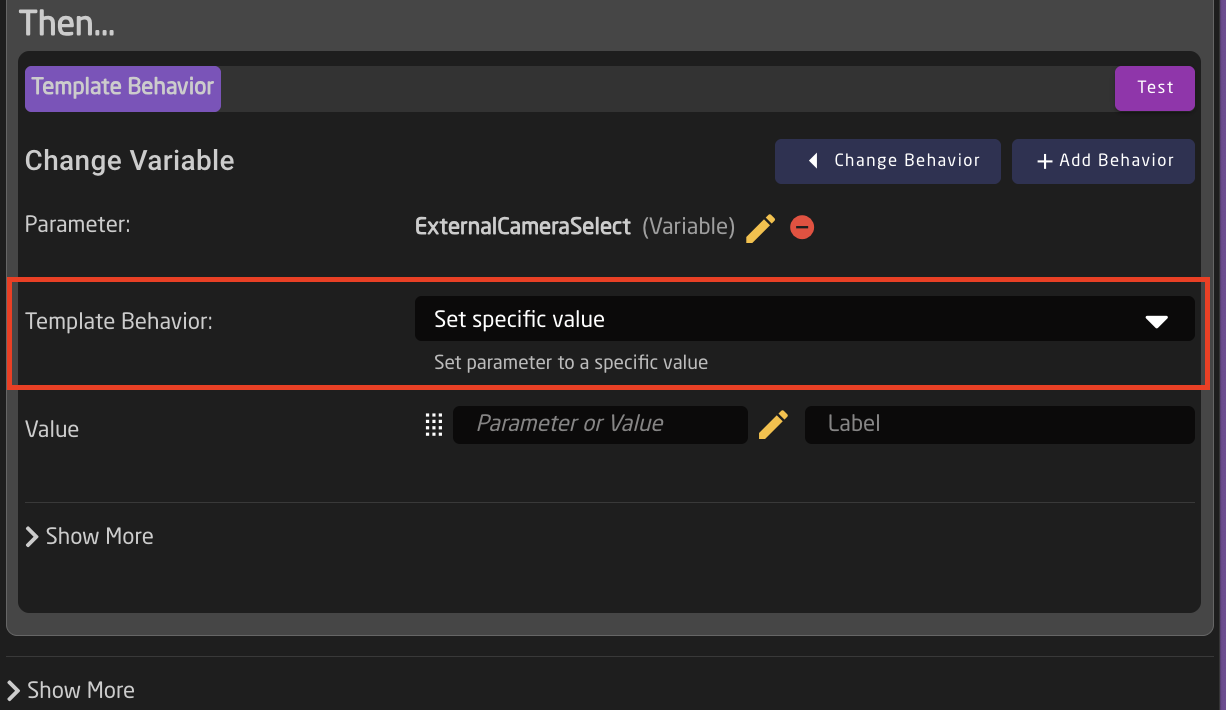
- For the THEN parameter, select the ExternalCameraSelect Variable
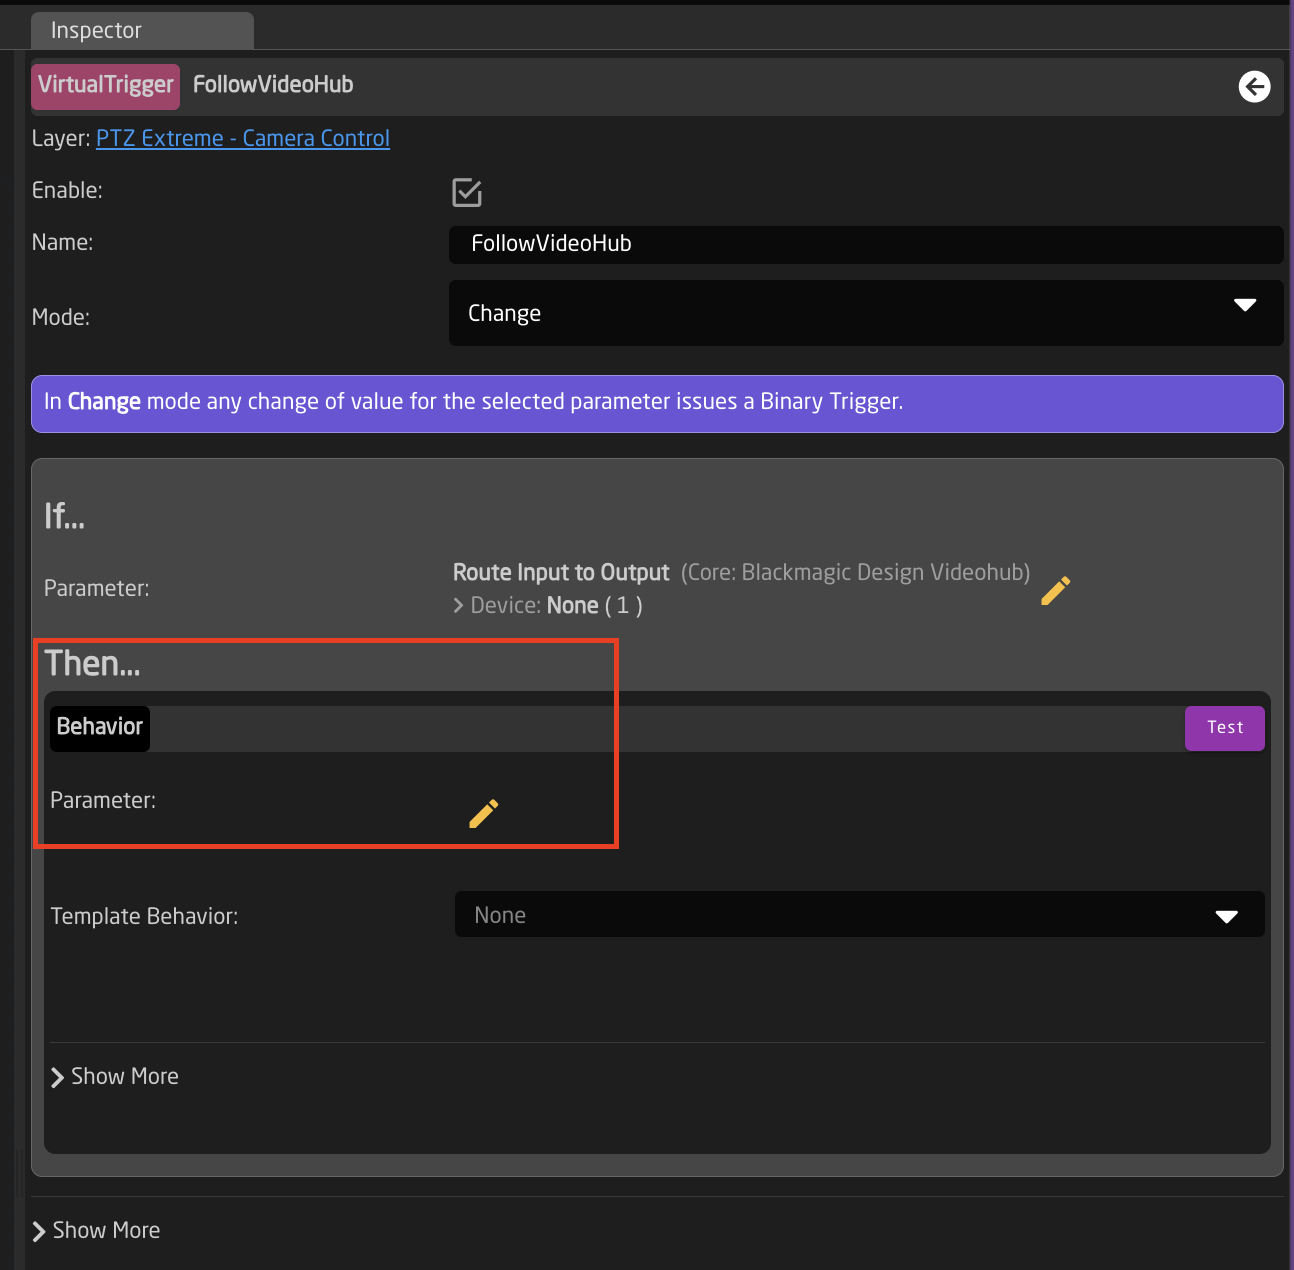
- The needed Template Behavior for the THEN should be auto suggested. If it is not, you will want to select SET SPECIFIC VALUE.
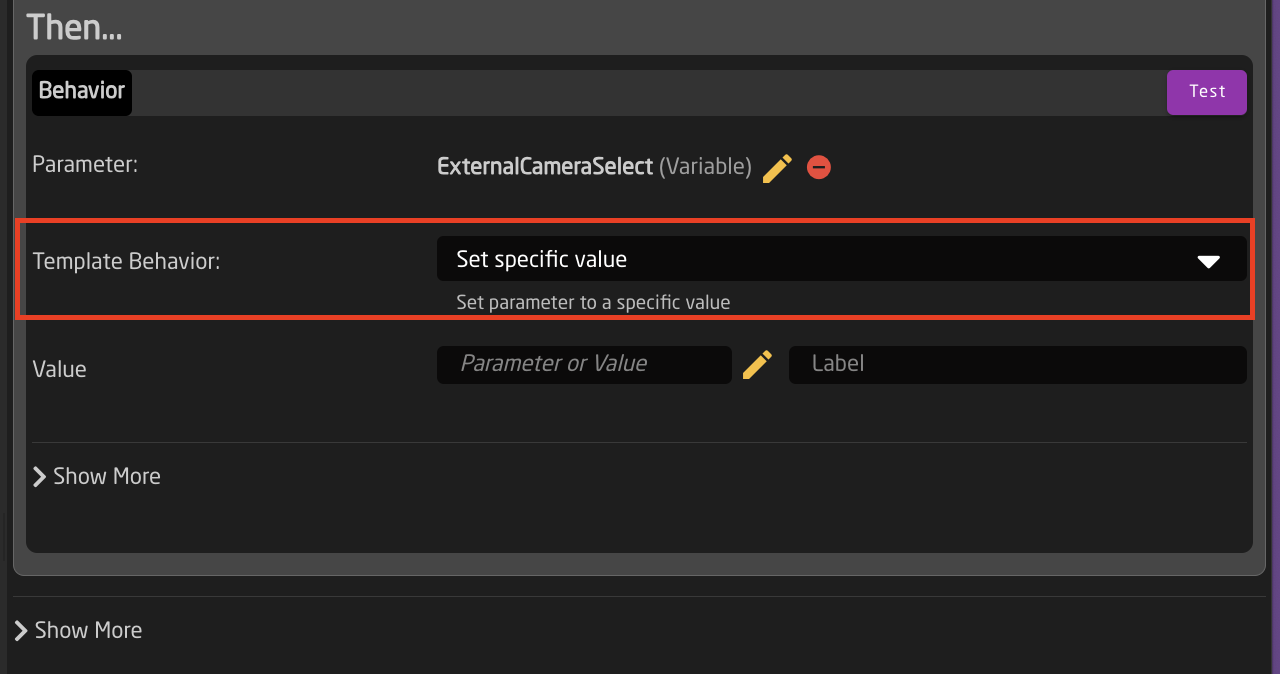
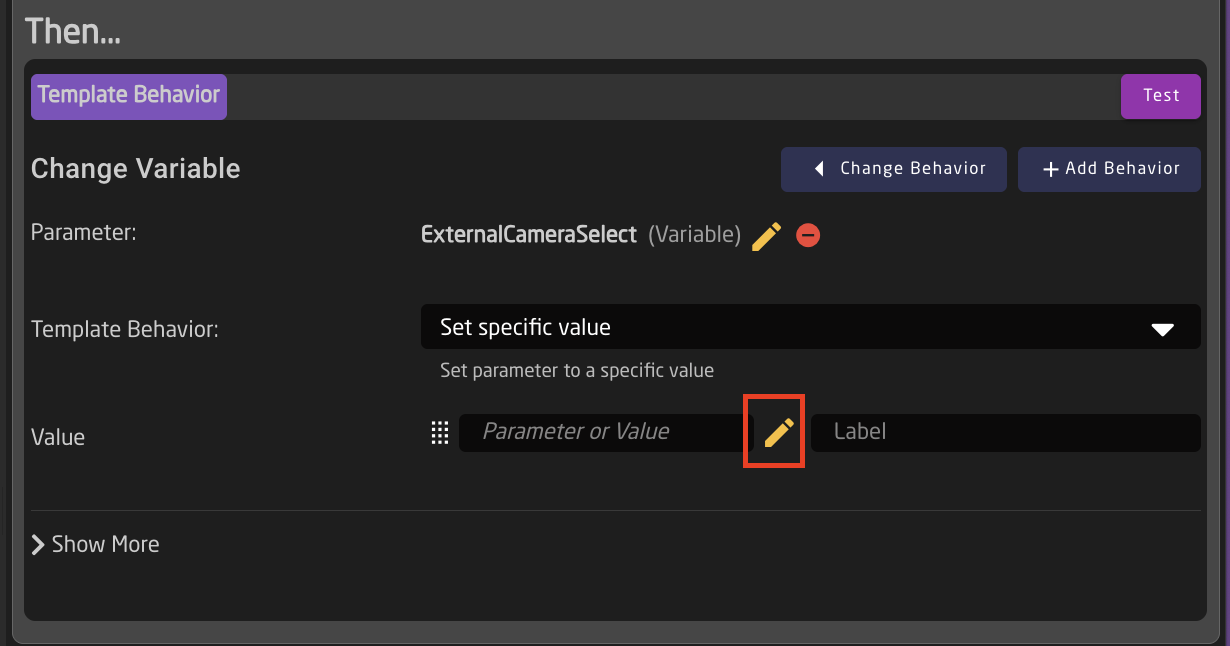
- For the Value, set again the same parameter you used for the IF parameter. In this example it was Output 1 of a Blackmagic VideoHub.
This is why it is recommended to set the Ex. Cam Number in the Camera Selector Settings Table to match the Input number from the trigger source. It can then easily be synced.
- The trigger is now set up and can be used. Note that any change in the source trigger's status will trigger the route (within the variable range set) but you are able to freely choose a different camera to control from the camera select row without it retriggering.
External Camera Select from External TCP Command
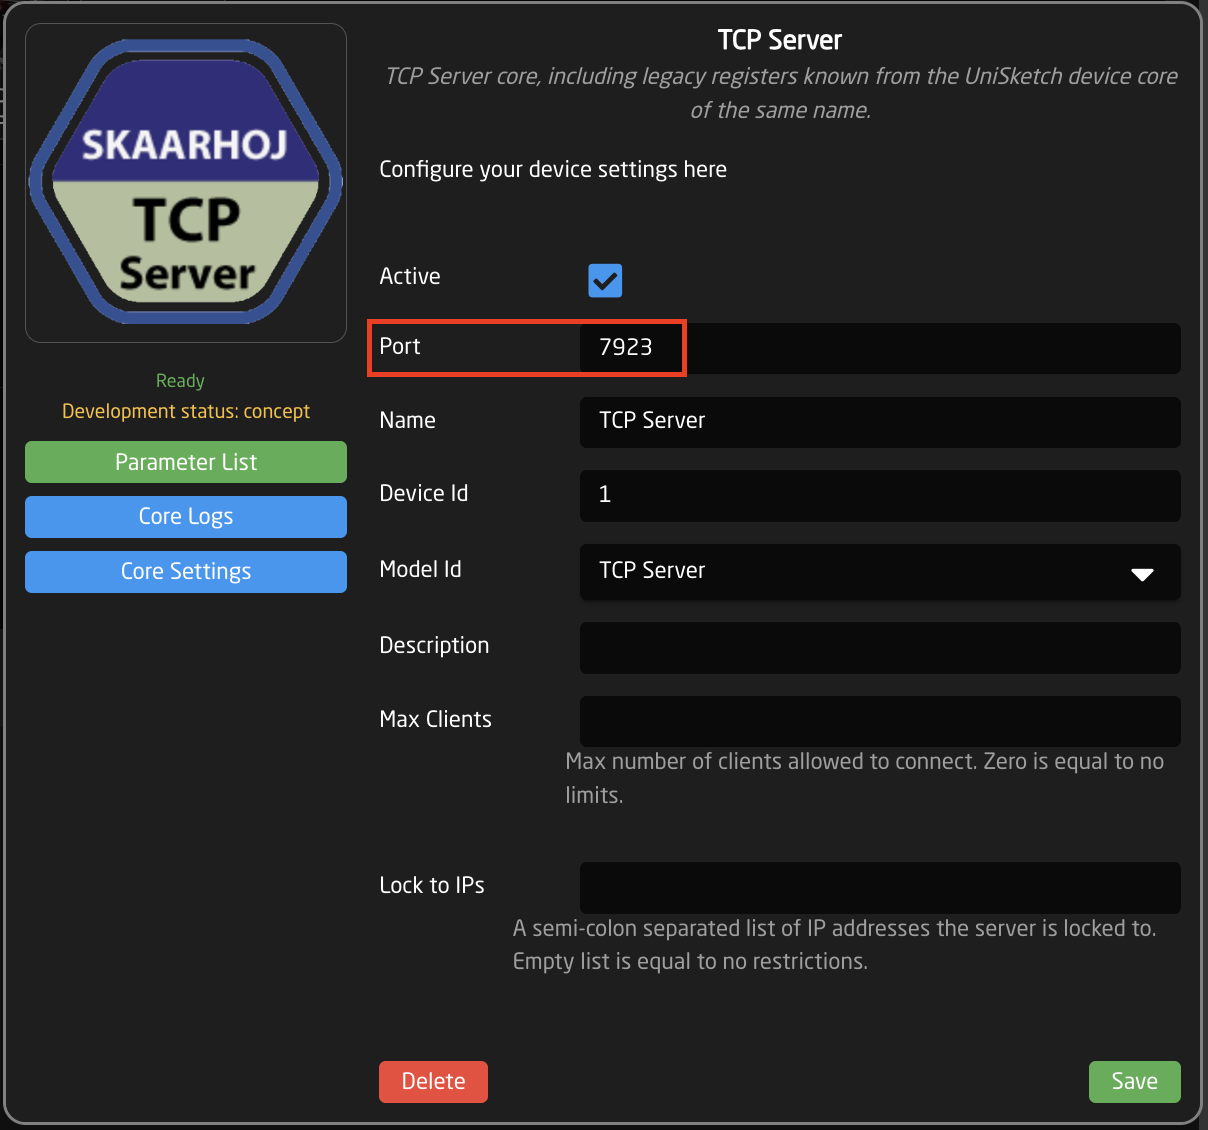
- Add an instance of TCP Server as a device on the Home Page.
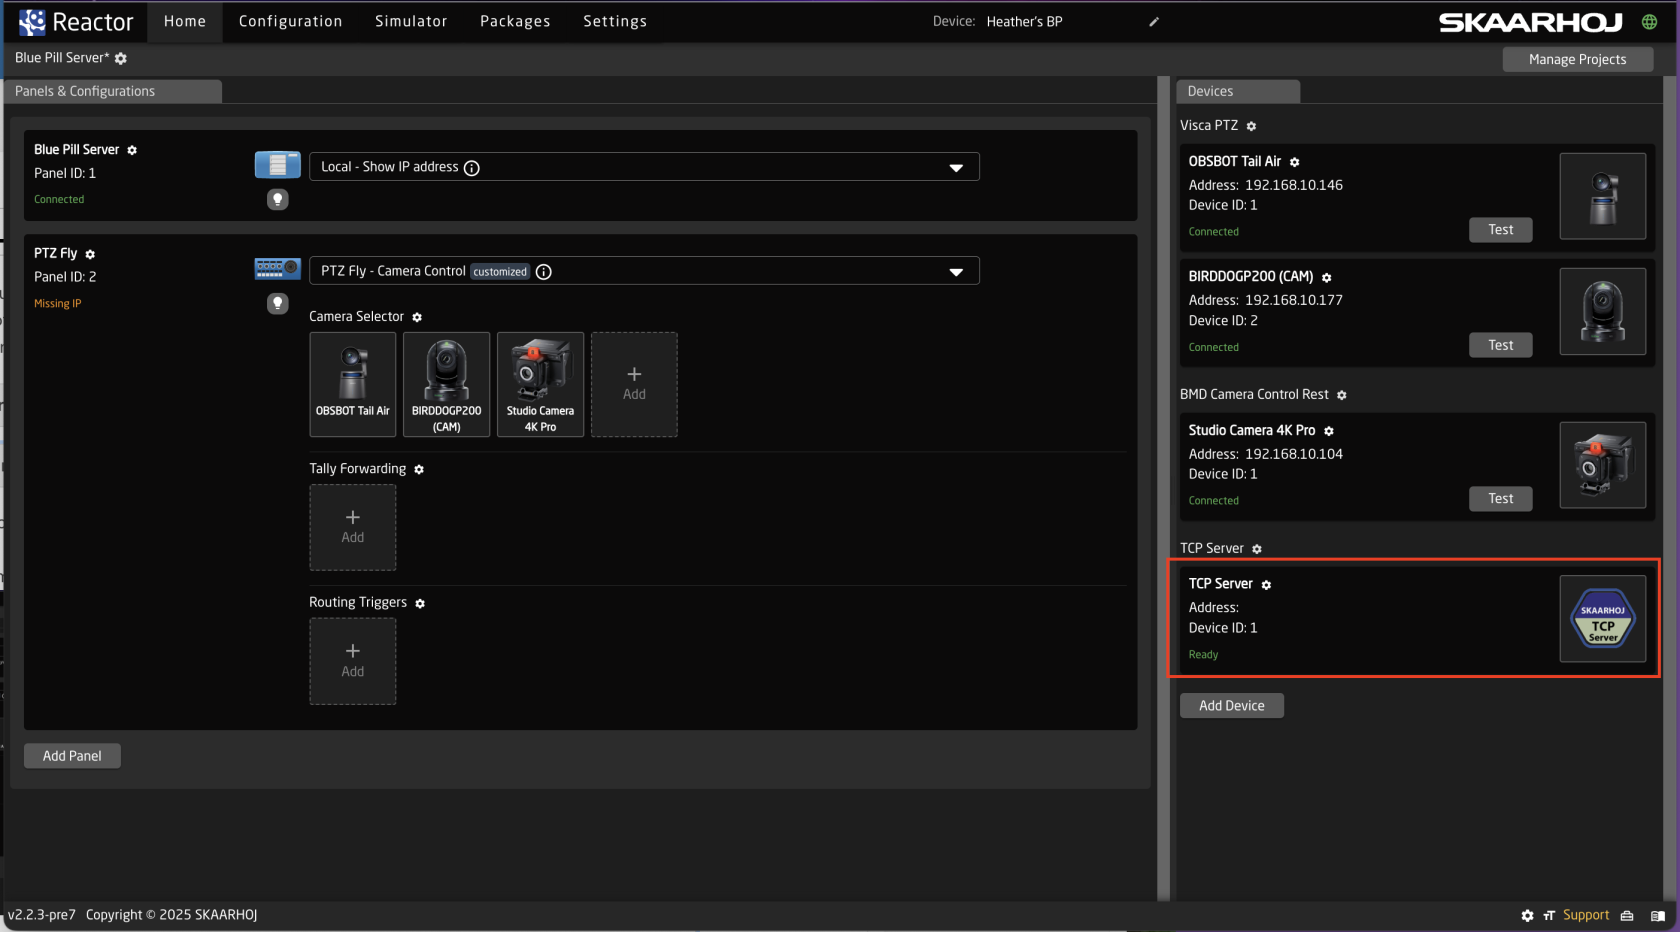
- On the Home Page, open the Camera Selector settings table.
- Enable Show Advanced in the Camera Selector
- Input a unique number to associate with the camera in the Ext. Cam Number column.

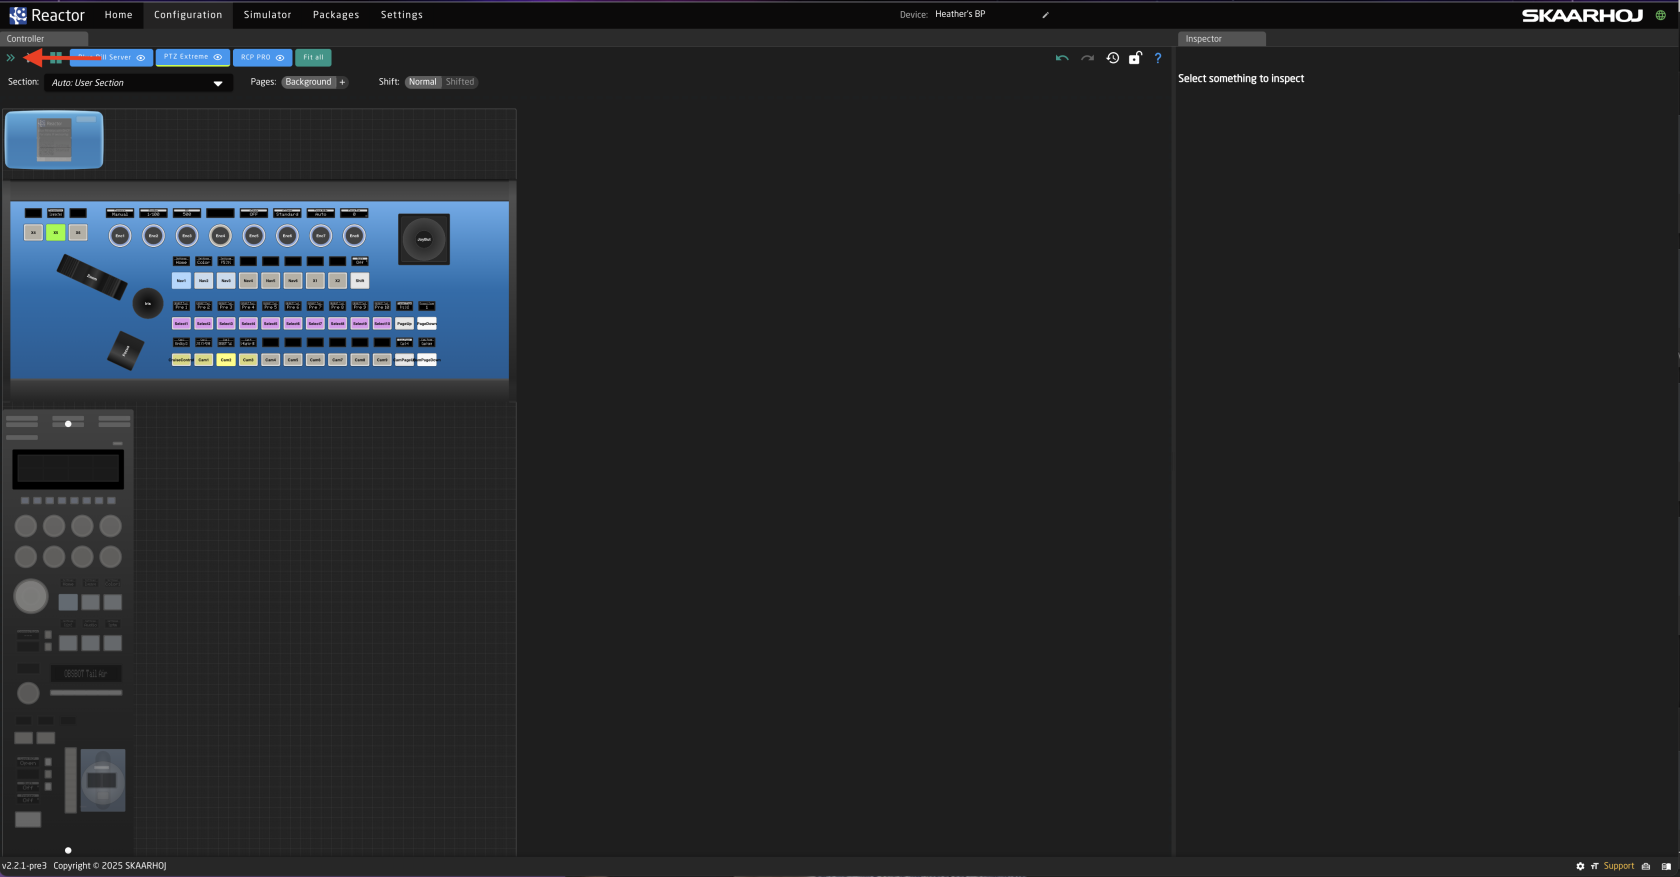
- Navigate to the Configuration Page.
- Click on the background of the panel in the controller section to open the background layer of the configuration in the Inspector.
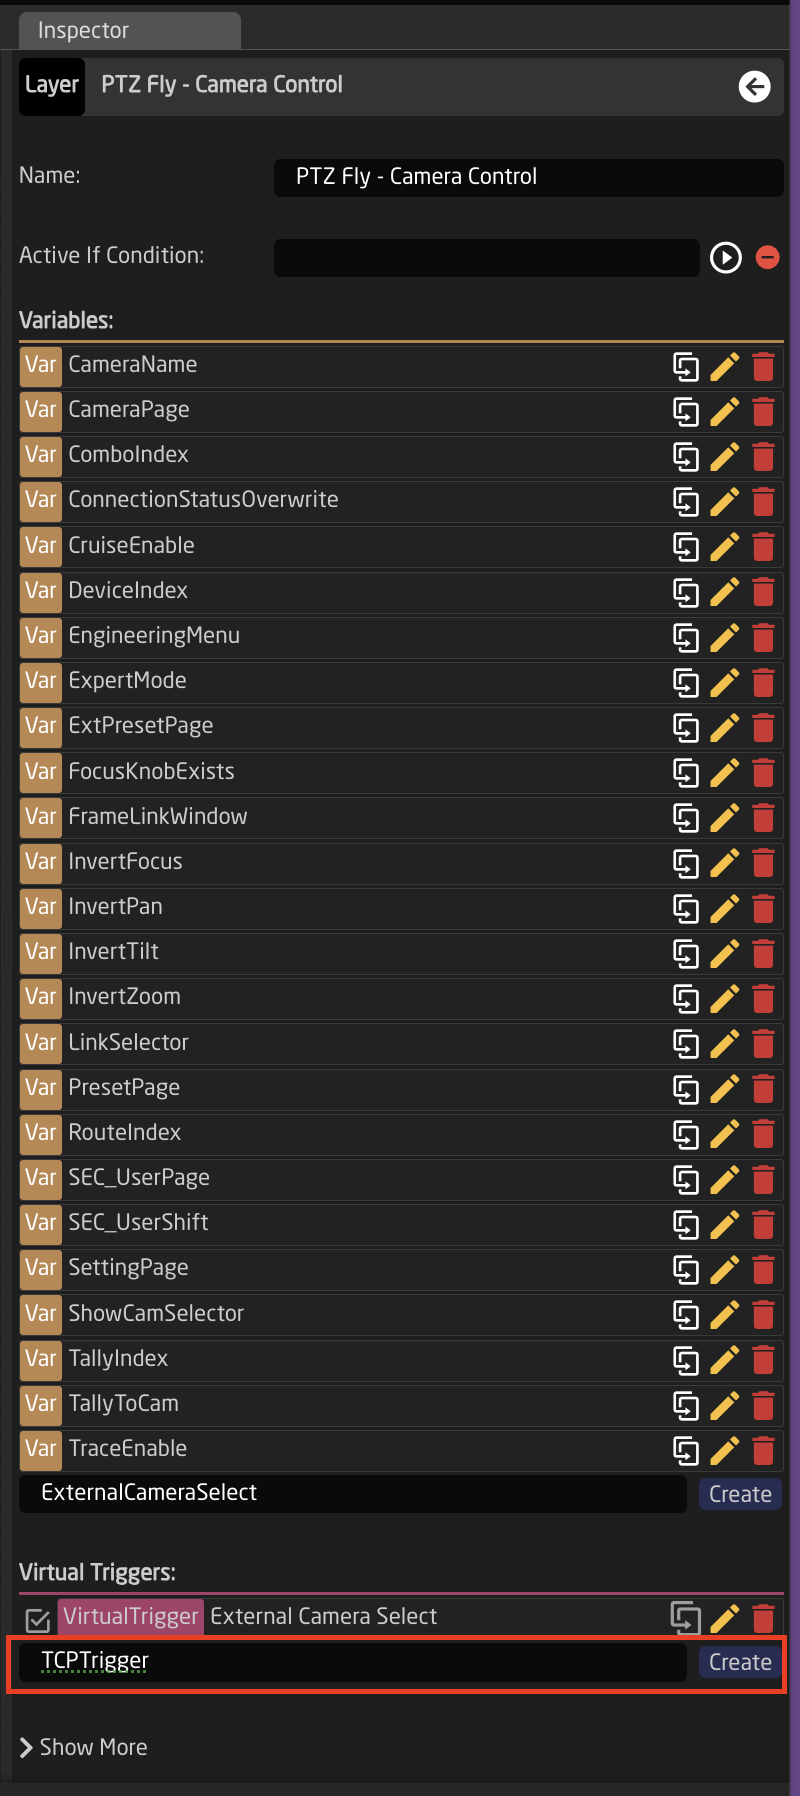
- Create Variable called ExternalCameraSelect Exact name is needed as it is prebuilt into a Virtual Trigger.
- Adjust the needed range of the Variable based on numbers used in the Camera Selector on the Home Page for the Ext. Cam Number. The range used should encompass all numbers you have defined. By default the range is 1-10, if that is all that is needed, then no adjustment is required.
- Create a Virtual Trigger to set the ExternalCameraSelect Variable based on external trigger. Name the Virtual Trigger something that will allow you to easily identify what it is doing.
- Open the newly created Virtual Trigger.
-
Set the Mode to Change.
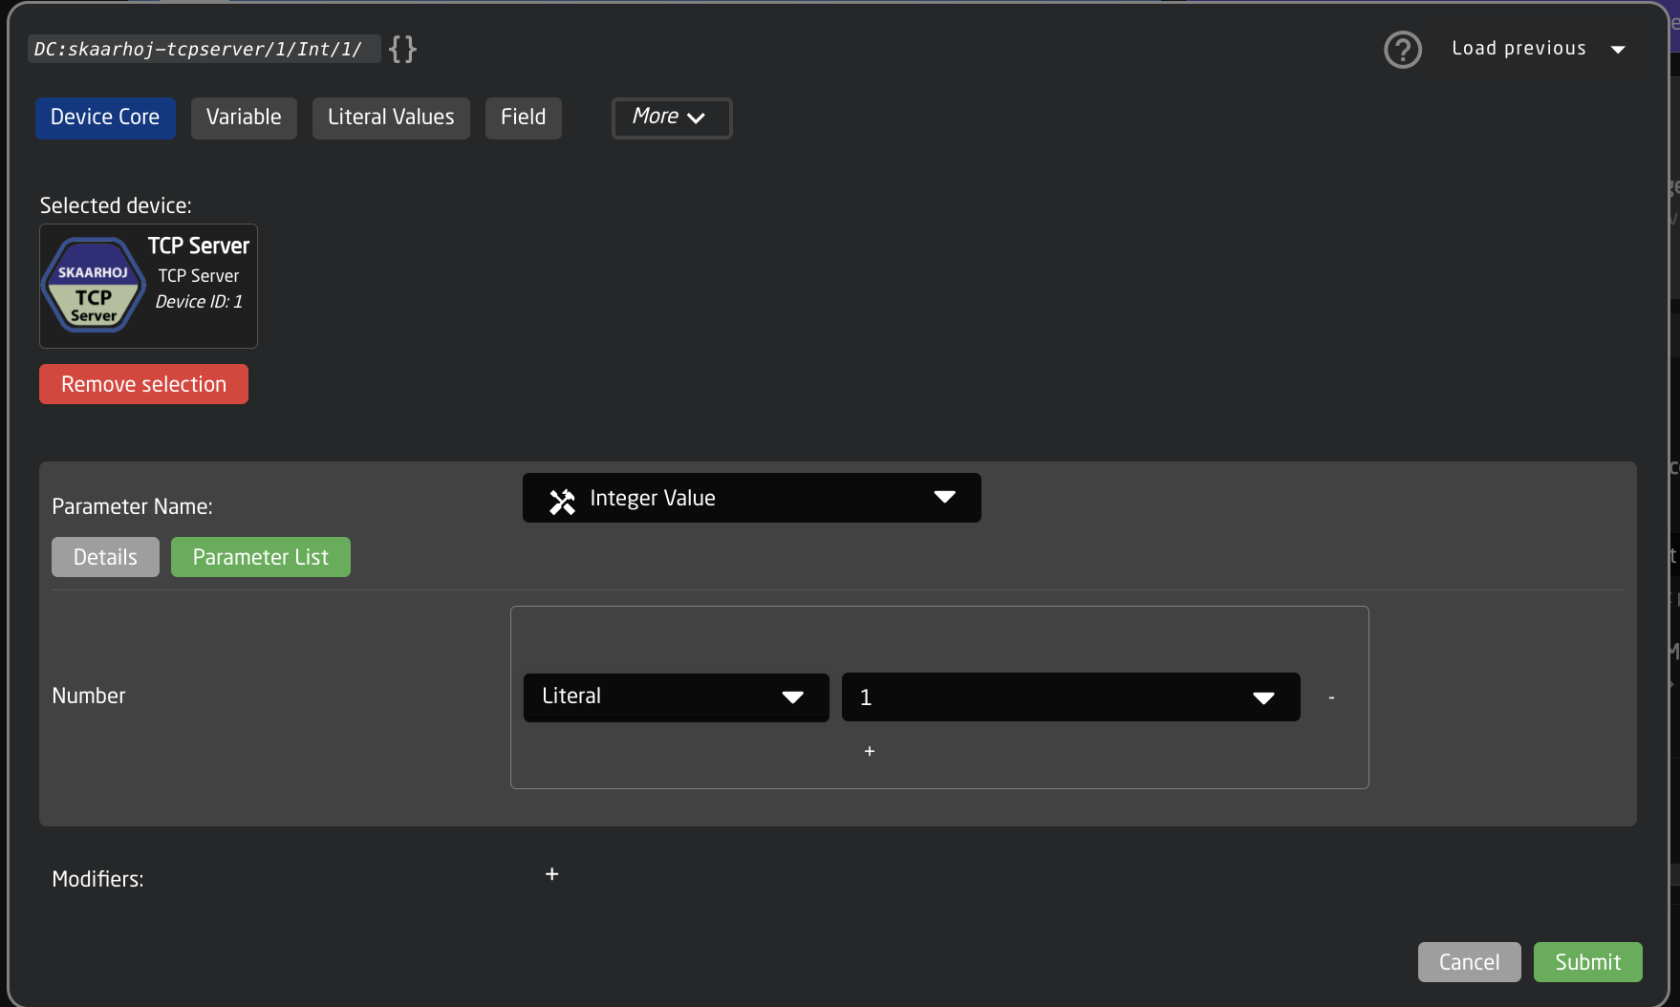
- For the IF parameter, set the source of the trigger. In this instance a specific TCP command will be used to change the ExternalCameraSelect variable.
Device Core: TCP Server
Parameter Name: Integer Value
Number: Literal: 1

- For the THEN parameter, select the ExternalCameraSelect Variable
First Expand System to select Change Variable behavior
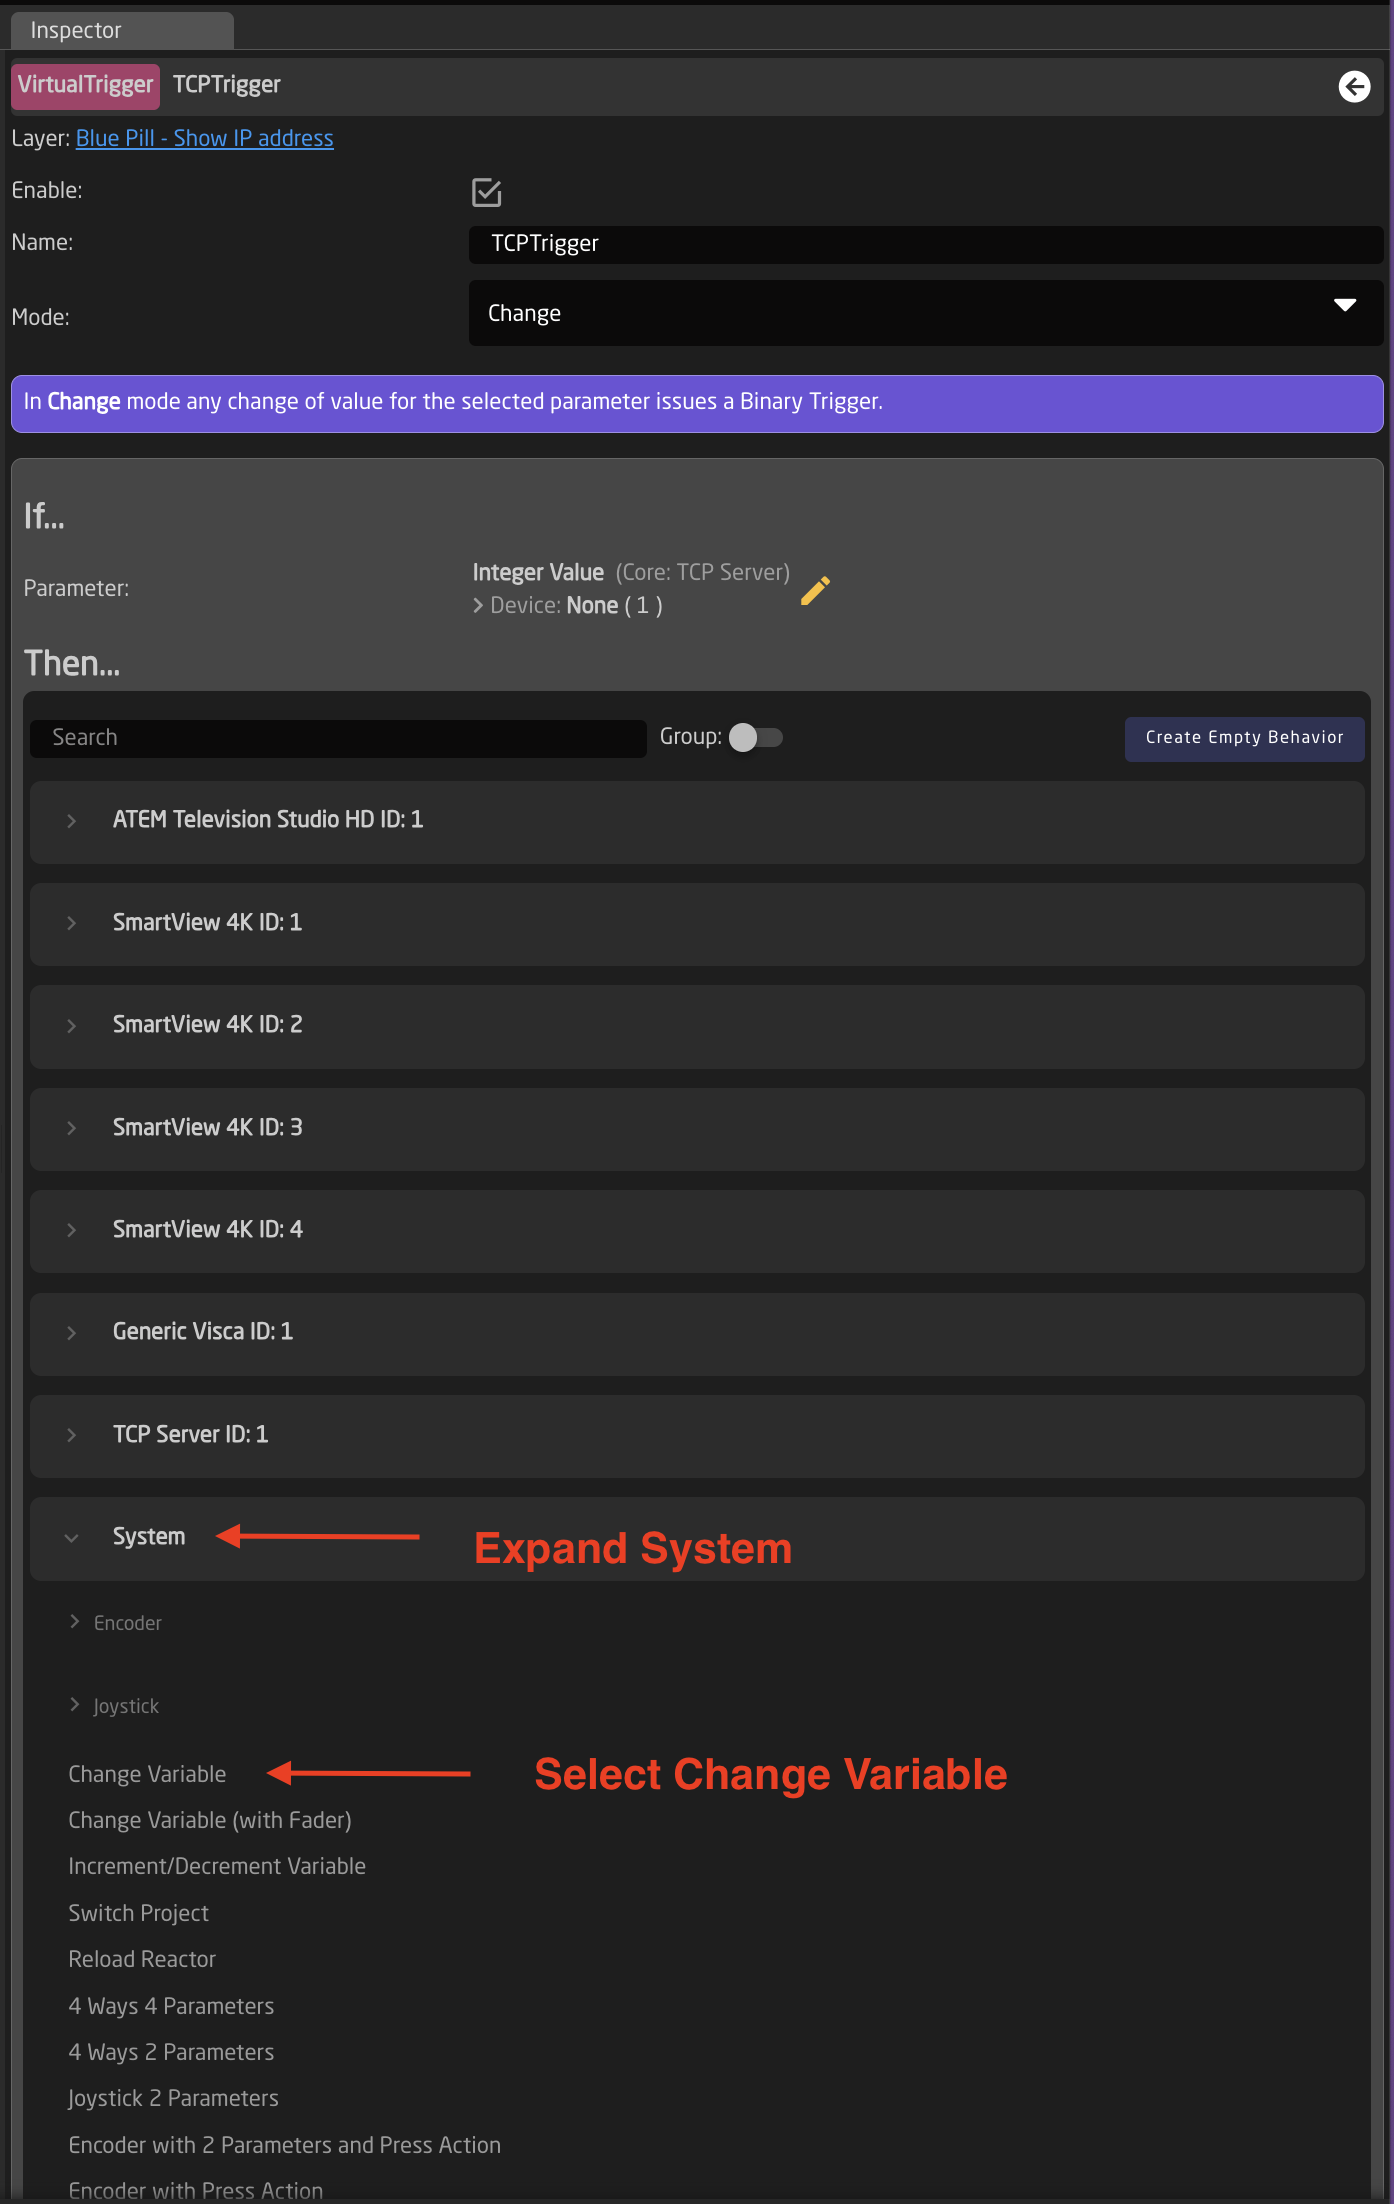
Second click to edit the parameter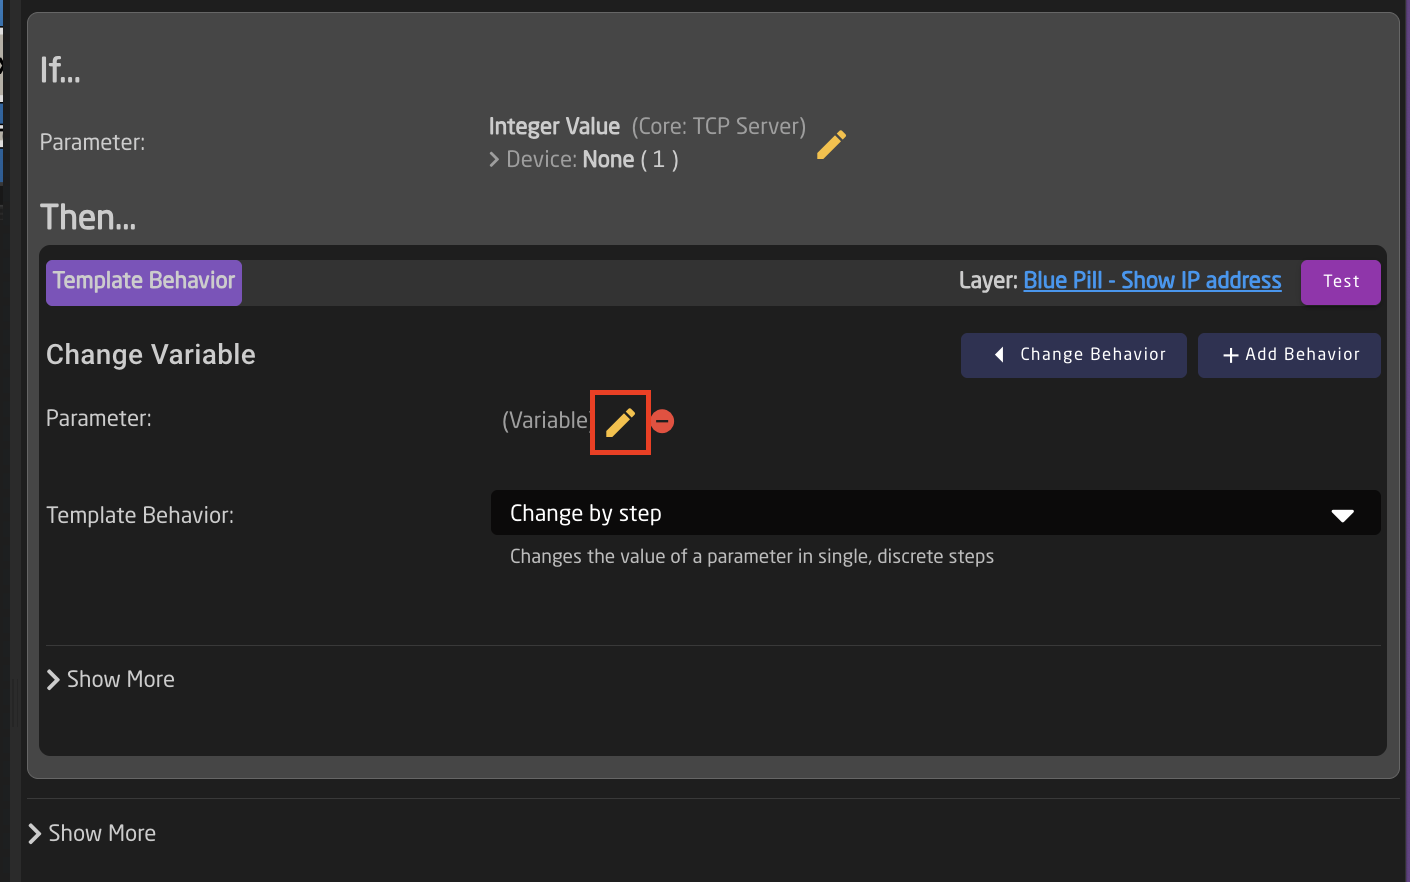
Third select the ExternalCameraSelectVariable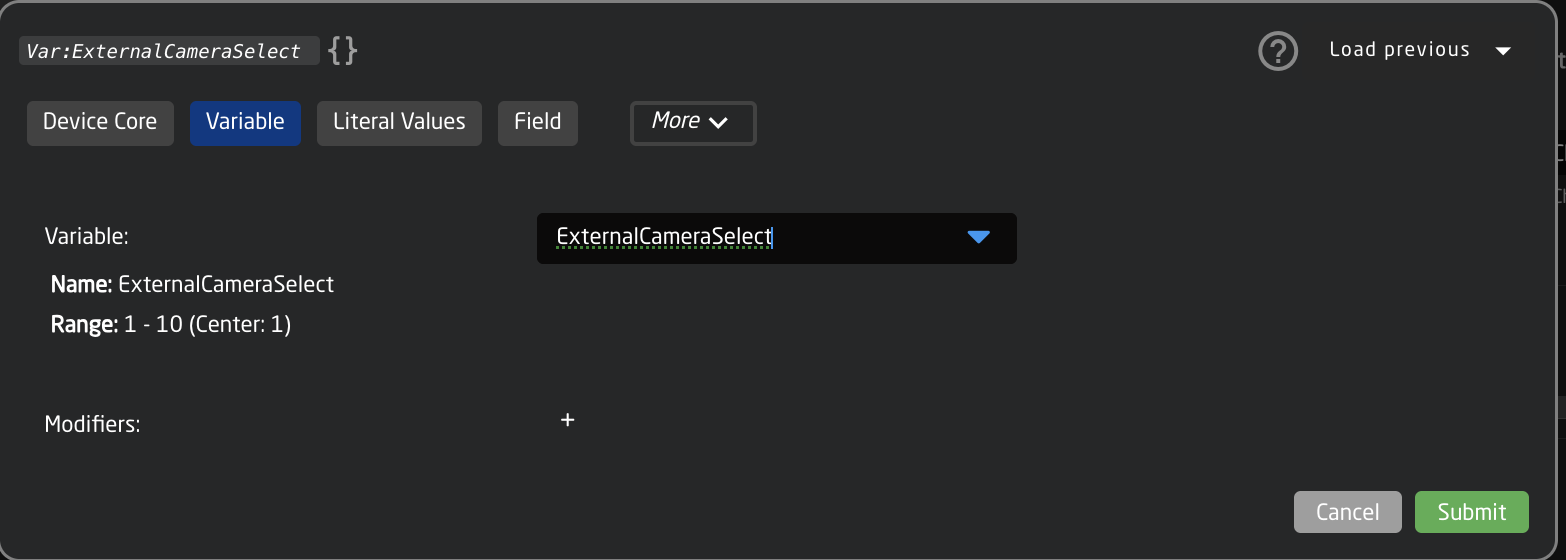
Fourth select Confirm when prompted.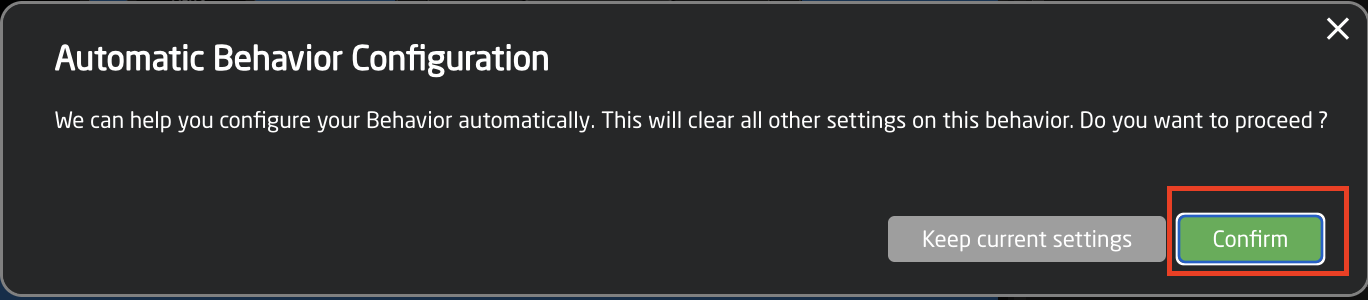
- The needed Template Behavior for the THEN should be auto suggested. If it is not, you will want to select SET SPECIFIC VALUE.
- For the Value, set again the same parameter you used for the IF parameter.
- The trigger is now set up and can be used by sending the command Int#1=X (X = the number set in Ex. Cam Number column in the Camera Select Settings Table on the Home Page) to the IP address of the Blue Pill device and the port defined in the TCP Server device details on the home page.
Example using a Terminal window on Mac.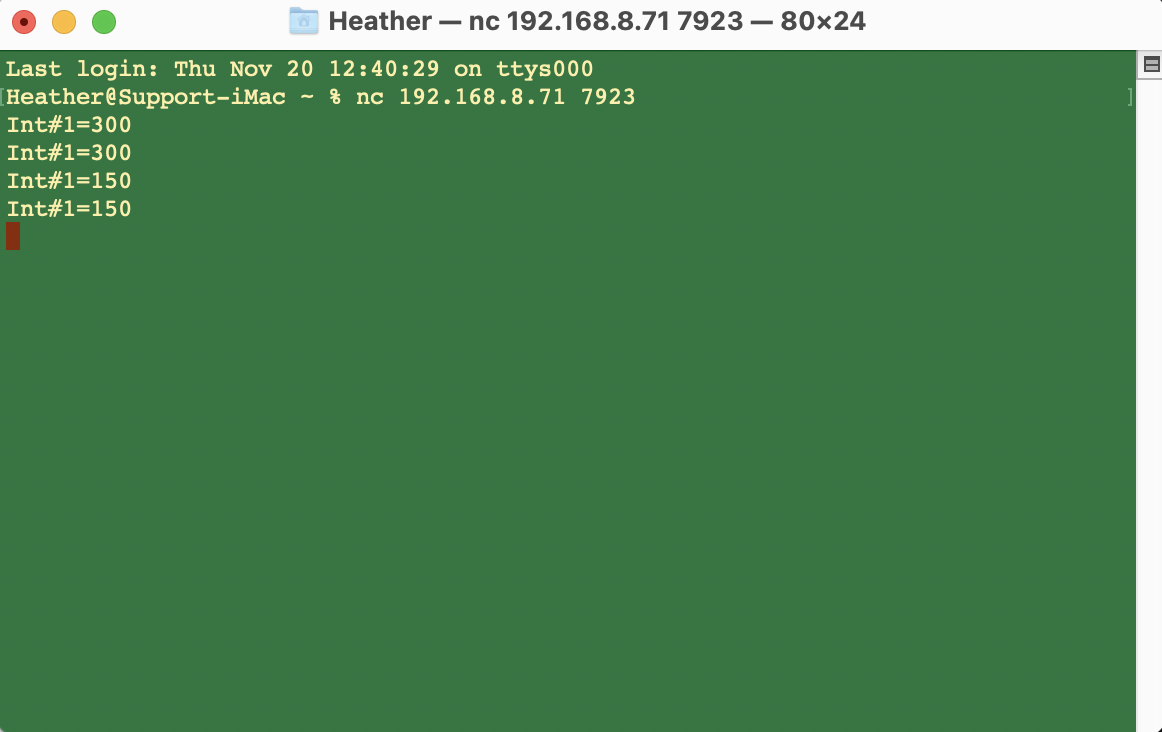

External Camera Select from Skaarhoj Panel in the Same Project
- Make sure you have connected to all your needed devices on the Home Page
- On the Home Page, open the Camera Selector settings table.
- Enable Show Advanced in the Camera Selector
- Input a unique number to associate with the camera in the Ext. Cam Number column.
- Repeat the process for your second panel.
The camera select doesn't need to be in the same order, but the same number needs to be associated with each camera.
- Navigate to the Configuration Page.
- Open the Configuration Tree and click on the Root Layer at the bottom.
- Create Variable called ExternalCameraSelect Exact name is needed as it is prebuilt into a Virtual Trigger.
- Adjust the needed range of the Variable based on numbers used in the Camera Selector on the Home Page for the Ext. Cam Number. The range used should encompass all numbers you have defined. By default the range is 1-10, if that is all that is needed, then no adjustment is required.
- Close the Configuration Tree but remain on the configuration page.
- Click on any of the camera select buttons for the panel you want to trigger the external camera select from. This will open the details in the Inspector.
- In the Inspector, click on the first Show More to expand it.
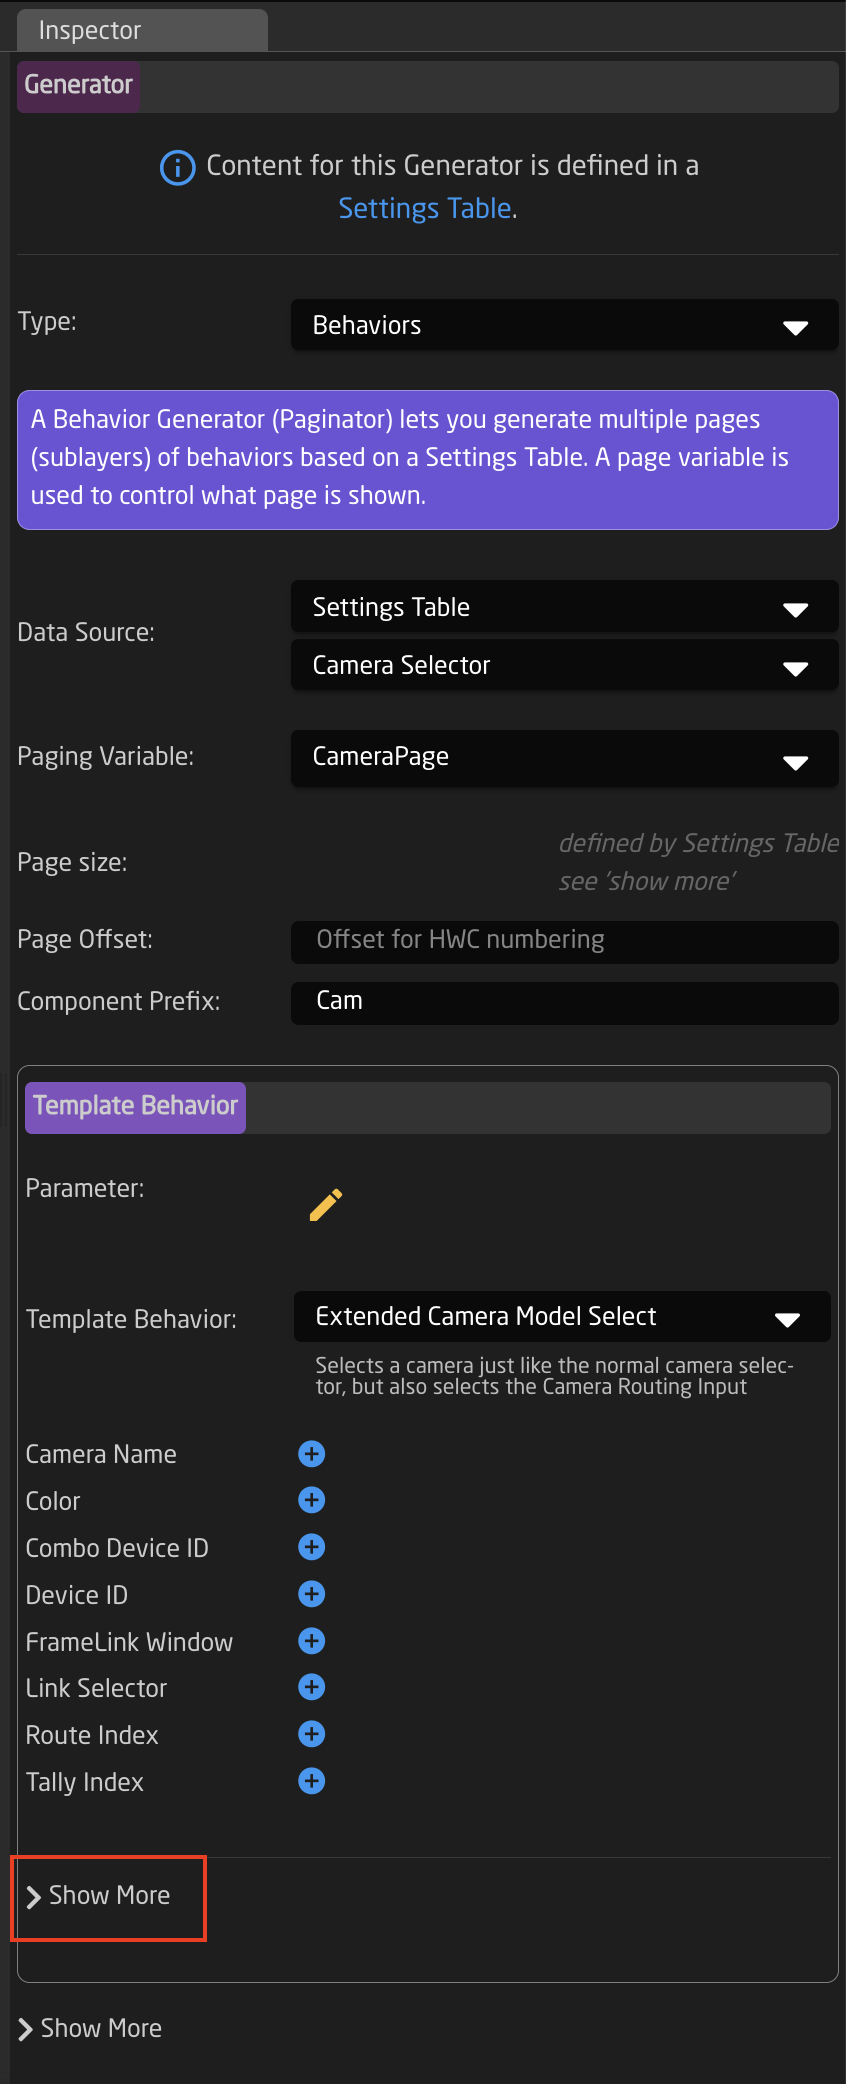
- Create another Action called externalselect
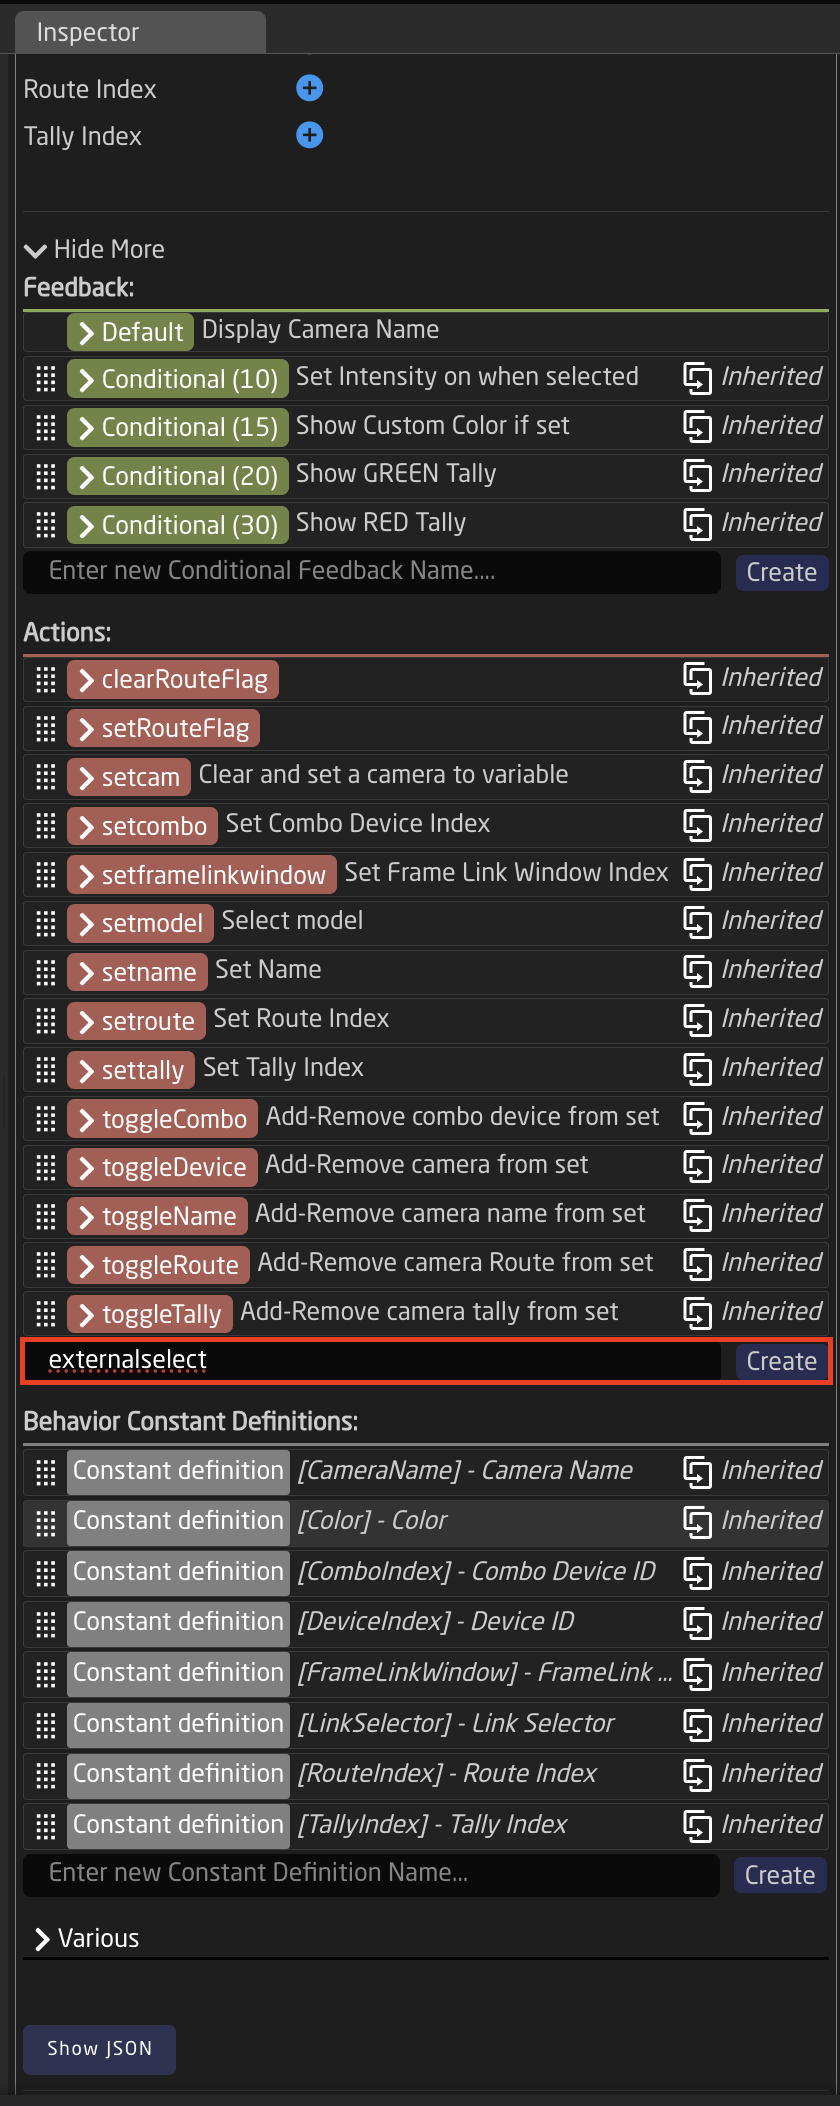
- Set up the action as follows:
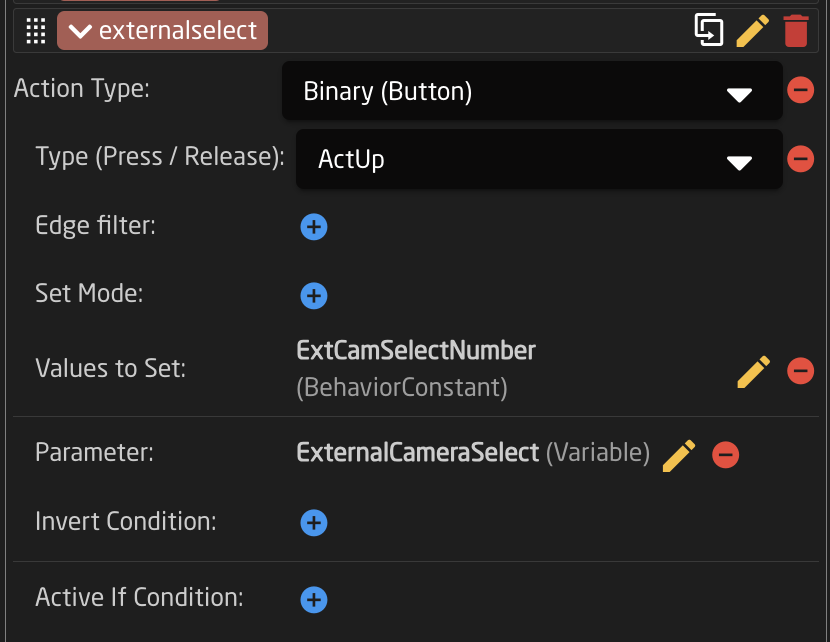 Action Type: Binary (Button)
Type (Press/Release): ActUp
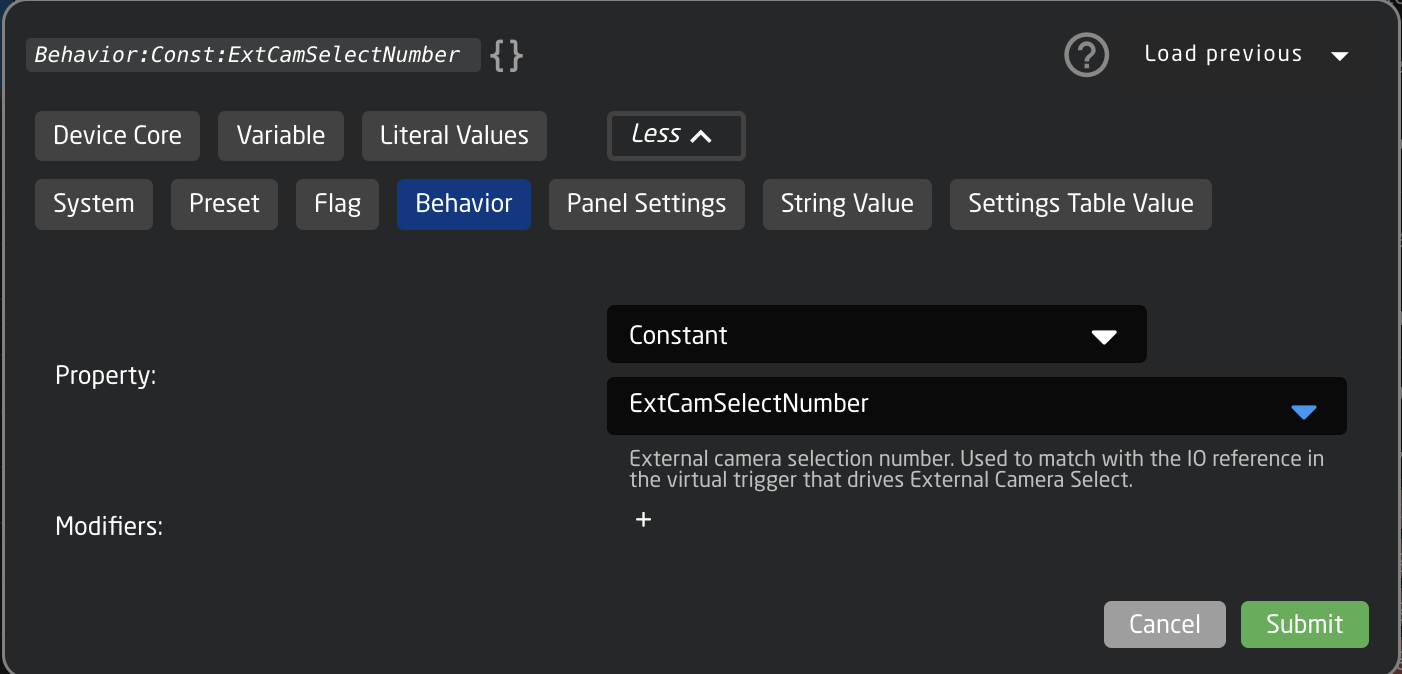
Values to Set: Behavior:Const:ExtCamSelect
 Parameter: Var:ExternalCameraSelect
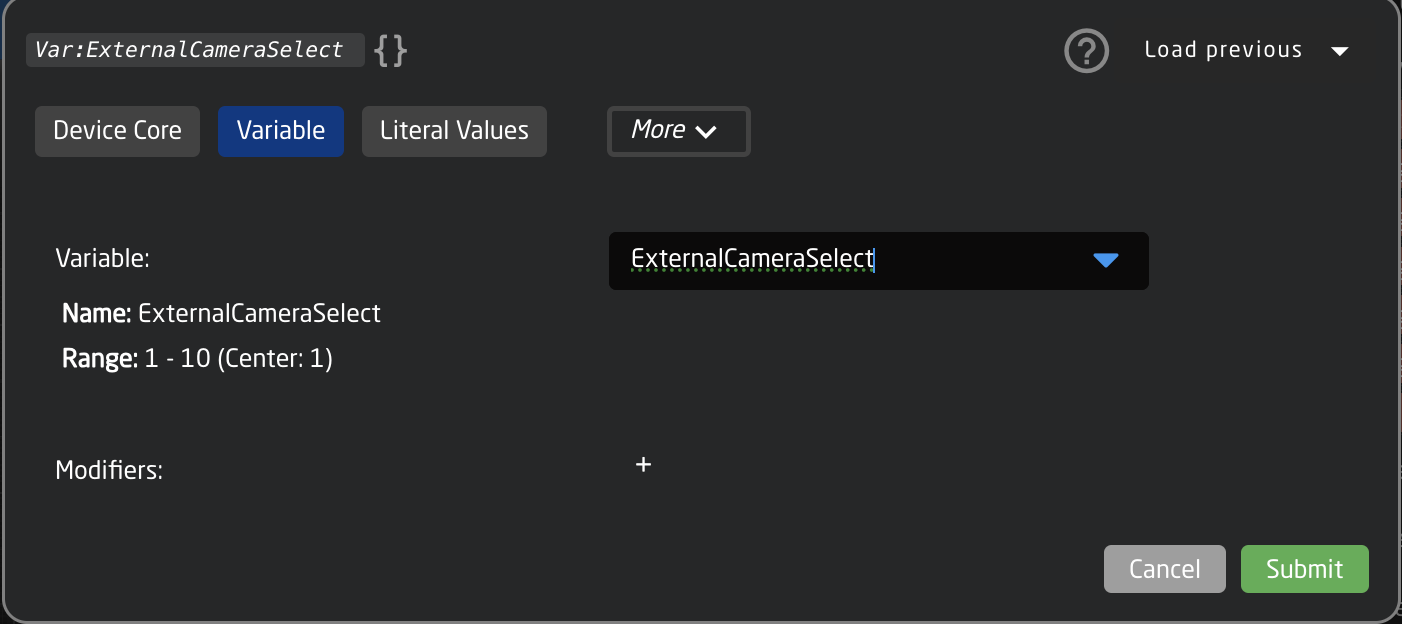
- If you would like to trigger the external camera select to go both ways, repeat steps 11-14 for additional panels.